The replica makes extensive use of the so-called “Hoik glitch” in the game, that allows for rapid, controlled player movement, much like gravity guides the balls downward in the original.
More information about the version in Terraria is posted on the video page.
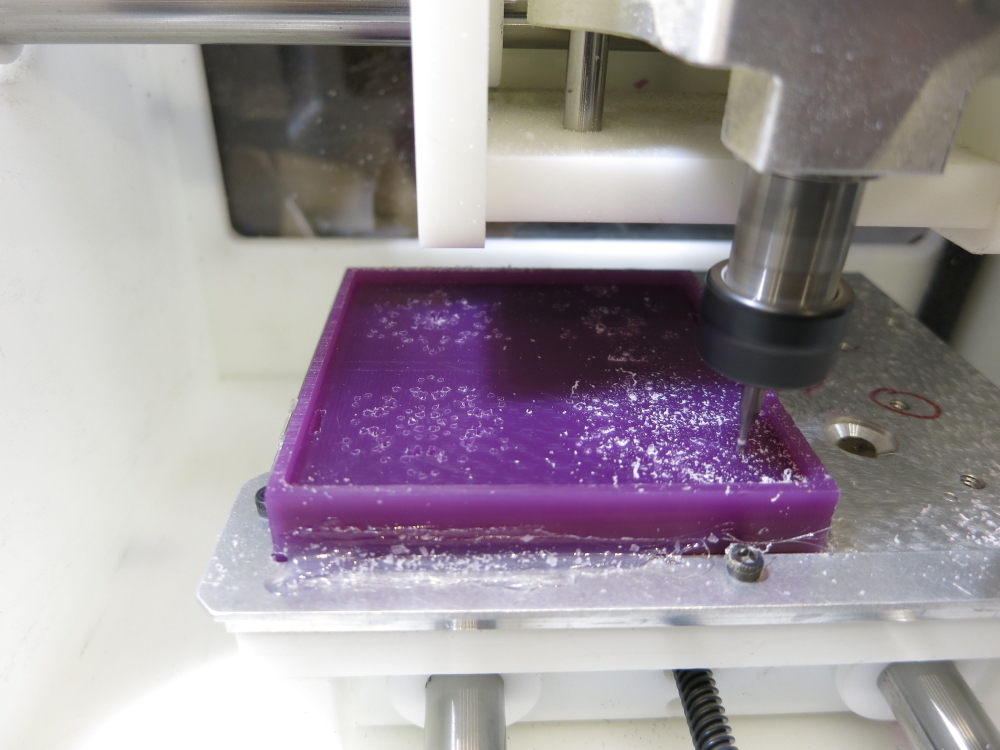
The process involves milling a wax positive for making a silicone mold. The beautiful two-tone chocolates are made by putting white couverture chocolate into the details of the mold, and then filling the rest of the mold with dark.
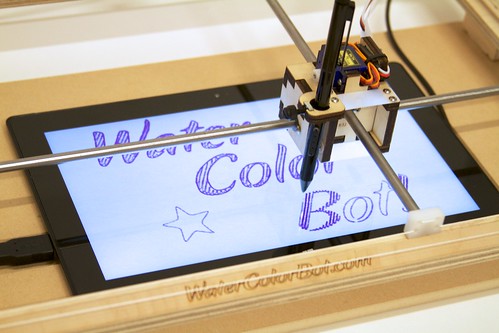
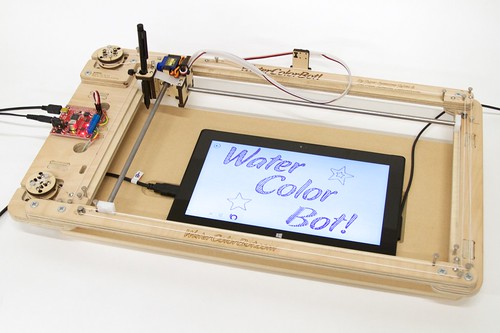
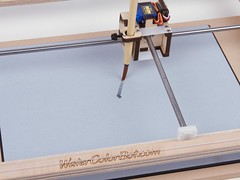
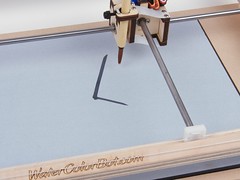
About a year ago, I started working on a project that used robotics to control a Surface Pro tablet. Not long after I started, I got my first glimpse at the the WaterColorBot on display at Maker Faire Bay Area 2013. The WaterColorBot is designed to carry a paintbrush over a piece of paper, raising and lowering it as needed to paint a picture. The movement and software control is similar to CNC router with special design modifications to make it lighter, cheaper and easier to control. A CNC router has to move heavyweight cutting bit with friction so needs expensive motors, rails, and belts. The WaterColorBot, on the other hand, needs only to move a paintbrush in a low friction environment.
I was instantly sold on the idea of using a WaterColorBot to control the Surface. I backed the Kickstarter, waited for my bot to arrive, and started working on software. When the WaterColorBot arrived, I was not disappointed. The assembly was quick and I was robotically painting in no time.
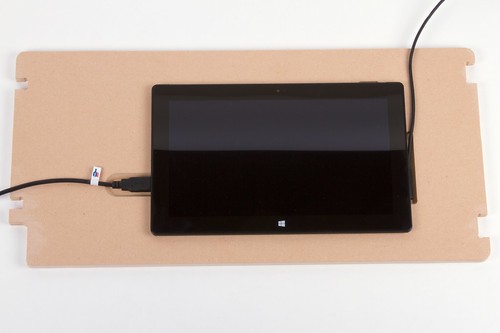
With the big mechanical and electronic solutions solved, my attention turned to the tablet. The Surface Pro is rare among tablets in that it uses a digitizer that allows extremely precise tracking with a stylus along with “hover” and “right-click” functionality. It does not need to be electrically grounded like a stylus for a screen that only supports capacitive touch. I was certain that the Surface Pro was the way to go, but not quite how it was going to be held together. The project was about to take a another serendipitous turn.
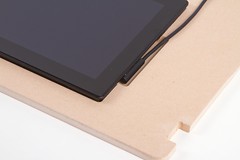
The custom-cut spoilboard
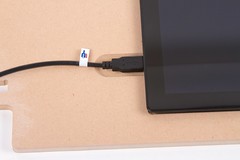
At this point, I shared my enthusiasm with Windell and Lenore of Evil Mad Scientist and they gave me a unique offer: Stop by the Evil Mad Scientist shop and together we would make a custom cut spoilboard (lower deck) fitted to mount the Surface Pro 2. Wielding digital calipers and other measurement and software tools, Windell came up with a design that held the tablet firmly and had extra space cut out for the charger, power button, and USB cable.
The area beneath the tablet has a lip and a lower recessed area. This design reduces wobble and makes it look even better. On the topic of machining – I got a few lessons in how larger CNC machines work. Windell showed me some design considerations in software and gave me a safety briefing about the CNC router itself. This thing can cut fast.
After a little sanding, we fitted the tablet, spoilboard, and WaterColorBot together. Having the co-creators of the WaterColorBot with me on this journey was priceless, as we can see from the final assembly. The first spoilboard we cut matched perfectly and the tablet is held firmly in place.
With enthusiasm fueled by seeing it all fit together, we decided to tell the WaterColorBot to do some painting. Windell loaded up an example sketch in Inkscape and, with only a minute to calibrate the stylus height, we were drawing!
The software running on the Surface Pro is called FreshPaint and we chose a simple marker tool. In the video, you’ll hear a laughter break where the Surface picked up the floating toolbar in the app and dragged it around the screen.
Given a little time, we could have taught the WaterColorBot to change brushes and colors in FreshPaint, but our goals for the day were met. The light weight and low friction of the Surface stylus is perfectly matched for use on the WaterColorBot. A custom fitted spoilboard means the Surface will always be at the exact same place on the X/Y plane, greatly simplifying future software development. Next project: Teaching the robot how to see!
(Full disclosure: My day job is Systems Operations with Yammer, a Microsoft company. This project and use of the Surface Pro 2 is not affiliated with Microsoft in any way nor did they influence the project with sponsorship or exercise any editorial control. If they had, I’d try to talk them into contributing a Surface Pro 3! “Surface” is a trademark of Microsoft Corporation.)
James “techninja” Todd has just released Hershey Text JS, a port of the Hershey fonts to JSON, capable of being rendered quickly via JavaScript & SVG.
The Hershey fonts a classic set of “engraving” or “stroke based” (as opposed to outline based) fonts that are excellent for use with all kinds of physical cutting, drawing, and painting machines. Several years ago we introduced the Hershey Text extension for Inkscape, and you can find a more in depth introduction to the Hershey fonts in that article. Hershey Text JS is adapted from our Inkscape extension, and provides easy access to the font data for programmers who prefer to work in javascript.
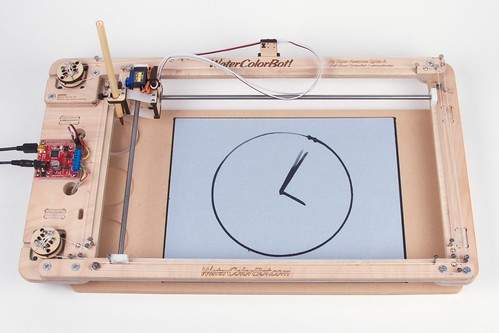
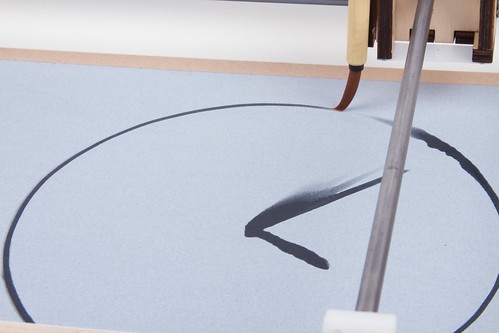
We built a evaporating-hand water clock using a WaterColorBot fitted with a Buddha Board. The Buddha Board is a black board with a gray ceramic coating that becomes transparent when wet, so you can paint on it with plain water to make black marks that disappear as the water evaporates. (And, it fits nicely in a WaterColorBot with the appropriate jig.)
As a clock, once a minute it draws the minute hand, then the hour hand, and finally the outline of the clock face.
As the water evaporates over the course of a few minutes, the old minute hands fade away. It’s a neat effect.
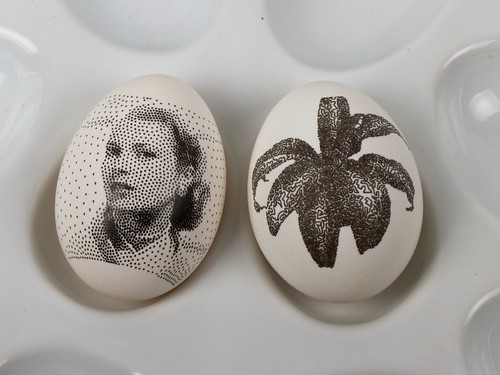
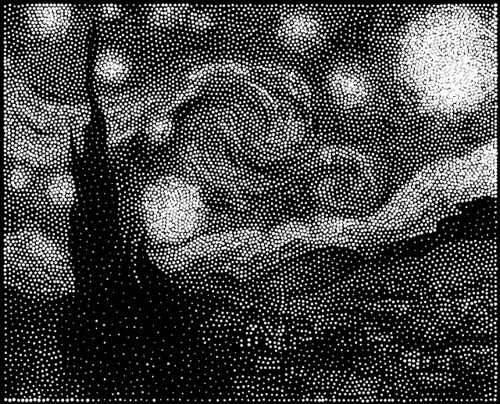
After letting StippleGen2 crunch the numbers for a while I imported the resulting vector graphic file into inkscape and generated the G-code so that I could use my laser cutter to cut the image into a black paper. 2 hours and 23 minutes later I had a 20×20 cm piece of paper with about a 1000 holes in it and it looks awesome! Would be perfect for a lamp shade or just nice to put up in a window and let the sun shine through. I can highly recommend StippleGen2 it’s super easy and a lot of fun.
Two months ago, we introduced StippleGen, a program that can generate stipple diagrams and “TSP path” art from images, using Adrian Secord’s algorithm of weighted Voronoi stippling. It’s a great (and free) tool for turning a photo into CNC-ready artwork, for use on the Eggbot or in other contexts.
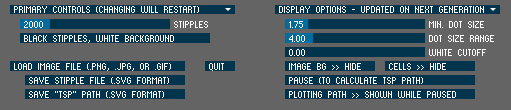
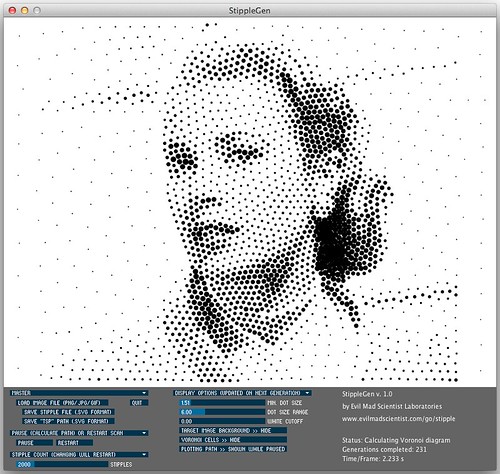
Today we’re announcing a new verison, StippleGen 2. As with the earlier version, StippleGen 2 is free and open source software, written in the Processing development environment. It comes ready to run on Mac, Windows, and Linux, and it is available for download now.
StippleGen 2 comes with three new features: A gently redesigned set of controls that makes life easier on tiny laptop screens, an inverse color scheme— as illustrated above —so that you can now calculate white stipples on a black background, and comprehensive documentation on our Wiki.
The controls in StippleGen 2 have been redesigned and streamlined. They are also overall a bit thinner so that the full screen (and all of the controls) can now be viewed on an 11″ MacBook Air, without reducing the size of the main display area.
In the first version of StippleGen, the image was always computed with black dots on a white background. For most images that have a light-colored background, this is a good choice. However, if you have an image with a dark background, you may find that nearly all of your stipples are used to just darken the backdrop, leaving less detail available in the foreground of the image.
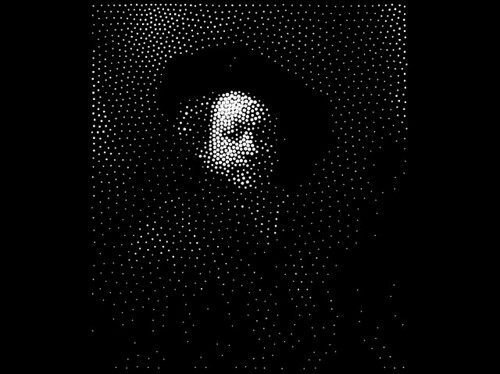
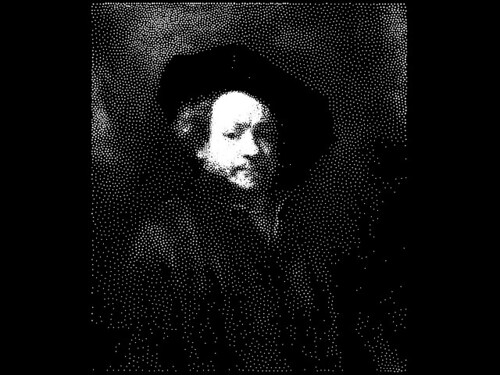
StippleGen 2 gives you the option to draw with black stipples on a white background or white stipples on a black background. By using a dark background here, you may be able to recognize Rembrandt in just 2000 white stipples.
It does, of course, look better with a larger number of points.
For images with a lot of black and a lot of white, it can be hard to choose which is the better scheme.
However, as this is tool to generate applied artwork, the choice is often made for you in advance. If you are drawing with a black pen on a white egg, you’ll want black stipples. On the other hand, if you’re carving into a black panel, white stipples might be the better choice.
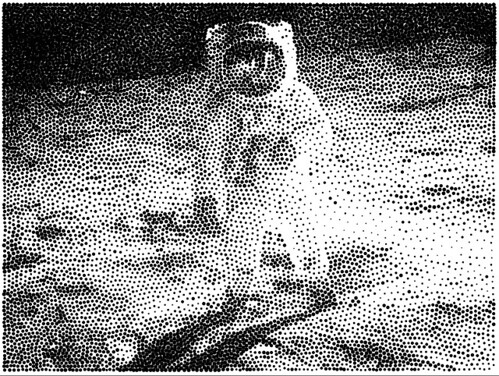
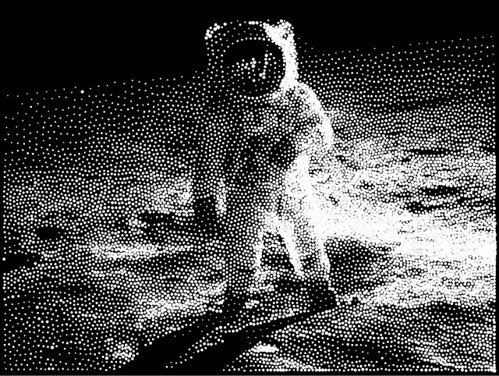
And here are a couple of other “test images” that we’ve been running in the new color scheme.
[… ] Microcontrollers are no longer just for engineers — anyone can now pick up an Arduino board at their local Radioshack! Now that microcontrollers are even easier to find and buy, they should be just as easy to interact with and program. Modkit Micro works to make microcontrollers accessible to anyone, regardless of their particular background or skill set.
Modkit Micro is a graphical programming environment for microcontrollers that supports a growing number of popular microcontroller platforms including Arduino and Wiring boards. It makes it easy for almost anyone (perhaps especially those with no programming background) to get started using microcontrollers, just by dragging and dropping blocks on their screen to write the firmware.
That part is already pretty neat, but what’s really great about Modkit is that it isn’t trying to be a substitute for “real” programming in source code. When you’re ready to go deeper, Modkit allows you to go “under the hood” to directly view and edit the code that it generated for you. If you’d like early access to try out Modkit, we’d encourage you to support their project— they’re opening up the next round of access to supporters this month.
One of the perennial problems that we come across in a variety of contexts, including CNC artwork and producing artwork for the Egg-Bot, is the difficulty of creating good-quality toolpaths– i.e., vector artwork representing halftones –when starting from image files.
One of the finest solutions that we’ve ever come across is TSP art,” where the image is represented by a single continuous path. You can generate a path like this by connecting all of the dots in a stipple diagram. Designing a route that visits each dot exactly once is an example of the famous Travelling Salesman Problem (or TSP). From the standpoint of toolpaths (for the Egg bot and most other CNC machines), a “TSP” path is even nicer than stipples, because little or no time is spent raising and lowering the tool.
Today we’re releasing a new program, StippleGen, which can generate stipple diagrams from images, using Secord’s algorithm. StippleGen saves its files as editable, Eggbot-ready Inkscape SVG files, which can in turn be opened by other vector graphics programs, or re-saved as PDF files for use in other contexts. It can also generate a TSP path from the stippled image, and either save that path as an SVG file or simply use that path as the order of plotting for the stipple diagram.
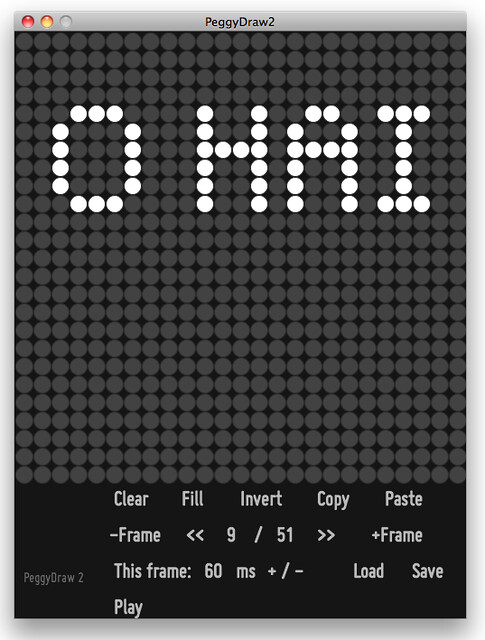
We are pleased to finally release PeggyDraw 2, a little bit of long-delayed software. It’s a Processing application that you can use to draw simple 1-bit animations on a 25×25 grid. The neat bit, of course, is that you can press the “Save” button, and the file that it saves is actually an Arduino program, ready to be programmed onto a Peggy 2.
You can download PeggyDraw 2 right here. It’s fully built in Processing, so that it works on Mac, Windows, and Linux. Also, open source, designed to be adaptable.
Some things to note about this program:
If you don’t have Processing on your computer, download it here.
The editing interface is easy point-and-click. Try it out to see how it works.
You can individually pick different delay times per frame, as low as 20 ms, or give every frame the same duration.
The frame data is stored in Arduino program memory, so you’re only limited by the flash memory in terms of frame number– over 250 frames fit on an ATmega328P.
The output file is located in the PeggyDraw2 sketch directory, inside a directory named “PeggyProgram” “data.” The file is called “PeggyProgram.pde.”
You can both save a file and later reload it for editing.
The formats used in PeggyDraw 2 should be easily adaptable to write sequences for other types of LED grids, even of different aspect ratio and control software.
And, special thanks to Matt Mets, http://cibomahto.com for assistance with Processing. Update, 3/19/2011: We’ve posted a new version, PeggyDraw 2 v. 1.1, available here. Note that the output file is now stored in the “data” directory, not a separate “PeggyProgram” directory.