


While it may not be possible to make omelettes without breaking eggs, it turns out that you actually can get pretty close.
In what follows, we demonstrate some methods of making omelettes inside of eggshells. Perhaps a culinary equivalent of the ship in a bottle.
Before we get too far along, it is worth pointing out that just as the inside of a bottle isn’t the easiest place to build a ship, the inside of an egg isn’t the easiest place to build an omelette. It’s certainly not quicker than a frying pan. You’ll need specialized tools, eggs, fillings, and (above all) patience. But, you just might want to do it anyway because it’s awesome and tasty.
I. Background
Our baseline goal is to create something akin to a hard boiled egg, where– once you crack the shell and open it up — you find that the contents are what you’d expect inside an omelette, rather than what you’d expect inside an egg shell.* There are a number of different ways to approach this. Our first plan was to:
- Puncture the egg with a small hole (1-5 mm)
- Scramble the egg inside the shell, through that hole
- Plug the hole (maybe with egg) so that the egg won’t leak
- Boil the egg for a few minutes to cook the outside part alone
- Use a syringe to extract the (still-liquid) center
- Fill the center with some appropriate filling
- Plug the hole again, so that the egg won’t leak
- Return the egg to boil, to cook the raw part that is contacting our filling
- Retrieve the egg and serve it
And, that all worked great… right up until step 2.
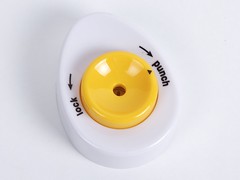

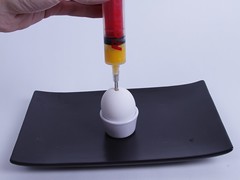
Step 1 above, puncturing the egg, is a solved problem. We picked up this cute egg-puncturing device, where you push down on the egg to jab a pin through the end. Works reliably without breaking the egg further. (A more elegant take on the same machine can be found here — thanks to Meng Weng Wong for that.) The purpose behind such egg piercers is to relieve pressure in eggs, so that they don’t crack while boiling. Sensible enough.
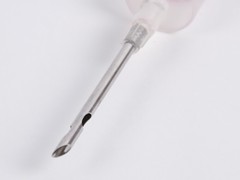
We had thought that scrambling the egg would be a piece of cake, especially since we had picked up one of several available AS SEEN ON TV “inside the shell” egg scrambling devices.
These devices have a little angled needle that spins around, direct drive on a tiny DC motor, and (in principle) whips the egg inside the shell, so that you don’t need to scramble it by hand after you crack the shell. After trying multiple needle angles and scrambling times near an order of magnitude in excess of those prescribed, we determined that this tool simply does not work worth a darn.
(And, if it had worked worth a darn, we’re guessing that we would have been the first people ever to find a use for it.)
In standardized testing, many years ago, I learned to skip questions that I don’t know the answer to and move on. So we decided to save the scrambling task for later. (If nothing else, the scrambling step is possible with a longer surgical-stainless or nitinol spring, spun by a Dremel tool.)

Now, if you remember, the usual reason to pierce eggs is to relieve internal pressure and prevent cracking while boiling. Unfortunately, it also creates a leak.
When we placed pierced eggs (or worse, pierced then scrambled eggs) in the boiling water, they began oozing their contents out into the water. Worse, if we interrupted the boiling after a few minutes, we found that the eggs were flooded with water. That may not be an issue if you’re cooking it all the way to hard boiled, but it’s certainly something that could get in the way of making the omelette.
The alternate plan to prevent leaking is to seal the hole somehow. We tried taping it, plugging it with cooked egg over the hole, cooking the egg by the hole first, and so on. However, egg shells are poorly resistant to internal pressure, and every time that we tried plugging the hole, the egg cracked on its own in just a couple of minutes.
Since we need to allow the pressure relief, but can’t tolerate the water leaking in, the obvious solution is to not cook them in water. The obvious solution is to cook them in a large bath of scrambled egg so that any leaking maintains the proper composition within the egg. One practical way to do that (and there are many) is to cook the eggs in plastic bags, with most of the air evacuated so that they don’t float. A second thing that might help a lot is to reduce the amount of pressure buildup, by lowering the cooking temperature. Another method of reducing the pressure buildup is to minimize the number and size of air bubbles. When mixing epoxies and casting compounds, it’s often necessary to pump them under vacuum for some time, to give the air bubbles better motivation to escape. So, processing the beaten eggs in a mild vacuum just might similarly help in this situation.
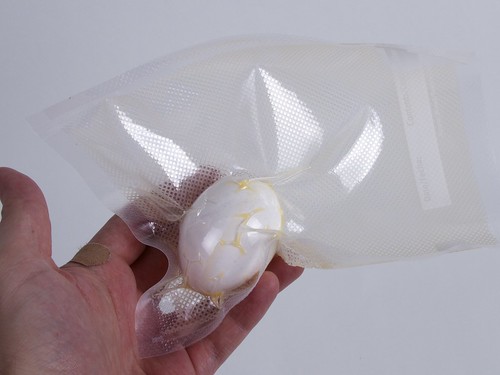
All of these factors point towards what might be an obvious solution to some: to cook the eggs in water at reduced temperature, sealed in plastic bags under vacuum. Which is to say that we’ve unintentionally rediscovered sous vide cooking methods. The good news is that are plenty of resources out there (see here and here, for starters) about how to cook eggs from a sous-vide standpoint.
We obtained a Foodsaver vacuum-sealer machine to use for this project, and found that it works admirably. Using the punctured eggs at reduced temperature and vacuum sealed, seems to completely eliminate egg breakage while cooking. You should also be able to do everything that we show here with regular ziploc bags after evacuating most of the air. (You may have food safety concerns about contamination from warm plastic bags. We don’t have answers to that one. A quick search of the manufacturers sites suggests that neither type of bag is likely dangerous at the temperatures that we’ll be using.)
*(Digression: Once can certainly argue that the name “omelette” should be reserved for egg dishes where there’s a frying pan involved. However this particular threshold has already been crossed. New methods of sous vide cooking have resulted in “omelettes” and “scrambled eggs,” prepared in plastic bags rather than frying pans. Arguably, an eggshell is a slightly more natural place to cook an omelette than a plastic bag. Also, we suspect that it is not actually possible to fit a frying pan large enough to cook the egg into the eggshell.)
II. Basic omelette in an eggshell
Having finally discovered how not to break eggs, we came up with a simpler procedure that works quite well:
- Puncture the egg.
- Extract the contents with a syringe or compressed air.
- Scramble and replace the contents.
- Inject the omelette fillings.
- Vacuum-seal the egg in plastic.
- Cook the egg — slowly at reduced temperature.
- Retrieve the egg and serve it.
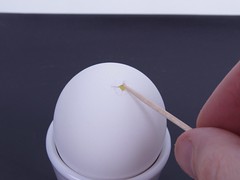
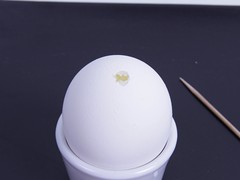
1. Puncture the egg. The egg-puncturing tool that we mentioned earlier is great to create the initial incision. If you don’t have one, a rotary tool or skewer end often works quite well. If your initial hole is smaller than your syringe (which we’ll get to in a minute), you’ll probably need to widen it. You can do this quickly and reliably with just a toothpick, once you get the hang of it. Pick gently outward, up and away from the hole, from inside the edges.
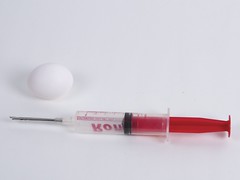

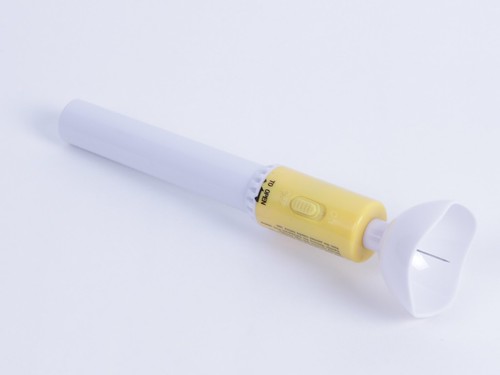
2. Extract the contents with a syringe or compressed air. The one “specialized” piece of equipment that you definitely need for this project is a wide-bore syringe. Having several would be helpful. This one is a Ronco “Flavor Injector.” (I suspect that this also has been seen on TV.) There are any number of other similar marinade-oriented food syringes available from gourmet and housewares stores, sometimes in the BBQ section.
Unless you have a means of fully scrambling the contents within the shell, it is important to fully remove the contents. If you do not, you’ll end up with a big and distracting blob of yolk in the middle of your finished omelette. This syringe has holes in the side, so it can’t suck up the contents all the way to the bottom. What you can do is to turn the egg upside down, and gently push air into it. The egg contents makes an air seal against the needle, the egg pressurizes, and the contents will squeeze out alongside the needle. (This is also the means by which a blas-fix is used to extract the contents of a Ukrainian egg.) Be careful not to overpressurize the egg, or it will burst. A low-end aquarium pump with a soccer-ball needle can also be used to extract the contents this way.
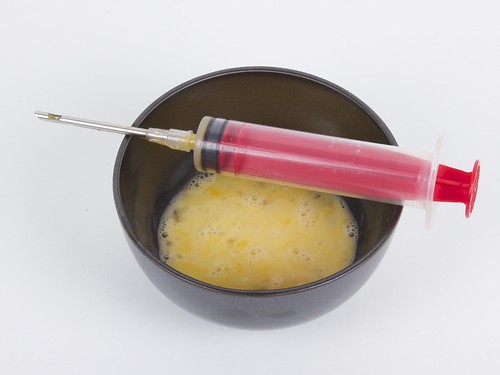
3. Scramble and replace the contents. Beat lightly, then inject back into the egg. Try to minimize bubble creation, and be sure not to overfill the shell. You may want to intentionally leave significant room for fillings.
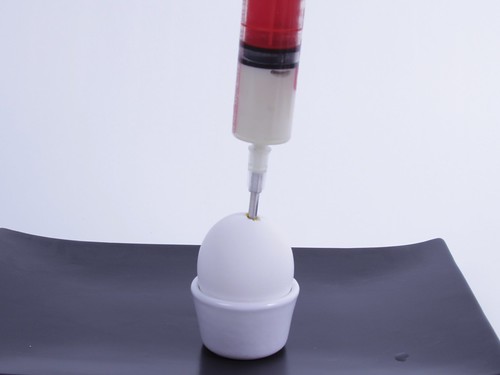
4. Inject the omelette fillings. Here, we’re injecting warmed (softened) cream cheese into the egg. There’s some art to this. Maybe you want the filling all on one side, or evenly distributed. In any case, as the shell fills up, be sure to slow down to allow any egg-liquid to escape out the hole, without overpressurizing and cracking the egg.
There’s also a lot of possible art in choice of fillings; we’ll come back to that a little later.
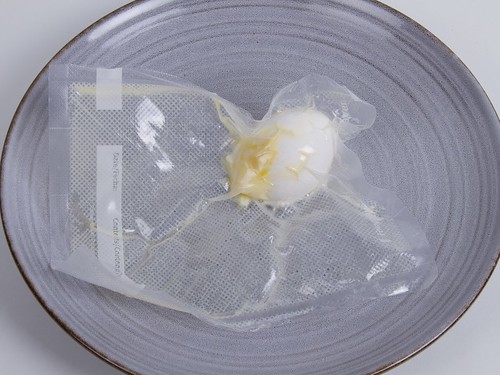
5. Vacuum-seal the egg in plastic. Again, it’s not absolutely necessary to use a vacuum sealer, but if you use a normal-pressure bag, you should try to get as much air out of it as possible. (See “Ziploc Bagging” on this page.)
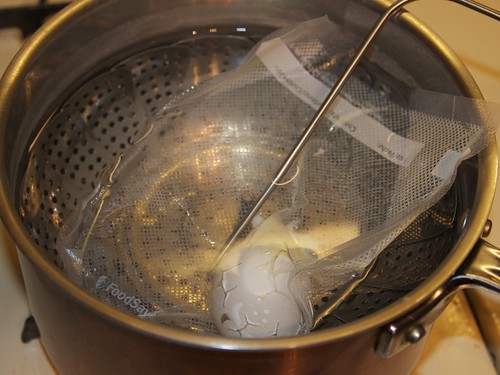
6. Cook the egg — slowly at reduced temperature. Purveyors of sous vide equipment would love to sell you expensive machines to maintain precision temperature in a water bath. You can but certainly don’t have to use something like that to cook the omelettes. For moderate precision, heat a big pot of water on your stovetop to about 70 degrees C (158 F), and adjust your heat low enough to keep it there. Check the temperature every few minutes, and adjust heat if necessary. The big pot of water acts as a “low pass filter” to stabilize the temperature, so that hopefully it won’t need adjustment more than once every ten minutes or so. Try not to overcorrect, but rather to ride steadily within a window of about +/- 5 degrees. (If you don’t have one, note that a digital “instant read” thermometer that you can immerse can make this very easy.)
At what temperature and how long to cook the egg is primarily a matter of preference. The links that we gave earlier (here and here) provide some useful starting points. I found that 30-45 minutes at 70 C made a deliciously soft omelette, but there are many factors to consider, including the type and distribution of filling.

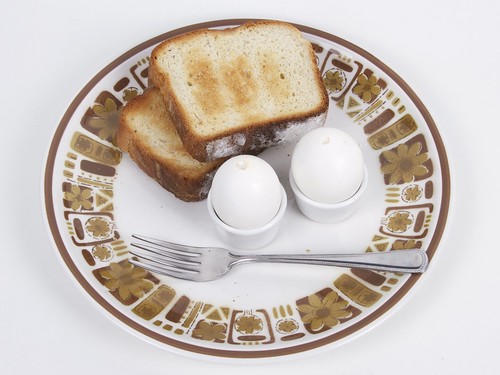
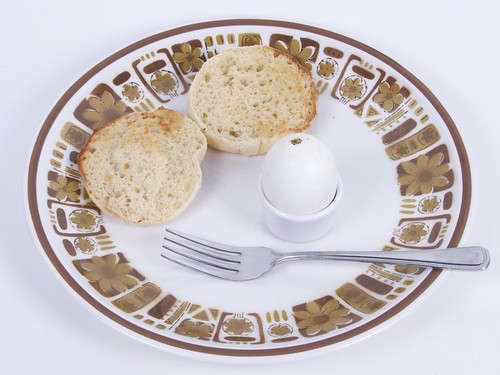
7. Retrieve the egg and serve it. As it comes out of the bag– at perfect serving temperature incidentally –the egg will have some cooked-on leakage. It generally rubs off with a paper towel. (Also, that leakage is edible.)


Here’s how a lemon-ricotta omelette in an eggshell looks. This filling was injected uniformly throughout the egg, in a number of locations, so there’s very little structure visible.
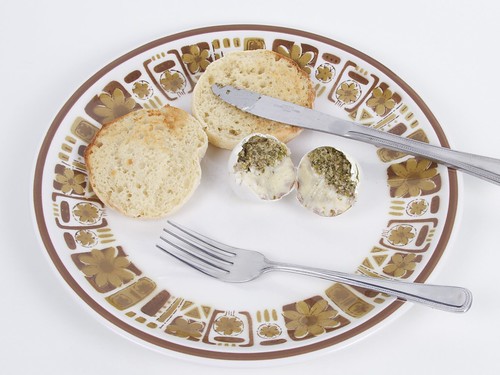
This omelette had basil pesto injected to one side. It’s not clear how much of the resulting distribution is due to that or to possible separation during cooking.
III. Basic omelette in an eggshell, variations
For simple omelettes like these, there is very little to limit what possible fillings you can use. In fact, there’s only about one limit, which is that it needs to be able to fit through the syringe. As a corollary, certain omelette fillings for which texture is key are never likely to work well– such as diced tomato, peppers, onion, bacon, or ham. Denver omelettes made this way will be texturally challenged.
But, here are a some suggestions of just a few fillings that you might consider:
Cheese mixtures:
- Lemon-ricotta
- Any fondue mixture, warmed
- Cream cheese with parmesan, herbs and garlic
- Warmed feta, possibly thinned with melted cream cheese
Sauces:
- Hummus
- Basil pesto
- Sun-dried tomato pesto
- Hollandaise
- Jams and preserves
- Aioli
Vegetable matter
- Roasted garlic
- Avocado
- Wilted spinach (no syringe: push in one leaf at a time with a skewer)
- Finely diced tomato
- Minced herbs (Possibly with a carrier like melted cream cheese, diced tomato)
Meats
- Beef, ala corned beef hash
- Chopped bacon, possibly passed through a mesh sieve
- Raw bulk sausage; can cook in place.
- Anything that passes through a food strainer
- No, we’re not going to suggest that you use baby food.
- Pate, rillettes
IV. White-edged omelettes in eggshells.
Going back to our original idea, what if you could start off by boiling an egg– just to cook the outer layer — and then pull out the center and fill it? Could that work?
Well, our hypothesis was that under boiling conditions, eggs heat up quickly from the outside, and cook from the outside in. That is to say, that if you stop cooking an egg after a few minutes, you should be able to extract the liquid (un-solidified) contents with a syringe to leave a perfect shell of egg whites only. Of course, that opens the door to even more questions. Amongst them, does the egg keep cooking when you pull it out of the boiling water, or will it stop cooking, leaving the center liquid?

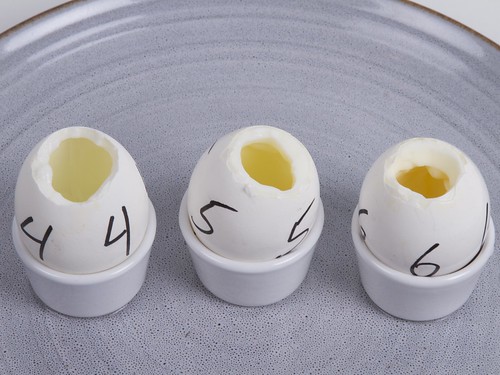
To get a feel for (1) whether this whole thing was really possible and (2) how long you should boil it for and (3) whether or not it was important to arrest the cooking in a water bath, we boiled some eggs under controlled conditions. (Sea level, plain tap water at boil, eggs resting on a vegetable steamer, not the bottom of the pan.)
In the photo above, the eggs on the top row were boiled for one minute, the second row for two minutes, and the bottom row for three minutes. Roughly speaking, the measurements were as follows:
- Boil 1 minute, cool in water bath: About 1.5 mm of solidified whites
- Boil 1 minute, cool in air: About 2 mm of solidified whites
- Boil 2 minutes, cool in water bath: About 2.5 mm of solidified whites
- Boil 2 minutes, cool in air: About 3 mm of solidified whites
- Boil 3 minutes, cool in water bath: About 4.5 mm of solidified whites
- Boil 3 minutes, cool in air: About 5 mm of solidified whites

And, it’s a bit easer to see the results without the liquid centers getting in the way.
Going a bit further, here’s what the results of boiling for 4-6 minutes look like. The whites are approaching fully cooked as we approach 6 minutes. Beyond here, the principal change will be that the yolk begins to get more firm, and hence harder to remove through a syringe.
Armed with the data, we have a more advanced procedure for producing omelettes where the outer shell is just the original solidified egg whites.
- Boil the egg in water, 4-6 minutes.
- Extract the liquid contents with a syringe or compressed air.
- Inject the omelette fillings
- Vacuum-seal the egg in plastic.
- Cook the egg — slowly at reduced temperature
- Retrieve the egg and serve it
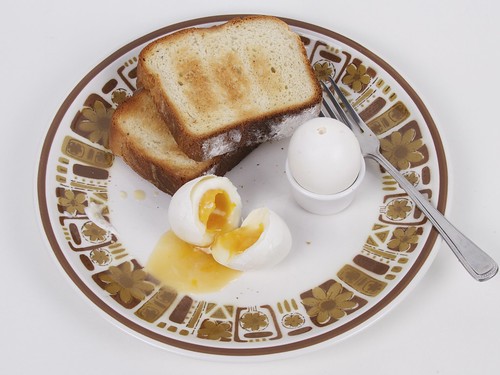
To make these omelettes, we first boiled the eggs for a full six minutes, setting the whites and beginning to stiffen the yolk at the edges. We then extracted the yolk to the extent possible, using the syringe. Next, we injected the eggs full to the edges with lemon curd, vacuum-bagged and cooked it.
During the cooking process the filling actually leaked out of the eggs to some extent, so the as-cooked appearance had some empty space at the access holes, which we filled with sour cream before serving. Once opened– still hot –the molten lemon curd spills out onto the plate.
V. Advanced variations.
With these techniques in hand, here are just a few of the different directions that you could take this:
- Skinny omeletteYou can make an all-whites omelette by only boiling the white-edge omelette for 4 minutes, and then fully removing the liquid center.
- Yellow omeletteYou can go back to our original plan, scrambling the egg contents (inside or outside the shell), cook it for just a few minutes, and extract the liquid center before proceeding.
- Pre-deviled eggsBoil until only the whites are set. Extract center and yolk, replace with deviled egg filling.
- Inverse scotch eggsInject sausage into egg. After cooking, peel egg, then bread and deep fry. (Rather than having a sausage covered egg, you get egg-covered sausage.
- Inverse eggs florentine, with spinach and hollandaise. Serve peeled, on an english muffin.
- Inverse quiche. Extract egg contents, mix with cream, cheese, and other fillings. Once egg is finished cooking, cover in pie crust and bake.
- Abstract geometric stuffed eggs. Get a egg-cuber, or one of many bento-box egg presses. See how unusual it can become.
Footnote on sharing: You’re welcome to use these ideas in any ways that you like. If you do use them, please give credit to Evil Mad Scientist Laboratories where possible, and links back to our site are always appreciated. The permanent link to this article is http://www.evilmadscientist.com/go/omelette.

Playing with you food is always interesting but I think I will continue to do my eggs the same old fashion way. I would like to suggest that you cook the eggs in a double boiler. I use them all the time for Ice Cream, puddings and cream of wheat made with milk to provide much more even cooking
I am doubtful that a double boiler would provide any additional benefit for boiling eggs. The purpose of a double boiler is to use water in the bottom portion to provide a stable, even heat source for the food cooking in the upper portion. But when you are cooking eggs by boiling, you already have a pot full of water to provide the stable heat source for the food being cooked.
I think Anonymous @4:15 meant actually *cooking* eggs in the double boiler. It’s a nice, gentle way to scramble eggs.
Steaming in cling-film seem like a much lower-tech but likely highly effective solution. I may have to try and report back.
The other thing to try might be scrambling the egg [i]without breaking the shell at all[/i]. Any fool will tell you that you can spin a boiled egg on its end but not a fresh egg because the liquid slops about inside. Rapid acceleration and deceleration might well be enough to scramble the egg by this effect without needing to puncture it at all.
Syringes suitable for this can also be found at farm stores (Fleet Farm/Farm Fleet in the US midwest). You will find them under the animal remedy section, where they are used for injecting horses and cattle with vaccines etc. They are cheap and come in a wide variety of sizes.
You can make your own decisions on whether they are safe to use on food.
As we said, there’s more than one of these machines out there. I can’t imagine why.
Windell H. Oskay
drwho(at)evilmadscientist.com
http://www.evilmadscientist.com/
The Ronco device actually works. I had one years ago. The needle was long, and more importantly at a slight tilt. Different than the device that you used.
We haven’t tried the Ronco one. We tried different needle angles on ours, but it was still highly ineffective. I suspect that the needle is just too short.
Windell H. Oskay
drwho(at)evilmadscientist.com
http://www.evilmadscientist.com/
Instead of boiling the egg, you can try steaming, with the egg in the egg cup, hole pointed up. You can adjust the heat between barely simmering and rolling boil, and don’t need to mess with vacuum sealing, leaky eggs, watery eggs, etc.
Yes, considered that. It solves some of the problems but not others. Steamed eggs still have the leaking and breaking pressure-induced problems that come with boiling. I haven’t tried low-temperature steaming; that is an interesting idea though.
Windell H. Oskay
drwho(at)evilmadscientist.com
http://www.evilmadscientist.com/
That’s what I was going to suggest. It’ll take some further experimentation though, because in my experience steaming the eggs takes longer for a given firmness because of the reduced heat transfer compared to immersion in hot water. But of course you could build an egg-steaming chamber in which the egg sits quietly waiting to get blasted with super-heated steam from a pressure cooker or a small steam boiler or something.
Have you considered microwaving the eggs? This would eliminate the problem of water infiltration. You might have to find a way to stir the egg contents occasionally to promote even cooking.
I’ve tried microwaving a partially peeled undercooked "hard" boiled egg (It was soft-boiled, I wanted hard).
It took me better than 20 minutes to clean the product of less than a minute of nuking off the inside of the microwave.
… maybe at a low setting in a water bath…
One thing you might want to consider if you ever take this up again is sealing the egg with zein/confectioner’s glaze – it’s a corn protein that forms a hard, water insoluble barrier and people have proposed using it for the precise purpose of making liquid eggs.
Sealing the egg is not difficult; the difficulty is that the mixture in the egg expands while being cooked. If we don’t relieve the pressure, the egg cracks.
Windell H. Oskay
drwho(at)evilmadscientist.com
http://www.evilmadscientist.com/
the dumbest thing i have ever seen, thank you and well done
Instead of boiling the egg in a microwave oven, just use an ordinary oven. That way you can
cook the egg standing up in an egg cup and won’t have to mess with the vacuum sealing. Allthough the thermal coupling between is less in air and cooking takes a little linger keeping the temperature below the boiling point is much easier.
This is very interesting, well done guys. Now, if only there were a way to create beautiful, CAD drawings on the eggs…
-JP
Now, if you can just figure out how to cook bacon inside the pig…
Buy the pig a carton of Camels. Pre-smoked!
As I look at this madness, all I can see is soft-boiled eggs made difficult. Or hard-boiled eggs eaten warm, which I’ve done, and sliced up and eaten on toast.
But I DO love your commitment to your EvilMadScientistiness. For that I give you a million Internet dollars. Worthless, but you do have bragging rights nevertheless!
~Bratfink
Nice article. Having made something similar based upon a 17th century French recipe [ http://medievalcookery.com/recipes/mayeggs.html ], I know how awkward and messy the process can be. I’m especially grateful for your analysis of the thickness of the cooked part of the egg for different cooking times.
Oh, when they did this sort of thing in the middle ages, they used bread to stop up the hole in the shell.
House made something like this in Season 6 Episode 2 "Epic Fail" in the show he replaced the yolk with a ragu made from scratch and then put it on a cracker. The egg was smaller, possibly just extra small or one that was not yet laid. Wanted to try it since the episode, thanks for getting me most of the way there! Love this!
It seems like that device is in the "How to microwave eggs" video at 5min.com, actual link keeps getting caught in the spam filter. She uses water in the video even thought the Amazon page seems to state you don’t need it.
Start with 1 Ostrich egg and work down via Goose and Large Duck.
Ok, this is so cool, that I will have to buy an eggbot JUST for making these!
I mean really, who really LIKES normal Easter eggs? Making them this way then decorating them via eggbot just seems SO much cooler! (& tastier)
Pity for the "inventer".
This was on tv show 35 years ago in Willem Duys on Dutch tv. You can ask AVRO tv.nl
best regards, I also invented things that someone else did before so, no offence
Harold McGee (2004) says that the temperature for cooking scrambled egg is 165 F. 158 F is just for unmixed yolk. You may have too much uncooked ovalbumin at 158.
When I boil eggs I always put salt in the water so that if any of them crack they will seal back up and not leak into the water.
I second the motion! Adding salt (or vinegar) to the cooking water is an effective way to retard leakage, because it denatures and coagulates any egg white that leaks out, sealing the break almost as soon as it occurs. See Harold McGee’s indispensable "On Food And Cooking" for more on the chemistry of egg cookery.
Usually it’s enough to start cooking eggs in cold water for them not to break, although I’m not sure how it works after replacing the contents. Also, you shouldn’t boil eggs, but cook them (i.e. the water shouldn’t be rolling.)
That matches our experience as well. The reason to use boiling water is to try and cook the outermost area of whites quickly. Lower temperature cooking definitely helped reduce cooking.
Windell H. Oskay
drwho(at)evilmadscientist.com
http://www.evilmadscientist.com/
http://www.khiewchanta.com/archives/snacks/barbecued-eggs-kai-peank.html
this method may be a little easier than sous vide and its yummy too!
I’ve cooked a lot of eggs in a lot of different ways. My favorite soft-boiled egg recipe:
1 Place eggs in cold water on high heat
2 When water reaches a boil, start a timer set for 3 minutes
3 Cool eggs in cold water for 1 minute
Starting in *cold* water allows the air inside the egg to escape through the pores. No puncturing necessary.
Also, I would be inclined to make a simple egg holder out of a 2×2 inch maple block with a 3/4 to 1 inch hole drilled in it. Place the eggs in the pan so that the hole is on the top, fill the pan with water to just below the top of the egg, bring to a simmer (not a boil) to cook the egg. Adjust cooking time as necessary to get the result you want.
*Much* easier than what you’ve posted here, imo, with only a couple of minor tweaks to the way I already cook.
>Starting in *cold* water allows the air inside the egg to escape through the pores. No puncturing necessary.
Yes of course. It also misses the point of what we’re trying to do here. For the first part, where we’re injecting fillings before cooking, the hole is already there (where we injected fillings). For the second part, where we cook the outer layer of the egg first, it’s critical that the egg be cooked quickly at high temperature, so that only the outer part cooks. Cooking whole eggs starting cold water will not work for any of the parts of this recipe.
Also, there’s evidence to suggest that puncturing *fresh* eggs is never necessary, and that it only helps for older eggs. Likewise, I would guess that there’s no advantage to cooking fresh eggs starting from cold water.
As for your suggestion of making a wooden egg holder, you might note that wood floats. (Maple has a density of 0.5 – 0.75 g/cc.) Our solution for this (also suggested by another commenter) of using egg cups in the pan is more suitable.
Windell H. Oskay
drwho(at)evilmadscientist.com
http://www.evilmadscientist.com/
You’ve obviously never tried to cook an egg starting with cold water. Believe me: it works and it won’t overcook the egg the way you think it will. I’ve done it hundreds of times. Try it and see…
You can easily make the hole after you’ve completed the first part of cooking, which is only cooking the egg white and you should have no trouble removing the still uncooked yolk.
This all just seems like so much work just to eat an egg. I can think of so many other cool projects to do in the meantime.
Thanks a million for taking occasional time to explore a bit of whimsy, experiment with it methodically, and share it with the rest of us! Some people don’t seem to understand doing things just for the fun of the challenge; I can’t understand *not* doing that.
Thanks also for the link to the FCI tech blog, which I’ve devoured over the last week; and thank you for kicking me out of my rut and prodding me into assembling my own too-long-in-the-making PID-controlled low-temp cooker. Awesome!
The lemon-ricotta looks absolutely scrumptious.
Best wishes!
This seems like an odd kind of project to tackle. Unless of course you are a chef and could fine tune the process to turn these things out fairly quickly; I could see something like that catching on at a snooty restaurant.
I do really appreciate the documentation of the trial and error that went into all of this. I would love to see more of that kind of thing from everyone who posts projects online, in magazines, etc. It helps to avoid the appearance of "Look what I did in just one try. See how smart I am." It also serves as inspiration for others to not give up when their experiments go awry on the first try (or even first few). Well done.
untested recipe for inside out hardboiled egg:
– empty an egg
– separate yolk from white from multiple eggs
– fill egg with yolk only
– sous vide at low temp for 4-6 min
– extract remaining liquid yolk.
– inject white
– cook some more.
wdyt?
Have you considered steaming the eggs in a steamer instead? if you have a small-ish teacup that holds the egg such that the hole is at the top, there should be no leakage. :)
I often steam eggs out of sheer laziness (along with steamed buns from your typical Asian grocery).
Grant Achetz has a recipe for cooking quail eggs: preheat your water bath to 149 F, place eggs in for one hour. After the first hour, raise the temperature to 150 F, and continue cooking for another hour. After the second hour raise the temperature to 151 F and cook for one more hour. Remove from water bath and probably allow them to cool a little before peeling so you don’t damage the white.
The current issue of Make has an article on a DIY sous vide immersion cooker that uses a commercial temperature controller unit. They even discuss the result of cooking eggs in their unit at 64.5 C for an hour.
I was looking for a way to make Regova eggs for a scifi food night- this has saved me a whole lot of time and experimentation. Fantastic! Thanks guys.
An amazing article! Truly mad science. We’re collecting loads of omelette variations at [link: http://www.makeanomelette.com Make An Omelette] (.com) and would love to share this!