


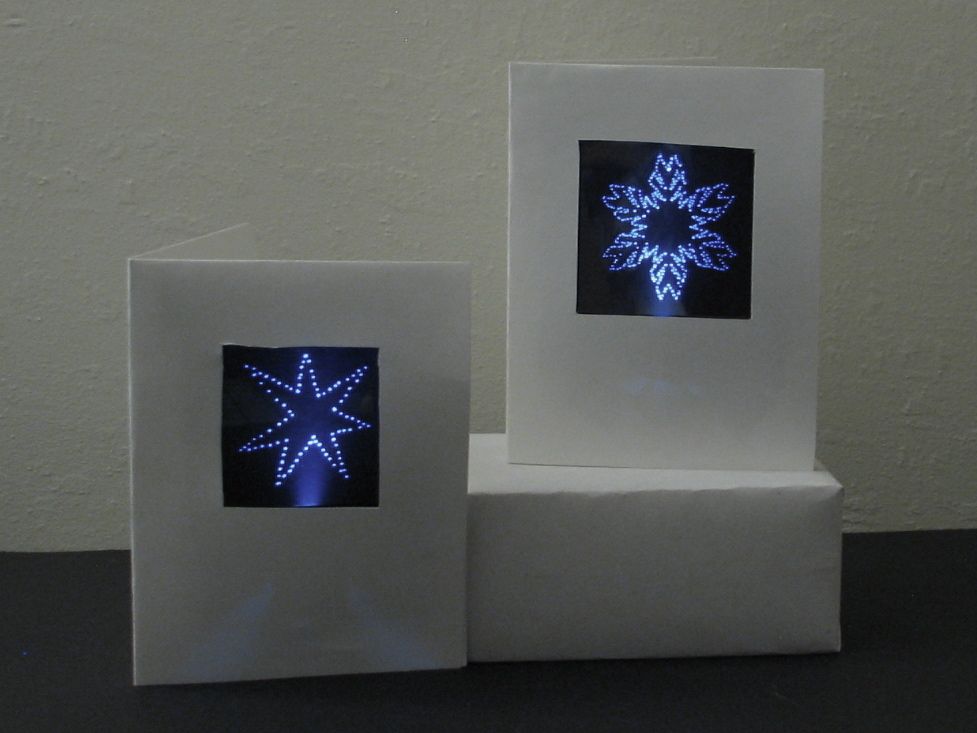
We’ve picked up a bunch of improvements on our Edge-Lit Holiday Cards since last year and we’ve collected them here for you to see. (Also, welcome Popular Science readers! This project is mentioned in the December 2009 issue.)
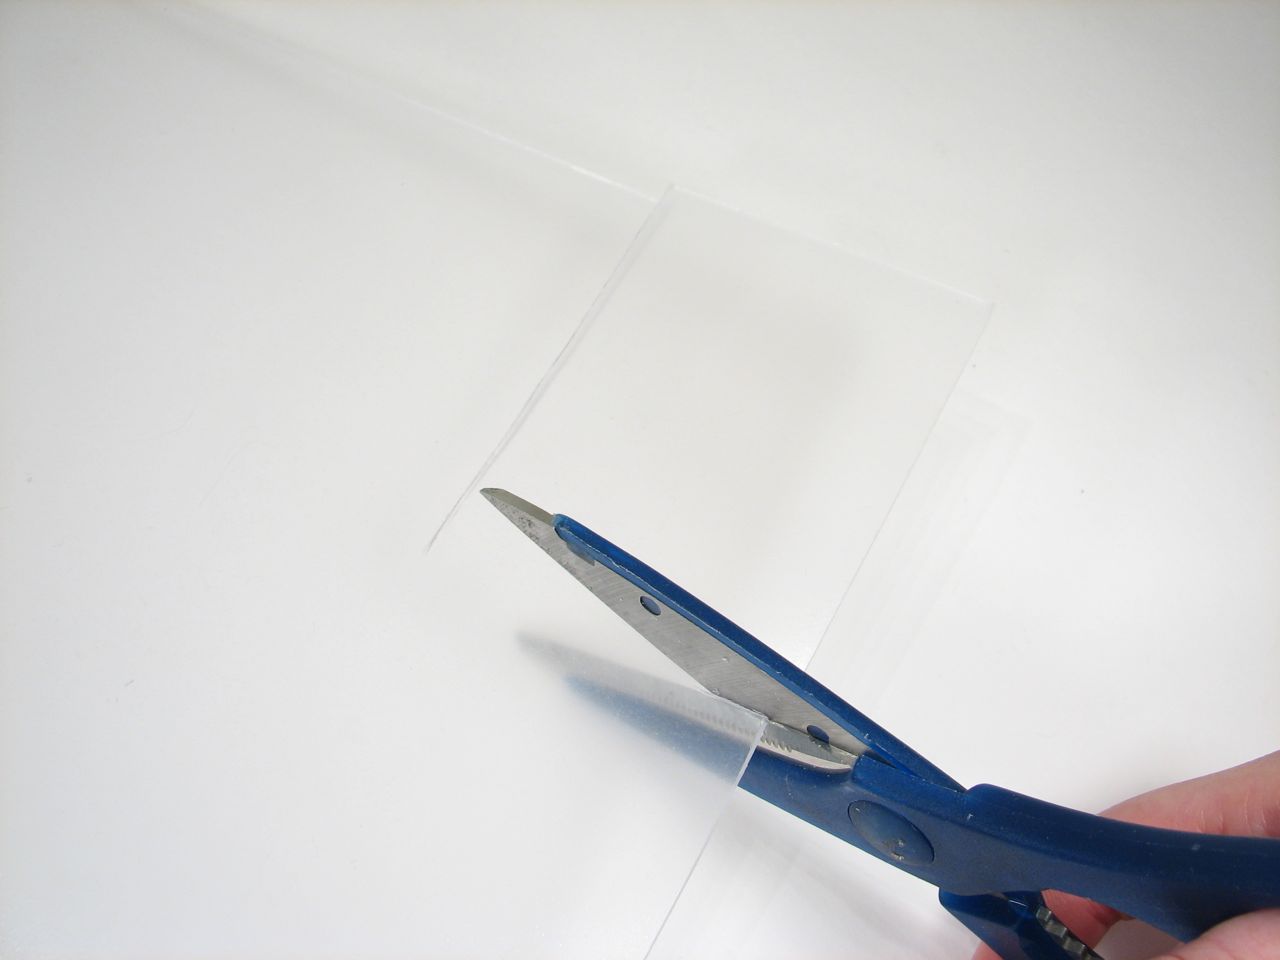
We’ve settled on 1/16″ PETG polyester for this project. It is the right thickness for use with a 3 mm LED, and not so thick as to be unreasonable for a card. The polyester has a couple of advantages over the acrylic we used last year. It is soft enough to be indented with a push pin and is still optically clear. It is also inexpensive. (Part 85815K11 at McMaster-Carr is only $2 for a square foot.)
With care, it can be cut by hand with heavy duty scissors into rectangles about 2 1/2 to 3″ on each side, which will fit into a card made by folding a letter sized sheet of paper (heavy weight paper or cardstock is best) in quarters.
Polyester sheets typically ship with a protective film on both sides (you can see that it makes the plastic look opaque in the photo above). You’ll want to peel it off before you get started with your design.
We previously used a hobby knife to carve the plastic, but a pushpin can be used to make just about any pattern. Not that we’ve stopped liking hobby knives, but pushpins do work well and might be more suitable for kids who want to do this project.
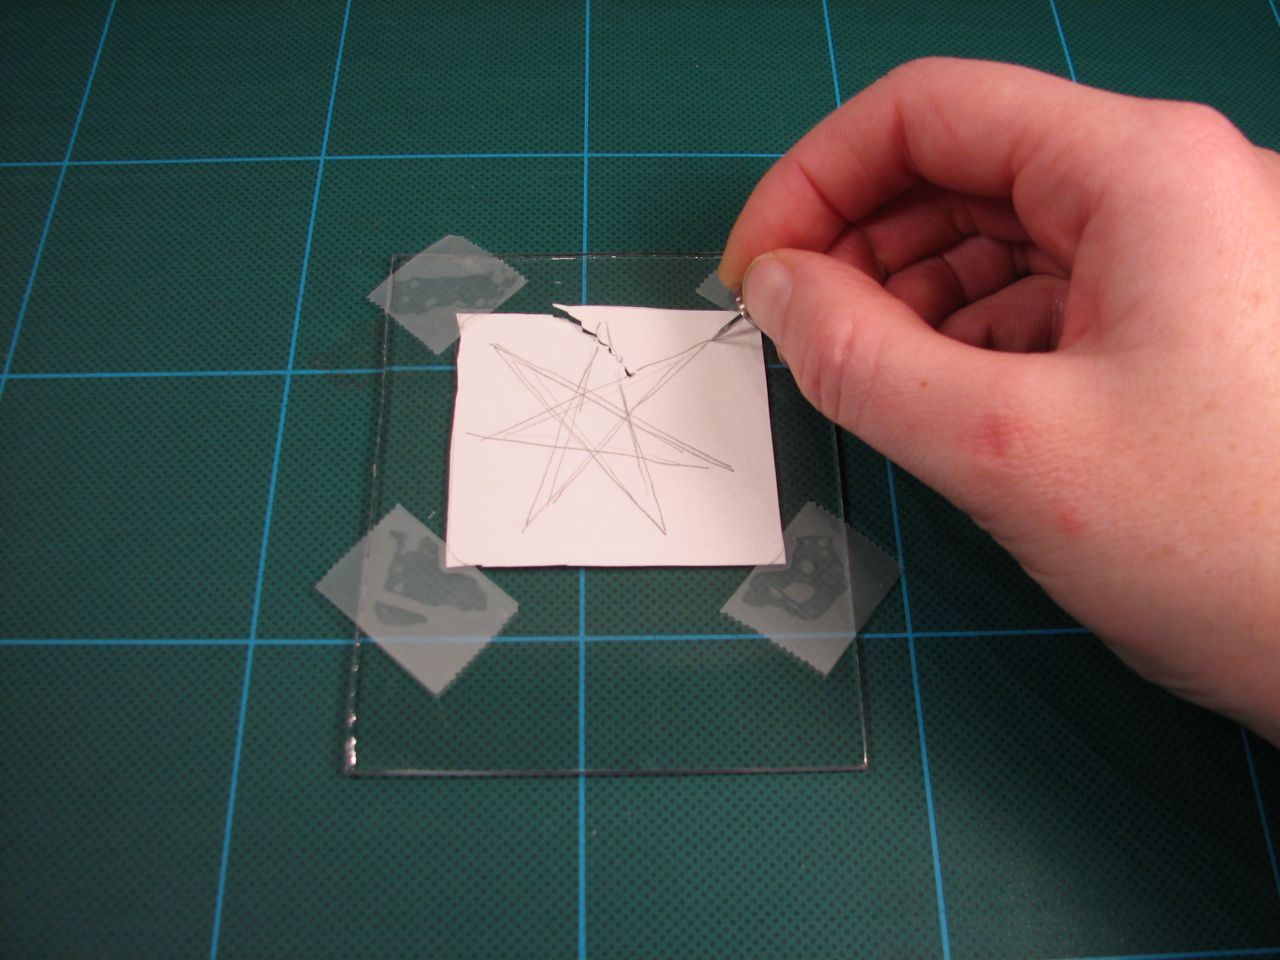
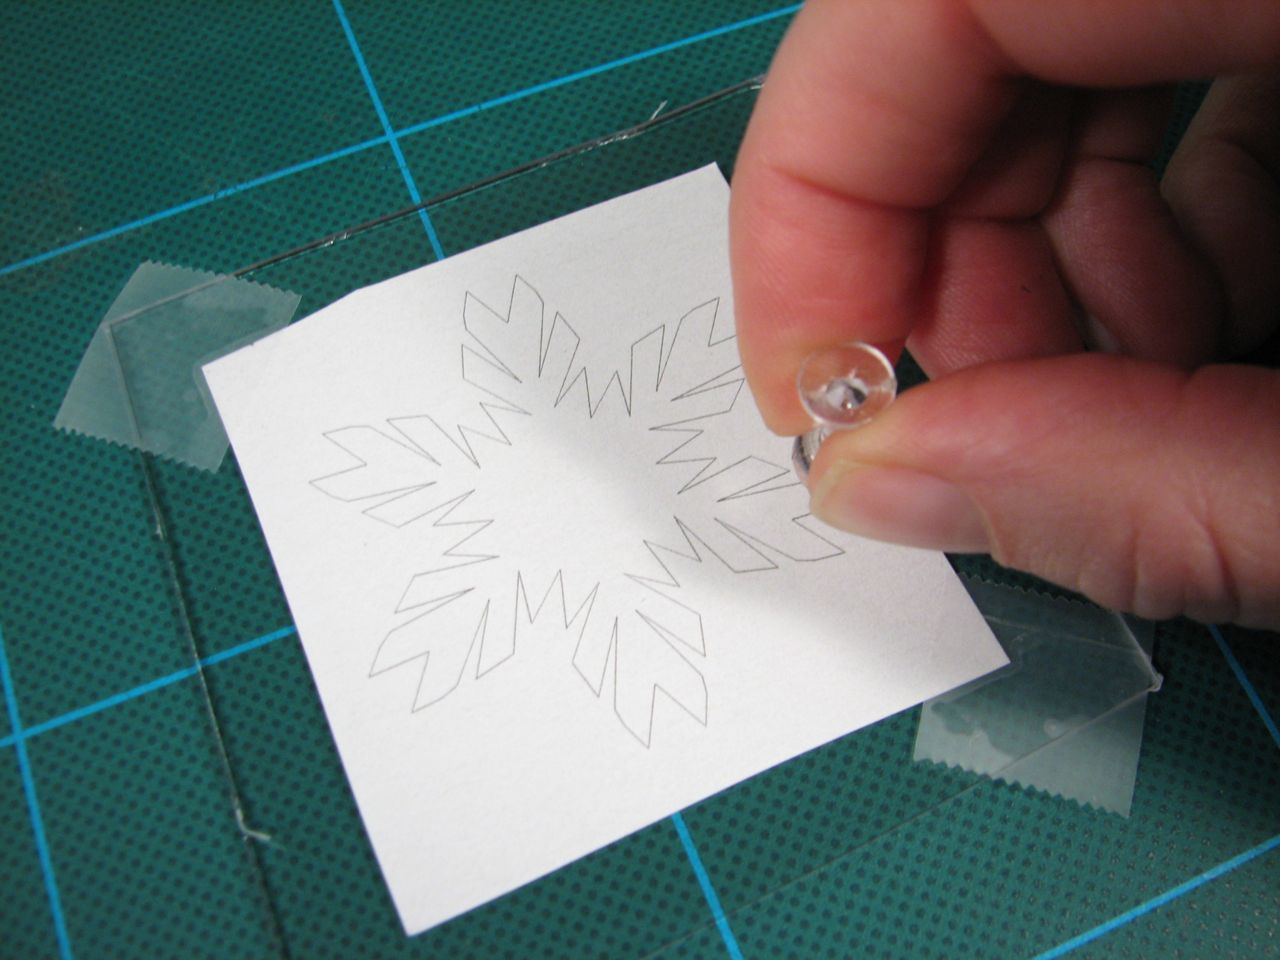
You can work from a hand-drawn design, or something computer generated. When we released SymmetriSketch this summer, we also updated our Vector Snowflake Application, which is a great way to create a card design. Just print out your snowflake at the right scale and tape it to your plastic.
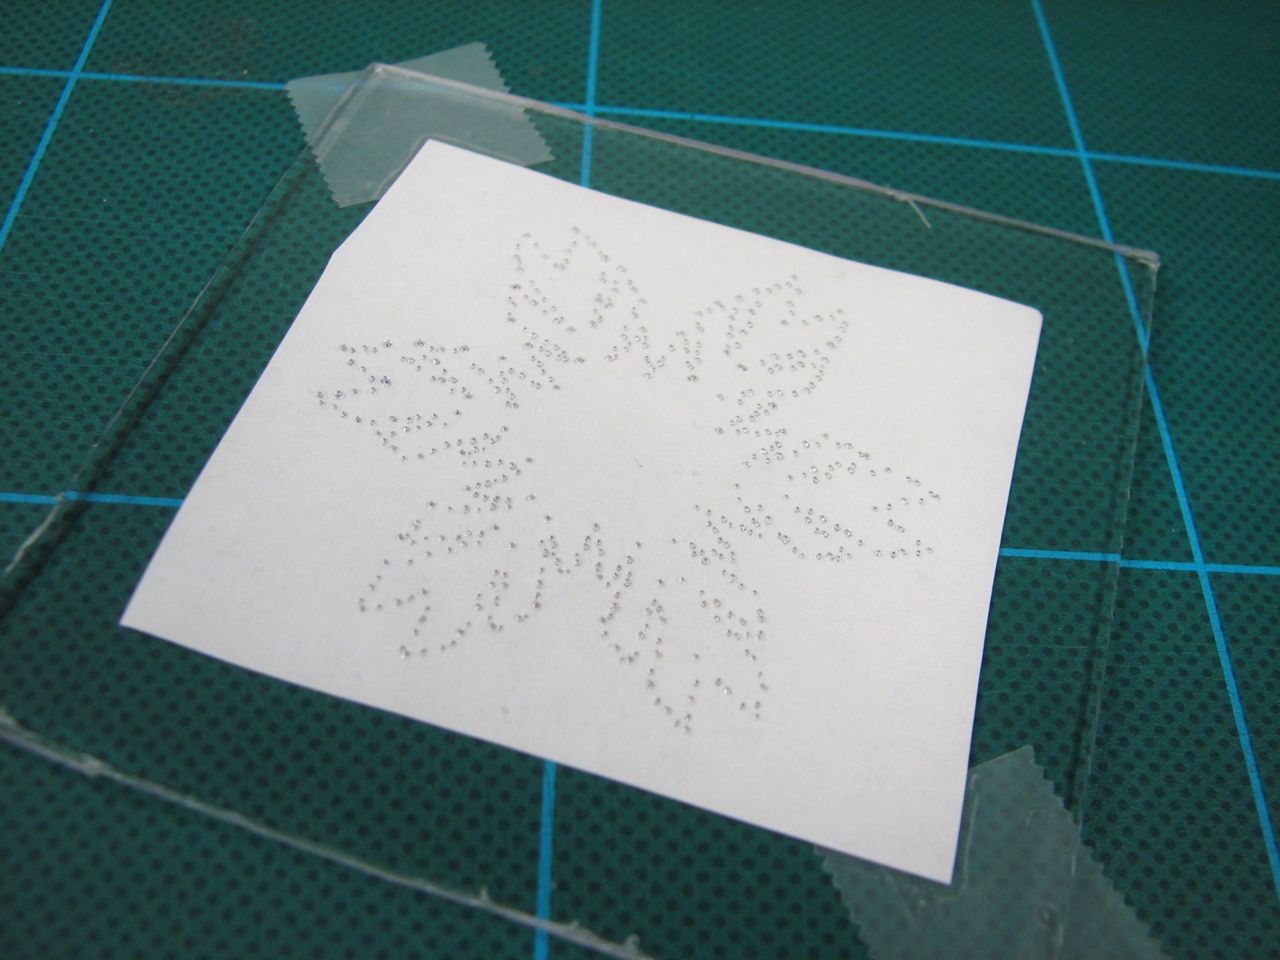
Press your pin in repeatedly around the edge of your pattern. You can flip it over to check and make sure your marks are getting through.
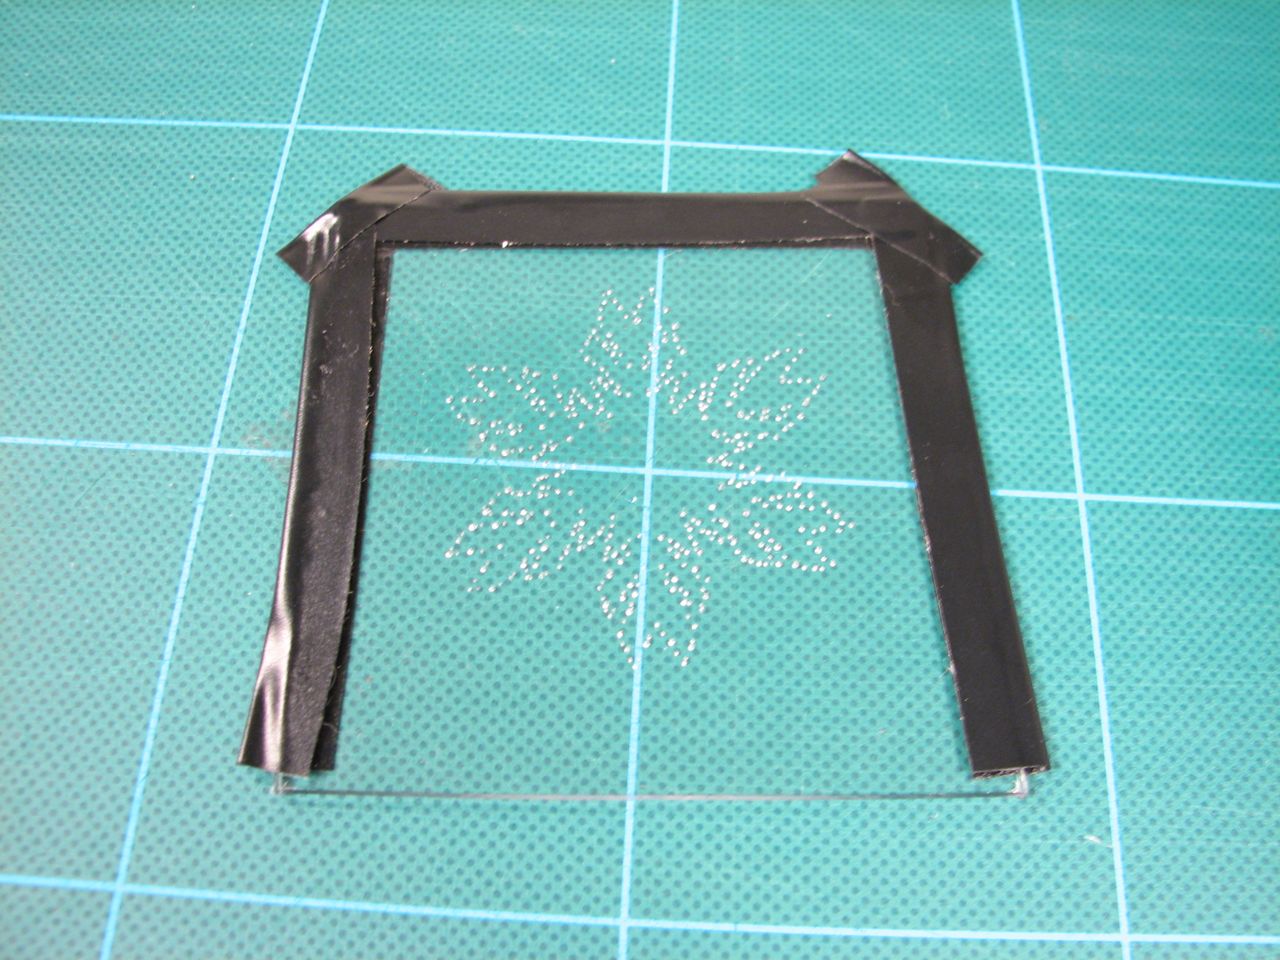
Once your pattern is complete, peel off your paper pattern. Next you’ll need to tape over the edges of the plastic with electrical tape to prevent light leaks.
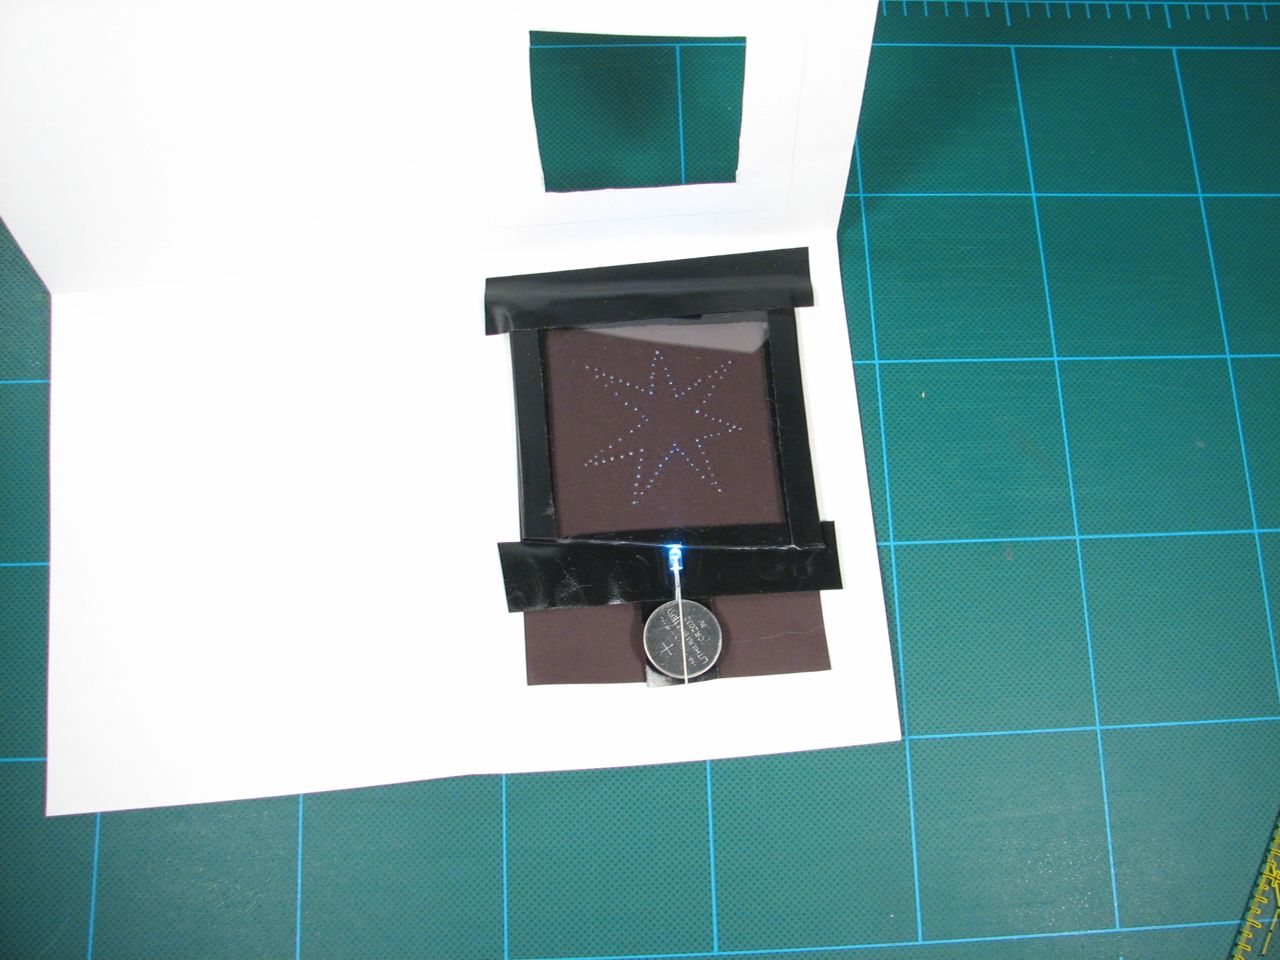
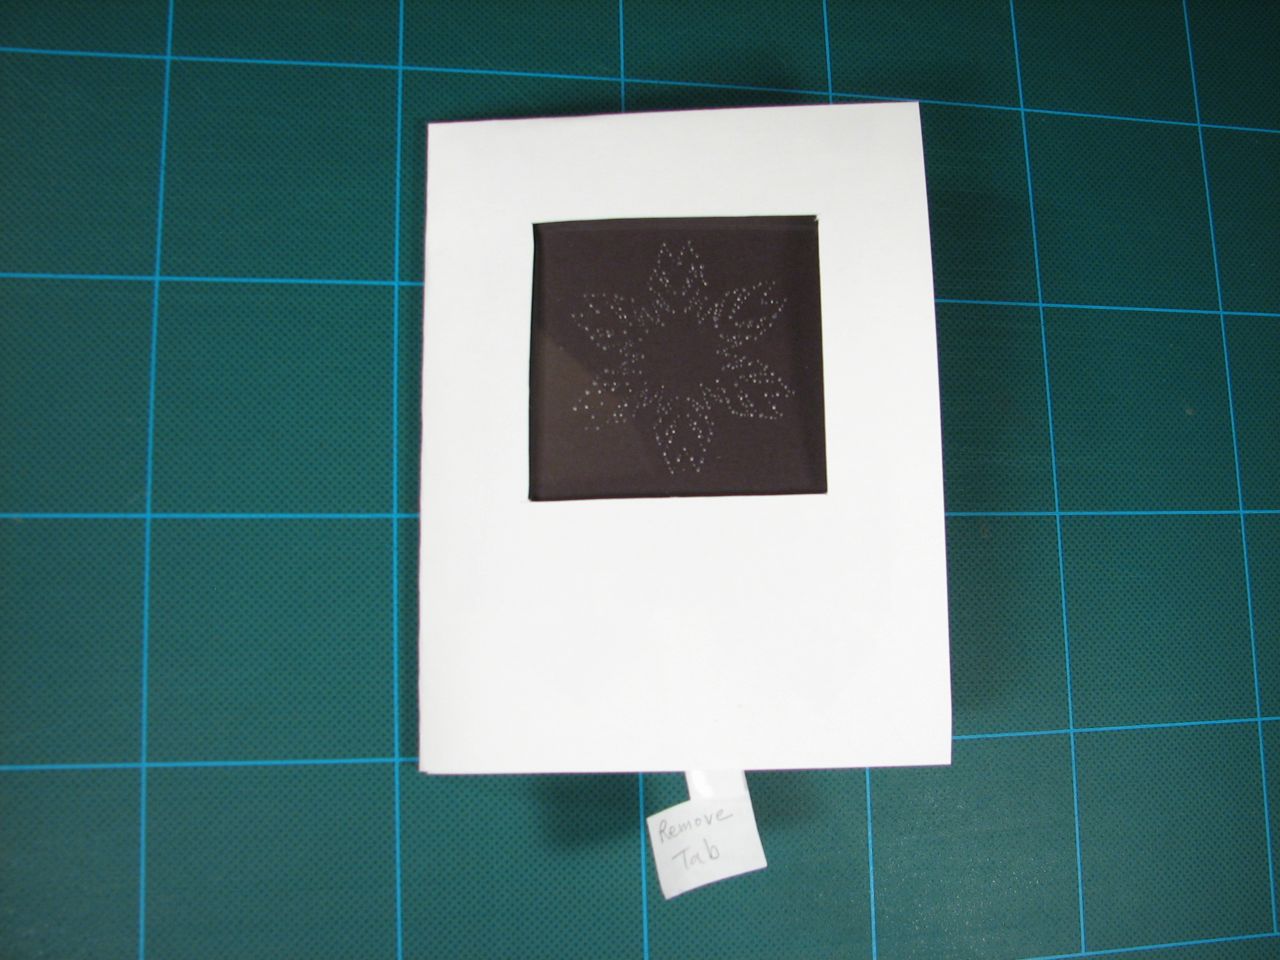
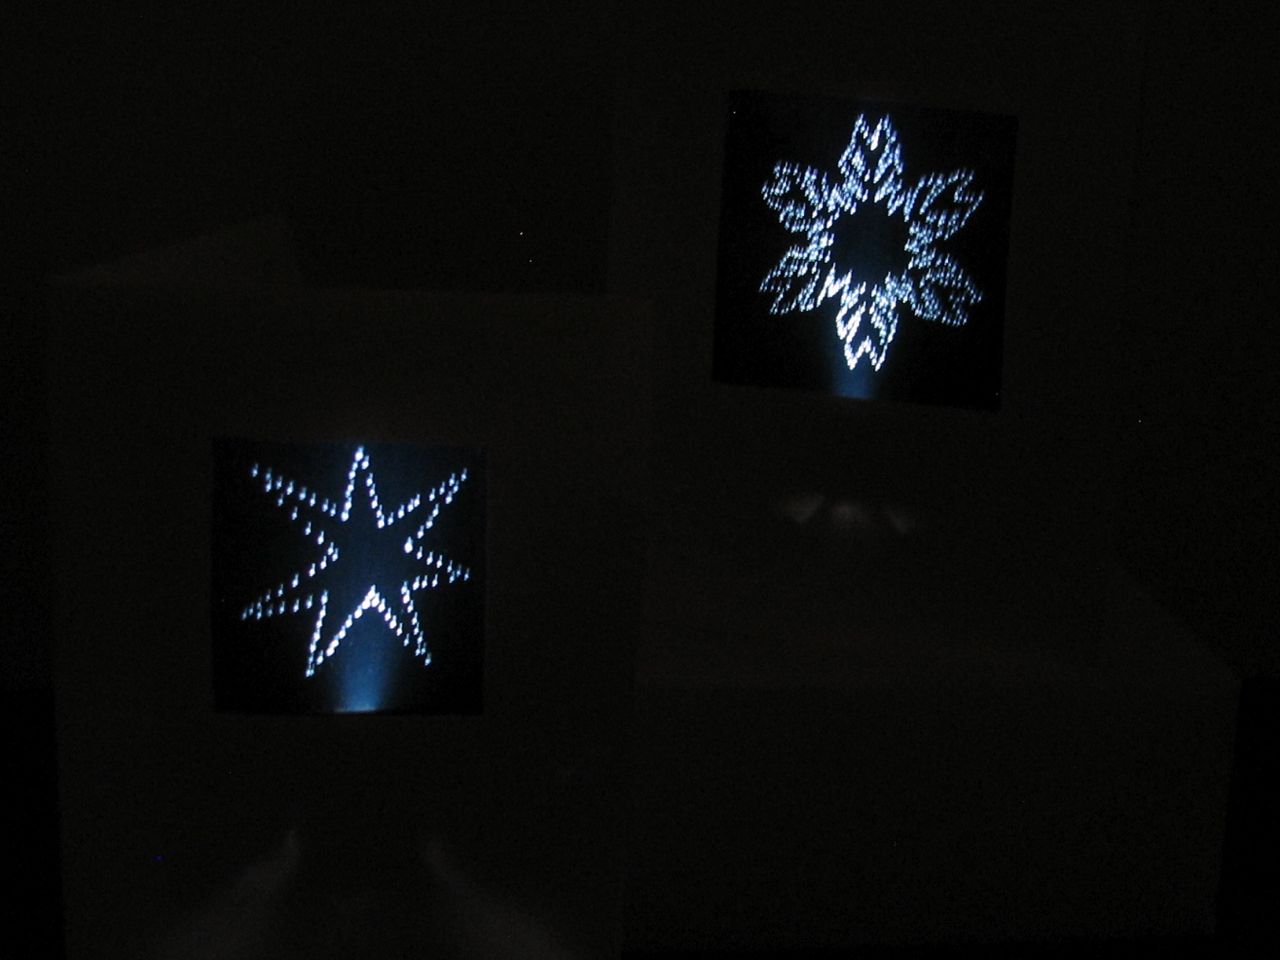
A piece of black construction paper behind the plastic will help provide contrast when the card is lit. The scratched side of the plastic should be against the black paper, and the smooth side toward the viewer.
You’ll need a window in your card paper as well, just a bit bigger than your design, but small enough to hide the taped edges of the plastic.
For our LED setup, we’re still using the classic “LED Throwie” arrangement– an ultrabright LED is attached directly to the leads of a CR2032 lithium coin cell. When the bright LED is pointed at the edge of the plastic, it travels through cleanly but lights up the areas that we’ve scratched.
3 mm clear lens LEDs are ideal for this since they work well with the plastic thickness; they transmit lots of light through the edge of the plastic.
We recently did some throwie analysis which suggests that if you’re going to use red, yellow or yellow-green LEDs, you may want to add a resistor to the circuit in order to extend the battery life. Blue, white, and pure green LEDs work very well driven straight off of the CR2032.
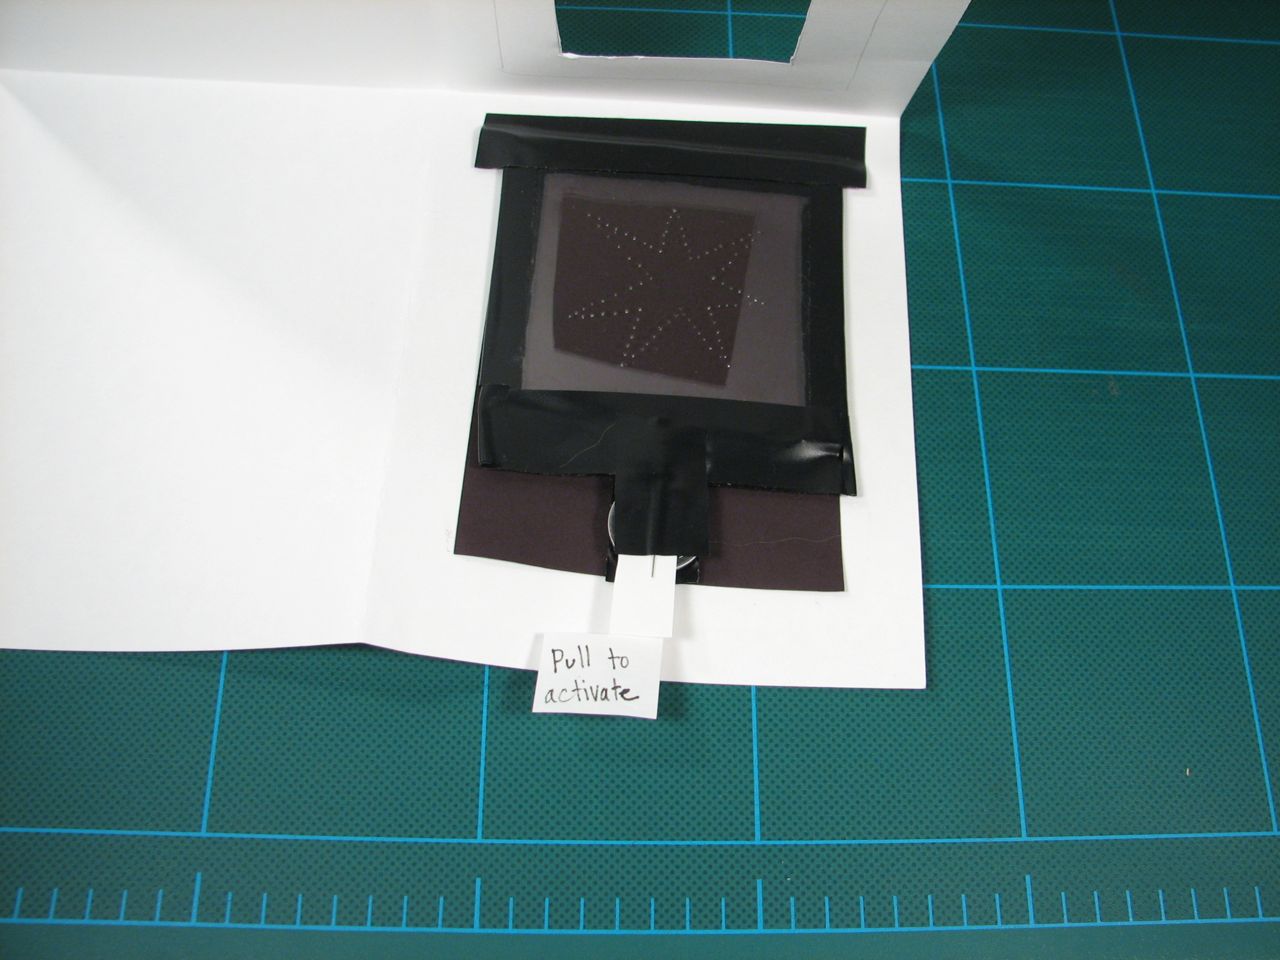
Another way to save the battery is to deliver the card with an “on” switch. A piece of freezer paper can be folded so that the slick side goes between the lead of the LED and the side of the battery. It can be pulled out by the recipient when they get it.
That’s it!
If you make your own edge-lit cards, we’d love to see pictures in the Evil Mad Science Auxiliary!

I used the lid of a CD jewel case, which worked quite well, too.
I also put household aluminium tape at the edges, right under the electrical tape. I found it helps distribute the light of the LED a bit more evenly.
I second the idea to line the edges with aluminum tape. It works quite well.
I imagine you can use multiple colors on separate layers to make multi-color cards.
Imagine a green tree with red/blue/yellow ornaments and flashing white lights!
>I imagine you can use multiple colors on separate layers to make multi-color cards.
Yes indeed. We demonstrated this in our original project write-up; you might want to take a look.
—
Windell H. Oskay
drwho(at)evilmadscientist.com
http://www.evilmadscientist.com/
Do you have a purchase link to the leds similar to what you did for the plastic sheeting?
We did these cards with LEDs that we happened to have lying around, but we’ve just put some up at our webstore, on the garage sale page, under the “evilmadscientist project parts” section.
—
Windell H. Oskay
drwho(at)evilmadscientist.com
http://www.evilmadscientist.com/
I may try drawing something with a CNC machine. it should look awesome.
Will McMaster-Carr allow for personal (ie non-business) orders? The reason I ask is that other sites like Granger don’t allow for non-business accounts and I don’t currently have a business address I could put this under :/
Yes. McMaster-Carr is *awesome* that way. :)
—
Windell H. Oskay
drwho(at)evilmadscientist.com
http://www.evilmadscientist.com/
Sweet, thanks a lot! I guess they’re going to be my new hobby shop. :)
Any way you can post a download link or something for the vector files used? I’m really interested in the snowflake you did on the first post for Edge-Lit holiday cards as well.
Thanks….
The vector snowflake drawing is one of the examples (I believe) included with our Snowflake application. The version used in last year’s card was traced from an "anatomical" snowflake found on one of the sites linked in the article about the Snowflake application, so you might poke around there a bit.
—
Windell H. Oskay
drwho(at)evilmadscientist.com
http://www.evilmadscientist.com/
Hello,
In the article, it says that it is best to use 3 mm LEDs, but I was wondering if I could use 5 mm ones and would it still get the same effect? Im asking this because the only 3 mm LEDs on the EvilMadScience store are the blue and white ones and I would like to change the colors up but it seems like the only option is to go with the 5 mm ones. Would it be best to use the 5 mm then?
Yes, you can use 5 mm LEDs, but they are thicker, and don’t fit as clearly into a thin card. 3 mm LEDs are available from a variety of sources– you’re welcome to use other colors and varieties of course, but you might want to read our "throwie analysis" linked above– there are things to consider when using other colors of LEDs.
—
Windell H. Oskay
drwho(at)evilmadscientist.com
http://www.evilmadscientist.com/
what kind of glue did you use to close up the card? (assuming you glued it shut??)
thanks
where can i buy the plastic sheets from?
McMaster-Carr, just like we said in the article.
—
Windell H. Oskay
drwho(at)evilmadscientist.com
http://www.evilmadscientist.com/
What thickness of PETG polyester would you use if your going to use a 5 mm LED?
I’d still use the same thickness of plastic– you’ll just end up with a thicker lump where your LED is.
—
Windell H. Oskay
drwho(at)evilmadscientist.com
http://www.evilmadscientist.com/
Do you think that there would be a visible difference using a clear lens or a diffused lens? Would the diffused lens still show the image nicely?
LEDs with clear lenses, which are designed to project light (as opposed to being designed for direct viewing), are definitely a better choice for this project.
—
Windell H. Oskay
drwho(at)evilmadscientist.com
http://www.evilmadscientist.com/
What level of intensity (mcd) would you suggest? Do you think that 2000, or 2500 would still be bright enough to be seen clearly? Or does this not even matter?
Anything above 1000 mCd is probably a good bet. Brighter is better, of course– it just means a more efficient LED, and easier to see.
—
Windell H. Oskay
drwho(at)evilmadscientist.com
http://www.evilmadscientist.com/
Do you think that it is better to use a resistor on every LED?
>Do you think that it is better to use a resistor on every LED?
For red or yellow LEDs, yes. Please see our article about that, here: http://www.evilmadscientist.com/go/throw
—
Windell H. Oskay
drwho(at)evilmadscientist.com
http://www.evilmadscientist.com/
I made these with my 4th – 7th grade students this December. What a great project! I downloaded the snowflake application on my classroom laptops and the kids created flakes after a math lesson on rotational symmetry. Then we made the cards, had a lesson on electric circuits, and finally put the cards together. They are already asking to make them again next year.
Thanks for sharing all the supplier information and for the tutorial.
Had a go at this with acrylic today, it turned out pretty well on first go, though I need to tidy it up a bit: http://www.flickr.com/photos/51035743260@N01/4861544139/
I used 10mm leds. I sanded them down to 3mm so that they were rectangular. Kept the card thin and provided a lot of light.
I had the design for the card engraved by Ponoko. It came out fantastic.
I printed a piece of paper that said "pull here" and cut it into a pull tab that I put between the battery and the led so that the light was off while it was in the mail.
Did you use light, medium, or heavy vector lines? did you experiment with the raster at all?
My hobby knife likes to go straight, but doesn’t like to turn or take curves.
I tried a grinding tip on a dremel, but I don’t think my 1/16" acrylic is thick enough for that to work.
Any thoughts or suggestions for getting decent curves without going to the expense of building or buying a CNC-type machine?
The most important thing is to use softer plastic– the acrylic really *is* hard. We did these projects without CNC tools, and you probably can too.
Windell H. Oskay
drwho(at)evilmadscientist.com
http://www.evilmadscientist.com/
I got some PETG from McMaster-Carr (arrived 22 hours after I ordered it!), but also ordered acrylic to see what the difference was. The order got mixed up and I got WAY more acrylic than I ordered from them, so I’ve been practicing on that. I’ll switch over to the PETG tonight.
Thanks! :)