


Once upon a time, we lived in a small apartment. Things got worse once we got a washer and dryer, because the hookups were in the tiny kitchen. In order to allow for comfortable dining space for three, it turned out that we needed to position the table up against one corner of the room. If we had a rectangular dining table, then someone would always have to sit at the pointy end of the table. If we had a round or oblong table, it would also be rather awkward. The solution was to build a new (funny shaped) table from scratch. And as long as we’re building something, why not make it unique?
The table top started as a piece of half-inch plywood. I hand-sketched the shape onto the wood with a pencil and cut it out on a band saw. My scribbled shape was designed to fit into the corner, provide several comfortable places to eat, and have an overall organic look that would complement the table surface.
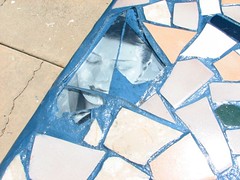
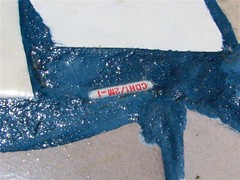
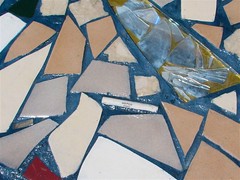
I then went and gathered materials for the table top. While there are a number of interesting objects embedded in the table, the majority of the surface is made of broken tiles. Not that they started out broken; I bought a mismatched set of shiny new tiles, and (more-or-less) carefully broke them. Cost was a major consideration here. The only other things that I spent money on were a tube of construction adhesive (Liquid Nails) and a bag of pre-sanded, pre-colored dry grout. (Total project budget: about $30.) I recovered some wonderful shapely shards of plate glass from a broken (not by me) ten-gallon aquarium. All of the other embedded objects are also ones that I had lying around, or ones that I came across in the few days between starting and finishing the project.
The most difficult part of a project like this is laying out where the parts go the table top. There are a lot of objects, which can be arranged in even more ways, and it’s easy to go through a few (dozen) iterations before deciding which
is the right one. Once they were all approximately in place, I used the construction adhesive to attach each object to the plywood. It forms a strong, flexible bond in less than a day. It’s helpful (but not easy) to make the top surface of the objects all lie in the same plane. (I only did a fair job of making the table surface level. While that doesn’t affect normal dining much, it leaves wine glasses a little unsteady. That’s a problem that’s easily solved by a place mat or coaster.)
Once the adhesive was dry, I began to to grout between the tiles. I mixed consecutive small batches of grout in a paper cup, stirred with a plastic spoon. Using the spoon and fingers inside rubber gloves, I filled in the channels, coarsely at first, and then carefully. A useful trick is to smooth the visible surfaces of the grout with a wet cotton swab; that leaves a smooth finish even over large gaps between tiles. All together, the grouting process took roughly three evenings.
After letting the grout dry for a few days, it’s hard as a rock. I chose to apply a water-based tile sealant to the entire table. This makes the grouted areas smooth to the touch. It also makes the table easy to wipe down, which is an excellent feature for a dining table. That’s it; the table’s done. In the photos that follow, you can see some of the interesting things that are embedded in the table.
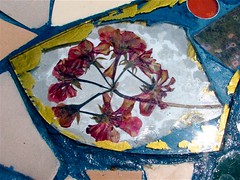
A pressed flower sits under two pieces of glass. The upper layer of glass extends past the pressed-flower part to cover a few other objects as well. Using two layers made some other interesting effects possible. For example, some torn golden tissue paper between the layers looks a bit like worn gold leaf.
This is one of several Man Ray photos that are in the table. They came from an old wall calendar that I cut up for this project. Again, it’s visible under two pieces of glass. The top layer is an overall cover, but the several pieces of glass below it act as windows to the picture below.
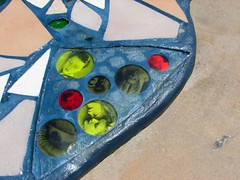
The small Man Ray photographs here are underneath colored photographic filters that sit under a larger piece of glass from the aquarium. I really like the effect; it’s my favorite part of the table.
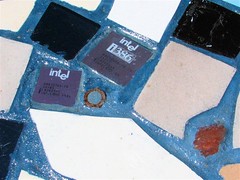
Here are a couple of other types of objects: An Intel 386 and 387. I thought that the table might run a little bit faster if I kept them close together. Between and below them is a steel hex nut. To the lower right, the amorphous red blob is a rosy piece of agate.
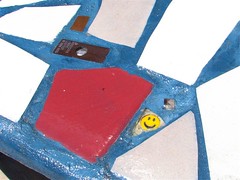
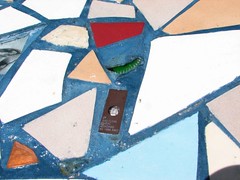
From top to bottom: A chunk of copper, an EPROM, a polarizing beamsplitter cube from a CD player, and a crappy little enameled smiley-face pin, safely hidden under a shard of glass.
Small 1 W power resistor.
Large ceramic power resistor, with one of the mistakes: A set of slightly melted, broken CD shards, glued to the bottom of one of the pieces of glass. If I had to do it over again, I’d leave this piece out.
[
Chunk of shiny copper, lower left. In the middle is a piece of glass from the bottom of a 7-up bottle, and one more EPROM.

Same piece of copper (upper right), along with a Man Ray photo of flowers.
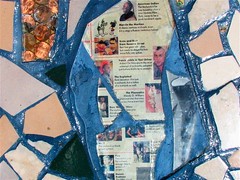
Last, and certainly not least, the illustrated history of the mohawk, from a vintage issue of Mondo 2000. I quote: “Bert has good elevation, but needs to shape his hair more fully into spikes.”
A set of pennies is under glass is also visible in this photo.
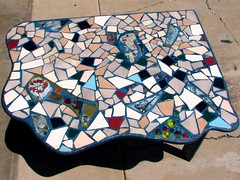
Overview of the table, where perhaps you can pick out some of the details now.
Epilogue: After we moved about a year ago, we had plenty of room for a regular-sized dining table in our new kitchen. So, we built ourselves a new table, the interactive LED dining table. The mosaic table has been relegated to life in the garage, where it is considerably less happy. Even so, we’ve been experimenting with mosaics lately, and hopefully we’ll have a new mosaic project to post in the near future.

that’s really nice :) thank you for so many wonderful ideas! talia, tel aviv israel