


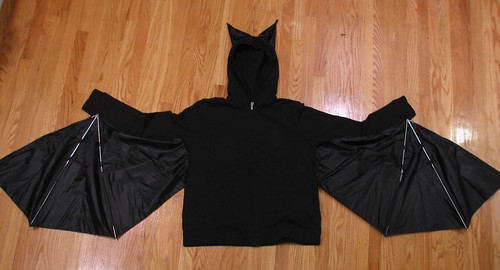
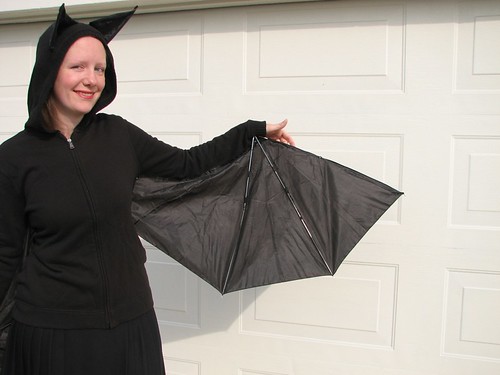
This updated bat costume puts wing spreading at your fingertips where it belongs. It also boasts a more impressive and slightly more dangerous wingspan. Watch where you point your wingtips!

Just like last year’s version, unscrew the top of the umbrella. Pop off the short wires that hold the ribs to the part that slides up and down the stem of the umbrella – they are like staples, and you can use pliers as a staple remover. Then use the pliers to untwist the two wires holding the ribs to the plastic parts on the stem of the umbrella. Unthread the wires from the ribs, reserving wires for later use.

Once you’ve separated your umbrella from its stem, cut the material down the center of one section. In the opposite section, cut about three quarters of an inch away from the ribs, leaving you with a triangle of surplus material to use for the ears. Remove the ribs adjacent to the half-sections.
For the remaining ribs, use tin snips or other clippers to remove all but the two longest pieces of rib. Use electrical tape to hold the joint in the middle of the rib rigid.
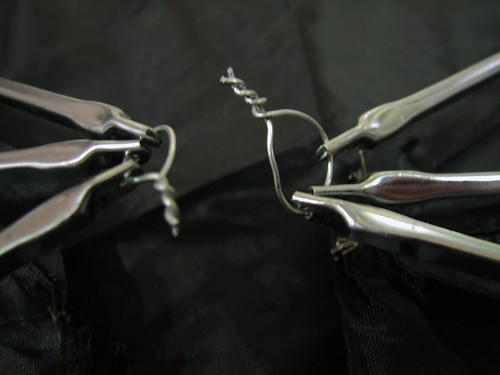
Wire the three ribs together – you can use the wires that were holding the umbrella together for this.
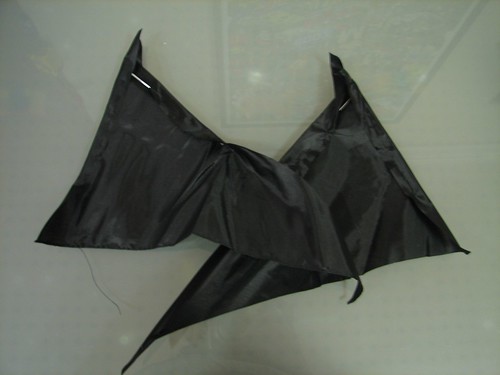
You can make the ears using the two extra ribs like last year’s version, or you can use the shorter leftover pieces to make smaller, less impressive ears as shown above.
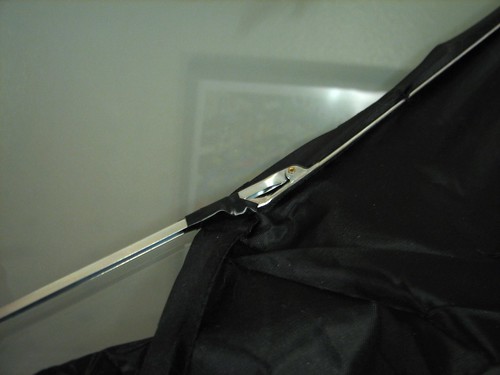
Stitch from the wrist of the sweatshirt to the underarm along the free edge of each wing. Align where the point of the missing rib would be to the side seam of the sweatshirt and stitch down the side. You should have a small triangle of material to trim away here when you’re done.
Finally, stitch the 3/4″ over the adjacent rib for the outer finger of the wing. This helps finish that edge of the wing, and hold the rib in place so you can extend the wing. That’s it – time to spread your wings!
Note: we still also recommend last year’s version, both for kids (restricted wing-span is good) and for going for that Acme look.
You can find more costume projects in our Halloween Project Archive.

I made the "last year version" mostly because I didn’t even know there was a "this year version"—I was so psyched how it came out, rave reviews from people at the party. Everyone wanted me to spread my wings! Thanks for the great tute!
-CB Davis
http://www.simplicityconnection.blogspot.com/
wow those are some hardcore shoes. impressive!
um yeah they are… I can’t tell from the photo if those macroplatforms’ “soles” are acrylic or not, but if they are, could be there’s a whole mini-project trapped in ’em just crying to get out. Dremel, ultra-bright red LEDs, button batteries, some sort of random voltage-varying controller that simulates flickering (OK, this is optional, but it’d be a really nice touch & I think y’all are up to it), hot glue, et voila: HIGH-STEPPING FIREWALKERS.
As if you don’t have enough to do. ;-)
– Theo
HOT! this is fine hot woman! im inlove??
Really clever costume and very cheap – I bought an identical umbrella for $3. Thanks for taking the time to post the instructions and the photos.
Thank You! I’ve been searching for a costume idea for the longest time. I can’t wait!
A really nice, easy, and cheap alteration could be to get some matte black spray paint so the silver colored metal ribs don’t show.
I’m totally using this idea in my 2011 halloween costume!
My fear is that spray paint would just flake off of the ribs and/or clog the fabric of the umbrella and flake off all over the place. A sharpie would probably be a better bet to mask the ribs (black chrome, anyone?), but it could take longer to effect the change.
Then again, if you took the time to properly tape off the umbrella to make the spray paint stick to just the ribs, it could end up taking the same amount of time, either way.
Or, for that matter, electrical tape the entire length of the rib, but section the tape so that it still bends where it needs to.