


It’s new… and we shall call it Mini Peggy.
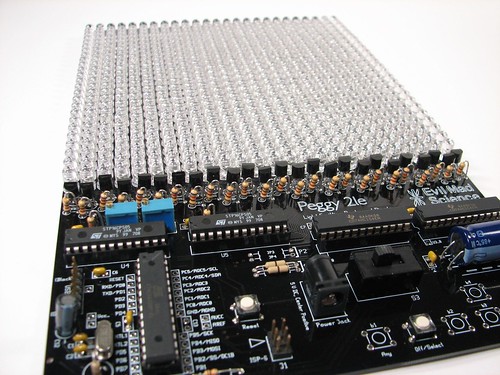
Peggy 2LE (“little edition”) is a diminutive version of our popular Peggy 2 LED “pegboard” an open-source LED matrix display. Peggy 2 is big, designed to fit a 25×25 grid of 10 mm LEDs. Peggy 2LE is mostly the same, just smaller: it’s designed to fit 5 mm LEDs.
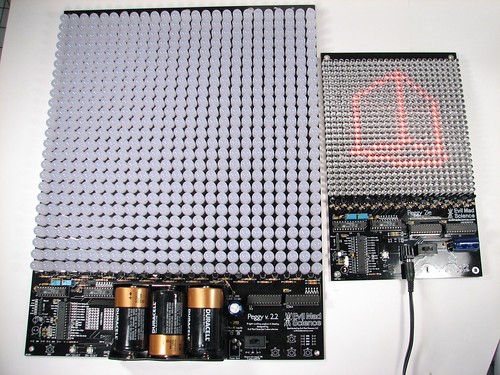
Here’s the family photo: Big ol’ Peggy next to the new Mini Peggy, Peggy 2LE.
Why make another version? A few reasons. One, some folks needed a higher density of LEDs (resolution) than available on the original Peggy 2 boards. Secondly, a lot of folks have been using Peggy boards to build larger (off-board) LED displays.
What’s New in Peggy 2LE?
Peggy 2LE supports the same basic functionality as the larger Peggy 2: it drives up to 625 LEDs of up to 5 mm size. Still open-source and hackable. Arduino compatible. Code-compatible with Peggy 2– every Peggy 2 program can run on the Peggy 2LE.
The four main differences between the two are:
- Peggy 2LE is smaller– about 1/4 the size.
- Peggy 2LE does not have a battery box. You can still use batteries if you want to (3xD cell) but a holder is no longer on board. Instead, it’s designed to run off of an ac power adapter.
- Peggy 2LE does not have the breadboard-style prototyping area on board. (Did we mention that it’s smaller?)
- Peggy 2LE can be built with a hardware serial port.
That last one may actually be the biggest difference: Peggy 2LE can optionally be built with a hardware serial port. What used to be a tricky hack is now supported with a simple wiring change.
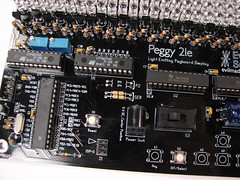
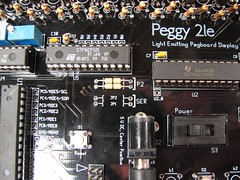
In the center of each of these two photos, there are two jumper wires (one black stripe each) located near the center. But they are located in two different positions. Depending which you choose, it’s wired up for Peggy 2 compatibility, so that all existing Peggy 2 code will work without modification. If you want to go for the “serial hack,” use the other one, and then you can use the serial port while the display is running. You can use it to send or stream data or images to the Peggy. (Note that the pins used to replace the serial port otherwise go to the I2C interface and to button b5 on the PCB. So, you’ll need to choose between I2C and Serial when you build it.) If you go for this option, it will not work with existing Peggy code– so we have whipped up a new version (“Peggy2Serial”) of the Peggy2 Arduino library (which you can download here) that compensates for the change, and will allow most existing Peggy2 software to work with this new configuration– you need only #include <Peggy2Serial.h>.
Like the other Peggies, Peggy 2LE is an open-source hardware and software project. We’ll be posting all of the design files (schematics, PCB layout, and build instructions) here in the next couple of weeks, as we finish getting all the materials together.
Peggy software is hosted at Github, and you can find related software there.
And Peggy 2LE is available as a kit at our webstore. :)
Update 12/3/09:
Schematics have been posted; you can download them here. (476 kB PDF file)
Update 12/6/09:
We have posted an updated version of the Peggy2Serial library for Arduino, which includes a large number of bug fixes, several all-new examples, and example code for communicating to the Peggy2 (serial) from Processing.
Nab it here. All users with the previous version are strongly suggested to upgrade!
Update 3/30/10:
The PCB design file for the latest version of the Peggy 2LE circuit board has been posted; you can download it here. (86 kB ZIP archive of gEDA PCB file)
Update 9/6/11:
Extended documentation about the Peggy 2LE kit is hosted at the EMS Wiki.
Update 9/28/17:
Source code links updated, now point to github, not google code.

Great to see! Looking forward to ordering one of these — I’ve been all about the LED display projects lately!
Cheers from Canada,
AO [ http://www.technoetc.net/blog ]
Is the schematic for Peggy 2LE the same as for Peggy 2?
—
Art Dahm • My Peggy 2.0 Web Page • http://www.mindlessdiversions.com/peggy2/
The only significant change is the addition of the serial option; we’ll be posting schematics and the other design files soon.
—
Windell H. Oskay
drwho(at)evilmadscientist.com
http://www.evilmadscientist.com/
I’m guessing this is going to be more difficult to put together than its more zaftig sisters?
Not much different, actually. We’re mounting most of the resistors on end to save room.
—
Windell H. Oskay
drwho(at)evilmadscientist.com
http://www.evilmadscientist.com/
So are you going to do a "Peggy Micro" as well? Perhaps using 24×24 worth of "standard" 8×8 matrix displays and SOIC for some of the components? It would be sorta neat to have three different sizes all firmware compatible…
That is a *very* interesting idea, and we’ll have to take it under advisement. The "Peggy" displays are the "pegboard" style ones– with discrete LEDs, and we have long-standing plans for more "Meggy" displays based on "matrix" displays. (One that we’ve been meaning to get around to is a *big* Meggy based on 16 8×8 displays.) But, the idea of doing a code-compatible one is very interesting, especially at 24×24. If we did that, there’s actually room for DIP components on the back side, too. We’ll have to think about it.
—
Windell H. Oskay
drwho(at)evilmadscientist.com
http://www.evilmadscientist.com/
Mine is on the way! Can’t wait to start soldering!
http://www.natnlabs.net/2009/12/peggy-2le-from-evil-mad-scientist.html
Im using windows, have *pcb file compatible, eksport into jpg file maybe
in the schematic, I see several outputs unused, is there any technical reason you didn’t make this 30×32 or even 30×30 instead of 25×25?
In principle, you can expand this to 32×32, although 1024 LEDs is *a lot* more to solder than 625…
Windell H. Oskay
drwho(at)evilmadscientist.com
http://www.evilmadscientist.com/
ah, i missed that Y0 wasn’t used on the 74HC154, so 32×32!
also, am I sane (other than for wanting so many LED’s) thinking another 74HC154 could be added on using the the button IO’s for 32×48? Or would it be better to add another STP16DP05 instead?
Expanding either way, there are tradeoffs in terms of cost/power/memory requirements/refresh rate. Depends what your goals are. Adding another fully Peggy to the side is another way to do it.
Windell H. Oskay
drwho(at)evilmadscientist.com
http://www.evilmadscientist.com/
Are the build instructions available online for the LE as they are the larger Peggys? I looked around here, the wiki, the store, and the Google code site but could not find them.
The build instructions for both Peggy 2 and Peggy 2LE are *version specific* and we have not posted instructions for every version online (there have been quite a few).
If you have a kit and need another copy of the instructions, please contact us with your specific version number so that we can give you the pointer to the correct online instructions.
If you just want to preview the instructions, please contact us about that, and we’ll give you a pointer to the latest version.
Windell H. Oskay
drwho(at)evilmadscientist.com
http://www.evilmadscientist.com/
I’m just starting to build the kit….will there be an RGB LED-matrix version or an RGB cube version in the future? I think this would be a better kit than the Rainbowduino kit which does not have very much software support or hard to program. I would definitely buy and build an RGB cube from EMSS !!!
What are the dimensions of the board?
As it says on the webstore, 9.625×5.9" (245×150 mm).
Windell H. Oskay
drwho(at)evilmadscientist.com
http://www.evilmadscientist.com/