


Turn off that television in classic style!
Here we show you how to hack a TV-B-Gone into the case of a vintage television remote control, such that the original on/off button instead activates the TV-B-Gone. We also modify the power supply so that it runs off of a regular 9 V battery, instead of a set of lithium coin cells.
The TV-B-Gone, manufactured by Cornfield Electronics, is a hacker’s delight: a simple, single purpose gizmo that’s easy to take apart. It’s a super-universal remote with a single purpose: turning off televisions.
You can pick one up at such places as the Make store, Amazon, ThinkGeek, or direct from Cornfield.
I got mine for $20 at Fry’s Electronics. I could have bought it elsewhere, but here’s the thing: Fry’s sells televisions! This is very important, because you can try before you buy. The TV-B-Gone is found in the toy section. Grab one off the rack, press the button, and it lights up a little blue LED so that you can see that the battery isn’t dead. Now carry it over to the section where they have rows and rows of televisions, and so that you can really test that it works. It’s amazing: You can get your money’s worth before you even buy it.
In order to begin making changes to the TV-B-Gone (TVBG) let’s first look at how it’s constructed.
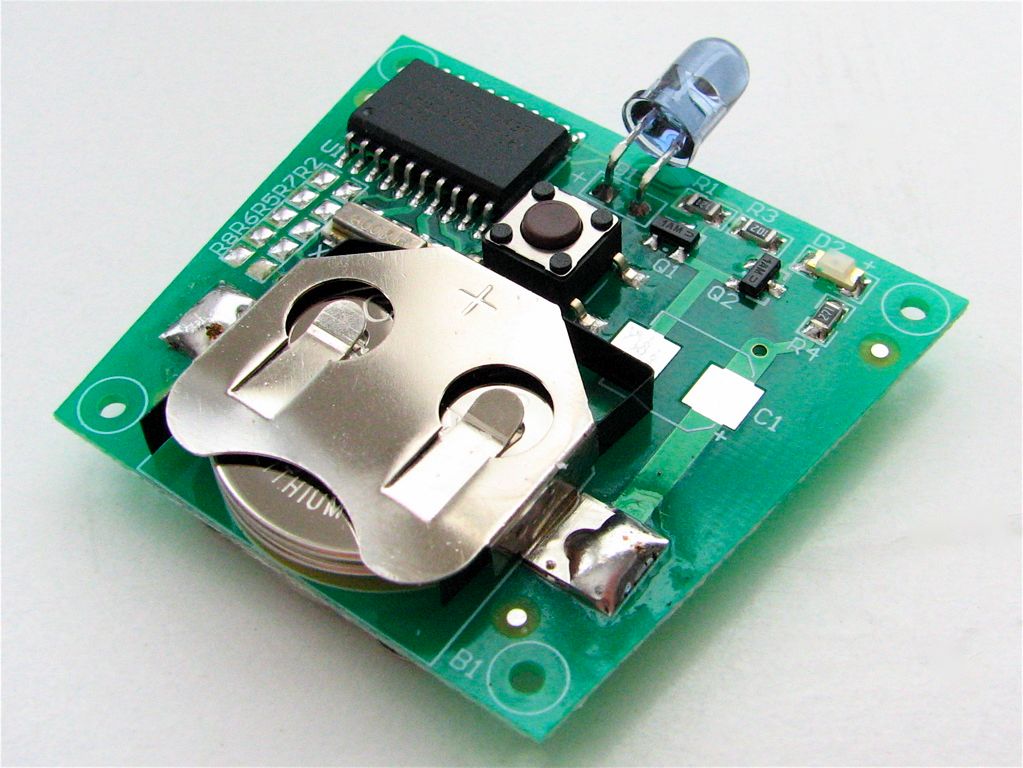
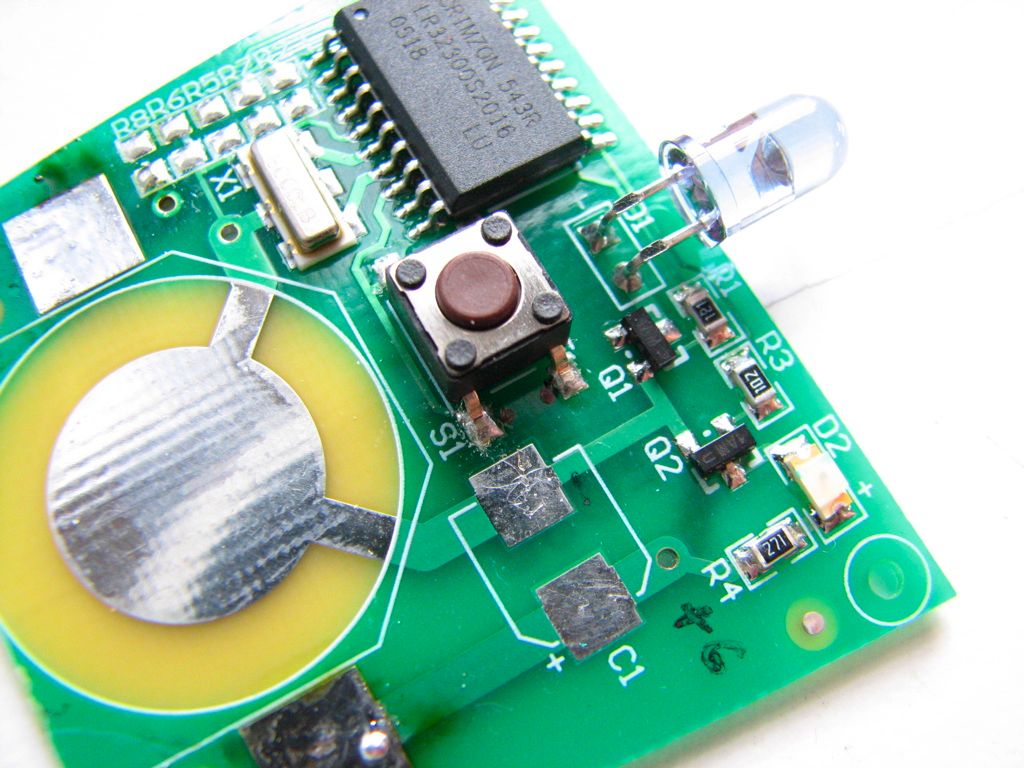
After removing the single screw to take the case apart, we find a printed circuit board with a battery holder on each side.
The big chip is a Zilog ZLR32300 series processor; a programmable microcontroller designed specially for use in infrared remote controls. (Sheesh, these things are specialized!) There is also a crystal oscillator for the processor, a pushbutton switch trigger, a large infrared LED, a tiny blue LED that blinks along with the infrared LED, two drive transistors– one for each LED, and three support resistors. The design is straightforward, clean, efficient, and provides easy access at all the right points for modification. Nice!
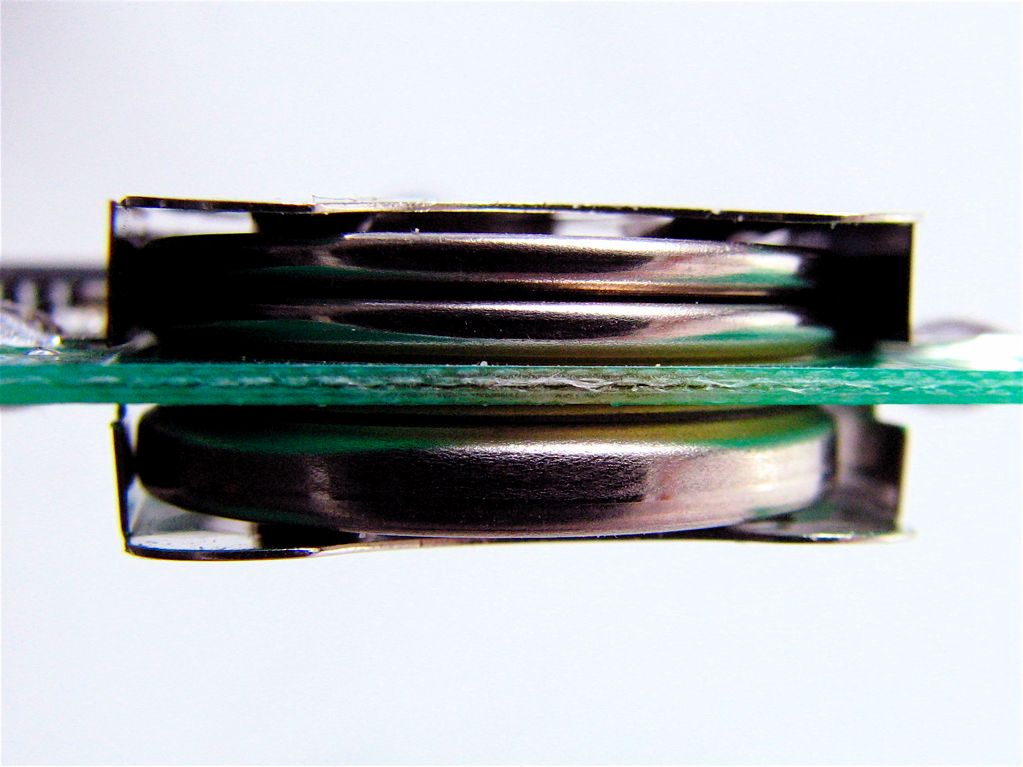
There are three lithium batteries in the TV-B-Gone. The two thin lithium batteries on the top side (the side with all the components) are in series to give a total of 6 V. These provide the high-current drive for the infrared LED. On the bottom side is a single (thicker) battery that provides a 3 V signal that provides the current for the microprocessor.
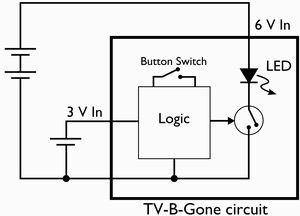
We can make a simplified drawing of the internals like this. The circuit has three inputs: power at 3 V and 6 V, as well as a pushbutton switch that triggers the action of the device.
We can model everything that happens in the device in a simple fashion: A logical circuit that turns on and off a switch (a transistor, really) that allows current to flow through the infrared LED in a predetermined sequence.
We are going to make two significant modifications to the TV-B-Gone circuit. The first is that we are going to hook up an external switch, the “OFF/ON” button from the vintage remote, to trigger the circuit. Secondly, we will hook up a new power source. The stock TVBG runs off of three lithium coin cells. While the vintage remote TVBG will make a great gift, it is only marginally in good taste to give away a gift that runs on funny little batteries. Besides that, the vintage remote has a 9 V connector and a battery door cover– it’s only natural.
In order to get our two voltages to drive the circuit, we will use a couple of moderately clever tricks. The 6 V that drives the infrared LED does not need to be a precise value. To keep things simple and cheap, we will use the original infrared LED from the vintage remote, in series with the LED on the TVBG. To get the 3 V that we need to run the microprocessor, we will use an LM2936-3.0 voltage regulator ( Digi-key part No. LM2936Z-3.0-ND ). The LM2936 is a somewhat fancy (and expensive: $2.50) regulator; it is used here because it is extremely power efficient, and will help the modified TVBG to have a long battery life.
Here is how the modified circuit diagram will look:


Let’s get started on modding the circuit.
First remove the batteries and save them for other projects like making
LED throwies or putting them in your Lego d00dz.
Next, remove the battery holders by desoldering the sides, with either solder wick or a solder sucker. After doing so, the underside of the TV-B-Gone printed circuit board looks like the one shown here.
The big circular spot in the center is the “ground” terminal, and the silver square on the right is the +3 V terminal.
Here is the top side of the TV-B-Gone PCB, after the battery holders have been removed. The big circular spot at the left is connected to the same “ground” as the circle on the other side. The little square by the label “C1” is the +6 V terminal.
When the button switch is depressed, it makes a connection between the pins of the switch. You can simulate pushing the button switch by connecting the pins closest to the labels “Q1” and “S1.” Instead, we will wire up the original power switch to connect these two pins together momentarily.
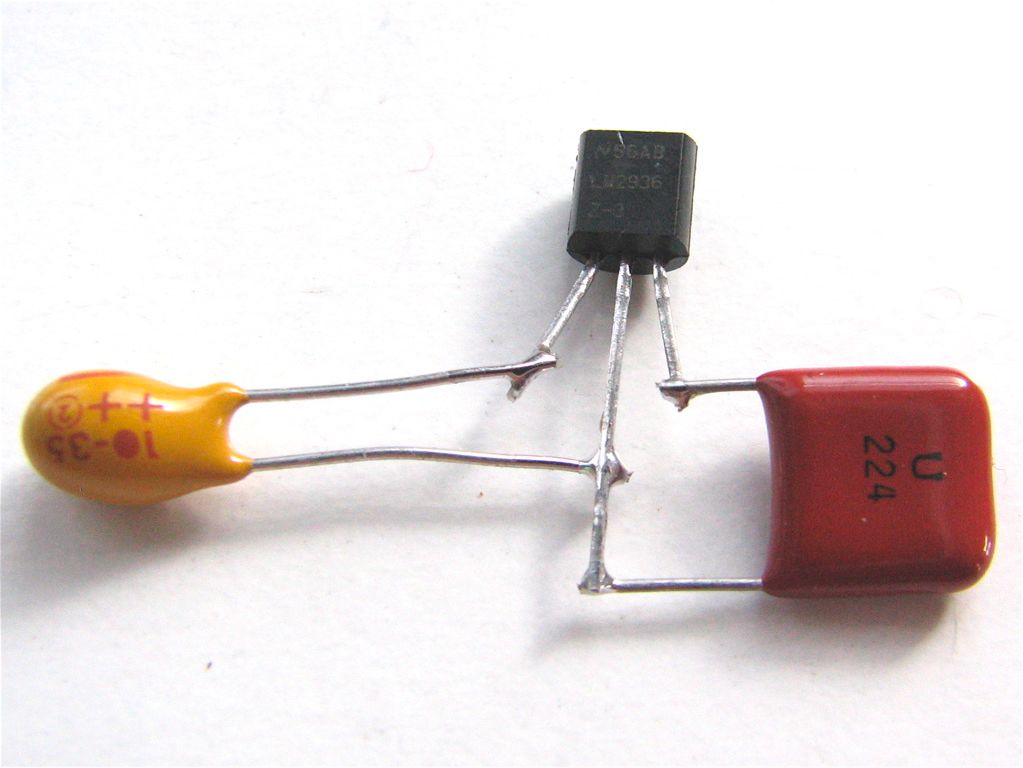
Here is the LM2936-3.0 voltage regulator, connected to the two capacitors that it needs for stability. The input (3.2 V – 40 V) is put on the rightmost pin. The center pin is ground and the left pin is the regulated 3.0 V output, which will provide power to drive the microcontroller.
I used a 10 microfarad tanatalum capacitor to connect the output to ground, and a 200 nF capacitor to connect the input to ground.
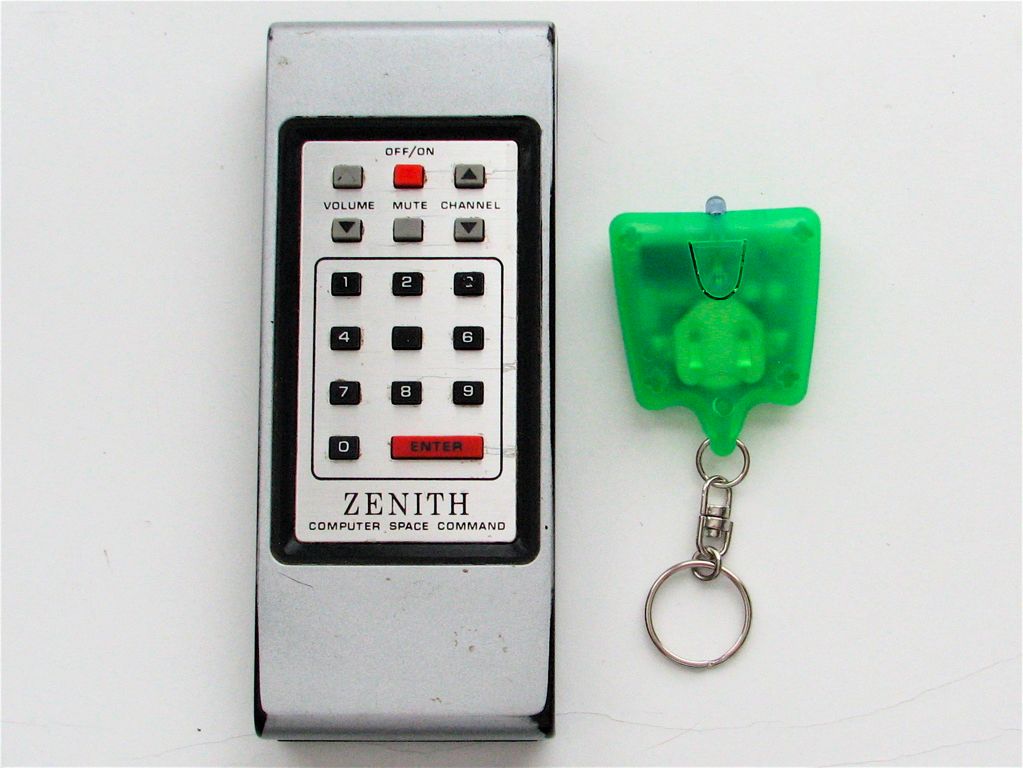
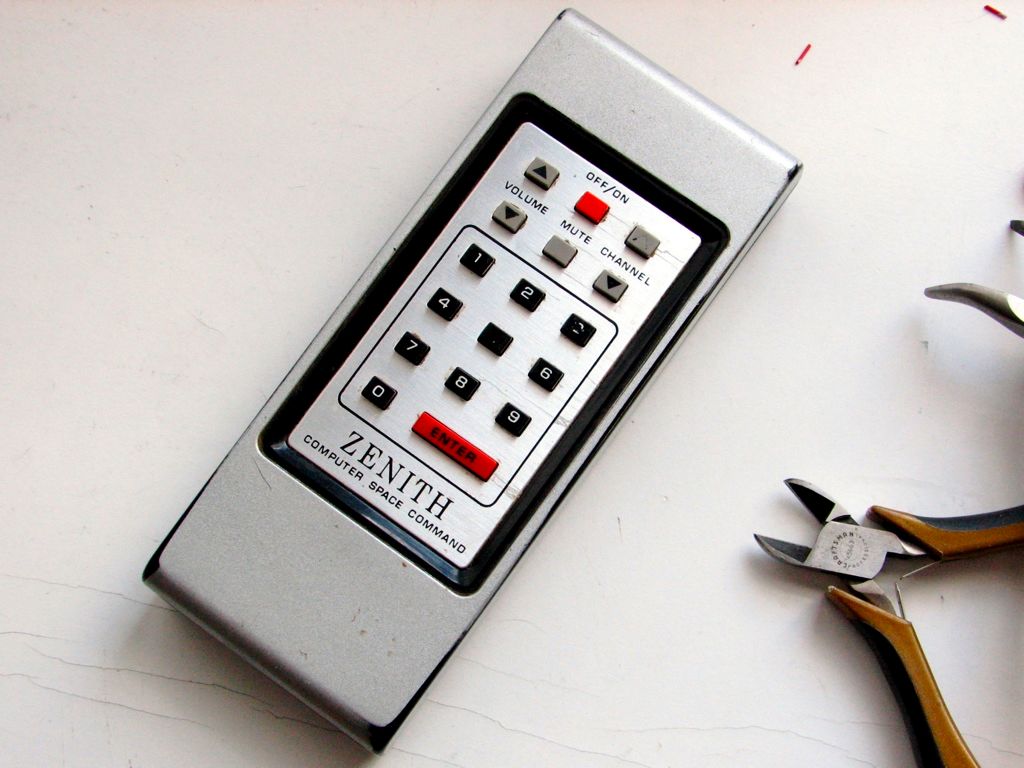
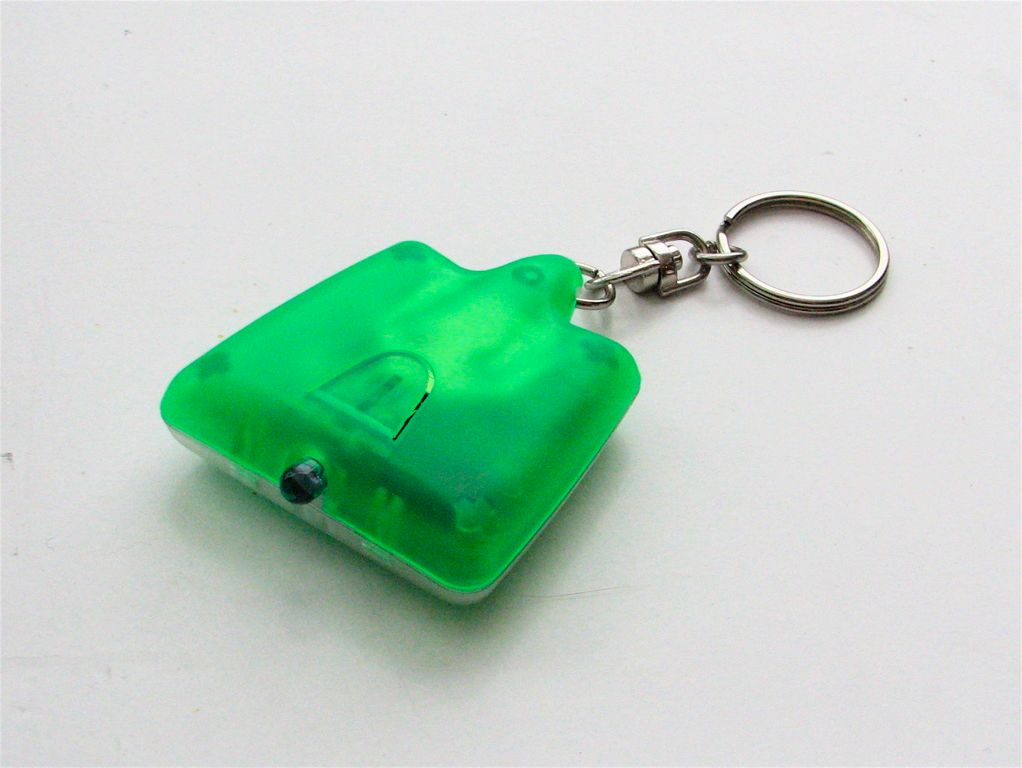
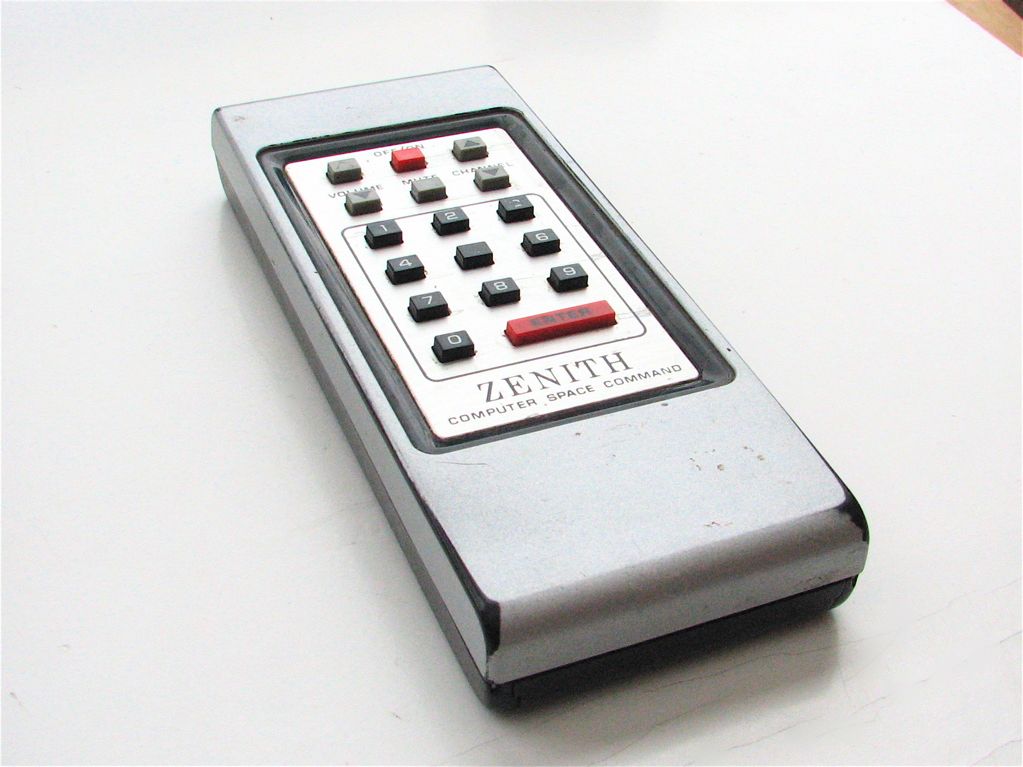
We’ve got our TV-B-Gone ready, so let’s take a look at the vintage remote. This is a Zenith “COMPUTER SPACE COMMAND,” shown with our little friend for scale. I picked it up for a buck at Weird Stuff a few weeks ago. As soon as I saw this beauty I knew what I had to do with it.
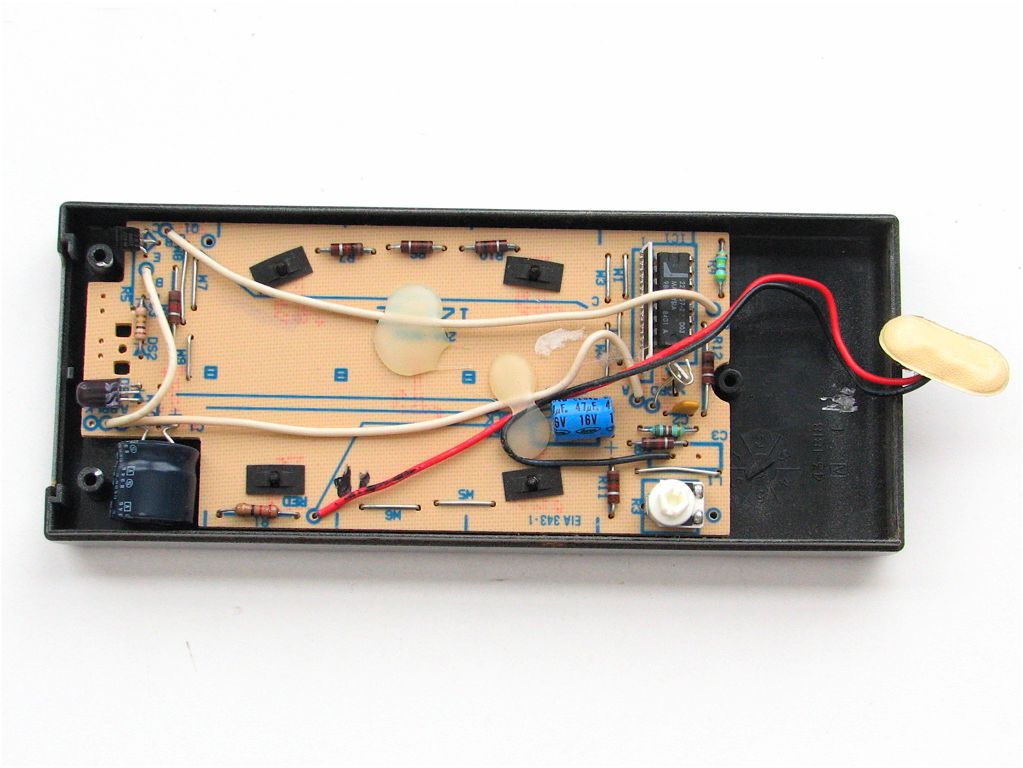
This is what the vintage Zenith remote looks like inside. Among other things, there are two large electrolytic capacitors, a 9 V battery connector (right side) and the infrared LED (left side). Most of this stuff can be outright removed.
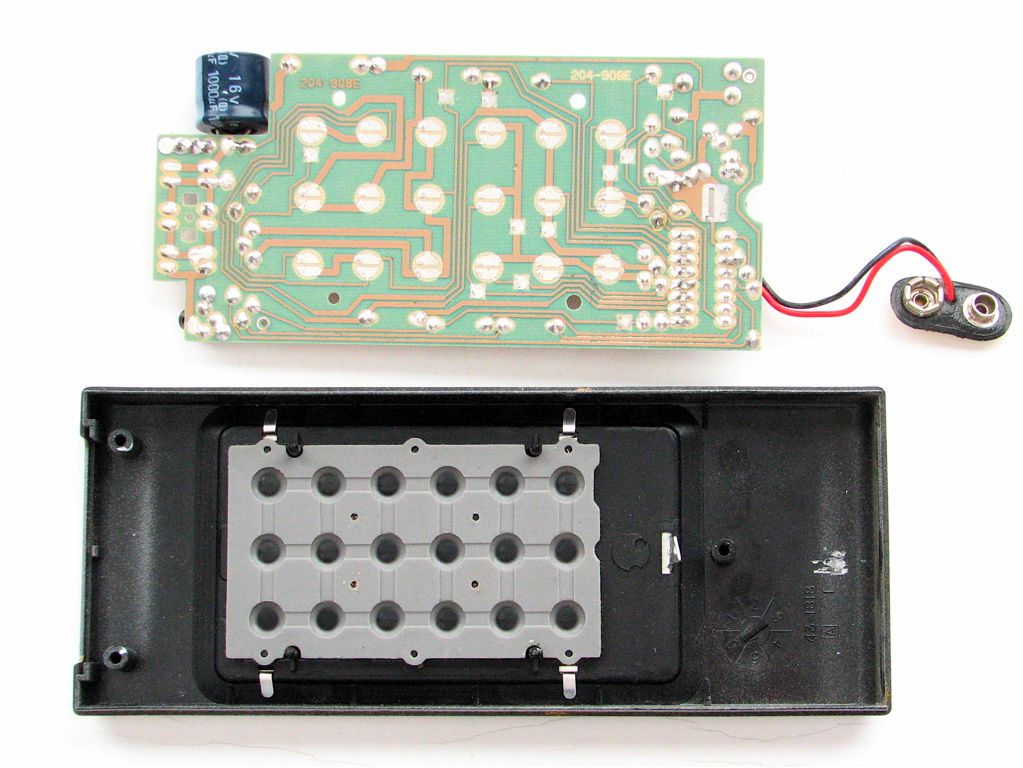
Removing the circuit board from the remote, you can see the conductive rubber keypad that is used to make connections on the circuit board. Corresponding to each button on the outside of the remote, there are two semicircular silver pads. When the button is depressed, the conductive rubber keypad makes an electrical connection between these points.
We’ll only be using the power button, so we don’t really need to worry about the others.
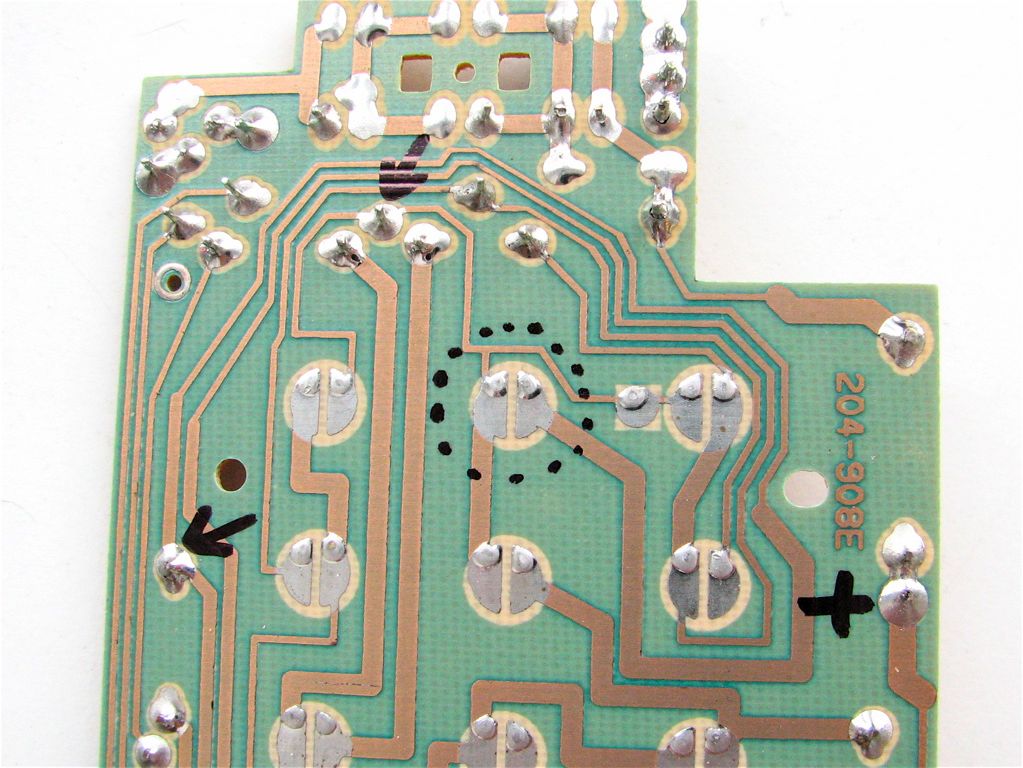
Here are some interesting points on the vintage remote PCB. Your PCB may vary; figure out what you need to do by tracing the leads by eye.
The spot marked “+” is where the positive terminal 9 V battery connects. In the middle, inside the dotted line, are the pads corresponding to the spot underneath the “OFF/ON” button on the remote. Tracing the leads, these two points connect to a couple of holes in the board, marked with the two arrows. We will connect wires from those two points to the two sides of the button switch on the TV-B-Gone PCB.
In order to avoid interacting with the remnants of the original remote circuit, cut the traces on the old board between where we connect to them and where the go to the other parts of the old circuit.
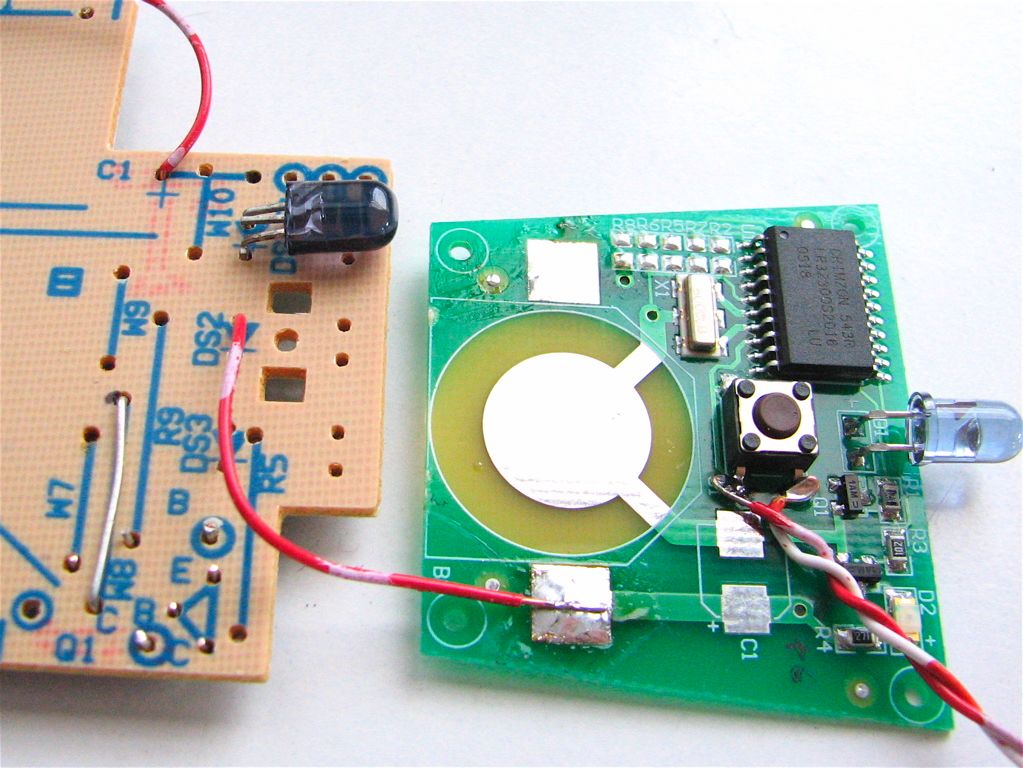
Now we start integrating the two circuits. The 9 V from the battery connector goes to the old infrared LED, and the low side of that LED connects to the +6 V terminal of the TV-B-Gone.
Also add the two wires to the button switch on the TVBG PCB.

Finish hooking up the wires to the power-switch traces on the old circuit board, and then connect the negative terminal of the 9 V battery (our effective ground) to the ground terminal of the TVBG circuit board.
Hook up the voltage regulator circuit with its input to 9 V and its 3 V output to the terminal on the back side of the circuit board.
Here’s a better look at the two circuit boards assembled together with the voltage regulator, and mounted in the vintage remote case. Again, we’re looking at the back side of the TVBG circuit board, so the red wire connecting to carries the 3 V from the regulator.

Here it is, all done, ready to rock and roll.
(By the way, if you want to mod a TV-B-Gone, you may also want to check out this awesome Ultra TV-B-Gone project on Instructables, which adds an output transistor and many more LEDs to increase the range of the device.)
Pastafarians: 1, Scientologists: 0.
In order to test out our new Vintage Remote TV-B-Gone, we took it to the mall. Many malls have electronics stores full of televisions. The one that we went to had a Sears outlet store with three giant plasma displays in the window. One click of my remote and Blink- Blink- Blink! They were all off. A success, but easy targets are somewhat disappointing, so we moved on. As we walked, I held the remote in my hand, relaxed at my side. Occasionally, as we passed store fronts with televisions, I pressed the button without trying to draw attention to it. I would estimate the range (before the TVs started turning off) at about thirty feet.
In a tiny but noisy shoe store, I made the mistake of turning off the four blaring televisions in a place where the four clerks had nothing better to do than watch TV. The very moment that the TVs turned off, they all scrambled out from behind the counter to investigate, wondering (loudly) what had happened. Somehow I managed to slip out without them noticing my gigantic remote control, probably because they were all still looking at the blank television screen in puzzlement.
One of the most annoying features of modern malls is the proliferation of little kiosks that sell toys, junk, jewelry, apartments, phones, or other junk in in the middle of the aisles. Many of them also have televisions to help them sell their junk. As we tried to walk by one of these kiosks, still twenty feet away from the point of closest approach, one of the guys from the booth targeted us and started walking over to hand us some flyers. Actually, it’s a good thing that he did walk towards us, because that way he didn’t see his video display blink off.
The most glorious moment of our trip, however, was when we happened to walk by the Hubbard Dianetics Foundation kiosk, where one poor soul was standing watching a video. Well, watching until we walked by, and then he wandered off on his own. I think that we may have saved a life. Final score of our trip to the mall: Pastafarians: 1, Scientologists: 0.
That makes me think of my father who was in a boarding school when he was a teenager.
The pupils got to watch football on sundays, and as he hated that, he made a device whitch interfered with the TV signals. At important moments of the football game, he would press a button, and the other boys would go mad, kiking the TV set…
A la the TV antenna scene from Amelie? (Itself a knockoff of the antenna-shaking scene from Delicatessan, but really, if you’re going to rip off other movies, you might as well rip off your own.)
I grew up with a Zenith Space Command remote. +several billion style points!
That makes sense….Take a very small inconspicuous easy to carry device and put it into a giant plastic unconcealable case! Brilliant! I suppose your next project will be to mod a thumb drive into a toaster enclosure.
I would TOTALLY do a thumb-drive toaster.
So there.
—
I think I am, therefore I am… I think
But…. but…. but…. the inner circuitry of a Space Command remote is really cool! It’s various little ultrasound frequency switches!!! It’s INNATELY COOLER!!!!! GAAAAH!
By which I mean, what did you do with the guts?
Unfortunately, the circuitry shown here is the original– this was an early IR model, not the ultrasound version. ("Computer space command" not "space command.")
Windell H. Oskay
drwho(at)evilmadscientist.com
http://www.evilmadscientist.com/