


For a recent project, I needed to control sixteen or seventeen LEDs with a microprocessor. The one that I chose was the Atmel ATtiny2313, because it has 20 pins, with up to eighteen outputs, can run without an external oscillator, and is fairly inexpensive at around $2.00 per piece.
Since I’ve got a Mac laptop and no real serial or parallel port, I opted to go with a USB-based programming solution. Furthermore, I wanted to program in C, not assembler, and use open source development tools. Since I was (eventually) successful in all of these goals, I thought that I should write up a few notes about it.
[UPDATE, January 2008. This article is mostly out of date. While this method does work, things have gotten much easier. See this post for an updated set of starting points. Amongst other things, the bug-fix hacks described in this article have been rolled into the current revisions of the AVR toolchain.]
I wish that I could say that programming a microcontroller is an easy, straightforward thing to do, but in my experience there’s always something to go wrong. In my case, several things went wrong, so perhaps it’s better to consider this a reference guide rather than a how-to guide.
Programming a microcontroller requires several things: The microcontroller itself must have power and a connection to the programmer, and there needs to be a software “tool chain” that takes the C code into machine code, prepares the binary objects, and downloads those binaries to the programmer. But, I’m getting ahead of myself. One thing at a time…
Where to begin…
I started out by looking at Leah Buechley’s set of instructions for programming the AVR on the mac. Her solution involved using a USB-serial connector and the Atmel AVR ISP serial programmer, which is apparently no longer available. The next best option initially appeared to be low-end serial programmers, like the the Olimex AVR-PG1, $12 from Sparkfun electronics. However, it turns out that that particular programmer does not work with USB to serial converters, and it’s been a long, long time since I had a computer with a “real” serial port.
After a little more searching, I found that Atmel had replaced their low end serial programmer, the AVR ISP, with a true USB programmer, the AVR ISP MkII , which is available for $34 from Digi-key (part no. ATAVRISP2-ND). This turns out to be an excellent solution for a number of reasons. It’s a great design: it’s simple, tiny, and comes in a tough, professional looking box. (It’s ‘E’ in the Thanksgiving
photo.)
Using the low-cost programmer made by Atmel ensures that a very large number of other people are using the same programmer as well, which means that there will be strong support for it from the open-source community. Finally, it turns out that “true” USB programmers are a little easier to configure for device programming (through avrdude) than serial programmers.
(If you’re a real open-source nut, you can get a kit (for a similar price) to build your own truly open source AVR-ISP-MkII-compatible programmer!)
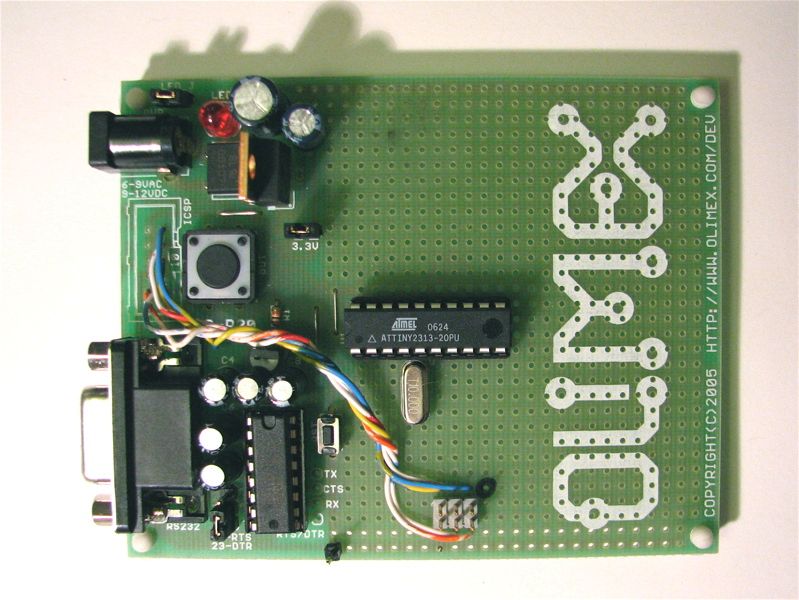
The next thing that I needed was a development board: a board to provide my microcontroller with power and the appropriate connections to the programmer. What I found was this 20-pin AVR development board by Olimex, for $16 from Sparkfun. After I had both the programmer and the development board, I thought that I might attempt to hook the two of them up together and program me some chips. However, it turns out that the the AVR ISP MkII, perversely, has a new type of 6-pin ISP (In System Programmable) connector that is incompatible with the 10-pin ISP connector on the breakout board. (Insert sound of me banging my head against the wall here.)
Fortunately, the six pins are a subset of those found on the ten-pin connector and it’s possible to make an adaptor. The mapping can be found on page five of this Atmel application note. In order to still be able to use the Olimex development board, I removed the original 10-pin ISP connctor, added a new six-pin header and ran wires from the six-pin header to the socket where the 10-pin connector had been. You can see a picture of the modified board up top. It turns out to work like a charm. At the bottom of the photo you can see the six-pin header that I added, and you can also see the bundle of wires going from that connector to the hole where the 10-pin connector was.
Software
For the most part, I followed these directions given by Leah Buechley, of the CU Craft Technology Group.
You can see other sets of instructions for compiling the AVR toolchain at the following addresses:
- http://www.anyma.ch/2006/research/avronmac/
- http://www.mip.sdu.dk/~frodi/macosx.html
- http://www.electric-clothing.com/tools.html
- http://www.macdevcenter.com/pub/a/mac/2005/01/21/embedded.html
Following Leah’s directions, everything seemed to work smoothly until I got to the part of actually trying to program the device, where I got the error code “avrdude was compiled without usb support.” Doh!
With a quick Google search, I found this page from the Arduino folks, who note that you need to have something called “libusb” installed for USB support. (figures.) You can get it here.
With libusb now installed, I went back to the avrdude directory and ran “sudo make uninstall” to clean out the old installation, and ran ./configure and sudo make install again. (If what I said doesn’t make sense, don’t worry– it will by the time that you follow Leah’s directions to this point!)
Next problem: Speed. When I first tried to communicate with the chip, the speed was unbearably slow– several minutes just to achieve contact. It turns out that the default programming speed of the AVRISP MkII is “lazy snail on barbituates.” Apparently this is a known problem, and there are two different causes. First, there can be a long delay– minutes– when first communicating with the device. Secondly, once it starts communicating, the speed is still unacceptable. I found two fixes for these problems that brought the speed right up to Damn Fast.
As I learned from this source, this can supposedly be fixed by manually programming the programming speed by communicating directly with the programmer. To get into interactive mode, enter at the terminal
avrdude -p t2313 -c avrispmkII -P usb -tuF
Once it (finally) enters interactive mode (mine took about five minutes), enter at the prompt “sck 10” and then “quit” to exit interactive mode.
To get rid of the initial delay, I found this great suggestion, which is to cut out the part of the code that was causing the amazingly long delay– which apparently can be done without causing any trouble.
Having done this, the entire compile and programming cycle takes about five seconds. Nice!
Now that I have everything up and running, it’s truly a great system. But, it was a bit of a hassle to make it work correctly the first time. So, here’s the quick recap of what I learned: The AVR ISP MkII is a great little programmer and I would strongly recommend it. Watch out for the two different types of AVR ISP connectors, 6 and 10 pin. You can follow the standard sets of recipes for compiling the AVR toolchain, but stop before you compile avrdude and (1) install libusb and (2) perform that little code hack that I mentioned earlier. Once those two parts are in place, you can safely compile avrdude, and get on with your microcontroller programming.