


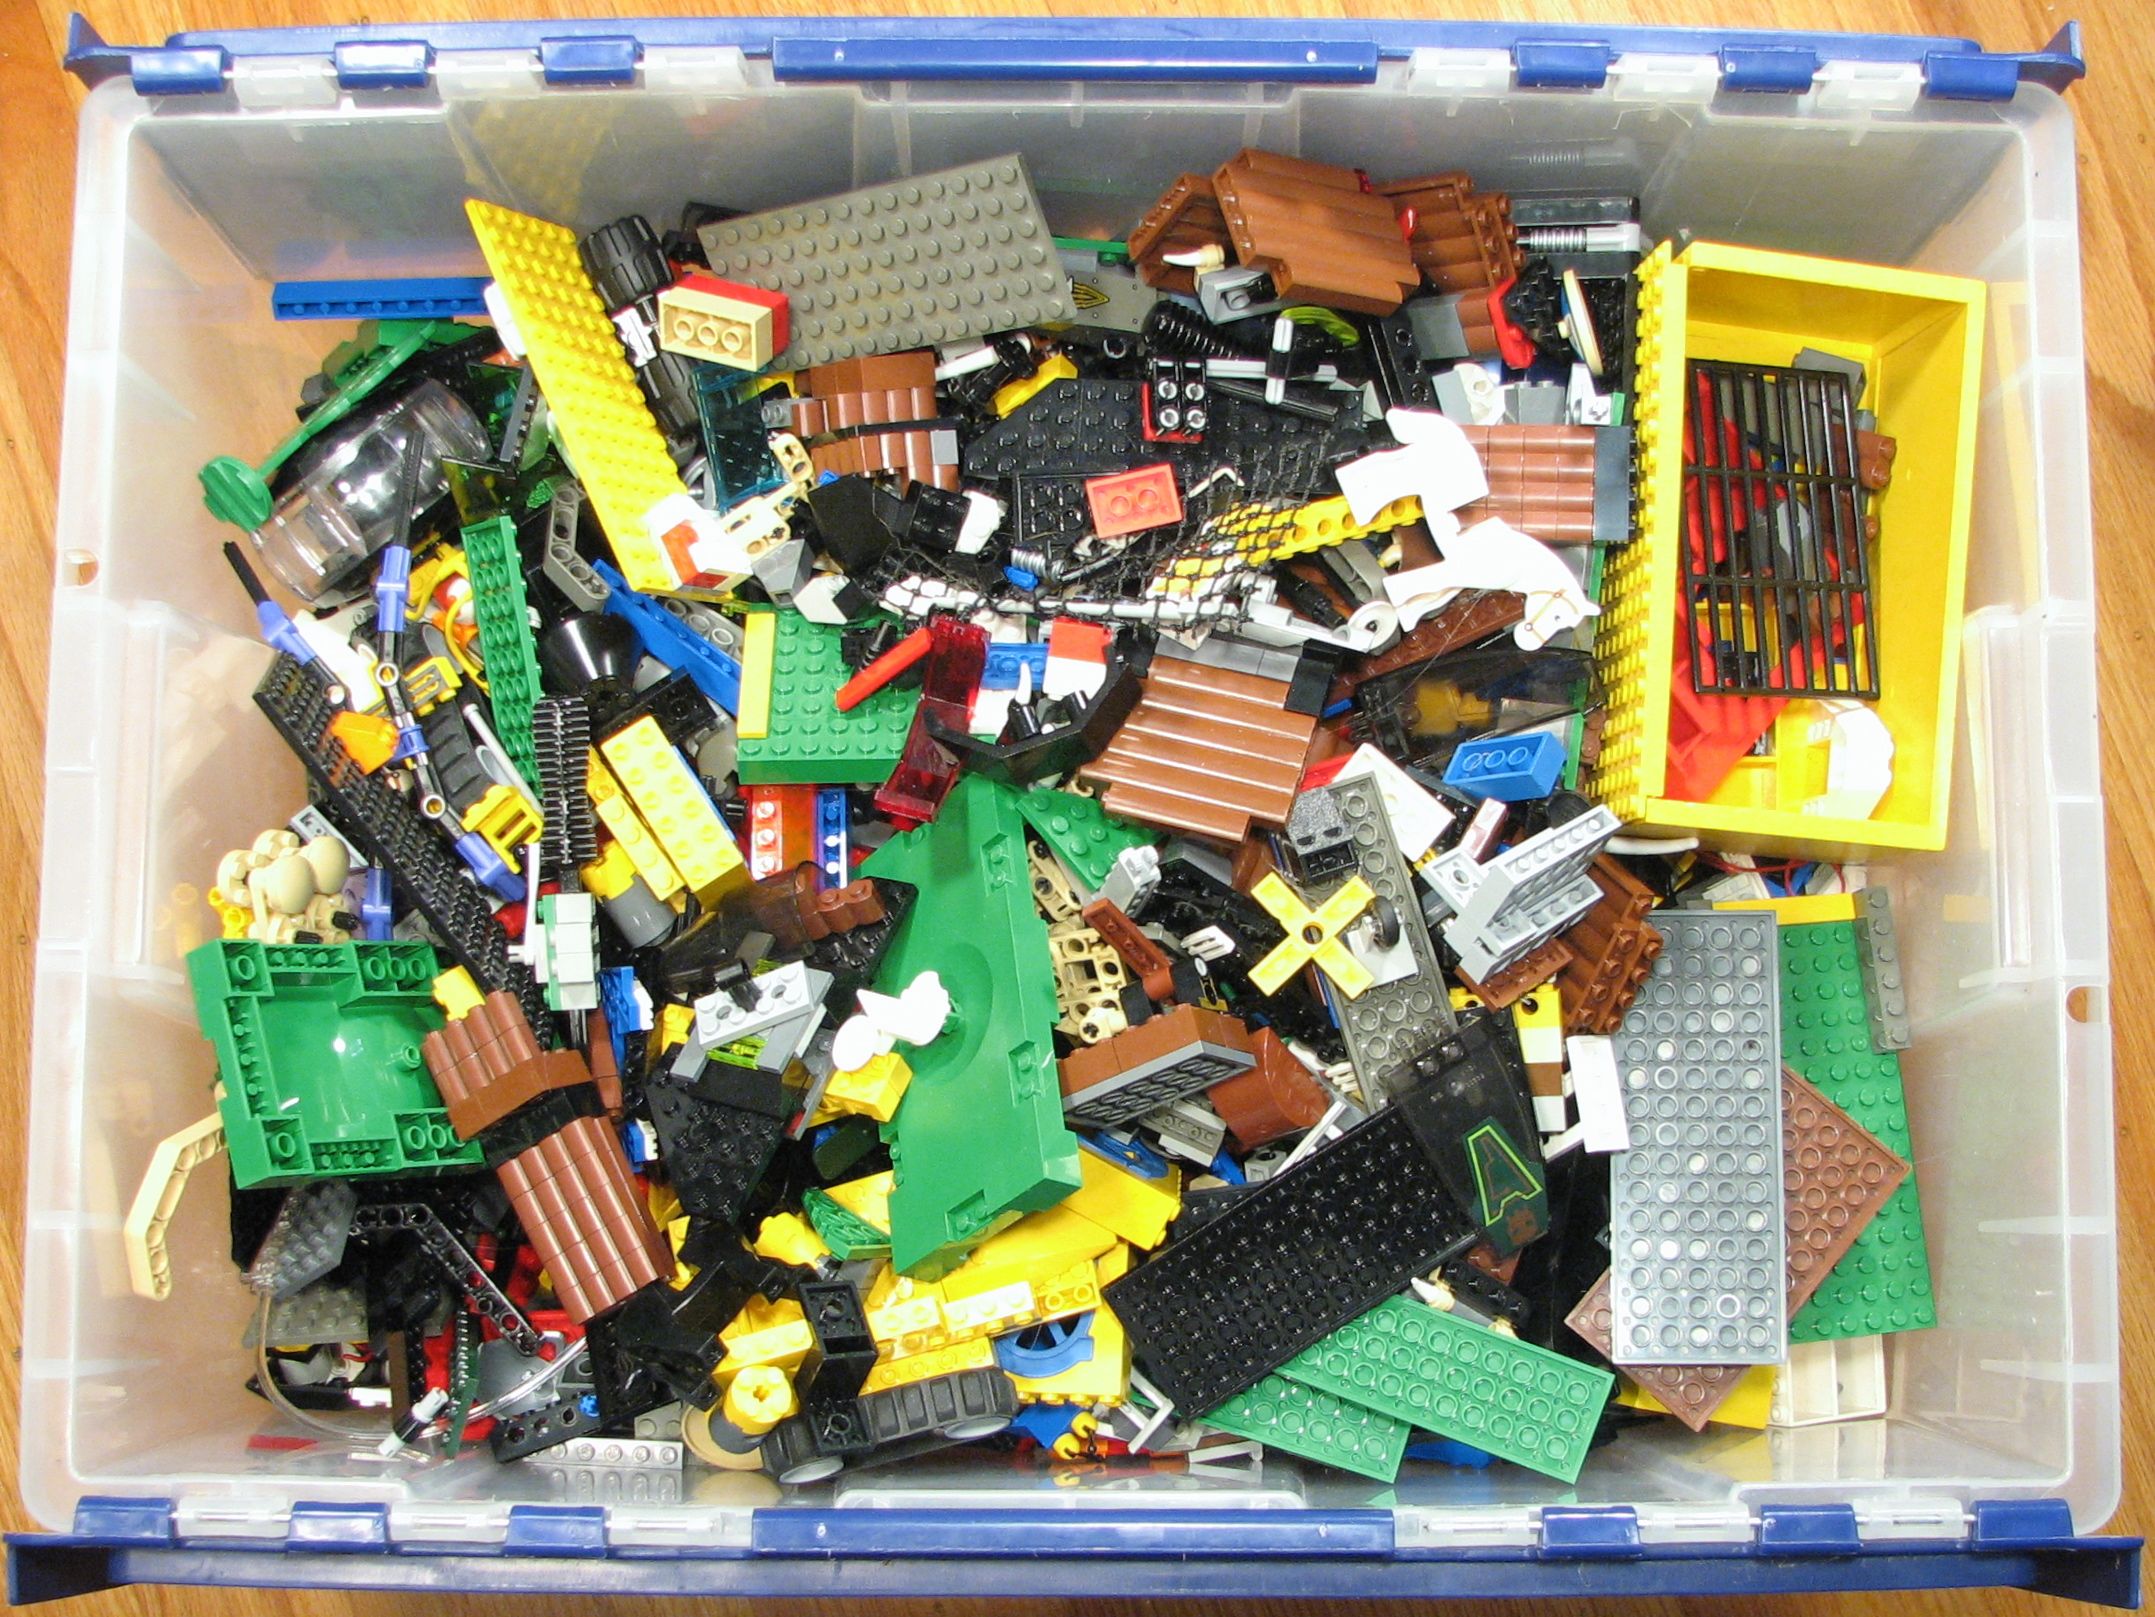
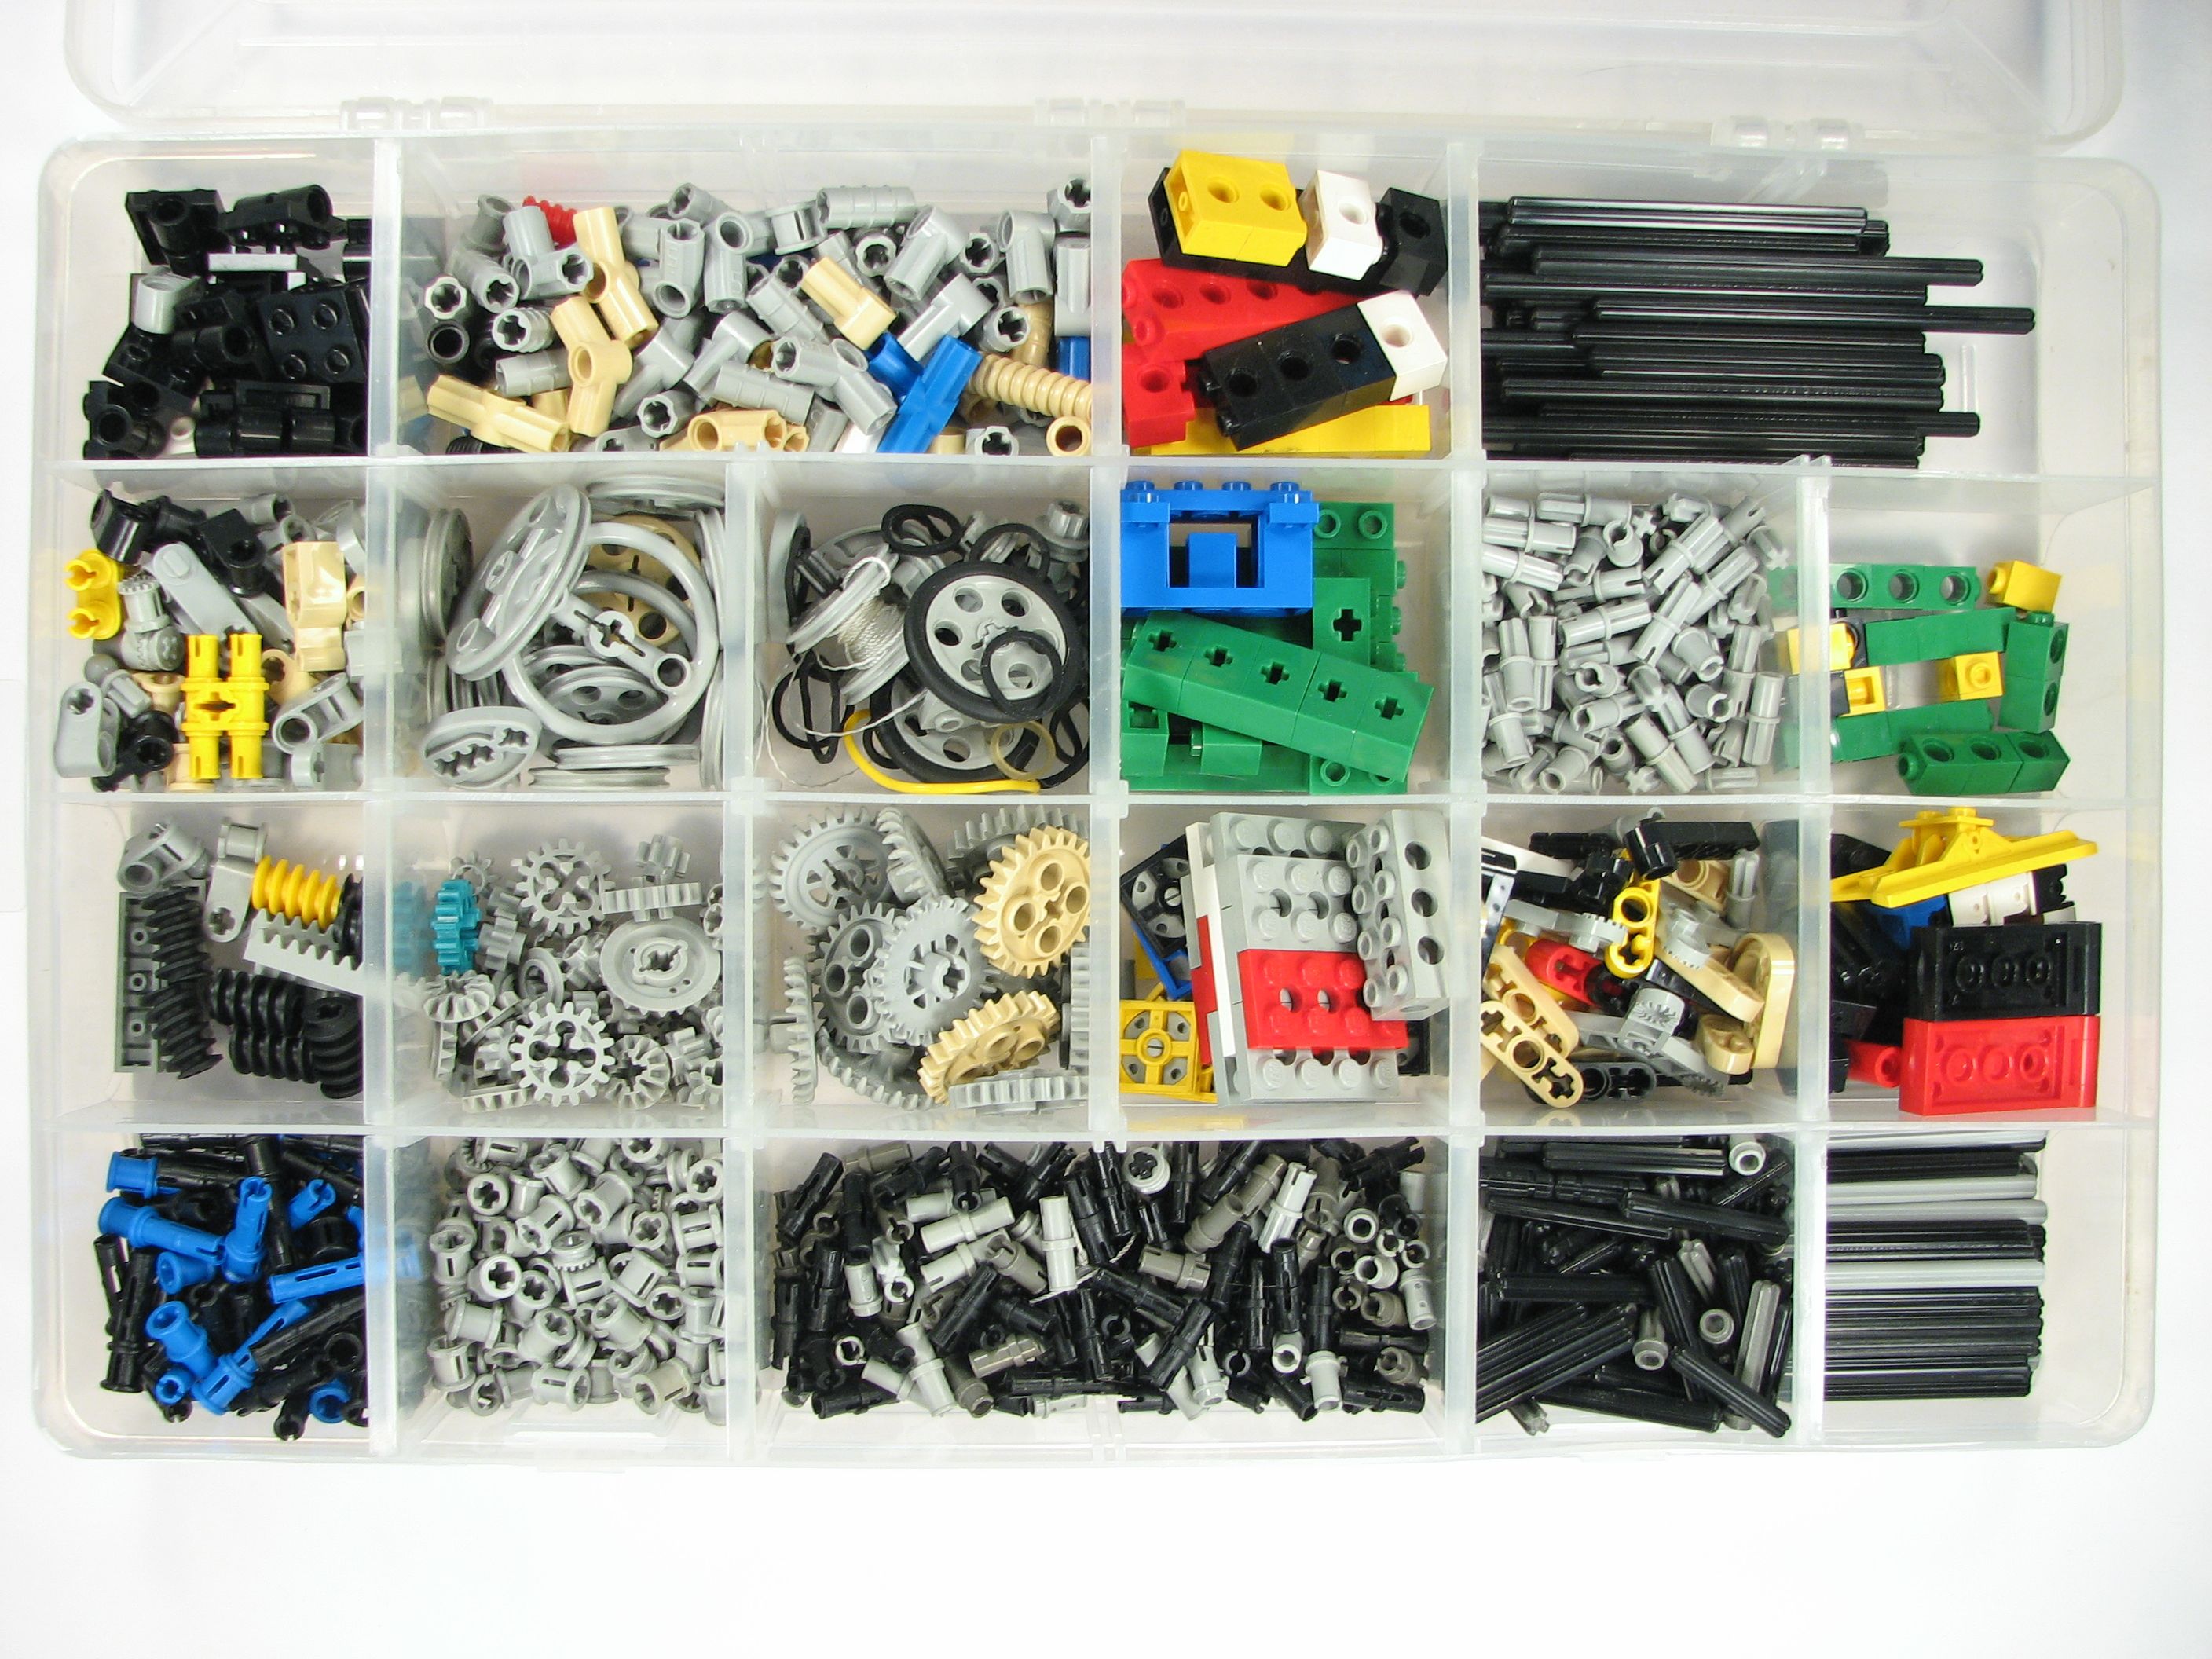
If you spend any time at all with Lego, then the sight above is probably a familiar one: a giant bin full of assorted Lego bricks and parts. As a kid, this was about the pinnacle of my organizational skills (hey, they’re in a box, right?) but I’m sure that in aggregate I wasted several years of my life pawing through boxes like this trying to find the next piece that I needed.
Twenty years later I have Lego again, but much less tolerance for digging through piles. So how can we make things better? In this article we show off some of the tricks that we use to keep our stacks organized, so that we can spend our Lego time building efficiently, not looking for bricks. (Warning: article is image heavy!)
So what’s the big idea? We need to be able to locate bricks of a given type easily. We need to be able to tell at a glance which colors, kinds, and quantities we have, and be able to separate them easily.
One obvious but not particularly good solution is to get a big set of drawers to store the bricks in. The chief problem with this is one of scalability: For a big collection, you need an awful lot of drawers, particularly for common large bricks. Secondly, the drawers are not fully mostly opaque, and you can spend a lot of time pulling out one drawer after another looking for what you need, even if they are well labeled. Larger drawers also suffer from the usual “pile” problem: Even in a medium-sized bin of sorted parts, it can be hard to tell how many are there in each color.
You could also consider sorting bricks into plastic bags, but this doesn’t really solve the fundamental organizational issue, because you’ve still got to find a way to file and display the plastic bags.
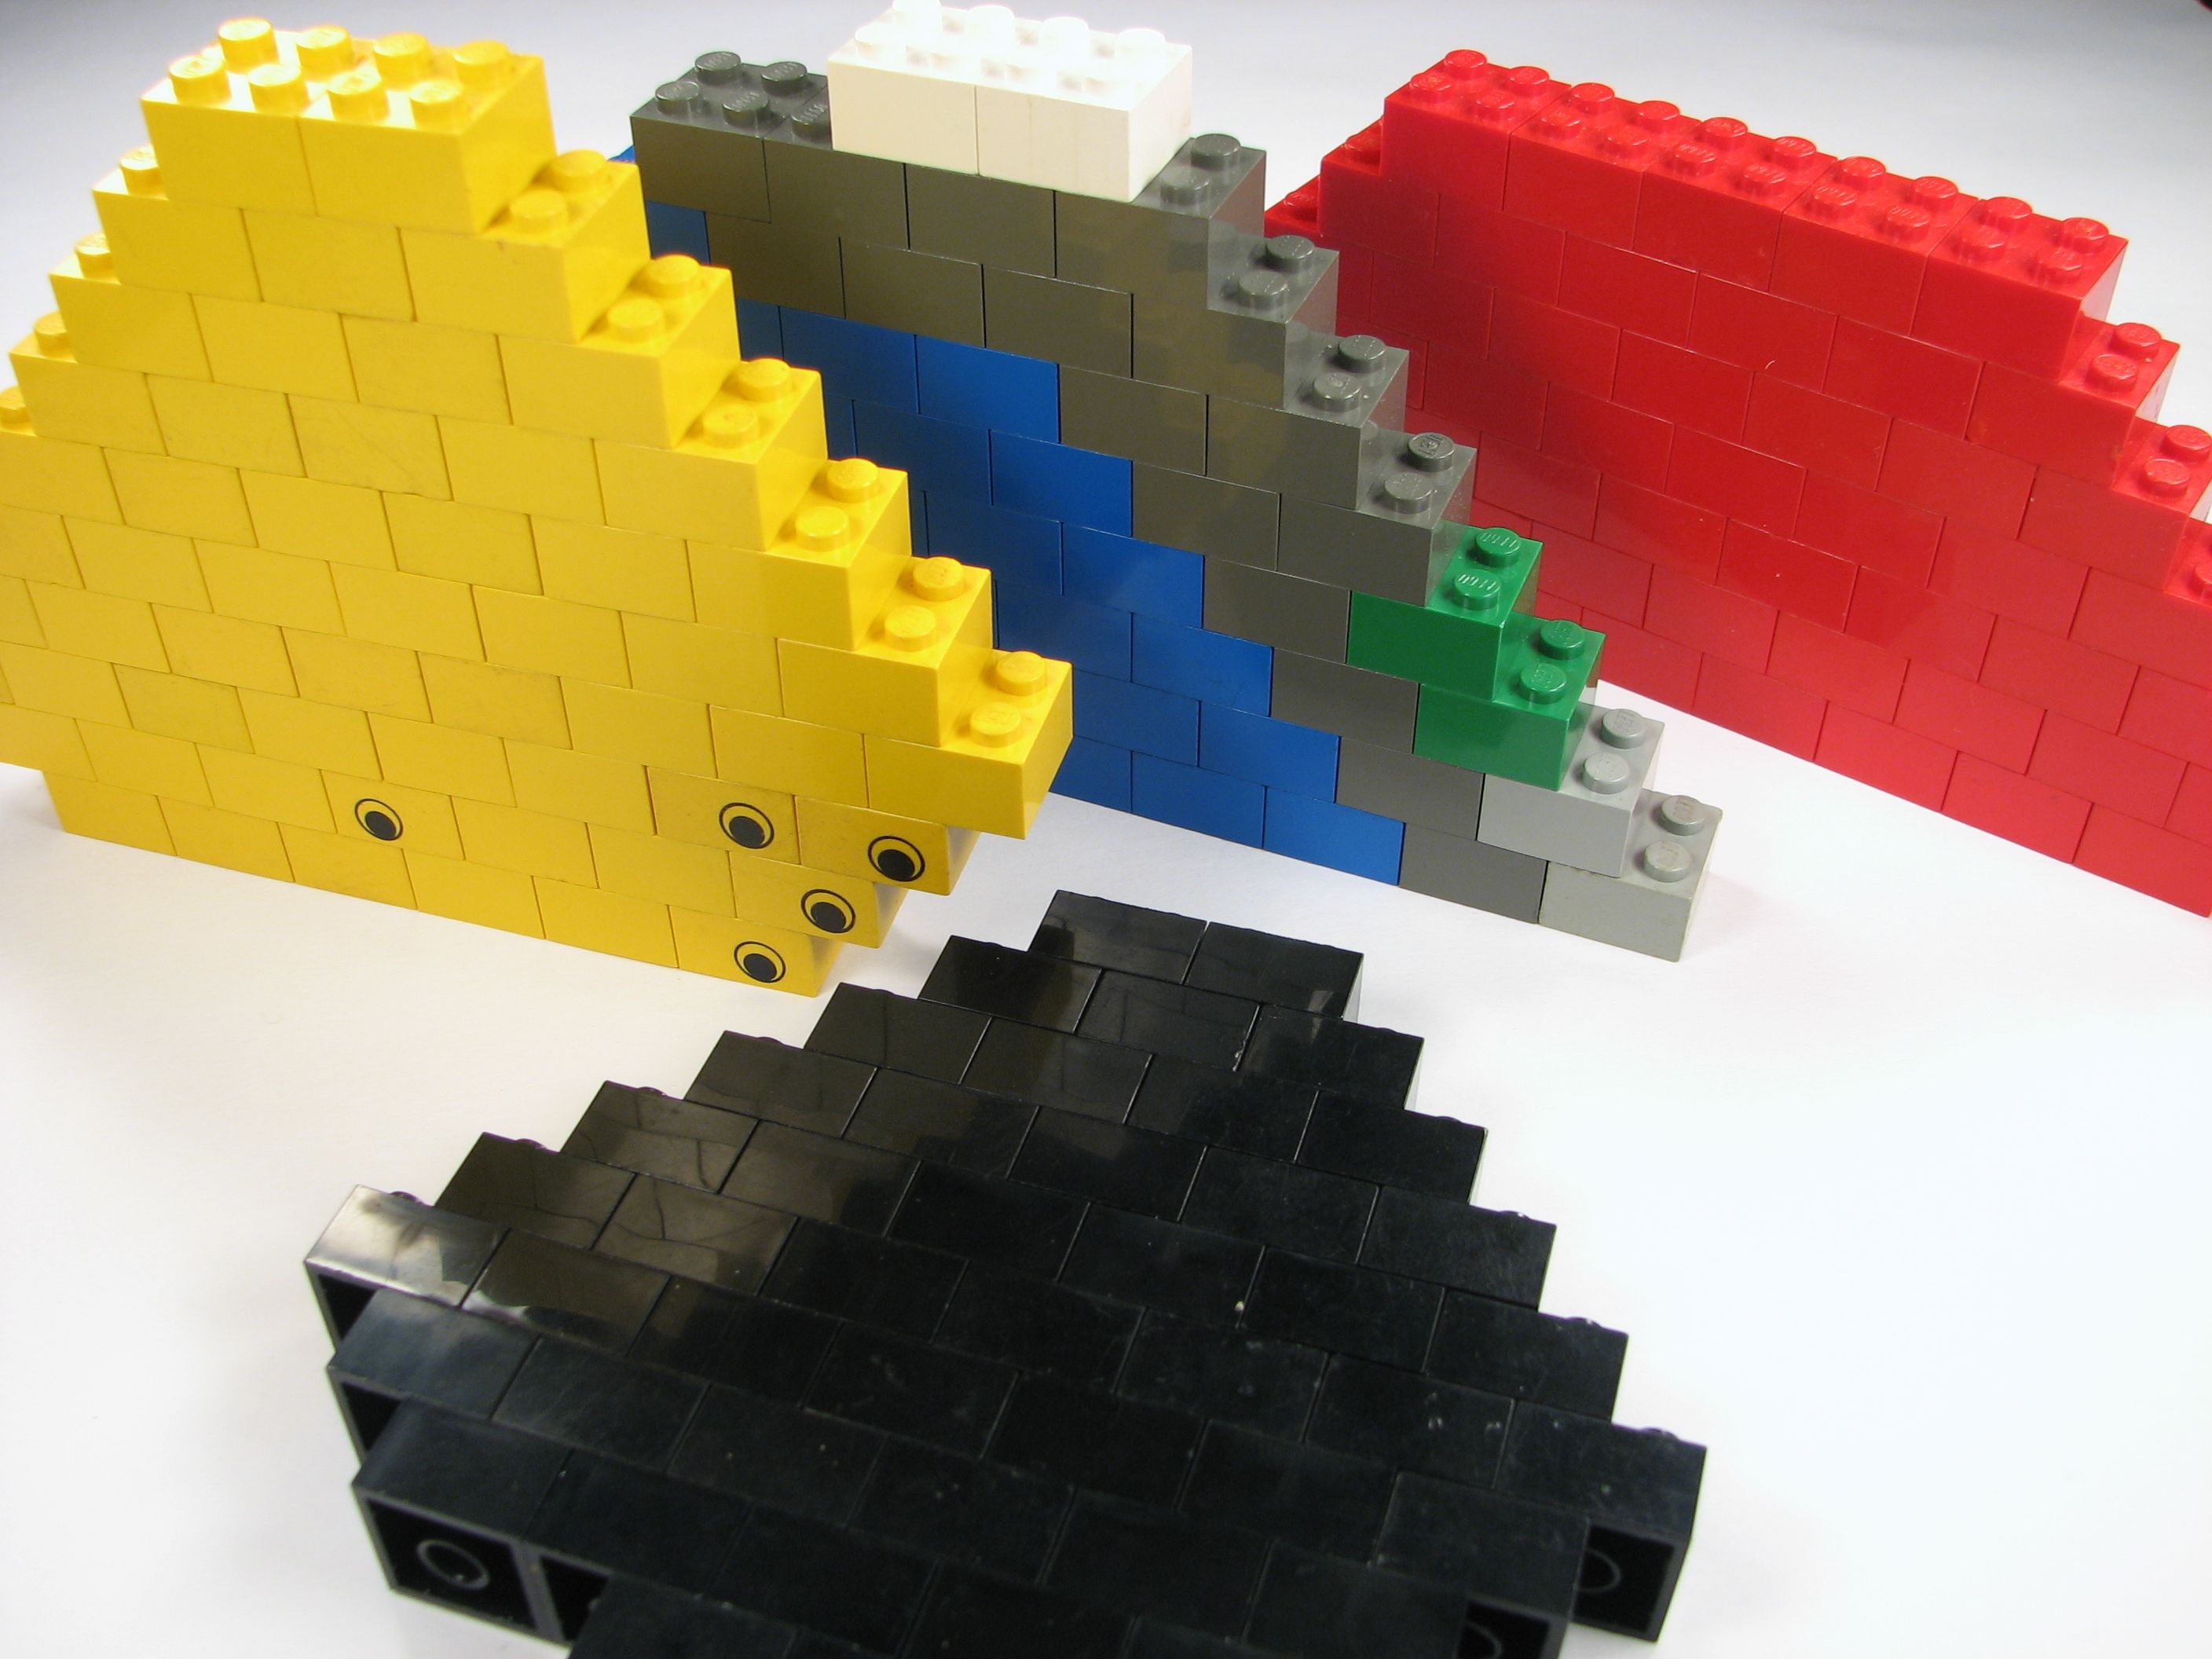
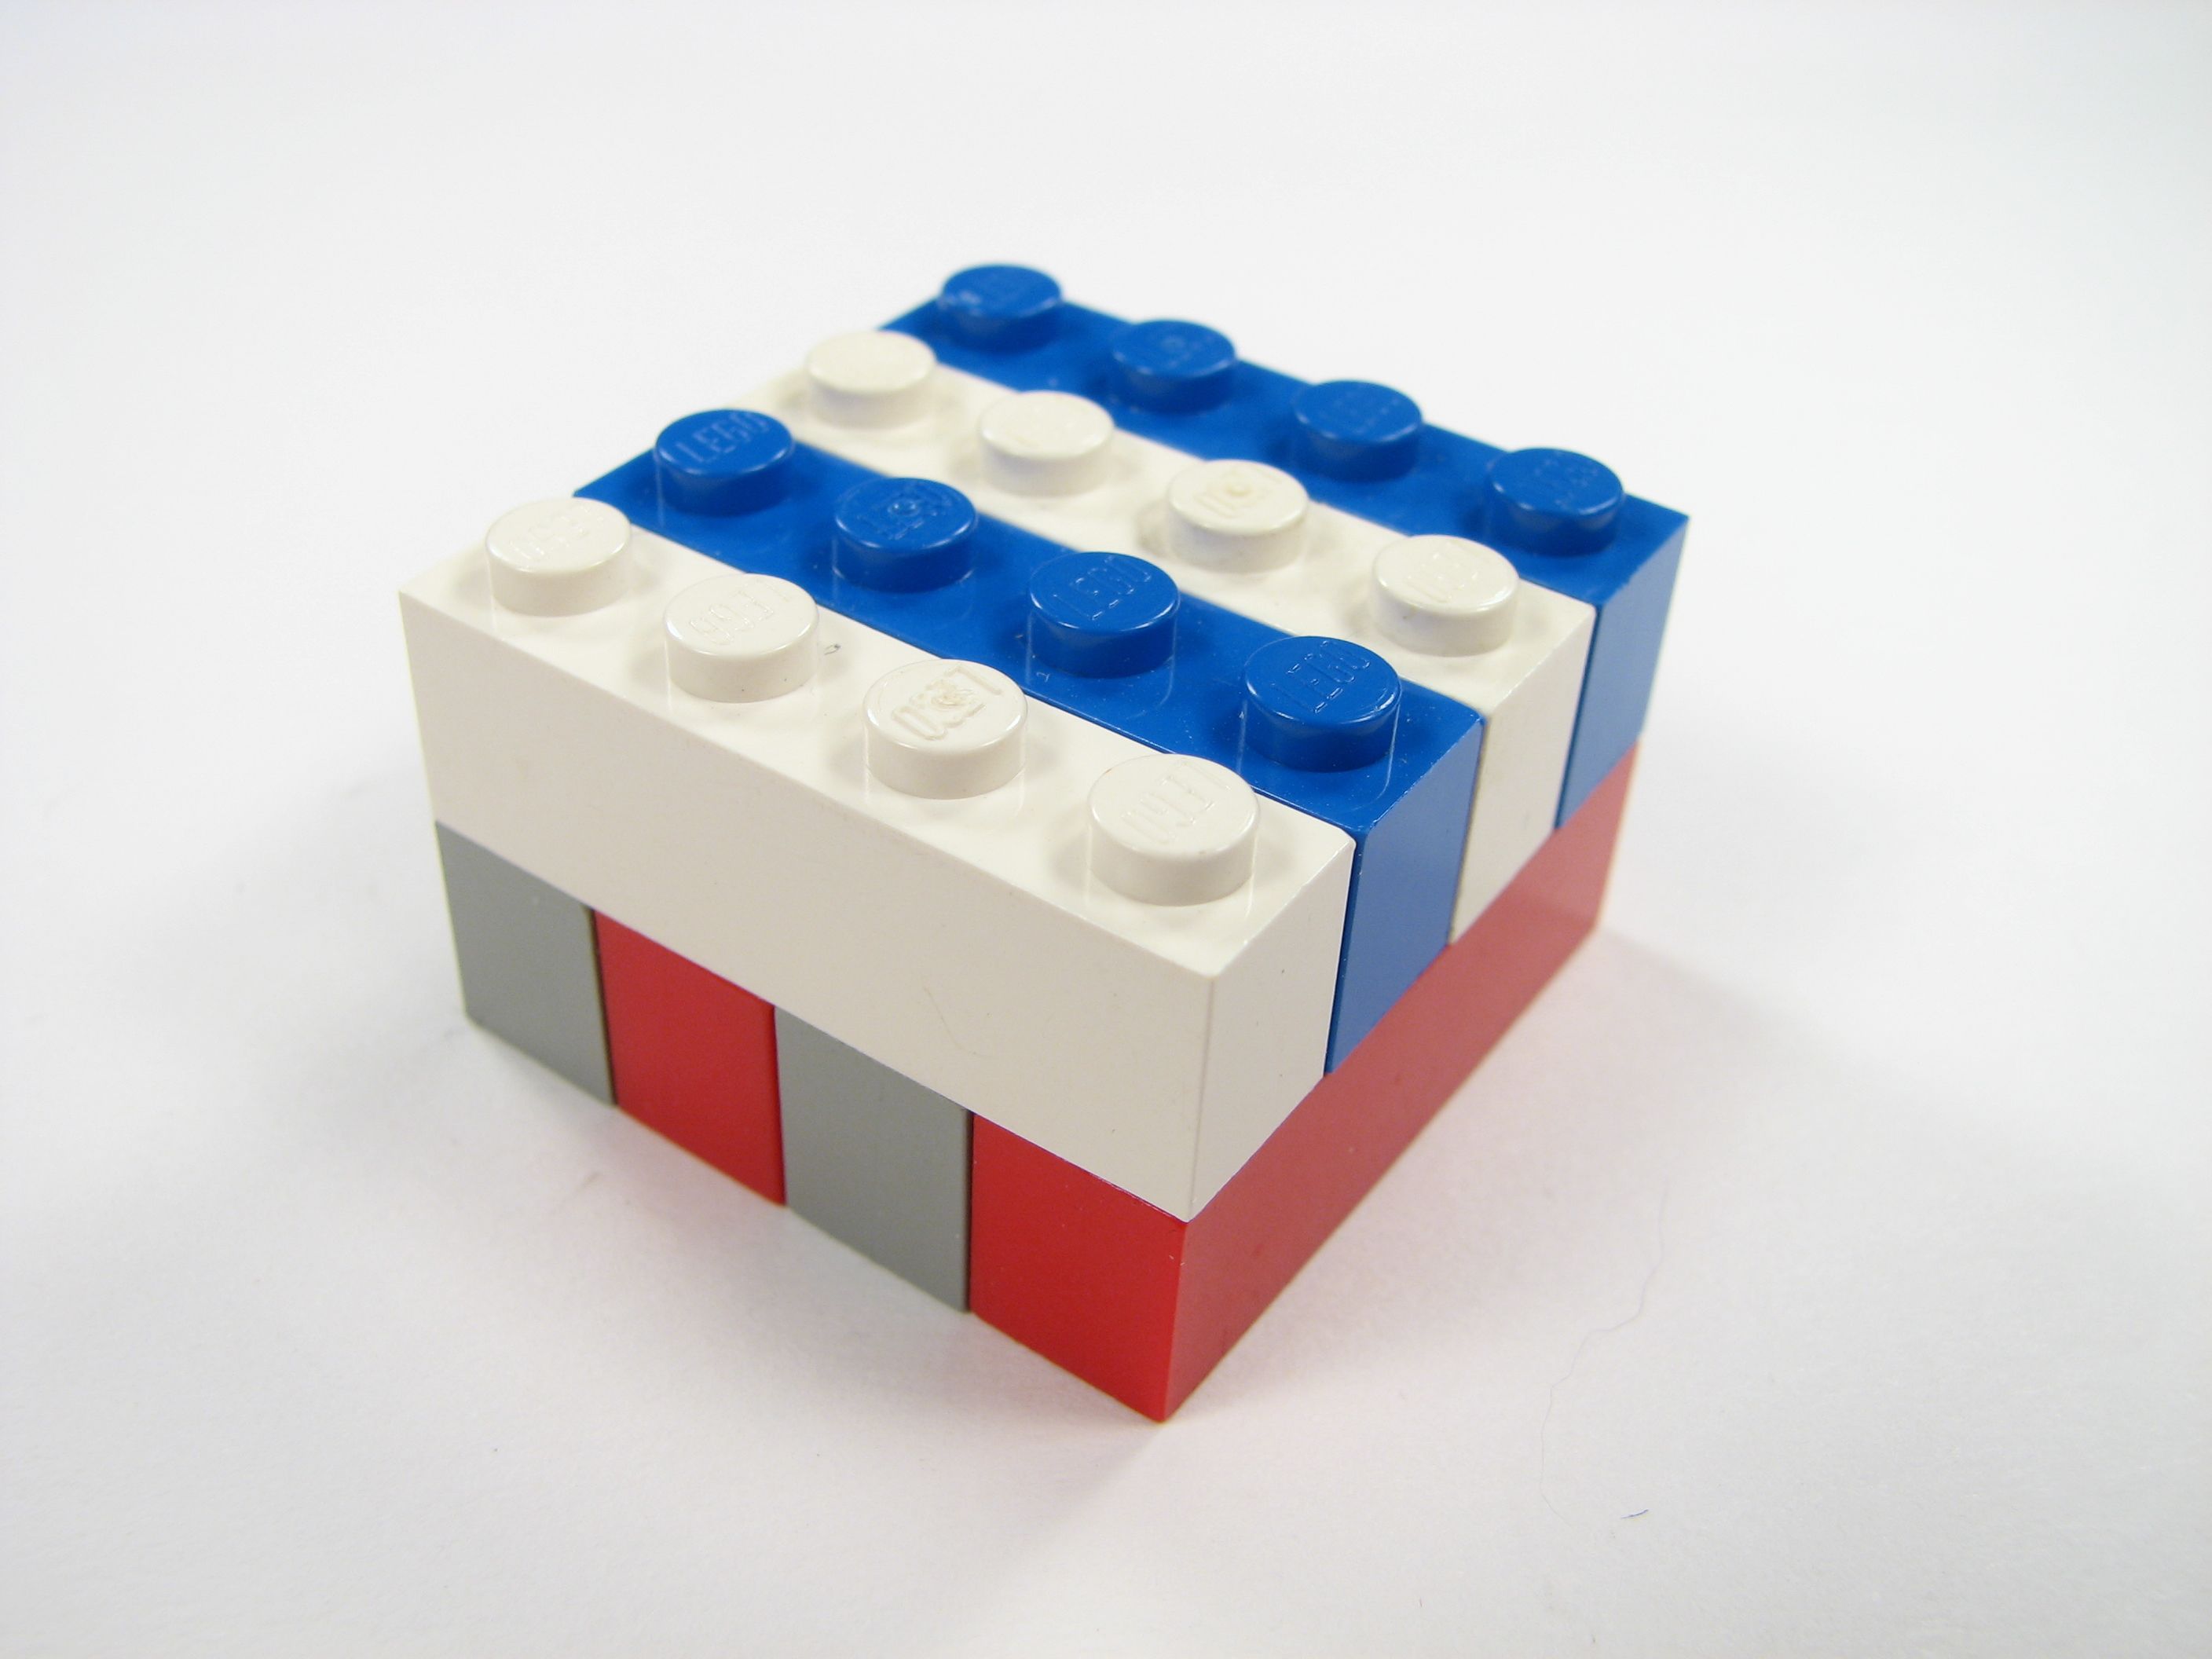
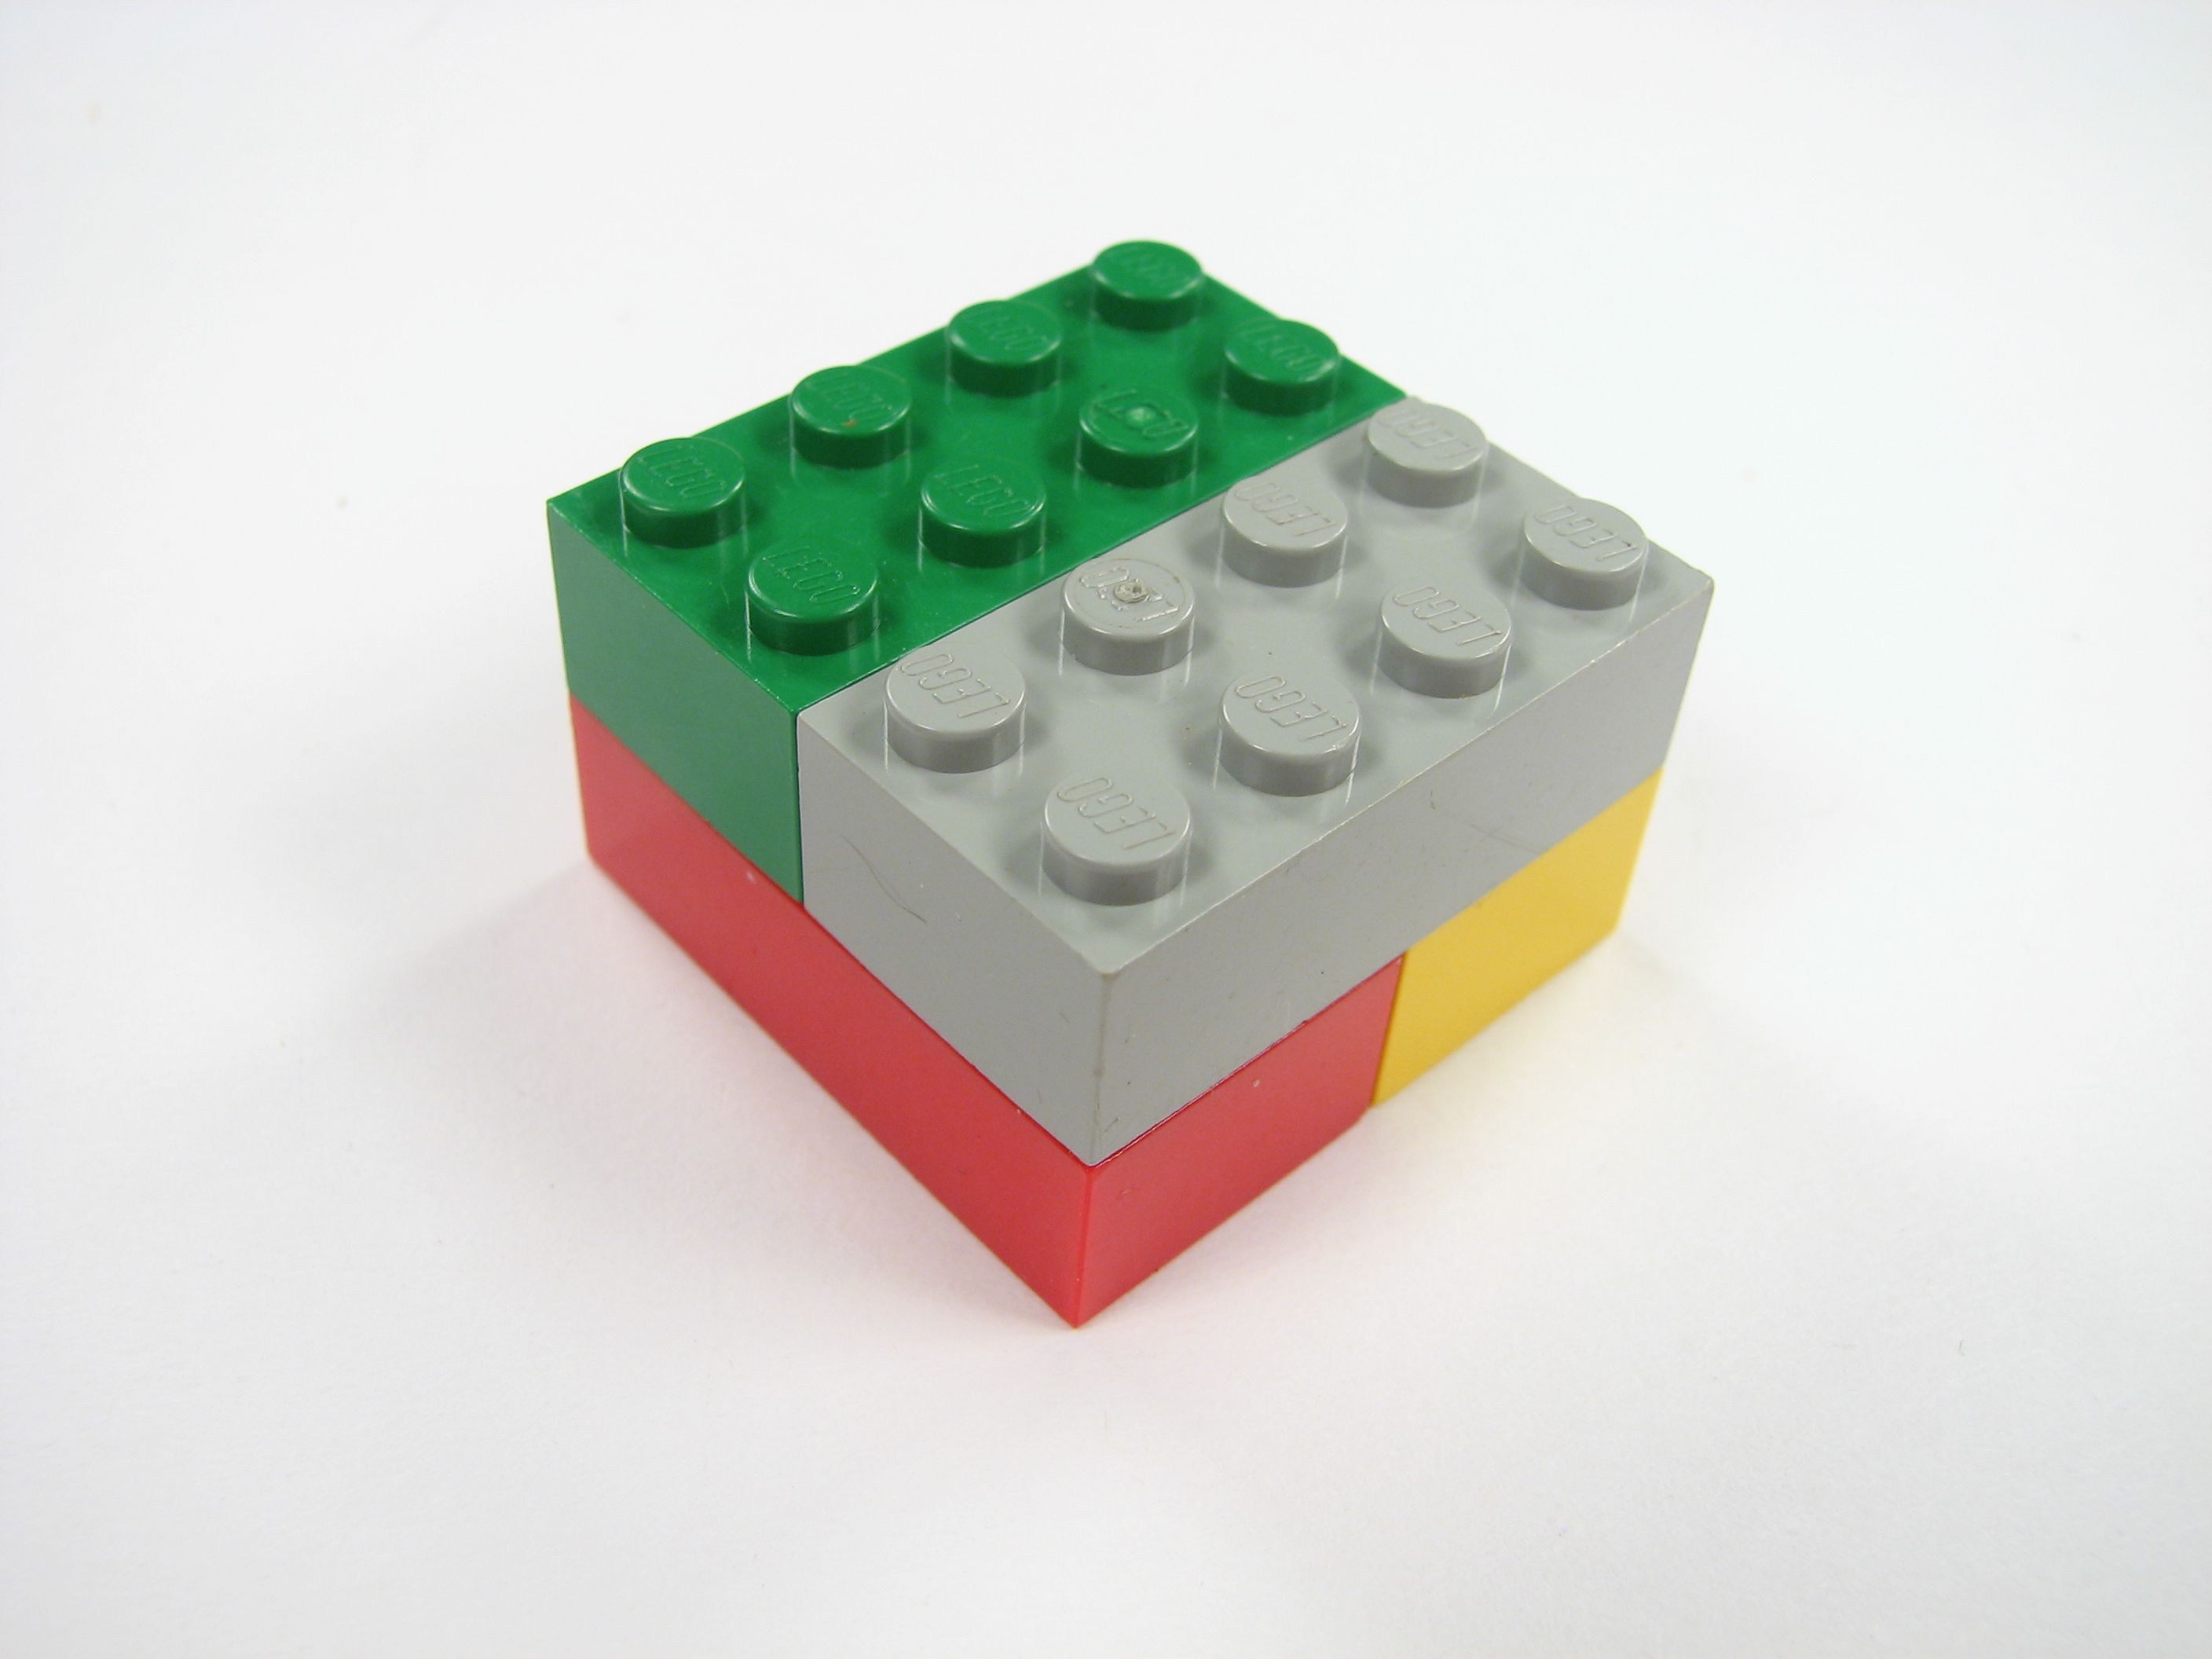
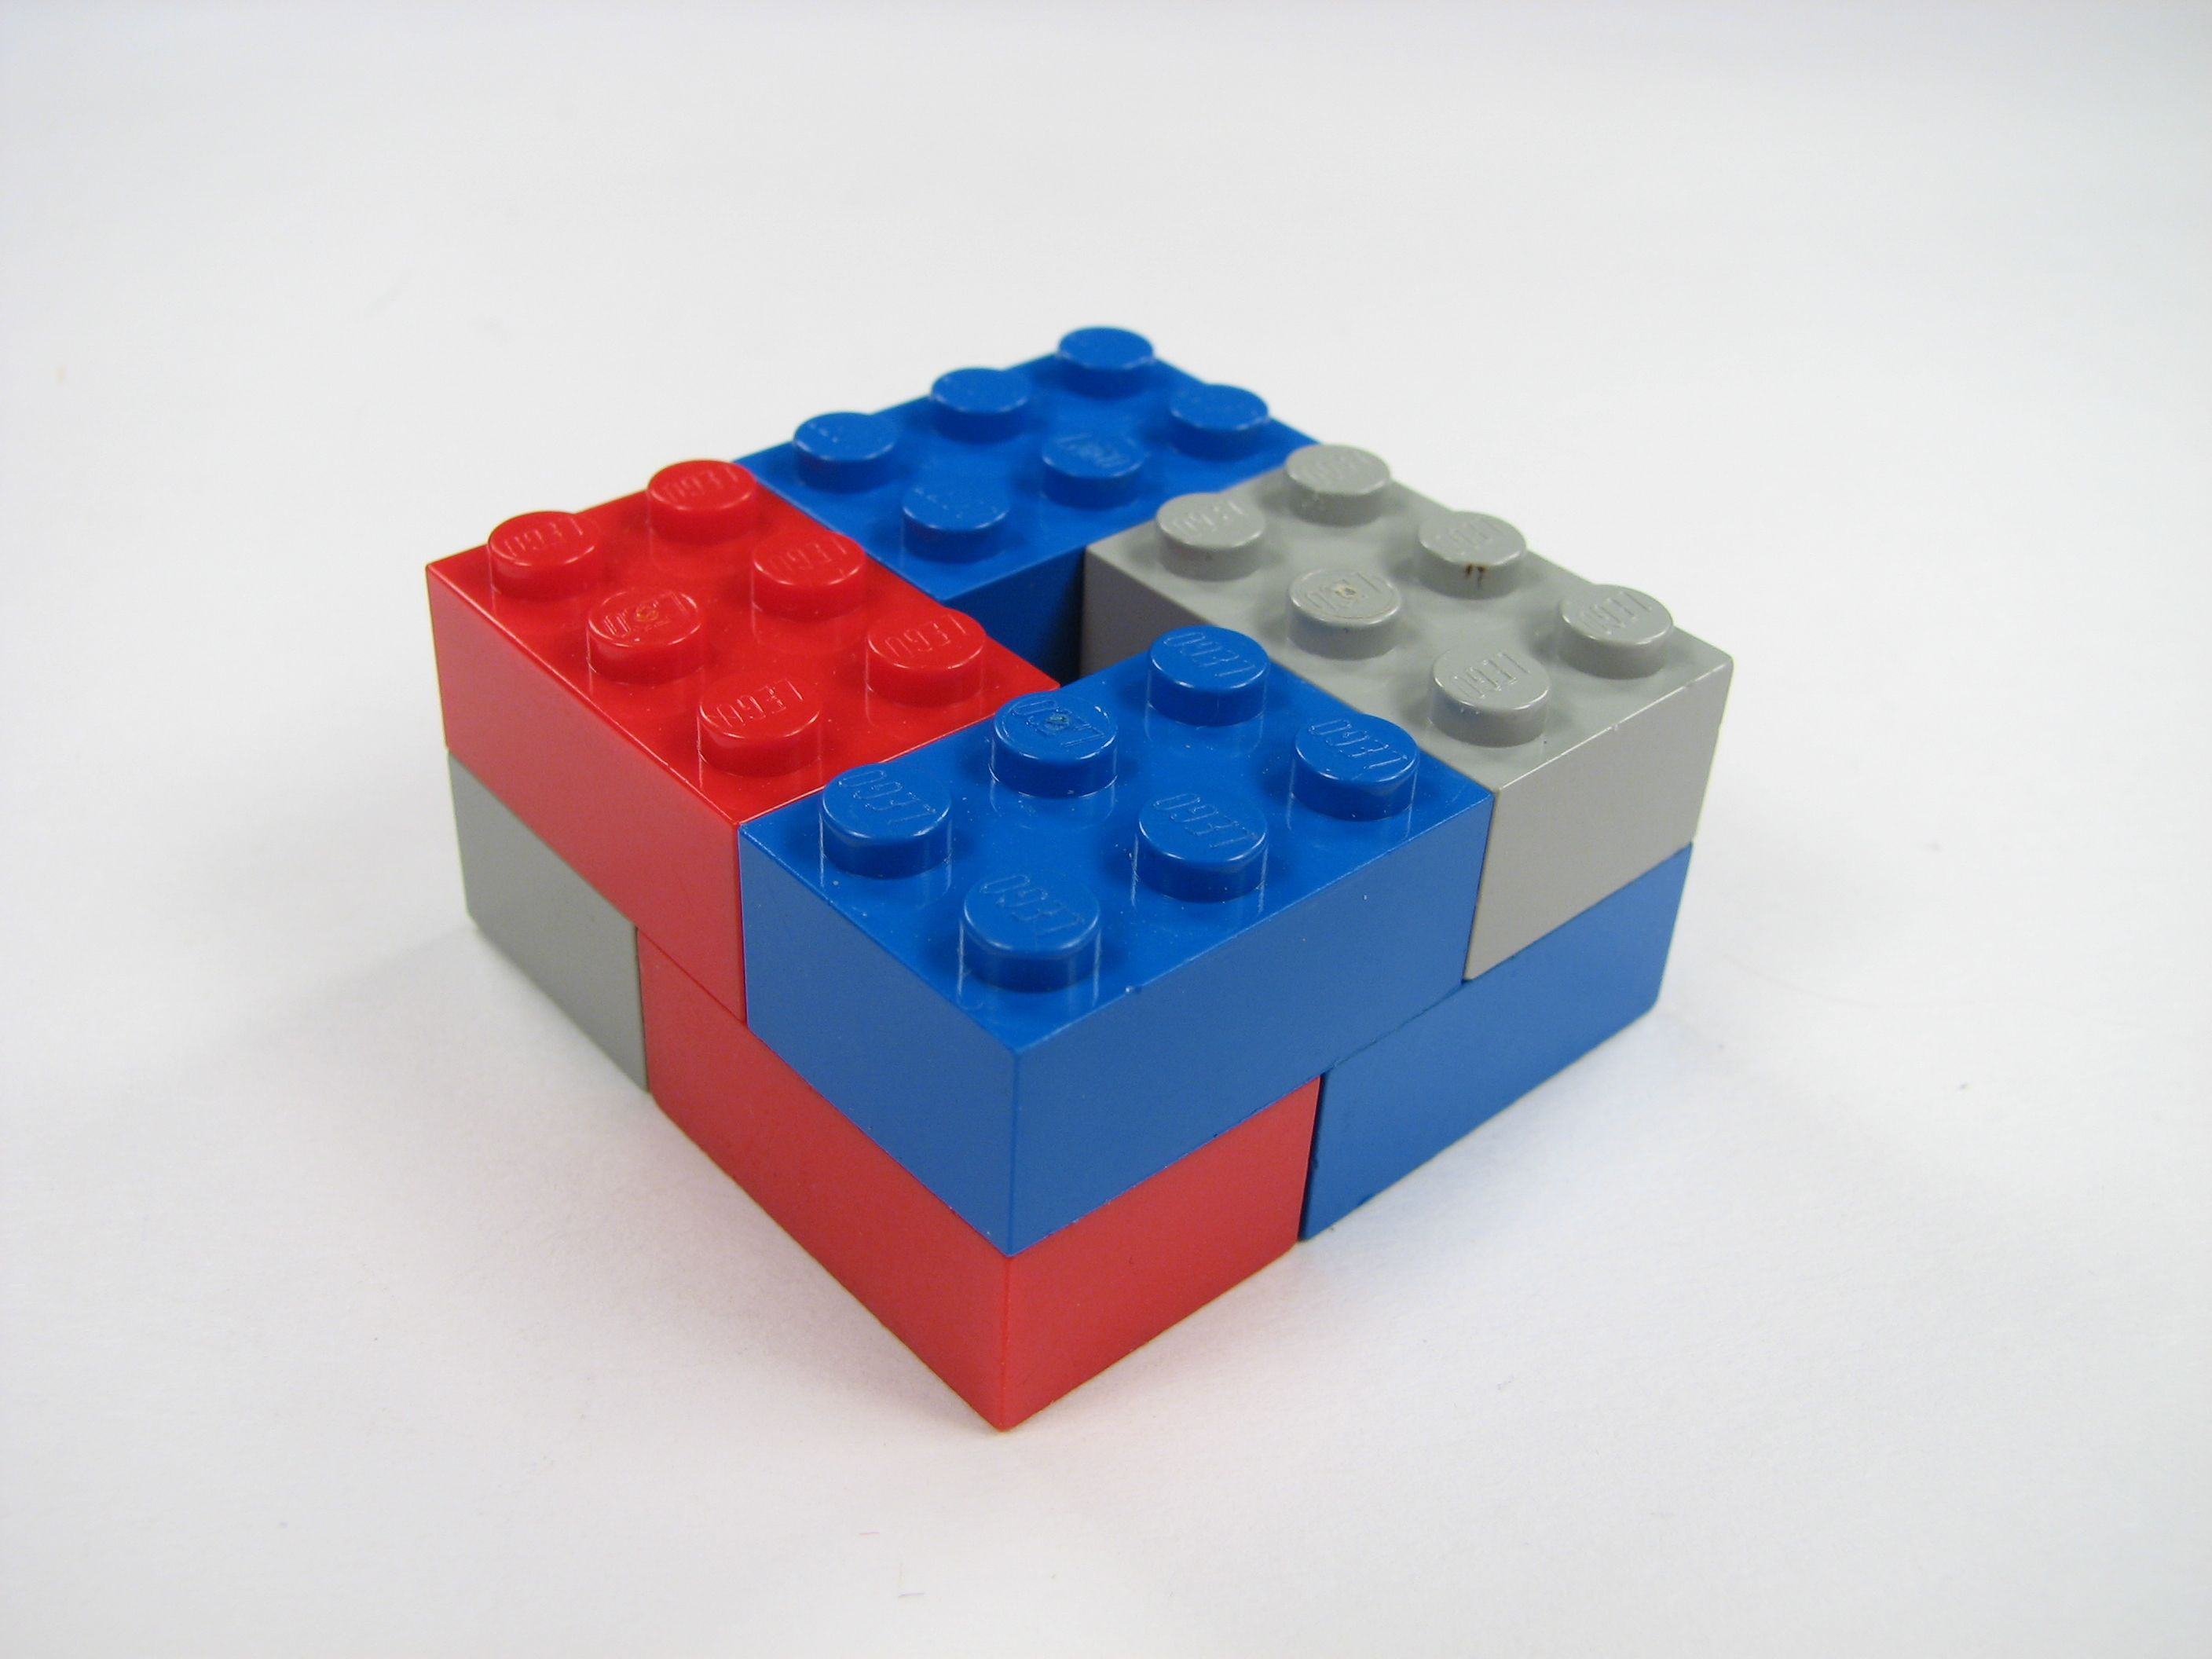
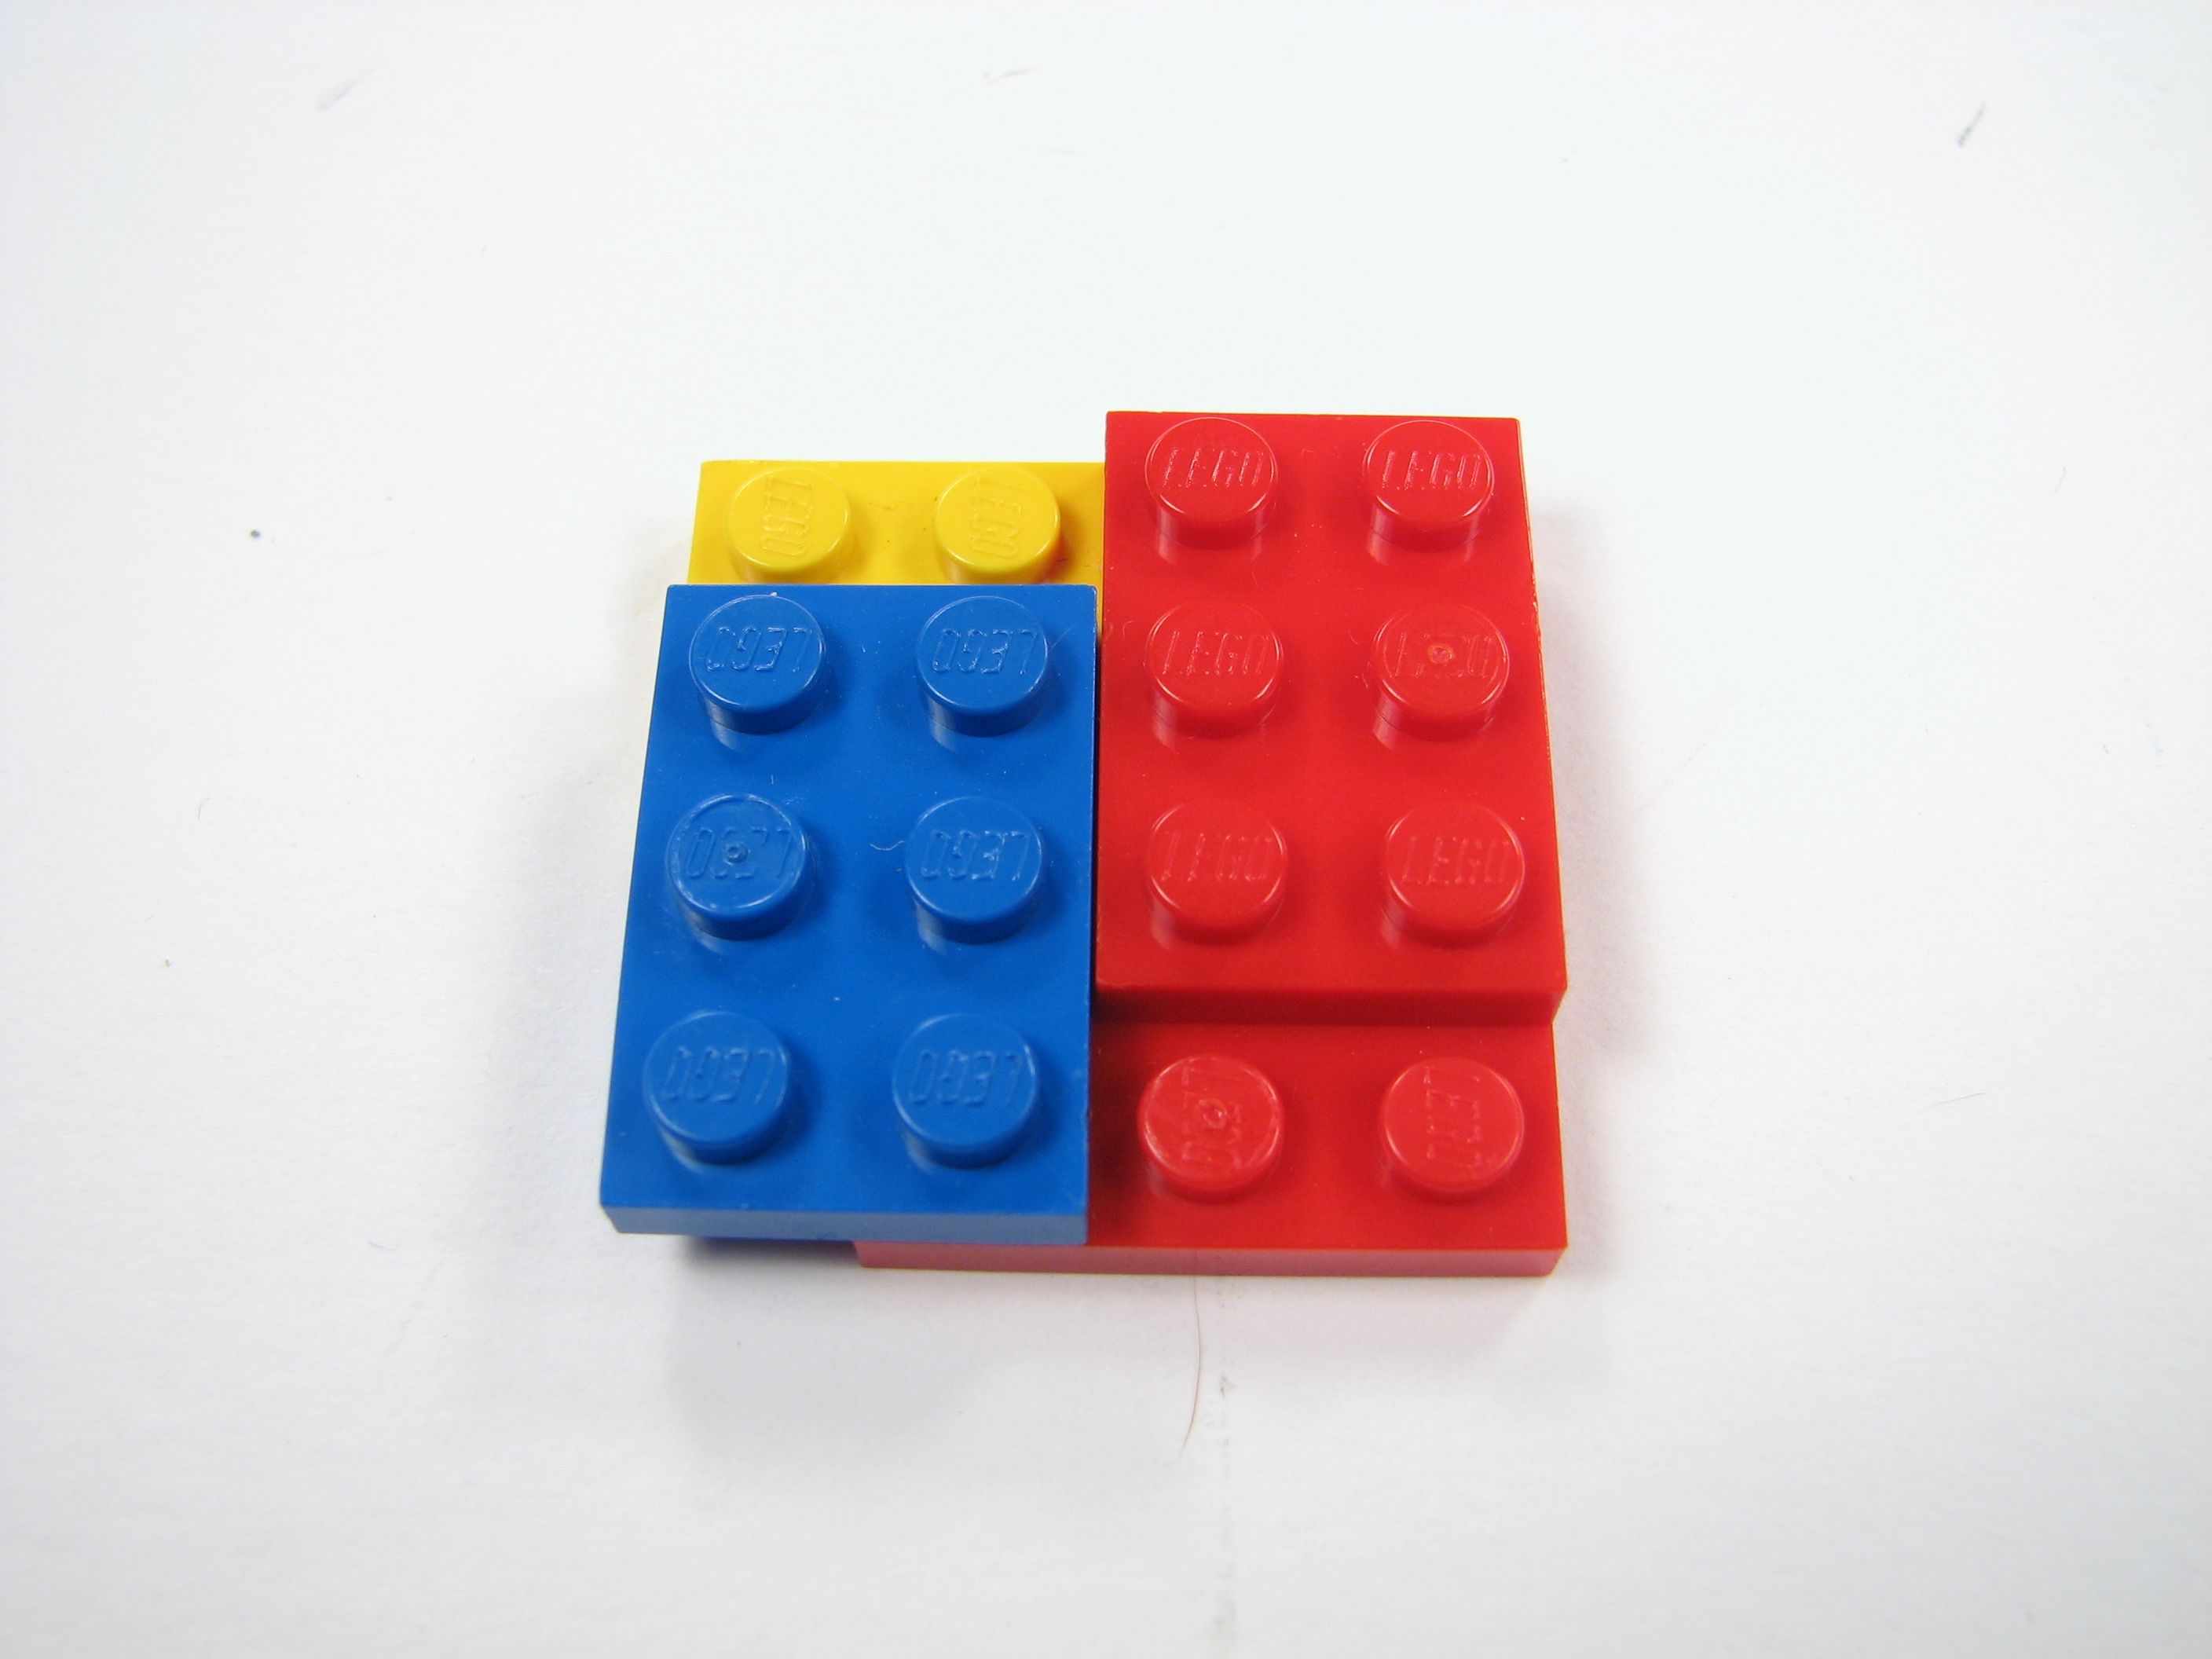
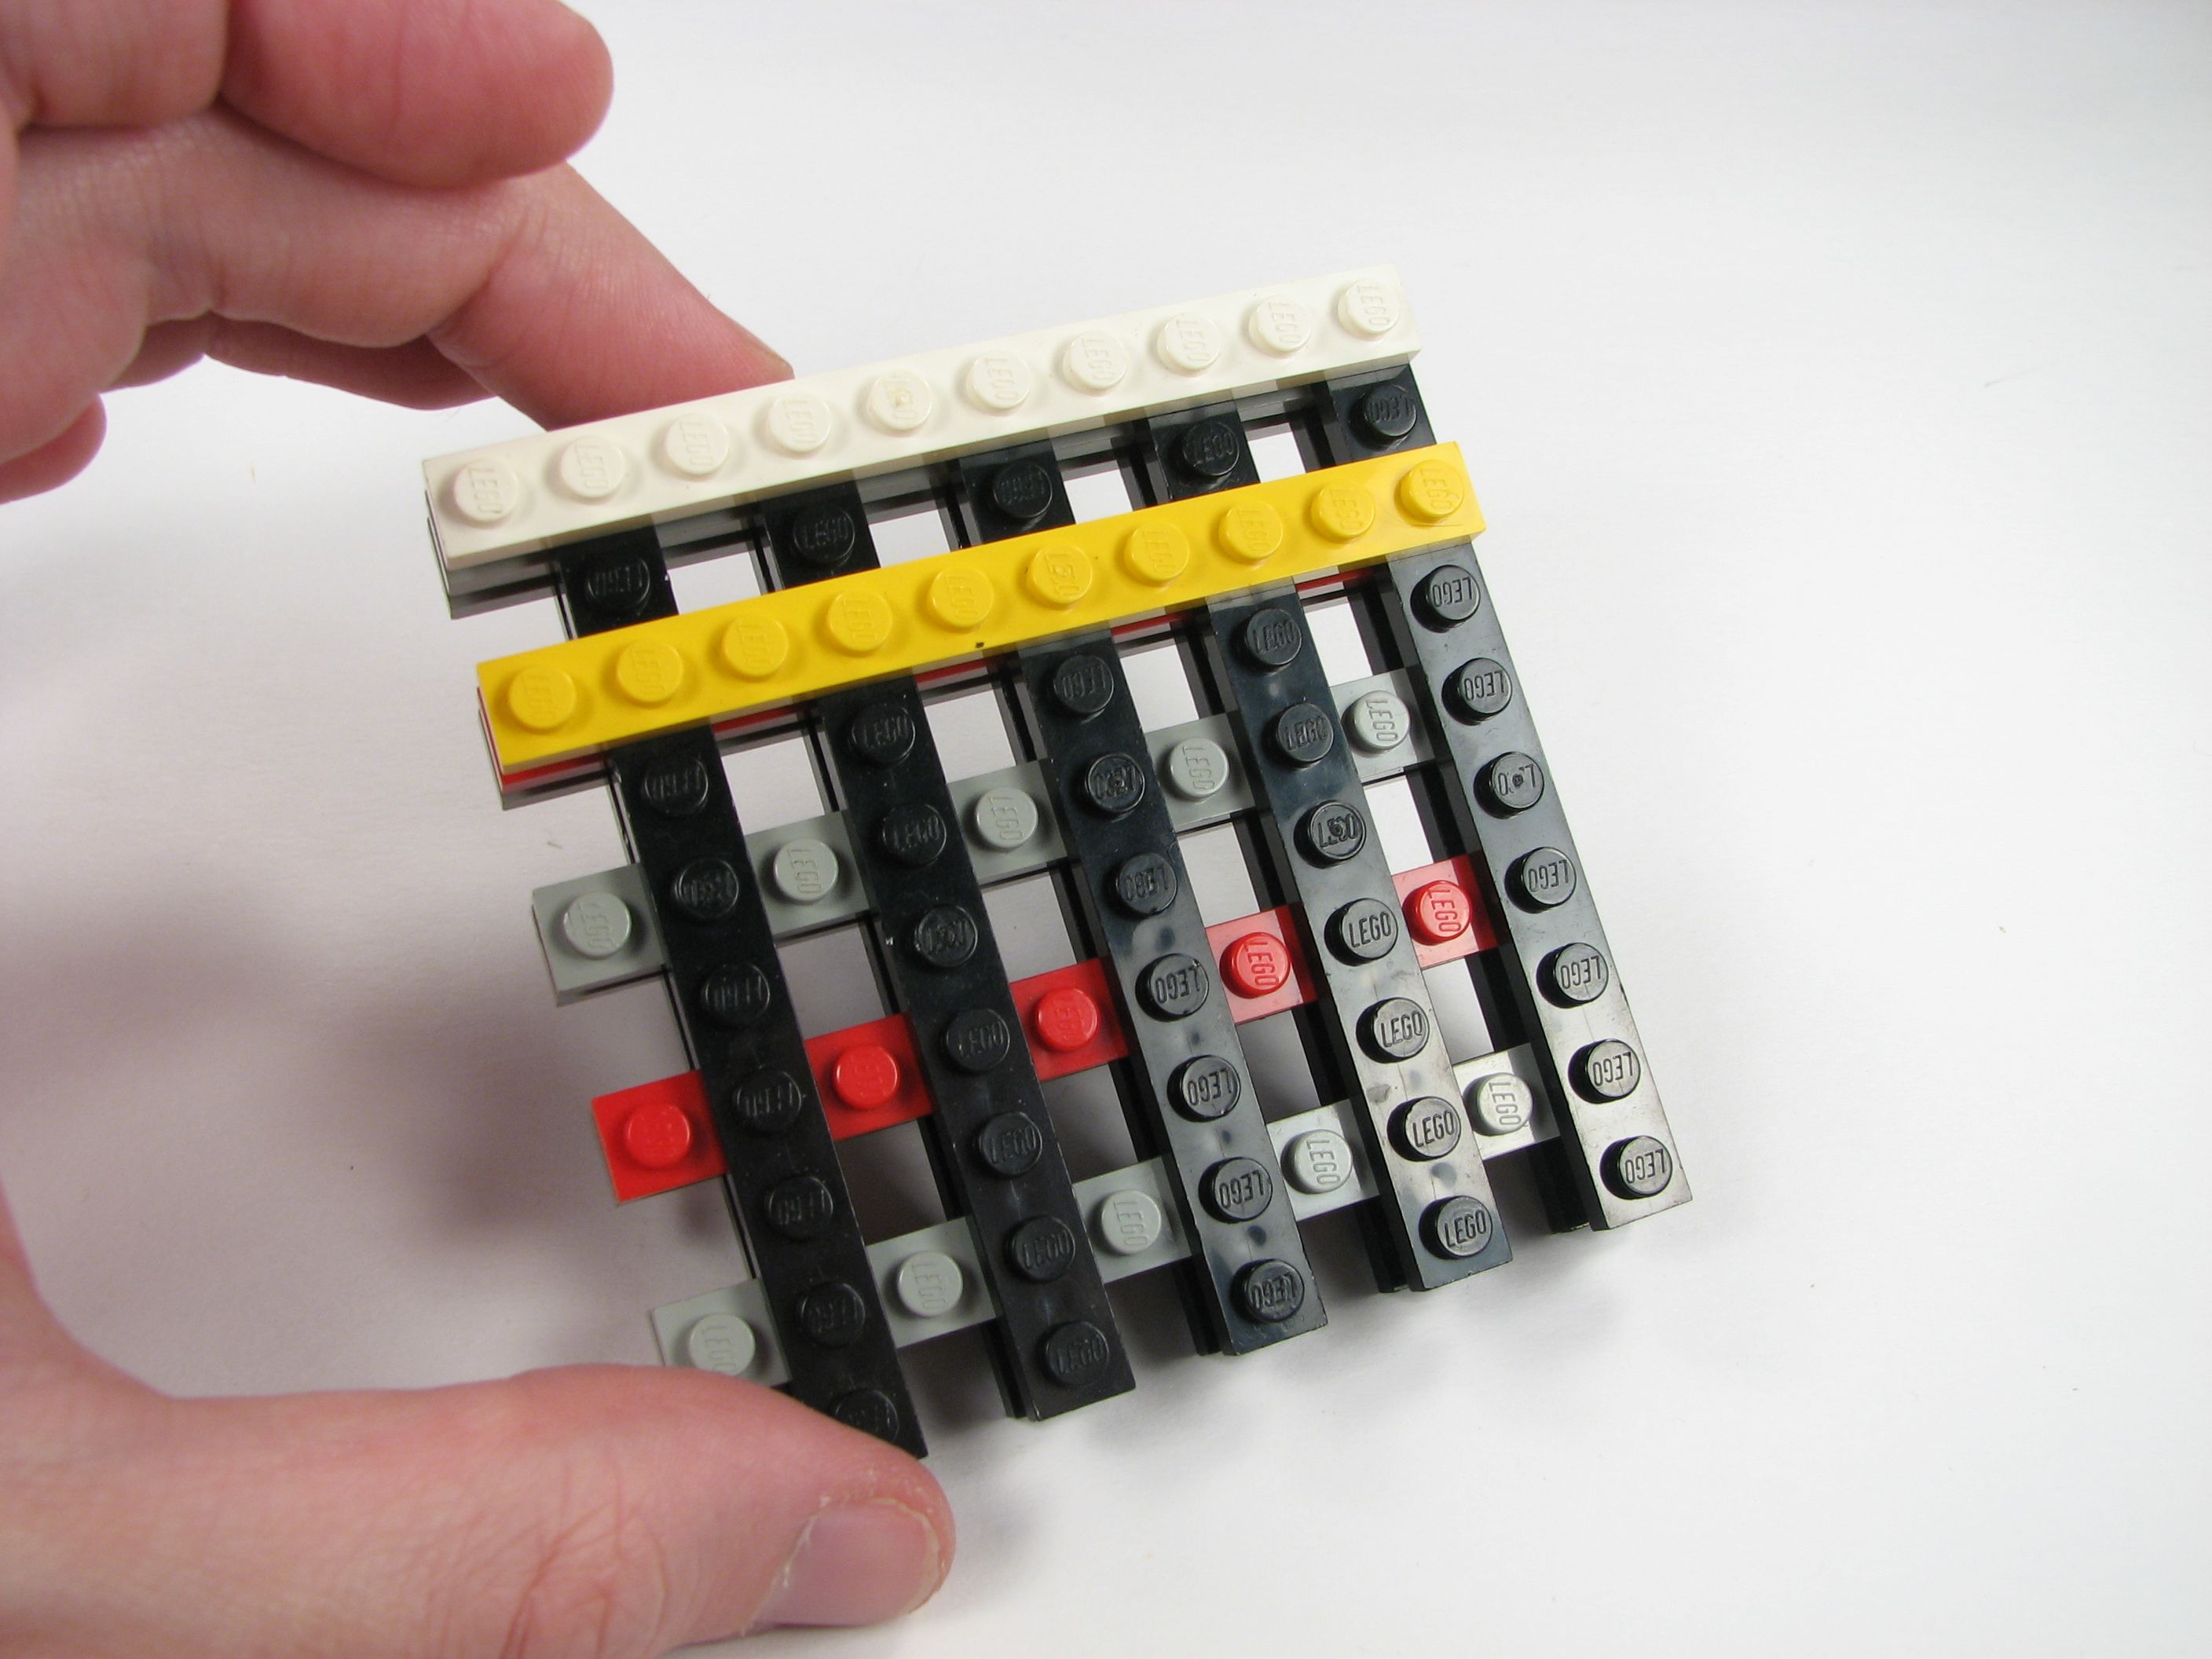
A solution that we like better is to simply stack bricks of like kind together, forming large neat structures that are easy to pick out of a large bin. However this has to be executed with some care. Consider the following picture:
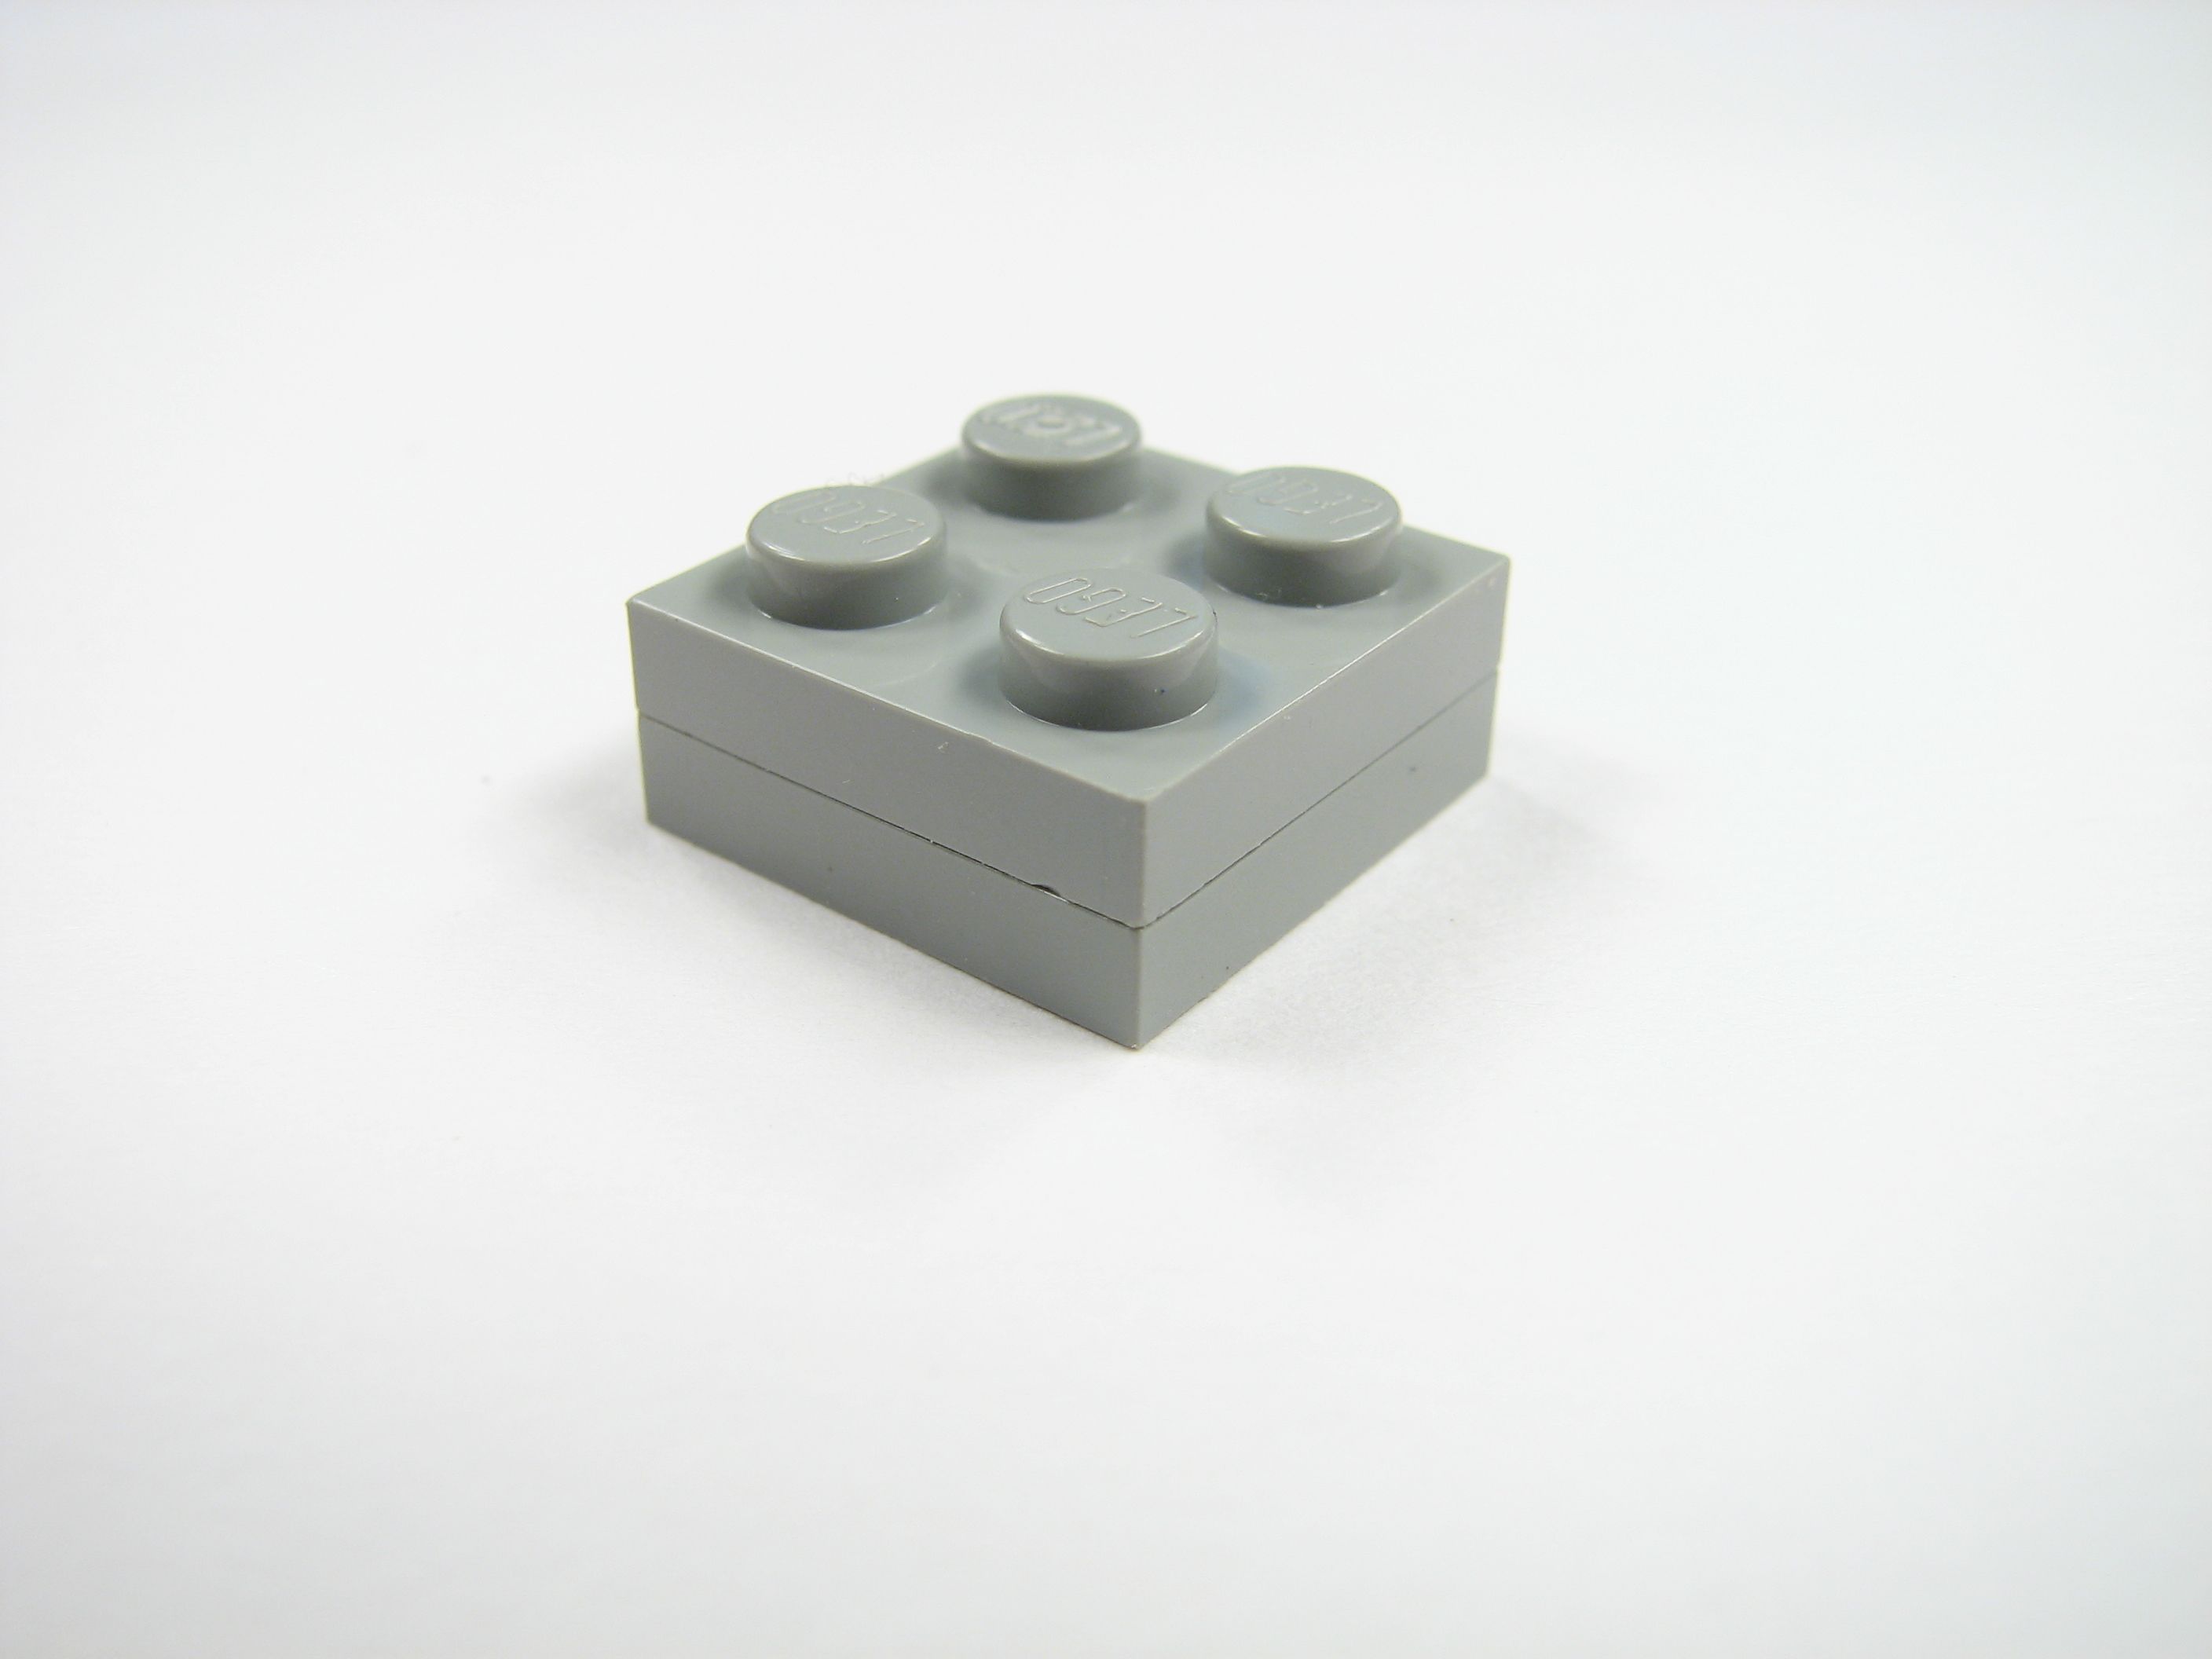
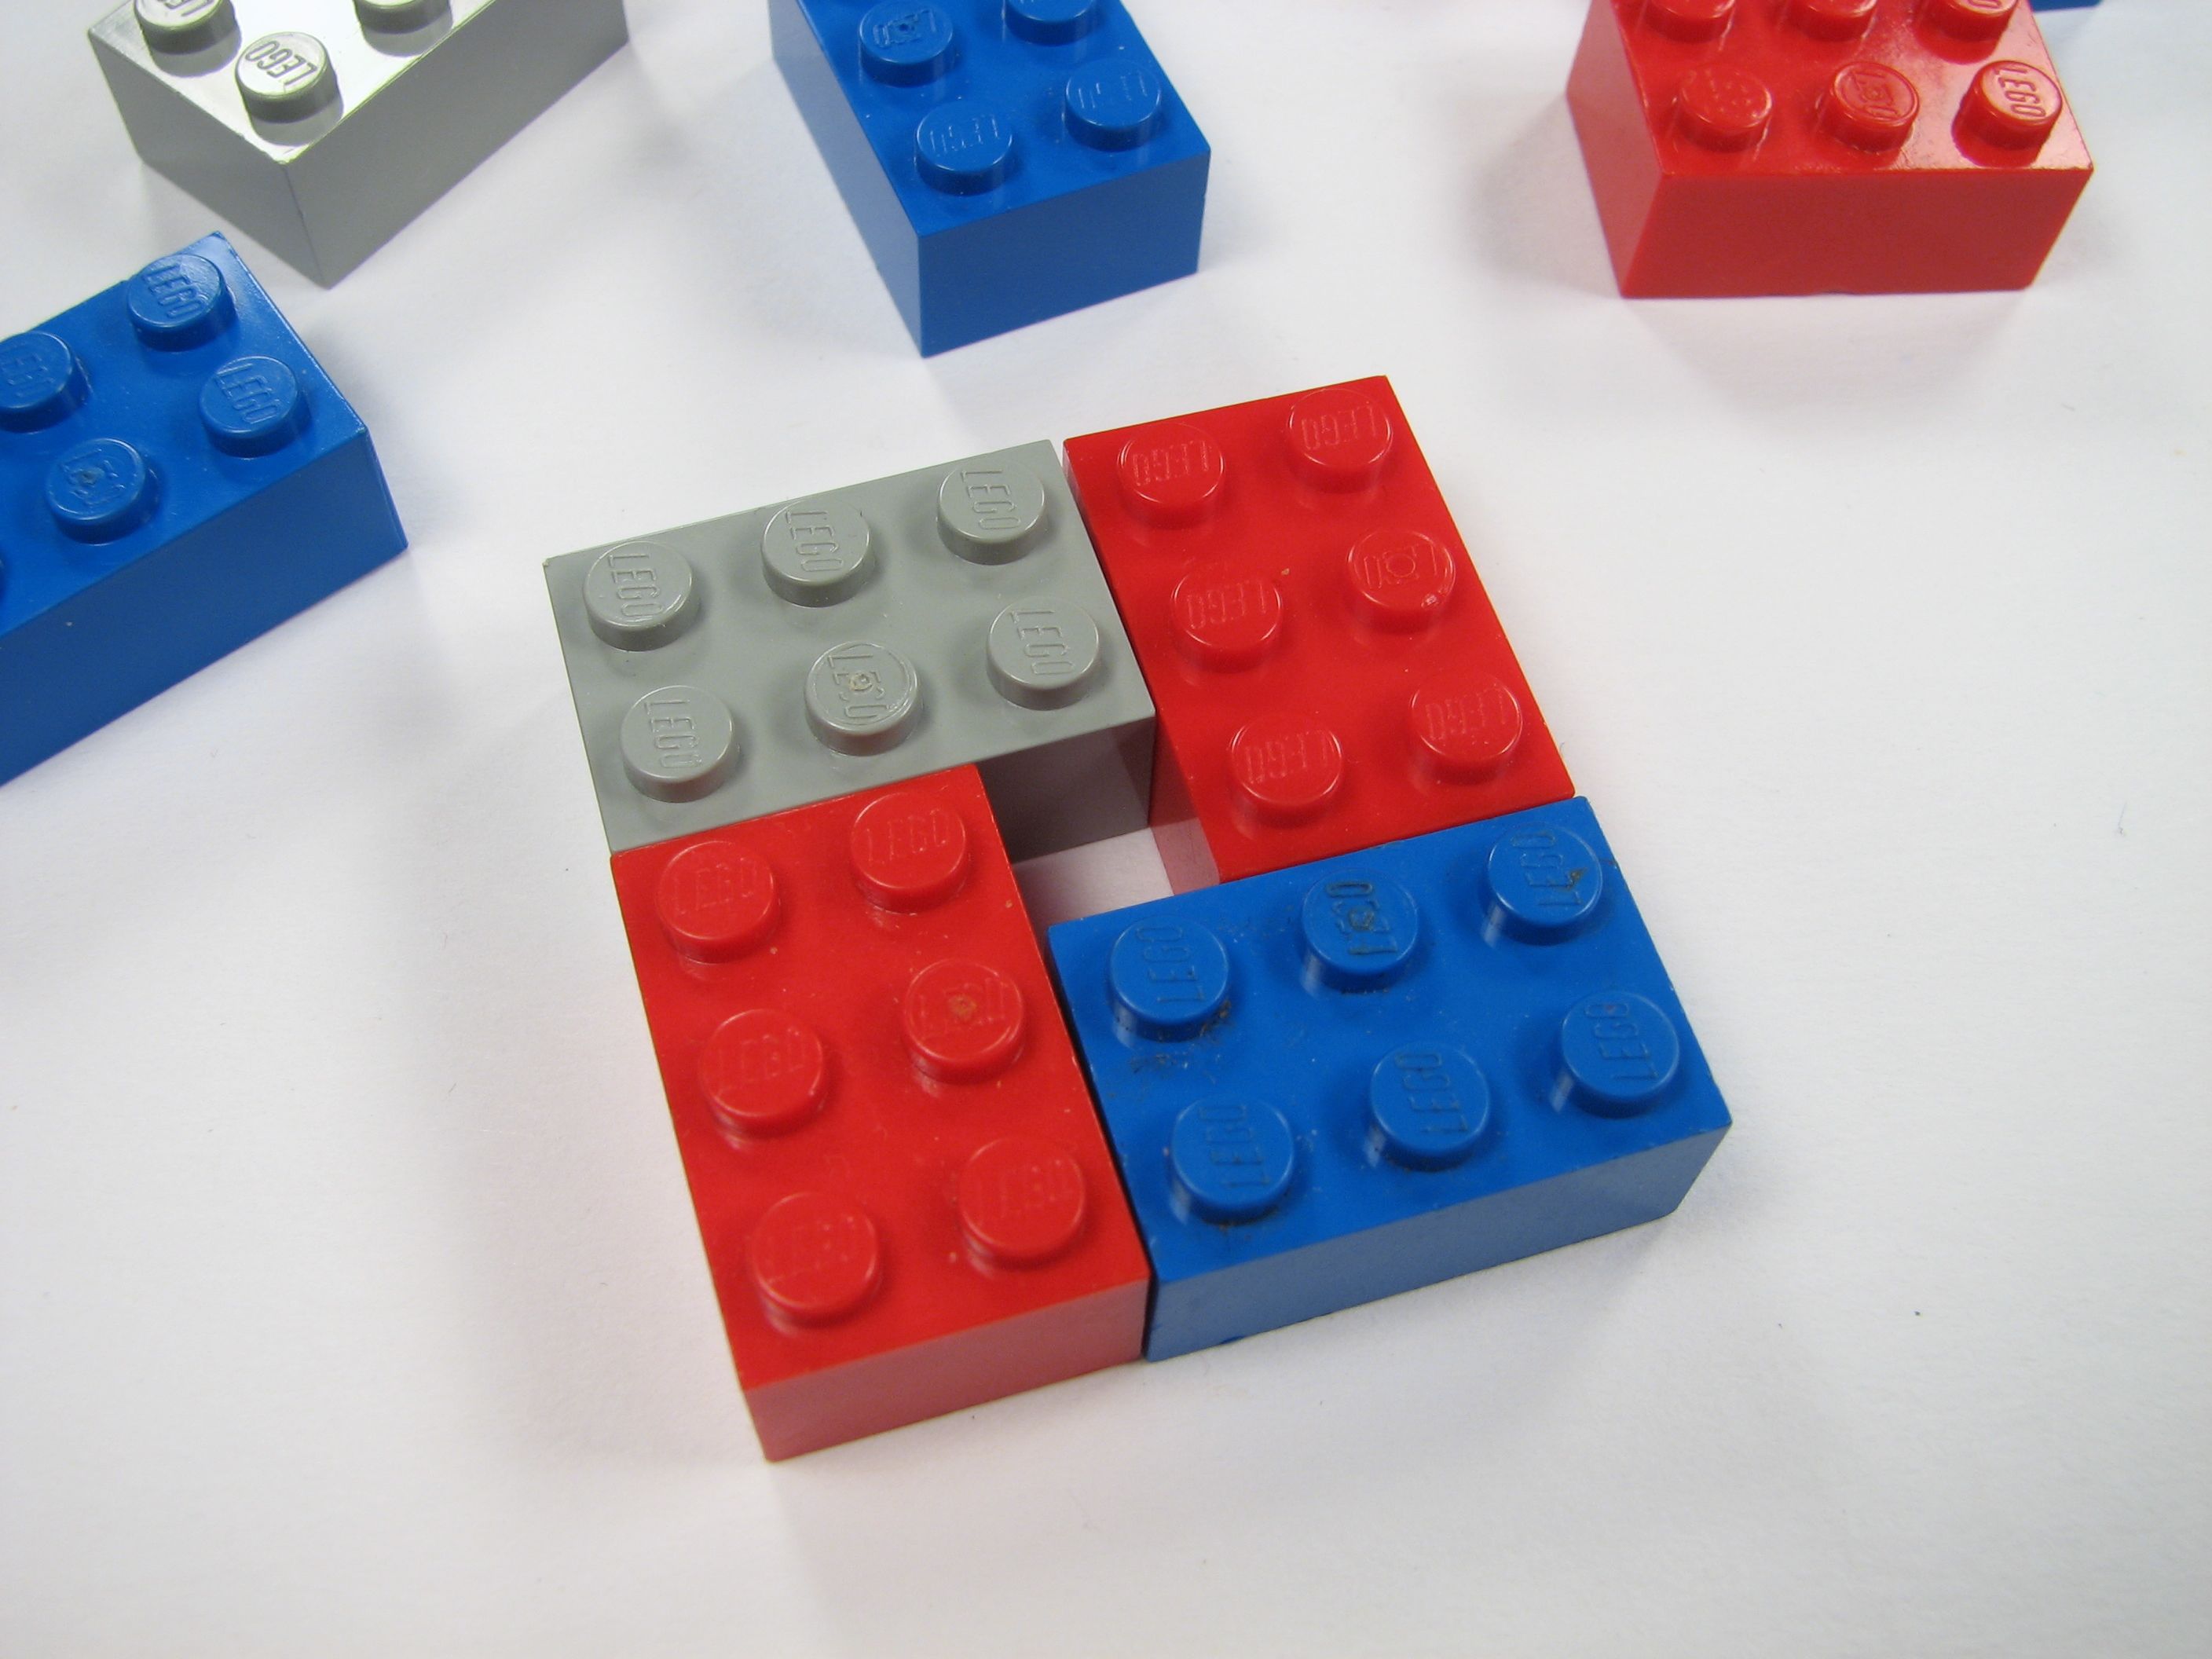
What we have here is a compact and space efficient stack: two 2×2 flat plates stuck together. However, it’s an abomination: those pieces are really stuck together. Even the godsend brick separator is all but useless in this particular case and there is hardly any non-destructive way to get the damn bricks apart. (A plastic putty knife or thin guitar pick can work, with effort.)
That naturally leads to our requirement that stacks be easy to separate. If not, you could end up spending all your time trying to get the bricks apart, which isn’t much of an improvement versus digging for them. In what follows, we illustrate some of the basic types of large organized stacks that hold together firmly, give easy access, and can always be separated easily.
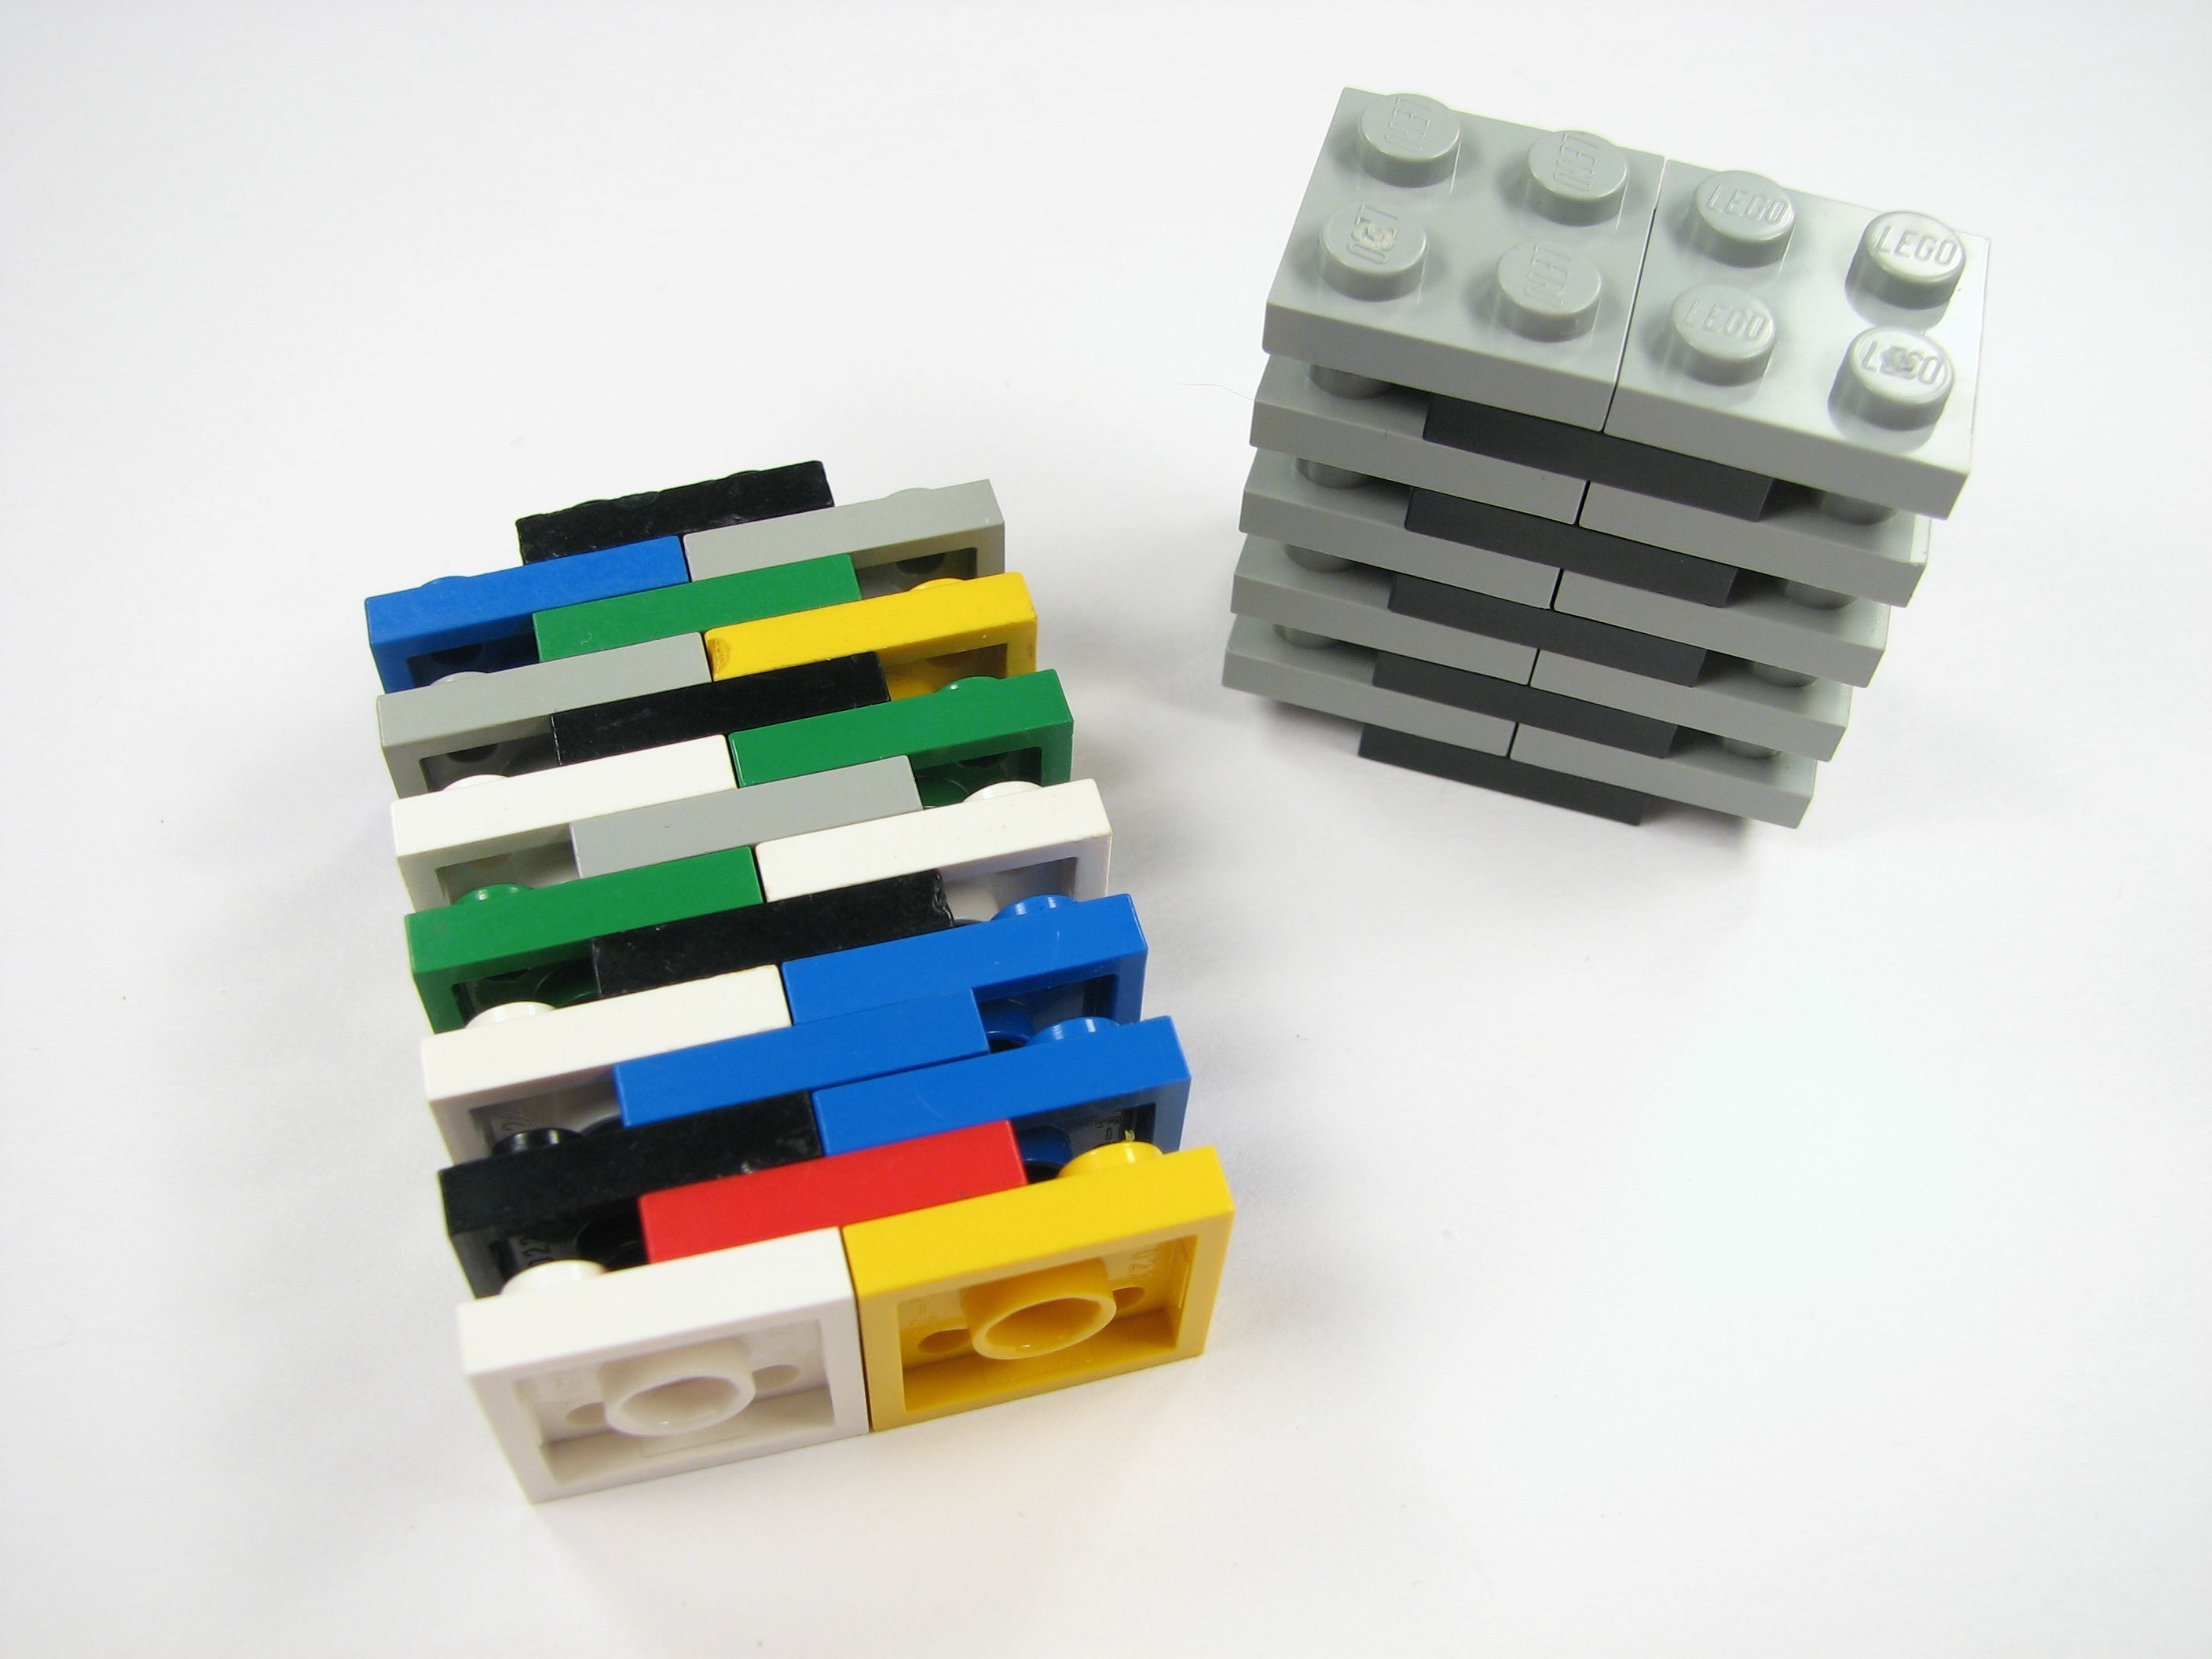
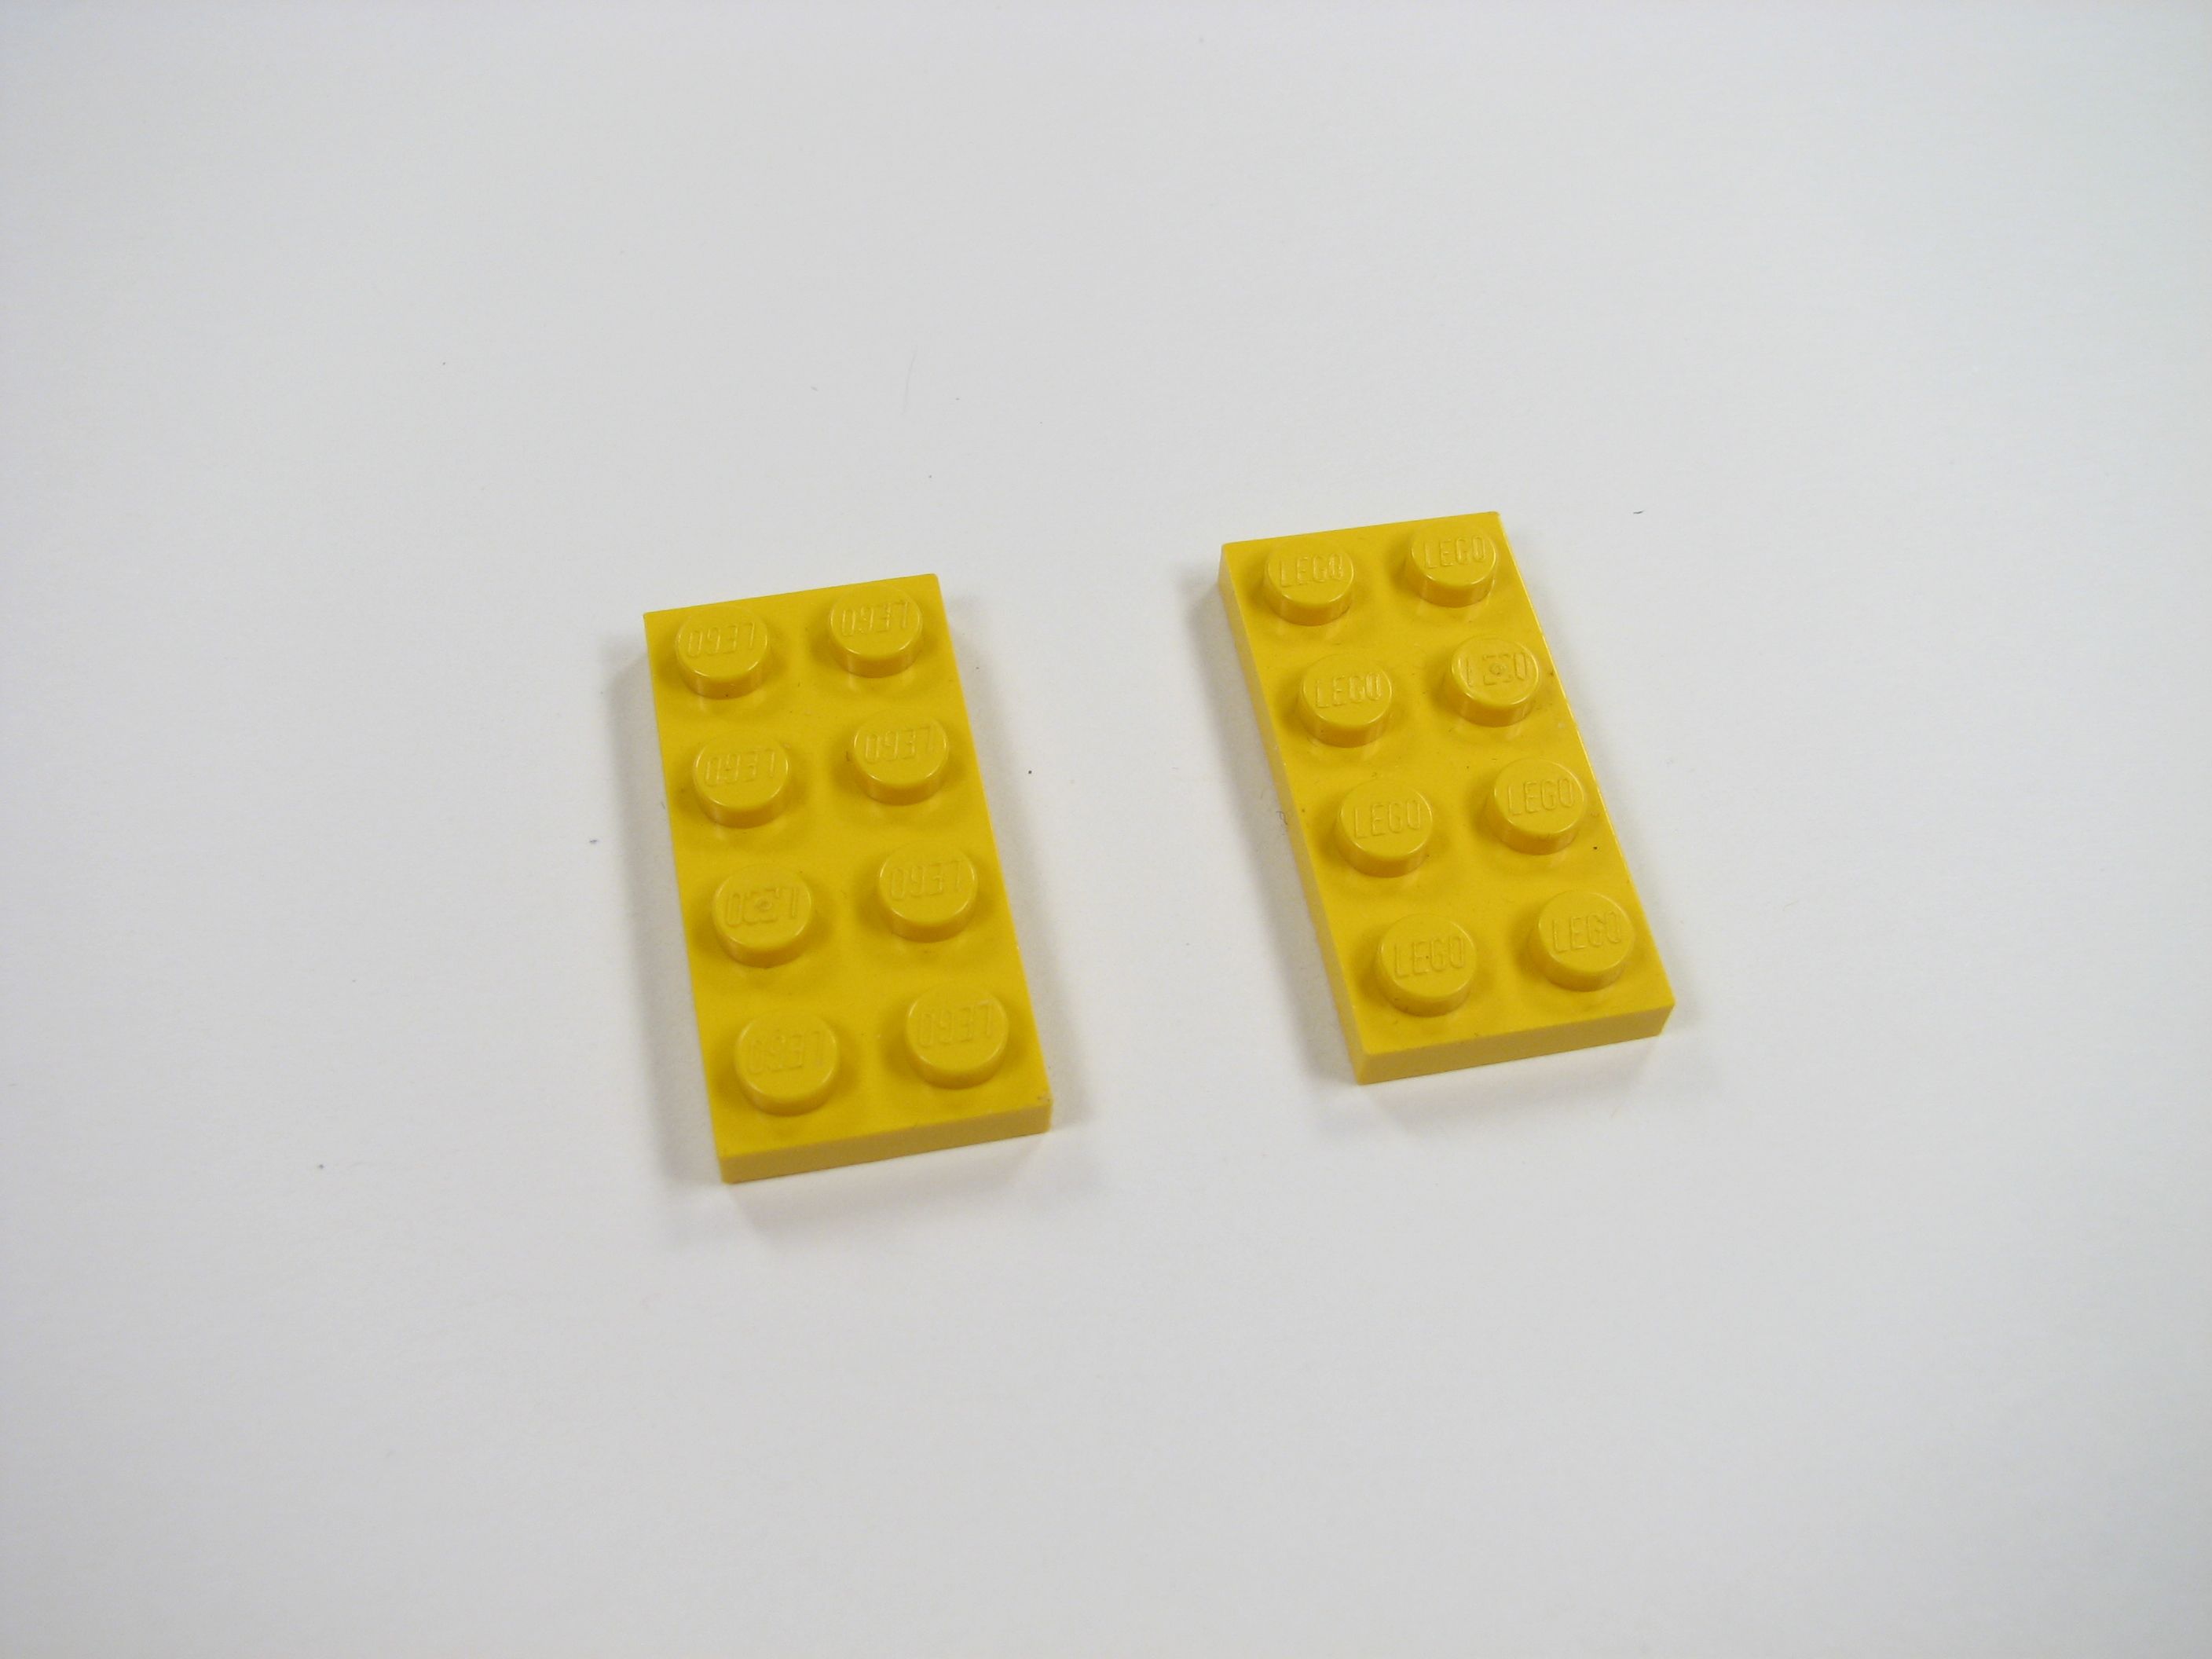
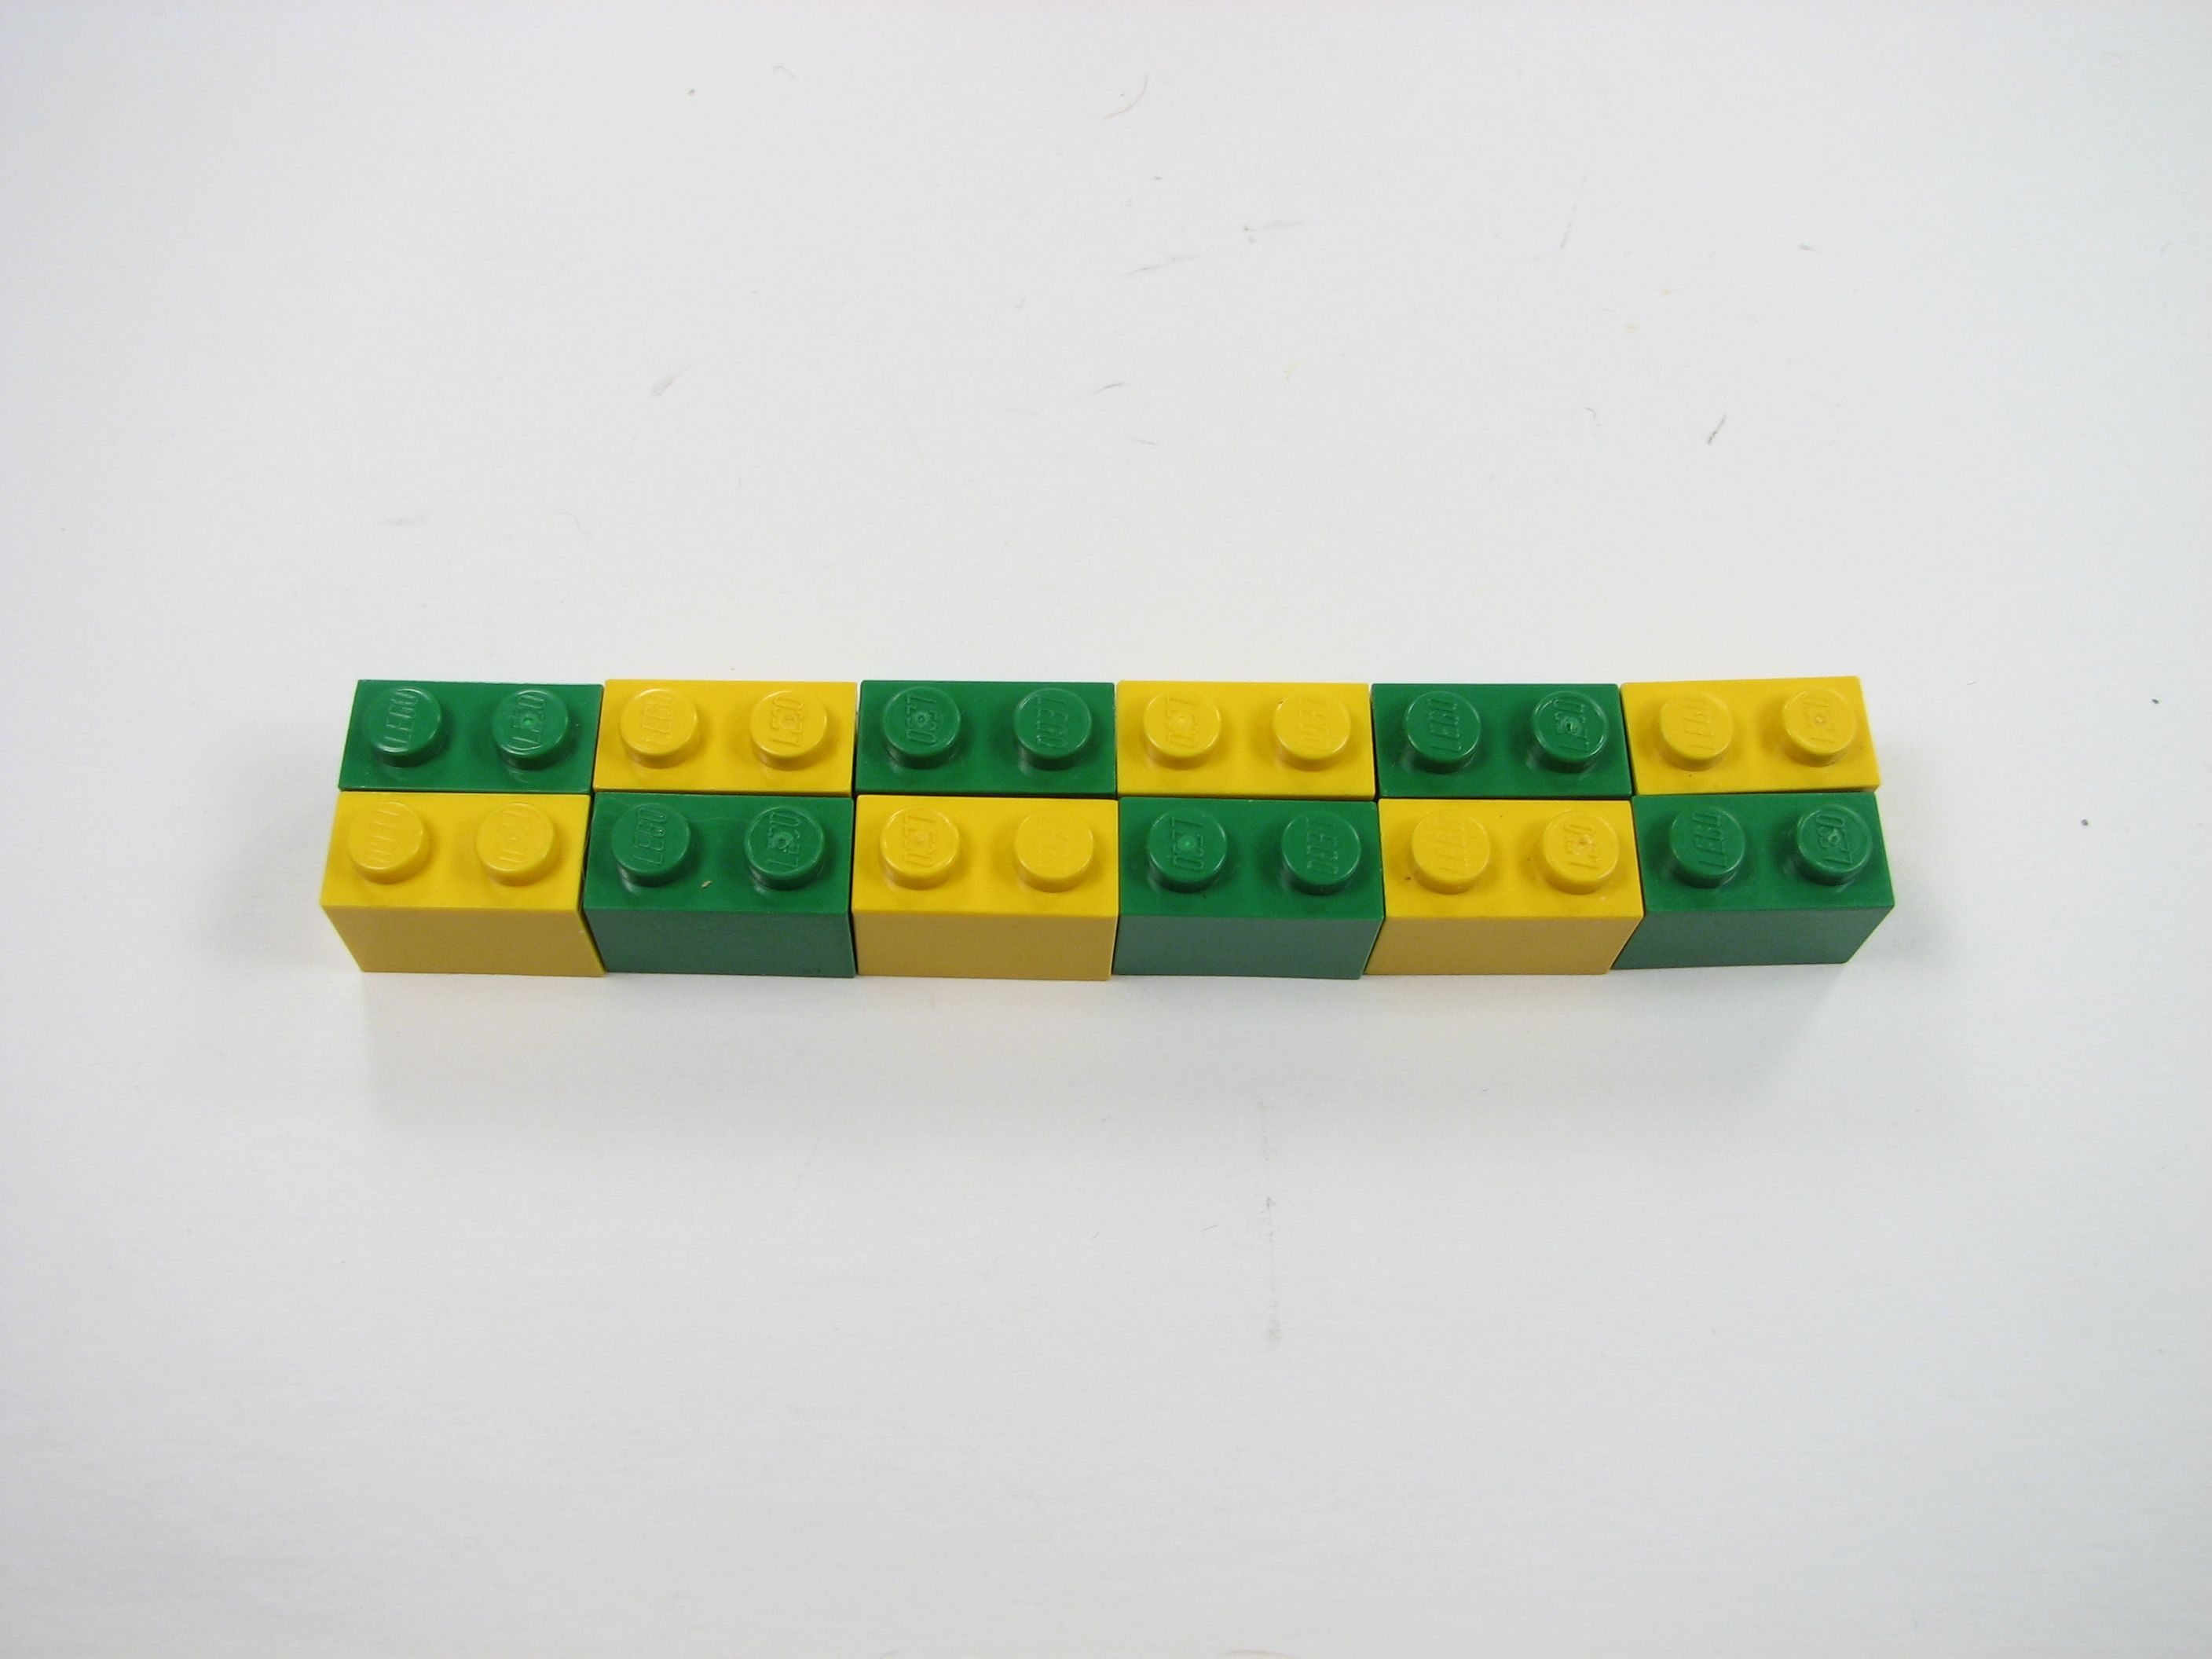
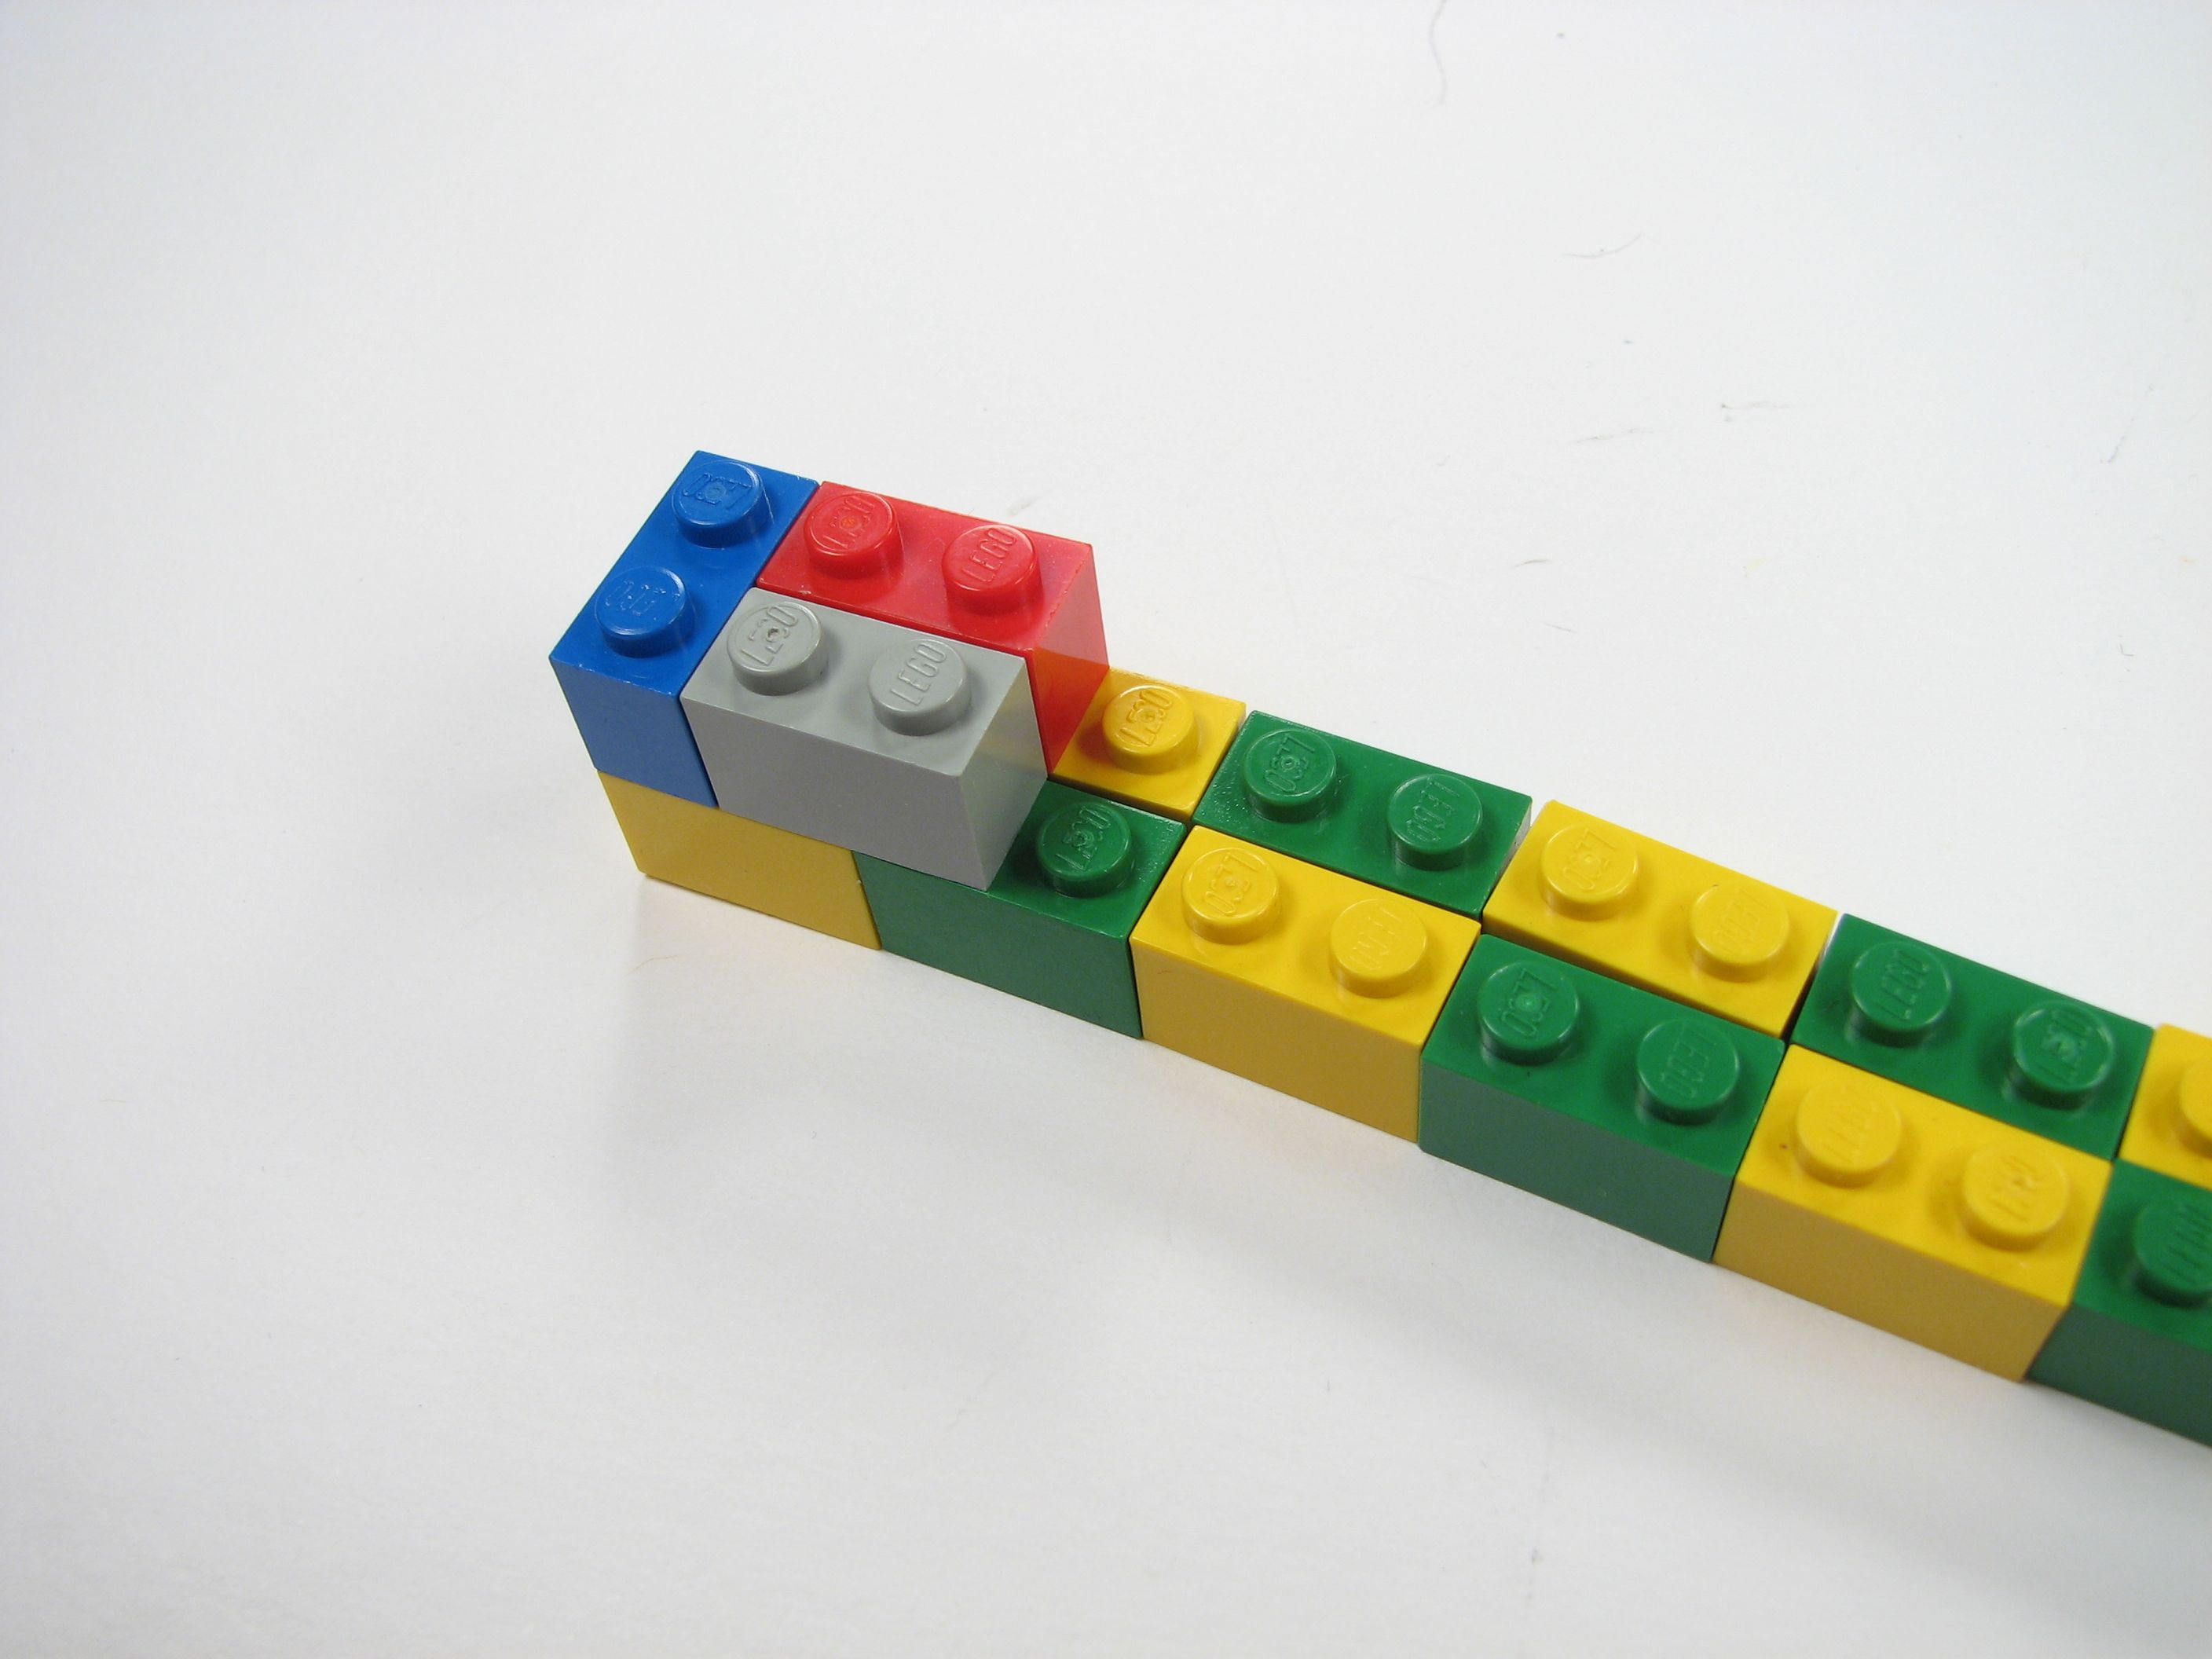
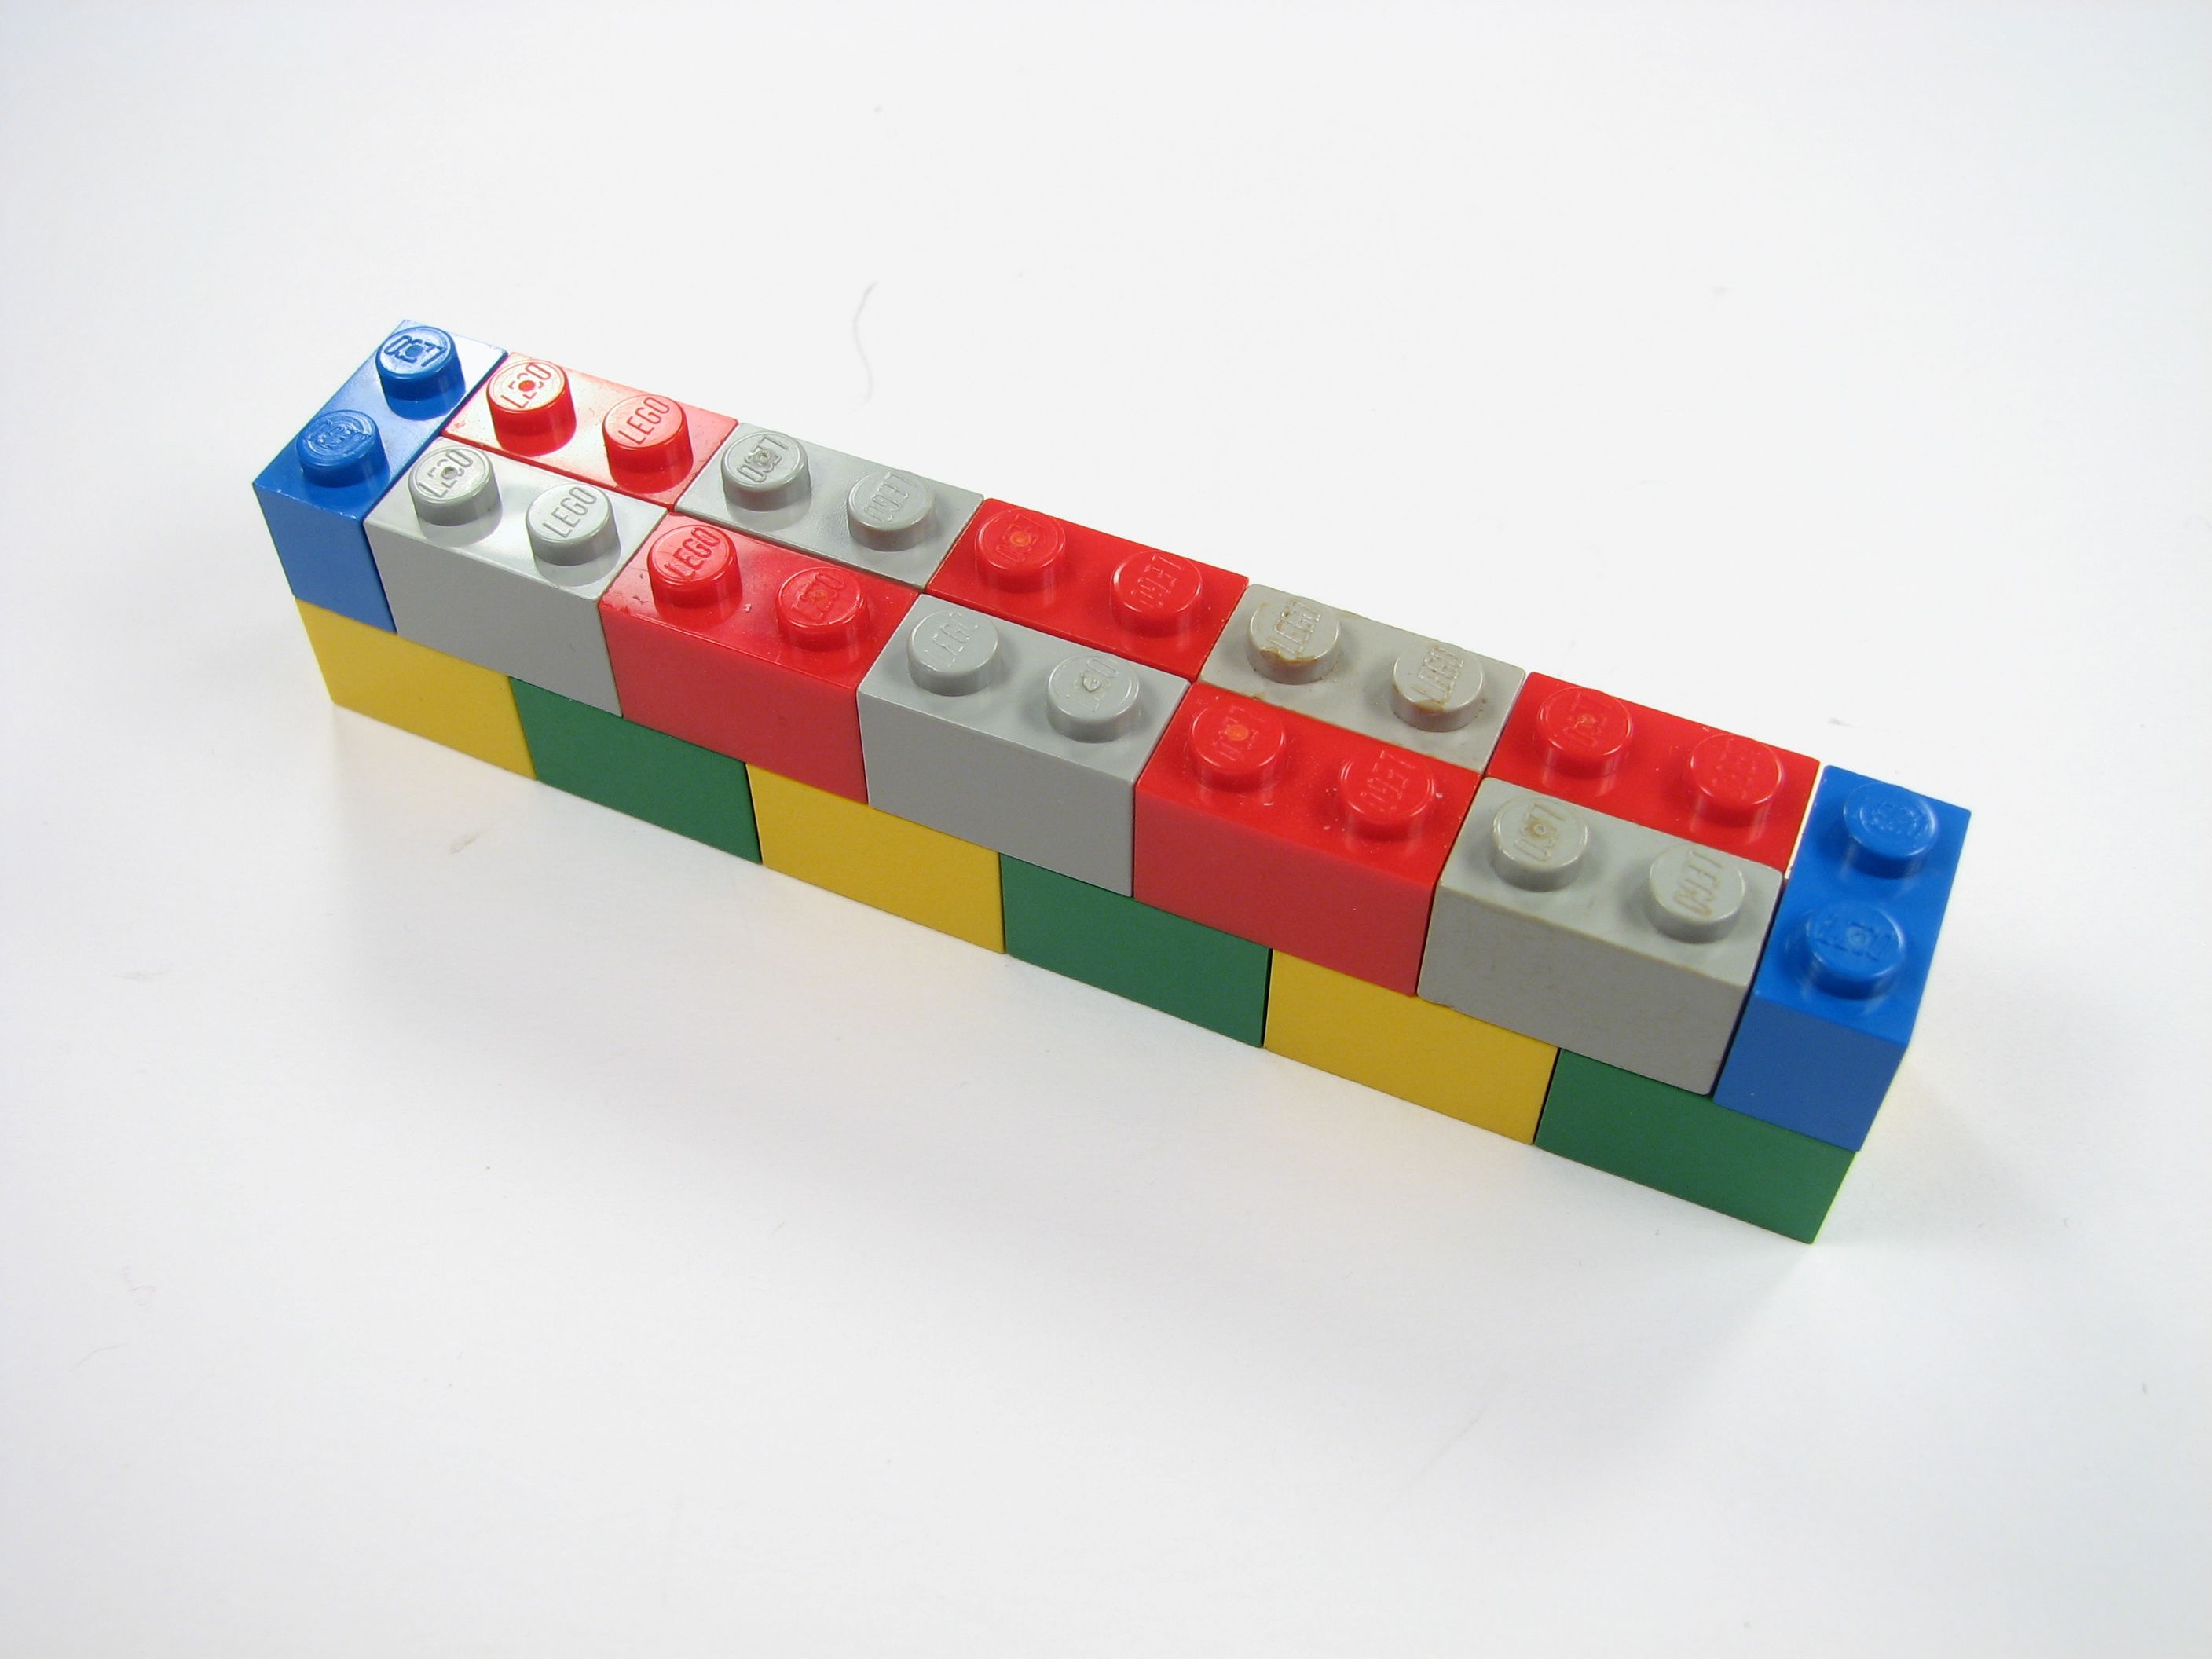
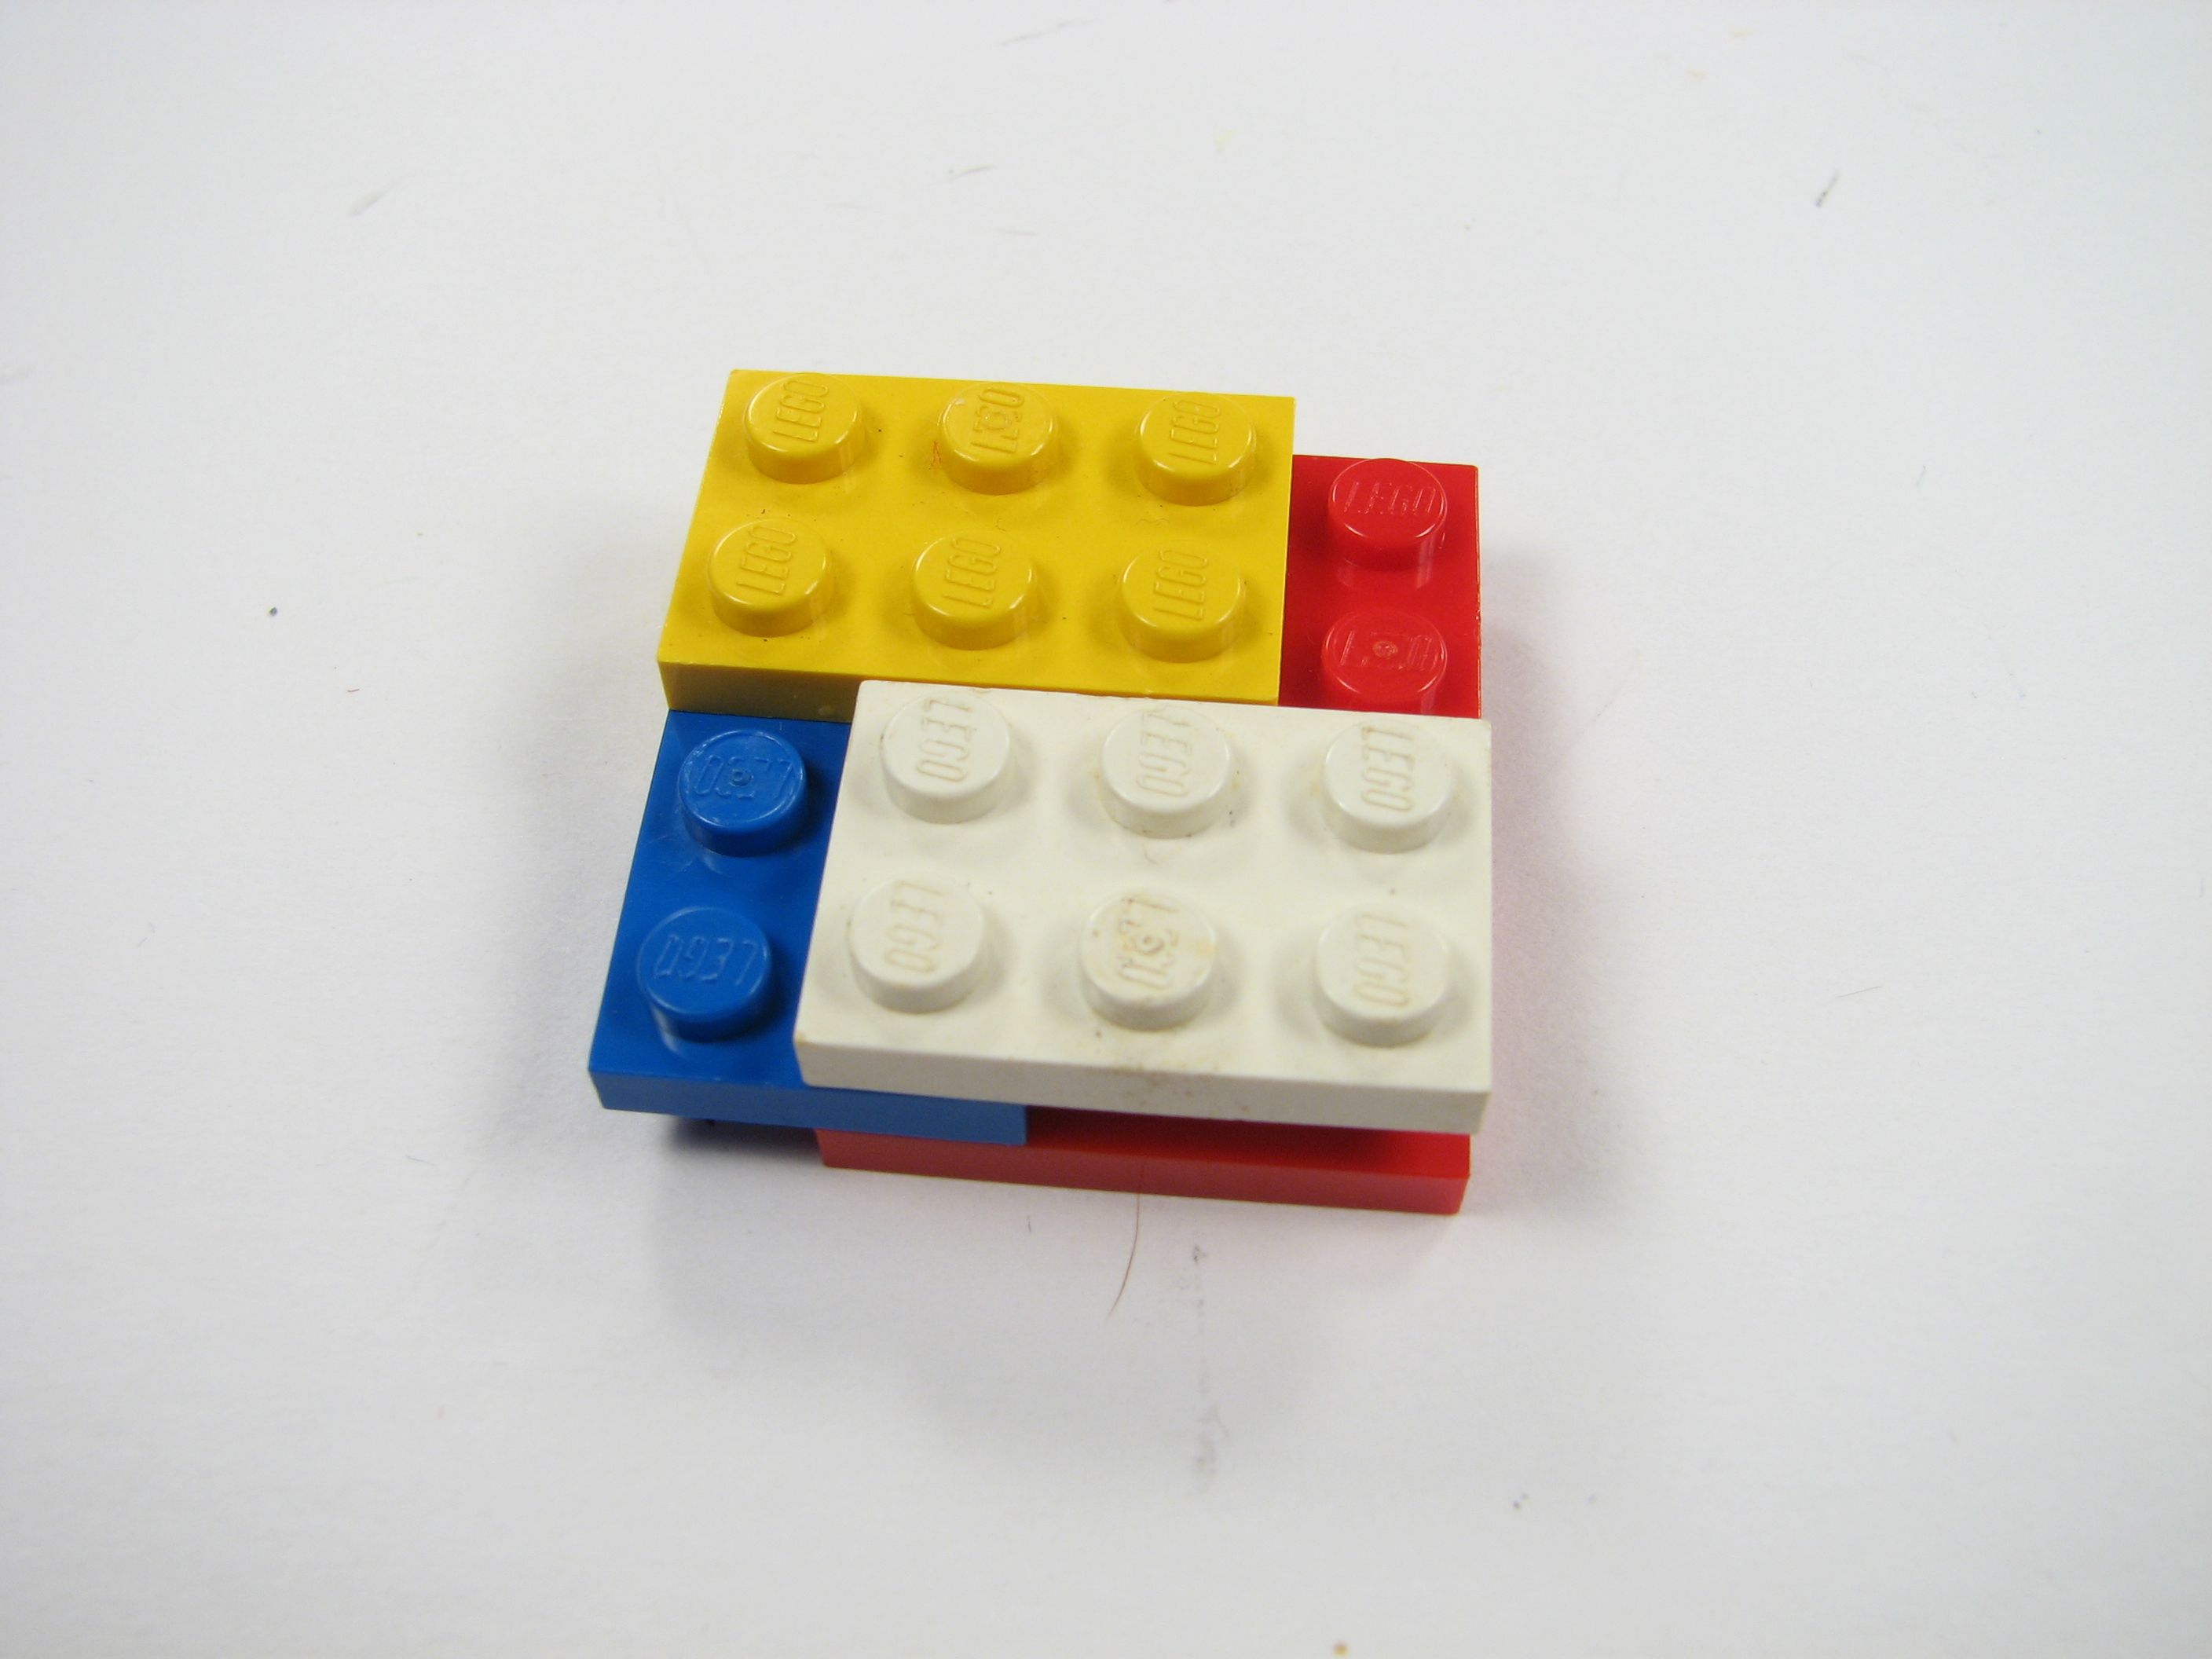
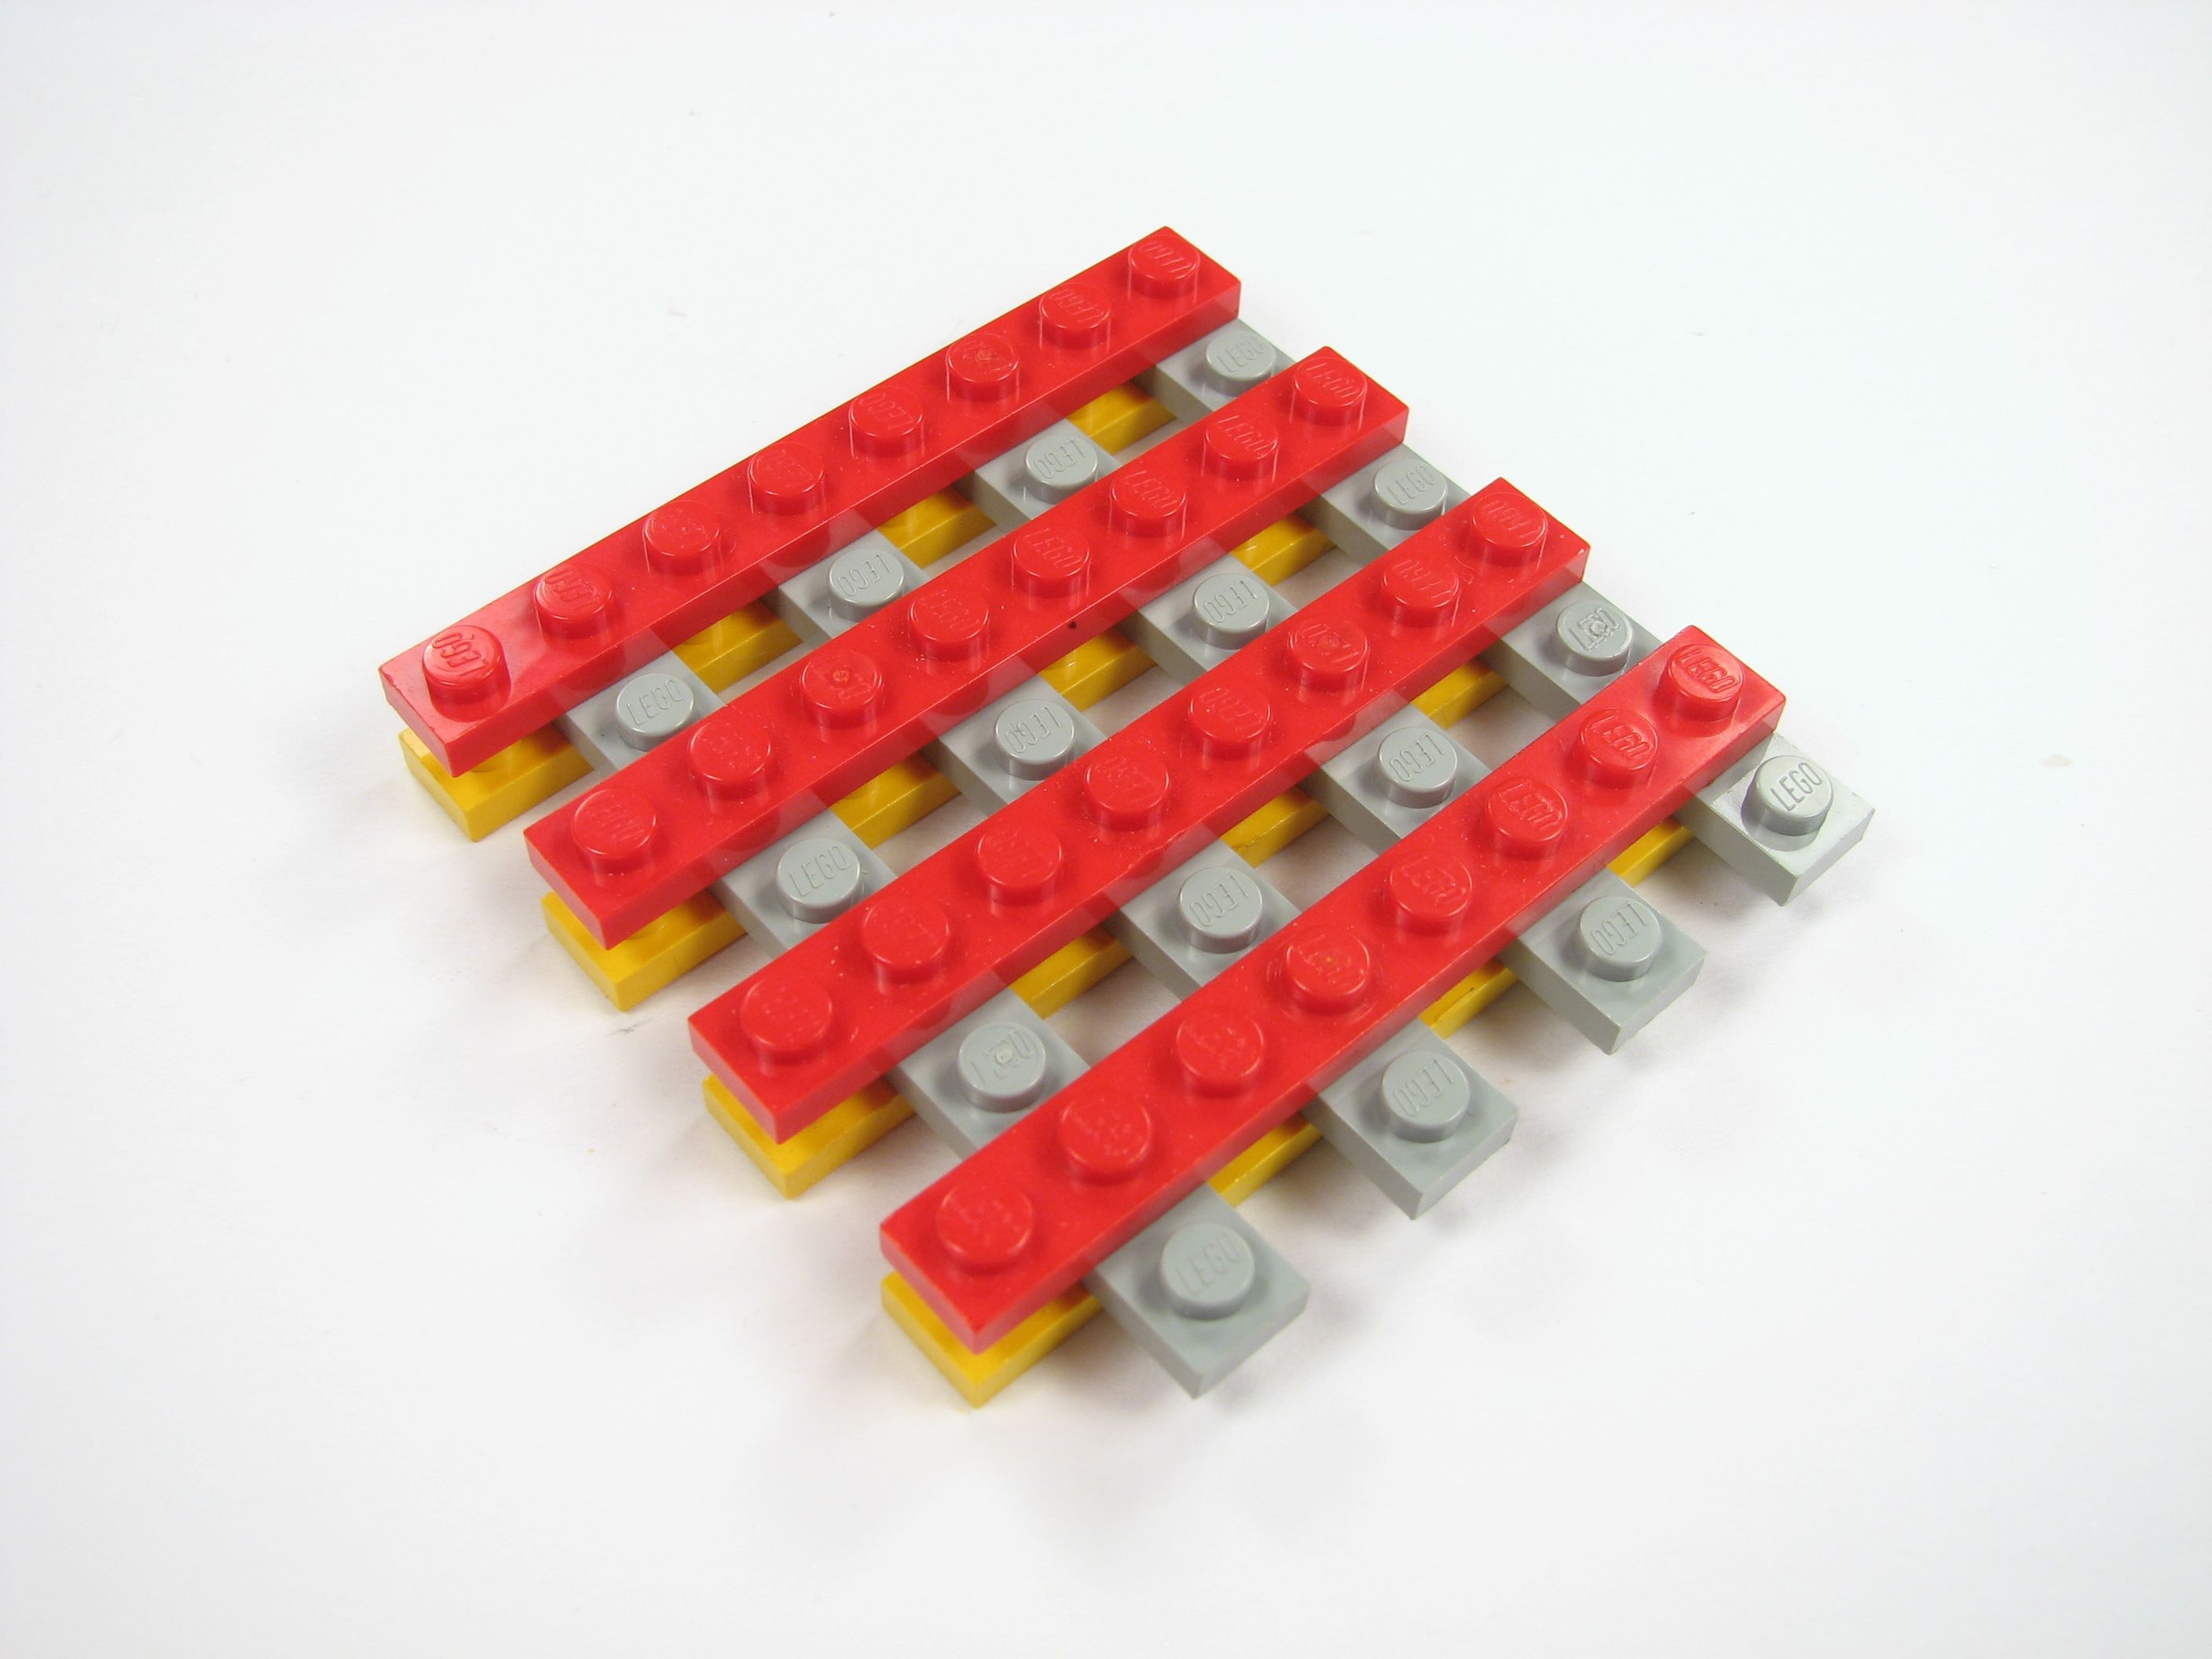
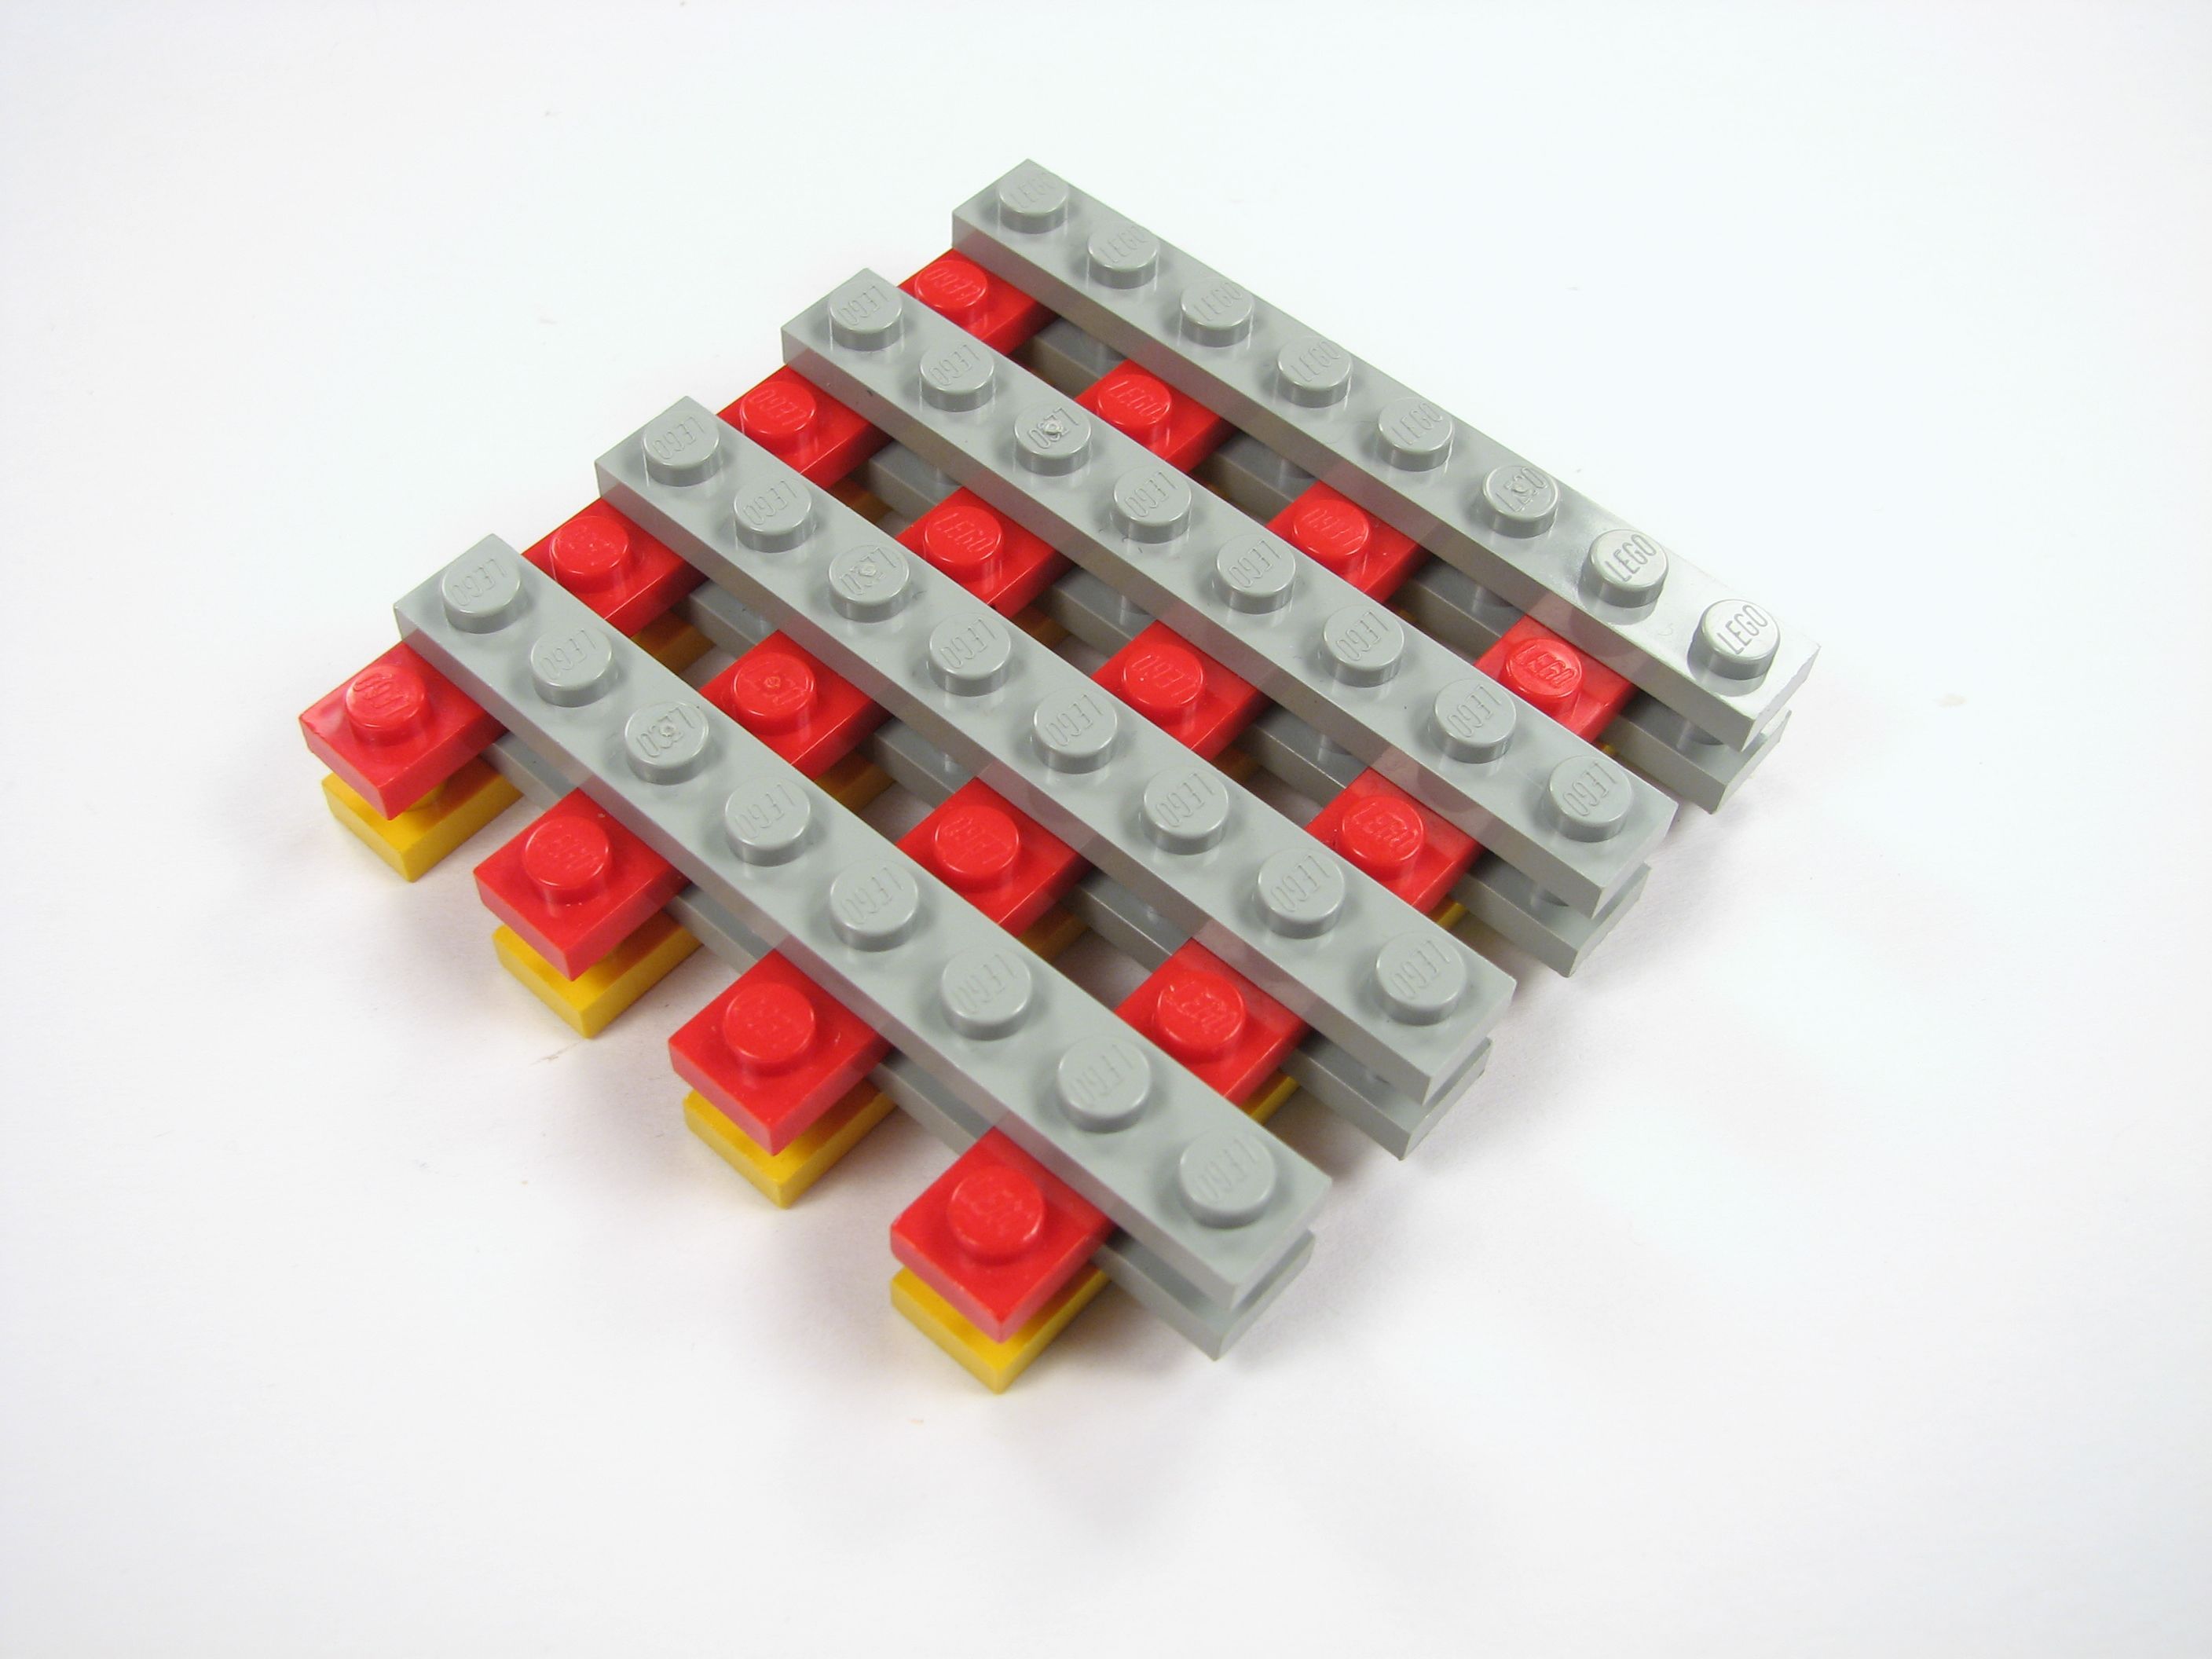
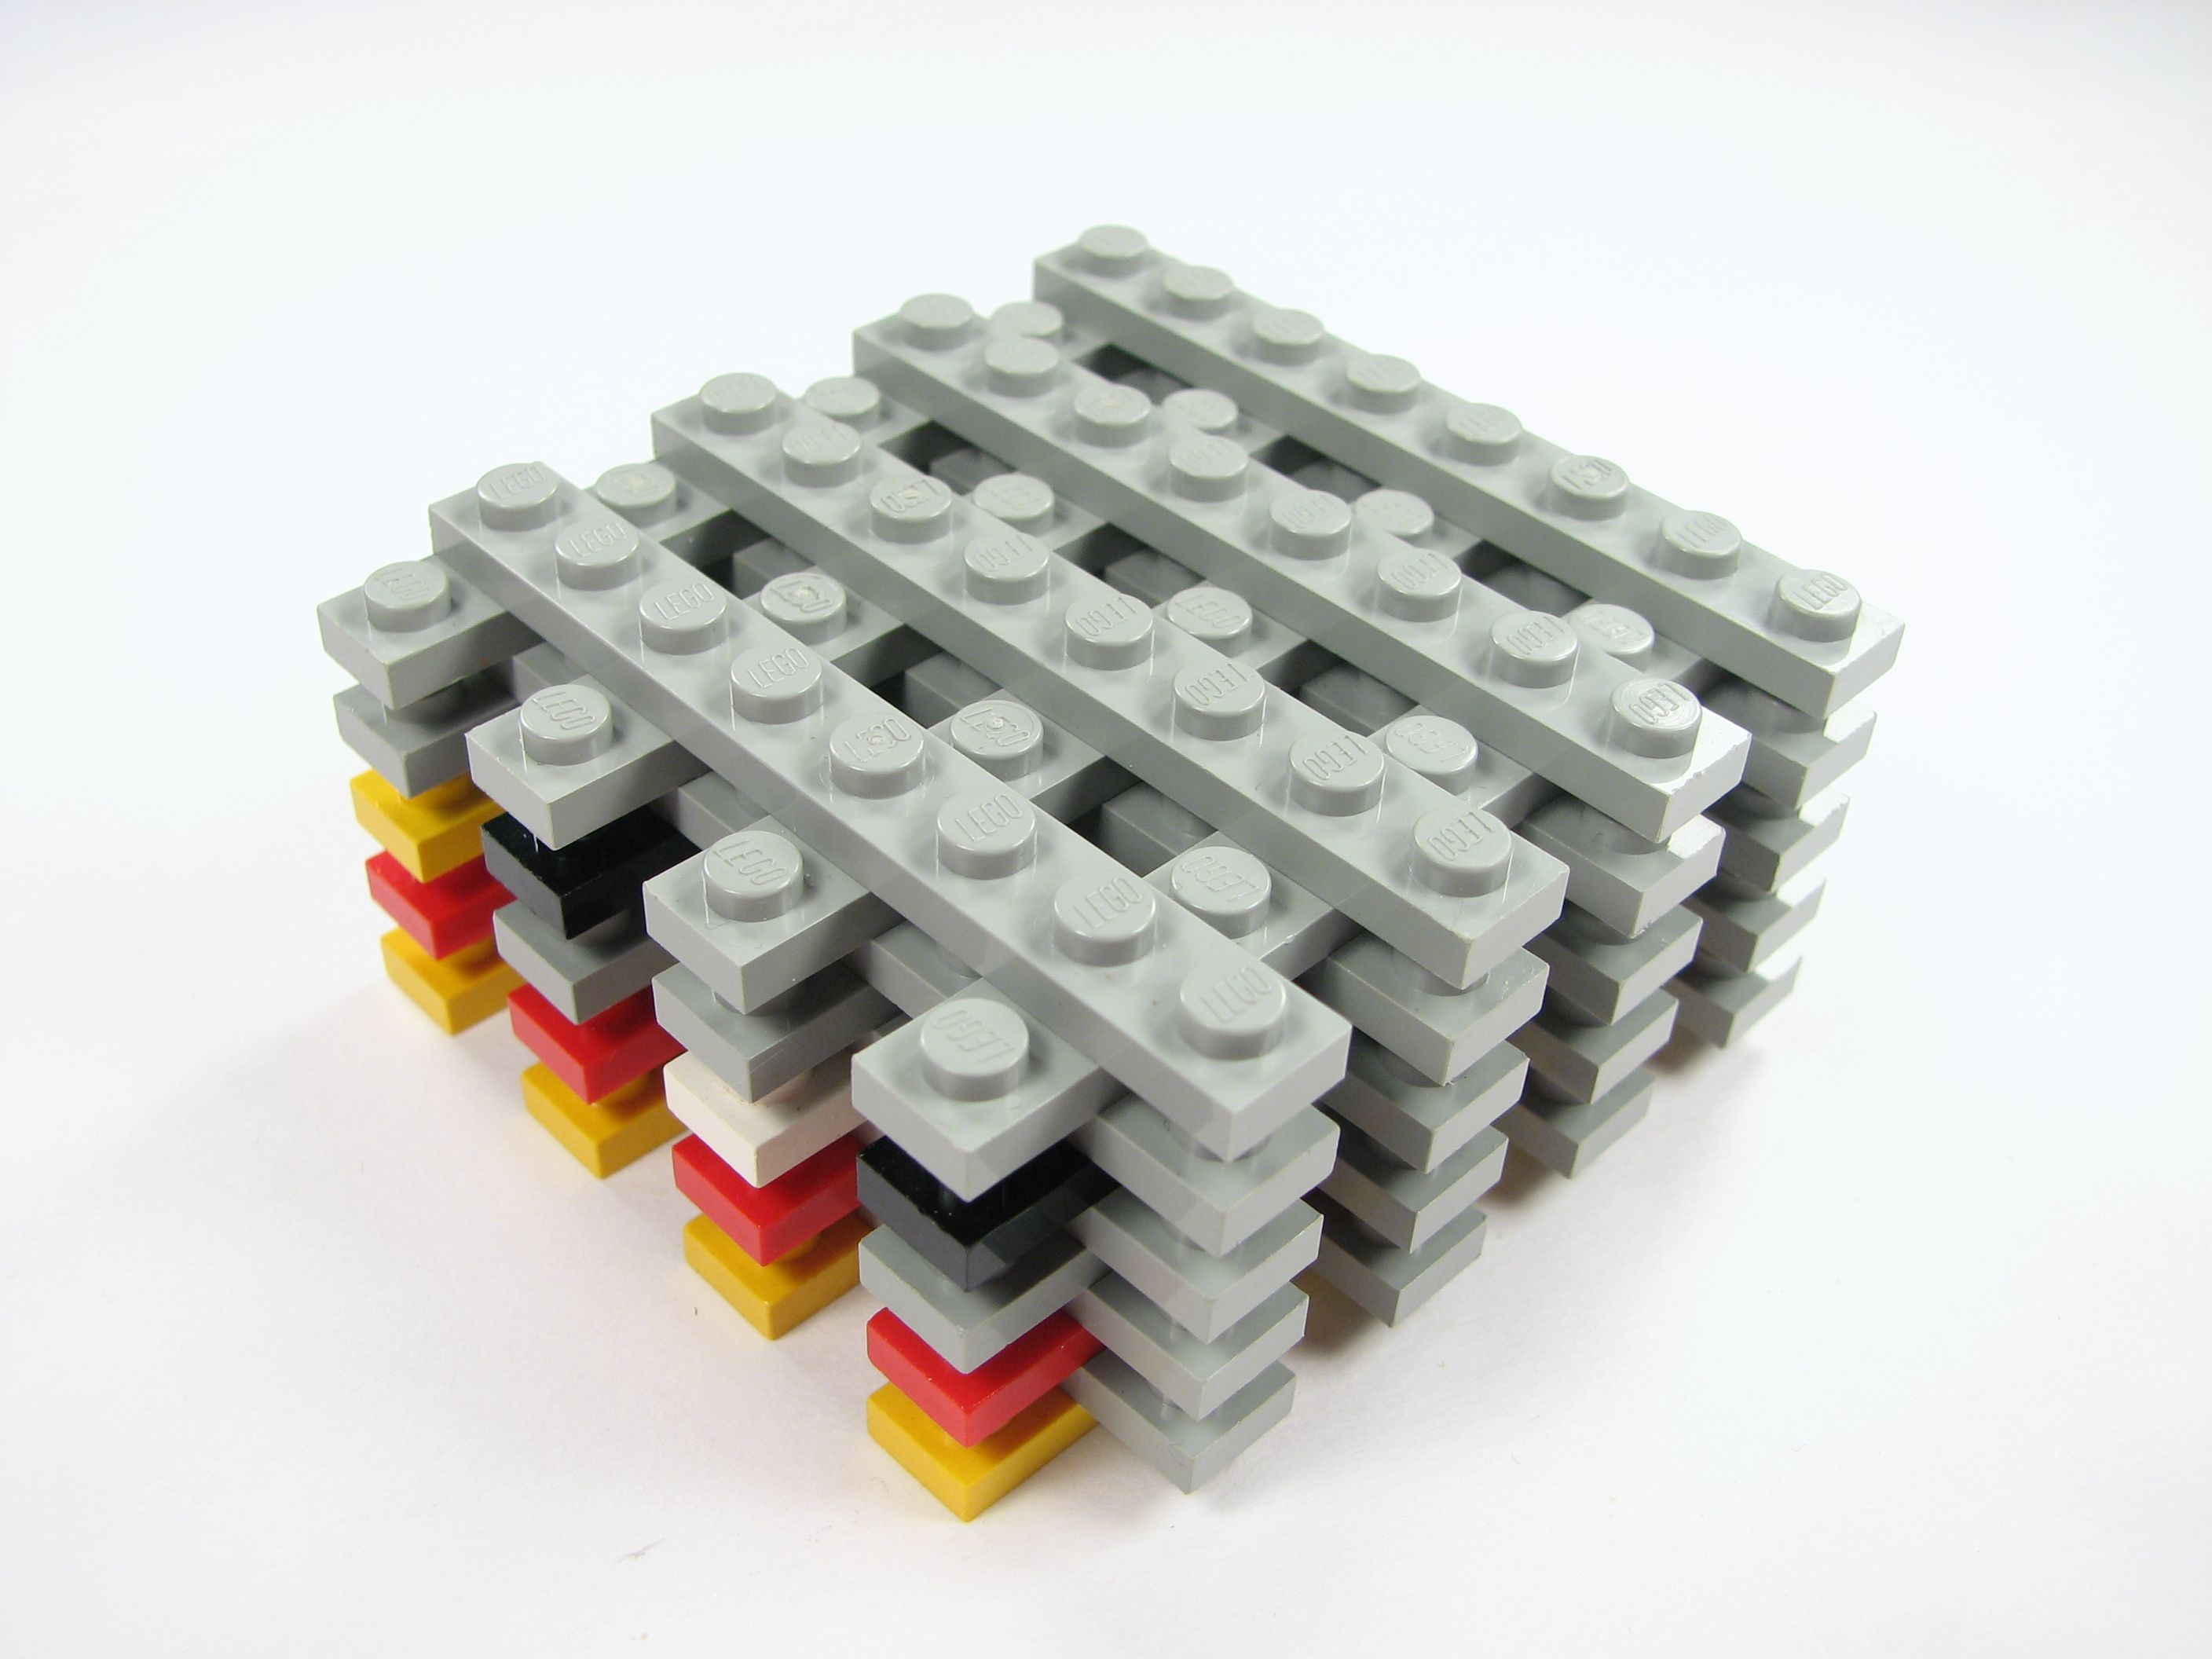
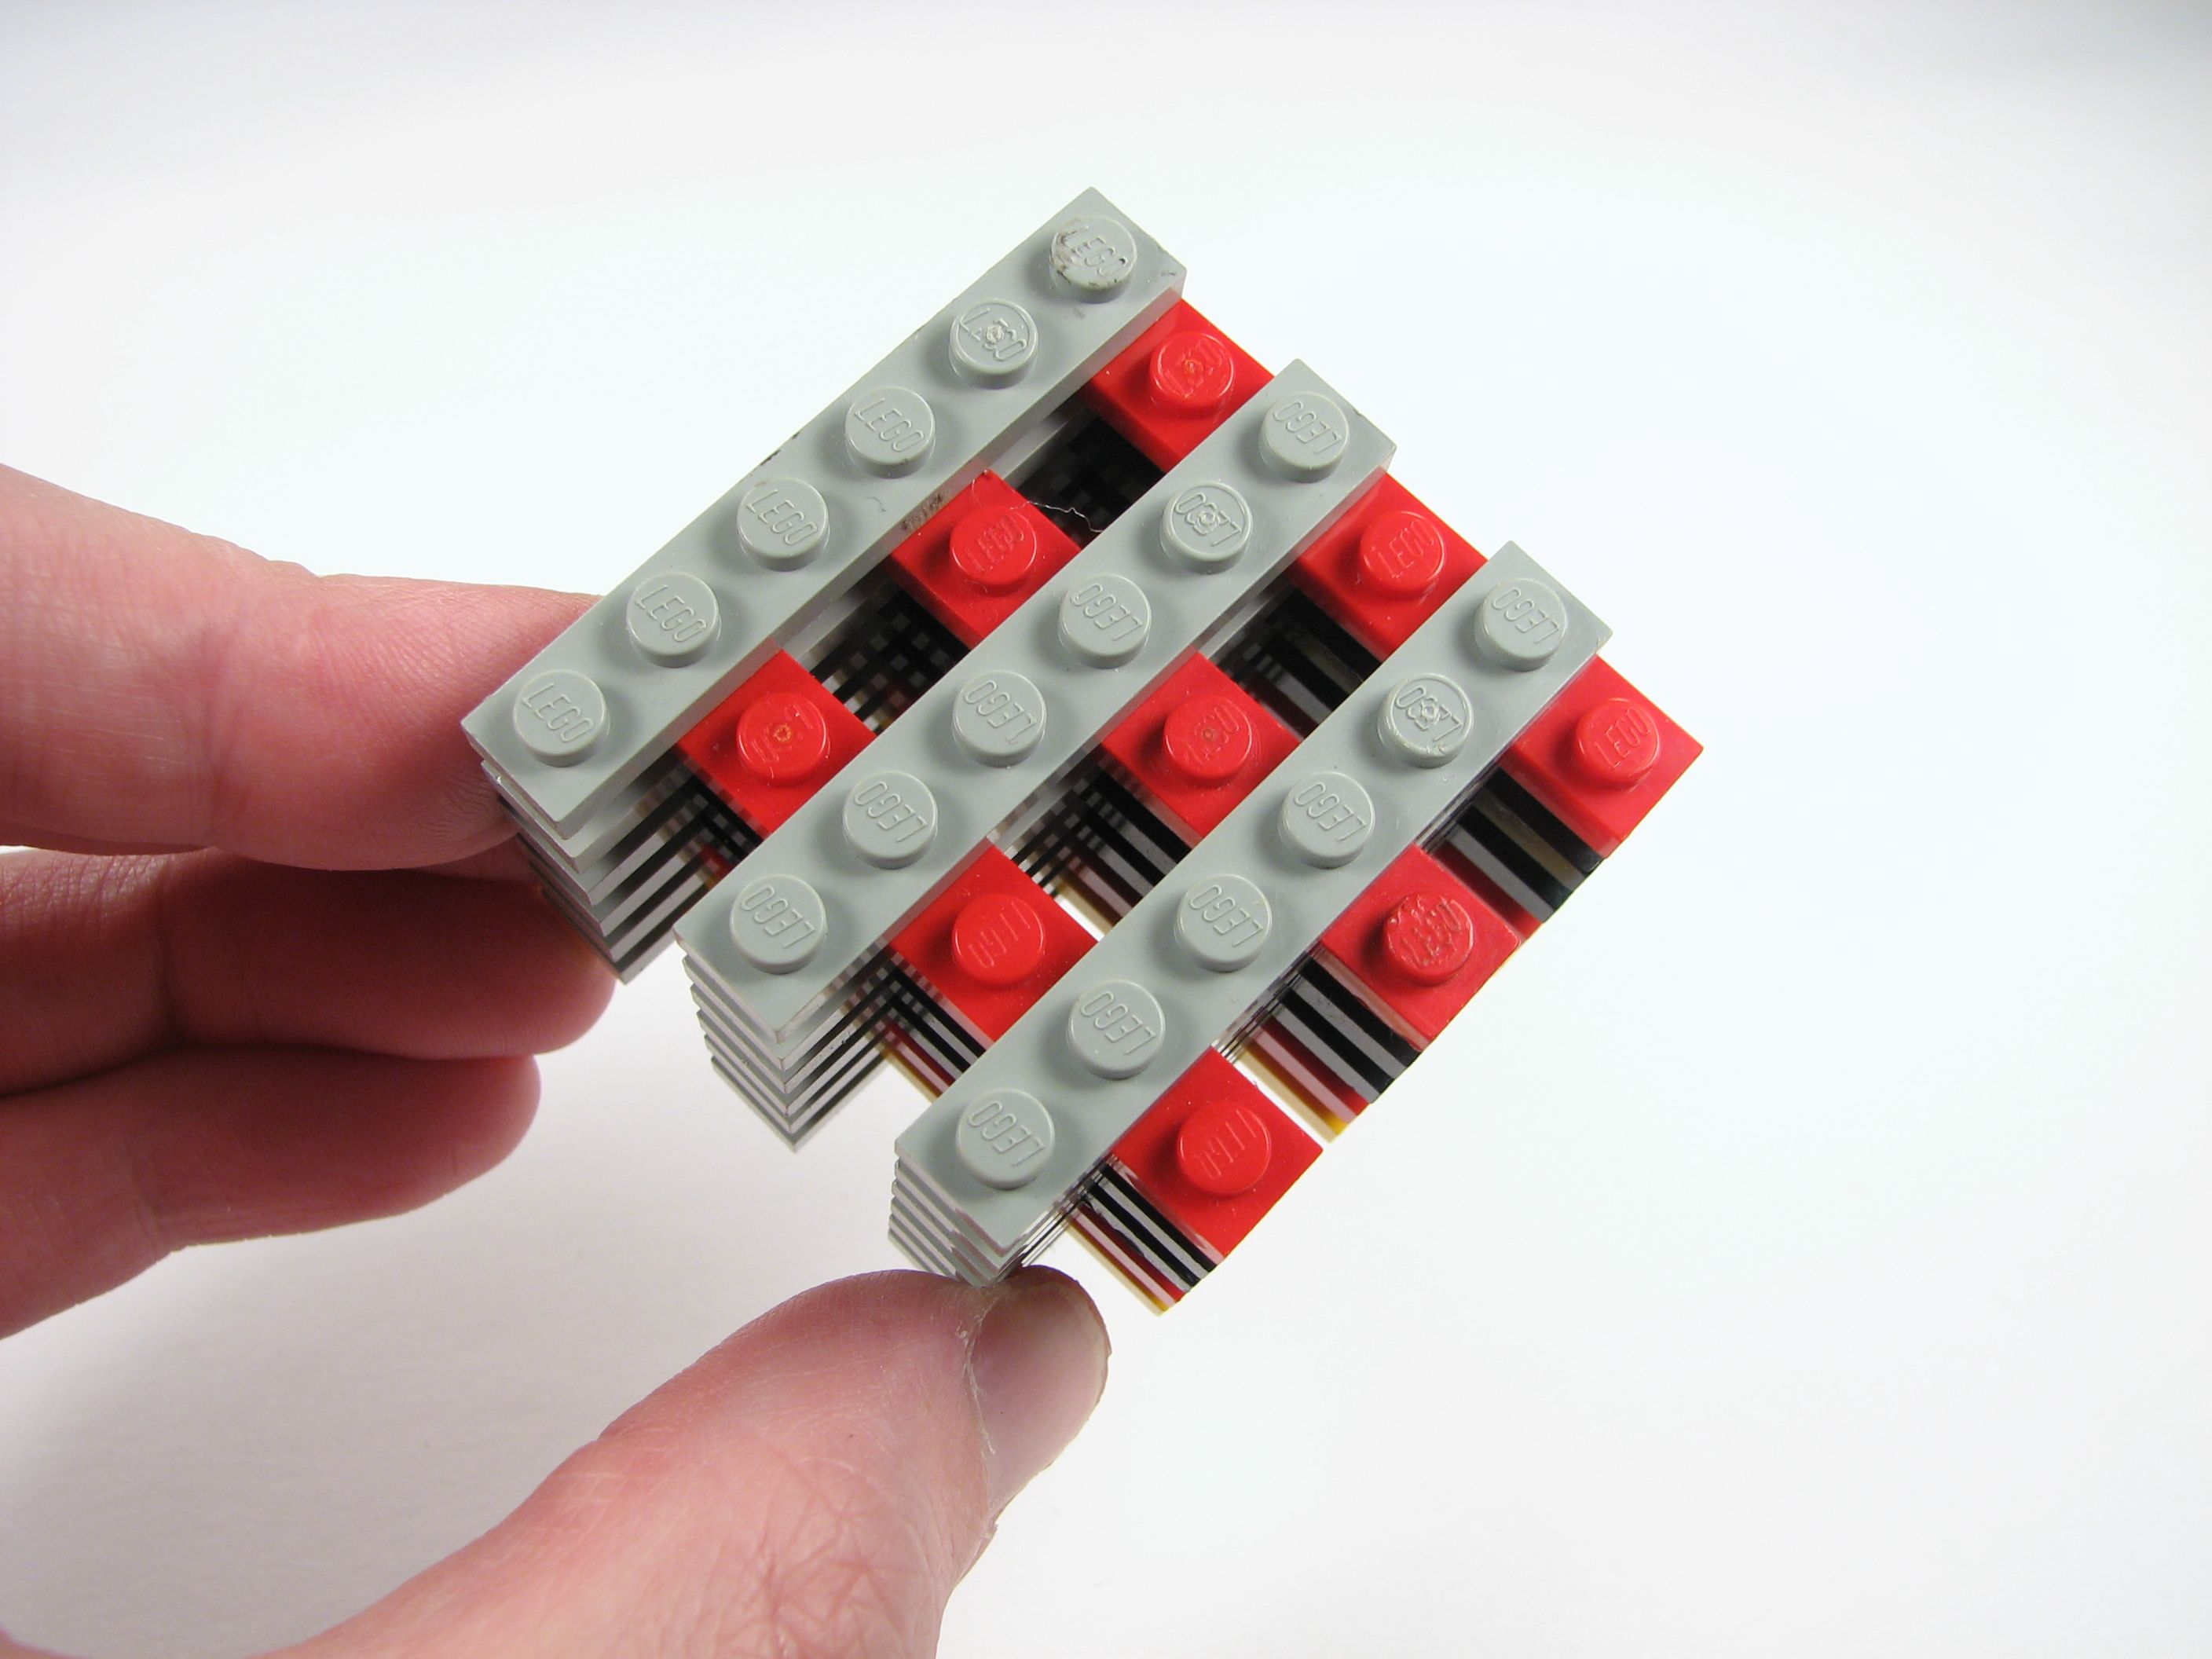
First off, here is a much better way to stack and store 2×2 flat plates. Each layer alternates a single flat plate with two flat plates side by side. You can make a long stick like this and it is very robust– if you place it in the bin with other big stacks it will come out in one piece. Yet, it is trivially easy to break it apart anywhere you want to– even if you need to get to that one green square in the middle of the stack.
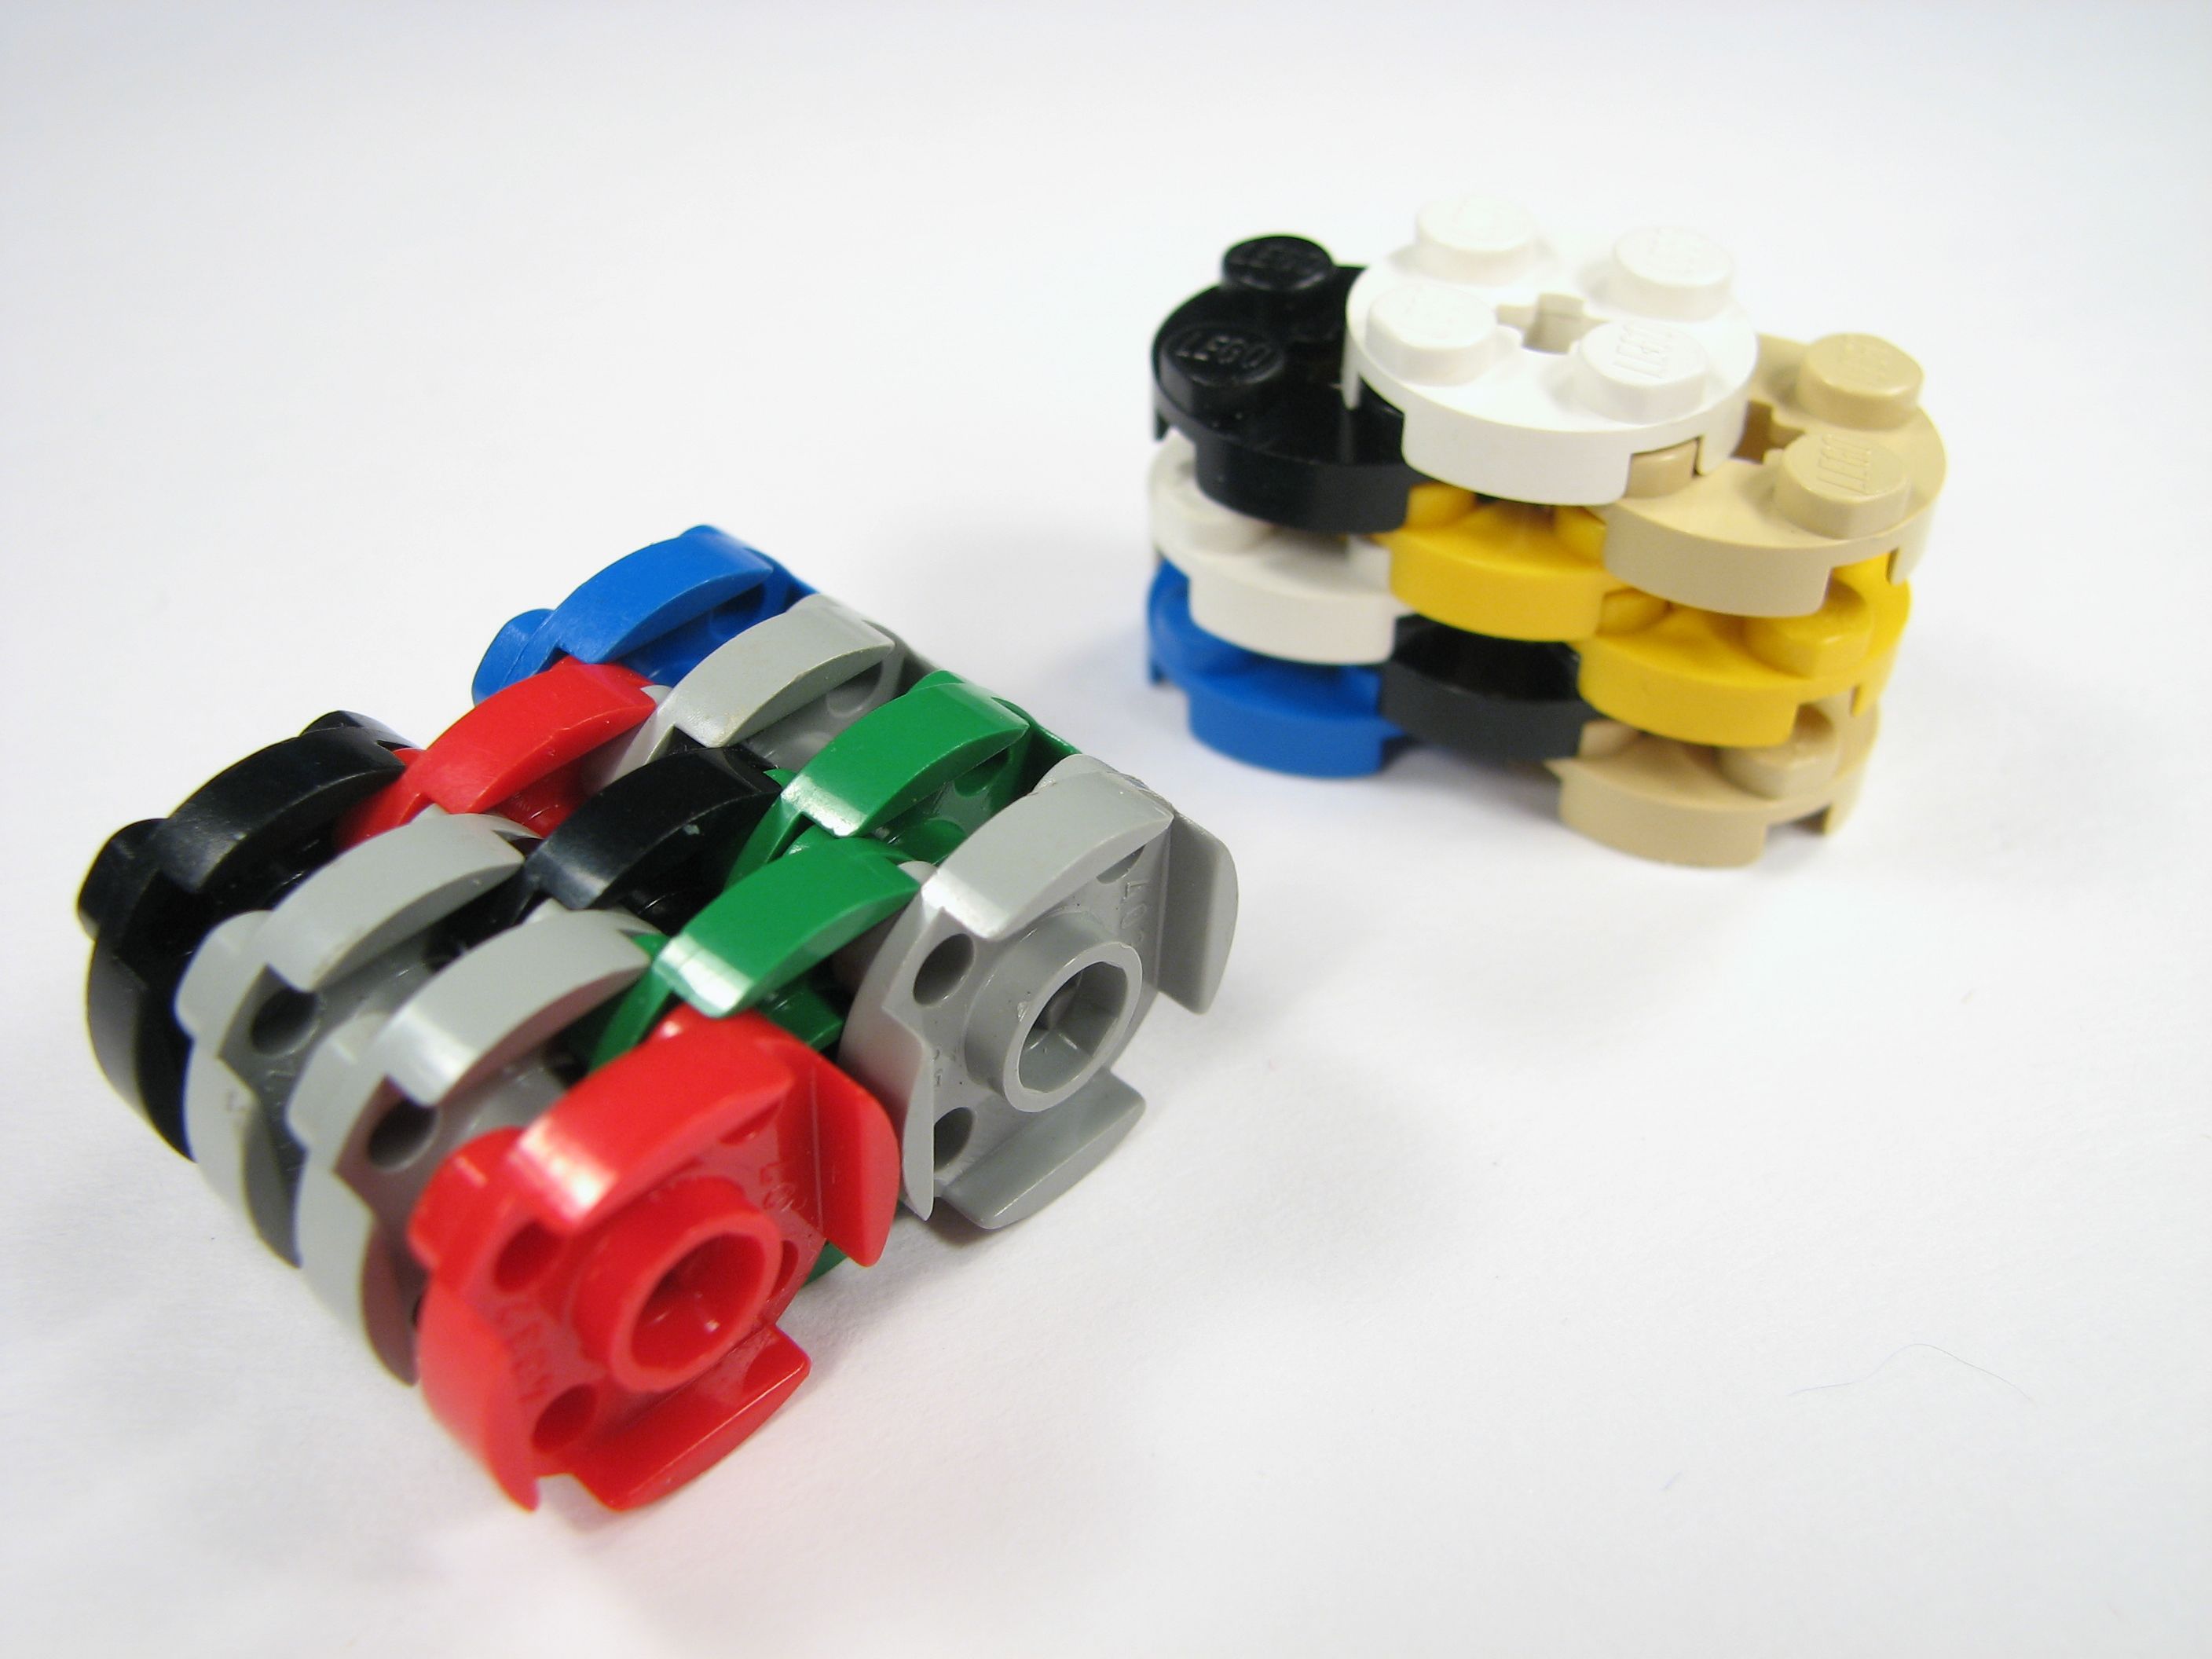
You can of course use the same stacking method with 2×2 round plates, although it ends up looking quite different and does not hold together quite as well. Recommended solutions: (1) Store these in a bin for small parts, unless you use them a lot or (2) follow the method for stacking 2×2 thick bricks shown later, rather than the method for 2×2 flat plates.
There are, of course, some small parts that really are better off not built into stacks.
We organize our small Technic pieces in this divided fishing tackle box with a locking lid. Note that as opposed to the set-of-drawers method, this lets you see– and access– everything at once.
We also keep a separate box for similarly small non-technic pieces.
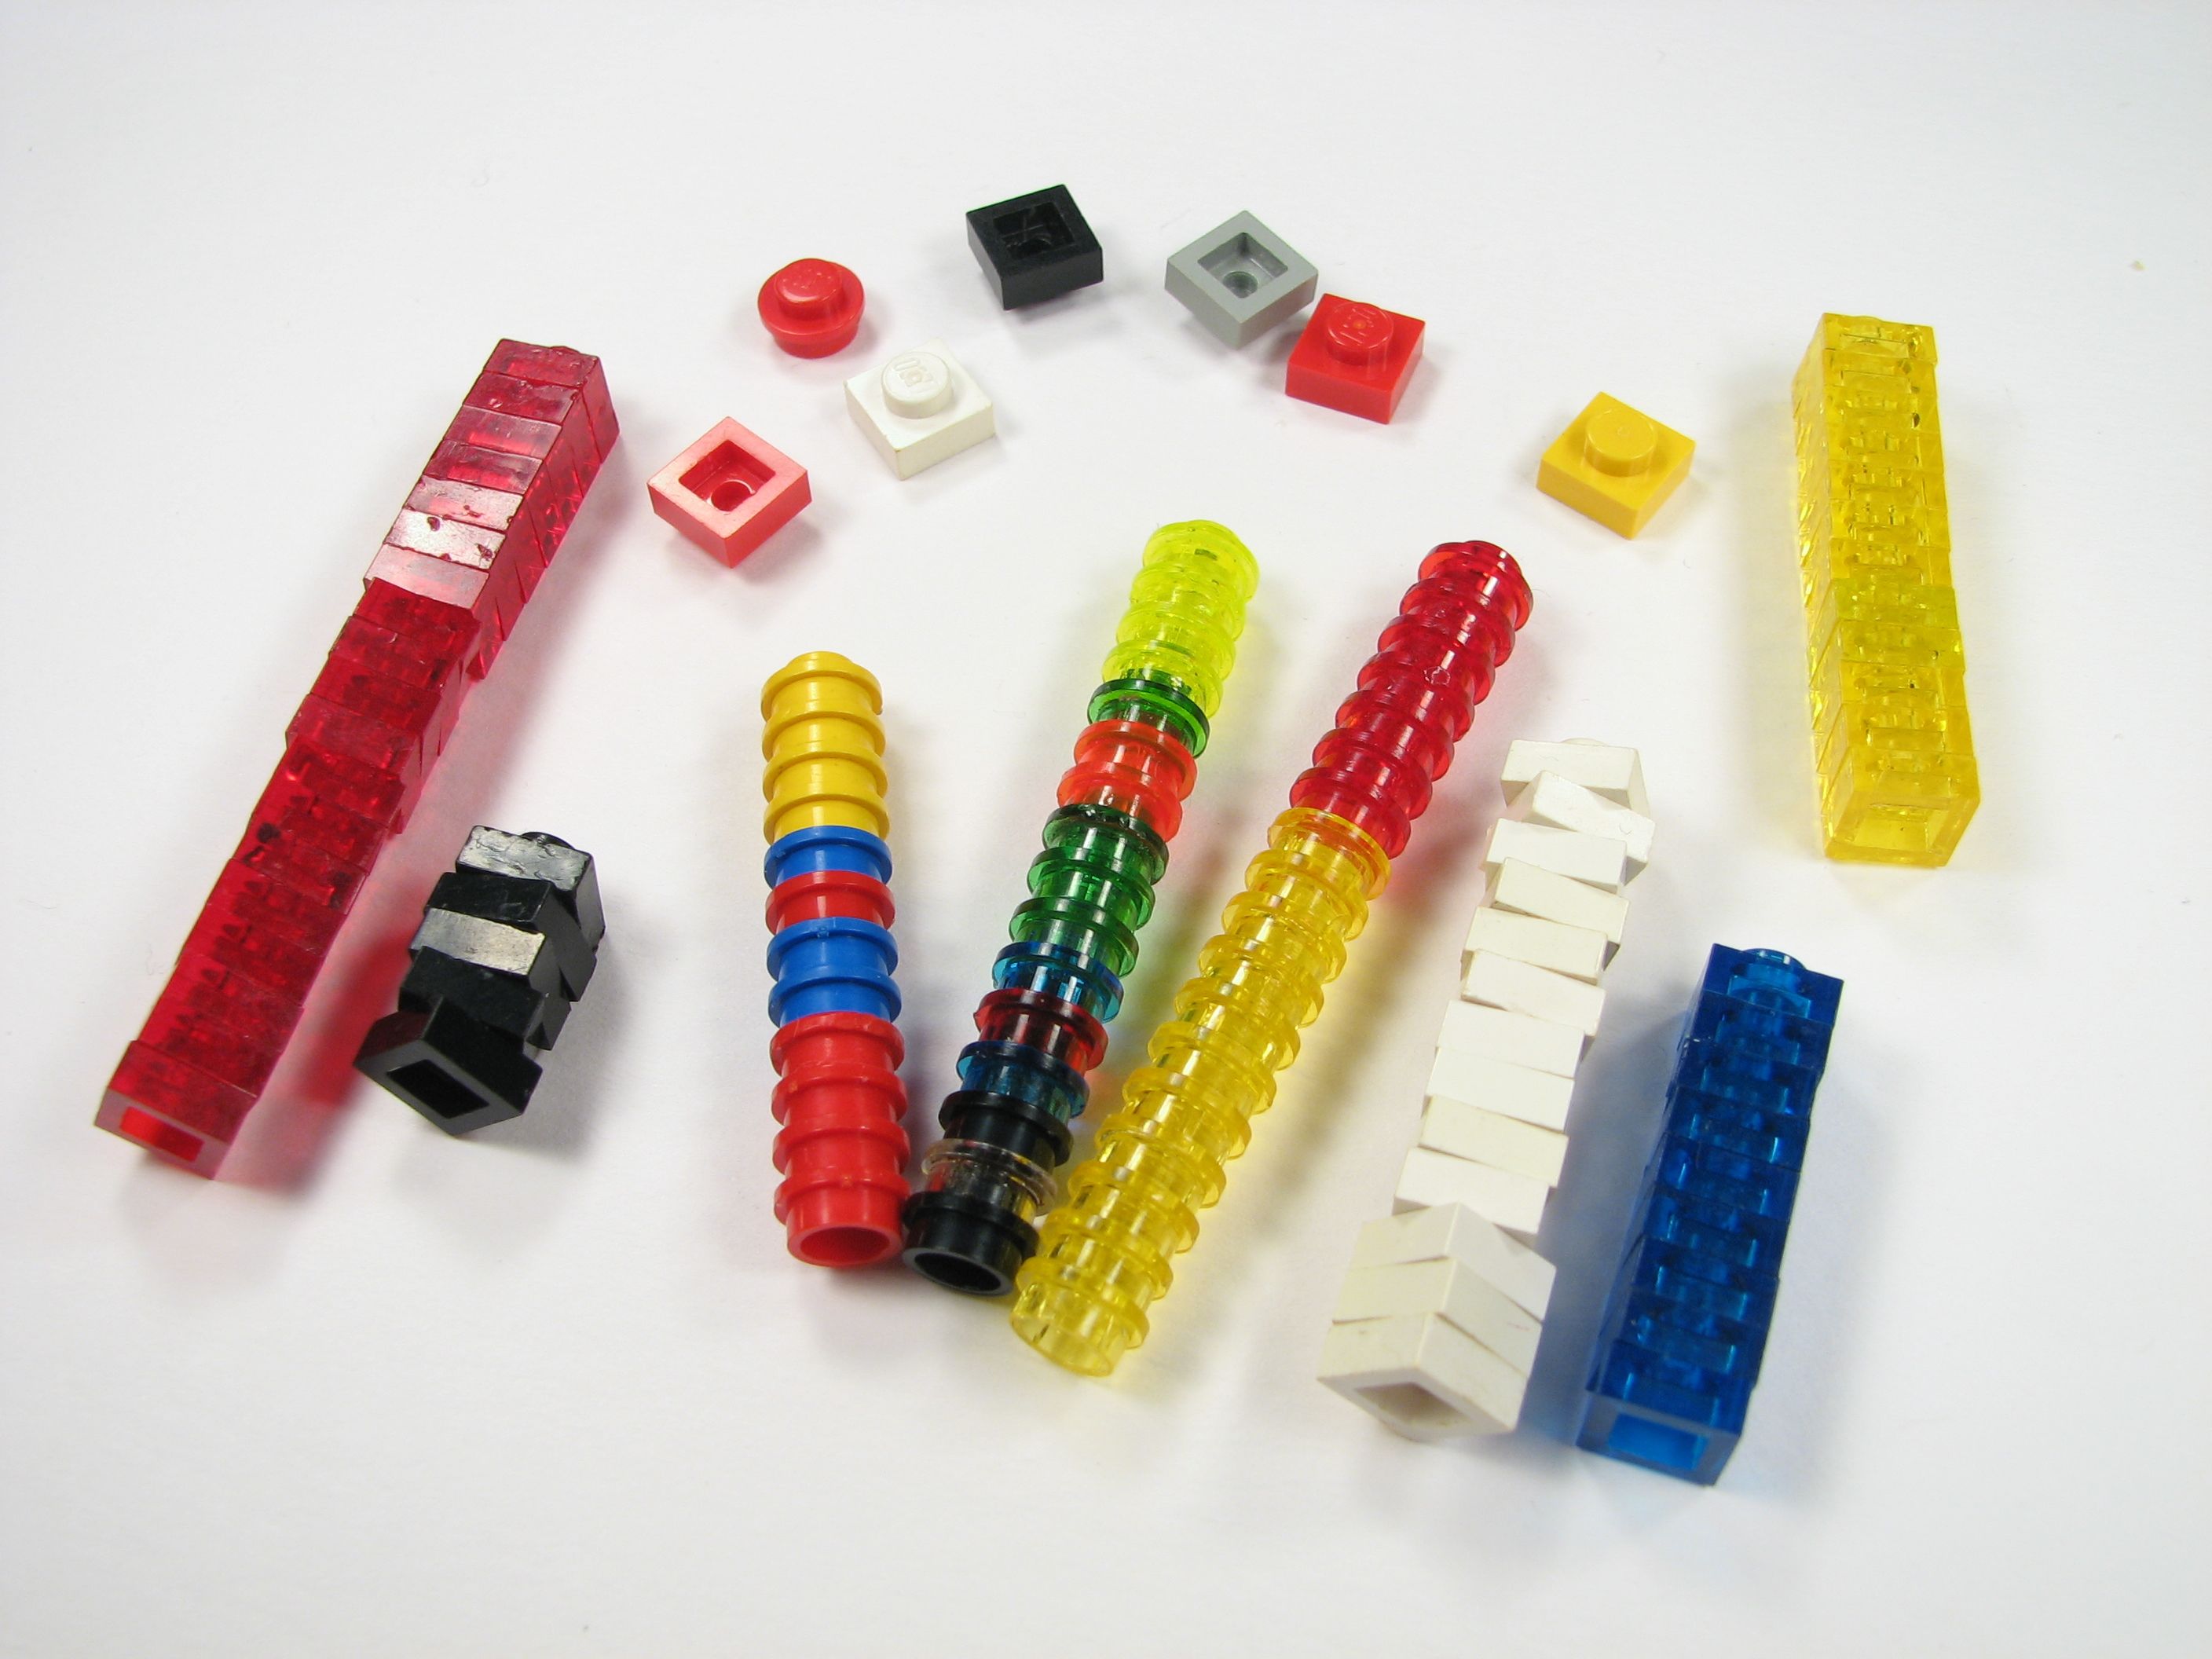
Speaking of small parts, these are our smallest parts that can be stacked. These 1×1 flat plates form neat columns that we store in the non-technic small parts bin.
There’s no trick to this, so why bother? It turns out to be useful because you can see what you’ve got at a glance– much more easily than with a drawer full of mixed pieces. (Do I have three blue round one-by-one plates?) Also, the columns are much easier to work with. With my much-larger-than-kid-size fingers, it usually takes a couple tries to reach into a tiny bin and pick out (for example) a transparent red round piece rather than a green one. Working with the stacks instead, you can just pull out the column that you want and pick off the pieces that you need.
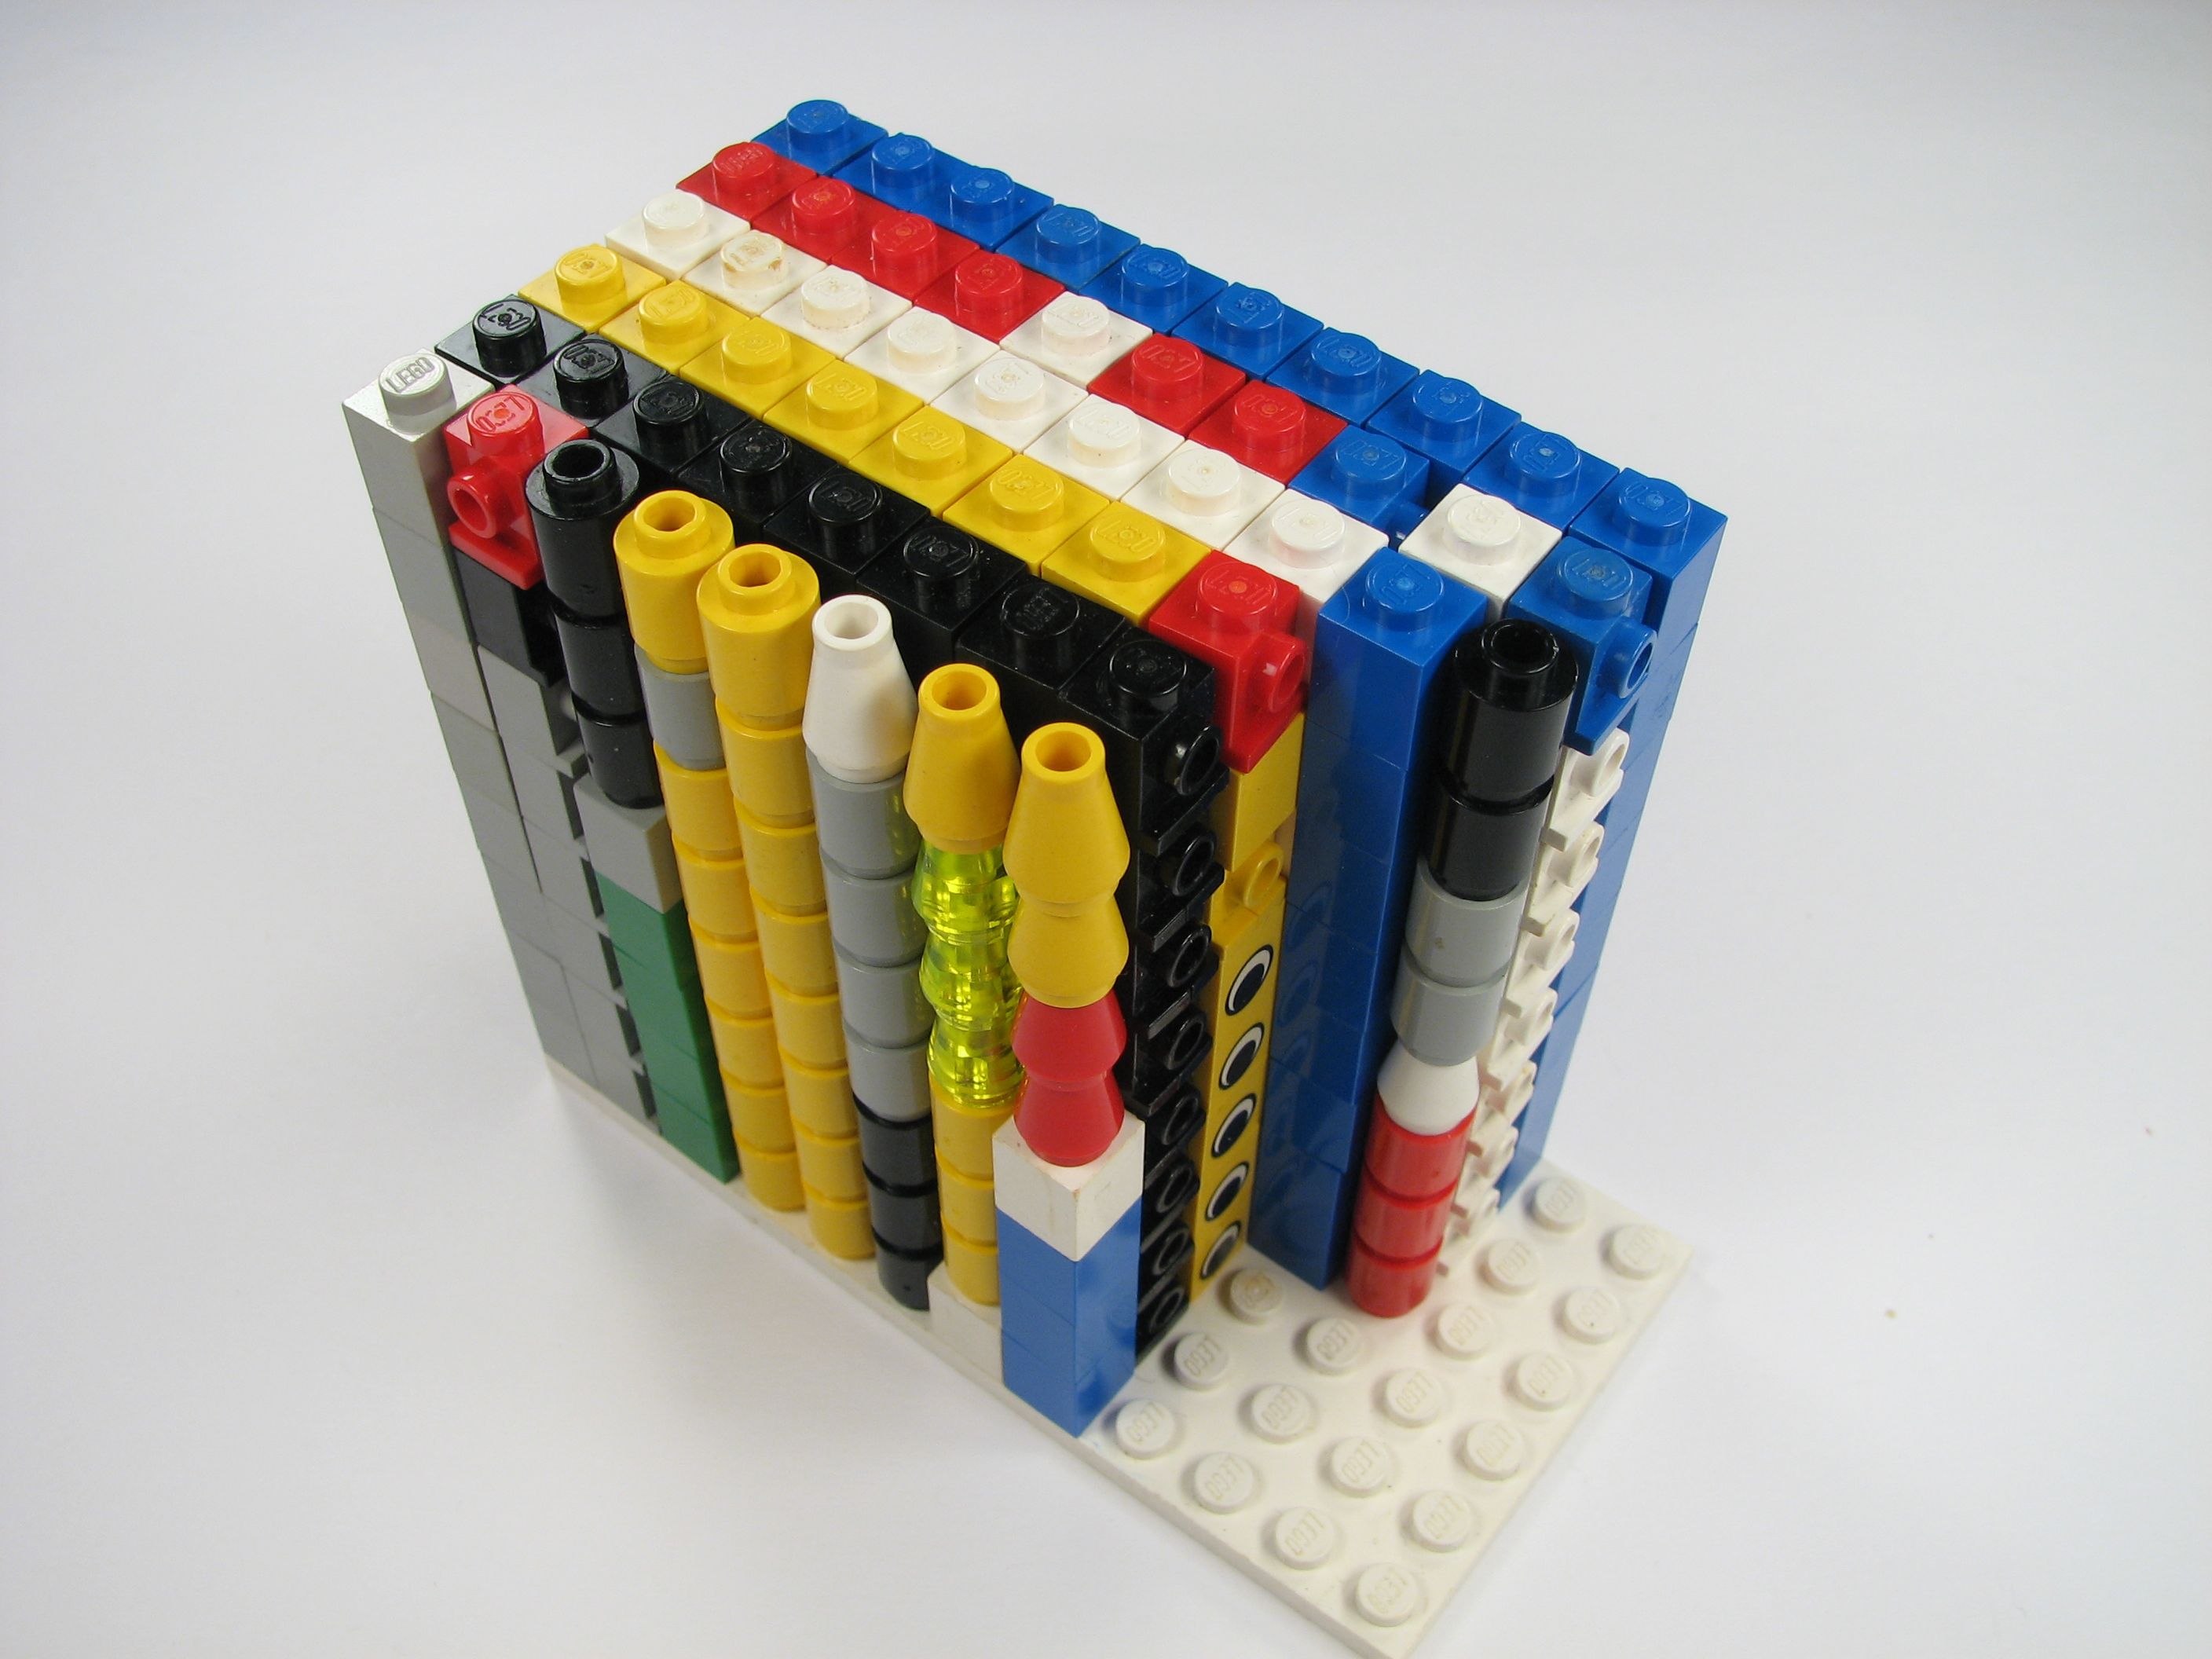
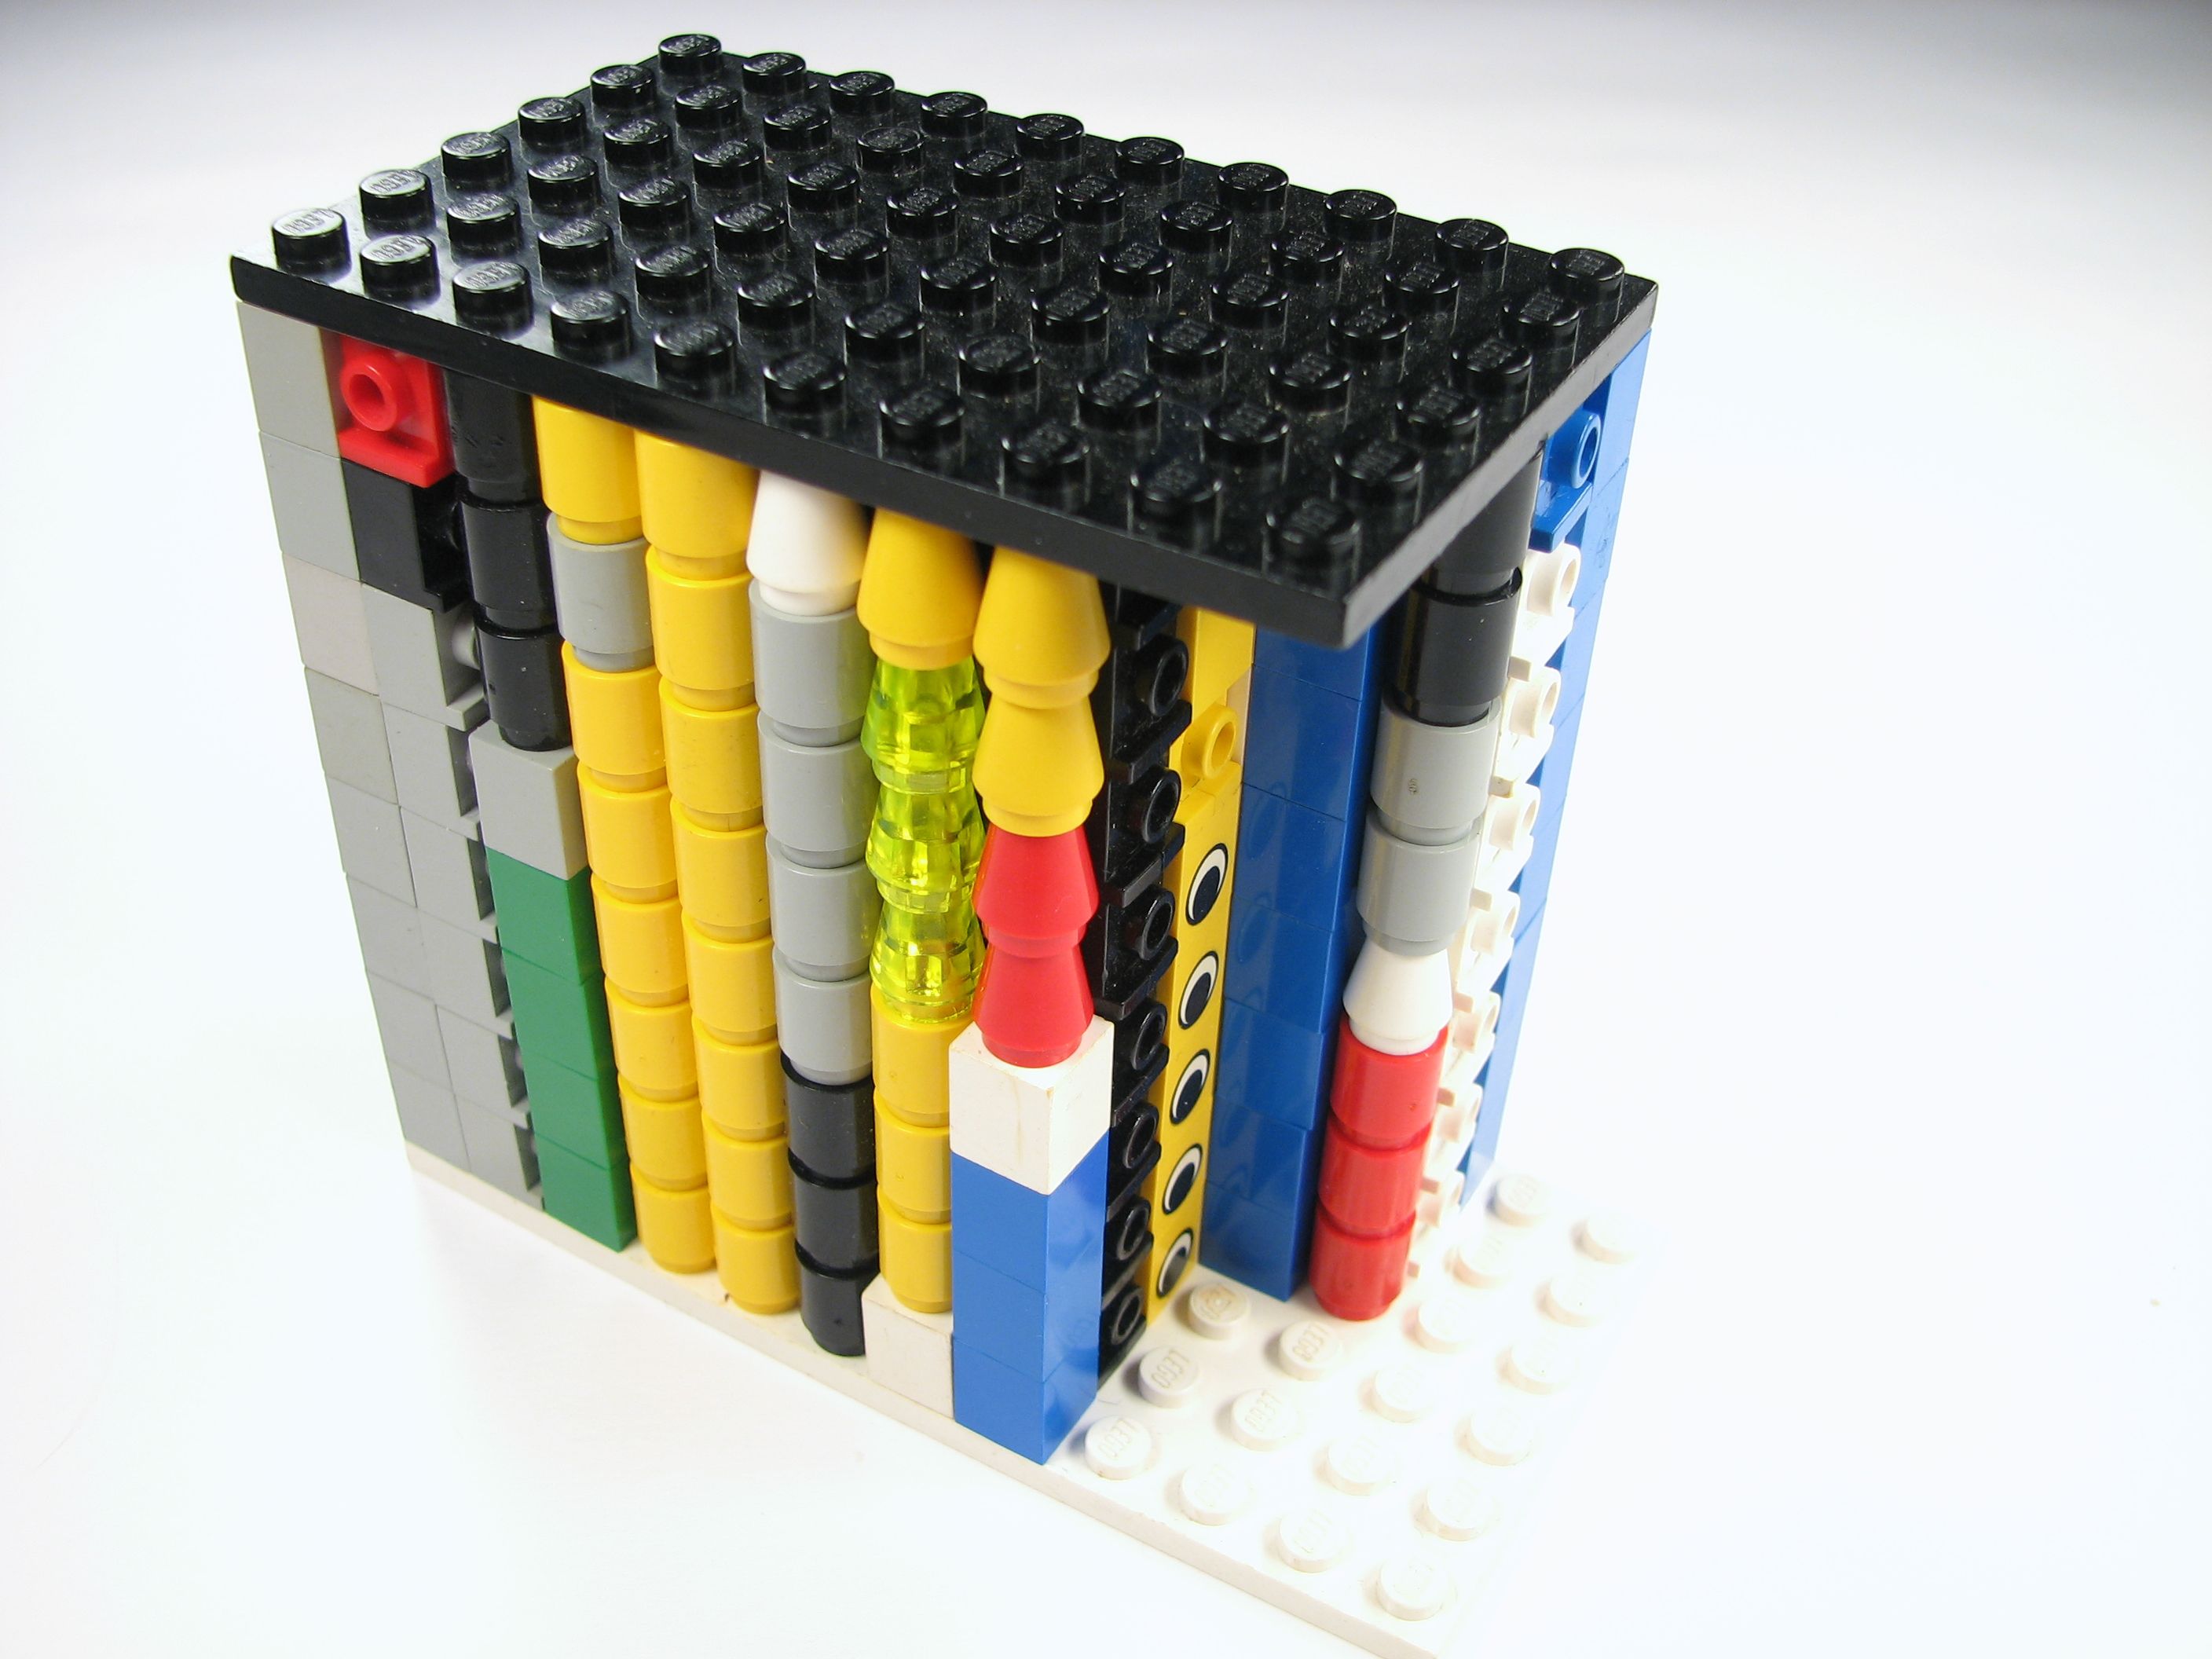
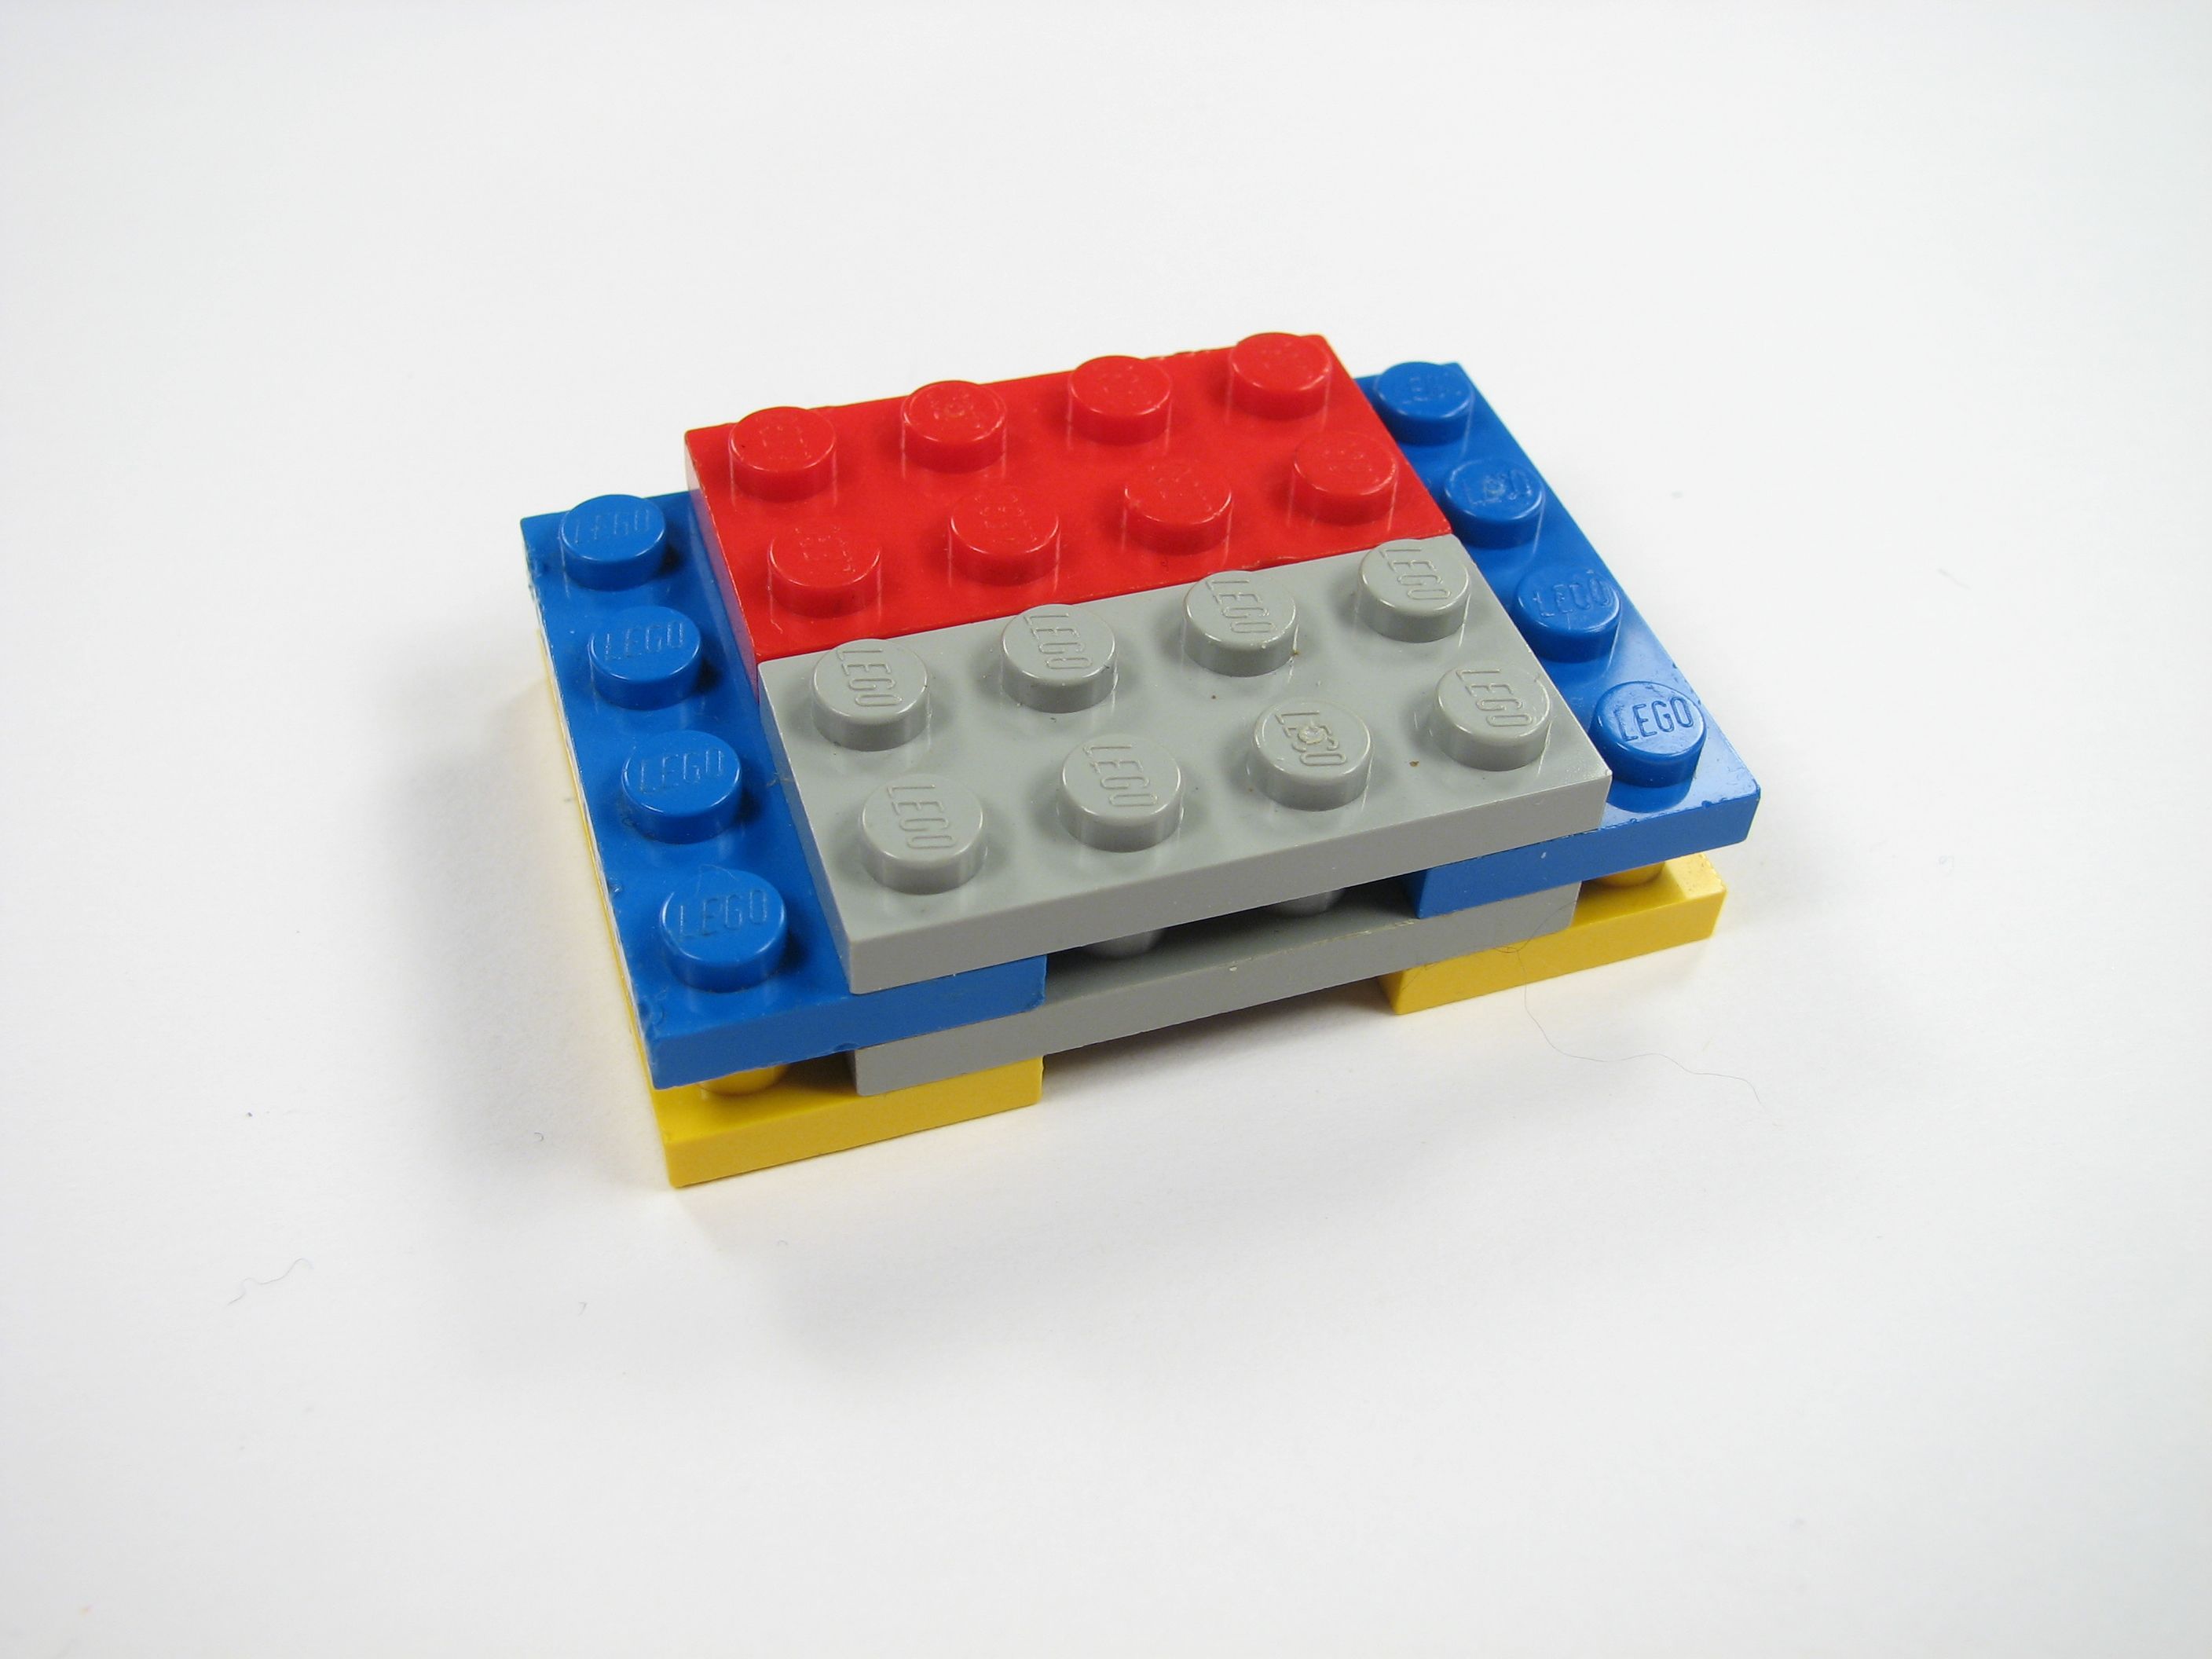
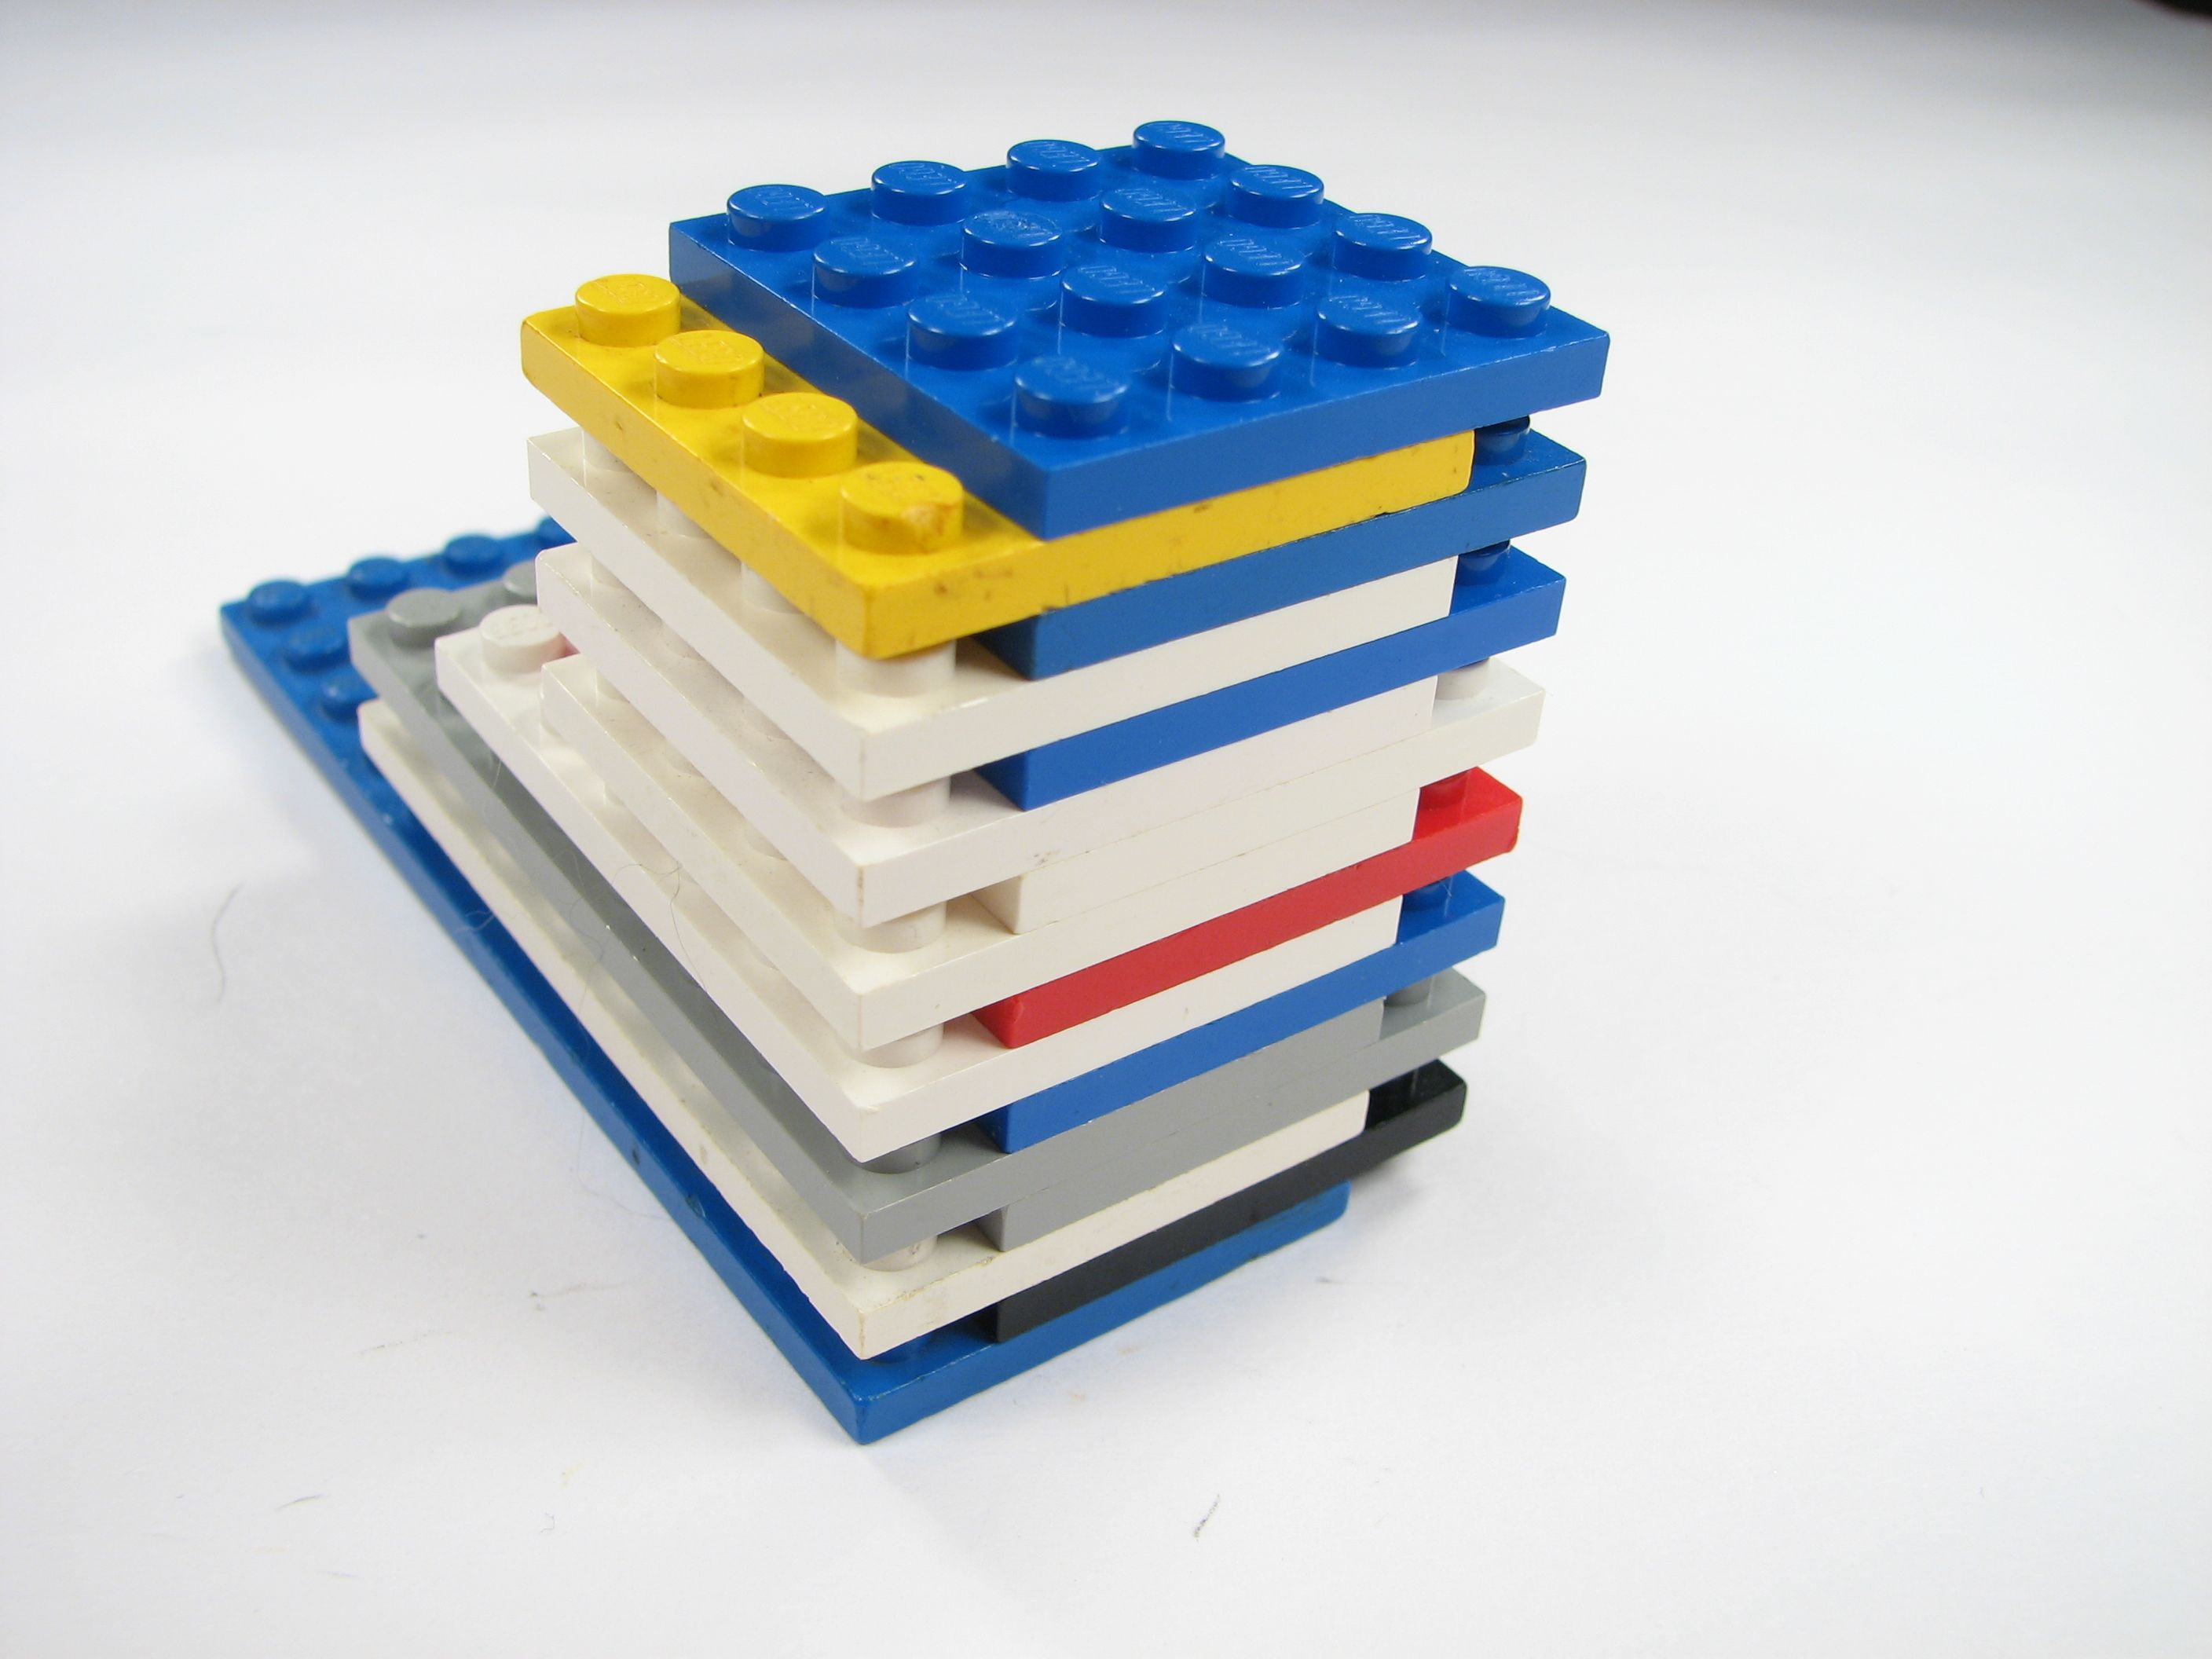
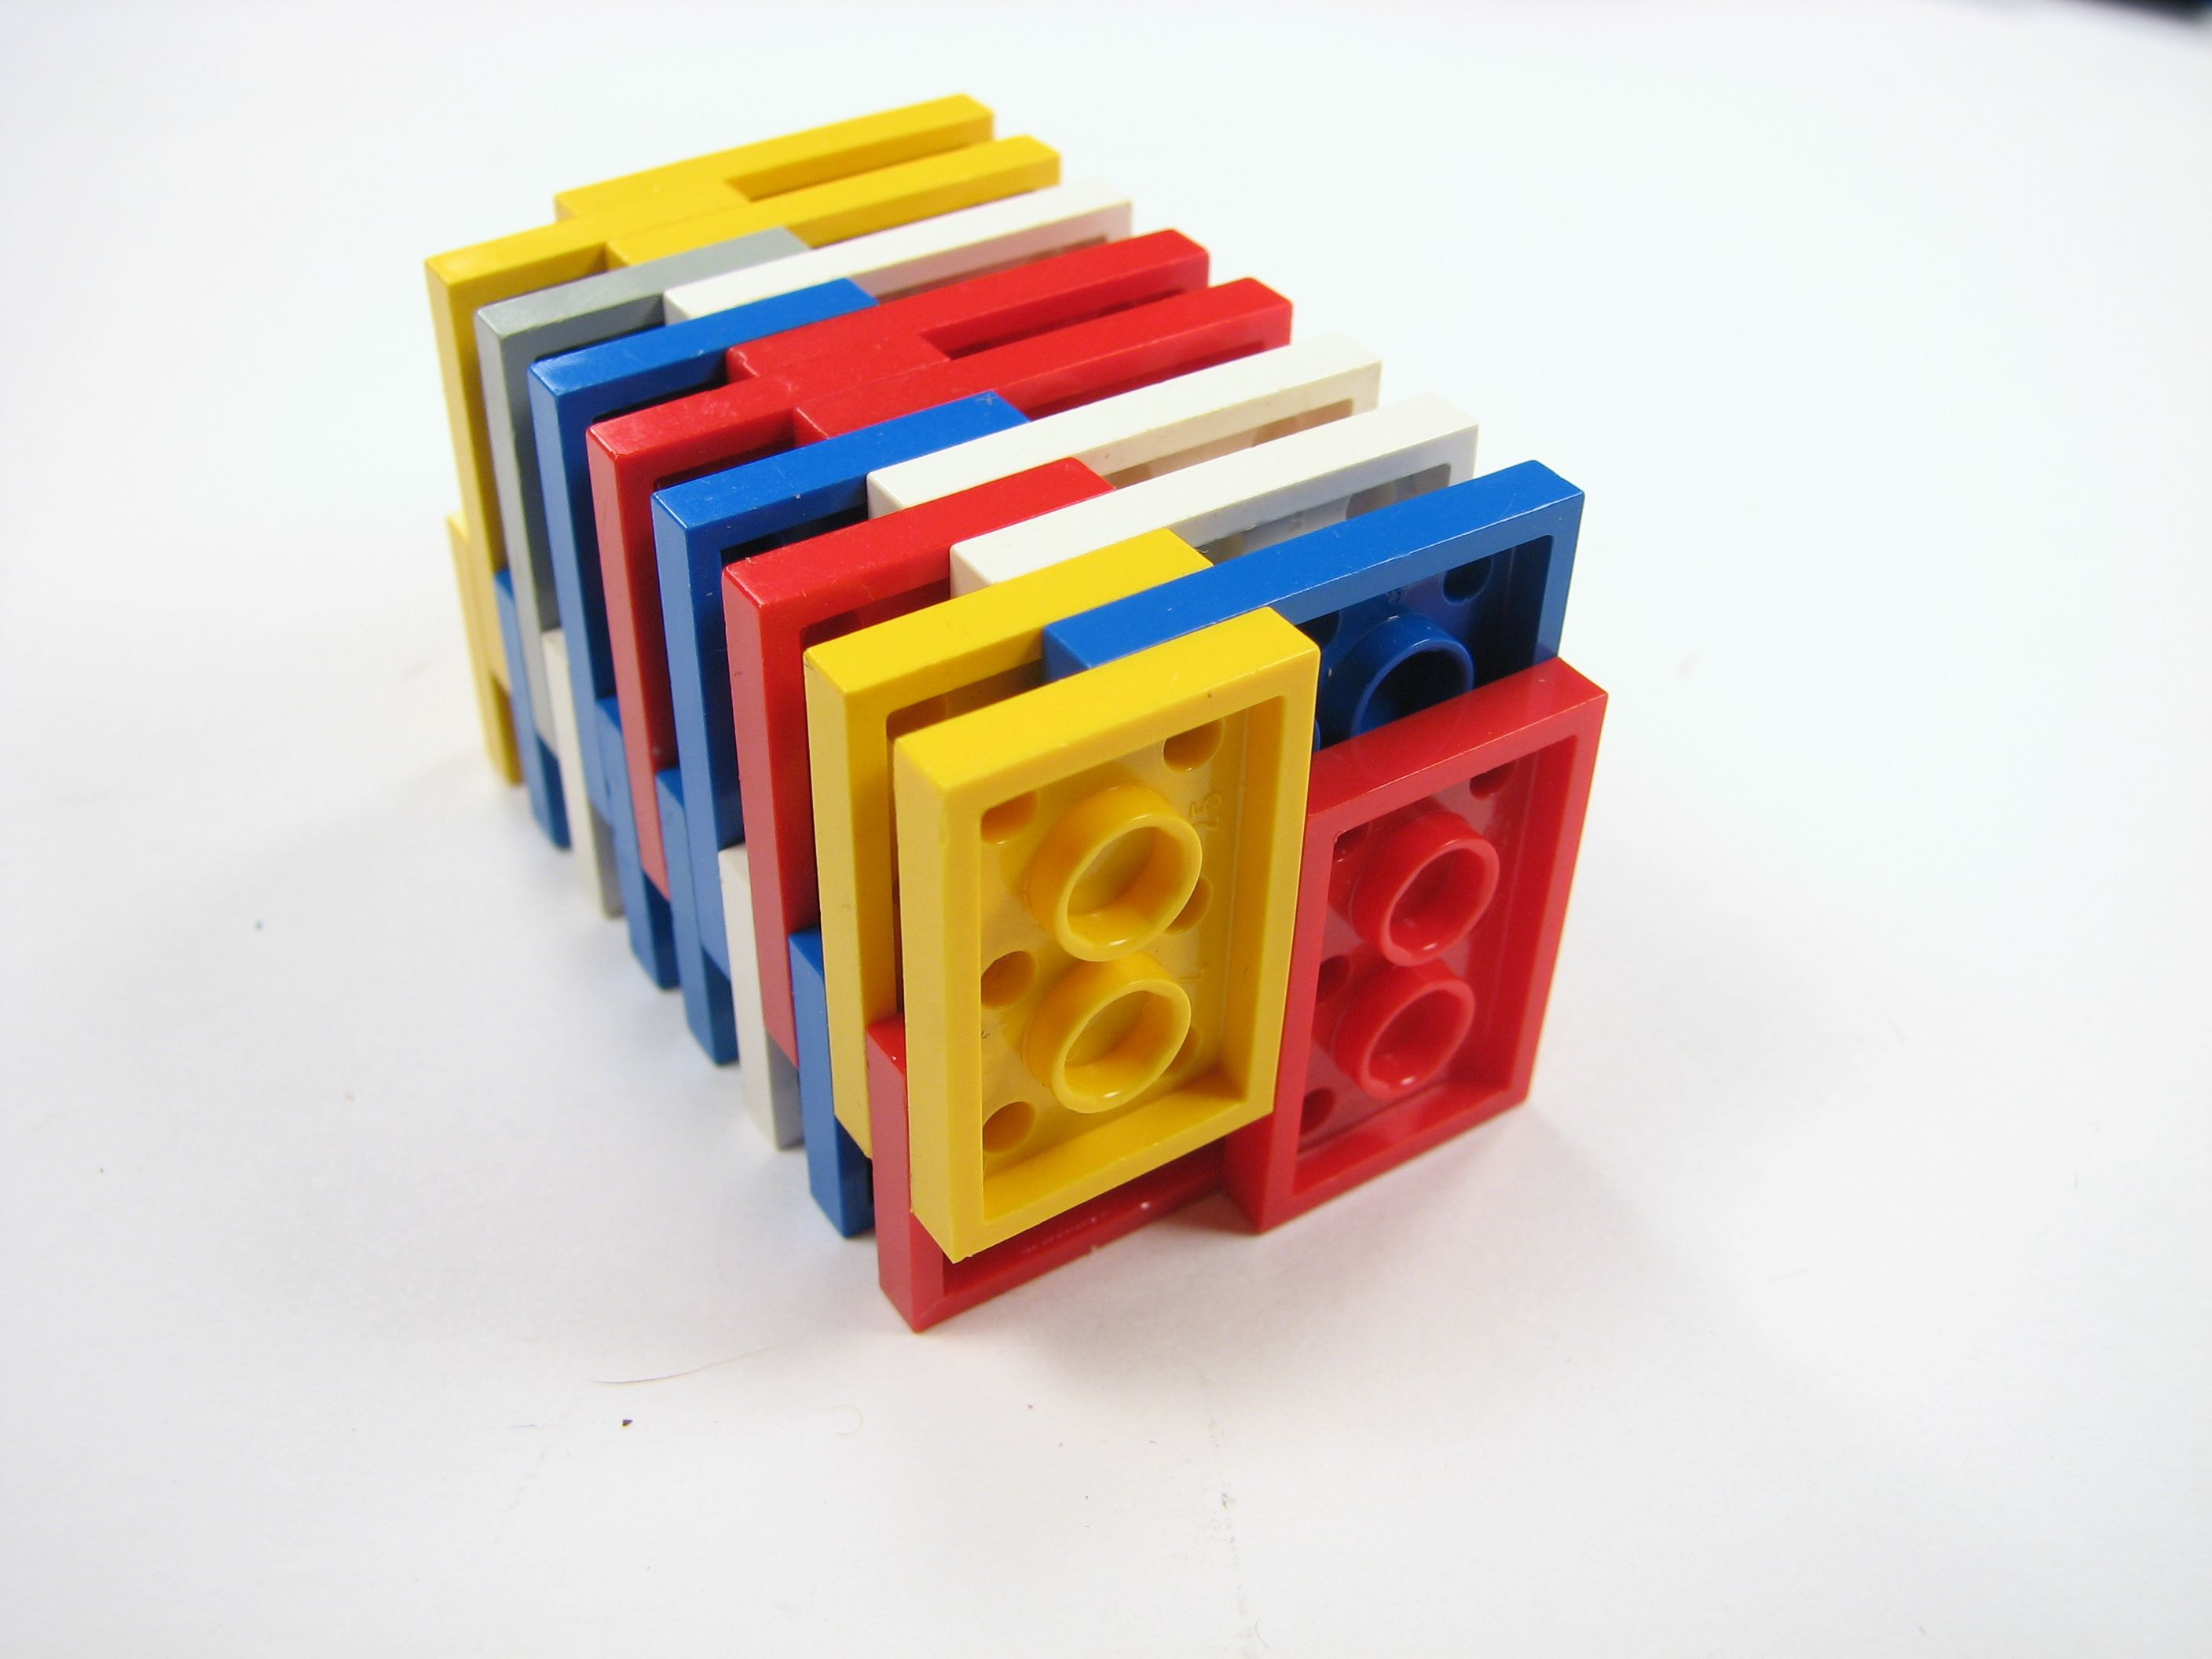
Here’s an interesting method that works well for storing 1×1 full-height bricks. Sandwich even-height columns of them between two large flat plates. When you need a 1×1 piece, peel off the top plate for fast and easy access. When it’s time to store them back in the bin, put the top plate back on. While the individual 1×1 columns have almost no strength, the whole assembly with top and bottom plates installed, is remarkably robust.
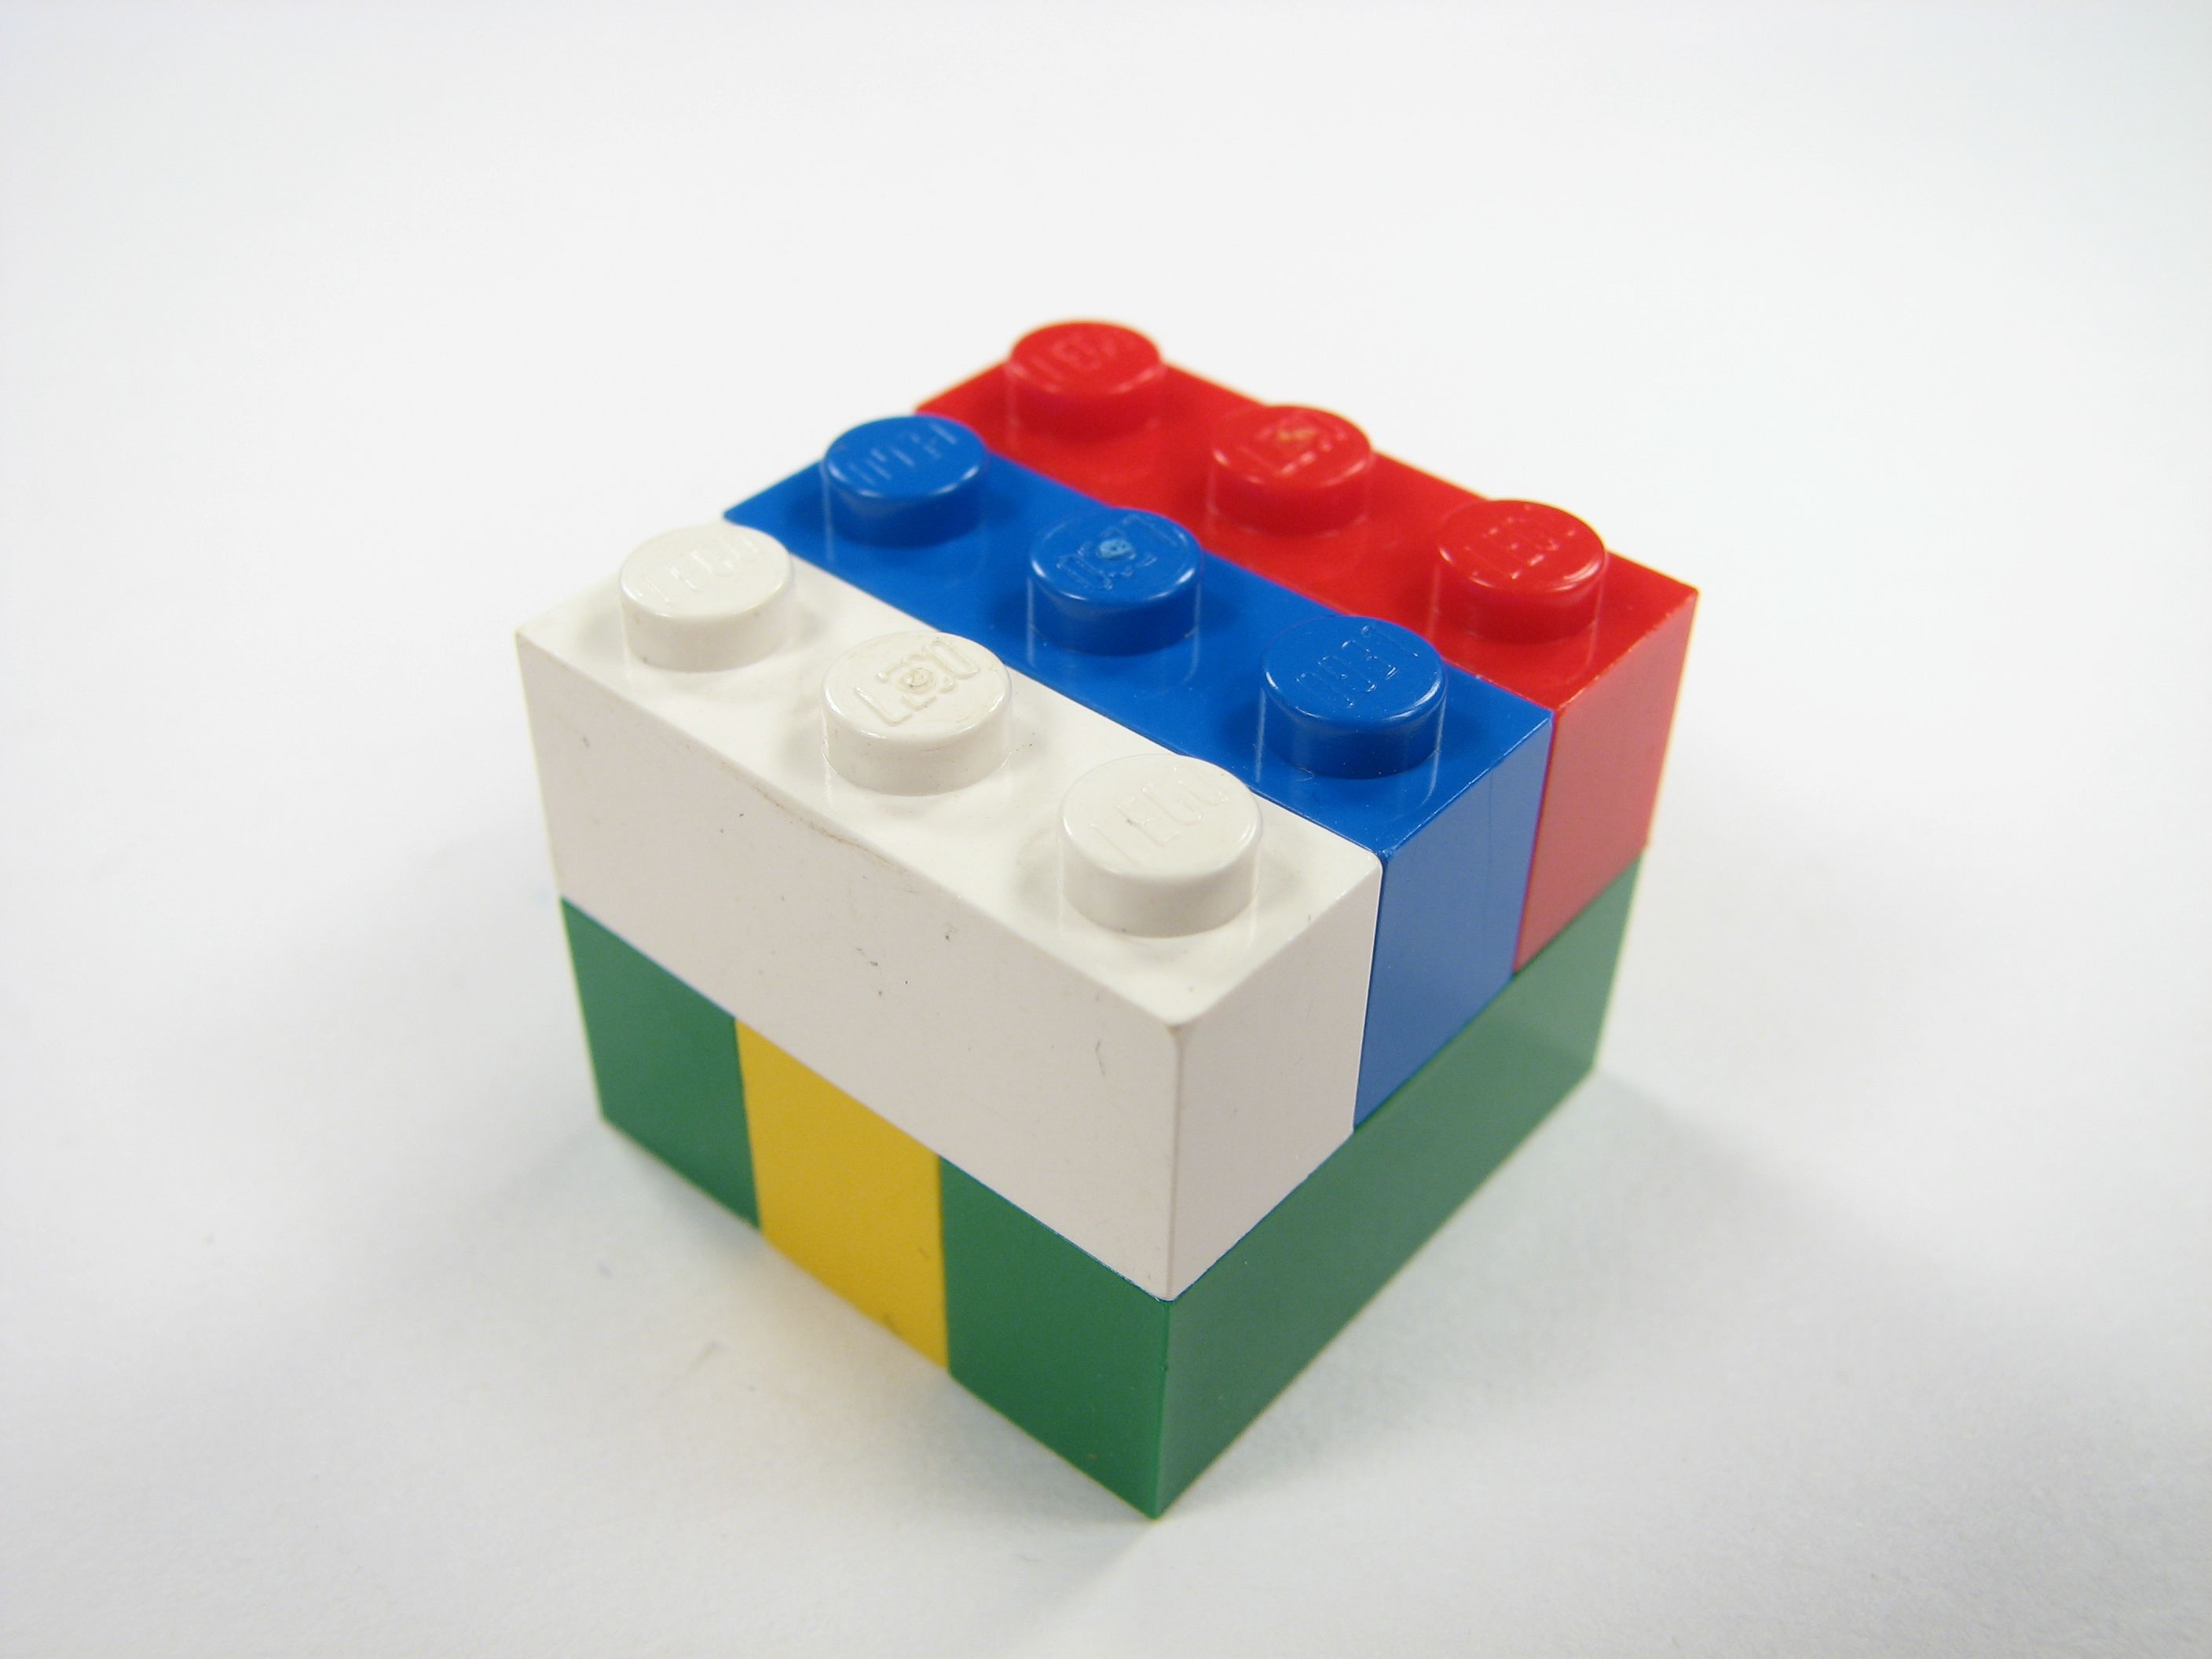
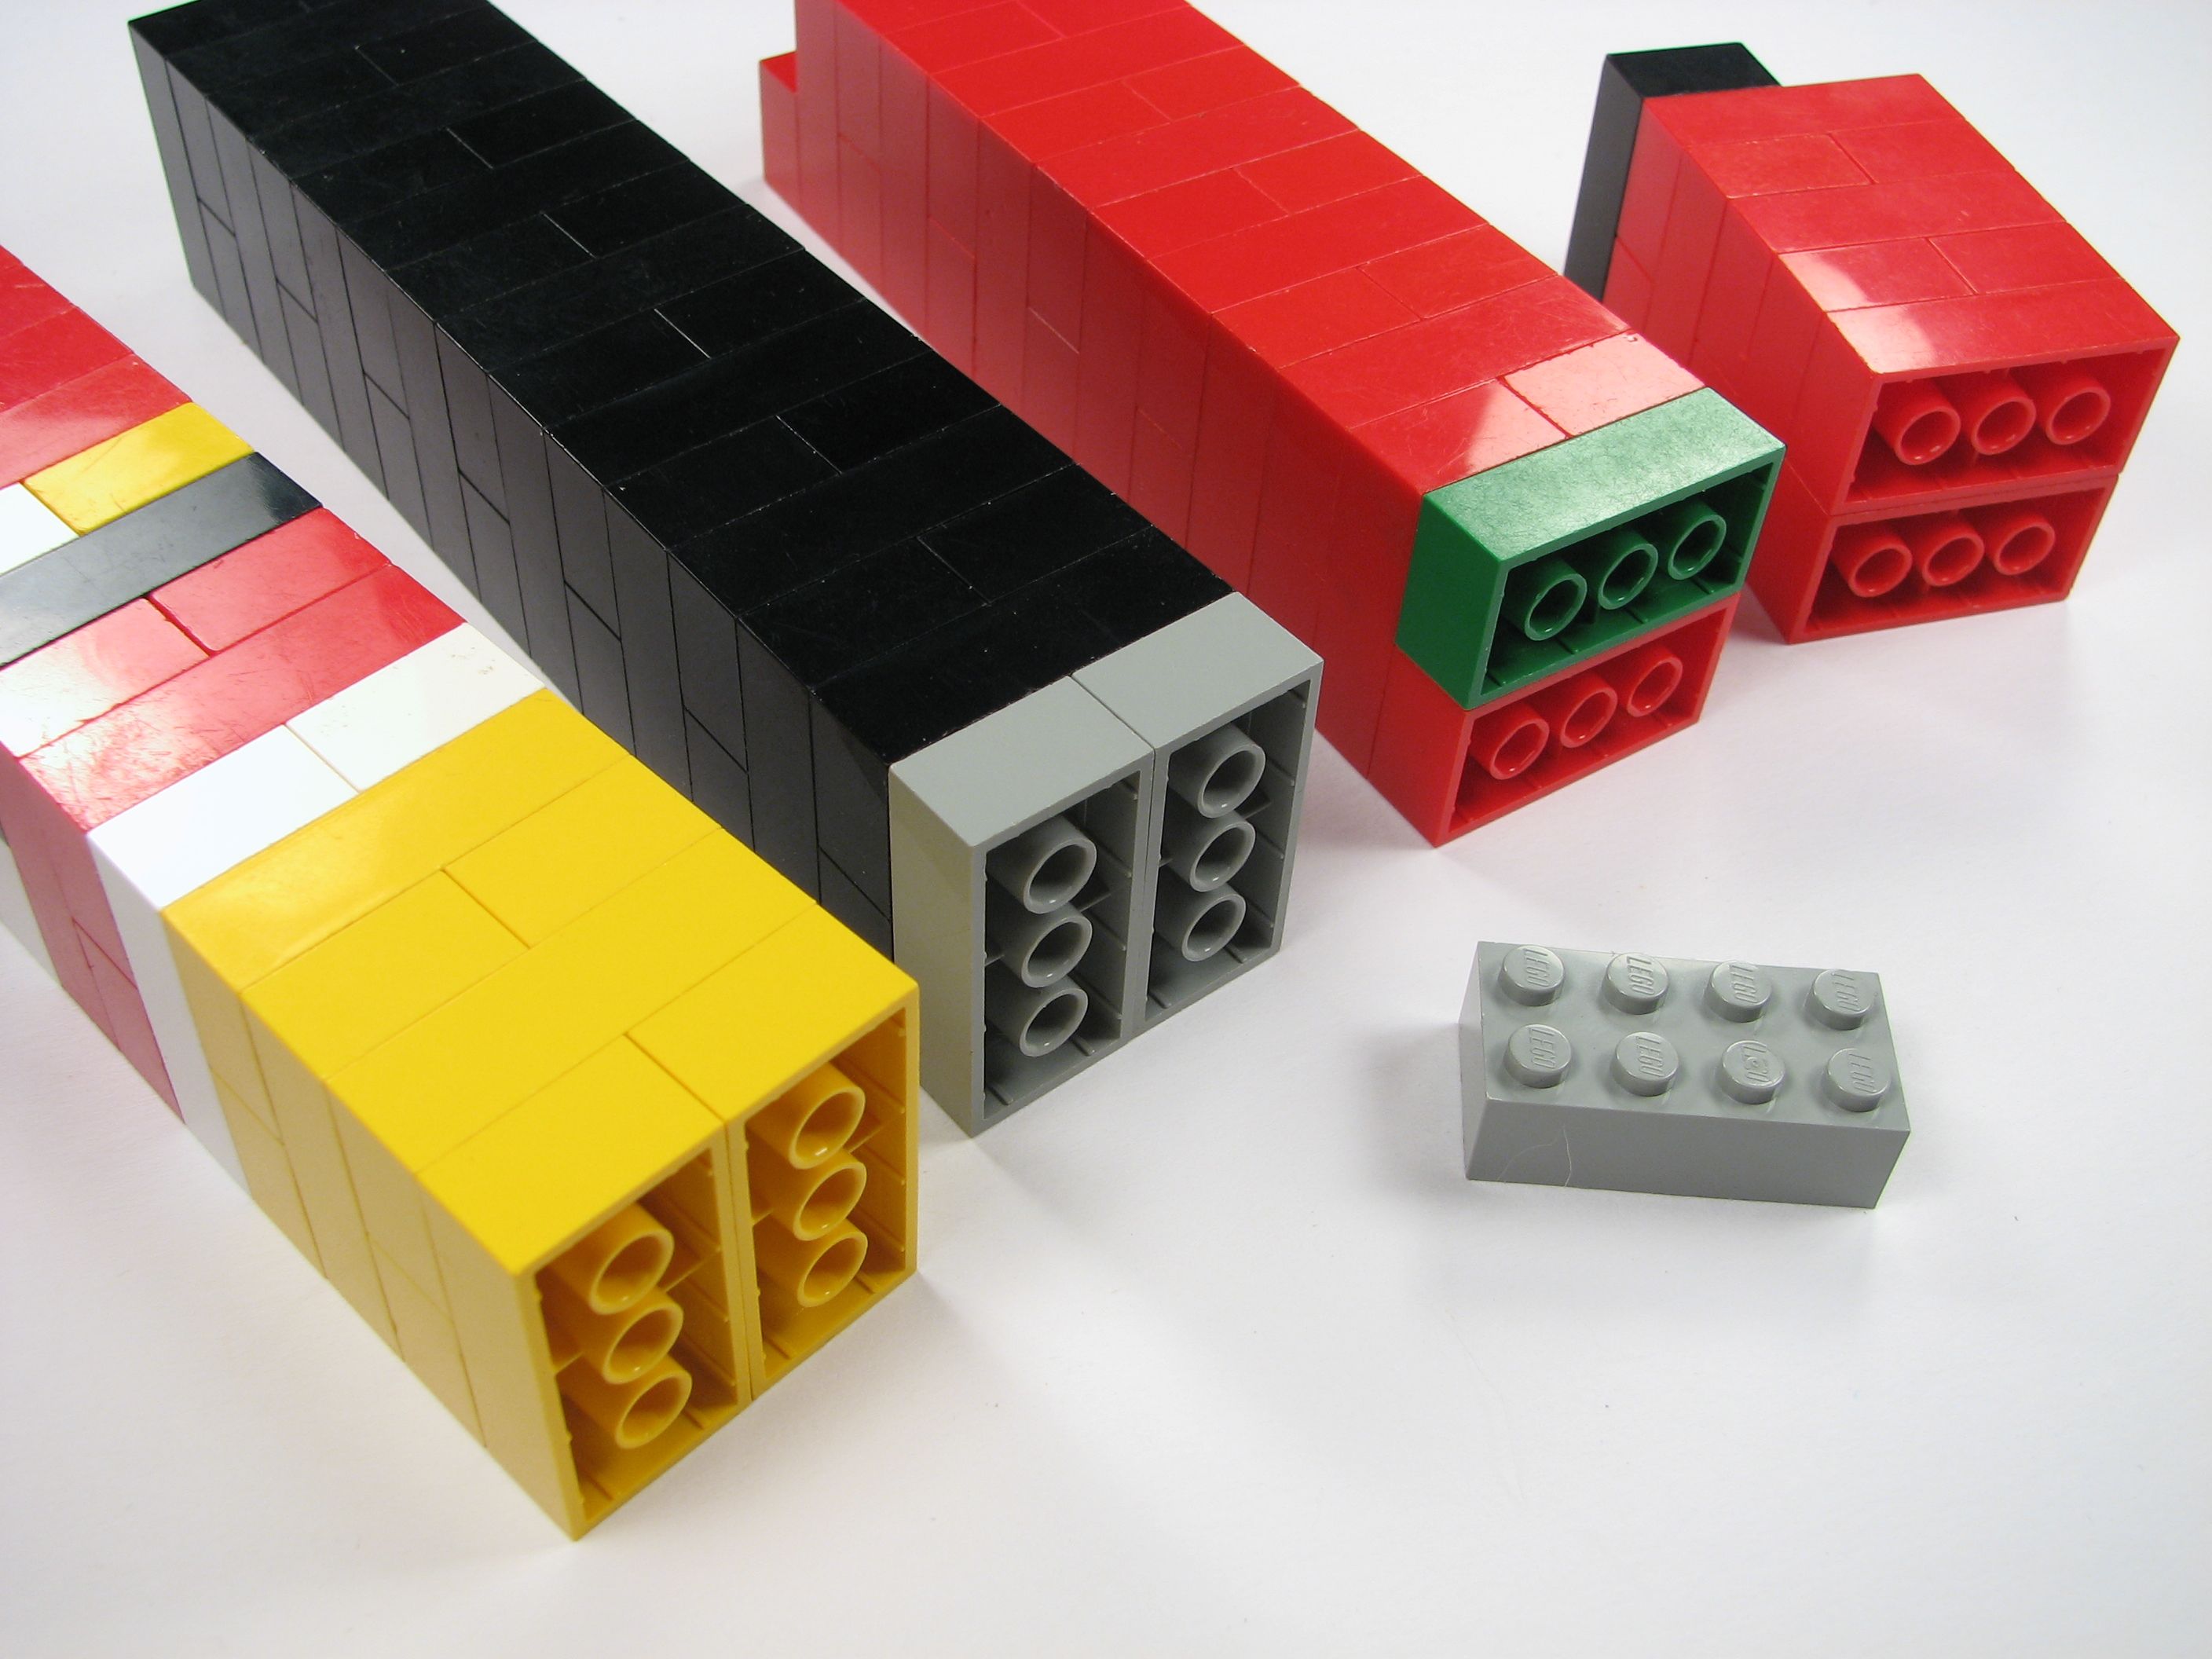
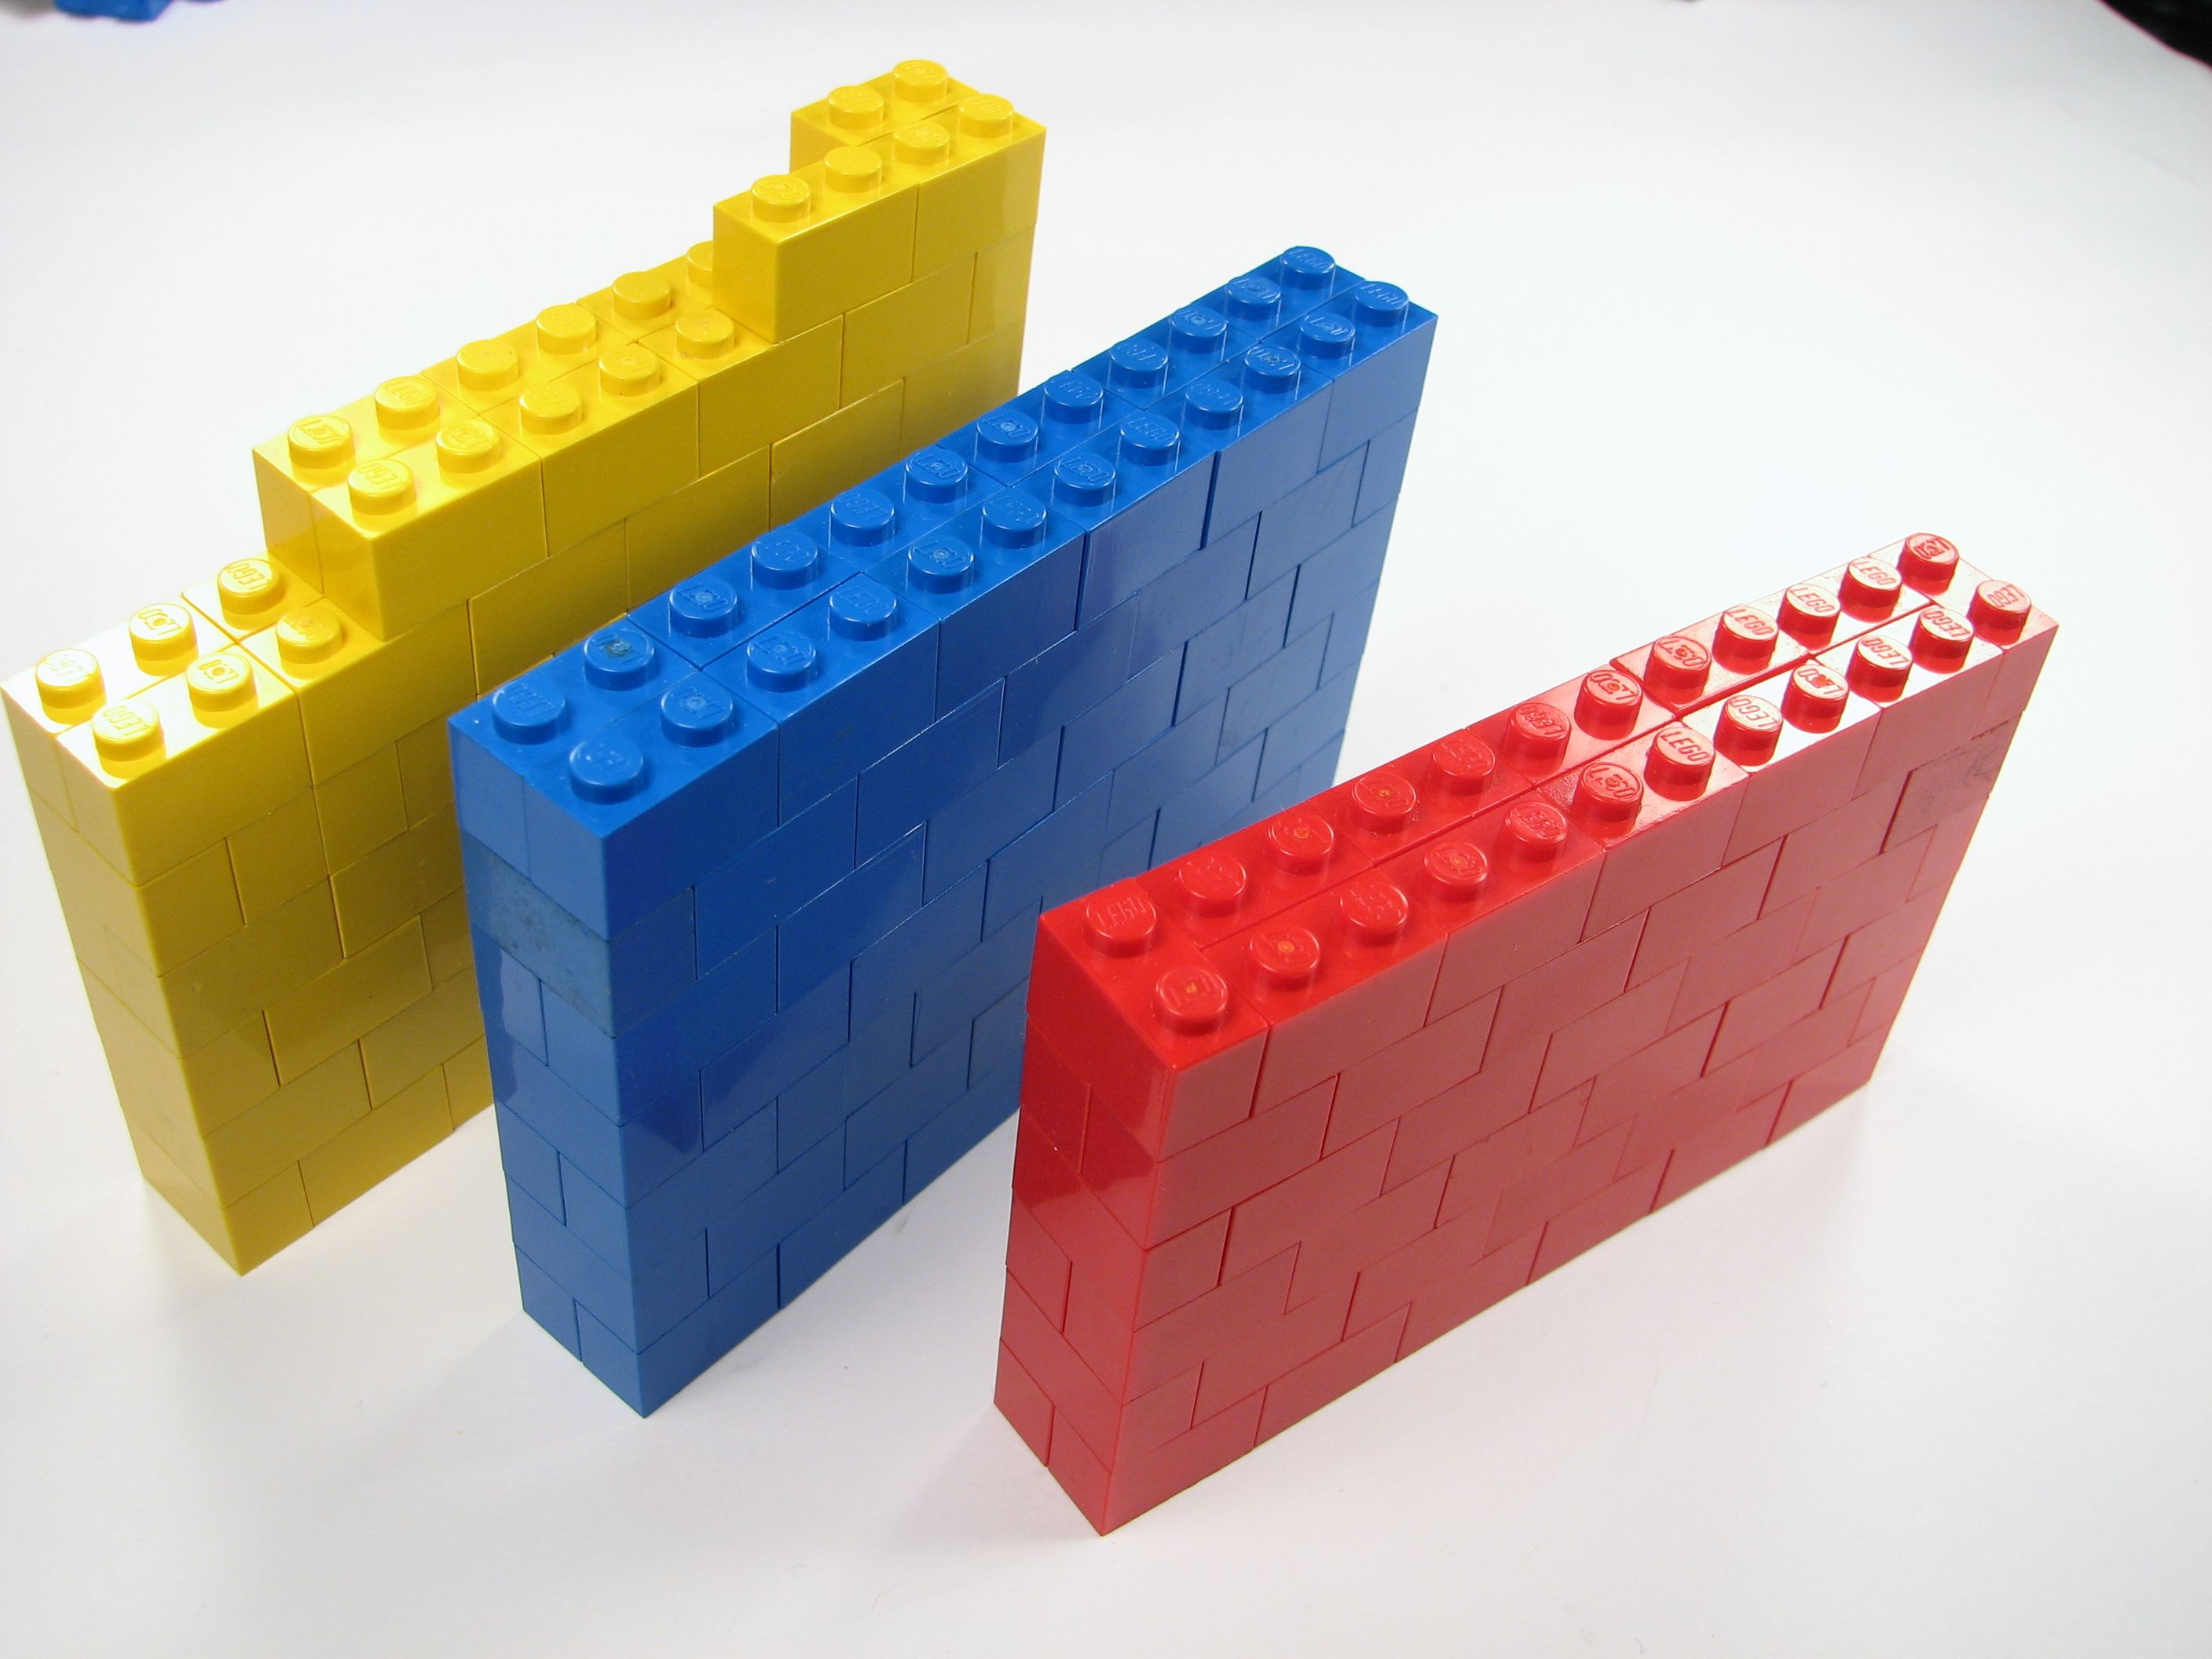
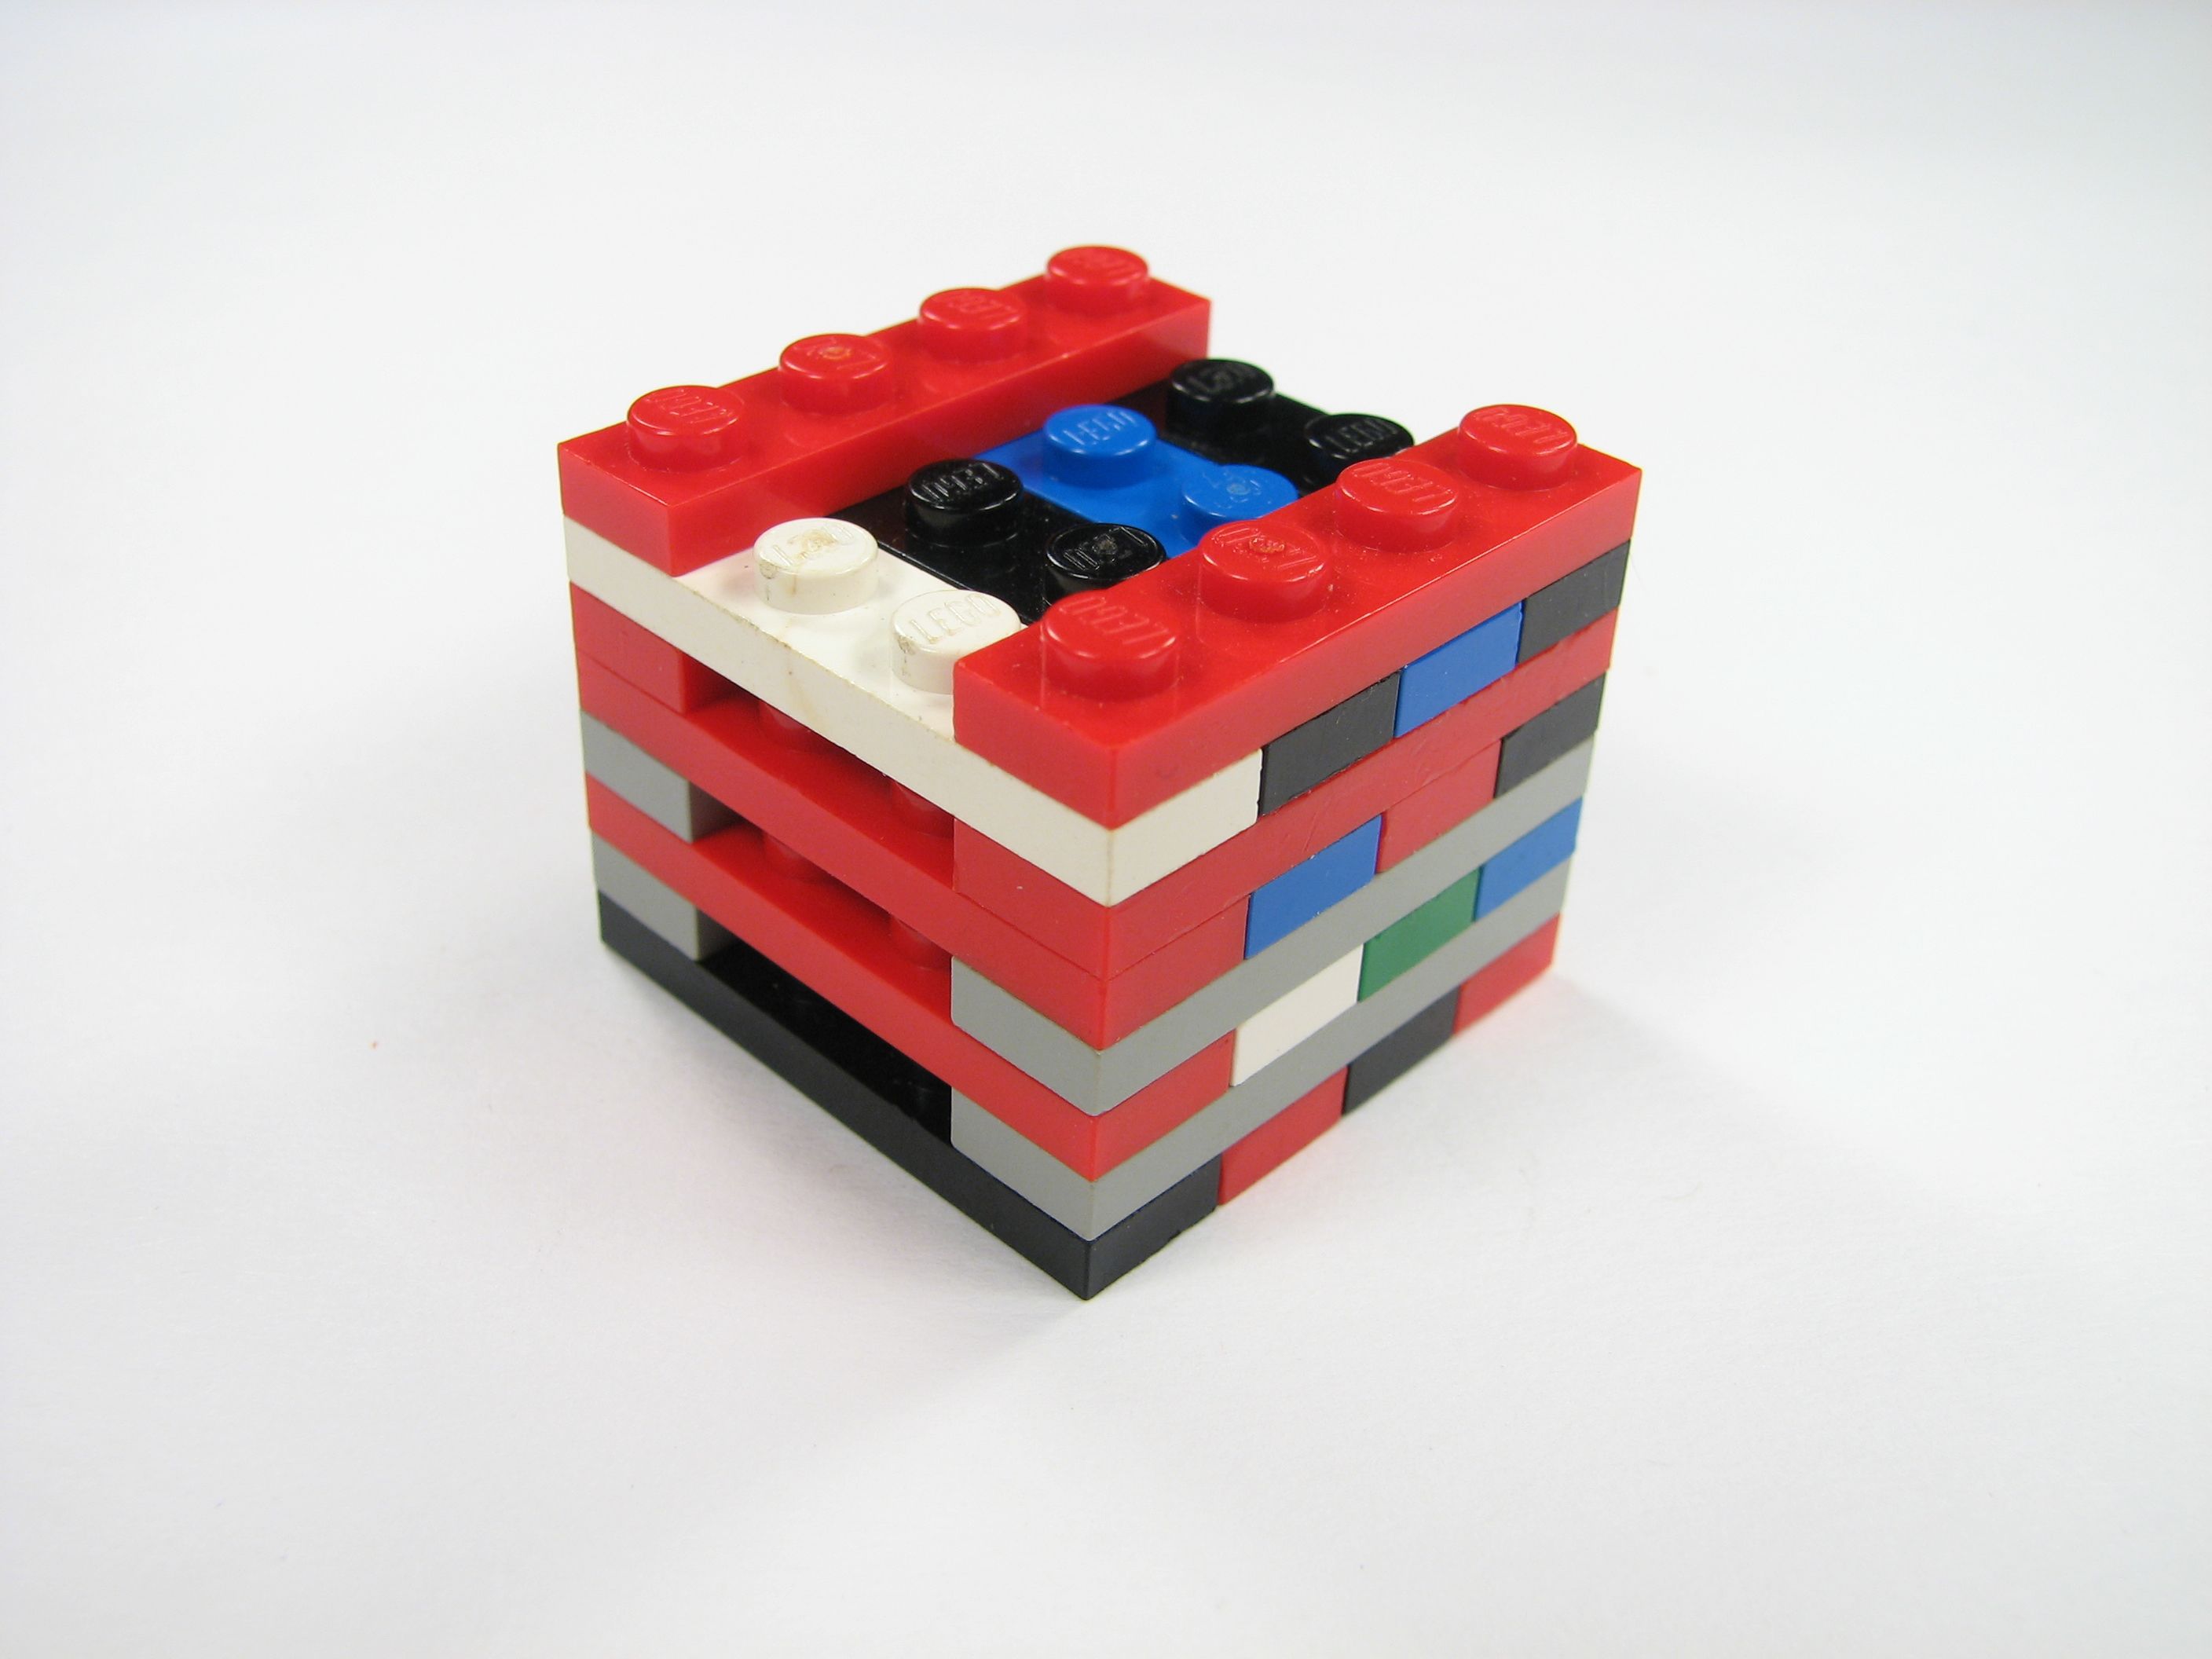
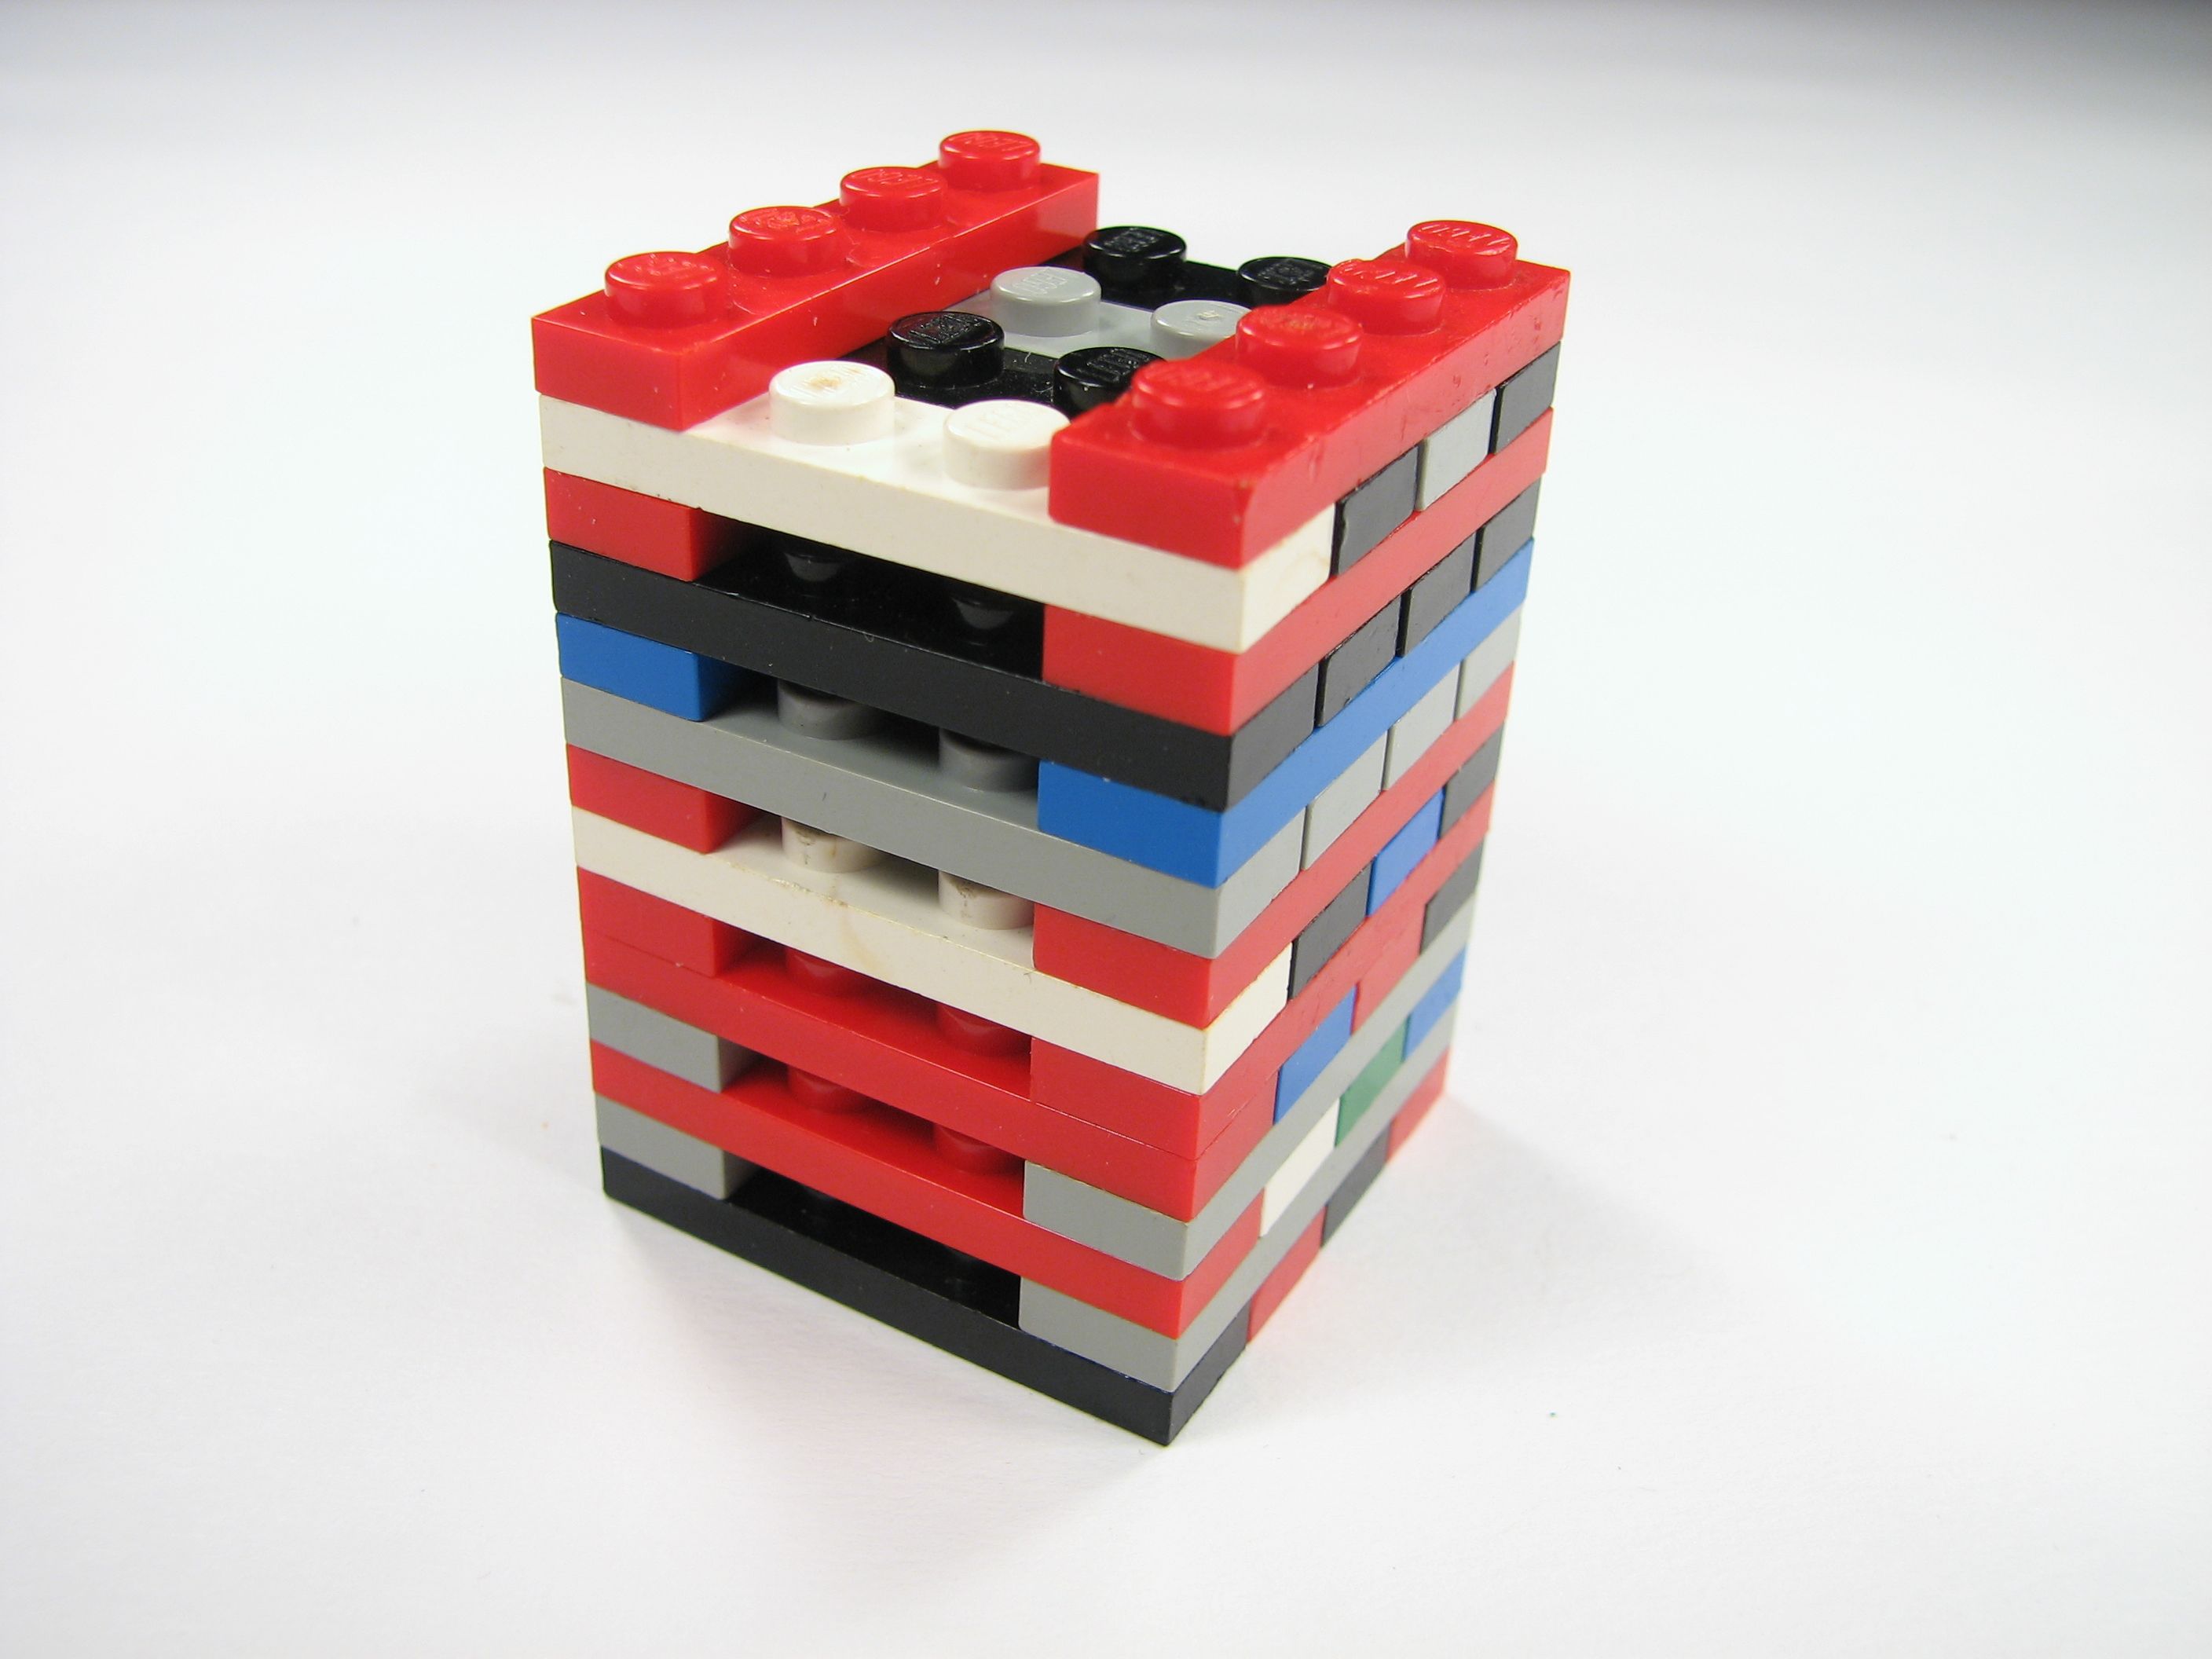
Build your own great wall. 2×2 full-height bricks are easy to deal with– these stacks are sturdy and always easy to disassemble.
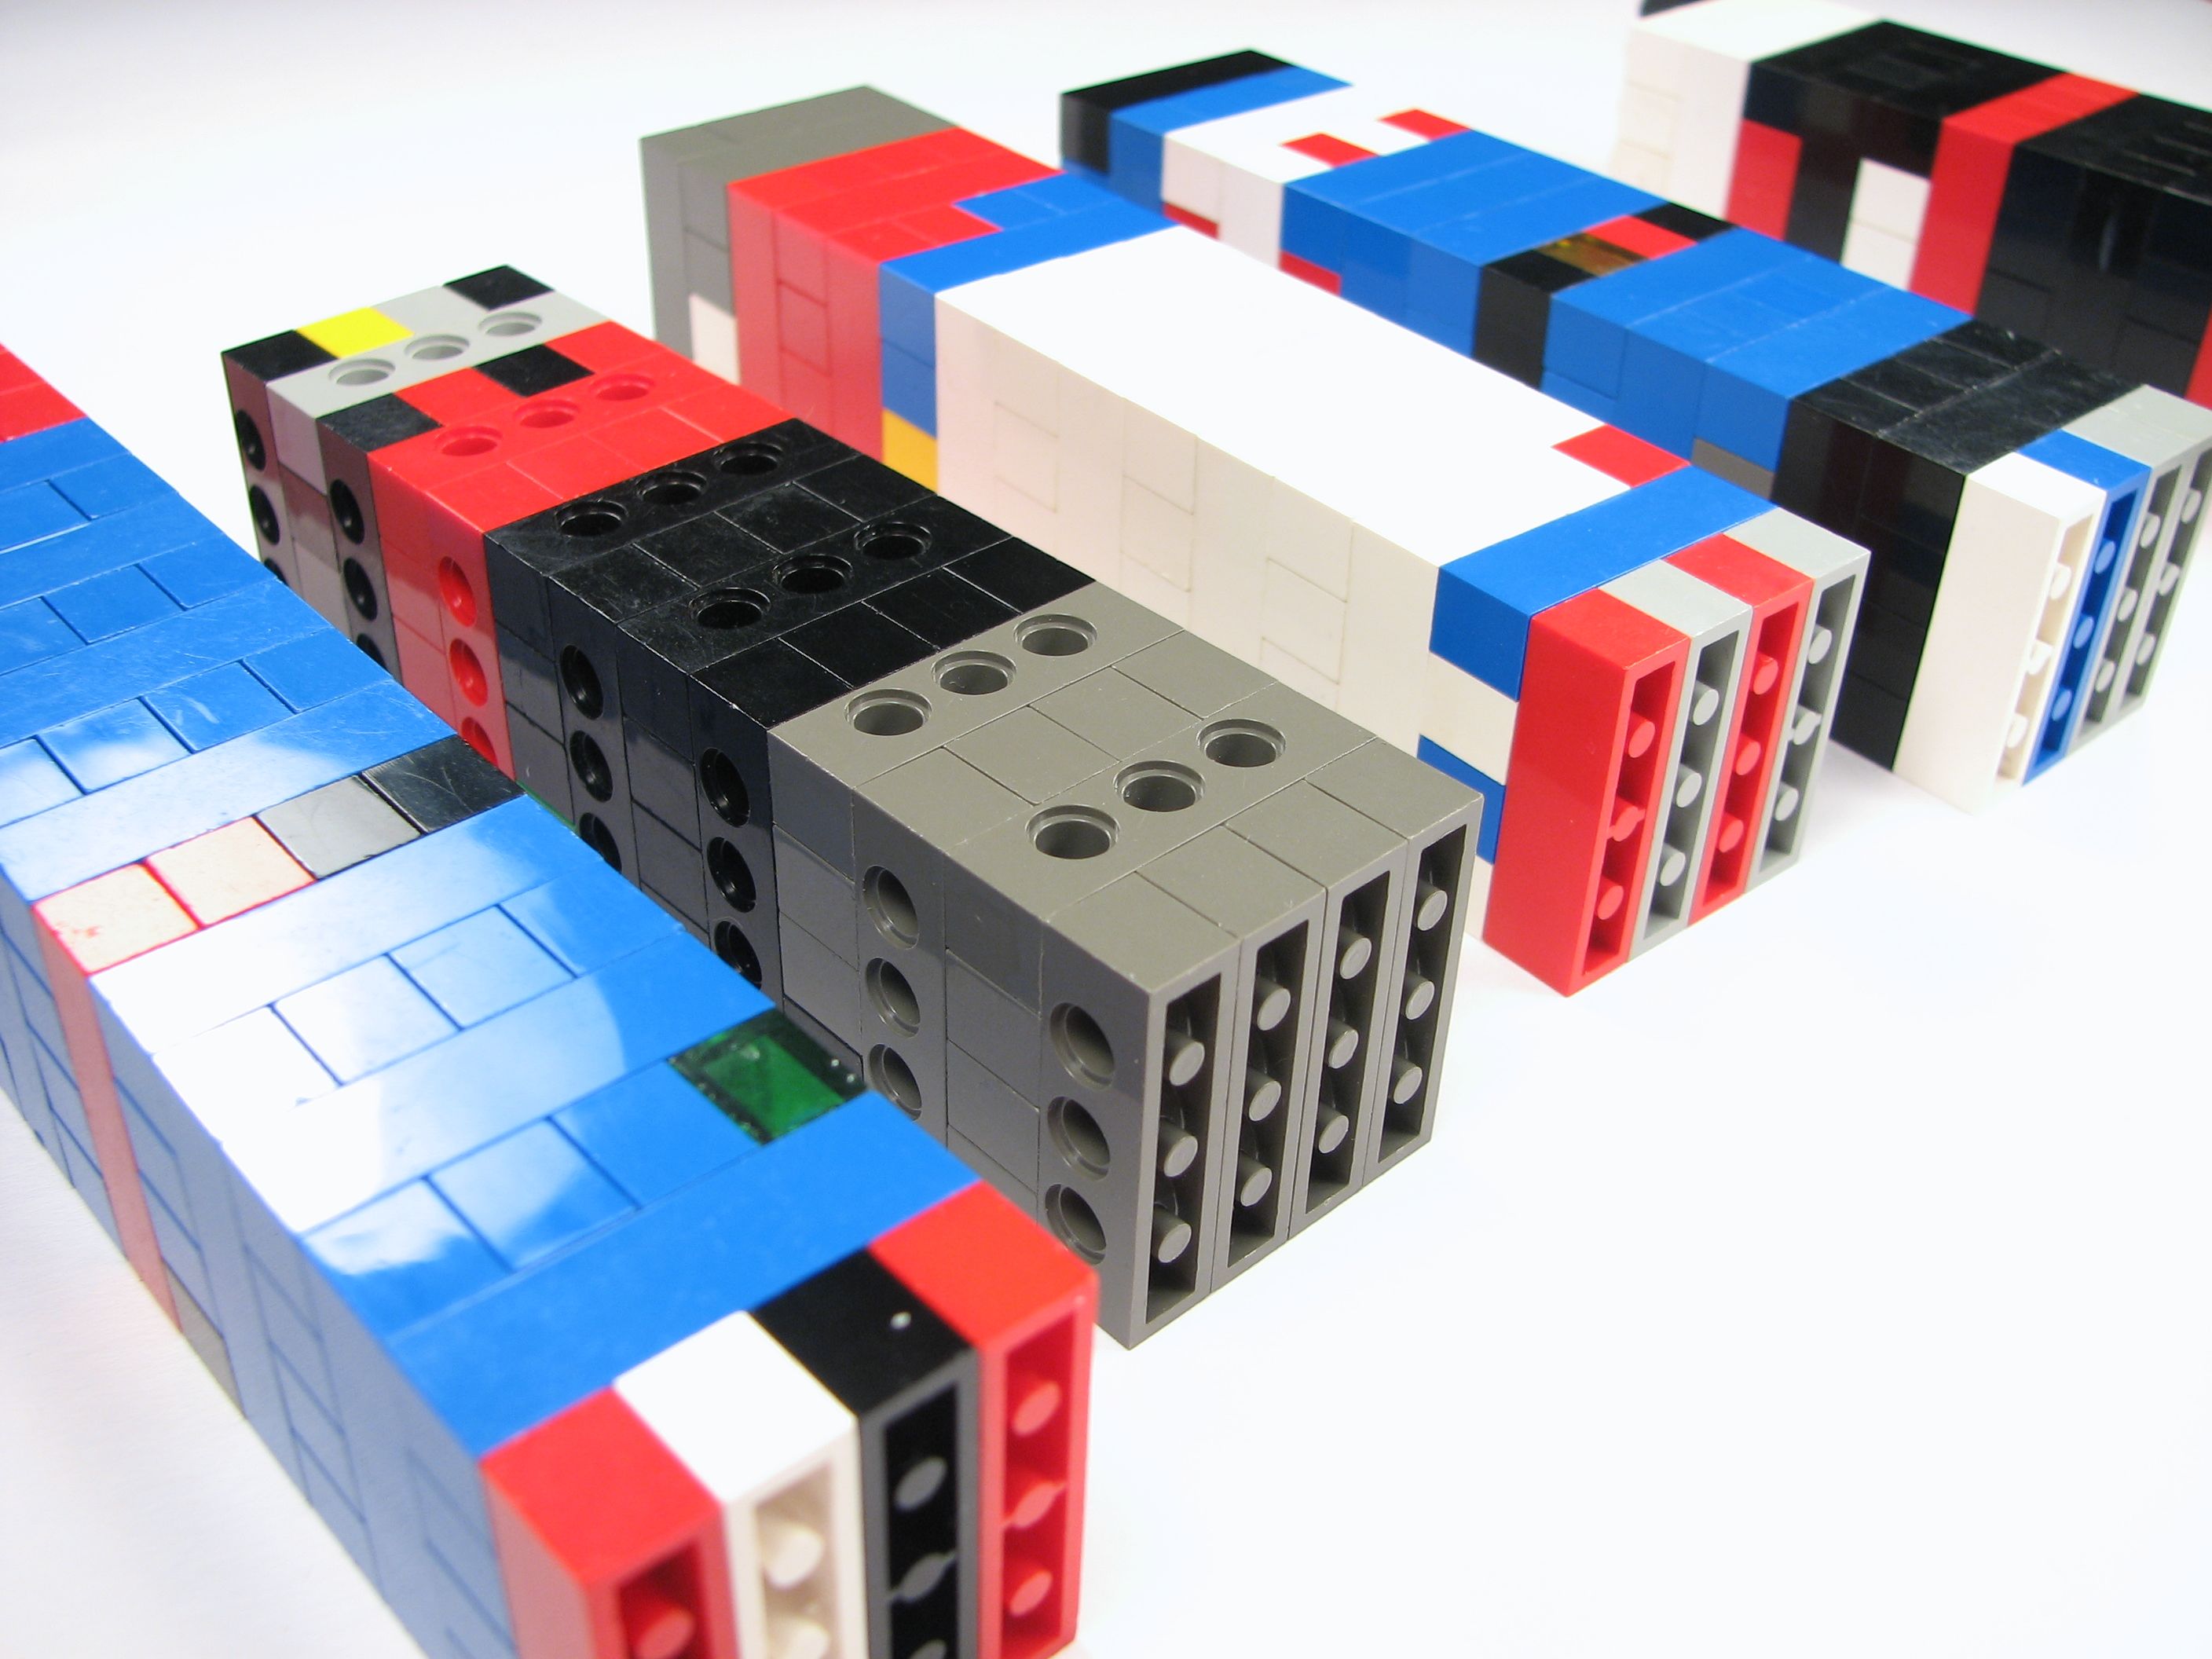
1×4 bricks separate easily, so you can just make square stacks of them with rows of bricks in alternating directions.
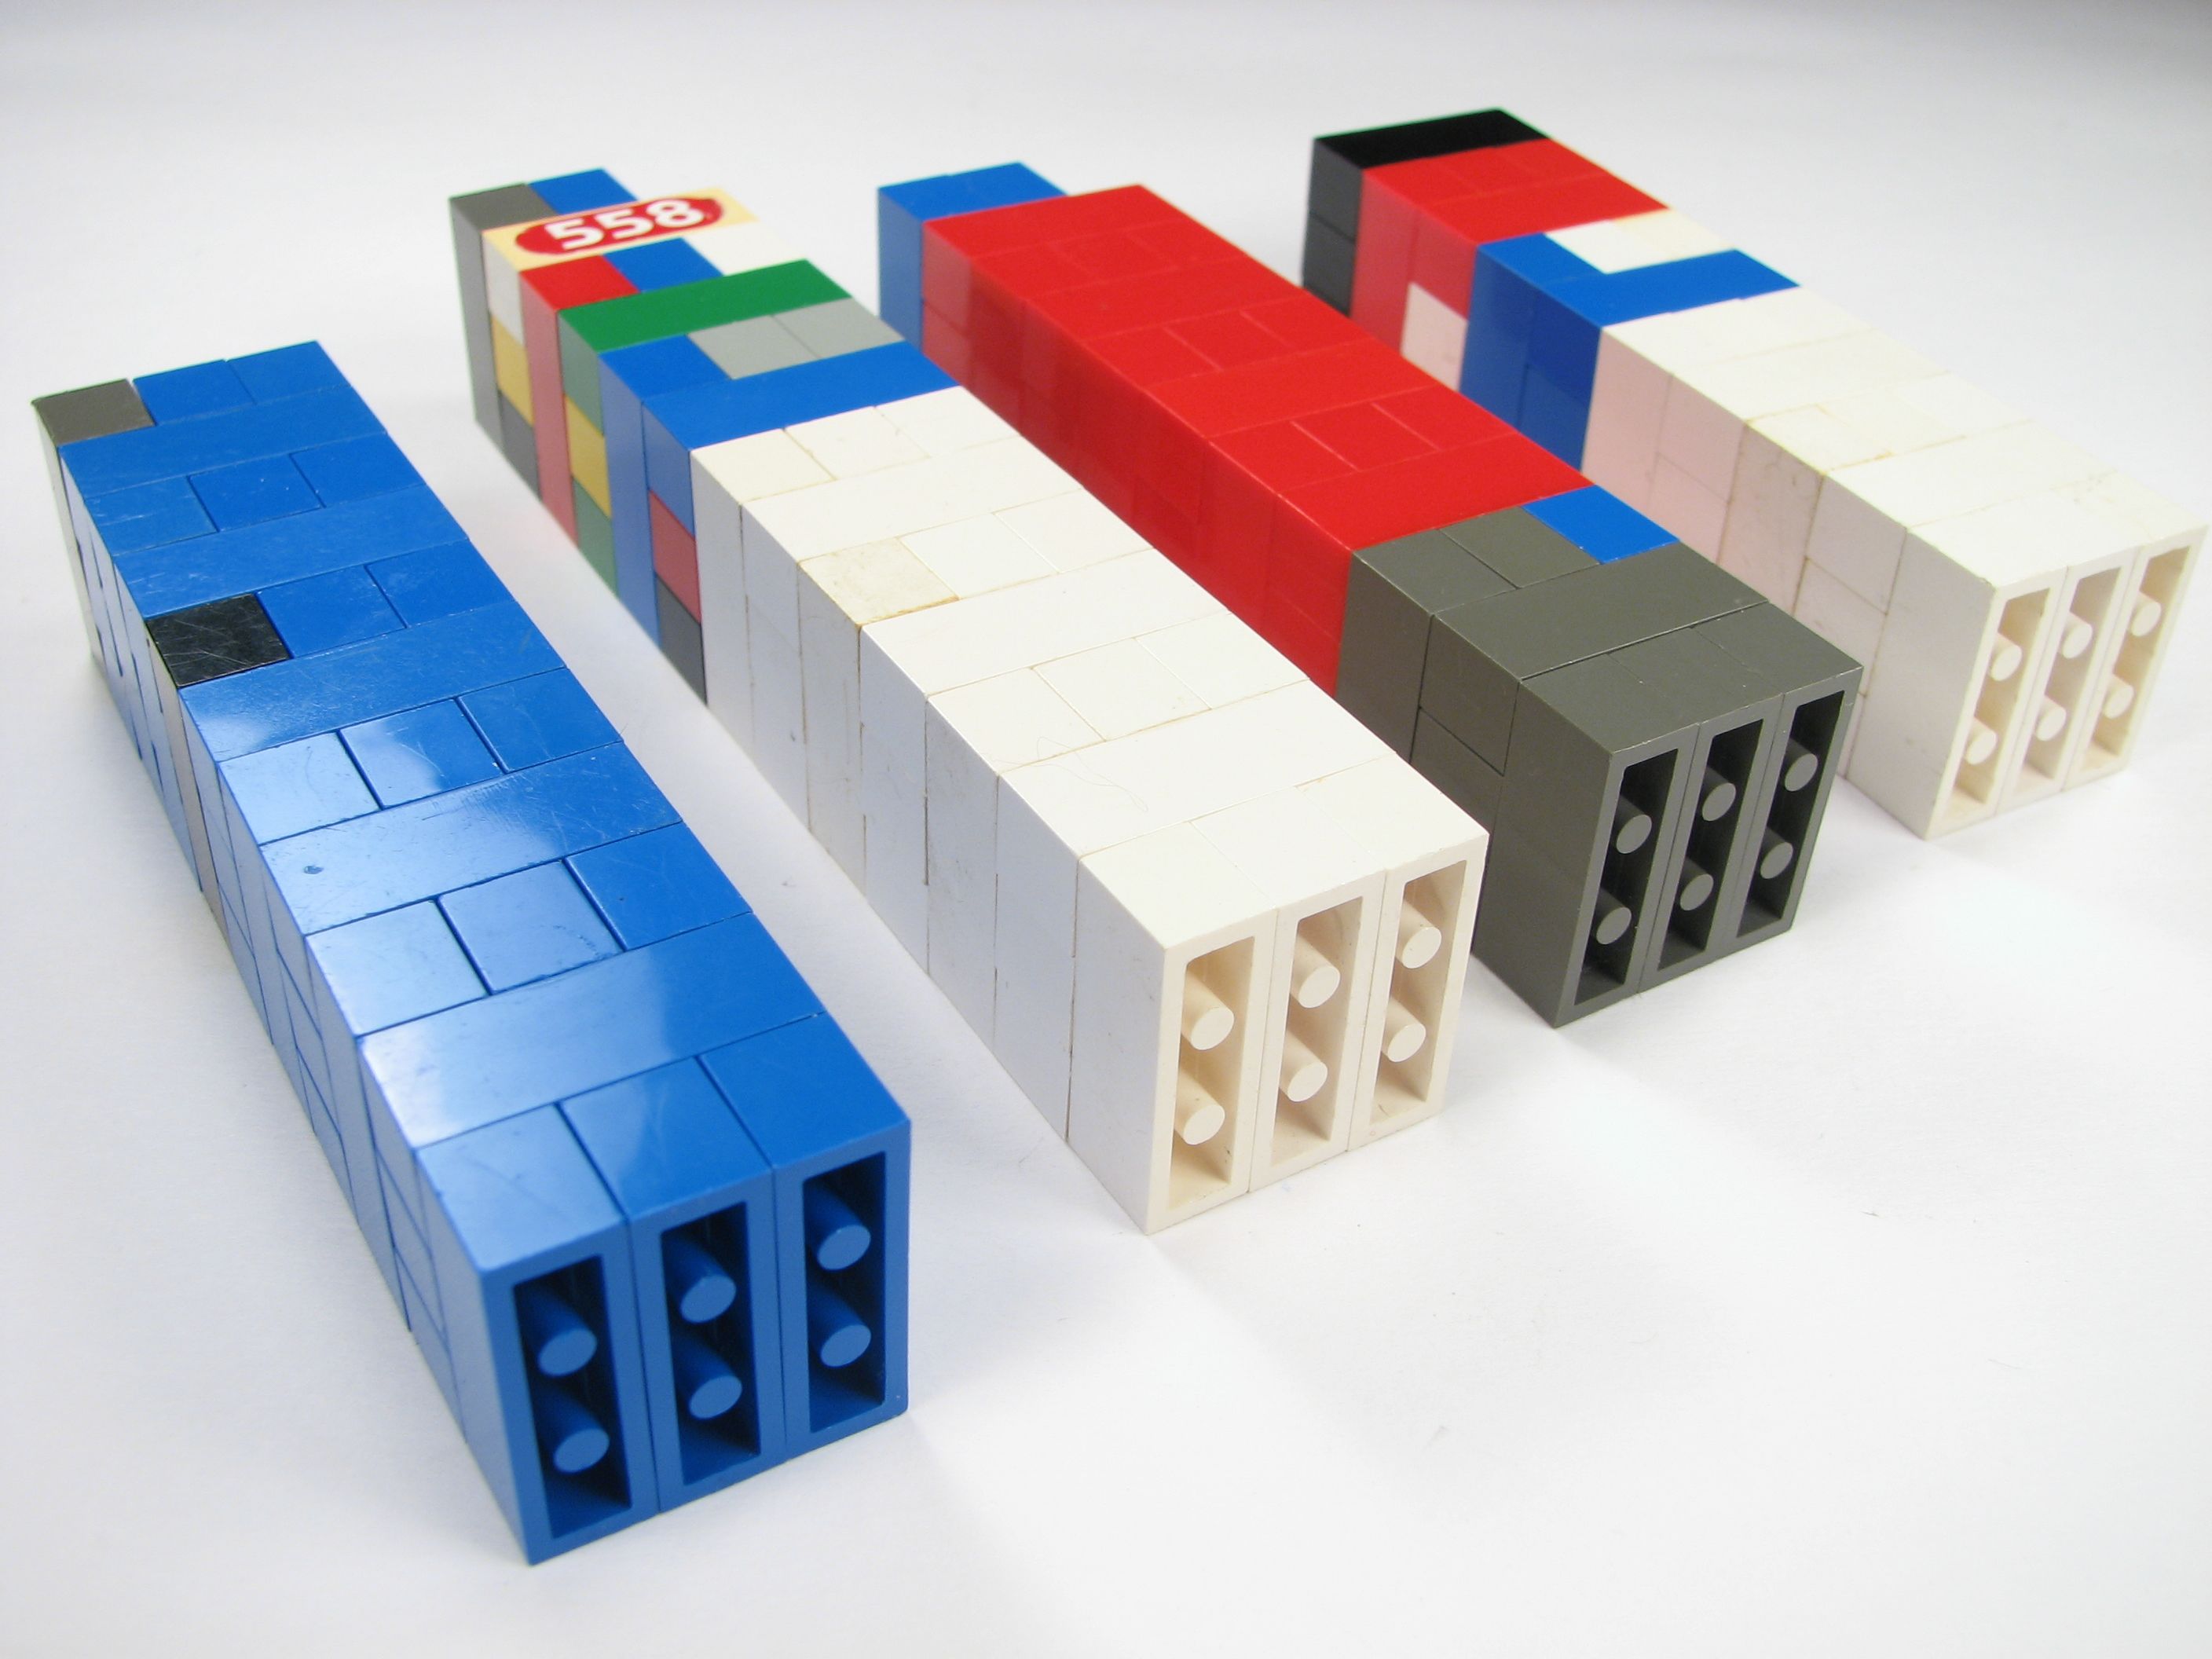
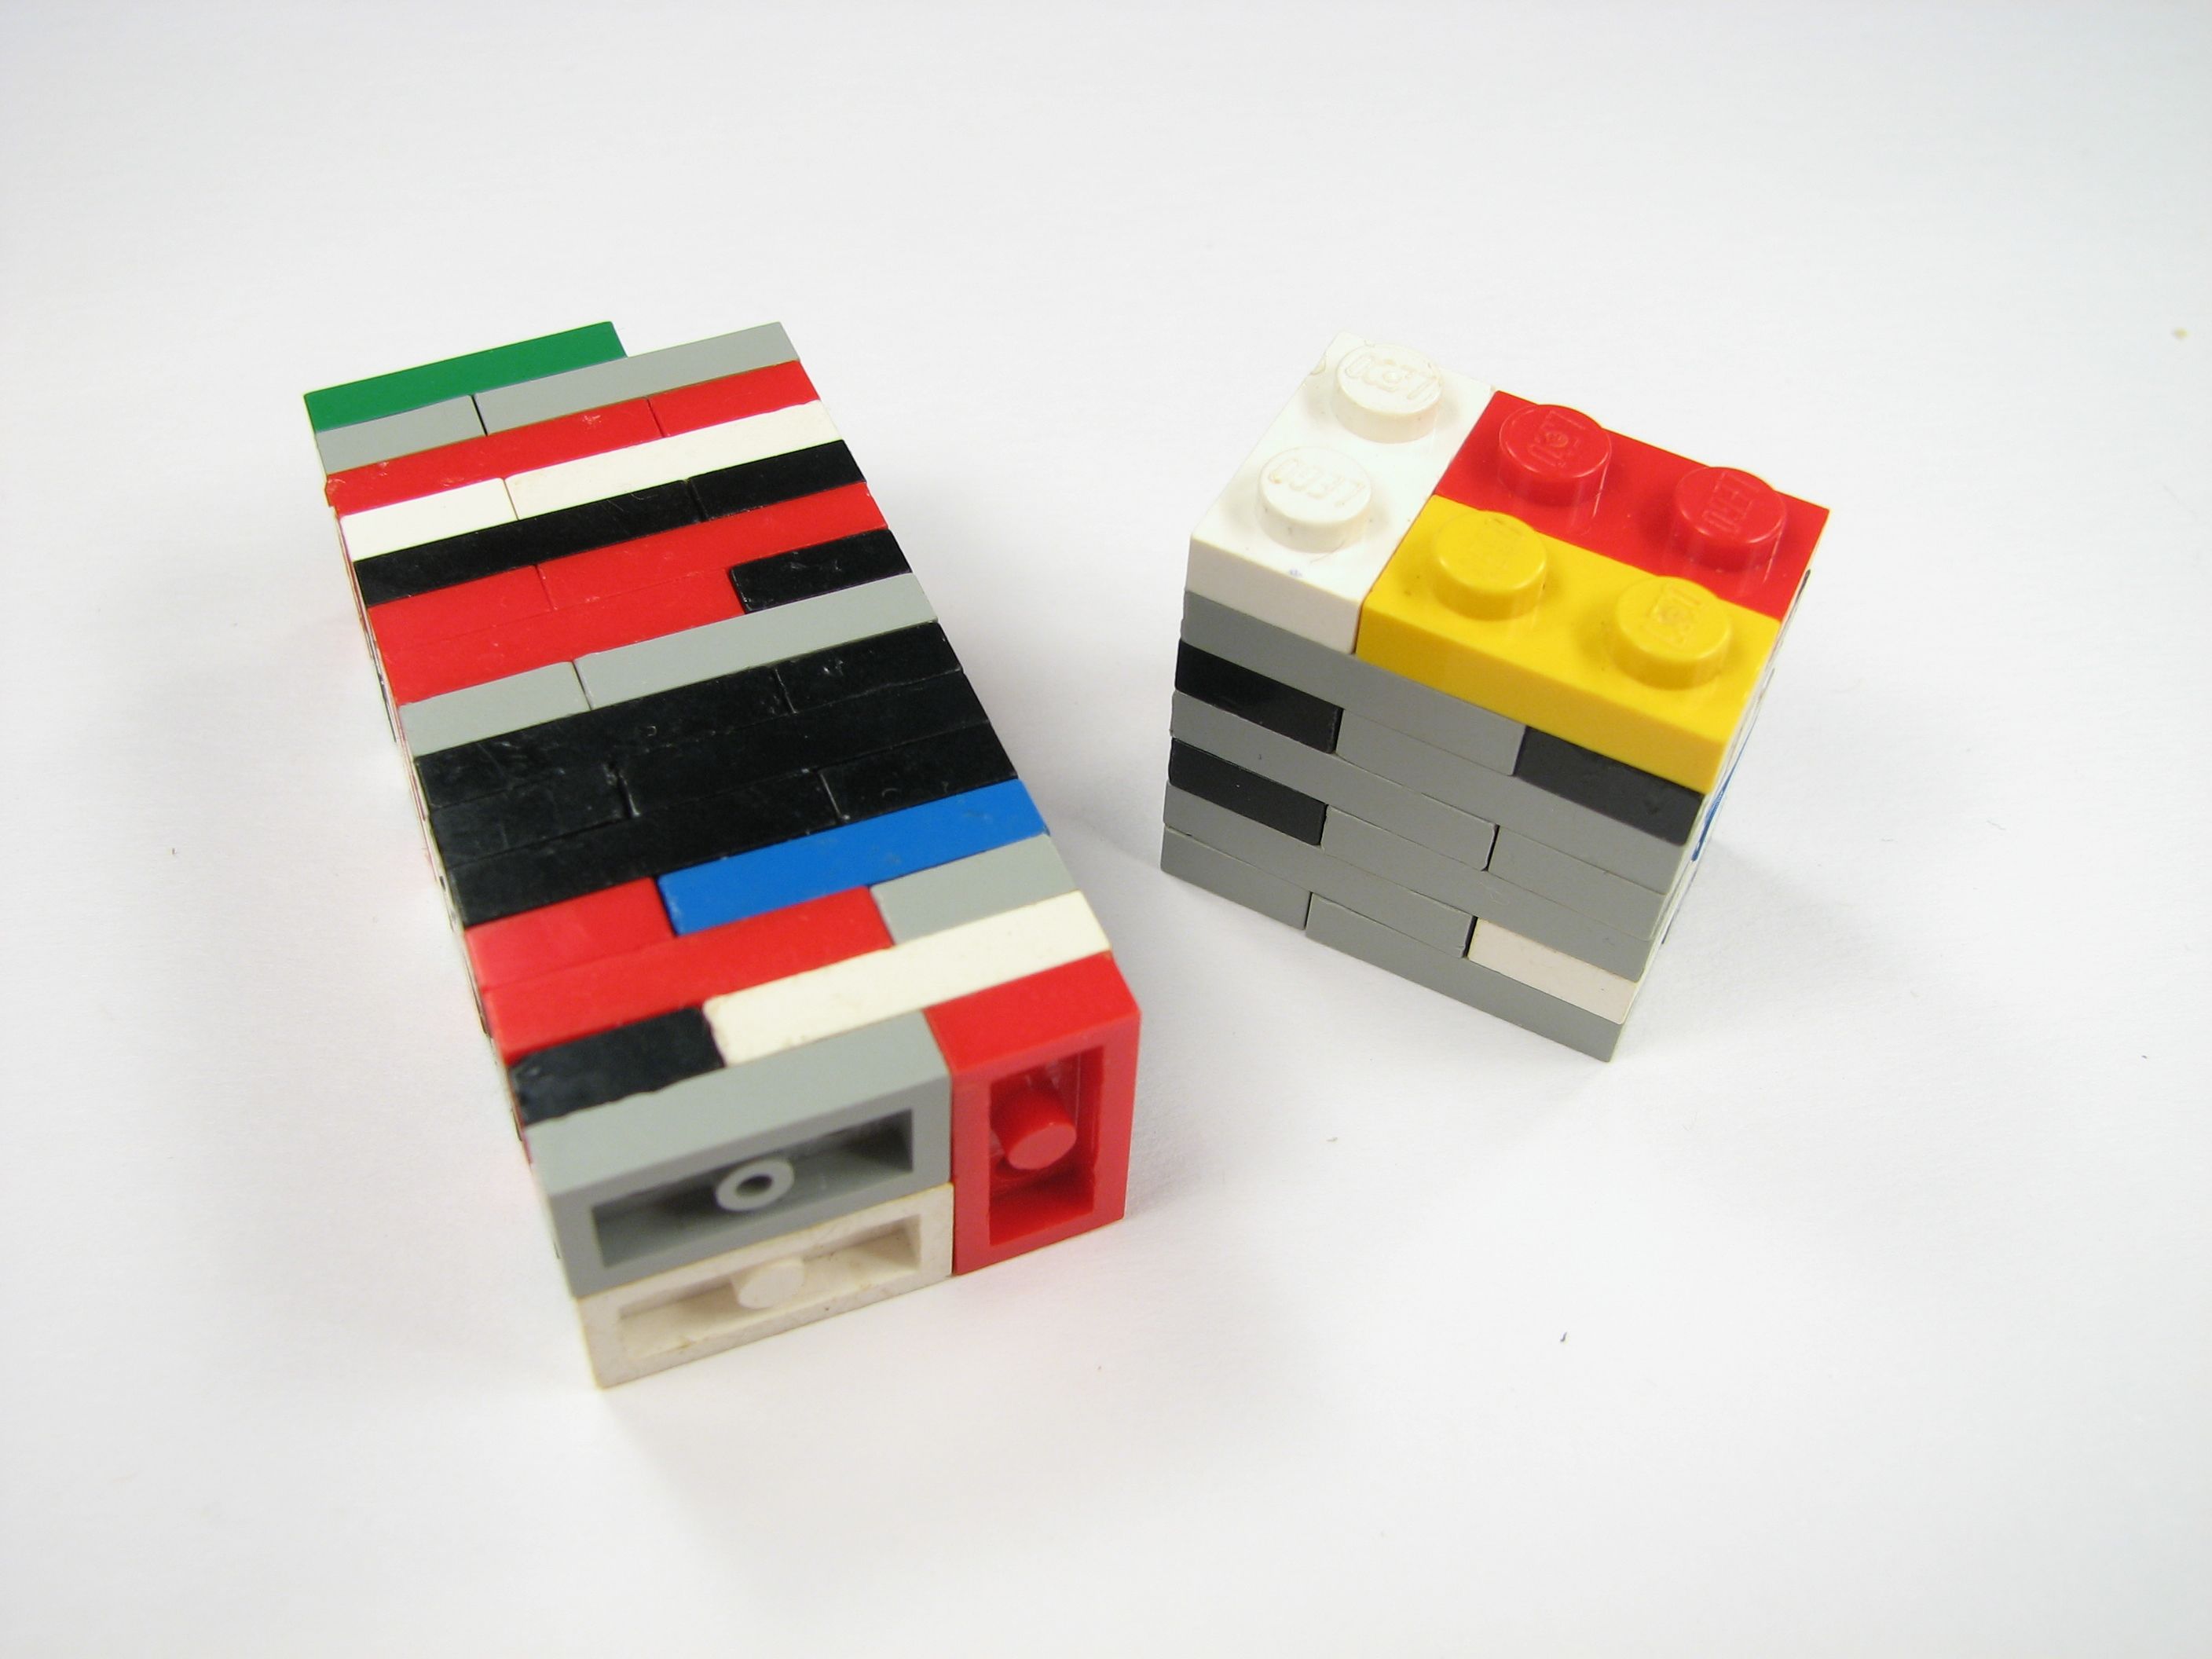
1×3 bricks. Just the same. Note that it can be helpful to store printed bricks on the outside of a stack with the image facing out so that you can find (or avoid) them easily.
2×4 bricks are absurdly easy to work with. Added bonus: can be stacked very tall and might make nice columns for that giant-scale Lego castle you’re building.

For 2×3 full height bricks, build a tower with a 1×1 hole in the middle. Alternate the two possible configurations on successive layers.

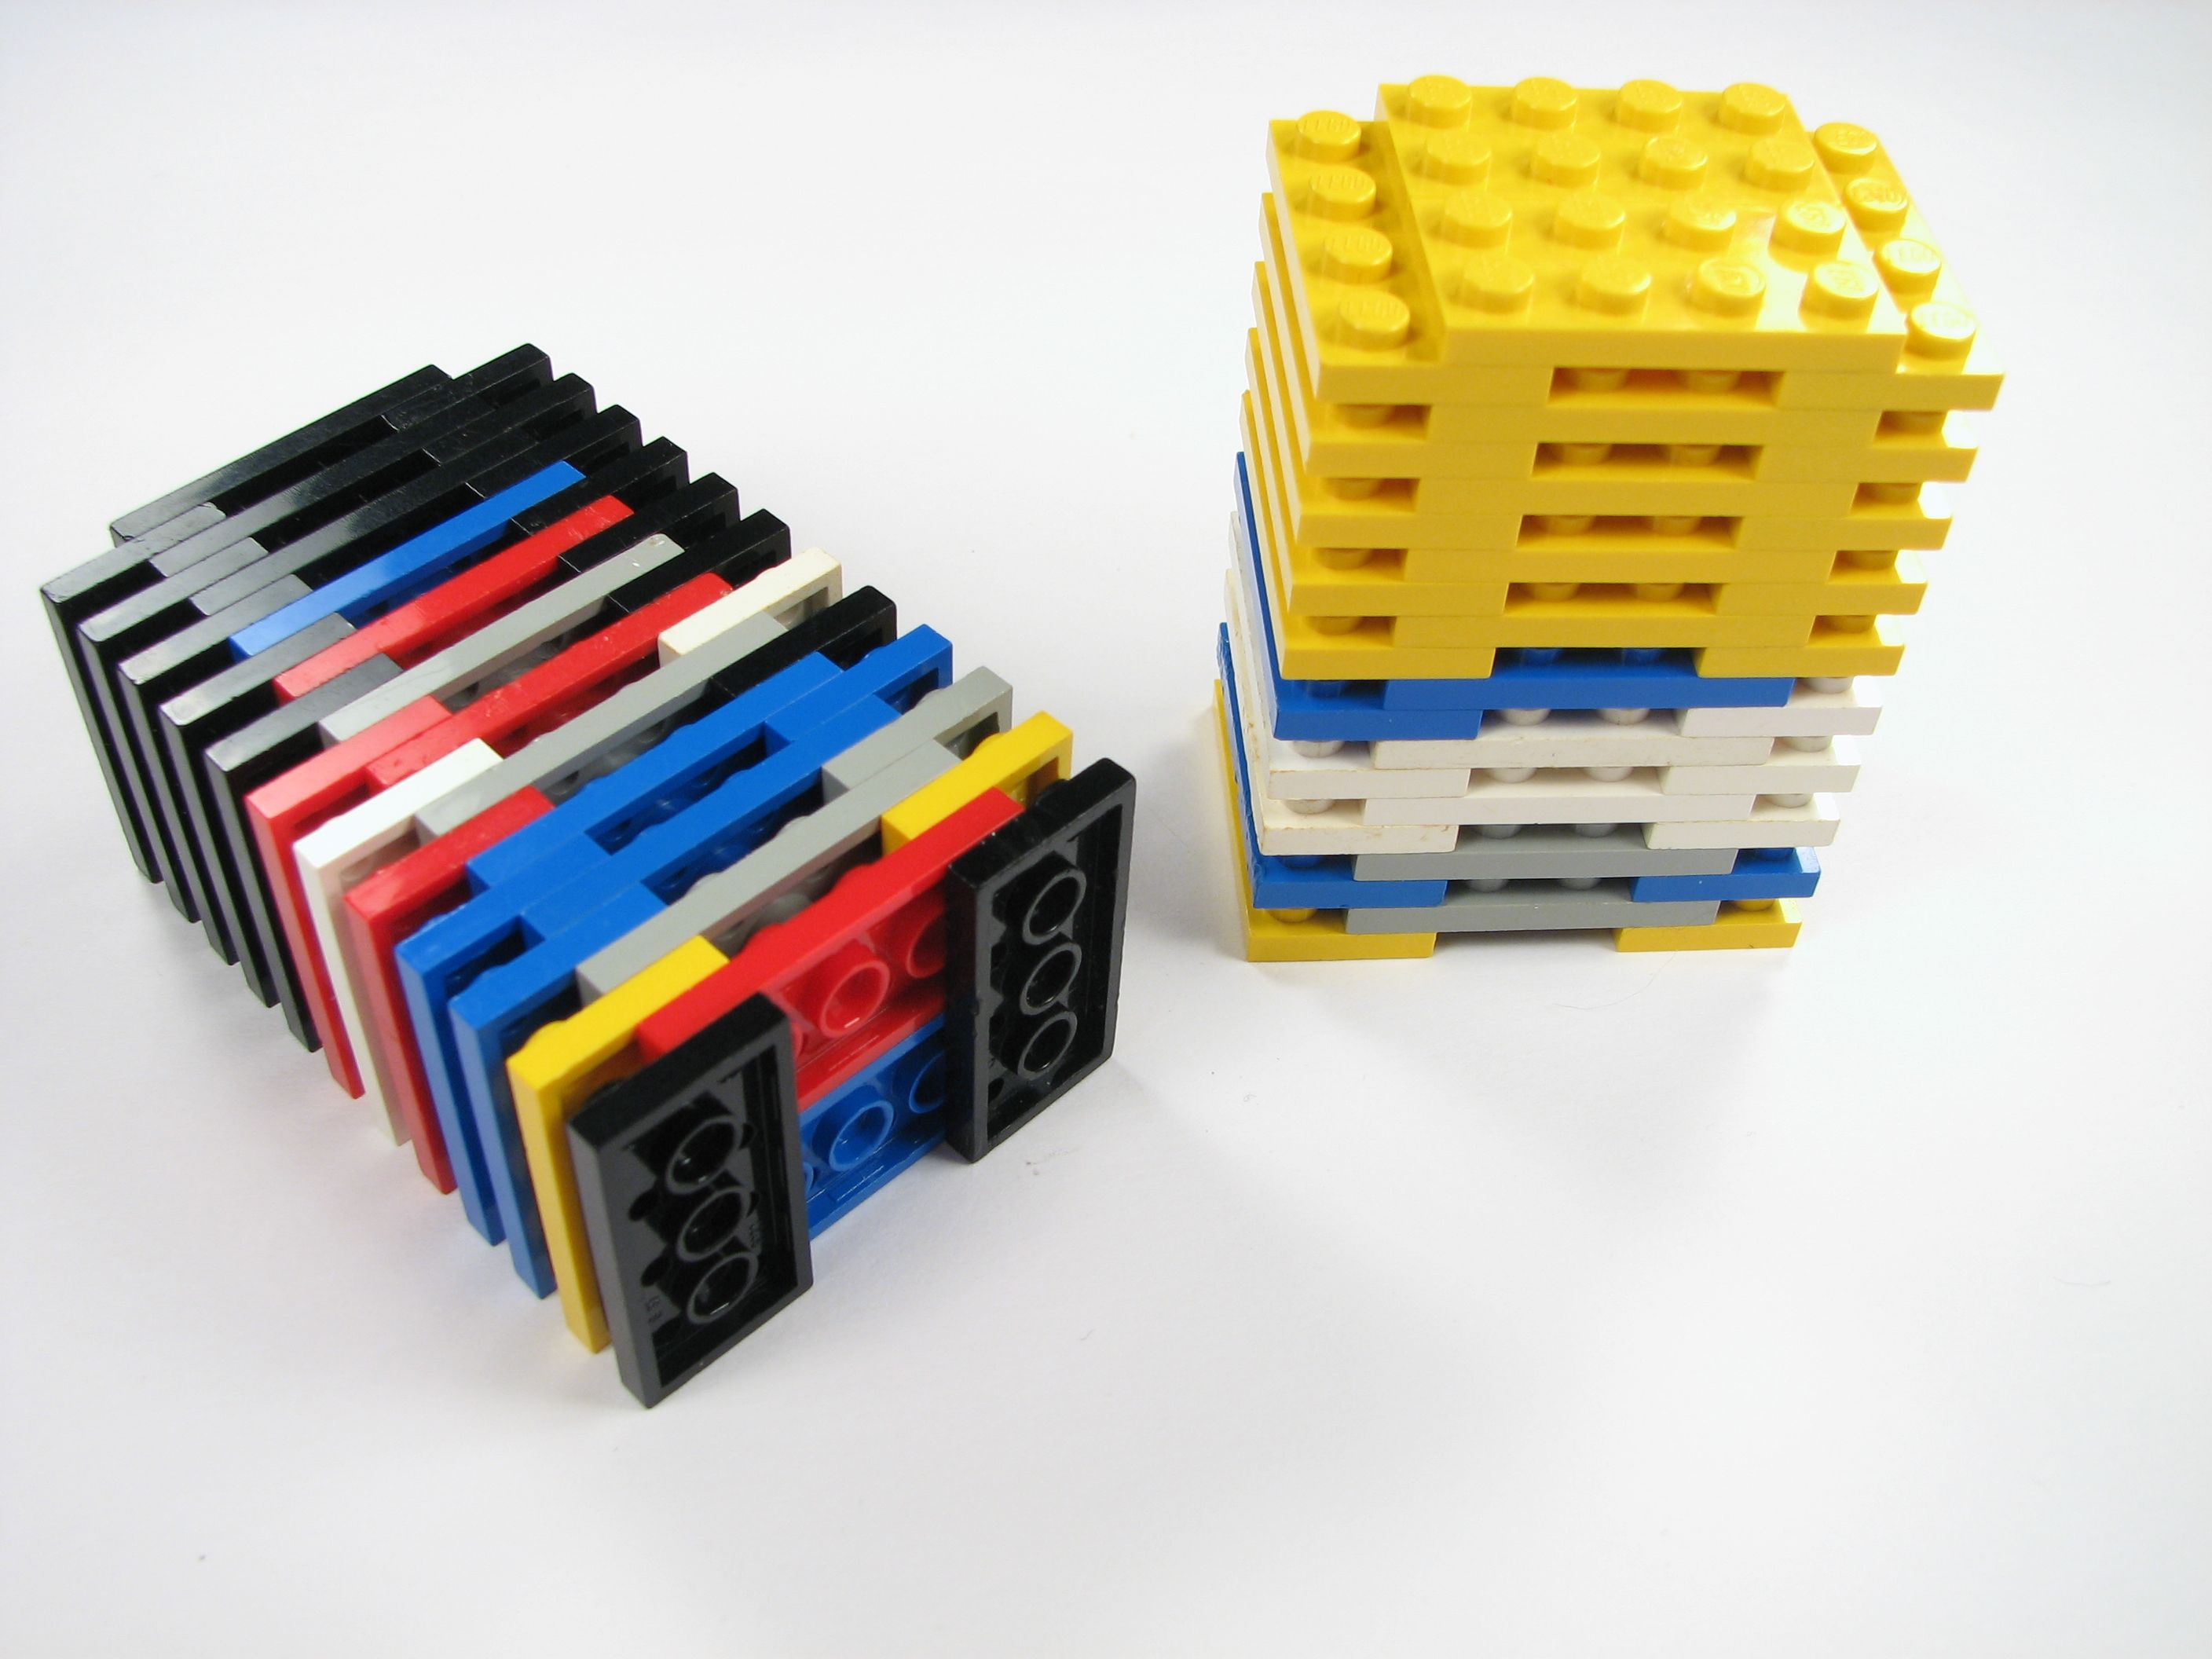
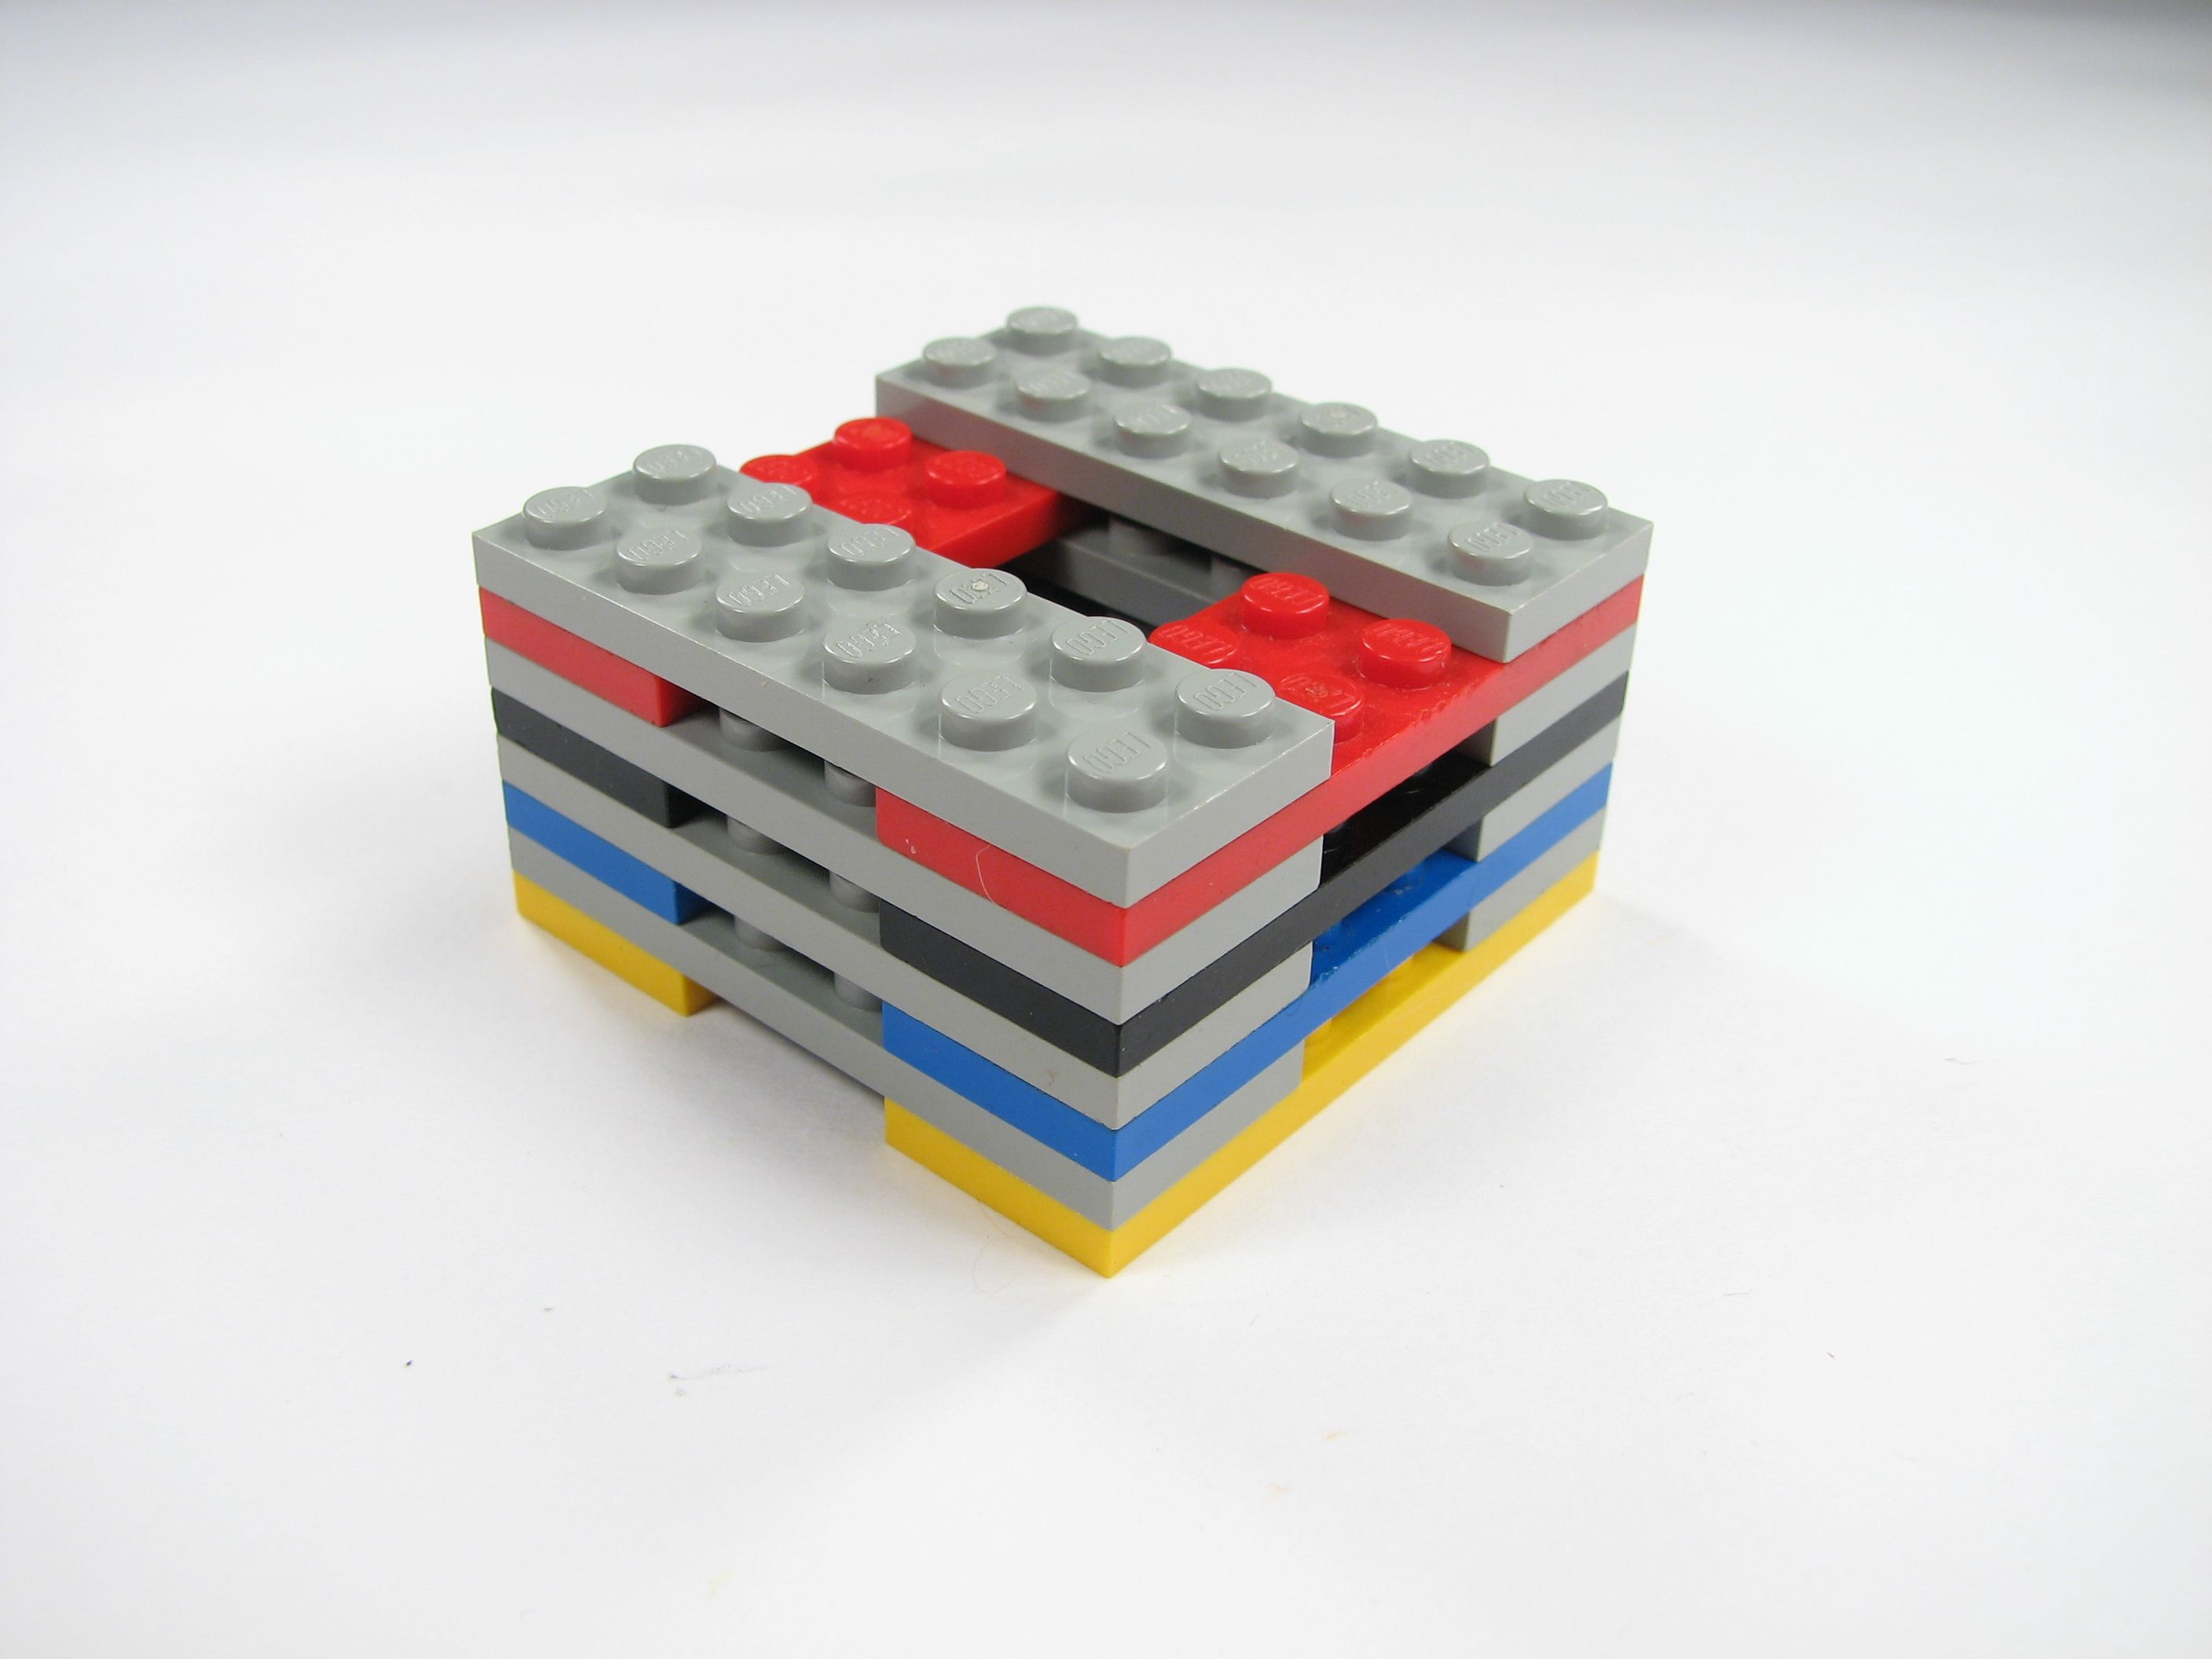
Like the 2×2 flat plates, the 2×4 flat plates can be difficult to separate if you don’t stack them carefully. Here, we’re alternating two repeating layers to create a strong but easily separable structure.
Painfully simple: A stack of 2×6 flat plates.
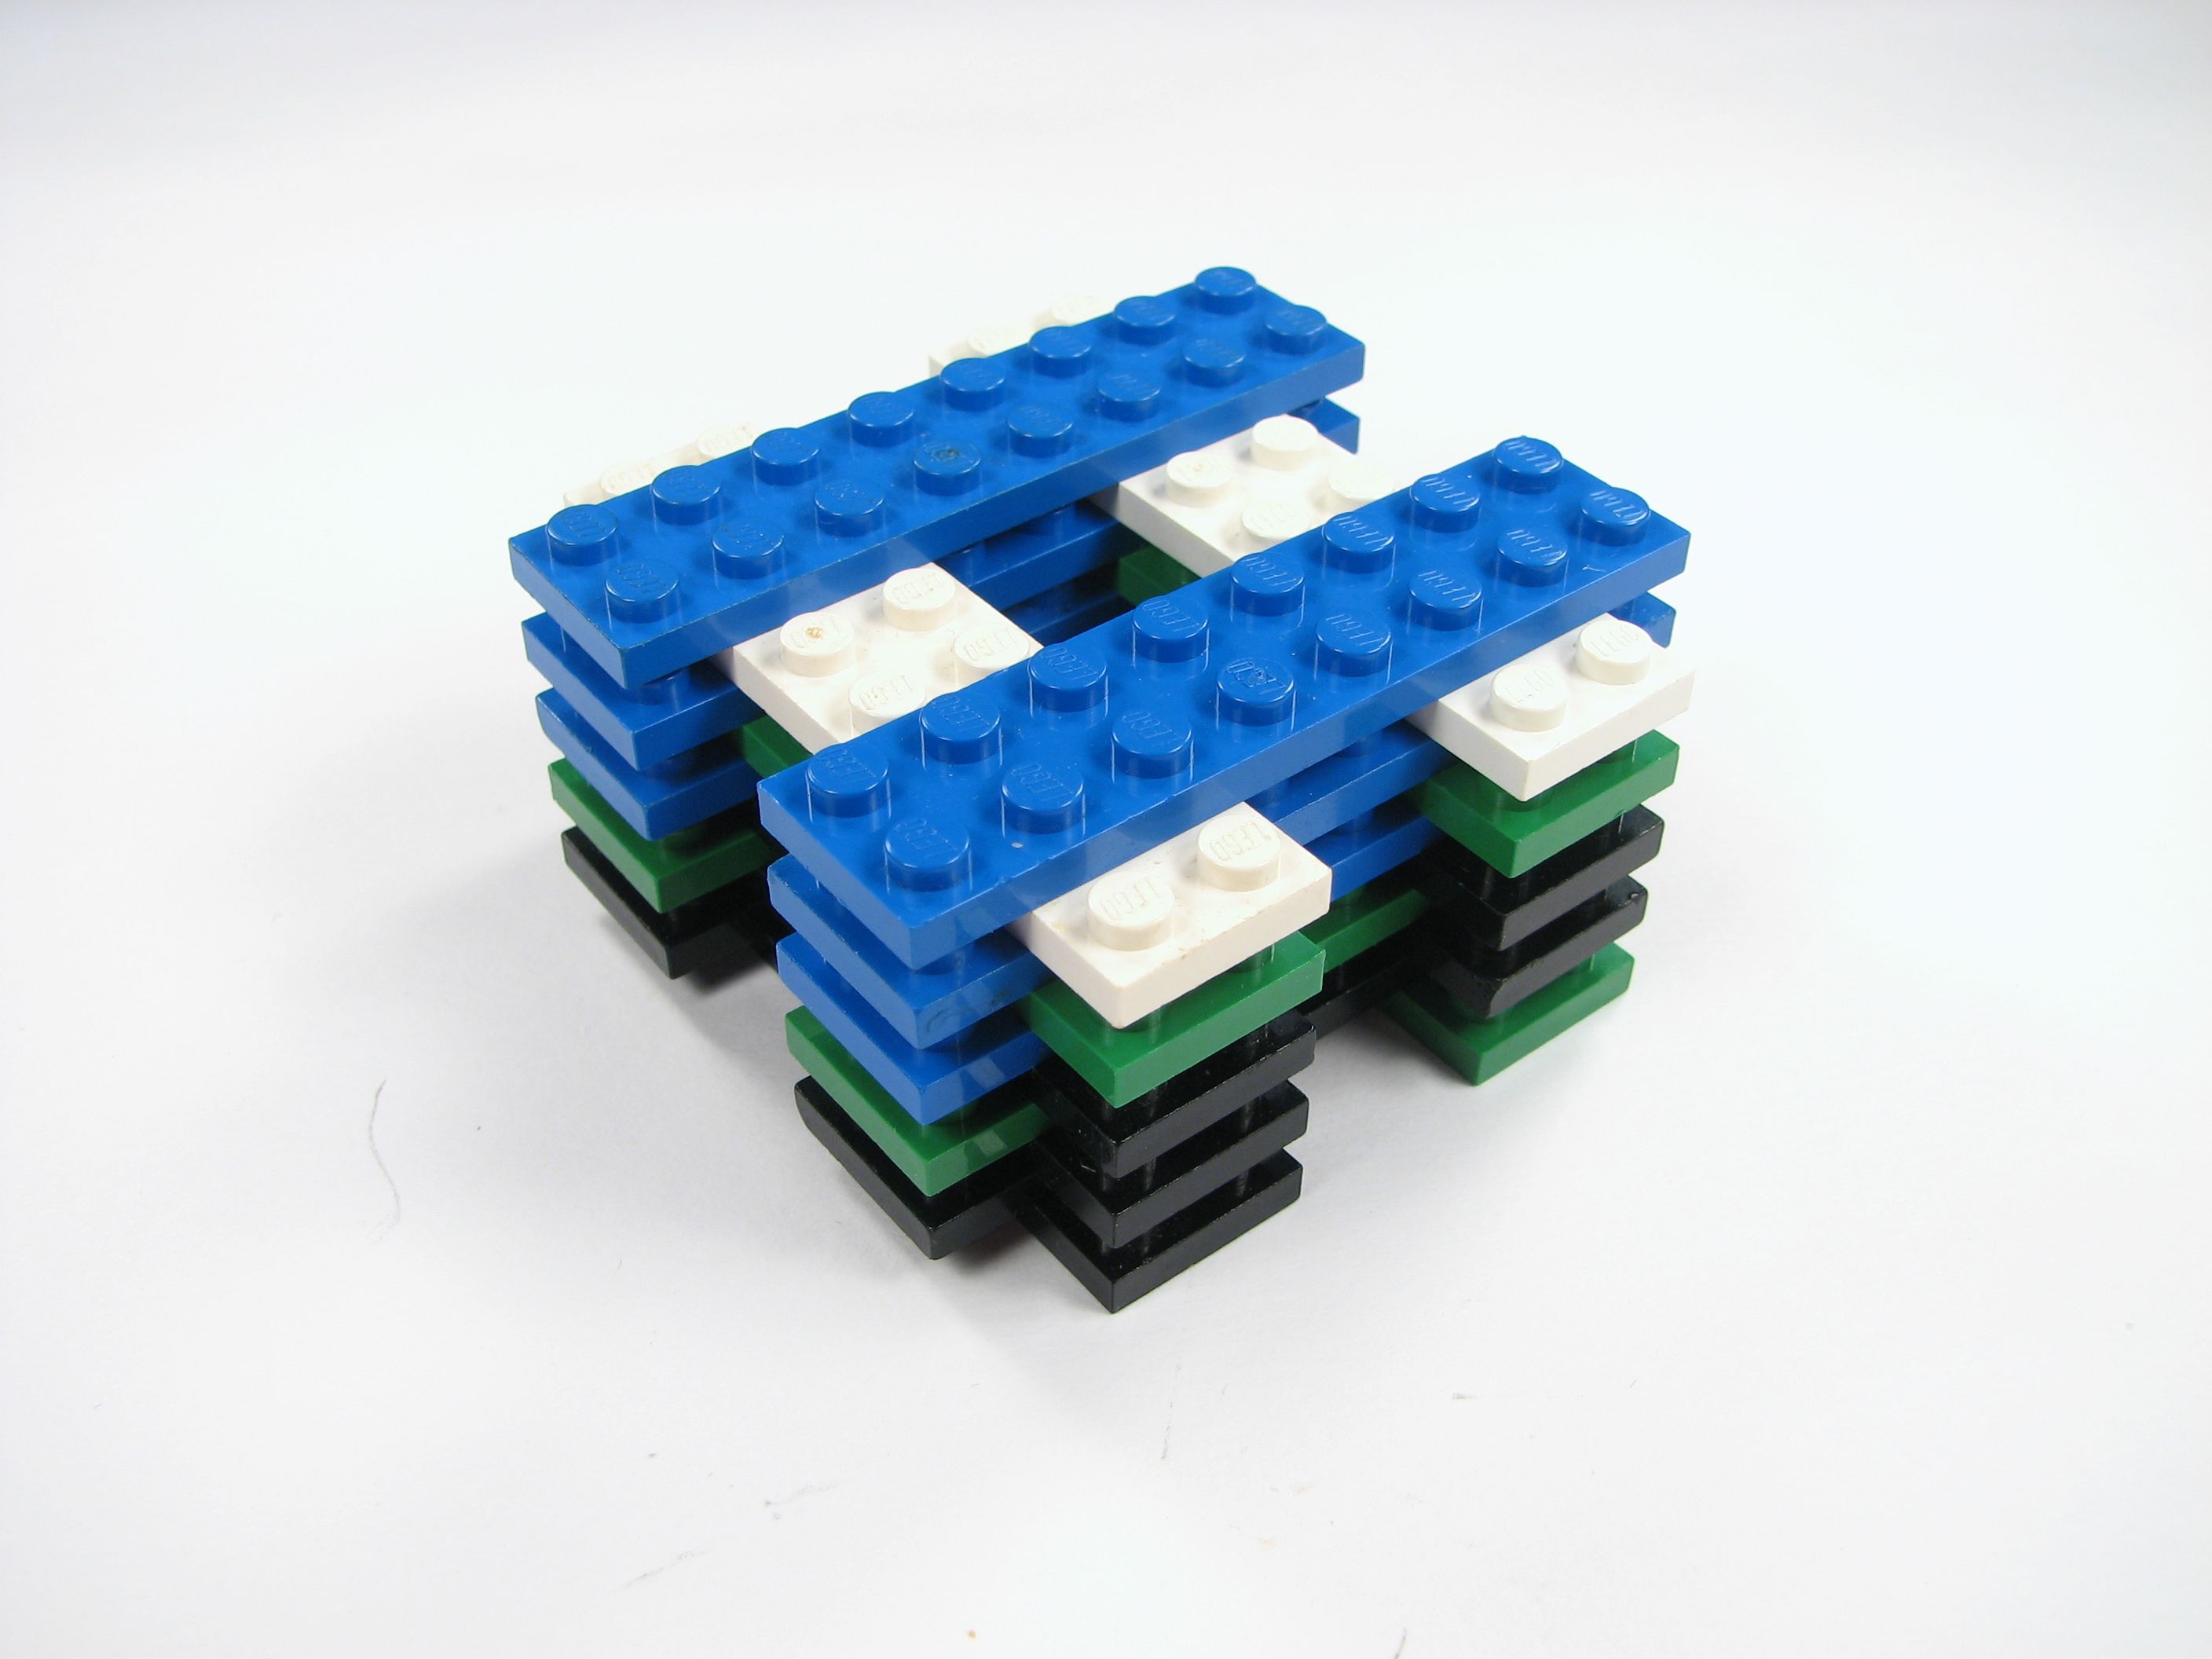
The same basic method is used for 2×8 and 2×10 flat plates. Be sure to leave (at least) a 2×2 hole in the middle, which helps to keep them easy to separate.
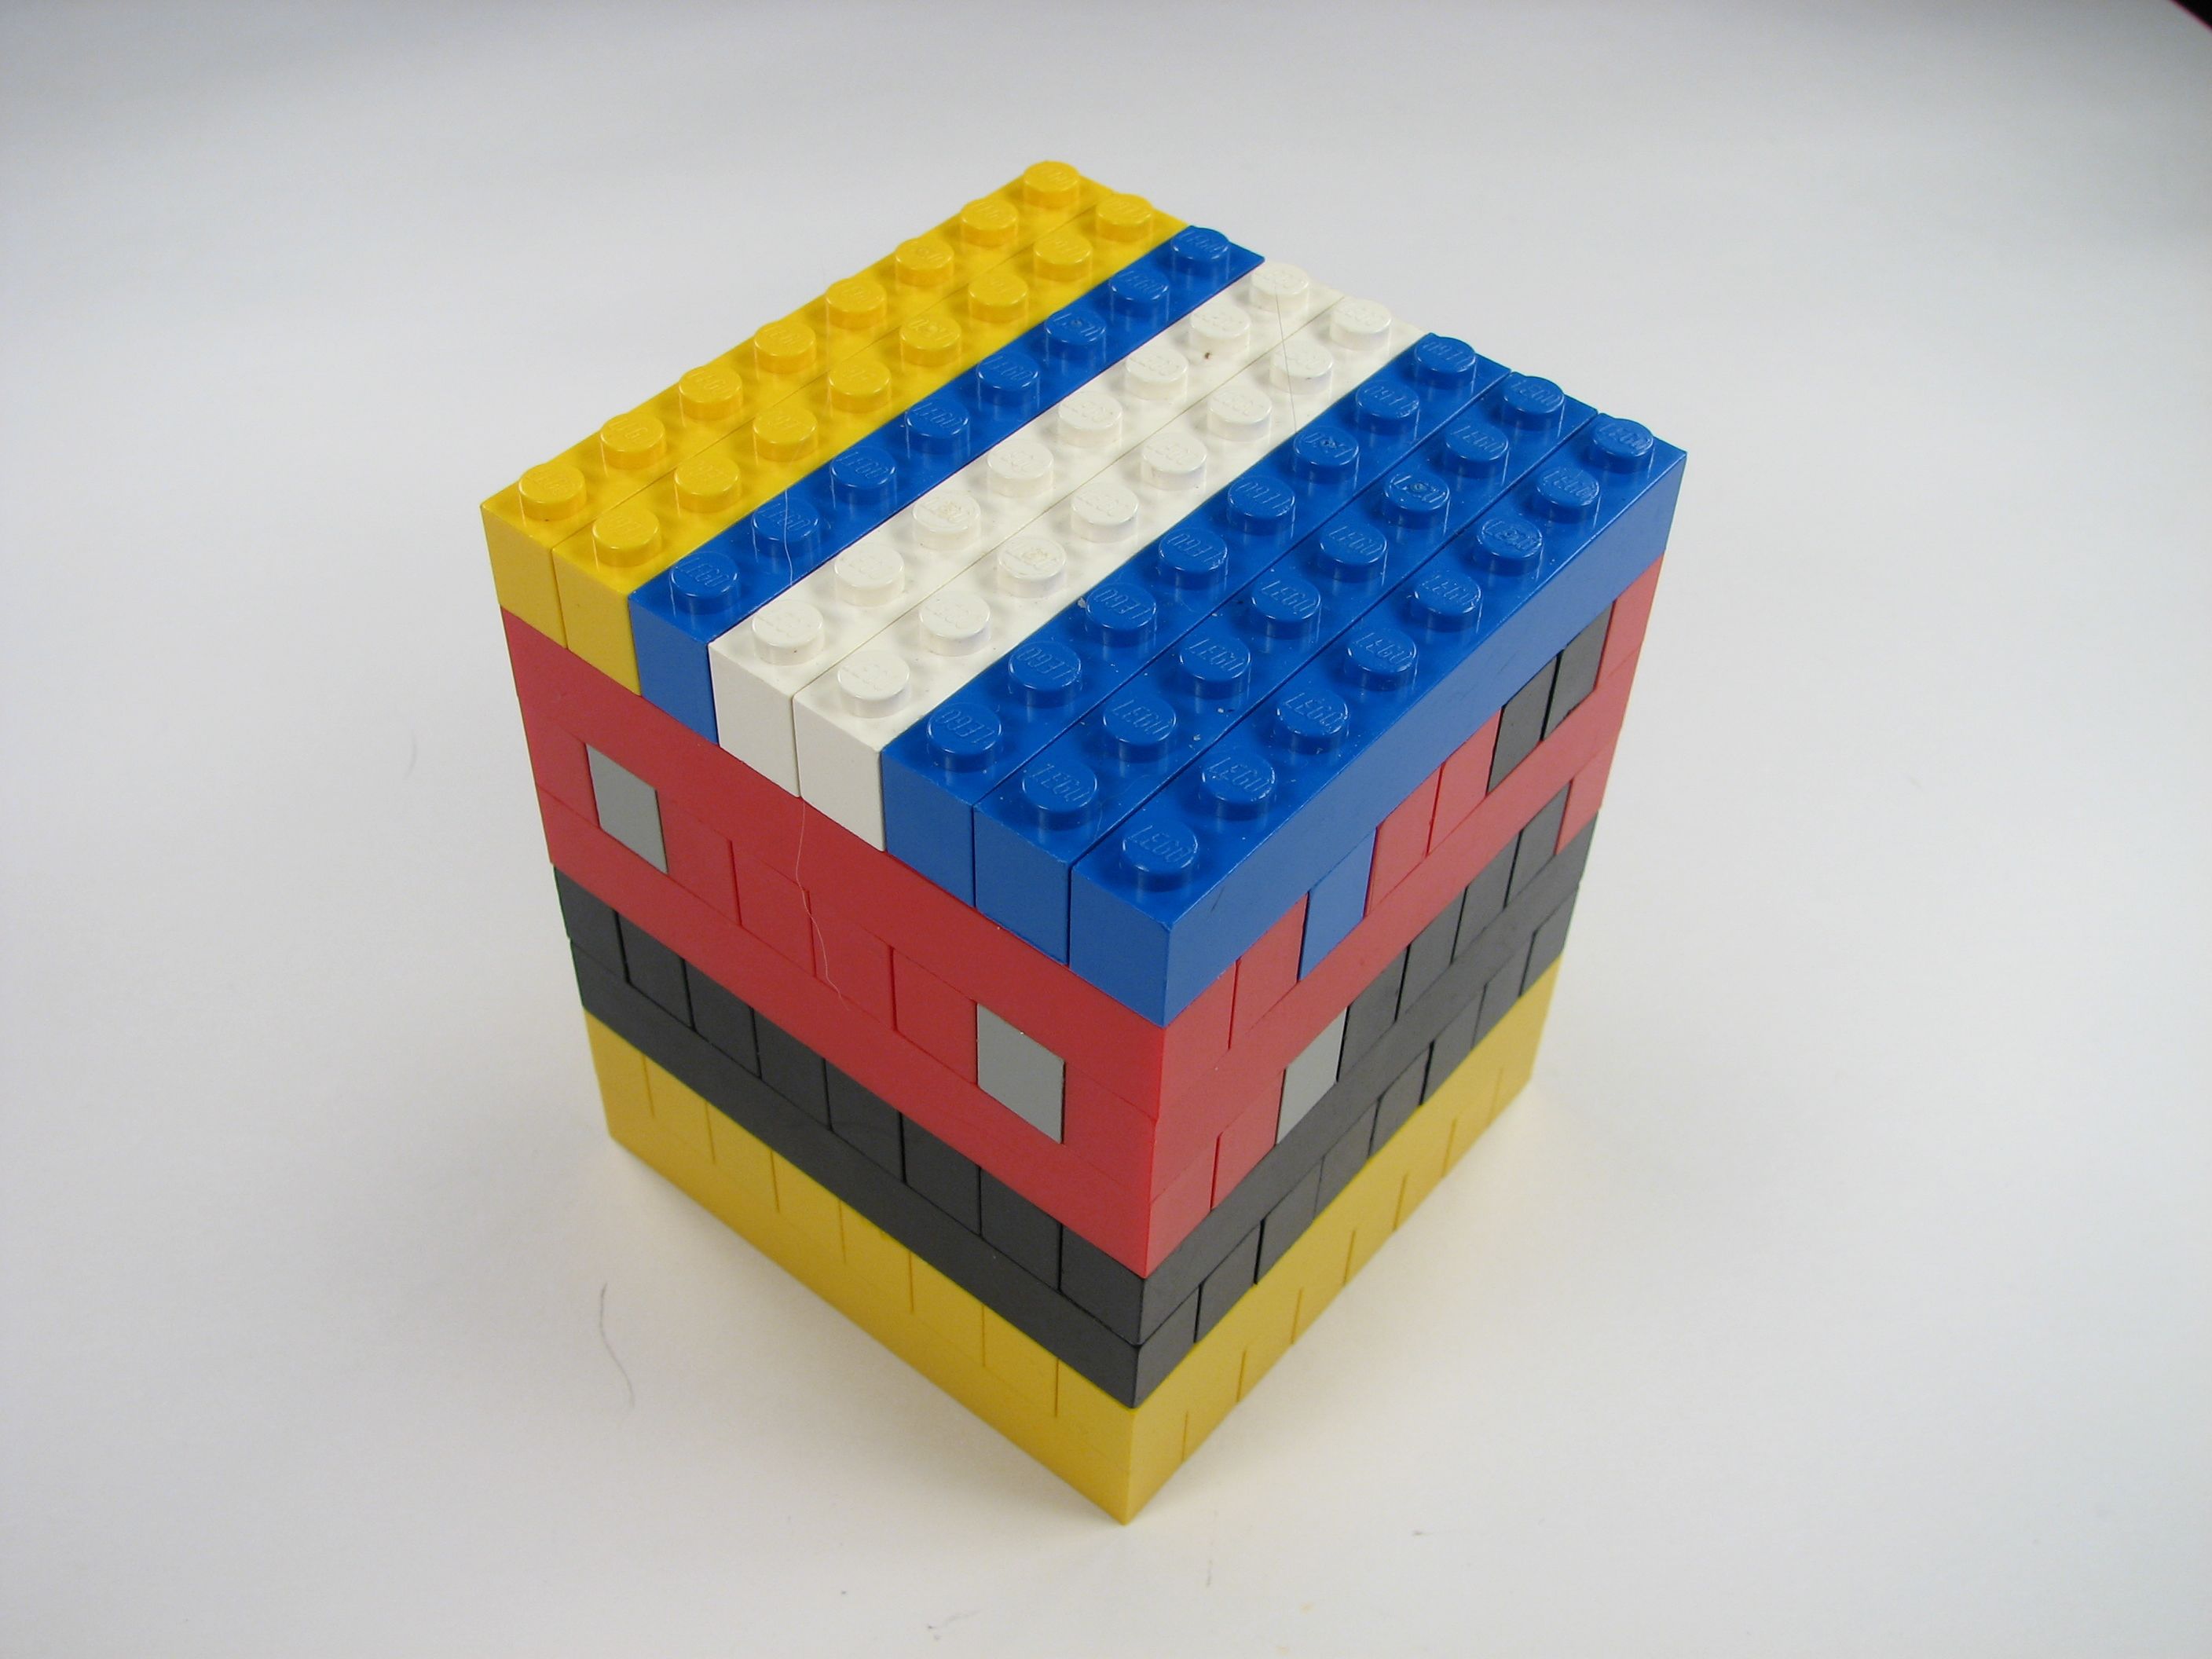
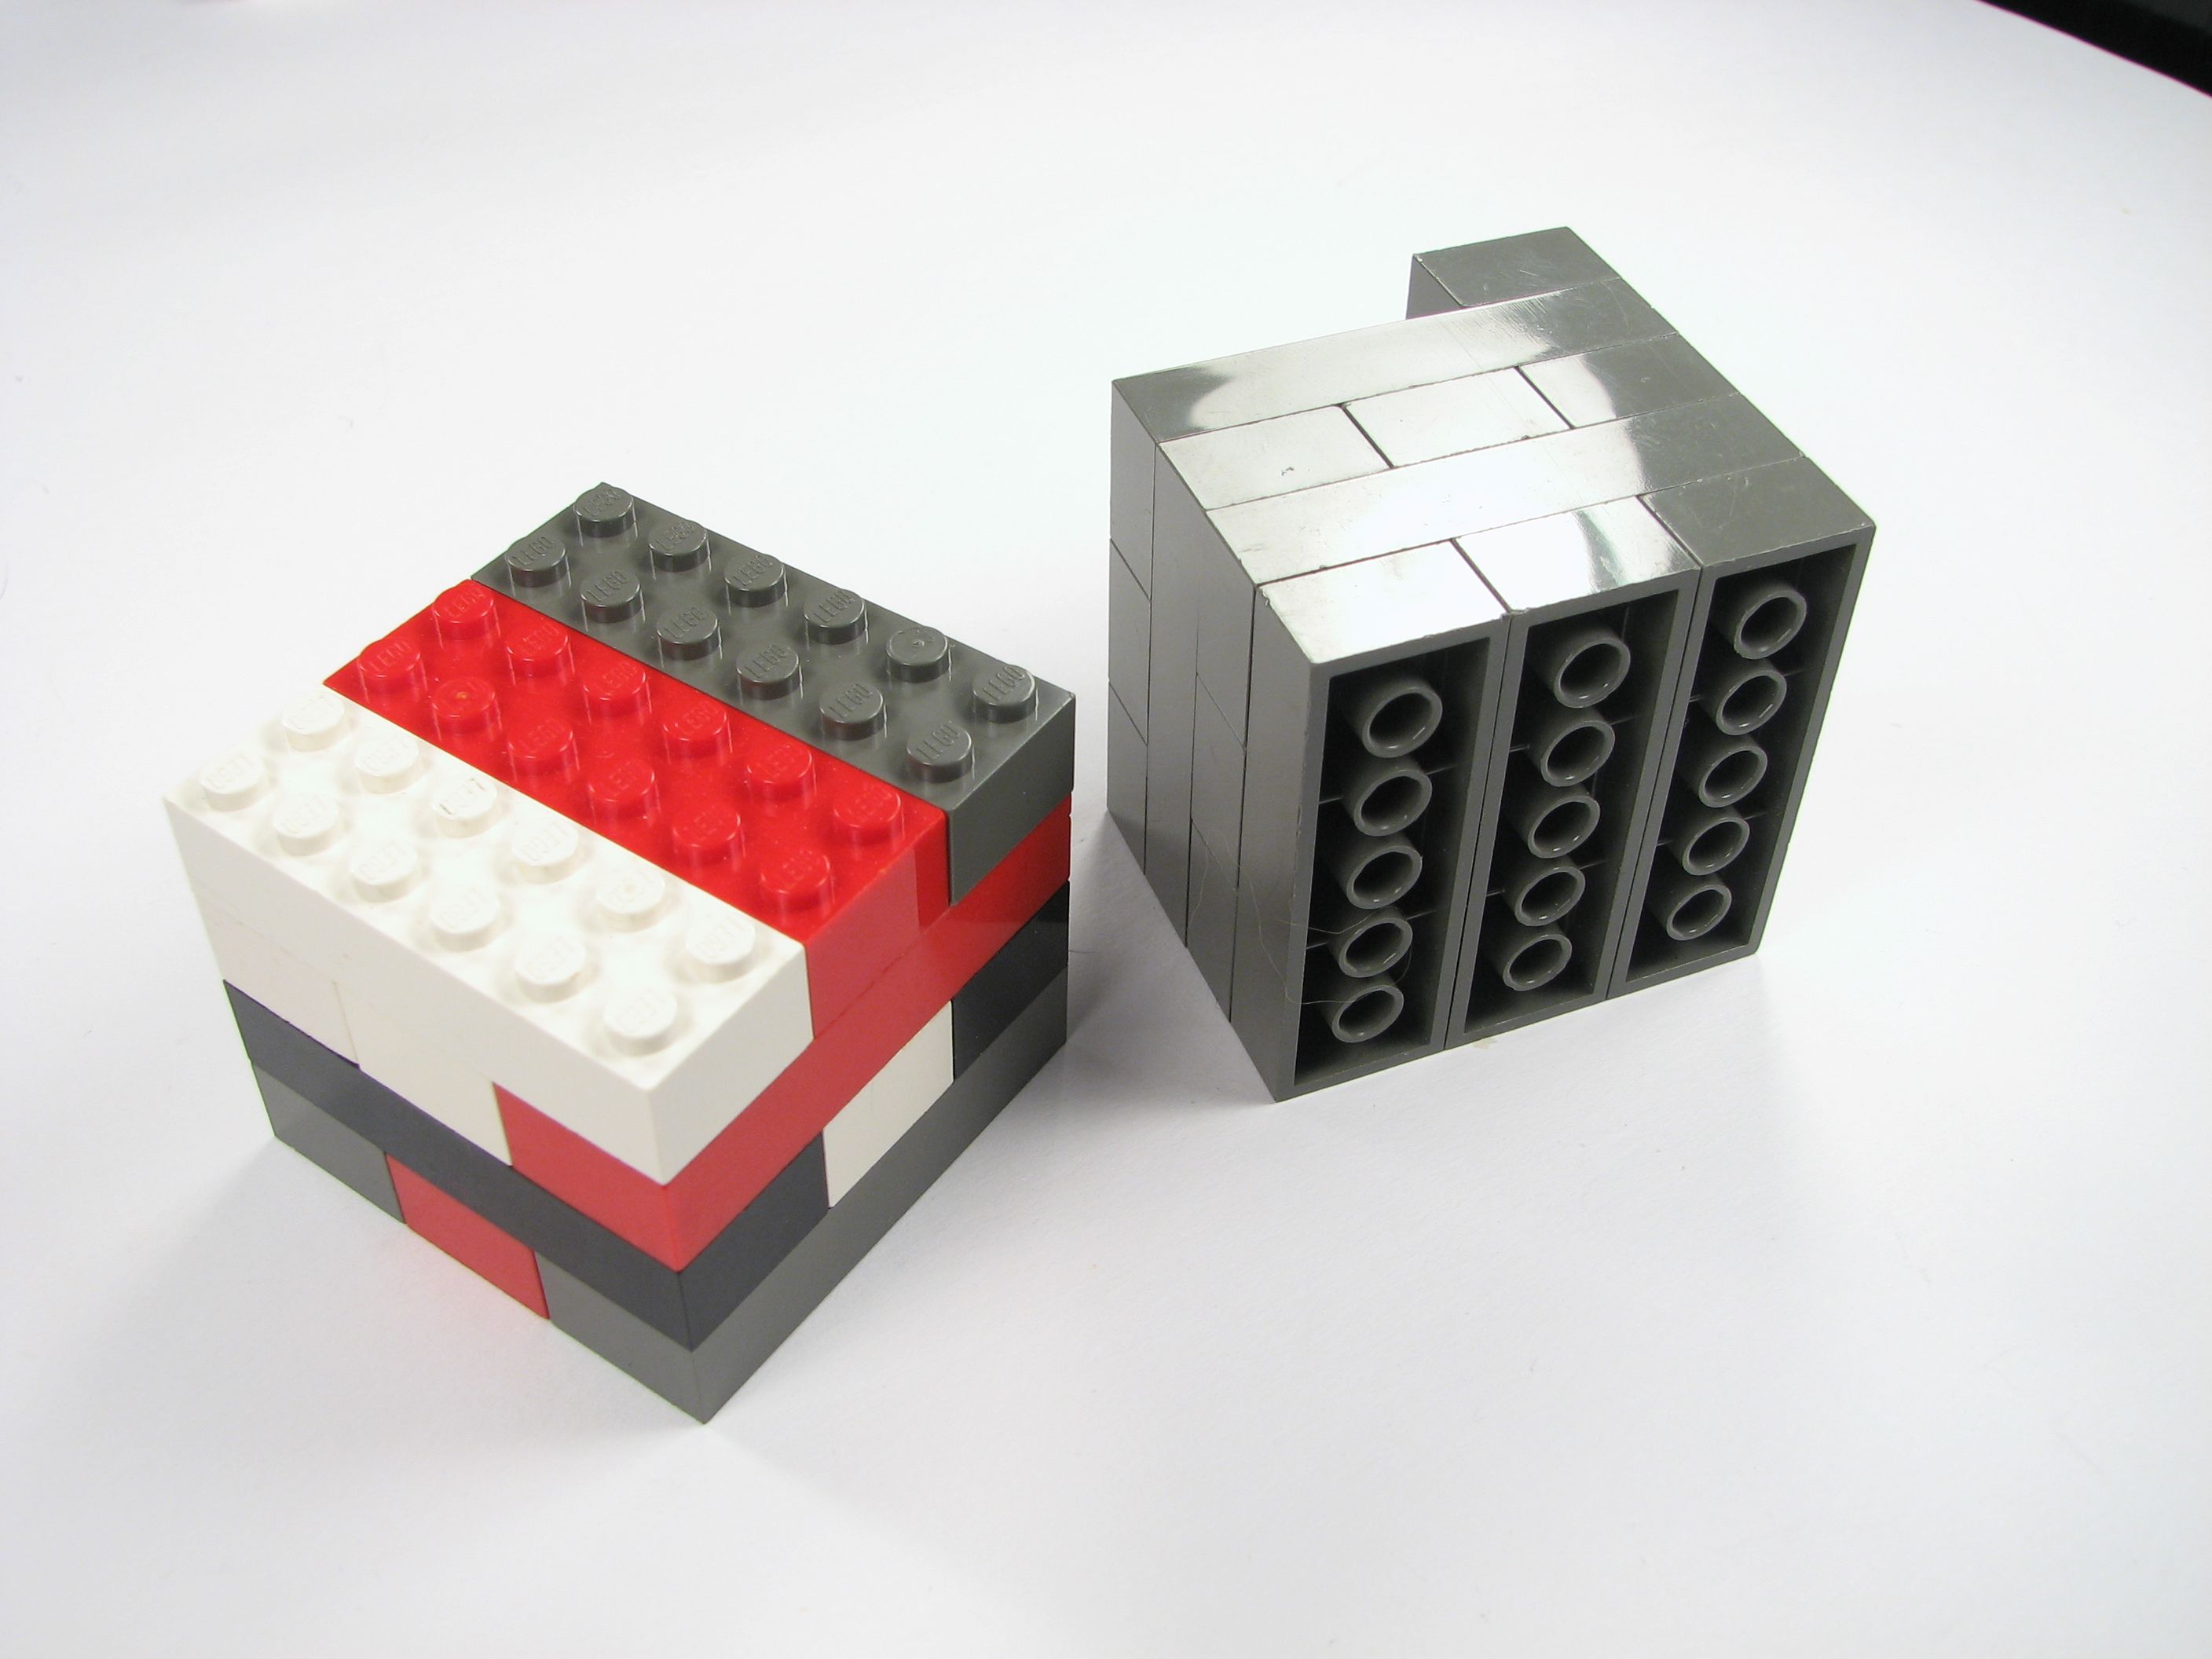
One Borg Cube’s worth of 1×8 full height bricks. These are fairly easy to separate out, but youngsters may want to emulate the method of the 1×8 flat plates (below) for something that’s less space-efficient but easier to separate.
1×2 flat plates. While this particular arrangement is very space-efficient, it isn’t so easy to take apart– keep a brick separator handy if you use this configuration. While you can stack these in some other ways (e.g., the great wall configuration), they are still hard to take apart. Often, a better bet is to keep them in a small parts bin.
The 1×2 full height bricks pose a bit of a challenge, it takes a little bit of thought to construct them into a larger shape that has sufficient rigidity for normal handling. The first three pictures illustrate the method: build alternating layers of 1×2 bricks as shown. The end result is actually solid enough to pick up and store in the bins with the other big stacks.
Assorted large flat pieces can be stored together by stacking them, each offset by at least one unit. Depending on how many you have, it may be better to create a few separate stacks.

Stacking 2×3 flat plates. These plates are a funny size– too small to treat like normal bricks but too large to file with the tiny parts. Stacking them into one big ingot of identical parts helps a lot in that respect.
2×6 Bricks. This one may actually be a little bit on the dense side, it can take a brick separator for kids to break these off. Youngsters may want to emulate the 2×6 flat brick stacking method instead.
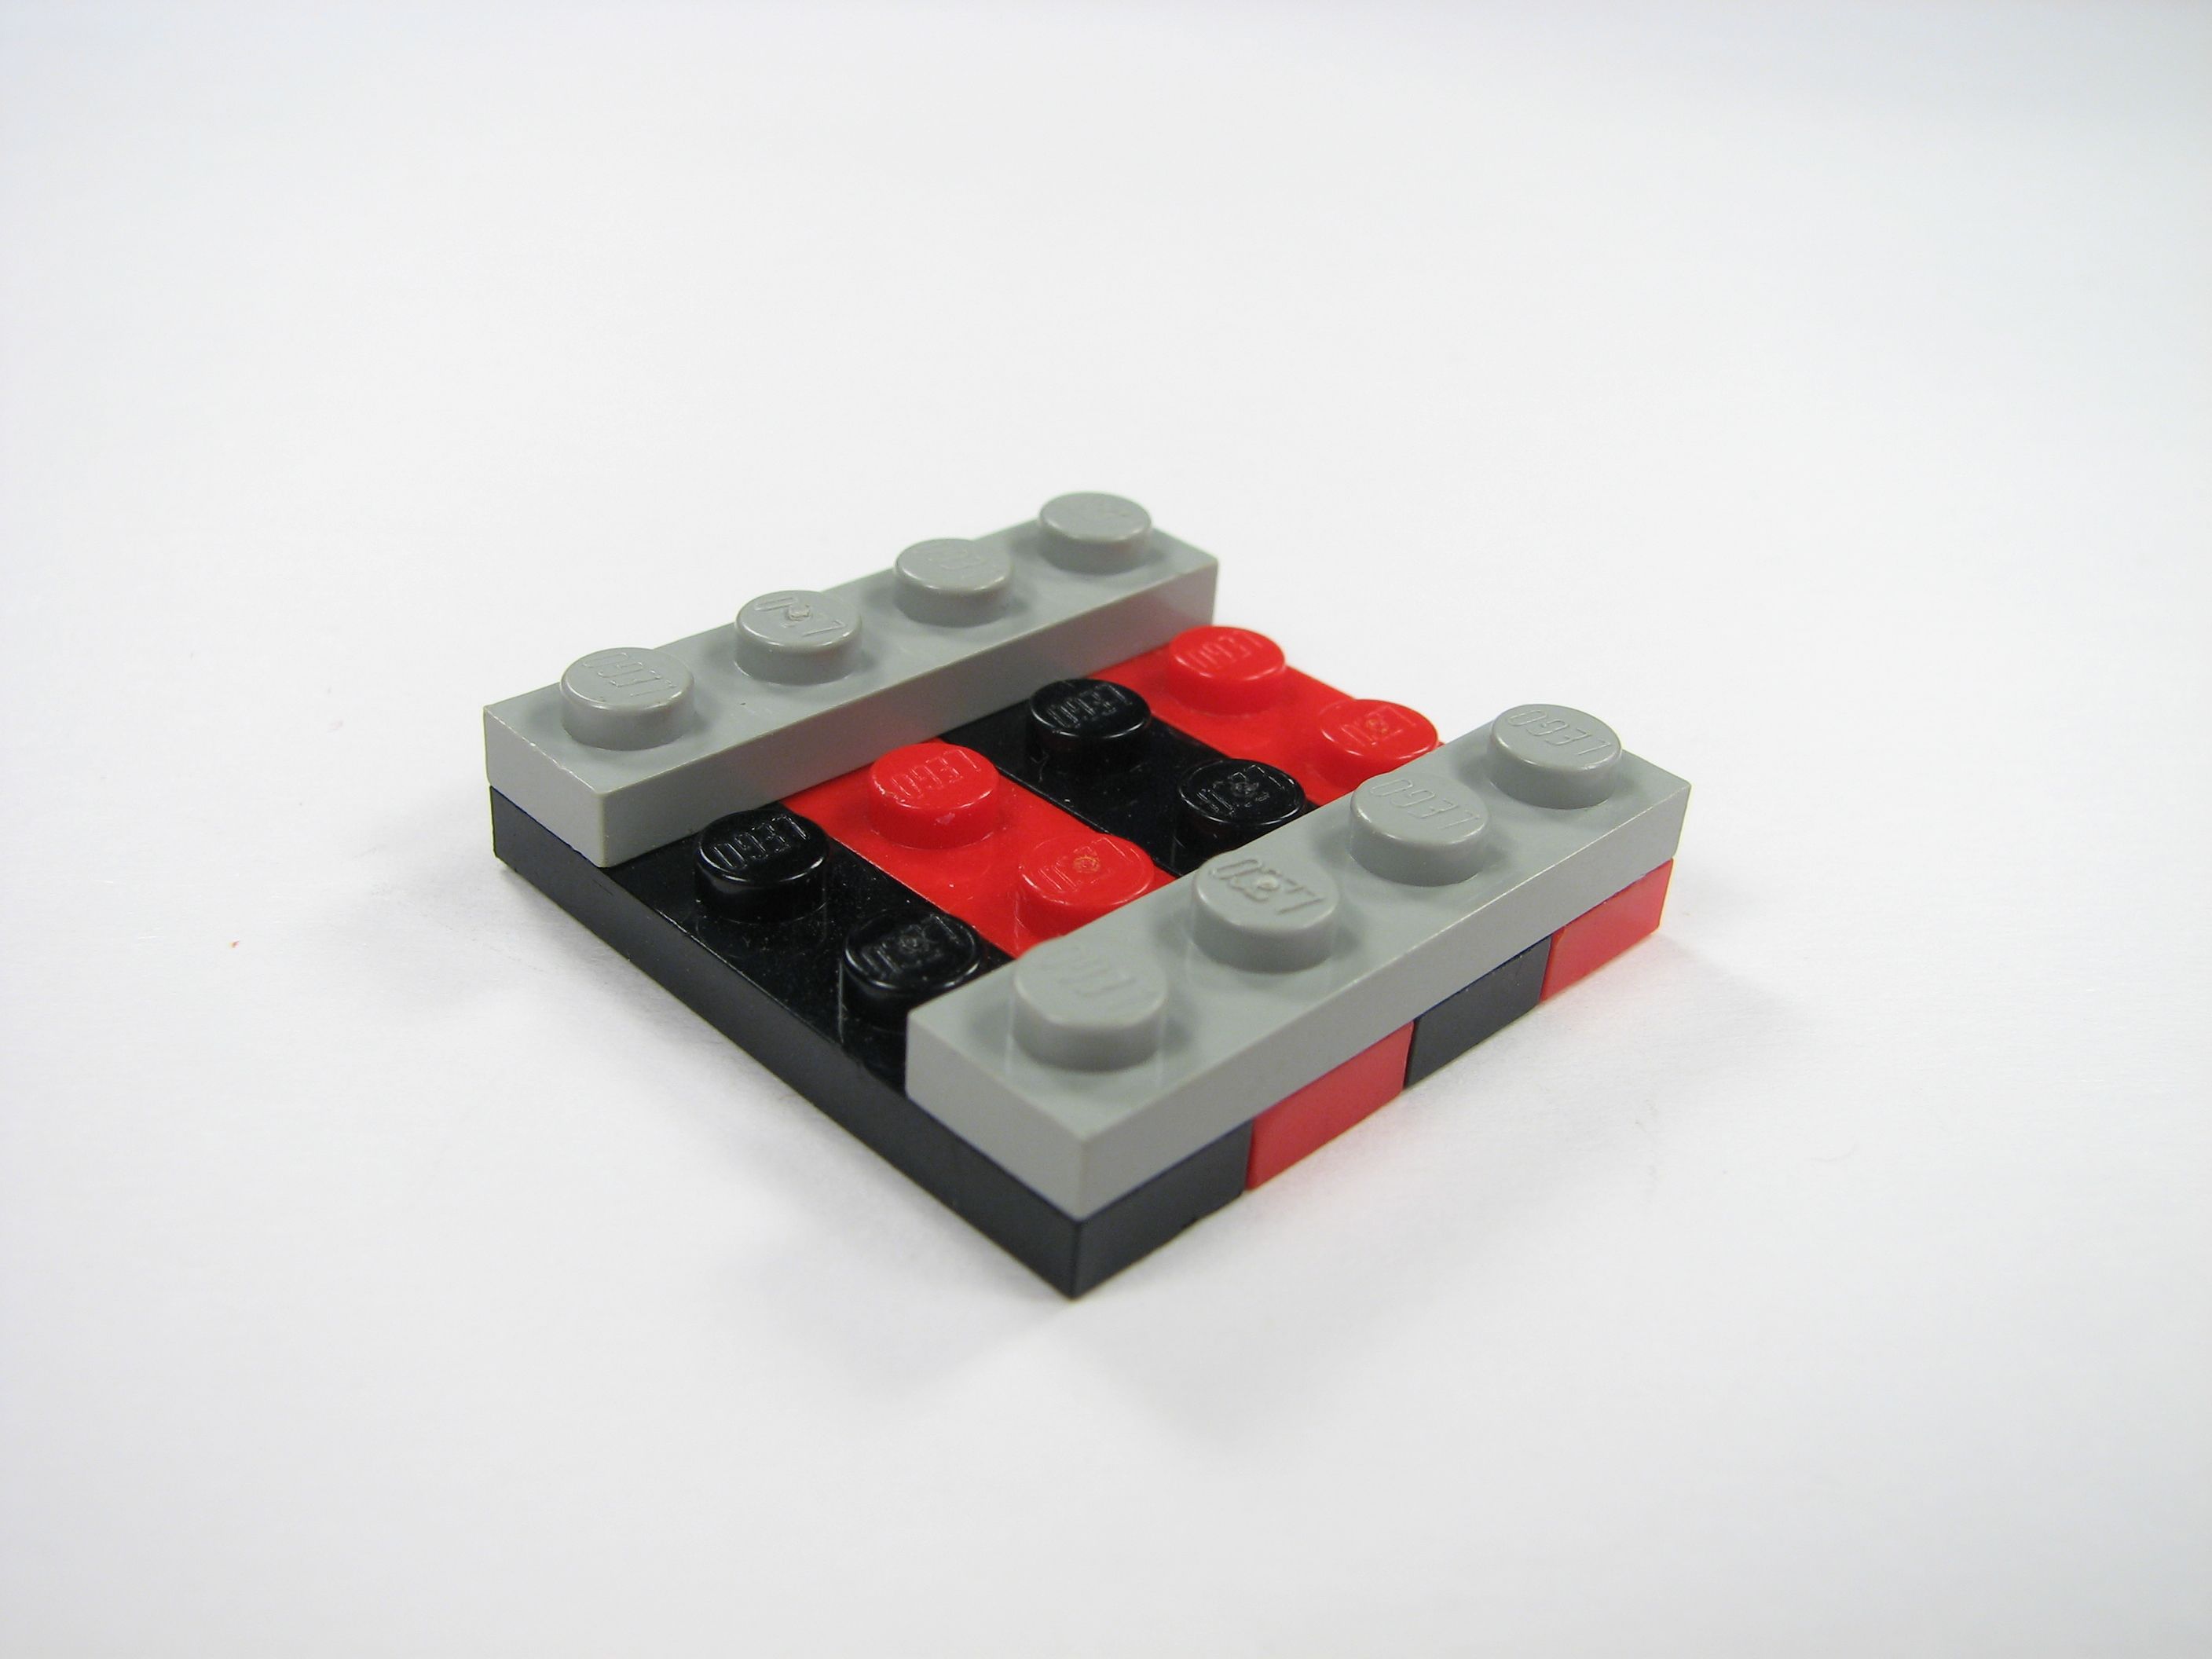
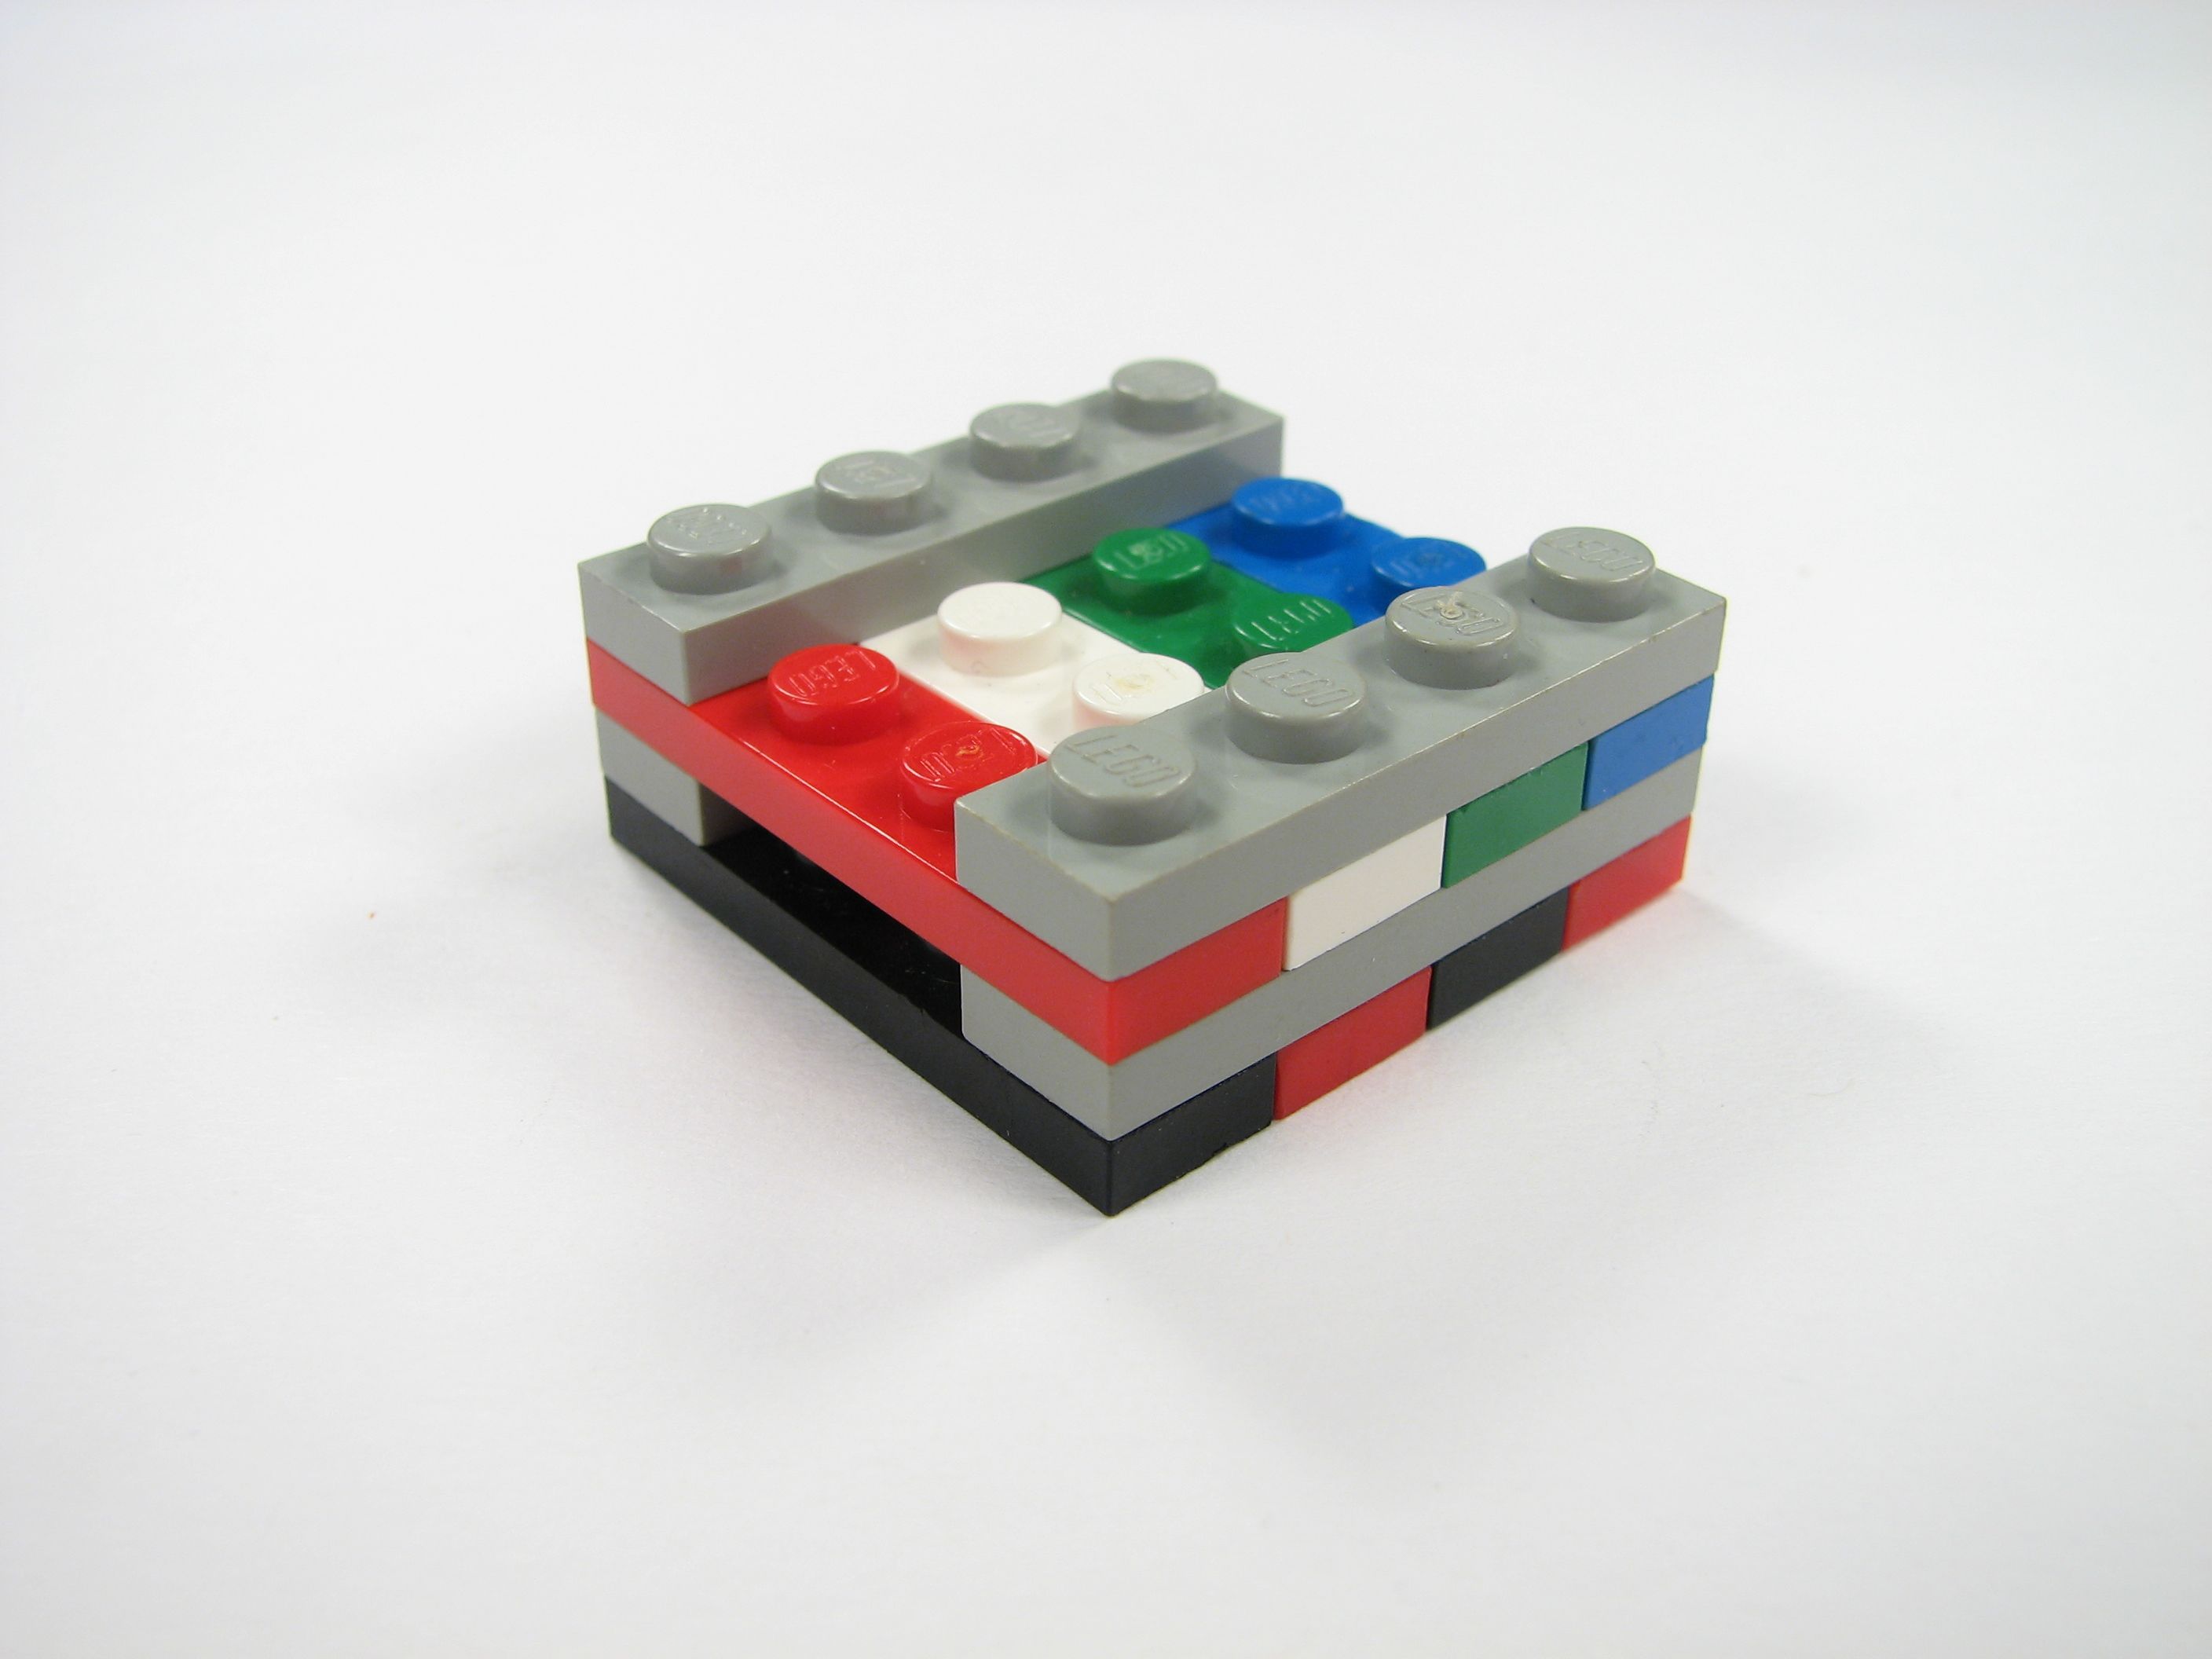
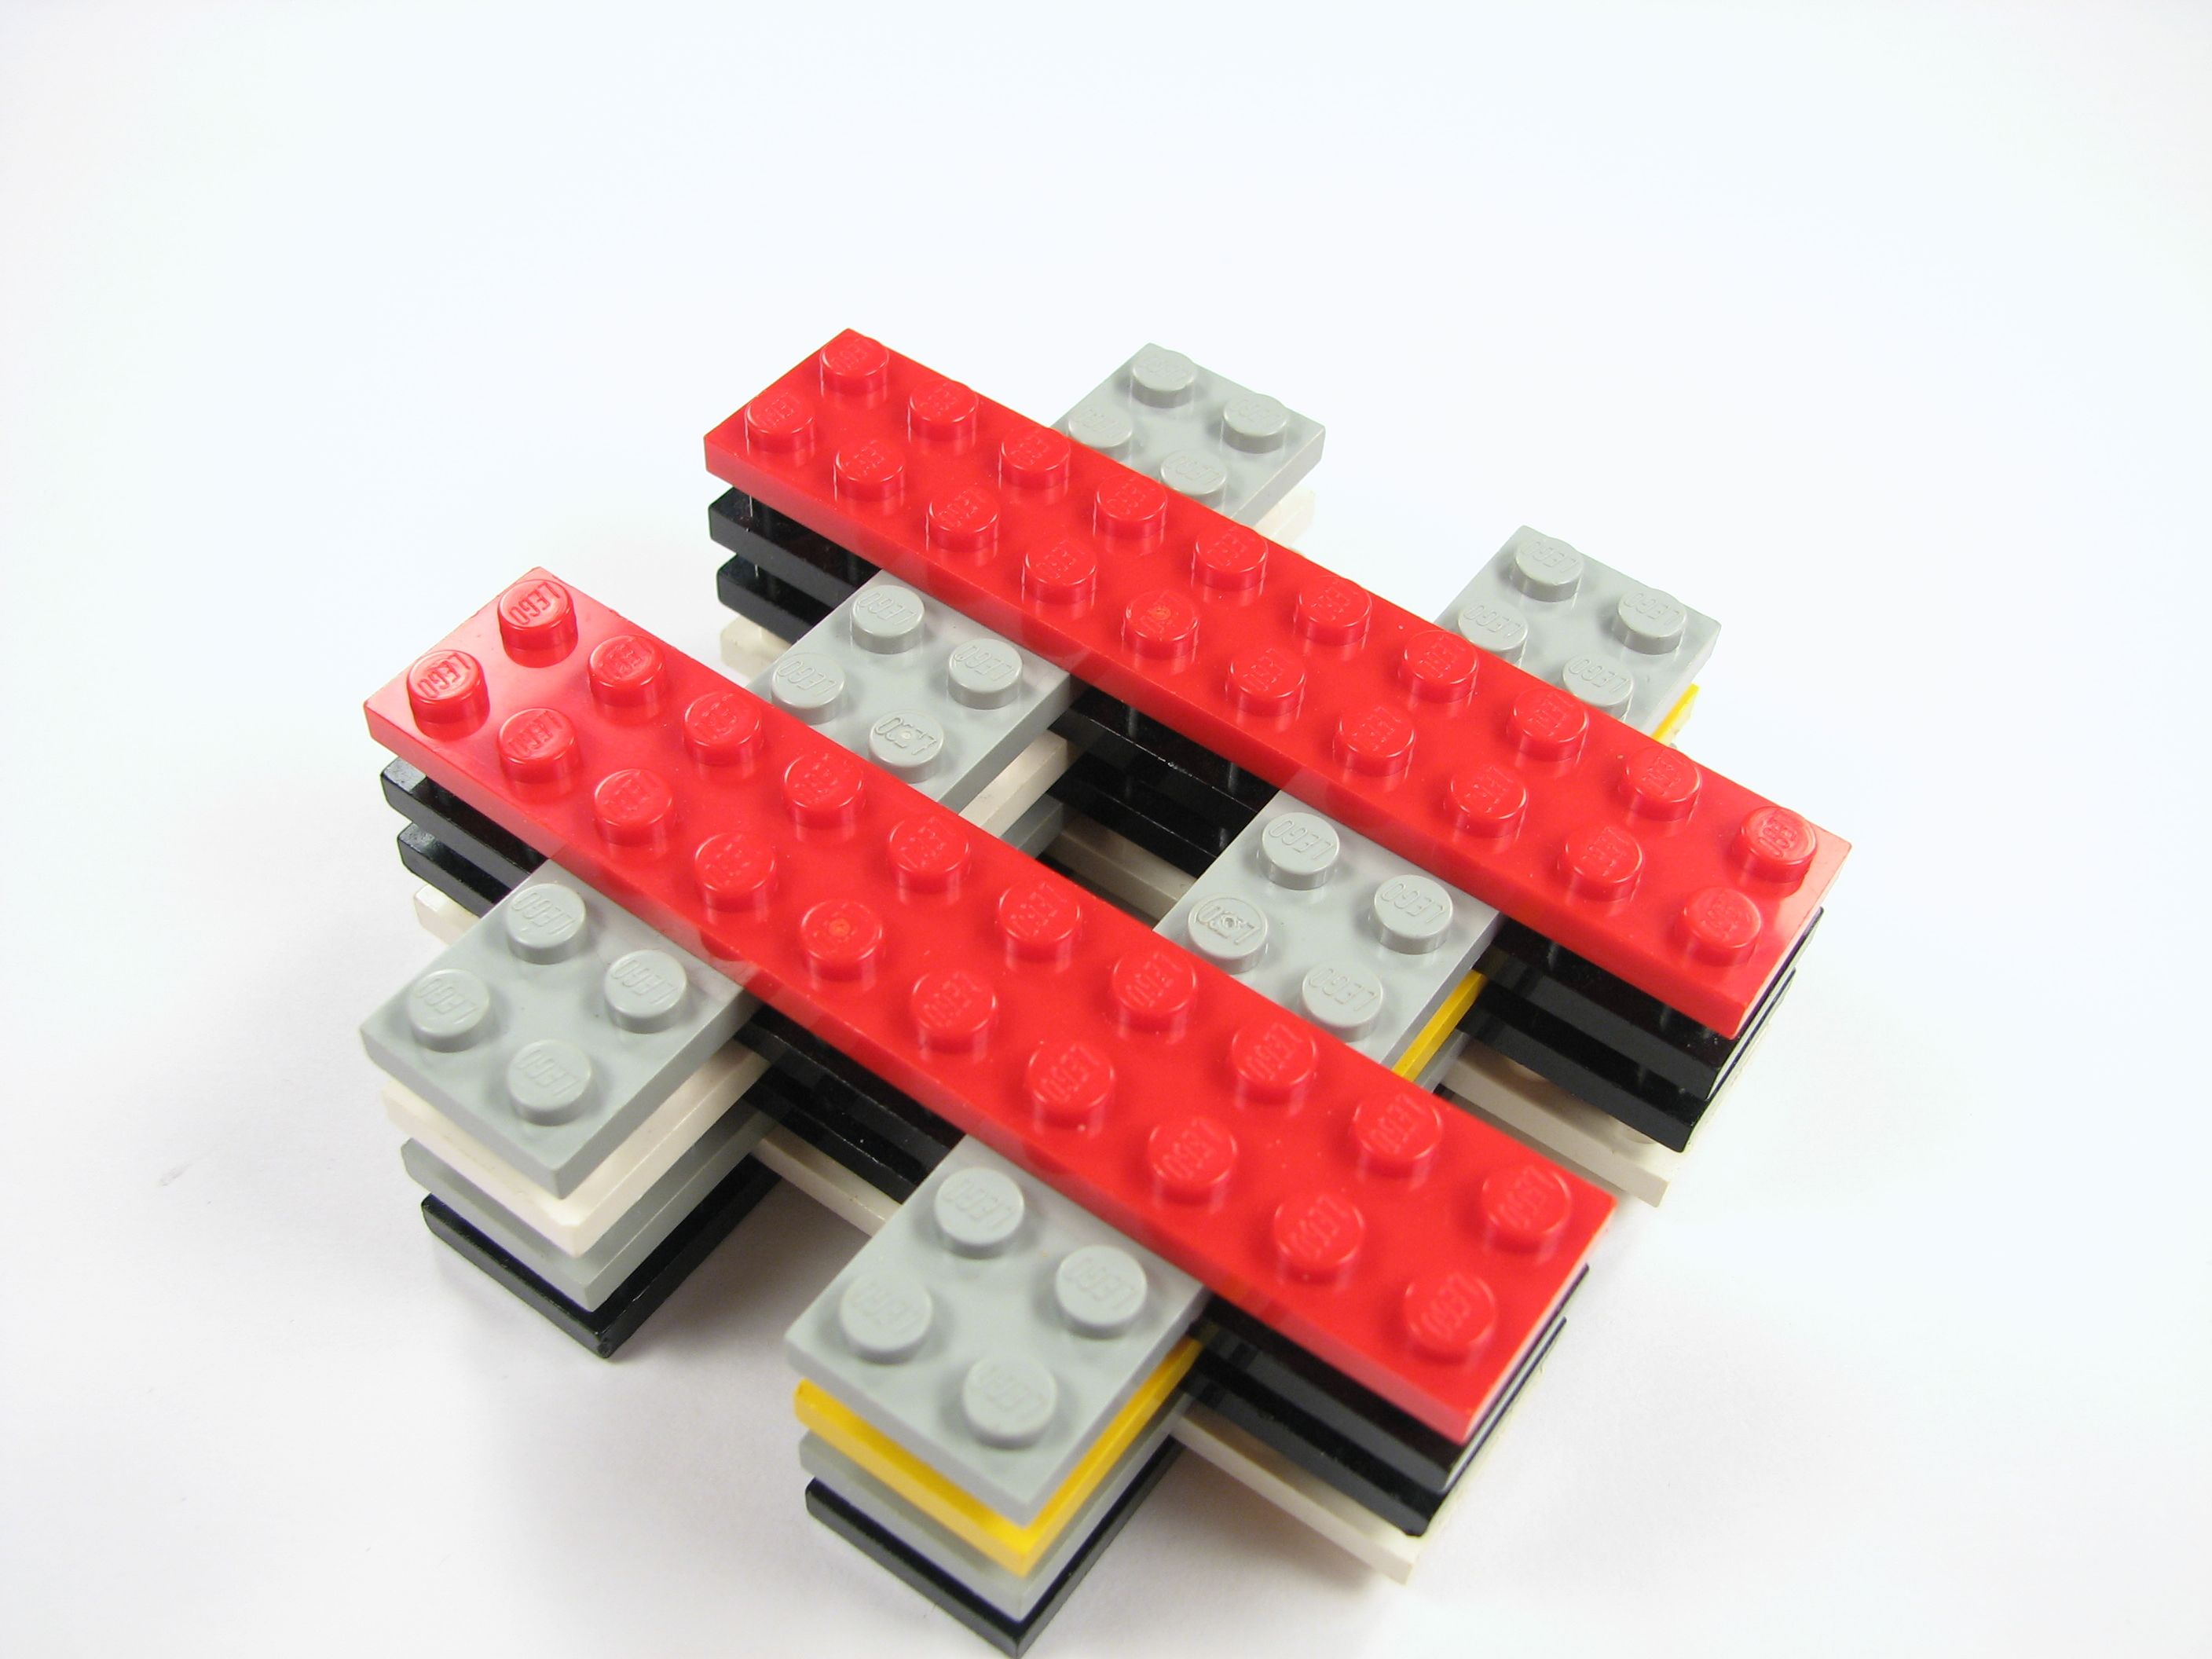
Here is a good method for use with 1×4 flat plates, although it can be applied in other situations as well. Alternate four side-by-side pieces in a layer with two perpendicular ones. This also makes large, sturdy canes that can be stored in a bin, but provides easy access anywhere in the stack without a brick separator.
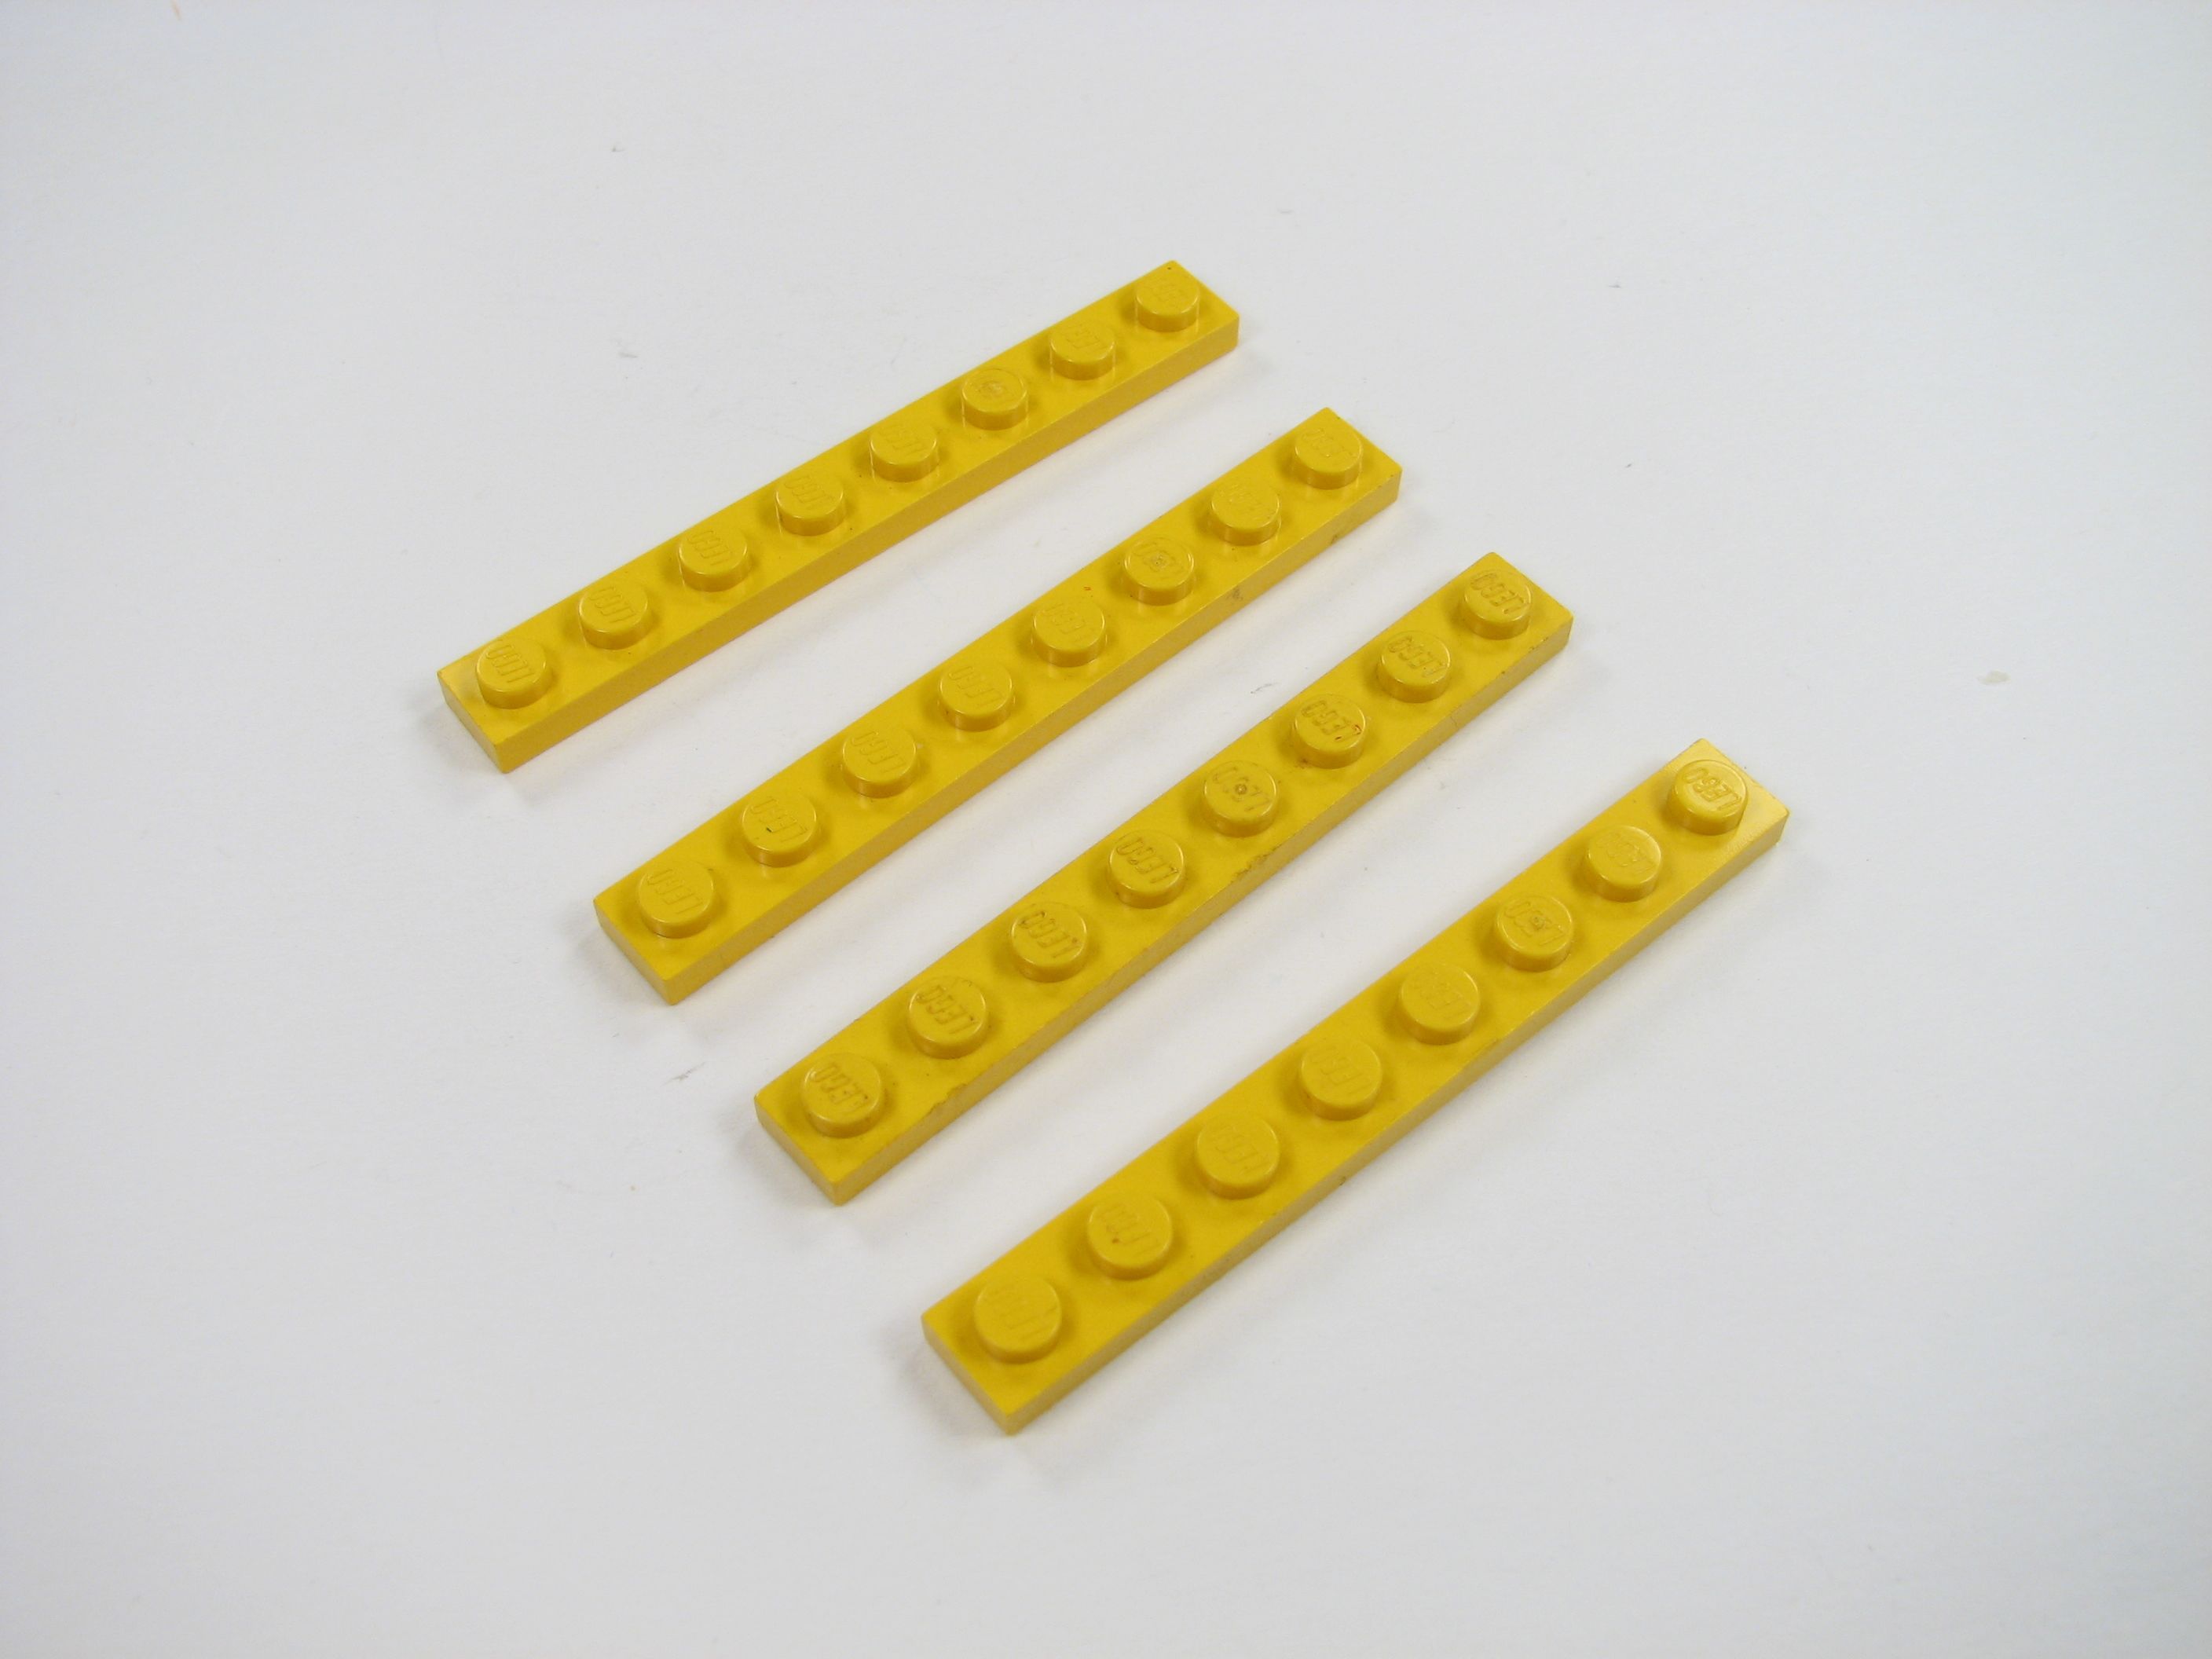
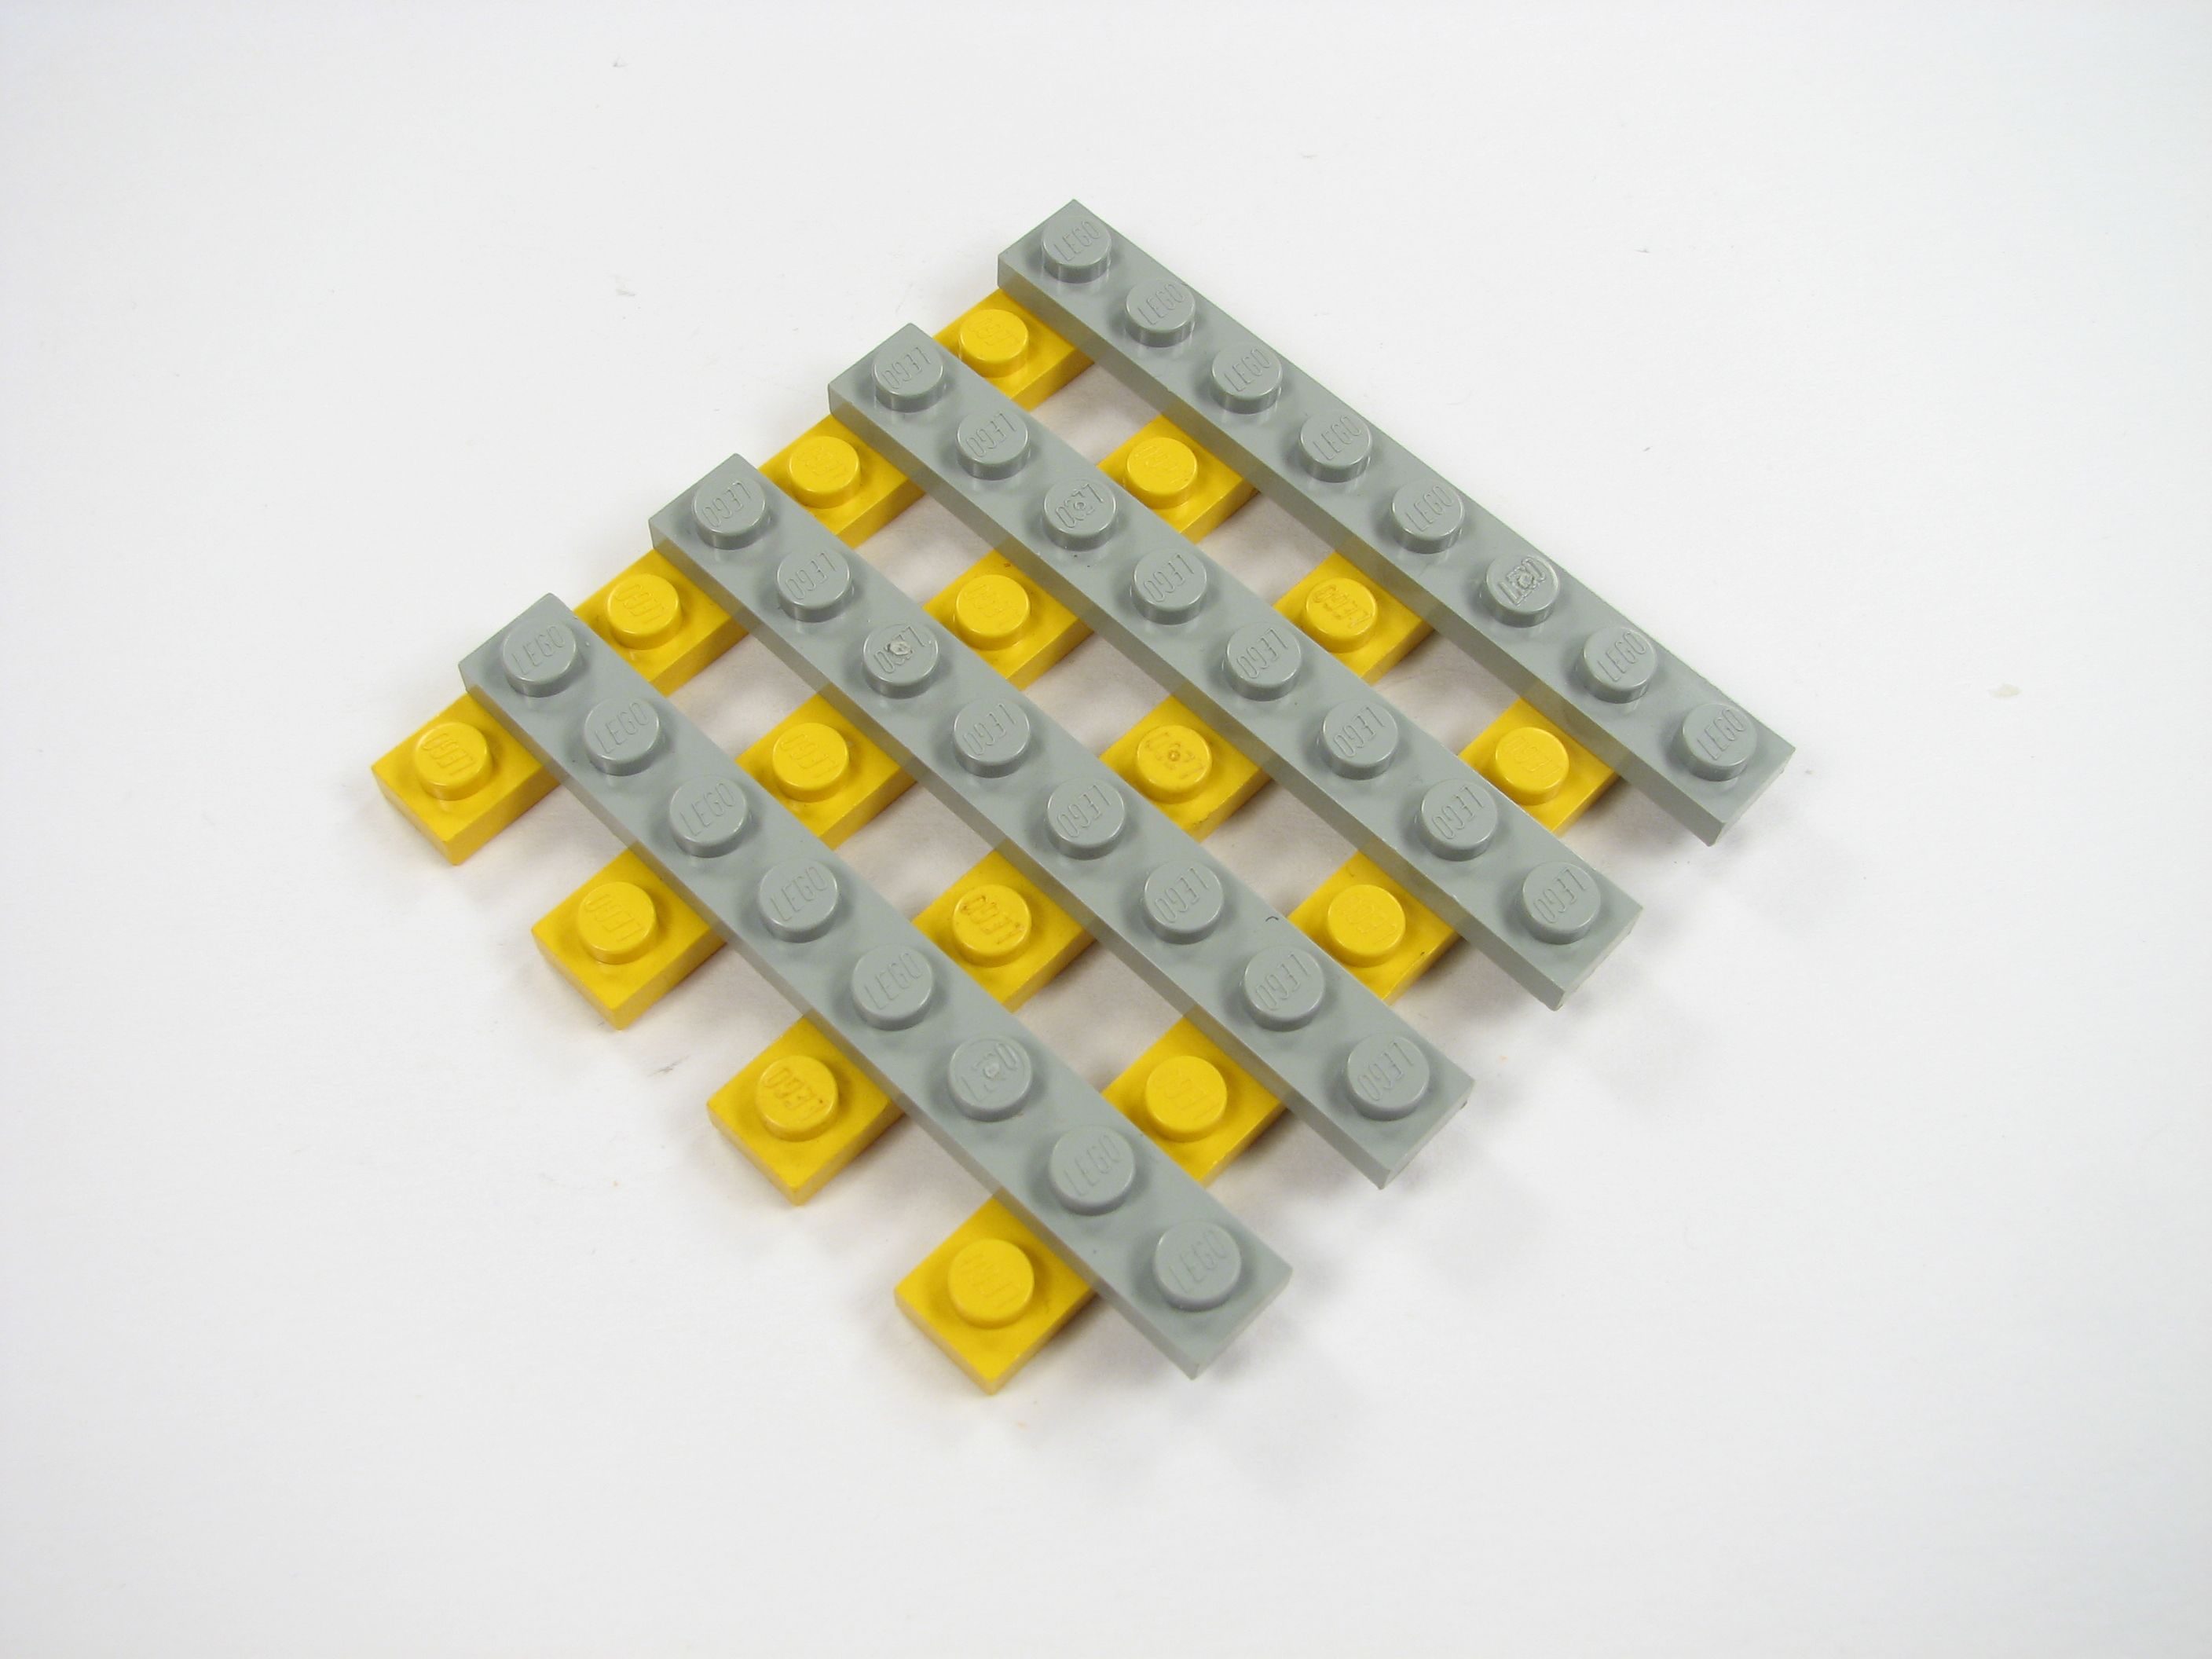
I like this method for stacking 1×8 flat plates a lot– not only is it efficient, but it looks cool.
The same stacking can of course be used for the 1×6 flat and 1×10 flat pieces.
Other evilmadscientist Lego projects:
It is always such a relief to find other people as enthralled with organization as I am. When we bought our house, which for all intents and purposes has infinite space (at least compared to our previous apartment), I spent about 2 weeks sorting all of my legos for easier access. Previous storage consisted of a gigantic purple plastic bin, plus a few smaller additional bins.
I’d always kept the "valuable" pieces (transparent bricks, etc.) collected together but unfortunately ended up damaging a few of the smaller interesting pieces. I’d clipped together a bunch of claw bits onto an antenna 15 or more years ago and when I finally took them off all of the claws snapped. :(
Now it’s fairly neat. I have two tackle boxes worth of small parts. I picked up one of those nail box organizers from home depot for mid sized unstackable pieces (wheels, lego people, etc) that just won’t fit in the tackle box. There are really a nice variety of drawered storage boxes available.
On the large end, I stopped at dumping my plates, bricks, and walls into separate large bins. So I still have to fish around in there, but to a much lesser extent. I may go back and stack them in this manner, it is useful.
I look forward to eventually buying my kid his first few small lego sets and seeing if he likes them. Assuming he does and wants more, that’s when I’ll unveil the multiple shelves worth of nicely organized parts down in the basement.
I’ve always wondered if this would work. The problem is, where do you put the big aggregate stacks? I think you still need bins, at which point why even have the stacks?
Even the godsend brick separator is all but useless in this particular case and there is hardly any non-destructive way to get the damn bricks apart.
Two separators solves this problem very well. One above, one below.
Thanks for the tip!
—
Windell H. Oskay
drwho(at)evilmadscientist.com
http://www.evilmadscientist.com/
>The problem is, where do you put the big aggregate stacks?
>I think you still need bins, at which point why even have the stacks?
Yes, you still need bins to store the stacks, but each bin is full of tall columns that sit side by side, not on top of each other. There’s no digging. Looking in the bin, you can immediately reach in and pick out the (say) 2×6 brick stack. (In practice, when I’m really building, I take all the stacks out of the bin and arrange them on a desk top so I don’t have to even reach into the bin.)
—
Windell H. Oskay
drwho(at)evilmadscientist.com
http://www.evilmadscientist.com/
Not for me. I ended up using my teeth; a terribble fate.
> the drawers are not fully opaque
Shouldn’t that be “fully transparent”?
You should post a link to your article on Lugnet in the storage forum.
ahh reminds me of…… me… (19 and still plays with lego)
—
Remember! Raid old appliances for parts/components
dont mind the typo’s, heh there a connection error
I posted this over at Lugnet, a with a response in this thread:
“…this may actually cause your bricks to warp slightly over time…”
and regarding a loss of “clutch power”:
“…I would recommend always storing any lego element not assembled…”
-Rob Antonishen
I certainly have not seen any warping or clutch loss in a few years of storing things this way. In any case, by that logic, all Lego models should be promptly disassembled after they are built to avoid the same fate!
—
Windell H. Oskay
drwho(at)evilmadscientist.com
http://www.evilmadscientist.com/
I’ve heard rumors of this sort of "clutch loss" from leaving pieces connected but, like you, I am skeptical. While I have had the occasional Lego piece lose its grip, I suspect that this was more due to repeated use (ie: many connects and disconnects) rather than being connected for a long period of time. As far as I can tell, ABS plastic tends to bounce back to its original shape unless deformed critically, in which case the damage is immediate. I could easily imagine friction wearing down the surface, however, which would suggest that repeated-use is the real culprit.
Someone should do an experiment. :-)
Those tackle boxes look pretty much like the ones I use, which come in stacks of 4 (with another hunk of plastic that latches them together) from Walmart. I’ve been so happy with them for both Lego and Bionicle parts that I now have several of them.
I find that when I bring home a new set I sort all of the pieces and put all of the smaller ones into one or two of the tackle boxes (or more if needed), and then just keep the larger pieces in sorted piles until I need them. If I have to put them up I try to put as many as possible into the tackle boxes, and any others go into zip-lock bags until I finish the model.
As far as stacking them goes, I tend to do that more with my daughter’s bricks than my own, but overall I wouldn’t expect to see many problems from that, since I have one model that spent almost 20 years assembled in my room at my parents’ house, and it still took some work to take apart (I didn’t want to move it across the country until I found the instructions scanned online to reassemble it).
Another thing many people don’t seem to know is that Lego’s website has a page to submit requests for replacement pieces if your pieces stop working properly or break, so it’s not much of a worry unless the particular piece becomes uncommon or unused in future sets.
Picture a collection of 2×6, 2×8… etc. ‘flats’.
A different way to stack them is to pinch lightly on only one end. You end up with a wedge – one side ‘firmly attached’, one side completely unattached. So you might have four 2×6’s, three 2×8’s, 7 2×12’s or whatever. They’re pre-sorted by color, and the ‘stack’ is easily sorted by length. Or separated into individual stacks if there’s a swath of a particular size.
The has the benefit of not needing the central ‘spacer’ piece, which is an additional step to remove. The drawback is the odd resulting shape if your bin is too small or you’re packing things in there that tight. You can also tell at a glance how many of a given shape-color combo you’ve got – because they’ve already been completely sorted. "Hmm, the grey stack has only three 2×6’s, the dark grey stack has eight…."
On large structures, it is helpful if all the random ‘storage blocks’ you’ve made are some set size. That is, make a little pyramid (or whatever) that contains exactly 10 blocks. Or 15. Or whatever – but make it something consistent. In the ‘1×1 storage’ picture for example, you’ve got a ‘set size’ of seven high. Well, if most of the columns are of identical pieces you can visually grok how many red 1×1’s you’ve got. (Roughly. You’ll have mixed columns too.)
Oh I am so showing my kids this today! I am always cursing the darn legos – and I hate that they are all over the place – we have bins and bins and bins….of them.
I too am an organized freak – love the blog!
Jamie R Lentzner
http://www.jpd.typepad.com
http://www.jamiespnd.com
Anyone know of a small "Automated Storage/Retrieval System" AKA AS/RS?
Think of a dresser sized cabinet, or larger, where the automation is that you ask for a certain part and it is presented to you in one of a number of fashions. This would probably work best and be cheapest at a small scale if you think of a series of drawer sized boxes that are on a chain-driven carosel, oriented vertically. Think of a Ferris wheel, but instead of seats, its 6-8" tall x 4′ wide x 1′ deep boxes, and instead of a big circle of metal framework, its an oval of chain, and instead of people, its legos. Using the above box dimensions, the whole thing might be about 4′ tall x 4.5′ wide x 2.5′ deep. Access to storage boxes might be through the top, or by pulling the top box out like a drawer, in both cases at about waist height in this example. To get to a different box, you would need to close the cabinet, and use the control program to tell it to rotate the boxes around until the one you want is in position. Inside of the large boxes there could be any degree of samller organizers. When putting a lego inside the system, you open up a program on a connected PC, type in the lego part number, type in the box, sub-container, and bin ID, and put the lego in that exact bin. Then later you decide you want to make something you’ve never made before. You have so many parts stored and inventoried on Peeron that you can go to Peeron and call up the plans for a set you don’t even own, and actually have the parts to build it. You take the inventory from Peeron in comma delimited format and import it into the AS/RS program. It looks at the parts and sorts by bin locations, moves the first storage box into position, and gives you a first sub-list of all the parts to pick from the bins in the first box it presents to you. You pick them, and hit continue on the program, and it moves the second storage box into position, giving you the sub-list of all parts that are in various bins inside the second box, and so on until you’ve picked out all the pieces. Now the system knows you’ve ‘checked out’ those parts, and you can at some point in the future reverse the procedure to put them back where they belong.
Another way to use this system is to use the Lego Designer program to build a virtual design. You export the parts list from LDD and put it into the AS/RS program, and again pick all the needed parts out to build your LDD design out of real parts.
Putting new parts into the system would get easier after a while, since you could take a set inventory from Peeron, import it, and the system could try to put all parts from the set that are the same as parts you’ve already stored into the same bins as those parts. The only time you would ever have to enter a new part number and pick a box and bin for it would be if it were a new part you had never stored before. Of course, once your parts overflow a bin, you would have to move or split those parts to bigger or multiple bins.
I think this is easily built as a dumb organizer, and then with some specialized hardware and programming, the full design envisioned above could be produced.
– Jay
email: jaycephus gmail com
argh yes i love lego but i dont think i could stand doing this.
the aim is to remember roughly where you last saw ”that piece” in the box
digging around is all part of the fun
the you find another piece, think ”ah yes i could do this too”
and the lego becomes far more imagineative and cooler.
those lego piece searching moments are useful
dont waste them.
I used to use something like the 8×1 stacking method to make simple machines out of legos before I had technic.
some people would say this is sad, but those people don’t have thousands of lego bricks.
I like your method! But you still need a place to put it all. We love our Legos and have found that the Bricksacks (www.bricksack.com) are the best for our ever growing Lego collection. My son has several of them for different themes (Vikings, Star Wars, etc). The sacks open up to lay flat on the floor, so you can see all of your pieces at once (no digging through bins). But since the sack spreads to a 3 foot diameter, the pieces pretty much stay on the circle. Then when he is done, he throws the few “run away pieces” onto the circle and cinches up the cord like a sack and stores the sack in a toy box. He has about 2 sacks per box. I think I’m going to encourage him to make stacks like you show for those hard to find pieces, so they are easier to spot. But the sacks have really eliminated the “Mom can you help me find….” Thanks!
Very nice article. One thing, though, the brick separator will easily separate 2×2 flat plates that are stuck together – if you have two of them!
http://www.philohome.com/remover/remover6.gif
This is only for square pieces. what about those pieces that have a slant? e.g. roof pieces
I’d really like to see a picture of what you’re describing here. It sounds useful, but I can’t quite visualize it. Are there pictures posted online somewhere?
It would drive me mad having to stack them all, we use [link:http://www.gogoandco.com/cart/toy-storage/gogosac GoGoSac playmat and lego storage ] organizer in one solution. Pretty easy we play on the play mat with all the LEGO, when its time to finish we just pull up on the GoGoSac handles and the clean up is finished. So simple and it really works for me & the kids, also keeps my wife sane as she doesn’t have to pick up all the little Lego bits off the floor. We are using 3 at the moment and love them, 1 for LEGO for me and my boy, the next for DUPLO for my little girl & the last is for general, when we go away or to the park etc for any toy. They even teach you how to get the [link:http://www.gogoandco.com/cart/gogosac-play-tips kids to play on the GoGoSac] which makes it fun for them and easy for us to clean up
They are made by [link:http://www.gogoandco.com GoGo&Co] and are located under the [link:http://www.gogoandco.com/cart/toy-storage/gogosac LEGO storage] on there website.
They are well worth it and have made our home life easier as no screaming to clean-up the Lego.
We are using the GoGoSac for our Lego, been a godsend for our Lego storage [link:http://www.gogoandco.com/cart/lego-toy-storage%5D Thanks for your links to the website, I got 2 of them from them
I have some of my uncles’ Lego bricks from the 1960s, given to me in the late 1990s. In the bag they were given to me, some connected, and some not; they still inter-fit with new bricks irregardless.
Extreme sun exposure, extreme use/wear seems that some of my own that were "driven daily" for a two to three decades do much more than just putting two bricks together for extended periods of time as my uncles’ bricks.
Hi!
I’m a 40yr old father who played with lego in the 70’s. A few sets survived thru the years and when I had a son, my old collection grew with his own selection. :)
Some bricks indeed lost their "grip" so to speak. Lego should be putting more info as to what the average length (in years) their bricks has effective "grip" or connectivity.
With regards to storage, I’ve been storing this way for 4 years, so far, our bricks did not lose any "clutch power". I wonder how long have the evil mad scientist been storing his bricks this way?
warm regards to all.
You are completely brilliant! After searching so many sites for ideas to help my sanity and my 5-year olds lego stash, I pored over the Internet for Lego organization ideas. I will try this one today – and even if it doesn’t stick, it will give me a fun afternoon. :)
You rock. Thank you so much for sharing this!!!
First off, I have that EXACT same box in the first picture, but with more Legos, and it’s one of the small boxes in my collection 0_0
Anyway, I wanna say this is an ingenious method of organization. It also helped me realize just how large my collection is. This has become like sifting sand out of a lake; no matter how many tons you get out, you’ll never notice a change in water level.
As for the clutch loss debate, I just wanna say correlation is not causation. My dad’s had pieces stuck together for 20-some-odd years now, and they hold just as fast as some of my newer pieces. The issue with clutch loss may be related to plastic yellowing, due to light exposure, as the pieces my dad’s got stuck have spent most of their life in a dark garage.
I see you have yellow 2×2’s with eyes on them! Those are CLASSIC. Mine have long since disappeared :(
I’m a 40 year old ex-lego fanatic who has rediscovered the fun with my 3 year old. Took out my 30 year old or so collection and spent 2 days organizing the bits into stacks and bins and it was totally worth it. I didn’t mind raking through thousands of pieces to find that sword or hinge when I was 12 but time is short now and having an organized bin for myself and my son is great. As a bonus, it also is a nice teaching tool for the little one in regards to color, shape and pattern. Worked great for me, thanks for the tip.
My little girls have quite a bit of basic Lego sets, I have a dozen or so Star Wars sets and asked my oldest (6 y/o) if she’d like to build them with me. Well, it didn’t take me long to get on the Internet and search for good tips on organizing Legos, having all these small and weird parts in the SW sets. So glad I found this site, very useful info and great examples! We have a GoGoSac as well, which is great for Basic Lego (lots of full height bricks), but not so much for small pieces like 1×1, 1×2, smooth tiles etc. Thanks!
Organization by categories…find some help using the Lego Digital Designer on seperation.
I have 4 Kids 10,7,4,2…And they love the sound of rustling lego piece…And I love too. However, as the 10 year old knows, finding an obscure lego star wars piece is crucial…
I have a large bin for leg bricks that are just 2x blocks…No organization for what I call standard bricks. Then we get to hear the wonderful sound. All other blocks organized.
In fact the 2 year plays legos by making the lego search sound…that’s it.
Also, the big bin of standard blocks is always out with large city plates for building. The 4 and 7 year old mostly build with these. When the oldest once to build a specific set, then the organization is there for him to build fairly quickly.
Hi there! Awesome to see that even reputable AFOLs like yourself use similar stacking techniques as the one I have also come to develop for myself. One question though: I find that large plates (4×4 or bigger) stacked together are really a practical storage solution. That said, even if they are offset by one or two lines, such plates initially grip very firmly together so that you may need to twist them really hard to pull them apart. That’s one problem, and I have already had cases of serious damage. But then over time they wear out and lose much of their grip, which makes them less efficient in regular use. That’s another, bigger problem. My most commonly used plate is the 6×4, as it suits most of my needs in the scale I generally build in. So it’s no wonder that I have a zillion such plates, in neat piles. However, I find that by using and reusing them, and stacking and unstacking them over and over again (as you always need the odd color piece that’s in the middle of the pile), they get looser from one MOC to the next. Any tip on how to avoid that? I suppose there’s no way really!
I’ve been searching for a way to help my 12 year old organize his Lego collection. Thanks so much for this entry! I’d love to see a similar piece on how to organize K’nex collections, especially those long tube type things.
Hi! Thanks for the awesome tip!
Part of our new year’s resolution was to organize and store our lego neatly so that we could have more fun building our sets instead of spending countless hours searching the bins for the right piece. :)
I’d like to ask though, does anyone know a site where I could get the complete list and picture of lego parts? Since my bins are opaque I plan to put the pictures of the specific pieces that are inside the bins to make the searching much easier.
Thanks!
If you want to put pictures on your bins, you might be attaching catalogs to the front instead…;-) Check out all of the pieces here:
http://www.bricklink.com/catalogTree.asp?itemType=P
For a more modeled isometric view:
http://guide.lugnet.com/partsref/category/
And poke around here:
http://guide.lugnet.com/partsref/
I don’t think I could stack all of my legos together… that would drive me nuts went I want to build something… I’d have to take it apart first. My fingers hurt enough from just taking things apart that my son and I build.
Thinking about this more, I think stacking the 1×1 plates and little nibs is good. Maybe even the 2×2 round plates… but I’d still prefer to leave everything else loose.
I love this. I would also like to see:
"How to organize your Computer Files"
"How to organize your ToDo-list"
and so on…
Thanks!
/Mårten
What a brilliant sorting method! I recently dug out all of my Lego again and decided to sort using this method after doing a pre-sort by color and parting out all of the various specialty parts into their own small organizers. I was reluctant at first, because this seems like it would take a lot of time even for a small collection, but for a few bins of bricks spanning 17 years or so, it only took an evening to arrange the plates and bricks into stacks. I’m sure this will increase my building efficiency and it also frees up a fair amount of space in comparison to storing loose bricks in bags or tubs.
I did some looking around to see if I could find any more information on supposed loss of clutch power through stacking bricks this way for an extended period of time before arranging my bricks in this manner, and this mostly seems like nonsense and hearsay to me – the bigger issue seems to come from some of the more dense stacks, from which it is more difficult to remove pieces by hand and can lead to some bending and warping of the stacks when pieces are removed, not the pieces being put together for a long period of time. This seems like it could vary from individual to individual depending on how large the stacks are and how dense they are arranged, more than anything else.
Hi, thanks a lot for the tip on how to organise the LEGO bricks! I’ve been sorting my bricks in a similar way for years, but your system is more developped then mine. Thanks again for your post!
Laszlo, a 44 year old father of 2 sons from Budapest,Hungary