


For a late night summer party, we wanted to deploy an array of maybe 20 or so little LED garden lights along the periphery of our back yard. And since it was for a one-time event, there wasn’t much sense in buying (or building) a set of nice looking permanent solar lights. So here is an alternative: make your own ultra-low cost temporary garden lights using LEDs, lithium coin cells, and mason jars.
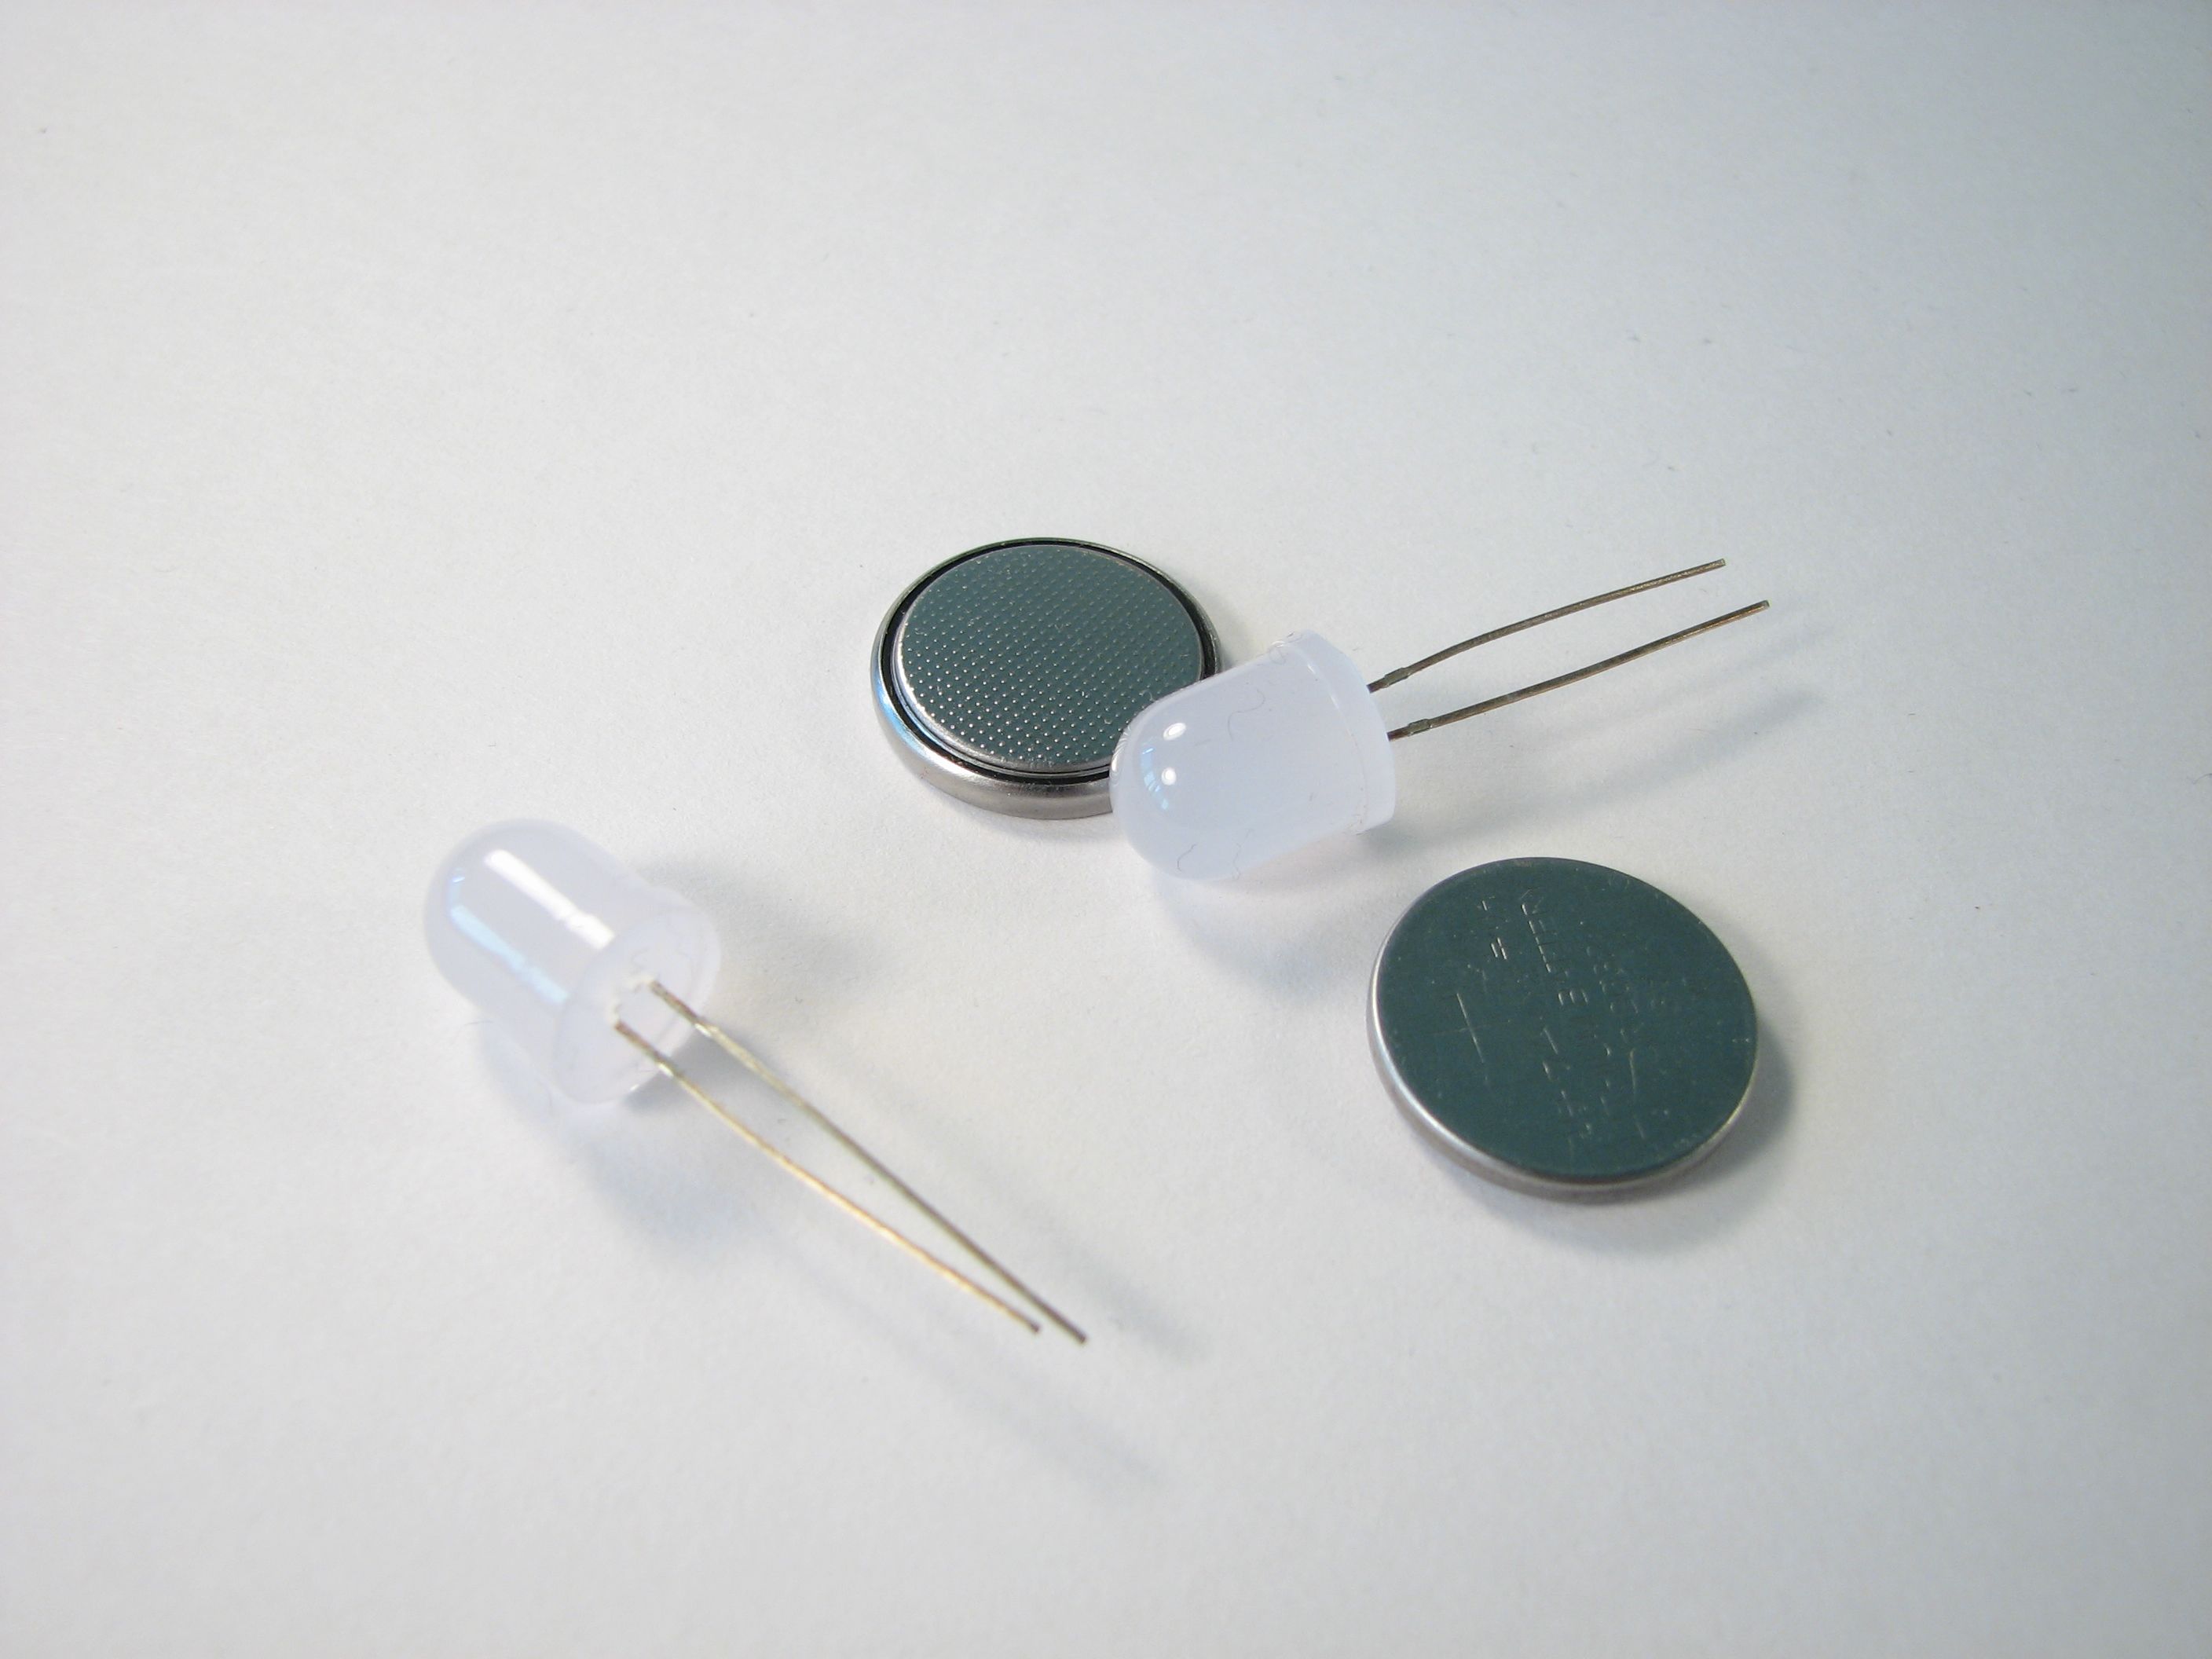
To start with, we need LEDs and CR2032 lithium coin cells. One each per jar. The best kind of LED for this design is an ultrabright LED with a diffused lens so that the light cast by the LED chip goes in *every direction,* not just in the direction that the LED points (which is what you get with LEDs that have clear lenses). Having easy access, we opted for the 10 mm diffused white LEDs from here, but you can get similar LEDs elsewhere as well.
For batteries, a very good option is Digi-Key. You *may* be able to do better from various eBay sellers and so forth, but we’ve gotten burned (figuratively, not literally) by bad sets of lithium coin cells, so beware! One thing to keep in mind: there are strict restrictions on shipping lithium coin cells by air, so if at all possible, allow time for ground shipment of batteries. (And, if you have leftover coin cells, you can always use them to make BristleBots!)
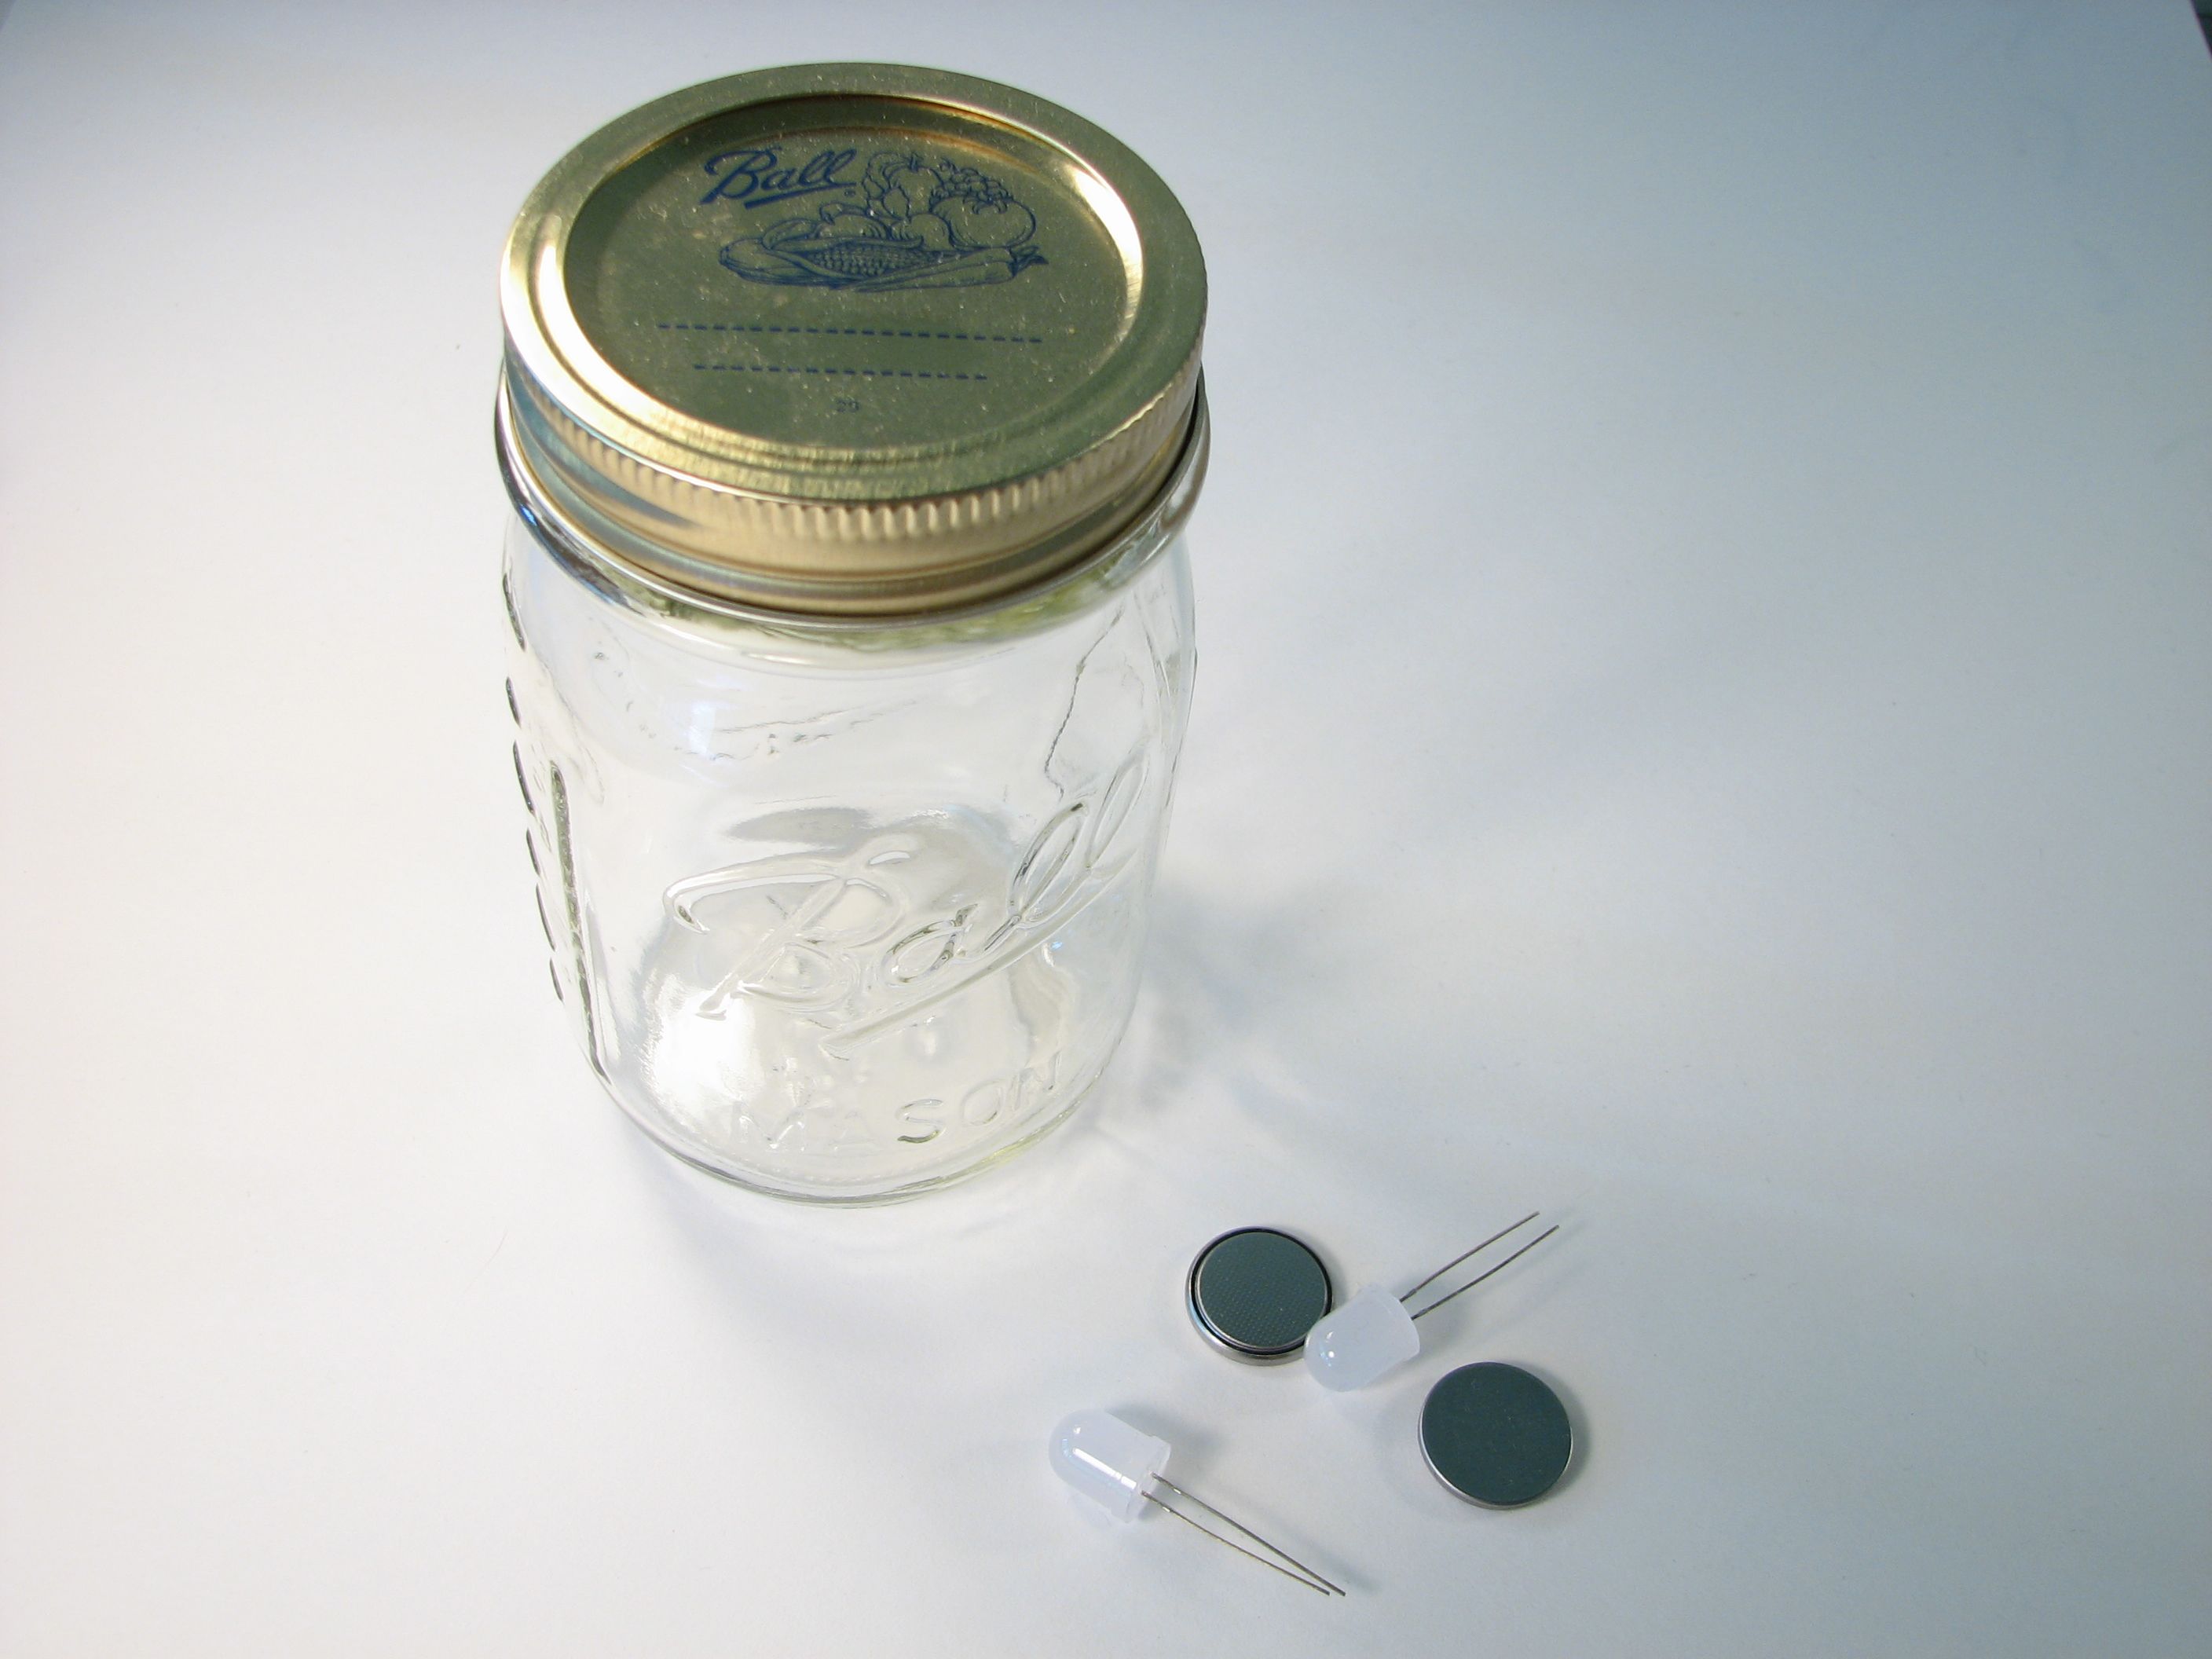
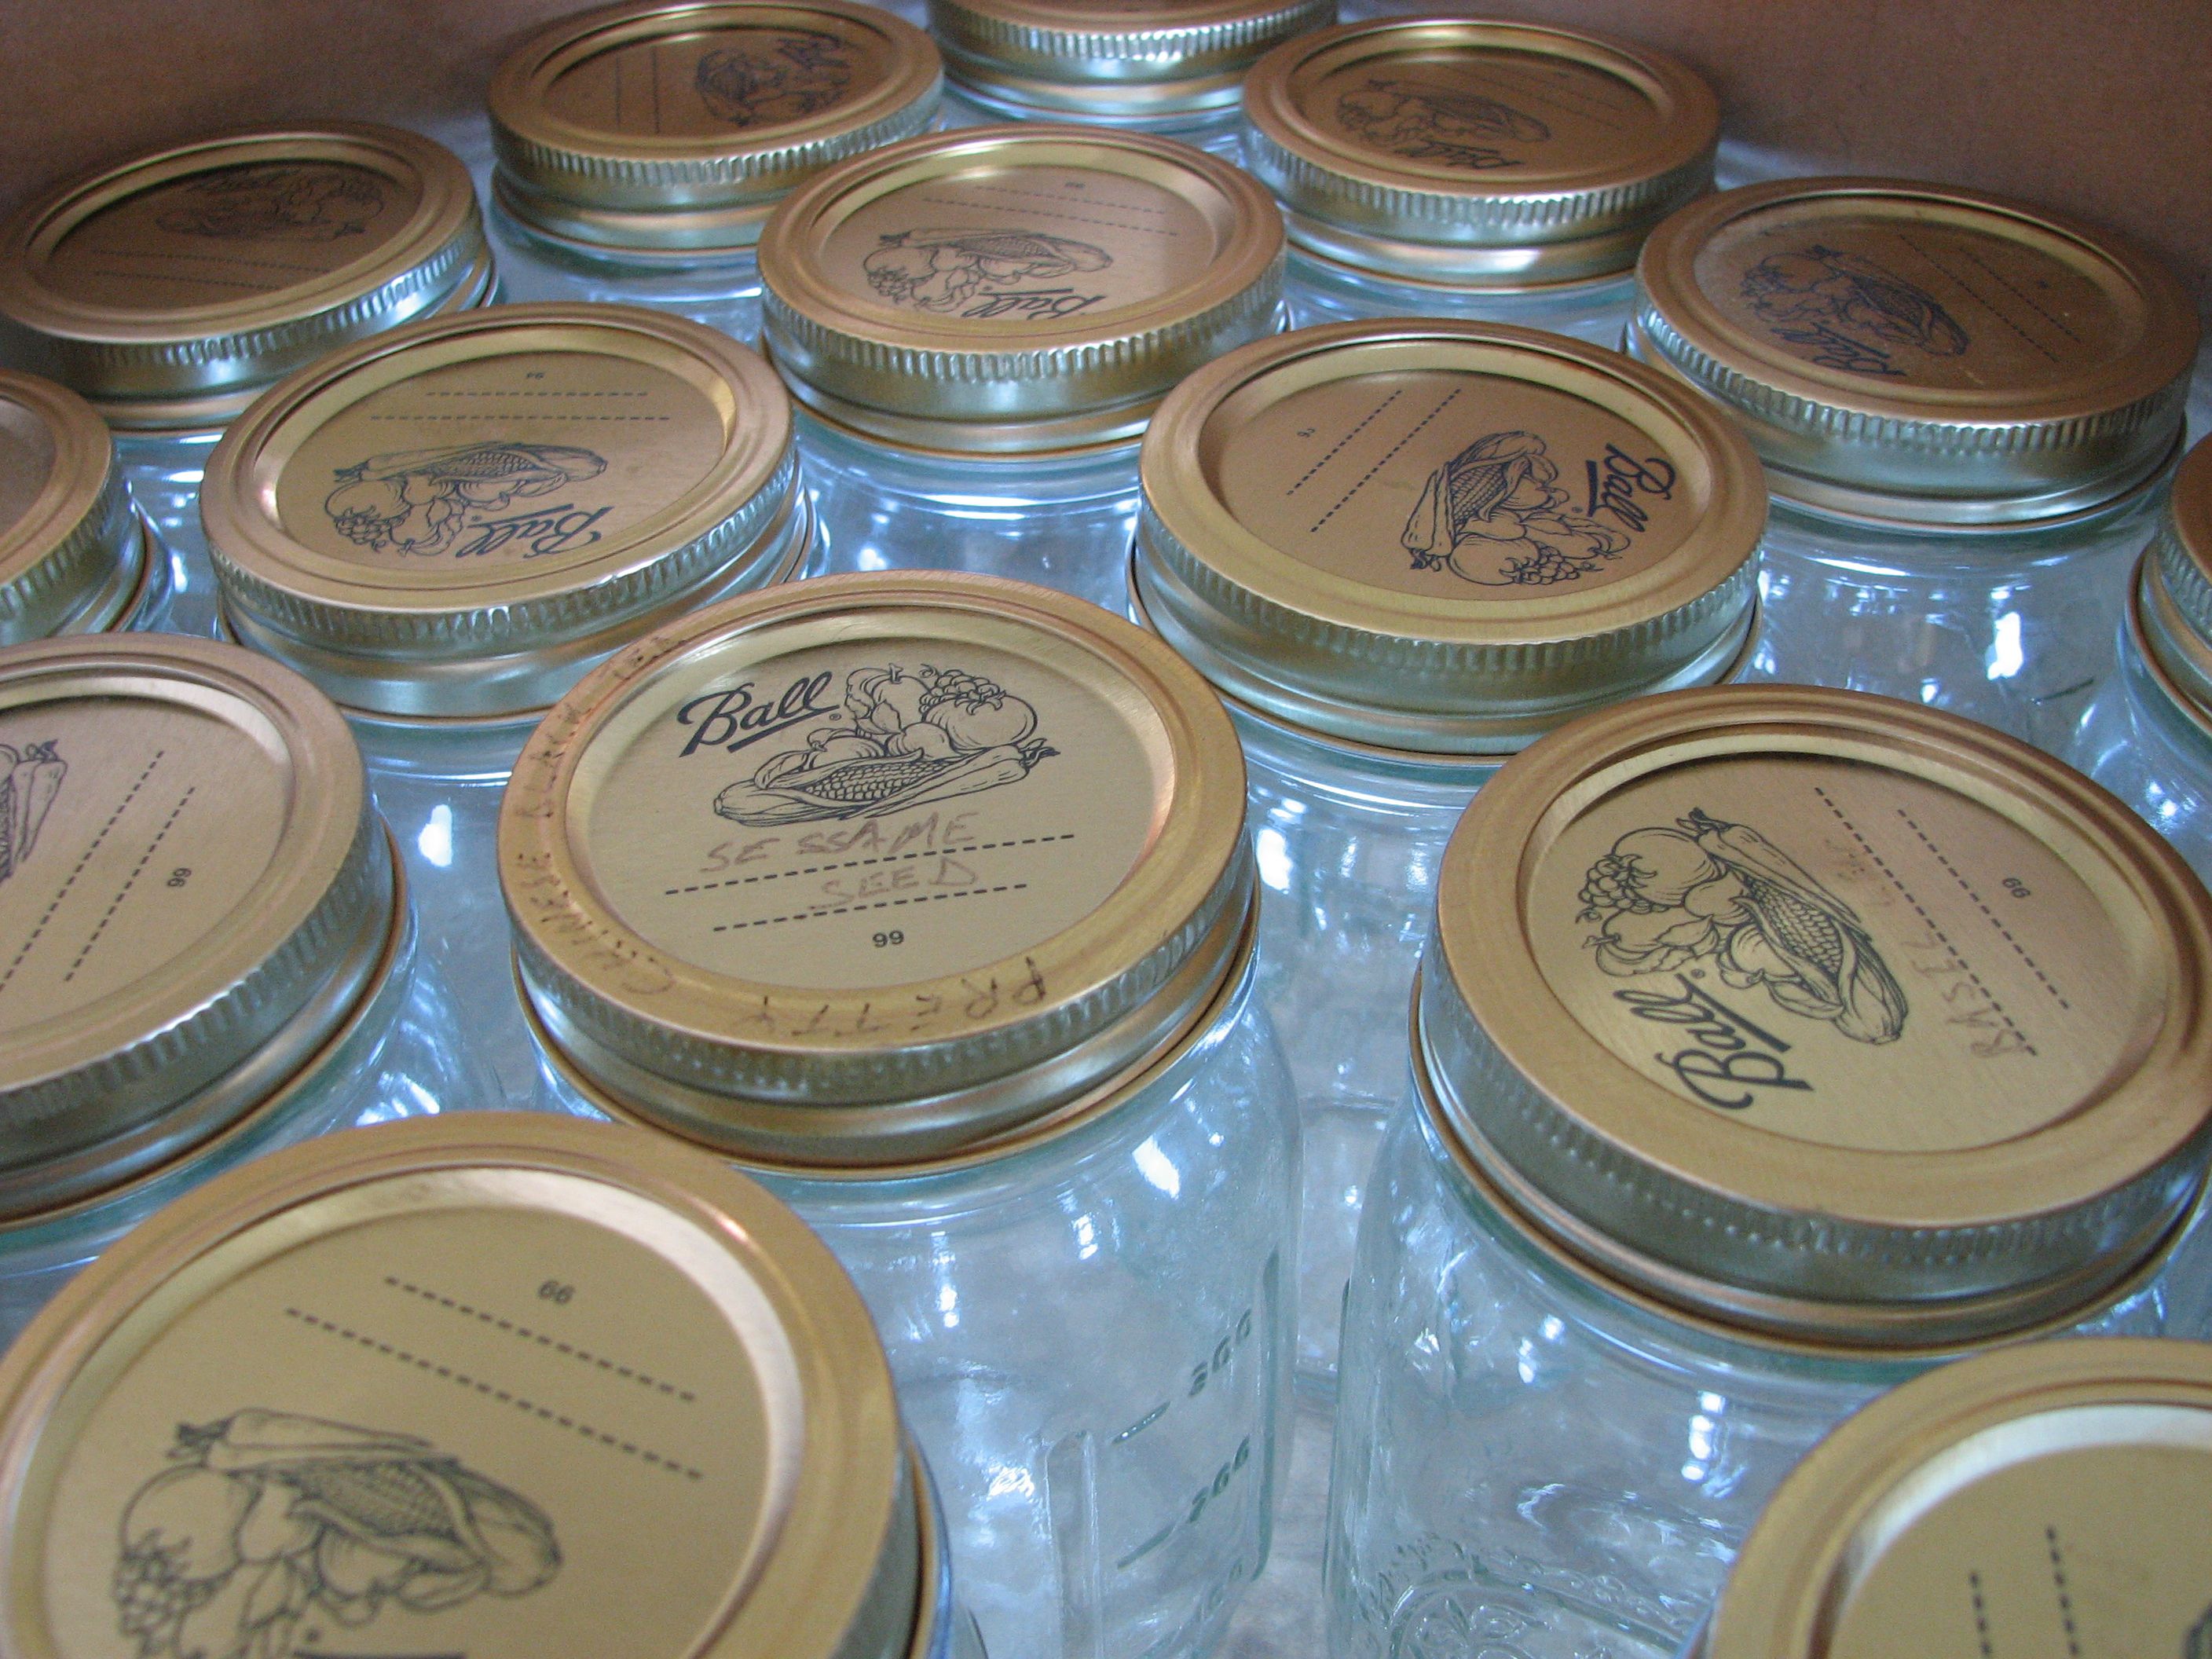
Next, you’ll need some jars.
Mason jars are available by the dozen in your local supermarket, in the canning/pickling section (which seems to actually still exist!), but are also available online of course. The “other” way is to start with a set of recycled jars, of course. If you eat a lot of pasta sauce from jars, you can build up a collection pretty quickly. And even if you don’t eat food that comes in jars, you can usually find good jars at thrift stores– so you really don’t need to spend a lot on this. But even if you’re buying brand new jars, you should be able to get all of your parts for a grand total of about $1-$1.50 per light jar.
(If you want to get a bit fancier, there is also plenty of room for that. I like this set of instructions for making frosted glass jars for LEDs– those would work well for this project too.)
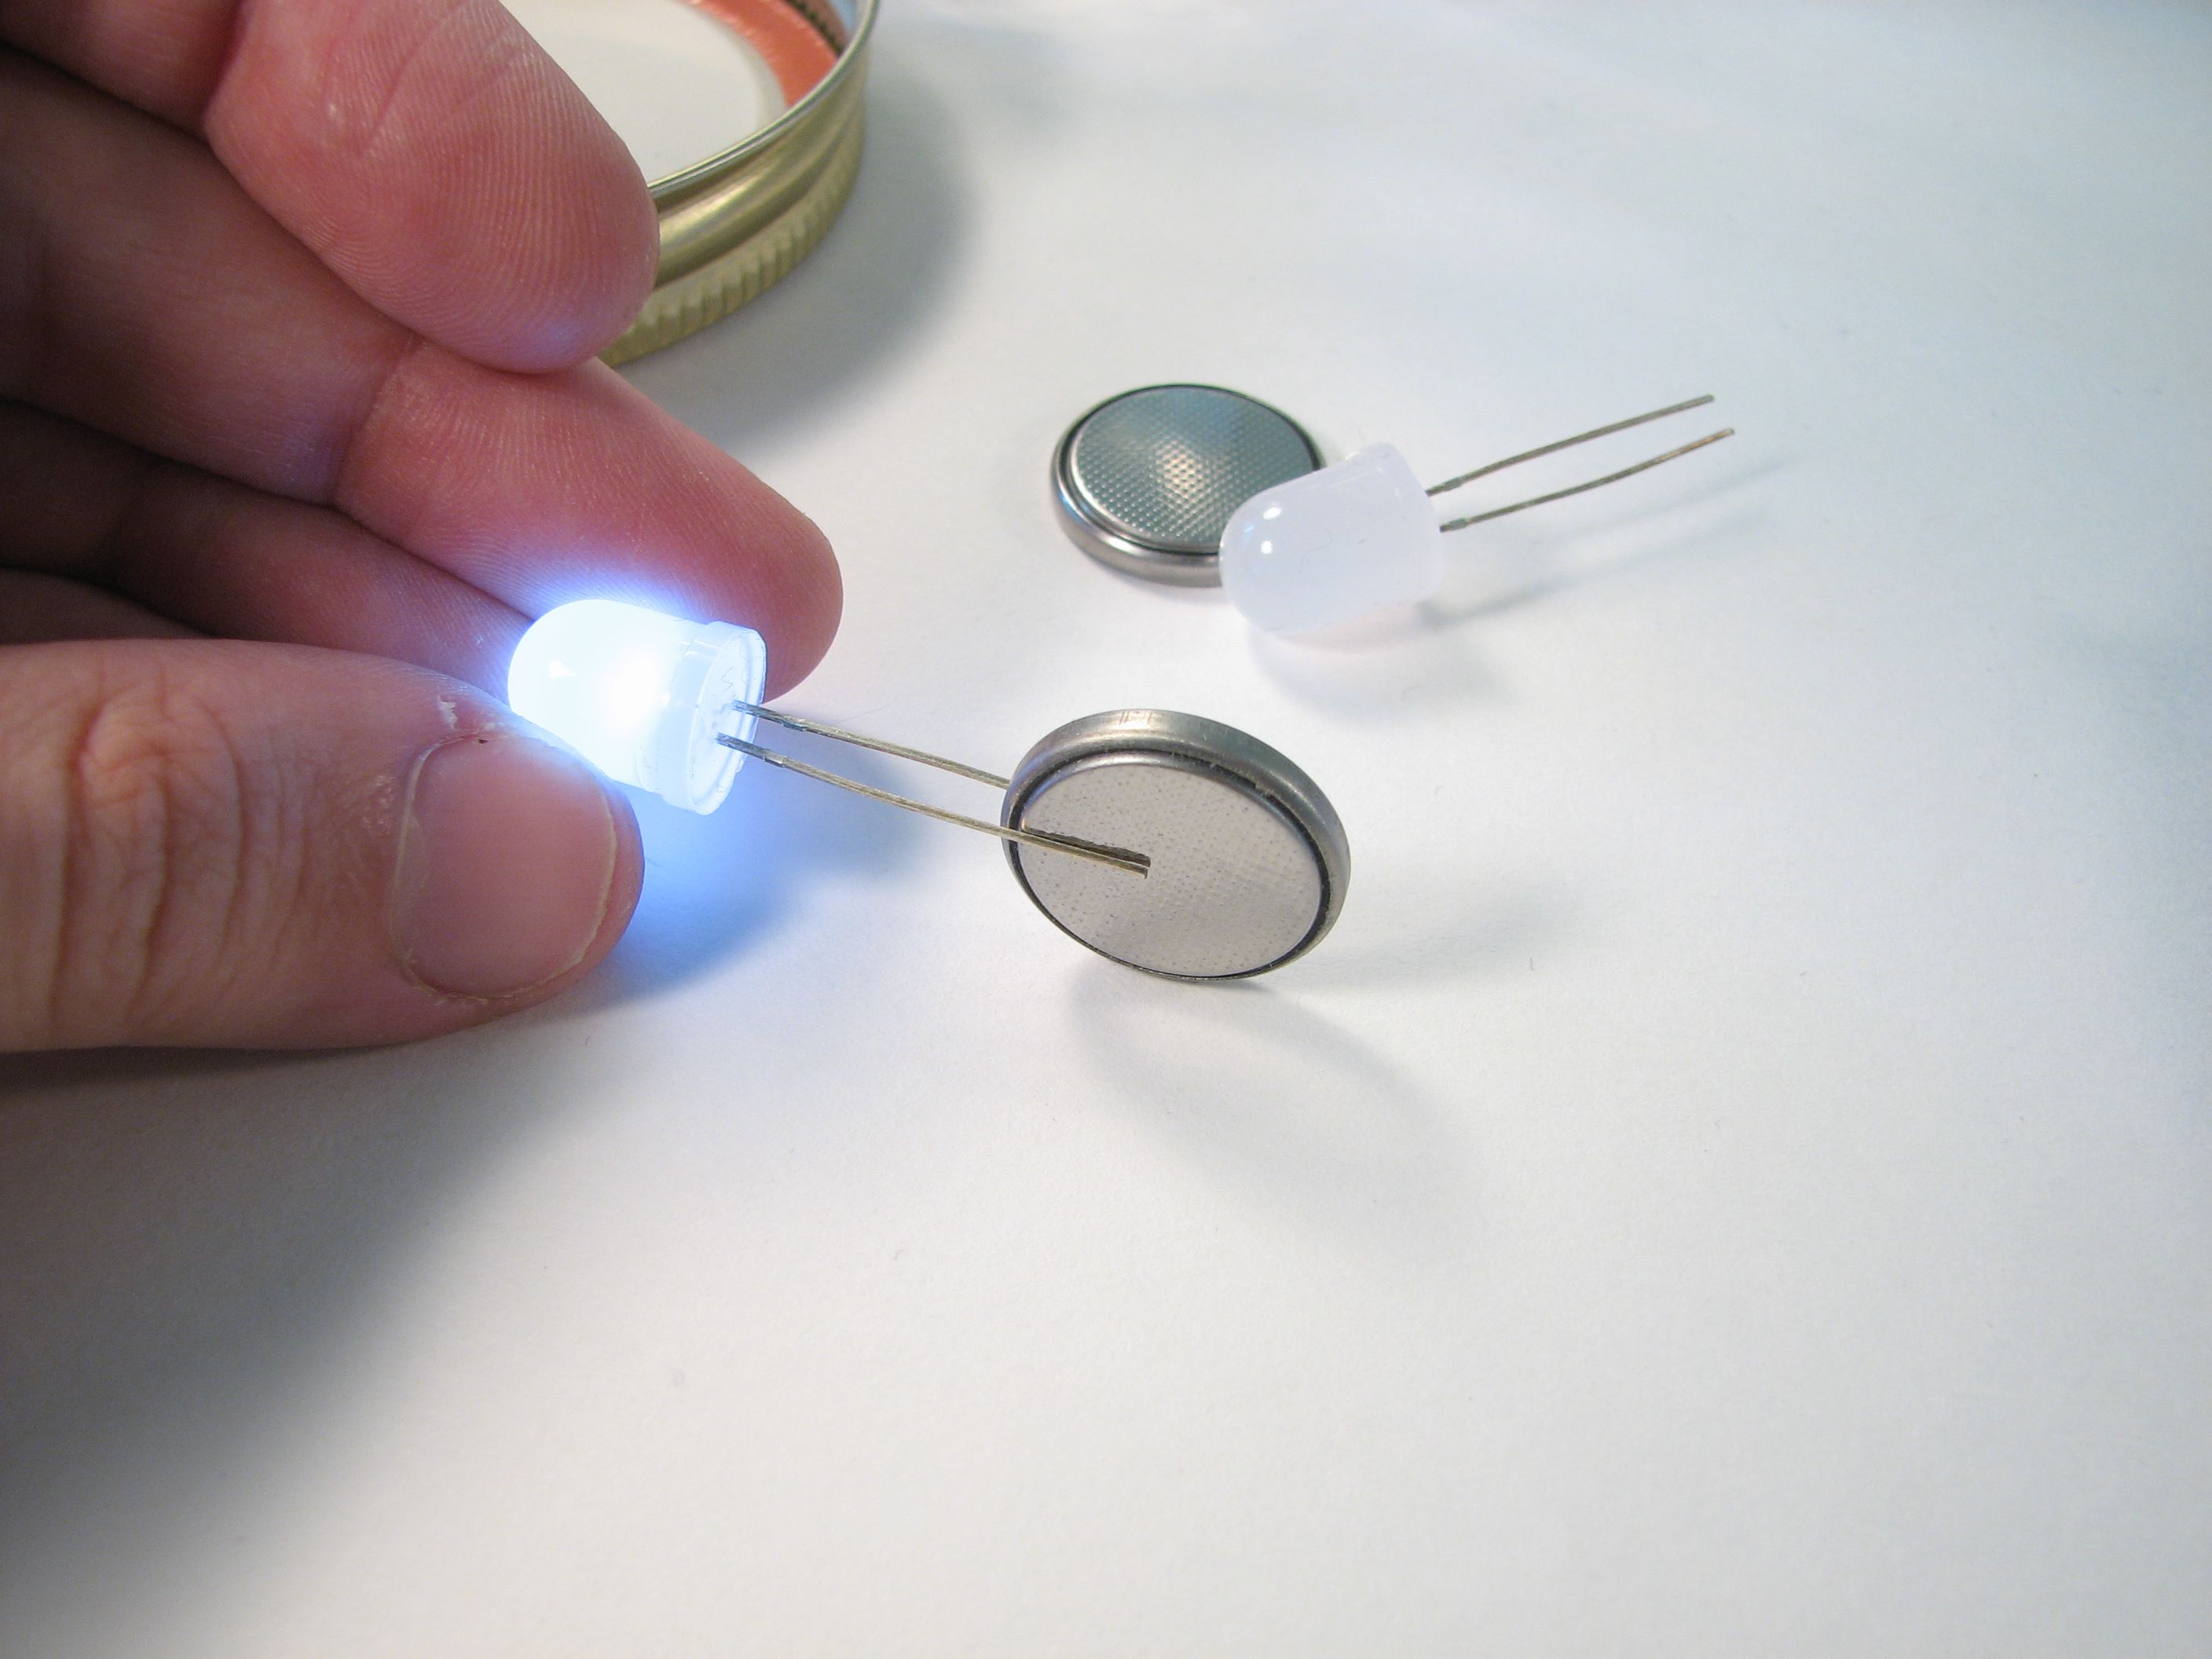
Now we hook up the LED to the battery as though we were making LED Throwies. *
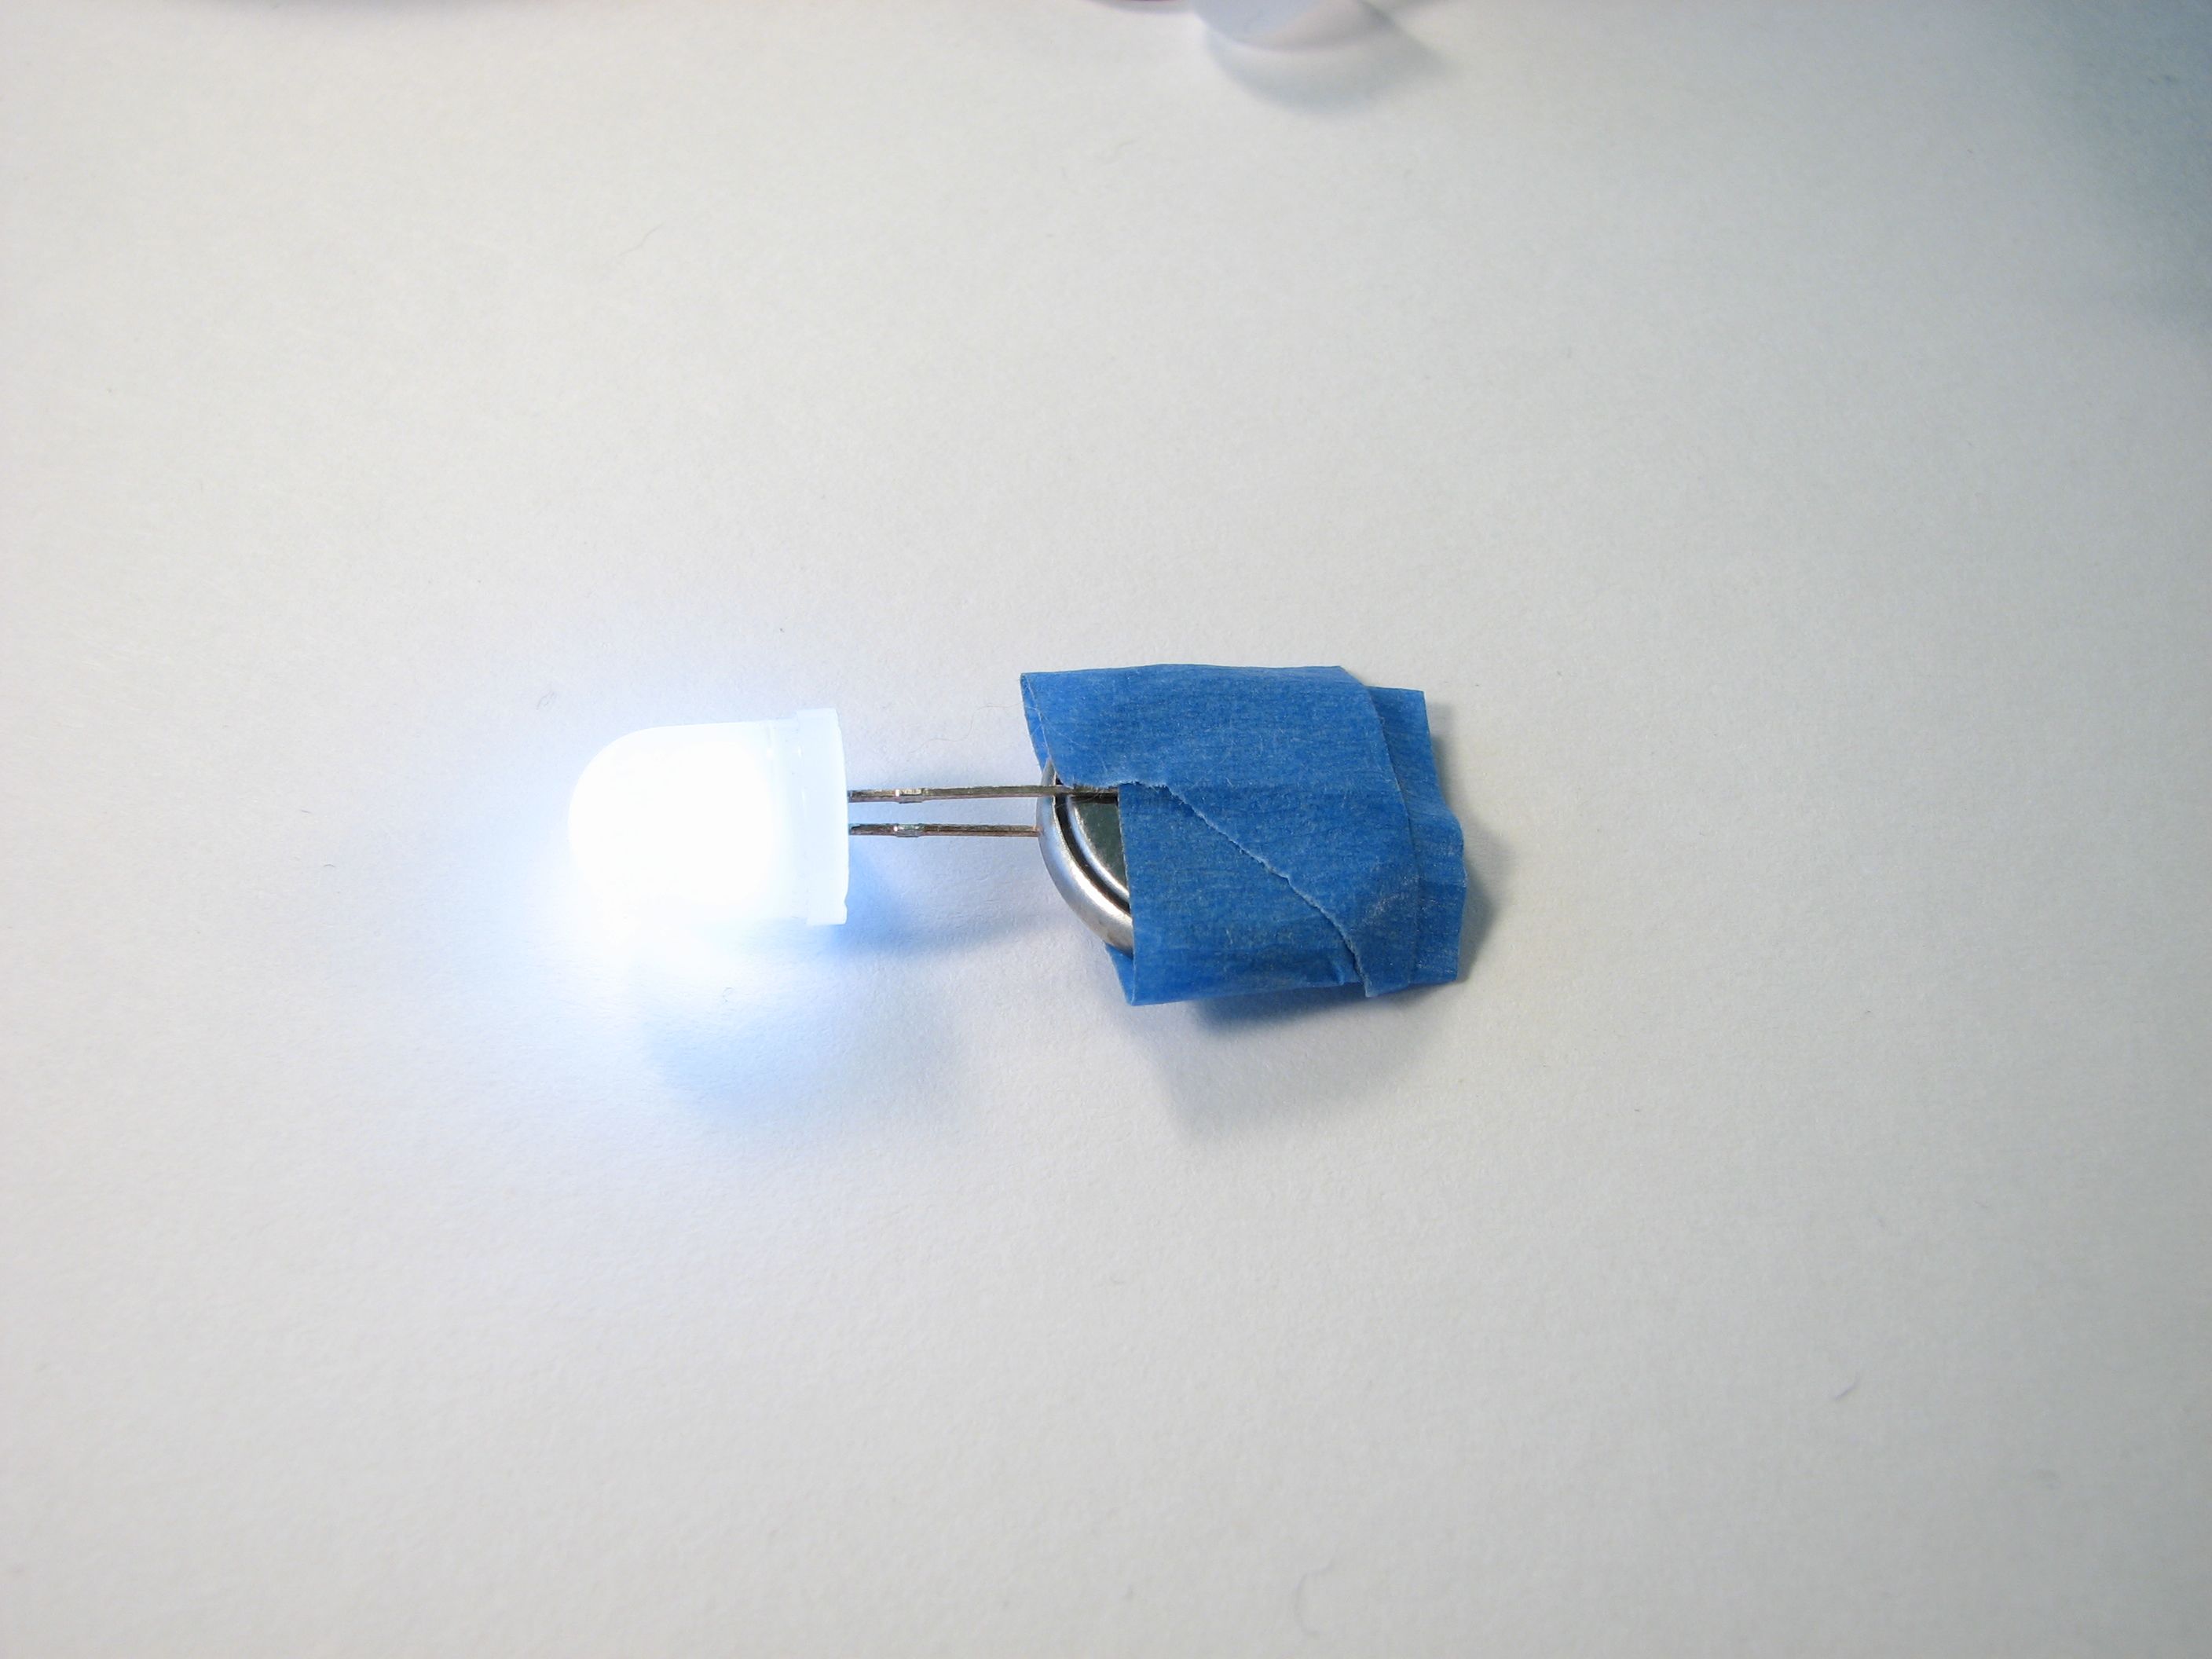
Connect an LED directly across the terminals of the lithium coin cell. The long lead goes to the ‘+’ side of the battery. Wrap it once with tape– just about any kind– to keep the LED leads touching the battery cell. (We had blue masking tape handy so we used that– it seemed to work just fine.)
*Important safety tip: do not throw the completed LED jar lights.
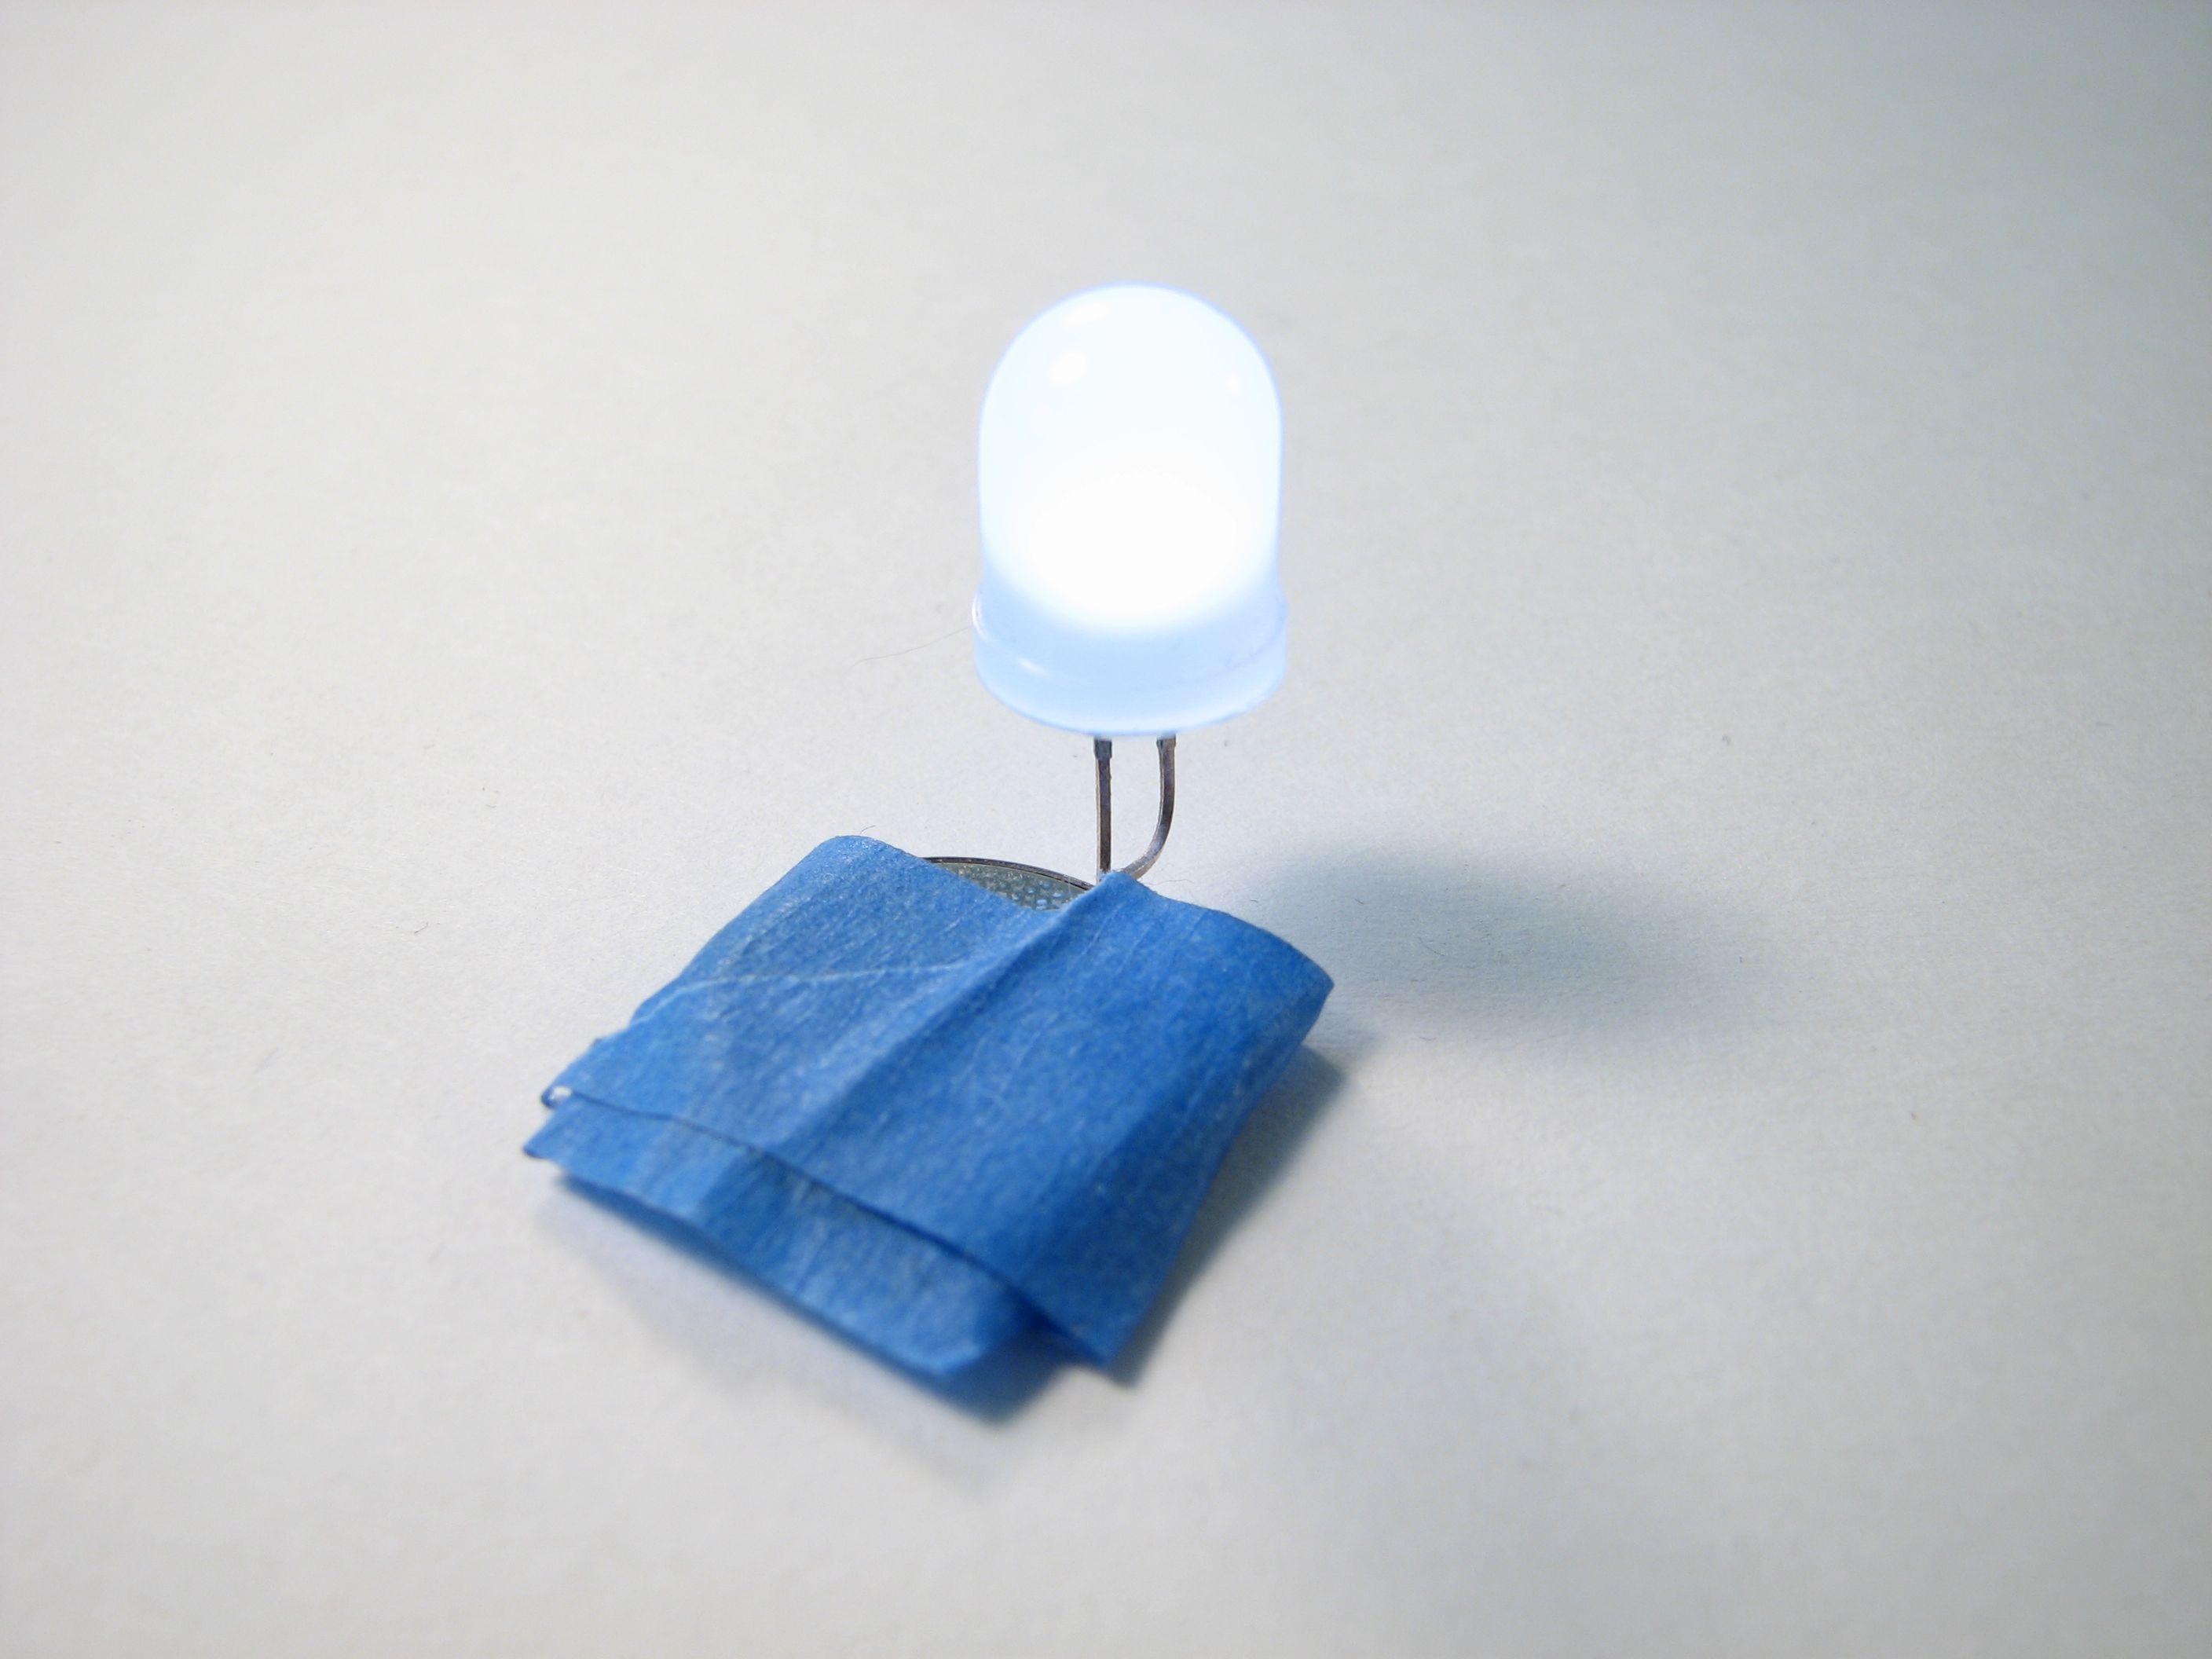
Now the tricky step: Bend the LED 90 degrees from the battery cell using a half-twist, so that (1) it can bend that that way and (2) you don’t touch the two leads of the LED to each other.
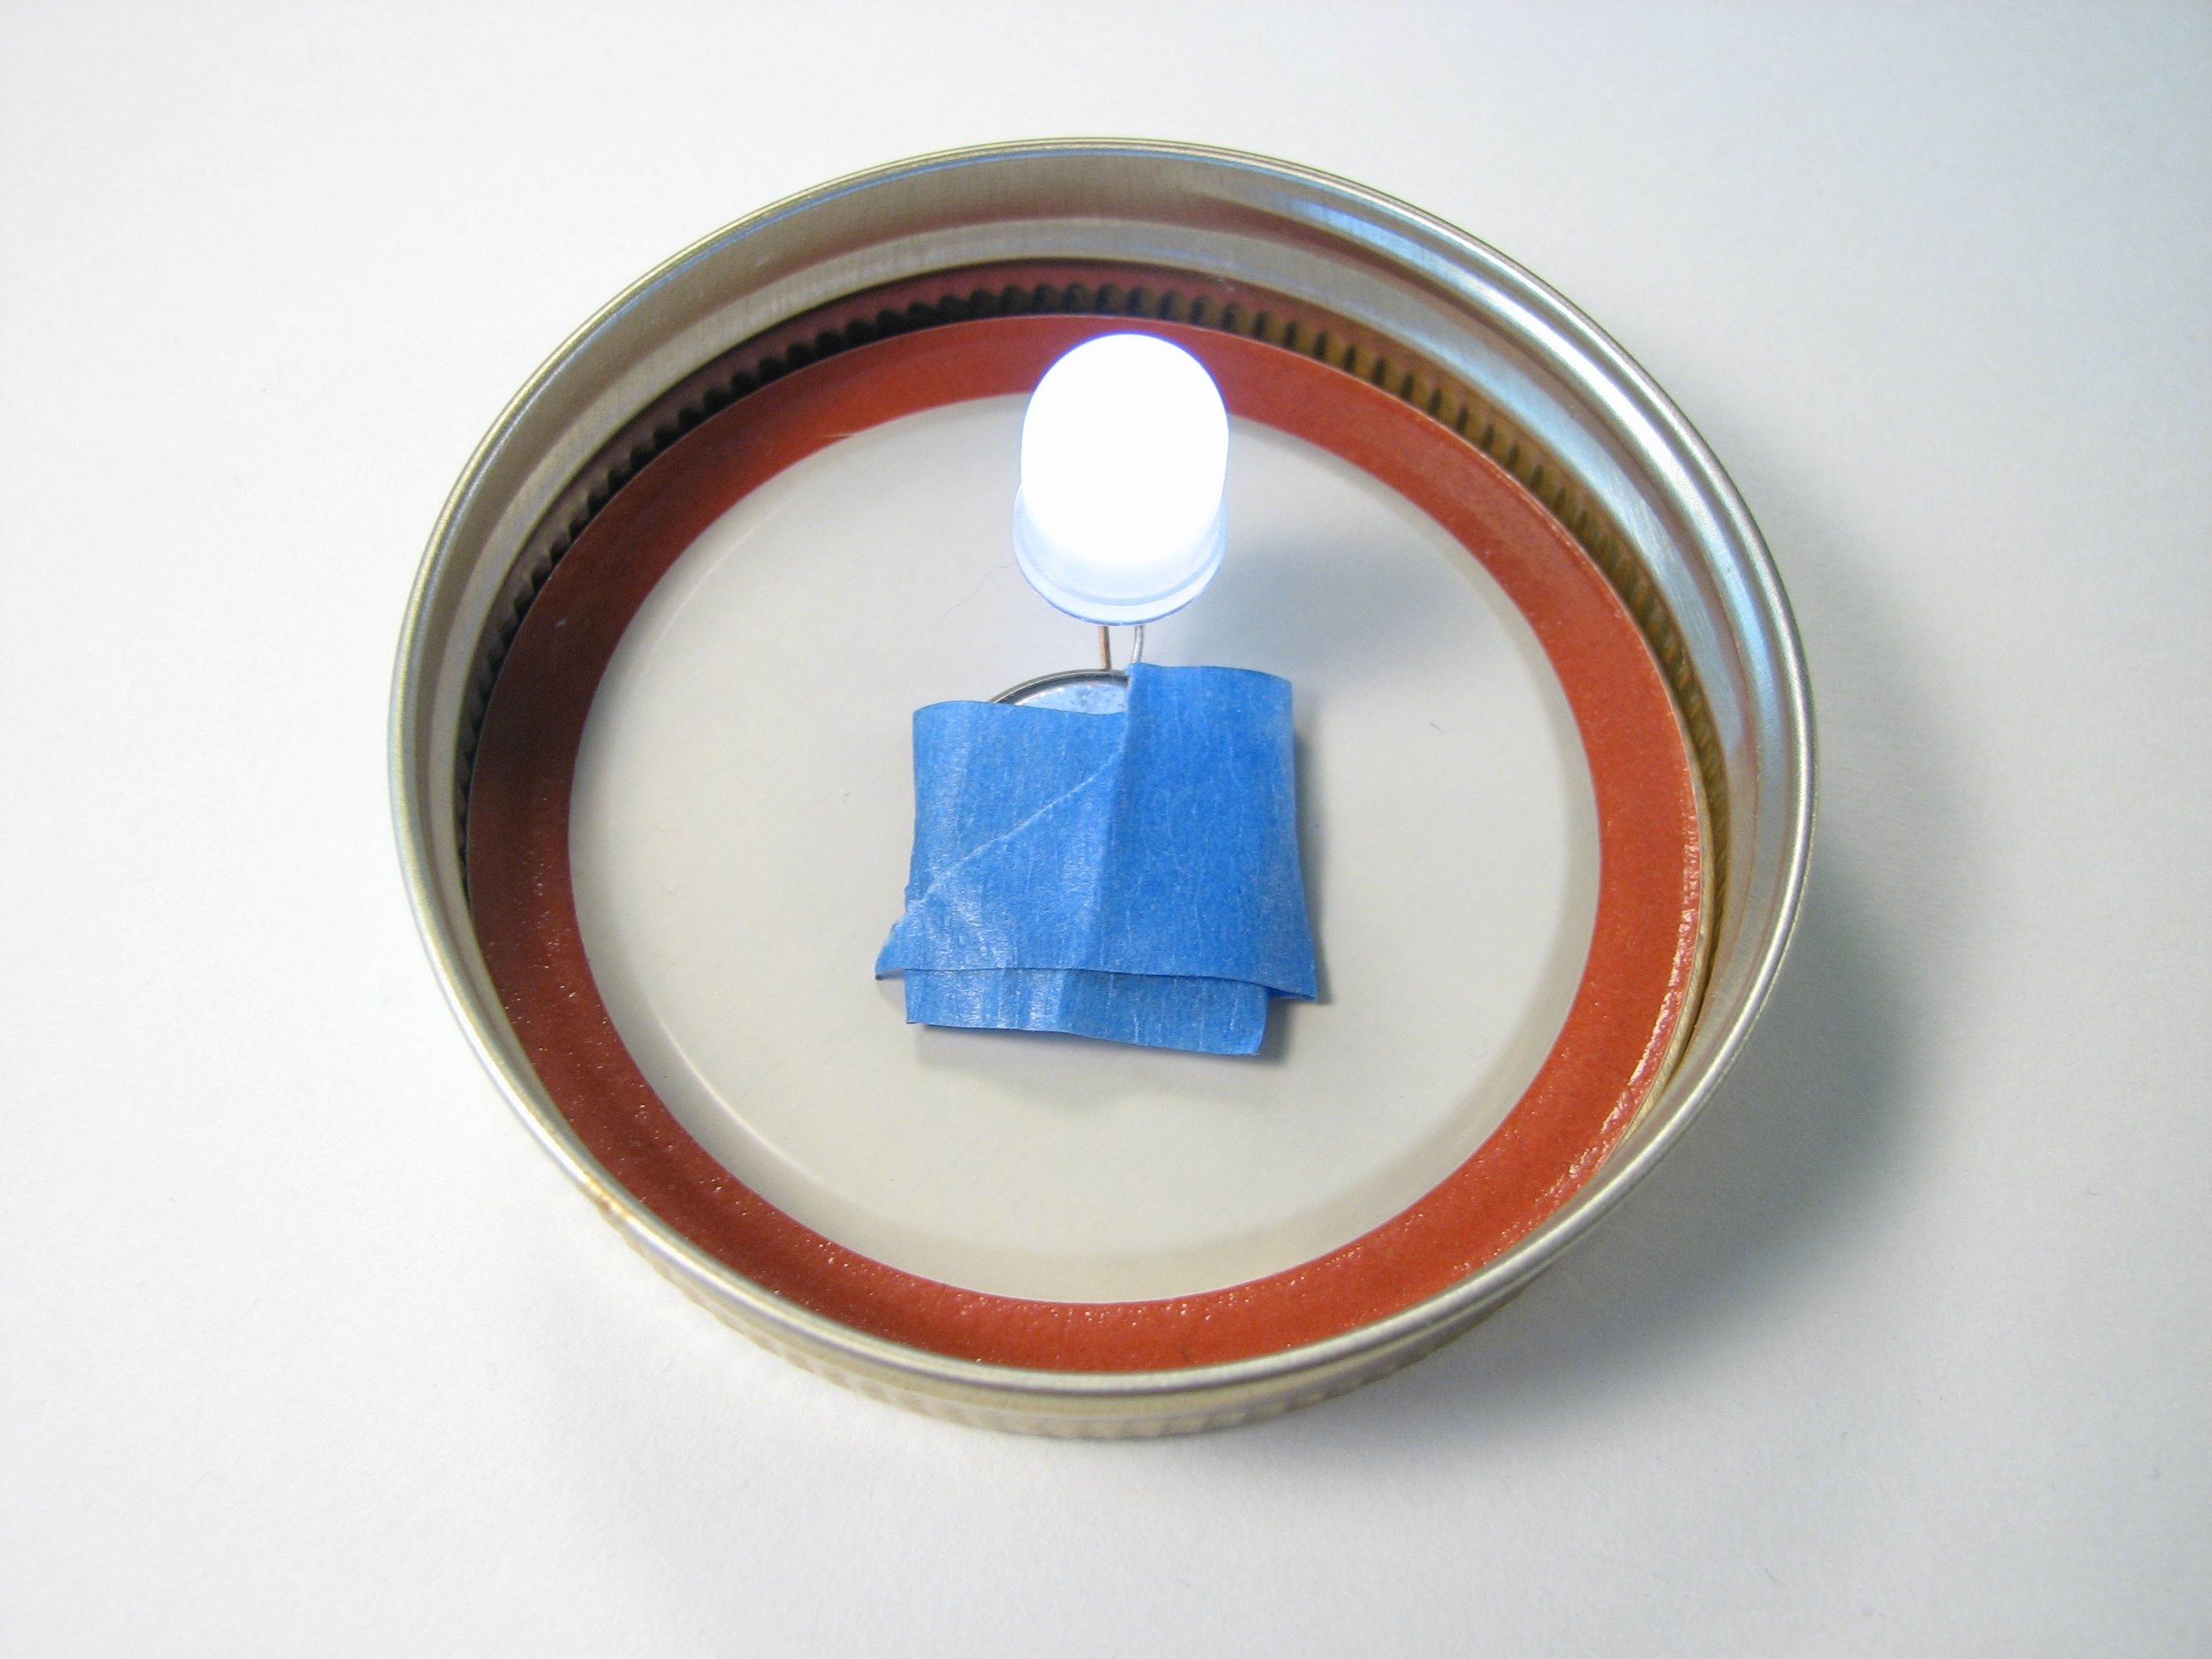
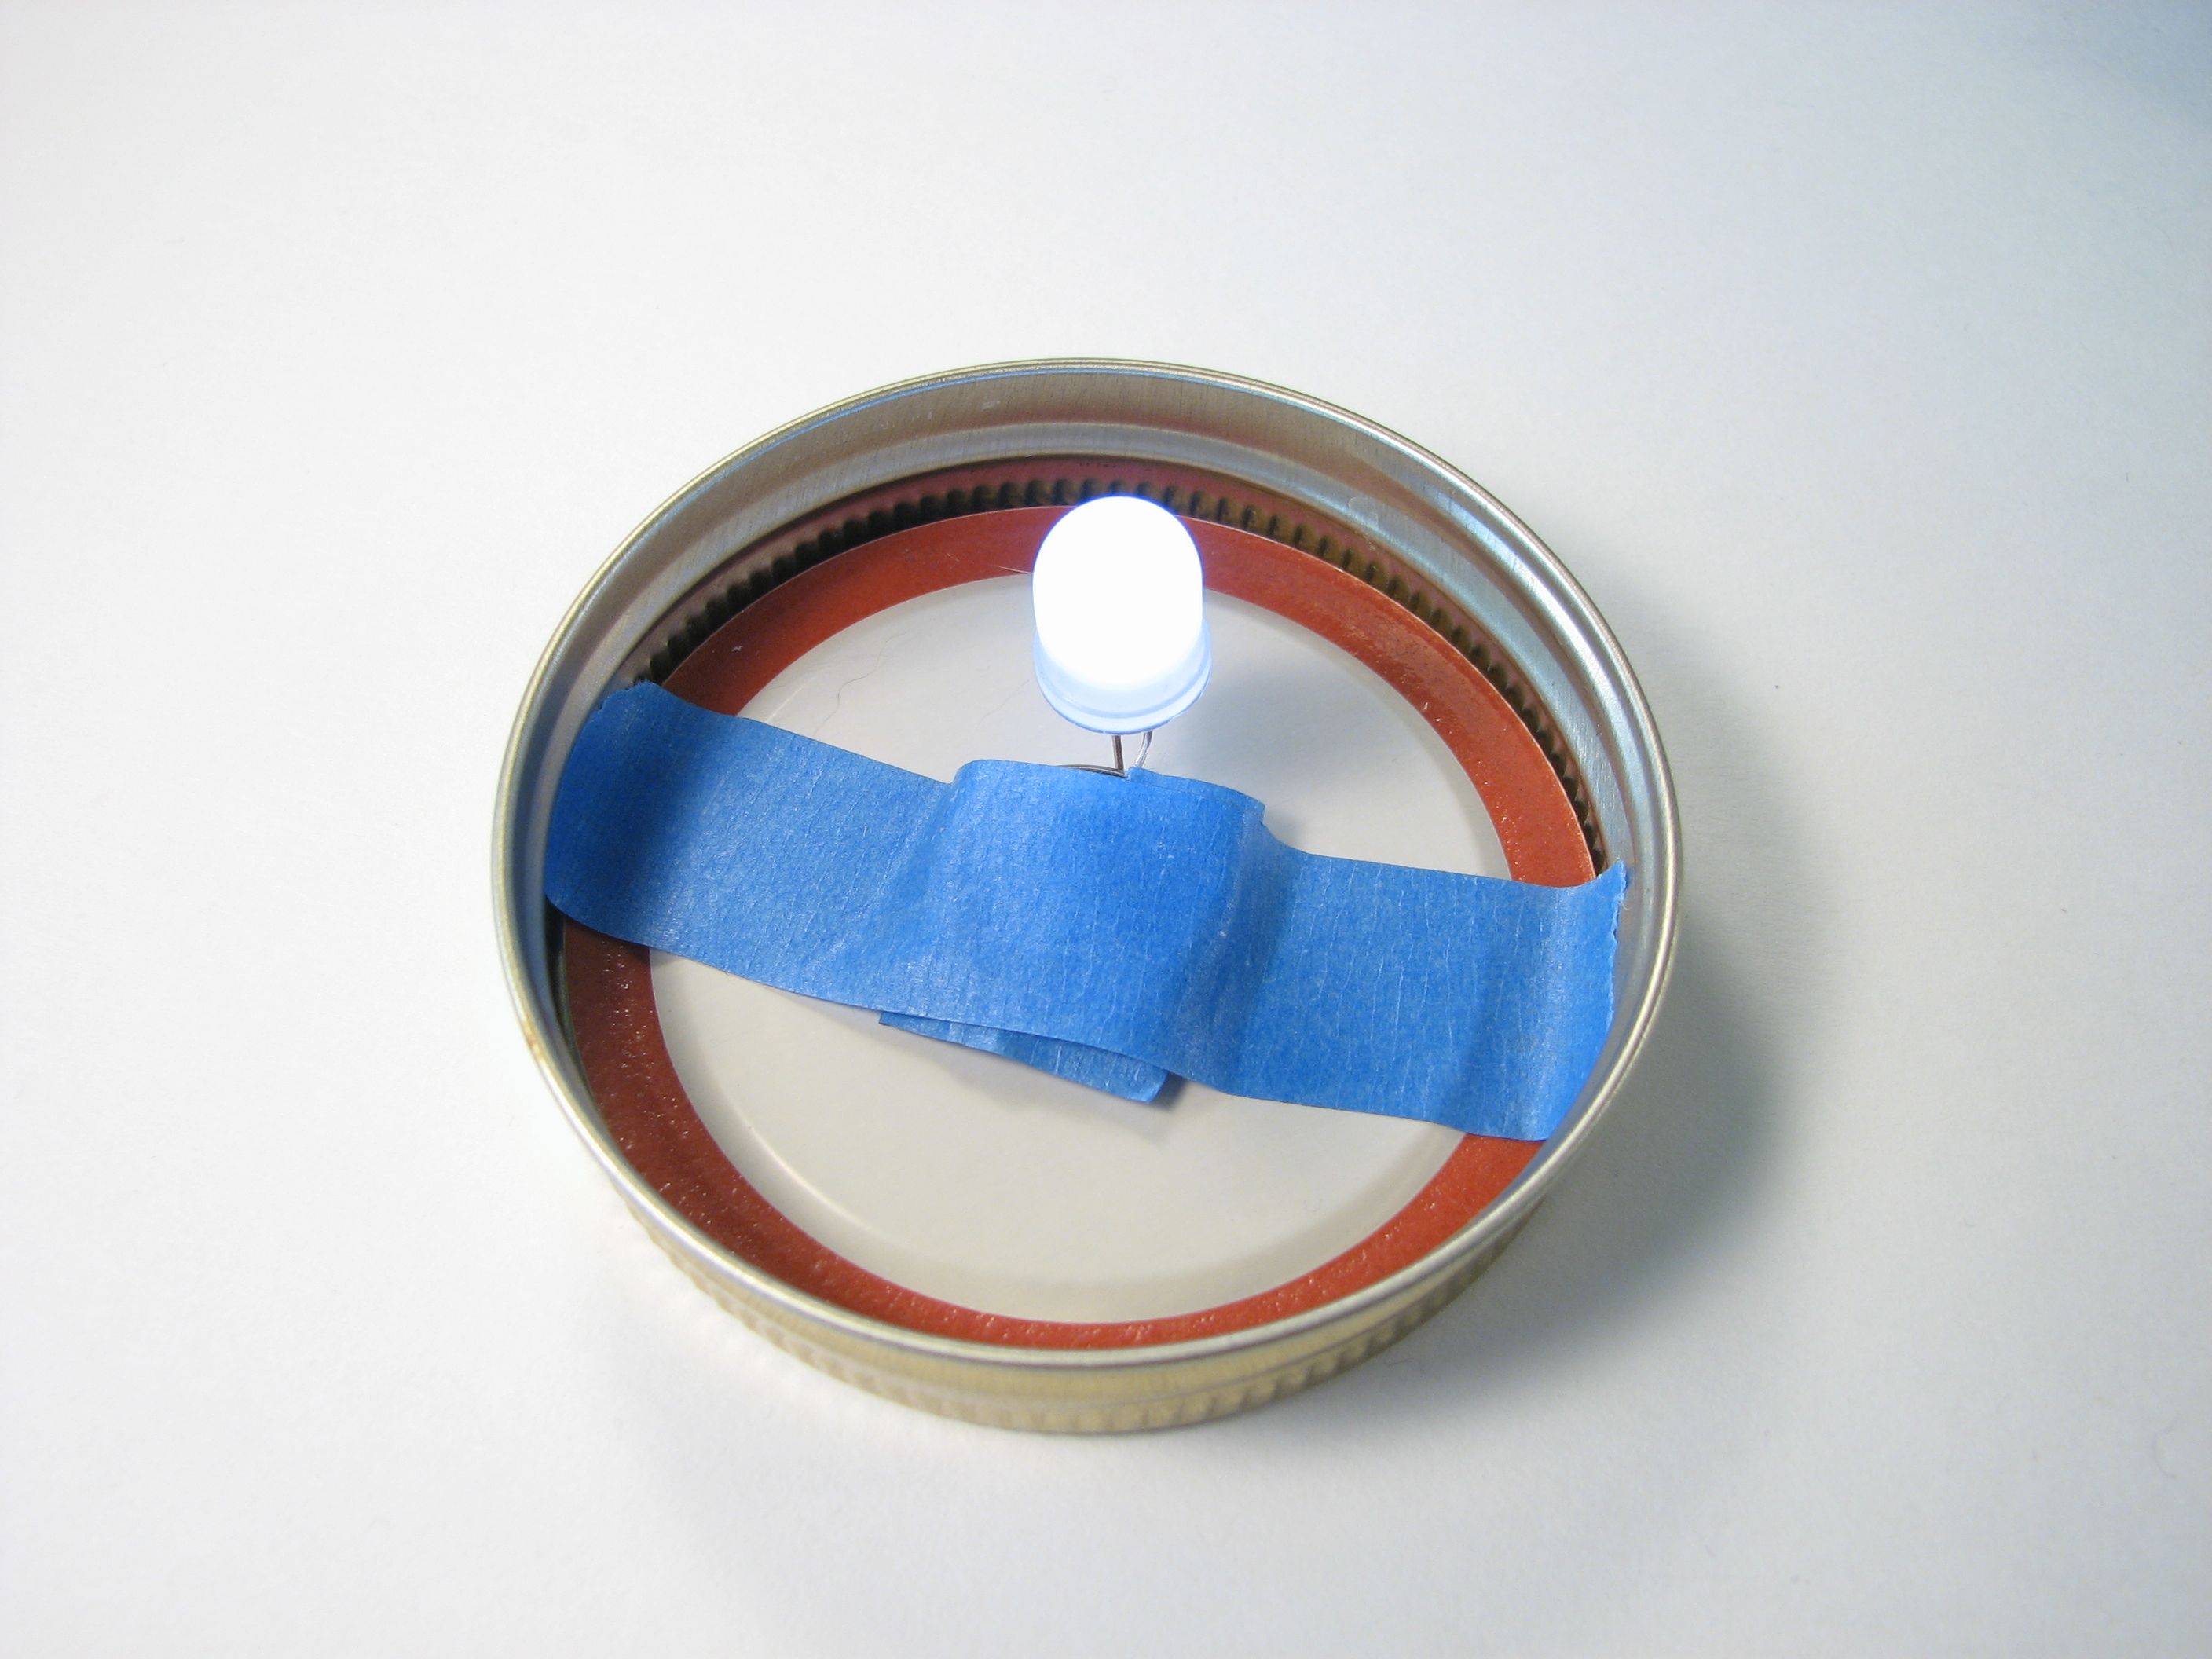
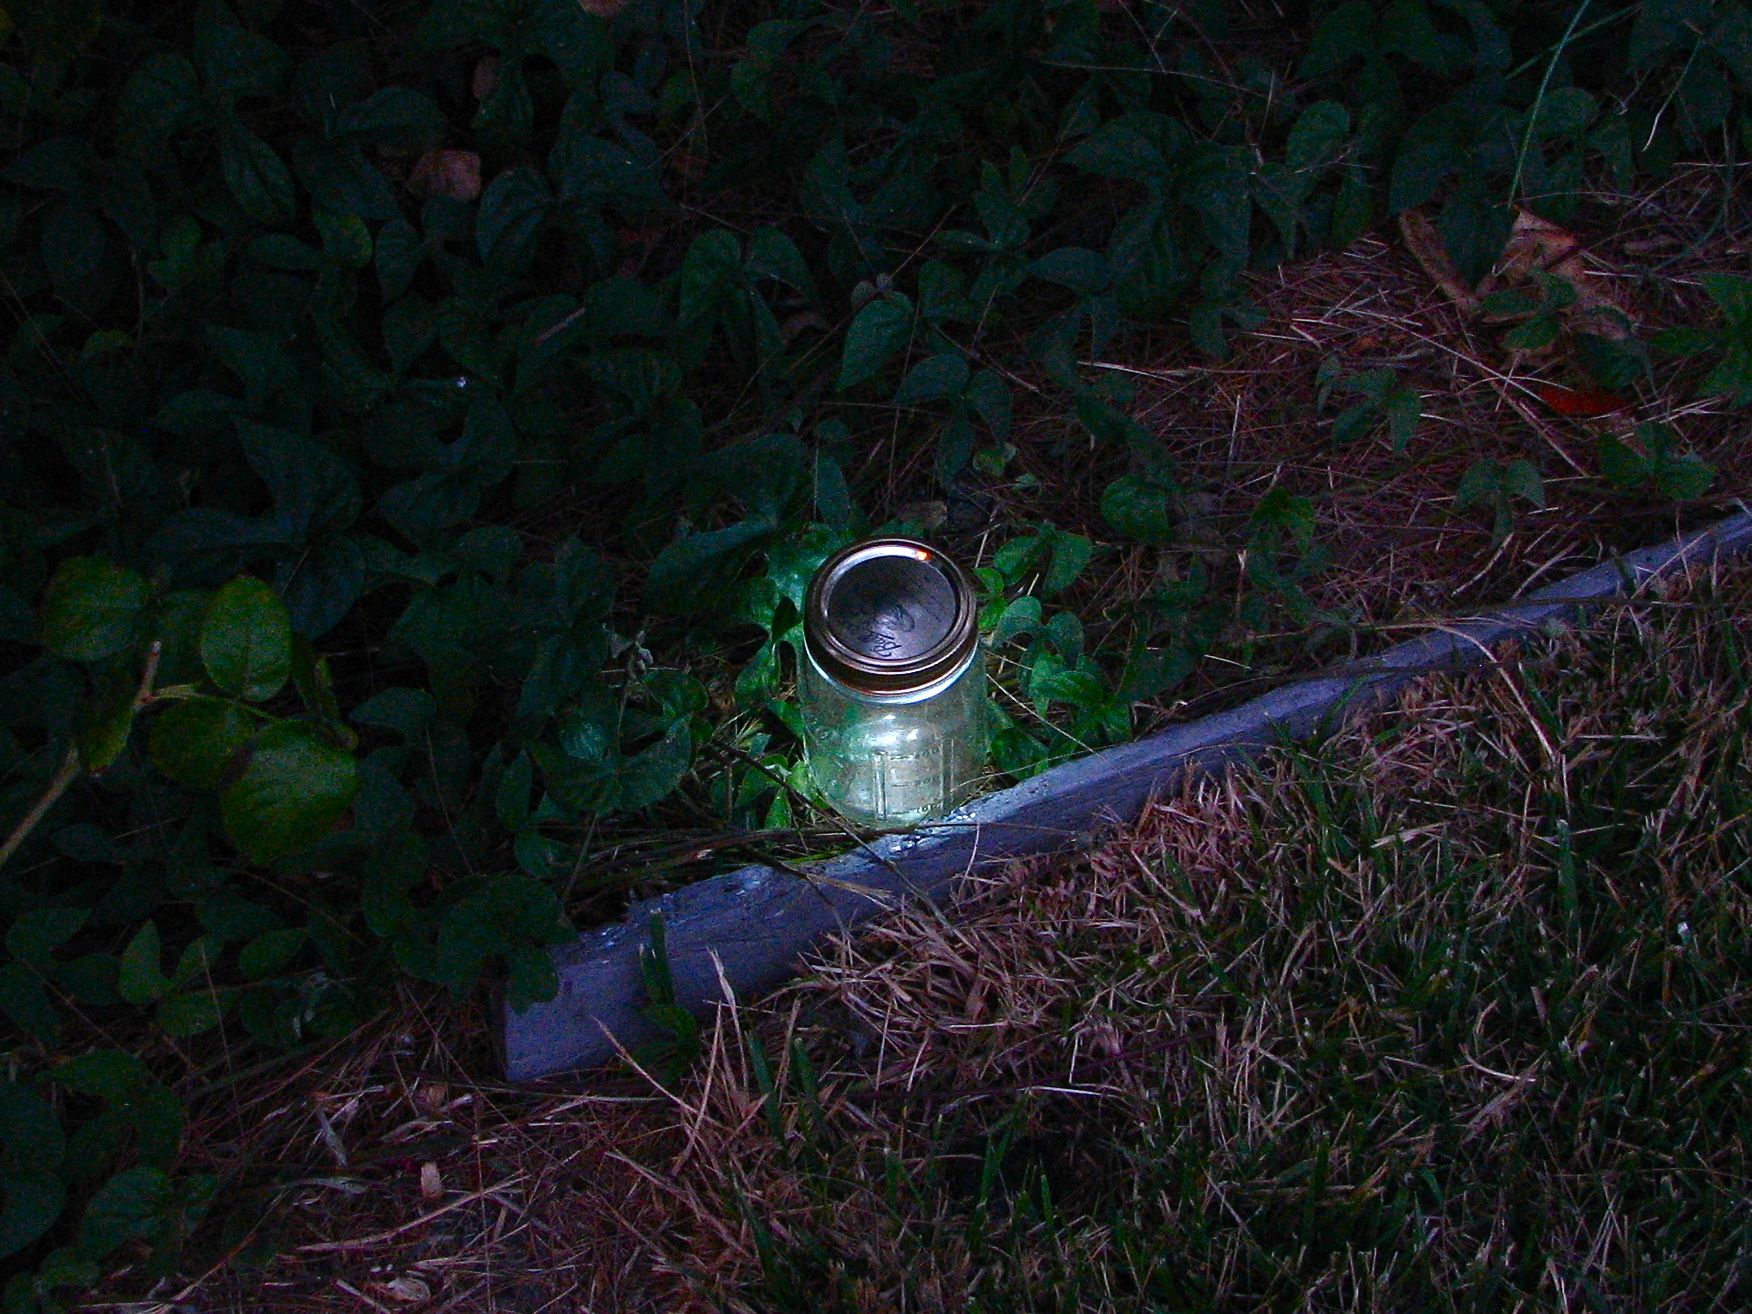
Place the LED assembly inside one of your jar lids and tape it down in place. (Optionally, you can do a better job of centering the LED than shown here!)
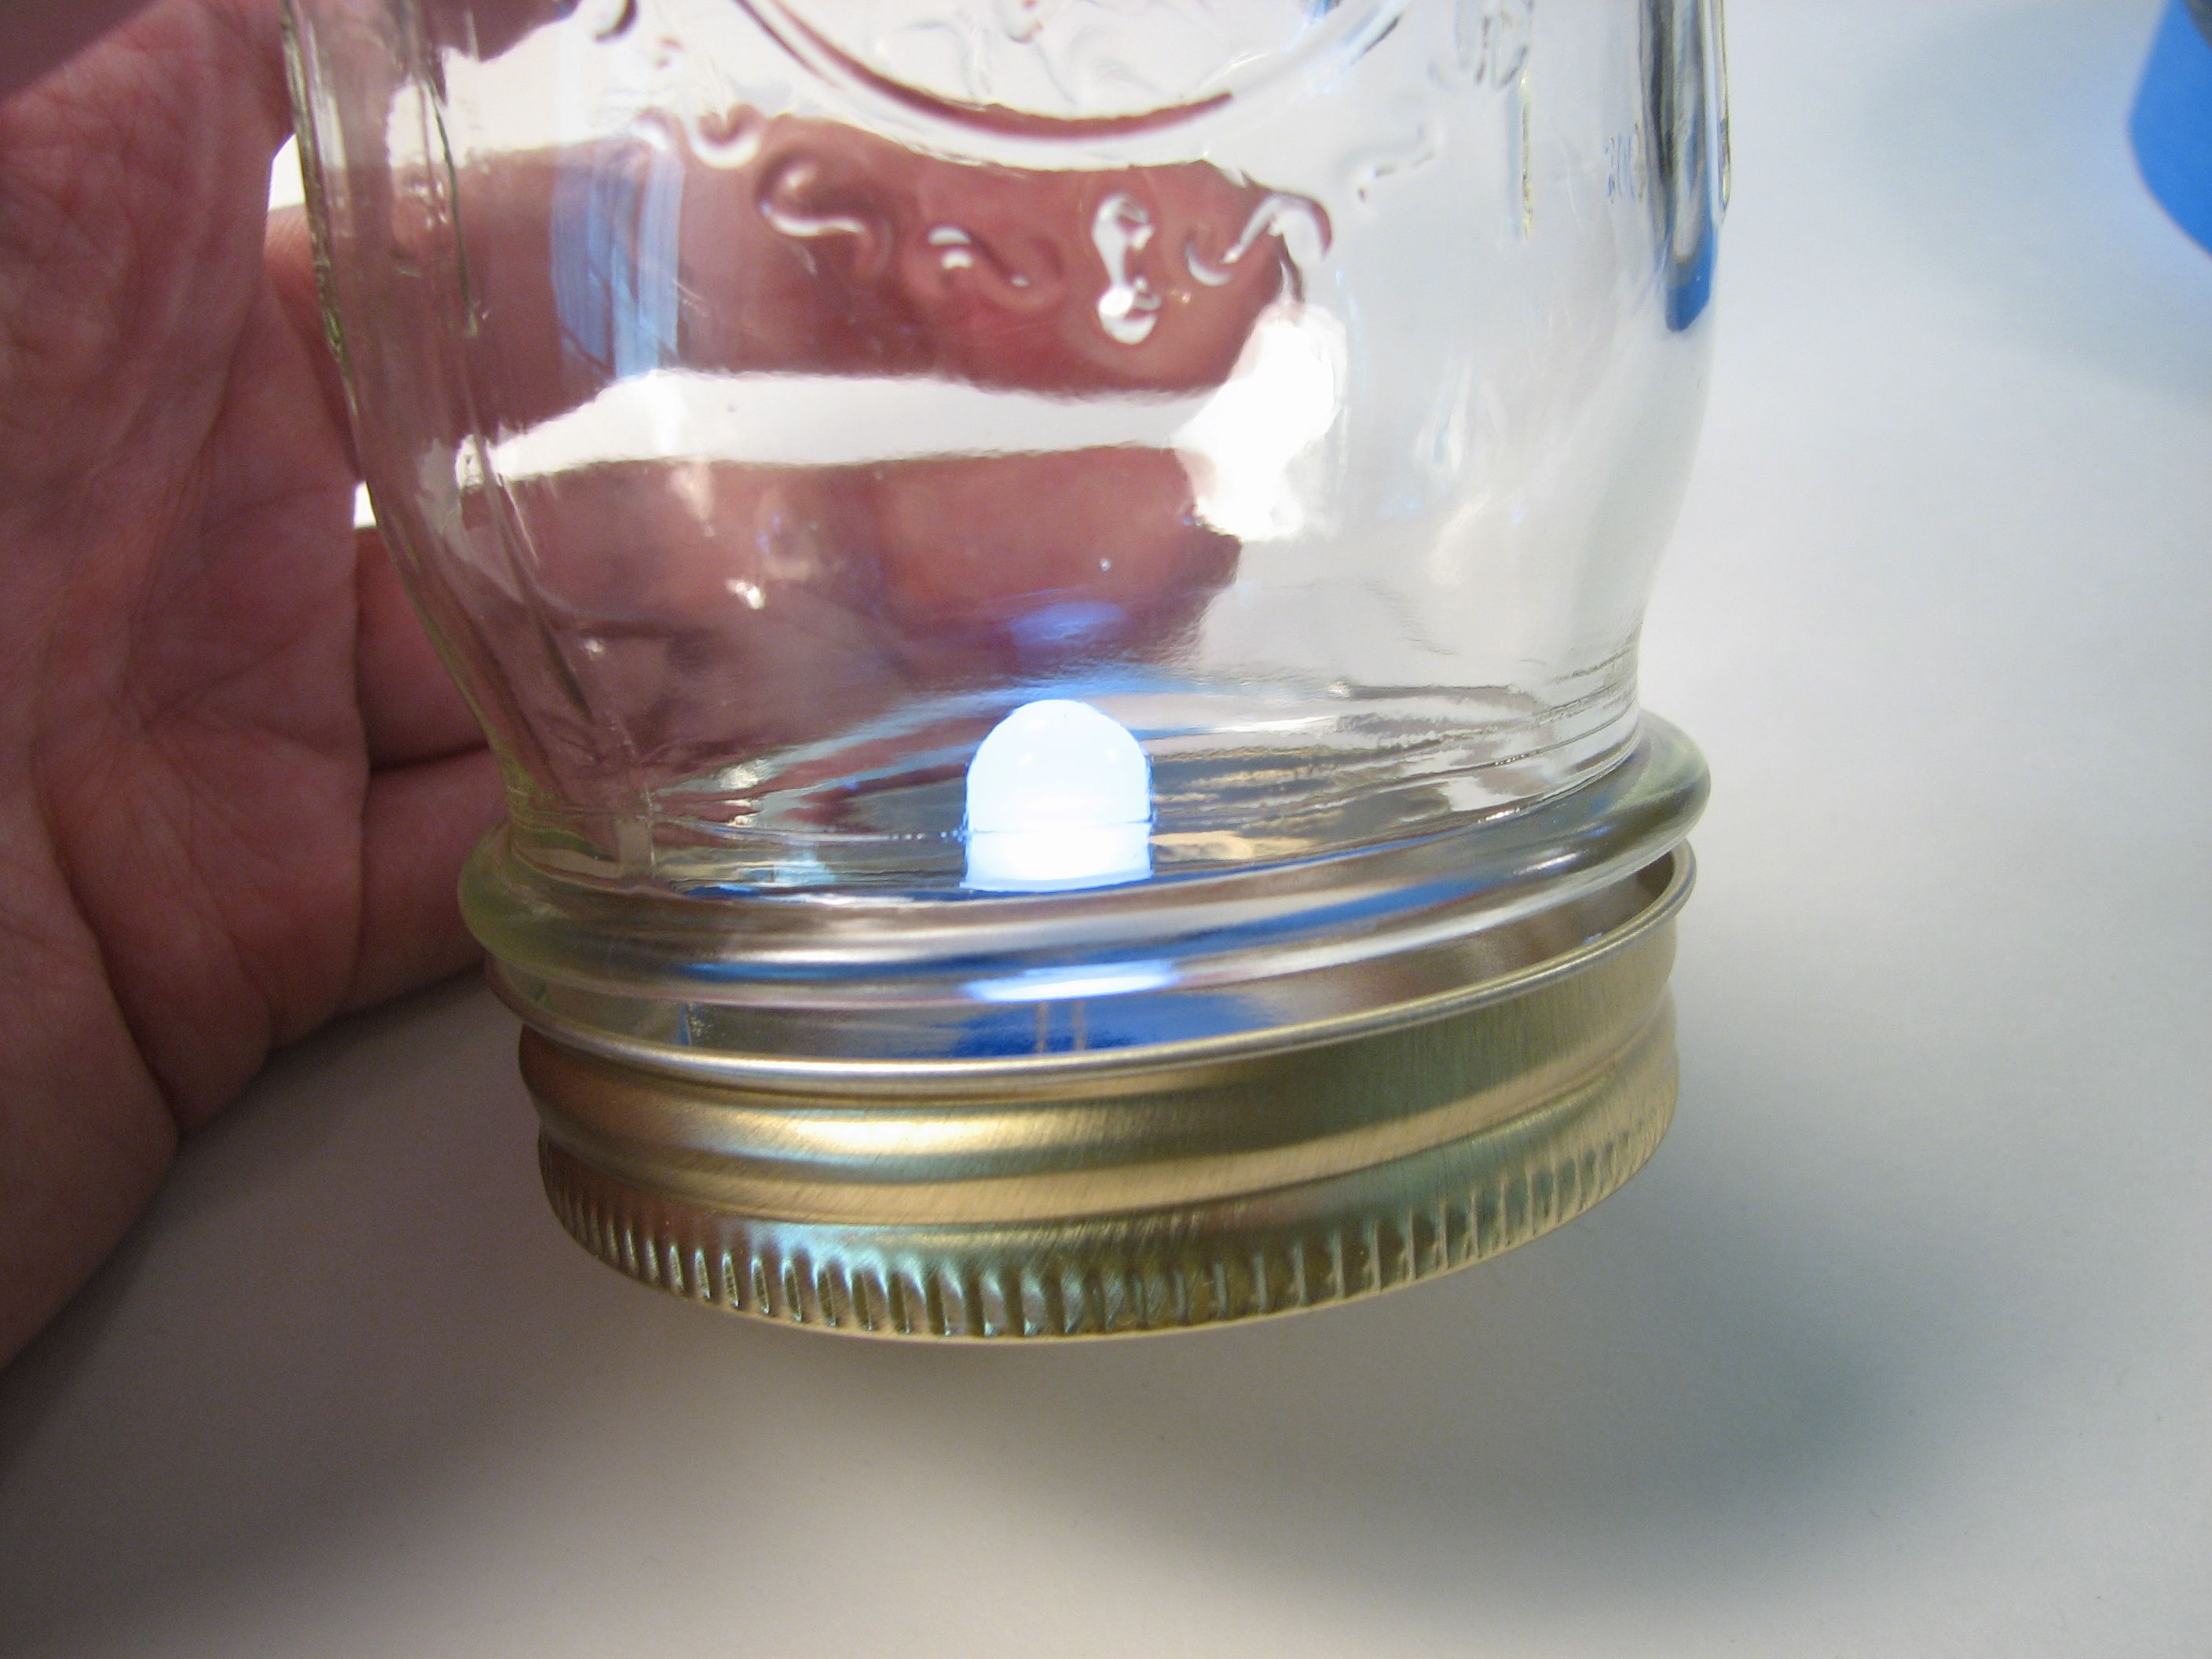
Finally, screw the jar onto the lid, and it’s done.
With a little practice, you can make a few of these per minute.
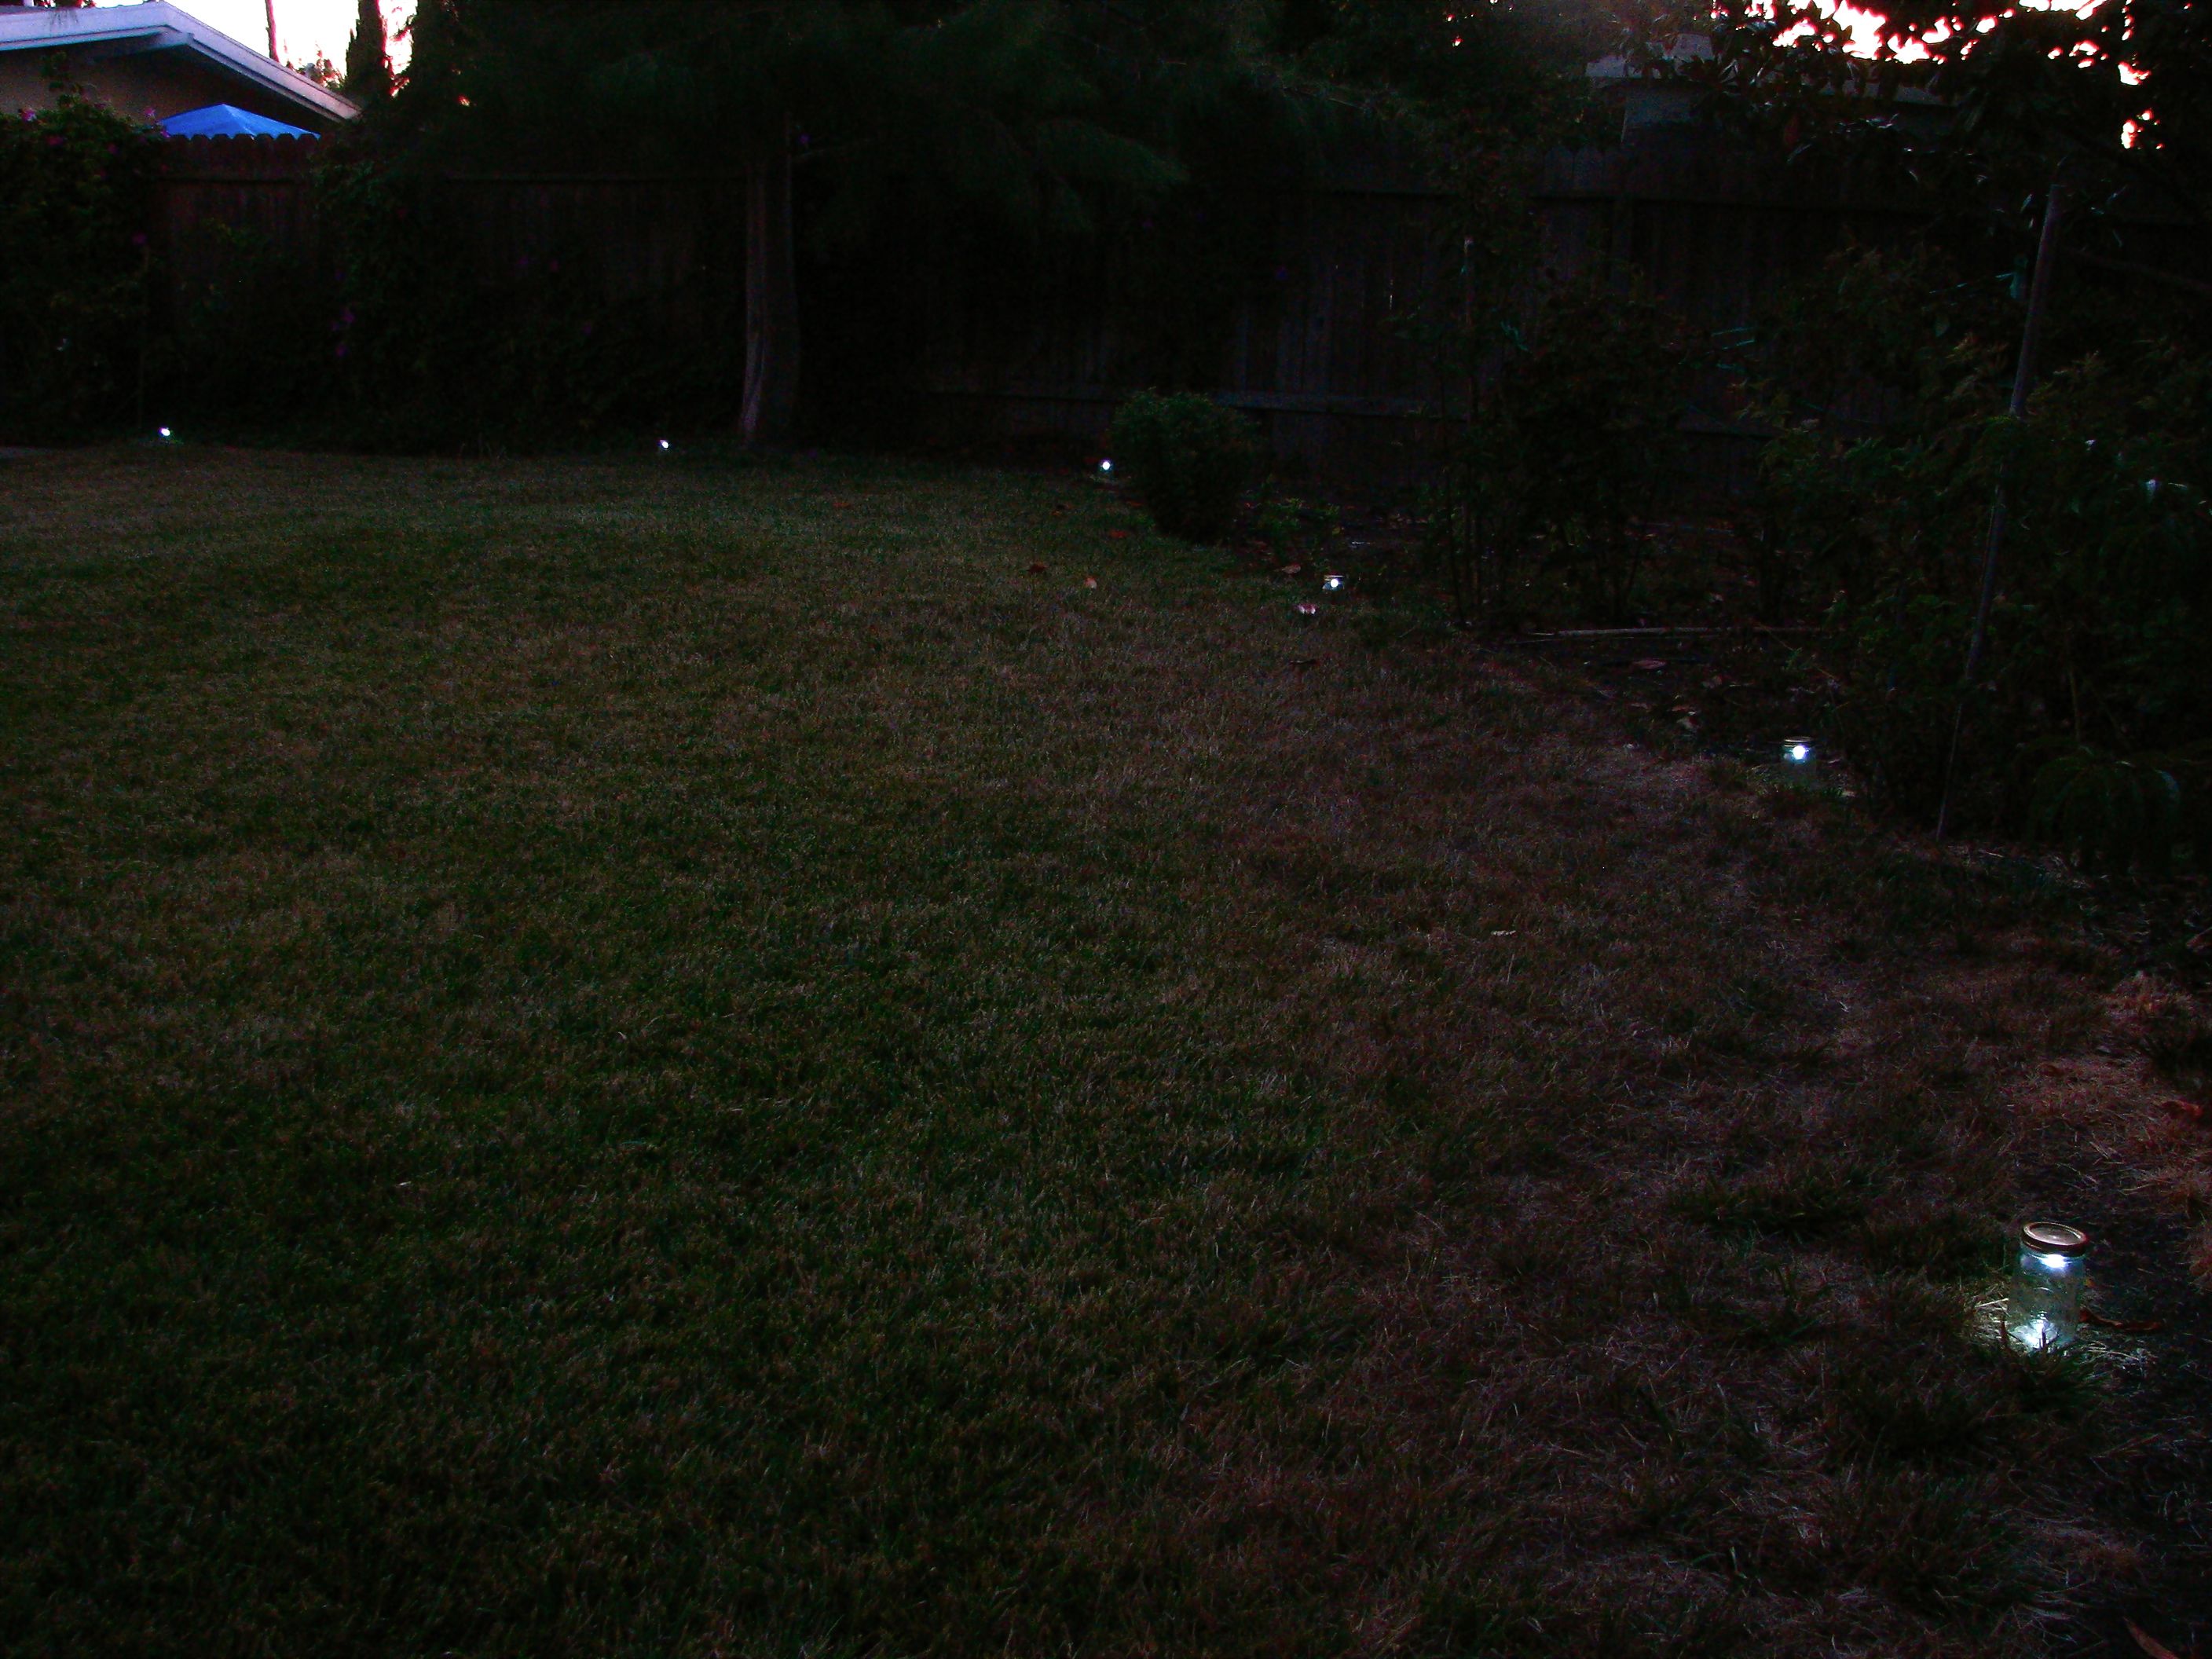
And, after dark, they start to come alive.
We think that these could be potentially interesting for a number of different types of outdoor events– making quick cheap lighting when and where it’s needed. They are relatively scaleable, in the sense that hundreds of them are much more affordable than regular solar garden lights. The difference is that like traditional luminarias, these jar lights are temporary. However unlike luminarias, LED jar lights are waterproof, won’t blow out or catch on fire, and will stay safely lit– unattended– for several days up to a week. And, if you don’t need them for a week at a time, you can always easily disassemble them and save the batteries for next time.
I wonder if a simple switch could be integrated into this design. Perhaps something that would turn the light off if you flip the jar upside down…
The big key would be SIMPLE. You’d want to reasonably compete with "With practice, you can assemble a few of these per minute."
A bit of copper foil double-face taped under the lid, which completes the circuit when the coin cell and LED are in the right position, and the cell/LED assembly loosely taped ("hinged" from one side?), so it hangs free from the lid, if turned upside down, perhaps.
Might take a bit of jiggling to make sure it comes on, but should stay on unless disturbed.
Dave
Simple switch? One idea; Use one of those double-sided sticky foam pads to stick one LED lead to the battery, and use the same pad to stick the battery/LED assembly to the inside of hte lid. Put a small weight on the other lead, either use a small dab of decent glue or solder it on. (You’d have to experiment to get the right amount of weight.)
One way up the weight pulls the lead away from the battery, and the other it presses it against the battery. It would then switch on when it’s lid-down, and off when it’s lid-up. You’d probably get a little more light that way, too.
Though it would require a tiny bit of soldering, and 1 more part, really what you’re talking about is adding a tilt switch.
A simple tilt switch could be improvised which disconnects the circuit when the jar is inverted. They could then be stored without dismantling.
Has anyone tried filling the jar with colored mineral oil? Whould this thing still work or would the oil kill it?
neat idea, and I’ve made my share of throwies, but I stopped making them when I realized the environmental issues. You can get the same effect (bit more money at about $5 per piece) just using the solar lights for driveways. But they last MUCH longer, and are reusable.
One could perhaps add some interest and color by loosely crumpling up some saran wrap of different colors in the jars. I know they make a rosy color and a teal sort of color. Should diffuse the light a little, but in an interesting sort of way.
lame…..i’ve seen this done in a podcast months ago except w/ putting the led’s in ballons
Lame? I disagree – why not take your disinterest elsewhere?
You could also add some color by filling the jars most of the way with water or corn syrup and adding food coloring. (Just mind not to spill, else another fun electrical experiment will ensue.)
Our distinction was that these are much cheaper than “a set of nice looking permanent solar lights.” We’ve seen the $5 lights, and we’d rather not, thanks. :)
Building these jars and using them once for a party we wasted *nothing*– none of the batteries are even halfway used up. The LEDs, batteries, and jars are all recovered and ready for something else someday.
—
Windell H. Oskay
drwho(at)evilmadscientist.com
http://www.evilmadscientist.com/
How would you integrate a photo sensor into the setup so that the lights would come on only at dark? Thoughts? I am a novice at this stuff.
Ah– you need our Nightlight circuit!
—
Windell H. Oskay
drwho(at)evilmadscientist.com
http://www.evilmadscientist.com/
I was just going to mention that!
THIS I could actually DO!
And I think I will….how darn cool is this idea?
Thanks!
Wow! A project I can actually DO (although it is always possible I’ll screw up the taping step :)
Please can you tell me where to get the LEDs? (a link / Online is best, so I don’t have to embarrass myself at an electronics store when the clerk asks me an ‘obvious’ question I can’t even parse).
Thanks!
PS: My cat may enjoy batting one of these about as well.
While we quite obviously biased, we got ours from the Evil Mad Science Shop LED Page. :)
—
Windell H. Oskay
drwho(at)evilmadscientist.com
http://www.evilmadscientist.com/
Hmm – I wonder if there’s a way you can incorporate the metal lid of the jar as one of the contacts in a simple switch – so you can give the lid a quarter turn to switch the light on or off. A patch of foil on the rim of the jar, maybe?
Of course, they would take more than 30 seconds to build this way, but would last a lot longer too. Anything to reduce the "disposability" of the battery (lithium batteries aren’t really disposable, they’re just cheap enough to throw away, which isn’t the same thing).
Wouldn’t it have been cheaper to buy tiny solar cells rather than buying expensive, disposable lithium batteries?
That’s a rather nonsensical question. If you want to run the LED directly off of the solar cell, it can only be on when sunlight is hitting the solar cell!
We want our LEDs on at night, so that means that you also need (at a bare minimum) two nimh or nicd batteries plus a reverse blocking diode for the solar cell. And, those batteries *will* cost more than the one that we’re using.
Our batteries cost $0.25 (or less), and I have never seen suitable solar cells anywhere near that cheap.
—
Windell H. Oskay
drwho(at)evilmadscientist.com
http://www.evilmadscientist.com/
Man, if you are going to do a throwie-inspired project right now, you could at least give a shout out to GRL co-founder James Powderly who is somewhere detained in China.
Better yet, why not buy a cheap photocell for each one? That way you won’t waste valuable energy during the day, etc. Or to combine several ideas, a solar battery and a photocell for each LED. :) It might cost a bit more (maybe? I’m too lazy to look up the parts on digikey), but it’d be a far more effective and sustainable solution.
I think everyone’s missing the point. Make a quick, simple, cheap lantern thing. The ideas about timers and switches and solar cells are all great…for another project. Instead of making a comment and walking away, write your own blog post with instructions on how to make your wonderful inventions. Then link it here.
Hey, this will be perfect for me when I get home to New Mexico. We moved from Albuquerque to a house outside town where fire danger (mountain woods = kindling) makes the traditional Christmas luminaria candle+sand+paper bag a BIG nono. If the fire doesn’t kill you, the neighborhood association lynch mob will.
I may whip up a dozen of these to lay out on our walkway, but I’ll put them in brown paper bags. Should make nice warm Christmas light. Thanks!
May I suggest an ecologically better solution?
Instead of batteries, use a CITRIC FRUIT, like a lemon (or a potato), and two electrodes:
– copper, the +
– zinc, the –
insert these two wires into a lemon, connect the LED’s longer lead to the copper electrode.
And you’re on. Feel free to experiment using two fruits, serially connected.
The best thing these batteries are fully disposable and environment safe
http://www.sciencebuddies.org/science-fair-projects/project_ideas/Elec_p029.shtml?from=Home
http://www.madsci.org/experiments/archive/889917606.Ch.html
http://www.madsci.org/cgi-bin/search?query=potato+battery
:)
You seem to be missing the point pretty well– this article is how to make the simplest and quickest garden light, not the most complicated and slowest. Also, you seem to have some pretty serious misconceptions about what a lemon battery is capable of.
A single-lemon battery produces about 2 mA at 1 V. To produce 20 mA at 3 V to run our white LED, we’d need three lemons in series, ten times in parallel– 30 lemons total. And (punchline) *they wouldn’t fit in the mason jar!* And, when lemons cost up to $1 each at the store, we’re talking $30+ per lantern, not $1+ per lantern.
Also, it would not necessarily be more environmentally sound. Growing and shipping 30 lemons, and mining and shipping the metal for 60 strips of copper and zinc doesn’t necessarily take less power/energy/carbon/water than making and shipping that tiny– and recyclable!– little coin cell. And finally what happens to the copper and zinc? They are partially dissolved by the lemon acid, leaving copper and zinc metal ions in our (now overflowing) compost heap that has 600 lemons in it, and that metal is– unlike the batteries– not recyclable.
So… how is this better?
—
Windell H. Oskay
drwho(at)evilmadscientist.com
http://www.evilmadscientist.com/
Well, to be fair, the lemon approach *would* be more EVIL. Kind of like running your Christmas lights off of a graphite-moderated reactor.
At home I’ve got a bunch of jelly jars in the small size (4 fl oz,) with faceted sides, which might make for a daintier sort of presentation, like LED votives.
*Important safety tip: do not throw the completed LED jar lights.
ROFL!
Molotov throwies!
You won’t be ROFLing after I throw a few jars at you. :)
The solar lights use batteries as well. Need somewhere to store all that energy. The cheaper lights use batteries and lights that are environmentally suspect. This project allows you to re-use many of the components.
Before anybody tries this, it’s important that you know the forward voltage of the LEDs and their current ratings as well as the voltage of the batteries. The example shows a white LED (typical forward voltage equals about 3.2 V) with 3V lithium batteries, which is probably okay. But replacing the LED with a red LED (typical forward voltage equals about 1.8V) and using the same battery, you’ll end up with a burned out LED or battery and burned fingers (and in the worst case, a small fire). Put a resistor in series with the LED to avoid that fate. Use Ohm’s Law to figure out the resistor value you’ll need. The equation is
resistance = (supply voltage – LED forward voltage) / (LED max forward current)
As it turns out, this actually works just fine with red LEDs because of the internal resistance of the lithium coin cell– it’s effectively got a built in resistor. (You won’t be able to burn out the LED, the battery, or your fingers even if you try.)
The only effect of the lower forward voltage is that the current in a red LED will be a bit higher, so the battery will not last quite as long.
—
Windell H. Oskay
drwho(at)evilmadscientist.com
http://www.evilmadscientist.com/
That’s a really good tip for my readers. Burnt fingers not so good.
Akemi via blog.1stoplighting.com
I have been looking around to try to find cheap lithium coin cells but everywhere seems to be really expensive. Do you know what strength of battery is needed and where to find them? Preferrably not an expensive version because i will need over 50 of them.
Did you follow the digi-key link we gave above? They *are* cheap.
—
Windell H. Oskay
drwho(at)evilmadscientist.com
http://www.evilmadscientist.com/
Does anyone know of any locations in Canada that have the LED lights. I cant find them anywhere.
Canada is pretty large–any particular city you’re interested in? I know Toronto has a lot of electronic surplus stores (which are good place to look for LEDs if you have to go brick & mortar), but I haven’t checked into any other locations.
What if you hot glued the battery and one lead to the inside of the lid, then taped the exposed lead to the other? This way you could pull the tape off to turn it off, and vice versa, thus expanding the battery life.
this is a great, cheap idea! one question: how long do the batteries last? if you’re using them for an entire evening, do they last the whole time?
~Am~
Lu-n-Am Blog
Yes, they’ll last for a whole evening– they are better than candles in that sense. Exactly how long they will last depends on the LEDs, temperature, and other conditions, but 7-14 days is typical.
—
Windell H. Oskay
drwho(at)evilmadscientist.com
http://www.evilmadscientist.com/
I’m making blackberry jam this weekend. Can I have the jars please, if you’ve finished with them?
Actually, I had just had a similar idea… I plan to hack apart some rechargeable LED outdoor lights and incorporate them into Ball jars. These lights flicker like a candle and will emulate a "firefly in a jar" feeling.
we bought the cheapest set of solar powered lights this weekend – $20 for a pack of four. Instead of putting them out in the hideous plastic housings that they came with, we glued the top assembly (Rain shield, solar cell, battery & LED) to a jar for simple, save & cheap patio lighting.
Actually, I was able to pick up LED Solar landscape lights at WalMart for $3.23 each. And to top it off, they’re not really ugly. They don’t put out a lot of light either. Basically a photocell, solar cell, rechargable AA battery and an LED. I’m trying to source a cheap source for 1.5v LEDs so I can have some multi-colored fun with the back yard.
The link that you give contradicts what you’re try to argue. It says that the potato or lemon battery *can* run an LED.
I didn’t say that lemons can’t light up an LED, just that it would be very impractical to get this kind of brightness.
Please read through the link more carefully– it shows four lemons generating enough voltage and current to drive an LED at about 2 mA– one tenth of what we are using. In other words, that 40 lemons would be needed to run the LED with good brightness… and that was our whole point.
—
Windell H. Oskay
drwho(at)evilmadscientist.com
http://www.evilmadscientist.com/
Place on Queen Street W in Toronto, above a clothing store. Look for the gorilla. Active Surplus, don’t know if they do mail order but it’s an amazing place to kill a couple hours.
Just an idea but what about using Glowsticks?
We are also interested in (and looking at) other types of GITD materials, but glowsticks are even more expensive than batteries, and don’t as long….
—
Windell H. Oskay
drwho(at)evilmadscientist.com
http://www.evilmadscientist.com/
can I use LR44 alkaline button cell batteries instead? I just got a bunch of these real cheap.
You might be able to use two of them (to get to 3 V) but they are thicker. The voltage is low enough that you should be able to drive blue or white LEDs safely. For red, yellow, or orange LEDs, though, it might blow out the LED– so use caution.
—
Windell H. Oskay
drwho(at)evilmadscientist.com
http://www.evilmadscientist.com/
that’s ok. I can color with syran wrap or theater gel-like material.
Check your local dollar store for cheap CR 2032s. I saw a strip of 6 for $1.
At Menard’s I can buy led lights complete with solar recharger, battery, enclosure, mounting stem and spike for $2.50. They last for many days and alot less work.
They do make colored LED’s.
Just found this, am hardly a lighting "sophisticate", but I am a complete design freak…this is fabulous. Thanks!!
Our non-profit, Gulf Coast Community Ministries, has an outreach program for homeless individuals. I am interested to know if anyone can provide me an idea of how to use a mason/mayo jar as a solar-powered led lantern. Ideally, this would be cheap, and we could get the mayo jars donated. It would be nice to have a switch, even one as simple as inverting the jar.
Please email me if you think you can give me a specific plan for this.
Thanks, James
James{at}DaddysBBQSauce.com
The problem with this is that the battery cells and leds would cost more that a set of lights.
I want to make mason jar lanterns for our wedding reception, to hang inside from the ceiling as well as on the tables, but the venue doesn’t allow candles, so your LED lantern is PERFECT. I did however see an idea called a Firefly Lantern which was a jar right side up, filled with moss/grass and LED lights throughout.. Do you have any ideas on how to make this? I saw it on a website similar to ebay where the person was selling them so I couldn’t really ask the logistics lol :) Any ideas would be very helpful! Thank you!!
The LEDs in this set-up are similar to LED throwies are stand-alone, so they can be placed wherever you would like them to be. If you wrap tape around the ‘LED throwies’ you can nest them in the moss/grass and it should be perfect!
These are great, but I am looking for some advise to take them to the next level. My fiance wants something like this for our wedding, but I would like to find a way of making the lights "twinkle" or randomly fade in and out, like a real fire fly. I am a real novice at this electrical stuff and I need to make about 100, so simple is better. Right now, I am buying those cheap LED flickering tea candles and ripping out the guts, but I am hoping there is a easier way… any thoughts?
Yes, our webstore now has “candle flicker” LEDs, available in normal (cool) white or warm white, each with a built-in flickering circuit. They can still be built into lanterns this way– just add a battery and some tape.
You can find them here.
Windell H. Oskay
drwho(at)evilmadscientist.com
http://www.evilmadscientist.com/
Can I touch the bulb during the bending step? I’ve read in other posts (for throwies) that you should only handle by the tape/battery section once the bulb is lit. Can’t wait to use this idea for my wedding…you saved me from my "no open flames allowed" venue heartache!
You can hold it anywhere, any time, so long as you aren’t made of metal. If you’re a robot, wear rubber gloves.
Windell H. Oskay
drwho(at)evilmadscientist.com
http://www.evilmadscientist.com/
If you want to color your lights with out the trouble of what voltage or temp the lights are … just buy a can of stained glass paint at any craft store. (hobby lobby-michael’s are examples) and spray the inside of the jar a few days before you need them. Pop on the tops and instant colored lights. I have done this with tea light candles in mason jar lanterns for years, its beautiful, easy, quick and fairly cheap.
I’ve already purchased the batteries and 10 mm leds. It works just as you described. Thank you. What would I need to add to make it flicker or fade? I know absolutely NOTHING about making circuits and such so simple is good. Kay
Best answer yet! but when the tequilla crowd finds the lemons….
why not get the integrated solar led with replaceable, rechargeable battery and automatic dark switch on for $2
http://www.canadiantire.ca/browse/product_detail.jsp?PRODUCT%3C%3Eprd_id=845524443324826&FOLDER%3C%3Efolder_id=1408474396672077&bmUID=1315268148142
Probably because it didn’t exist when this article was written 3 years ago. And besides, that wouldn’t be do-it-yourself.
For flickering, use “candle flicker” LEDs. For fading, not sure– depending on what you mean, there may be LEDs with a built-in function like that.
Windell H. Oskay
drwho(at)evilmadscientist.com
http://www.evilmadscientist.com/
I normally don’t post comments not matter how nice an idea is… BUT YOU ARE BRILLIANT !!! This is so simple and yet effective ! Brilliant
Make the Jars even brighter by diffusing the light on the inside: Spray the inside of the jars with Glass Frosting Spray paint – Krylon and Rust-O-Leum both make a version. The jars would then but unfit for food containment, but they are cheap and could be reused for more parties, storing other things, or just recycle the glass.
love this idea. what if I can’t use glass at our venue? can this be done, say, in an empty plastic mayo jar? love the "warm white" flickering option LEDs on the website. would this hue match the white of the the old-style white christmas lights?
Yes, plastic jars will work fine. Warm white LEDs are closer to incandescent than pure white, but are not a perfect match.
Love love love this idea. Yes, I am a green tree-hugger type, but your facts around the economics and net low-impact to the environment are right-on. Unfortunately sometimes folks recoil unjustifiably when they see the word "battery." Props on that.
My only question (I have NO electronic savvy): Can I use virtually any of the different diffused white LEDs you offer with the same size battery? Is the only difference going to be how long they last before the battery is drained? Or do I need different batteries for different applications?
Thanks in advance!
> Can I use virtually any of the different diffused white LEDs you offer with the same size battery?
Yes.
>Is the only difference going to be how long they last before the battery is drained? Or do I need different batteries for different applications?
Any "low power" (i.e., not "high power") white LED will drain the battery in about equal time. Different LEDs give different light appearances for different applications.
Windell H. Oskay
drwho(at)evilmadscientist.com
http://www.evilmadscientist.com/