


A detailed hacking how-to guide: Modify a classic 80’s desk phone for use with a modern wireless handset and build in an integrated handset lifter.
 [This is a guest project contributed by HiTek LoLife; all-around great guy, friend, neighbor, and reader of Evil Mad Scientist Laboratories.
A small bit of his handiwork has actually made an appearance here before and his fine stock ’94 Toyota shortbed has been known to transport the CandyFab 4000 from time to time.
Big thanks for submitting this great project and special bonus points for his fine graphic that reminds you exactly where your world is being delivered! –Windell ]
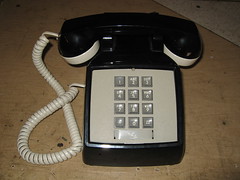
Some years back, I picked up this fine 1982 ITT desk phone at a San Jose antique shop. I have an inherent love of all things early-80s and couldnít help but notice that this particular phone matched the decor of our then-recently outfitted home office. I also liked the idea of having an old fashioned, wired, land-line phone available in case of emergencies that result in power outage.
 I wired a modular jack and set the phone up in the office, only to find it unplugged every evening. As it turned out, my wife (who actually WORKS in our home office) was unplugging it because she couldnít stand the bell. Even attenuated to the most muted level, the sudden percussive physical striking of the bells would (in her terms) “scare the pee” out of her every time the phone rang. So the phone remained unplugged (and fairly so; her WORK area and all that?) and became something of a retro-tech paperweight.
Some time later my wife’s work team moved to SoCal and she began to work at home almost exclusively. As such, all of her verbal communication with her team became phone based, which quickly became a quite literal pain in the neck. We first tried a few different headsets jacked into the handset of our cordless phone system but the audio quality on both ends of a call was unacceptable. Then we tried a wired-headset-and-base style desk phone, which worked just ok, but proved to be too confining.
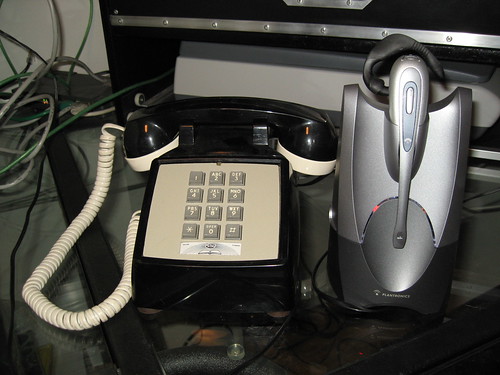
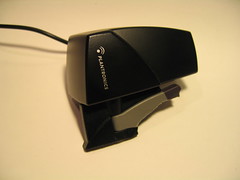
 The solution was obviously to go high-end with the Cadillac of headsets: Plantronics. After a bit of research, it became apparent that their most reliable headsets work exclusively with WIRED phones, thus presenting the opportunity to bring my coveted 80s artifact back into service. The CS55 seemed to fit the bill, and I was sure that with a little hacking, I could put together a desirable setup with the ITT phone (note: I later exchanged this for a CS50 due to interference and range issues. OUTSTANDING customer service I might add!).
So, having decided that a hack was in order, it was time to come up with some guiding requirements:
- Make NO external or non-reversible modifications to the phone; the original aesthetic qualities must be preserved (including handset cabling) with all mods being made internally.
- Make use of ALL capabilities of the wireless headset system (why buy high-end and then cripple features?).
- Employ alternate alert system for incoming calls (alleviate any further alleged “incontinence” hazards).
These requirements then led to the following hack task-list:
- Devise method of patching headset base between handset and internal phone terminal block using internal cabling.
- Integrate handset lifter inside of phone case to lift phone off hook internally when call is answered.
- Integrate kinder, gentler, electronic signal for incoming call.
The first order of business would be to remove the outer case of the phone to see what I had to work with.

After a good survey of the internal space and a quick review of the above requirements and tasks, it became apparent that I would only need to purchase a few additional off-the-shelf parts from the local Fry’s Electronics.


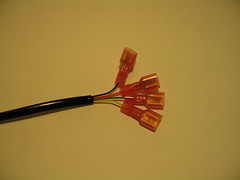
Spades and tab terminals for making internal connections.
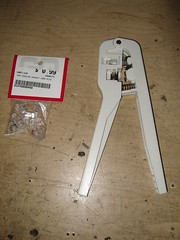

RJ22 handset modular plugs with crimper tool and cheap external flashing ringer.
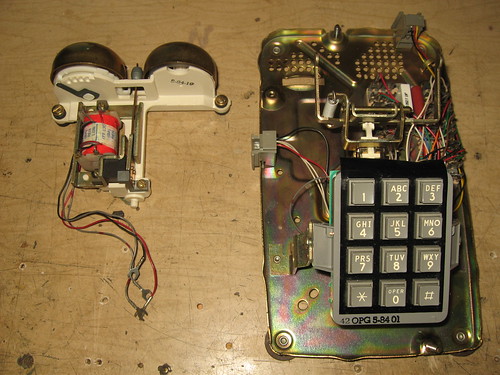
To get started, I removed the bell assembly, thus eliminating the only offending element of the original phone design and clearing up some space for the other required internal mods. The bell was donated to EMSL for a possible future project.
Next, I wanted to get a look inside the flashing ringer and see what I had to work with in there. These things basically consist of a small pc board with a connected speaker, an input cord with wall plug, and an output jack to plug in your phone. The lights are mounted to the pc board.

After getting the components out of the case I noticed that, as with many items from Fry’s, this device came “pre-broken” for my inconvenience.

Behold the amazingly shoddy workmanship.
Well, in my case, it wasn’t so inconvenient because I was gutting it for parts anyway, but you get my point…
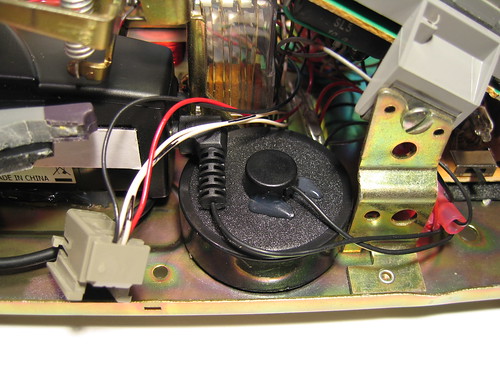
I used some extra phone extension wire to make new leads to patch the board between the spades from the input jack on the back of the phone and the terminal block. I also wired the speaker connection with a spade-and-tab junction for flexibility.


Here is the board and speaker re-wired with the necessary TLC so lacking before.

I hot-glued some thin plastic backing to the board and patched it in…

…then I hot-glued the board into my chosen parking space (and remembered to set the ringer switch for “low”).

Next, I connected the speaker and glued it in as well.
Now it was on to the handset wiring. This was logically identical to the ringer wiring (an in-line patch), but entailed the added necessity of running wire outside the phone and terminating it with RJ22 handset plugs on the external end.
I decided to use two cable colors so that it would be easy to differentiate between the outgoing and return lines after the phone was reassembled. Again, one lead would require tab terminals while the other would require spades.

Black extension cable with tab terminals and RJ22 modular plug to extend internal handset wiring to headset base.

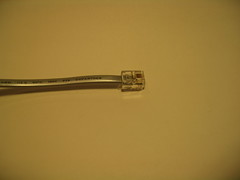
Silver return cable with spades and RJ22 modular plug to connect headset base to handset terminals inside phone.
After carefully tracing wires, noting their original terminals, and mapping out cable orientations, I ran both cables through the empty bell-volume adjustment opening, then pulled the handset spades from the terminal block and patched in the new connection.
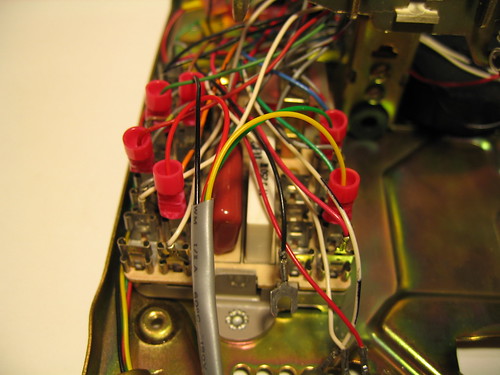
Return cable from headset base to internal handset terminals.

Junction of handset cable extension to headset base.

I then employed a nylon wire-tie to provide for neat routing and some strain relief.
Next, I needed to get the handset lifter integrated and working.

The handset lifter is a device controlled by the headset base that mechanically lifts the receiver when an incoming call is answered using the headset and lowers the receiver when a call is likewise terminated.

The handset lifter also contains an integrated microphone that would normally rest directly over the external speaker of a modern desk phone to sense the ringing of an incoming call, and in turn, signal the headset base to beep the wireless headset.
I snipped off the integrated mic because Plantronics conveniently includes a “remote” mic with a short cable that plugs into the handset lifter to accommodate phones that do not have the bell speaker located directly below the handset. This was perfect for my purposes, and as youíre about to see, much of the physical structure of the handset lifter was about to go away.

A literal “hack” was needed to trim down the handset lifter to fit in the interior space beneath the phone hook. I used wire dikes to snip the actual lifter-arm into shape.
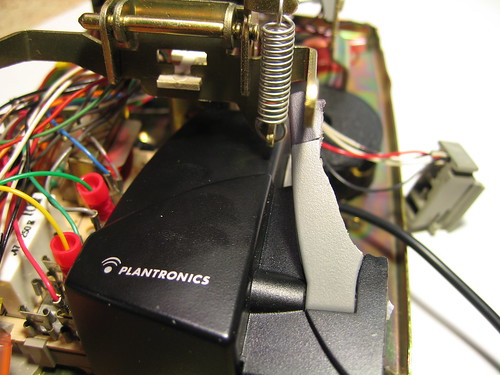
A rough trial placement (with double-stick foam tape) to align the lifter and phone hook allowed me to trace the lifter base for later permanent installation with hot glue.
Then I plugged the remote ring mic cable into the handset lifter and glued the mic to the newly installed electronic ringer, thus sealing off the speaker hole and muting the ring even further.
After a test of the lifter action, it was apparent that the soft, rubbery plastic of the lifter arm was binding a bit against the metal of the internal phone hook.

In about half of the tests the arm would stick about half way up and then fall back down under the weight of the handset, so I shortened the arm a bit and glued on a small piece of aluminum channel to serve as a sort of platform to distribute the weight once the arm was up. I also beveled the leading edge of the aluminum to reduce friction when engaging the phone hook. After these modifications, the lifter functioned correctly and reliably.

The modified lifter arm in action. I love it when a plan comes together.
I hot-glued the lifter in place, then ran the cord out the same opening as the headset base cords, added another zip-tie, and plugged everything in. No problems.
After putting the case back on the phone, the only thing aesthetically lacking was the empty number-card window on the faceplate. I know my own home phone number, and I didnít need it displayed, but I did feel however that it might be wise to incorporate a “friendly reminder” that, in our current state of “national insecurity”, any calls placed or answered could be subject to surveillance. I put together this informative graphic to alert all potential users to this possibility.

But why stop with a passive alert system? Another shortcoming was the fact that the flasher lights of the new electronic ringer were going unseen, just flashing away inside the phone when a call came in. There had to be a way to utilize this feature as well. The obvious choice was to illuminate the potential surveillance reminder system; however, the challenge here was that the number-card window sits directly on top of the lower frame of the dial pad, thus blocking any direct illumination. The solution: redirect the light with appropriately applied fiber-optics.

After deciding on a method of delivery, it became apparent that an ever-so-small, irreversible mod had to be made to the faceplate. A small slot would need to be cut along the bottom edge of the number-card area. Dremel time.


I hand-cut a small piece of thin plastic in the shape of that timeless symbol of authoritarian empirical knowledge “the pyramid” and applied heat from a small butane torch to get a clean, unclouded bend. All edges were cut with a bevel to allow for maximum capture and dispersion of light. It was a long shot, but it worked, and a faint orange pyramid halo shows through as part of the alert system when a call comes in.
The finished setup– note the graphic now installed in the number-card window.
And to finish this off, some video of the phone and headset in action:
I’M IN UR FONE LIFTIN UR HANDSET!
[Thanks again to HiTek LoLife for contributing his excellent and detailed project!]

Funny that your wife hates the sound of the bell ringer. I collect real bell phones, and that’s the only kind of ringer I use! :) On cellphones, sure, I use something else, but at home, all of the ringers are real bell phones. People comment on it when they come over – visitors love it.
The ringer on my cell phone is a recording of a real bell ringer.
Some times I pee when I hear dogs barking.
i do too, is the world going to end now?
I thought you solved this in a tidy and artful manor. It was documented thoroughly.
Practically gov.specs.
nailed it.
[IMG]http://i145.photobucket.com/albums/r222/noelgrassy/TwGL%20Avatars/PinningVUMeter.gif%5B/IMG]