


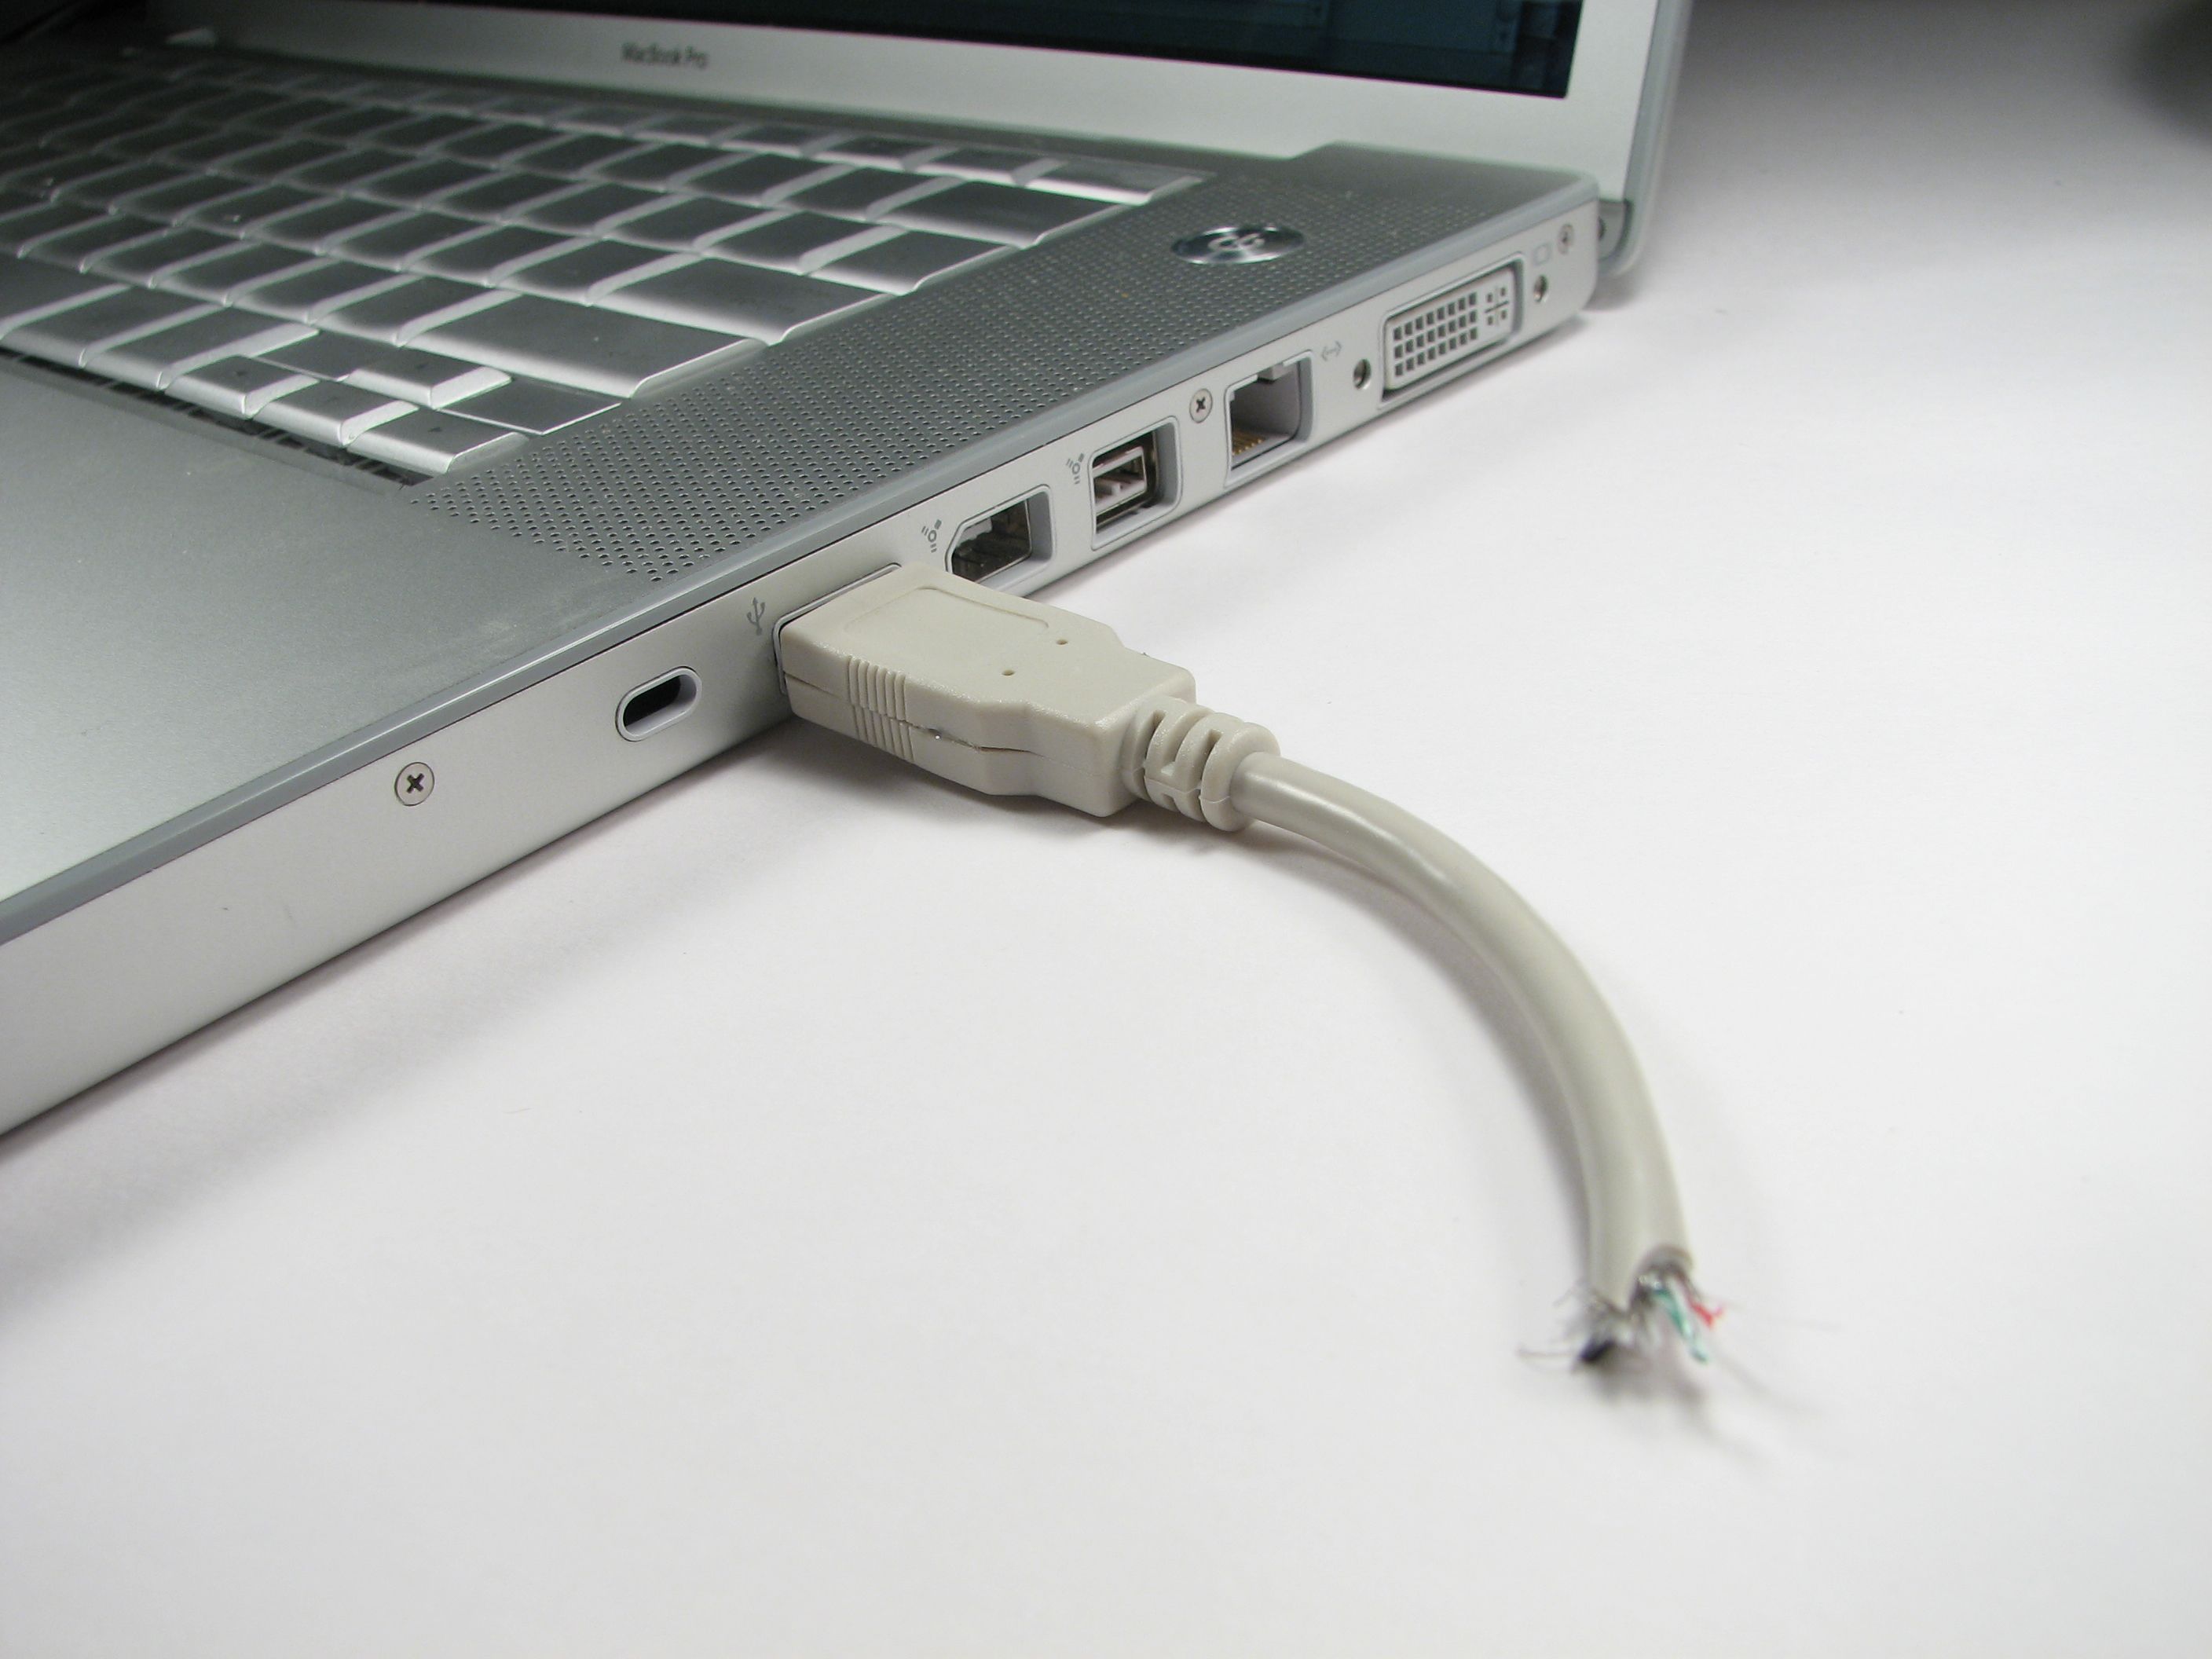
Holy crap– somebody just went and TORE MY FREAKING USB CABLE IN HALF while it was still attached to my laptop!!!
No– wait– sorry. That’s just my USB drive. My bad. Never mind.
(And after the jump, how to make your own.)
It’s no secret that there are a lot of strange USB devices out there, particularly flash drives. Not a comprehensive list, but we’ve sure seen Lego, twigs, action figures, bowling balls, sushi, anatomical parts, transparent drives, erasers, cassette tapes and on and on and on.
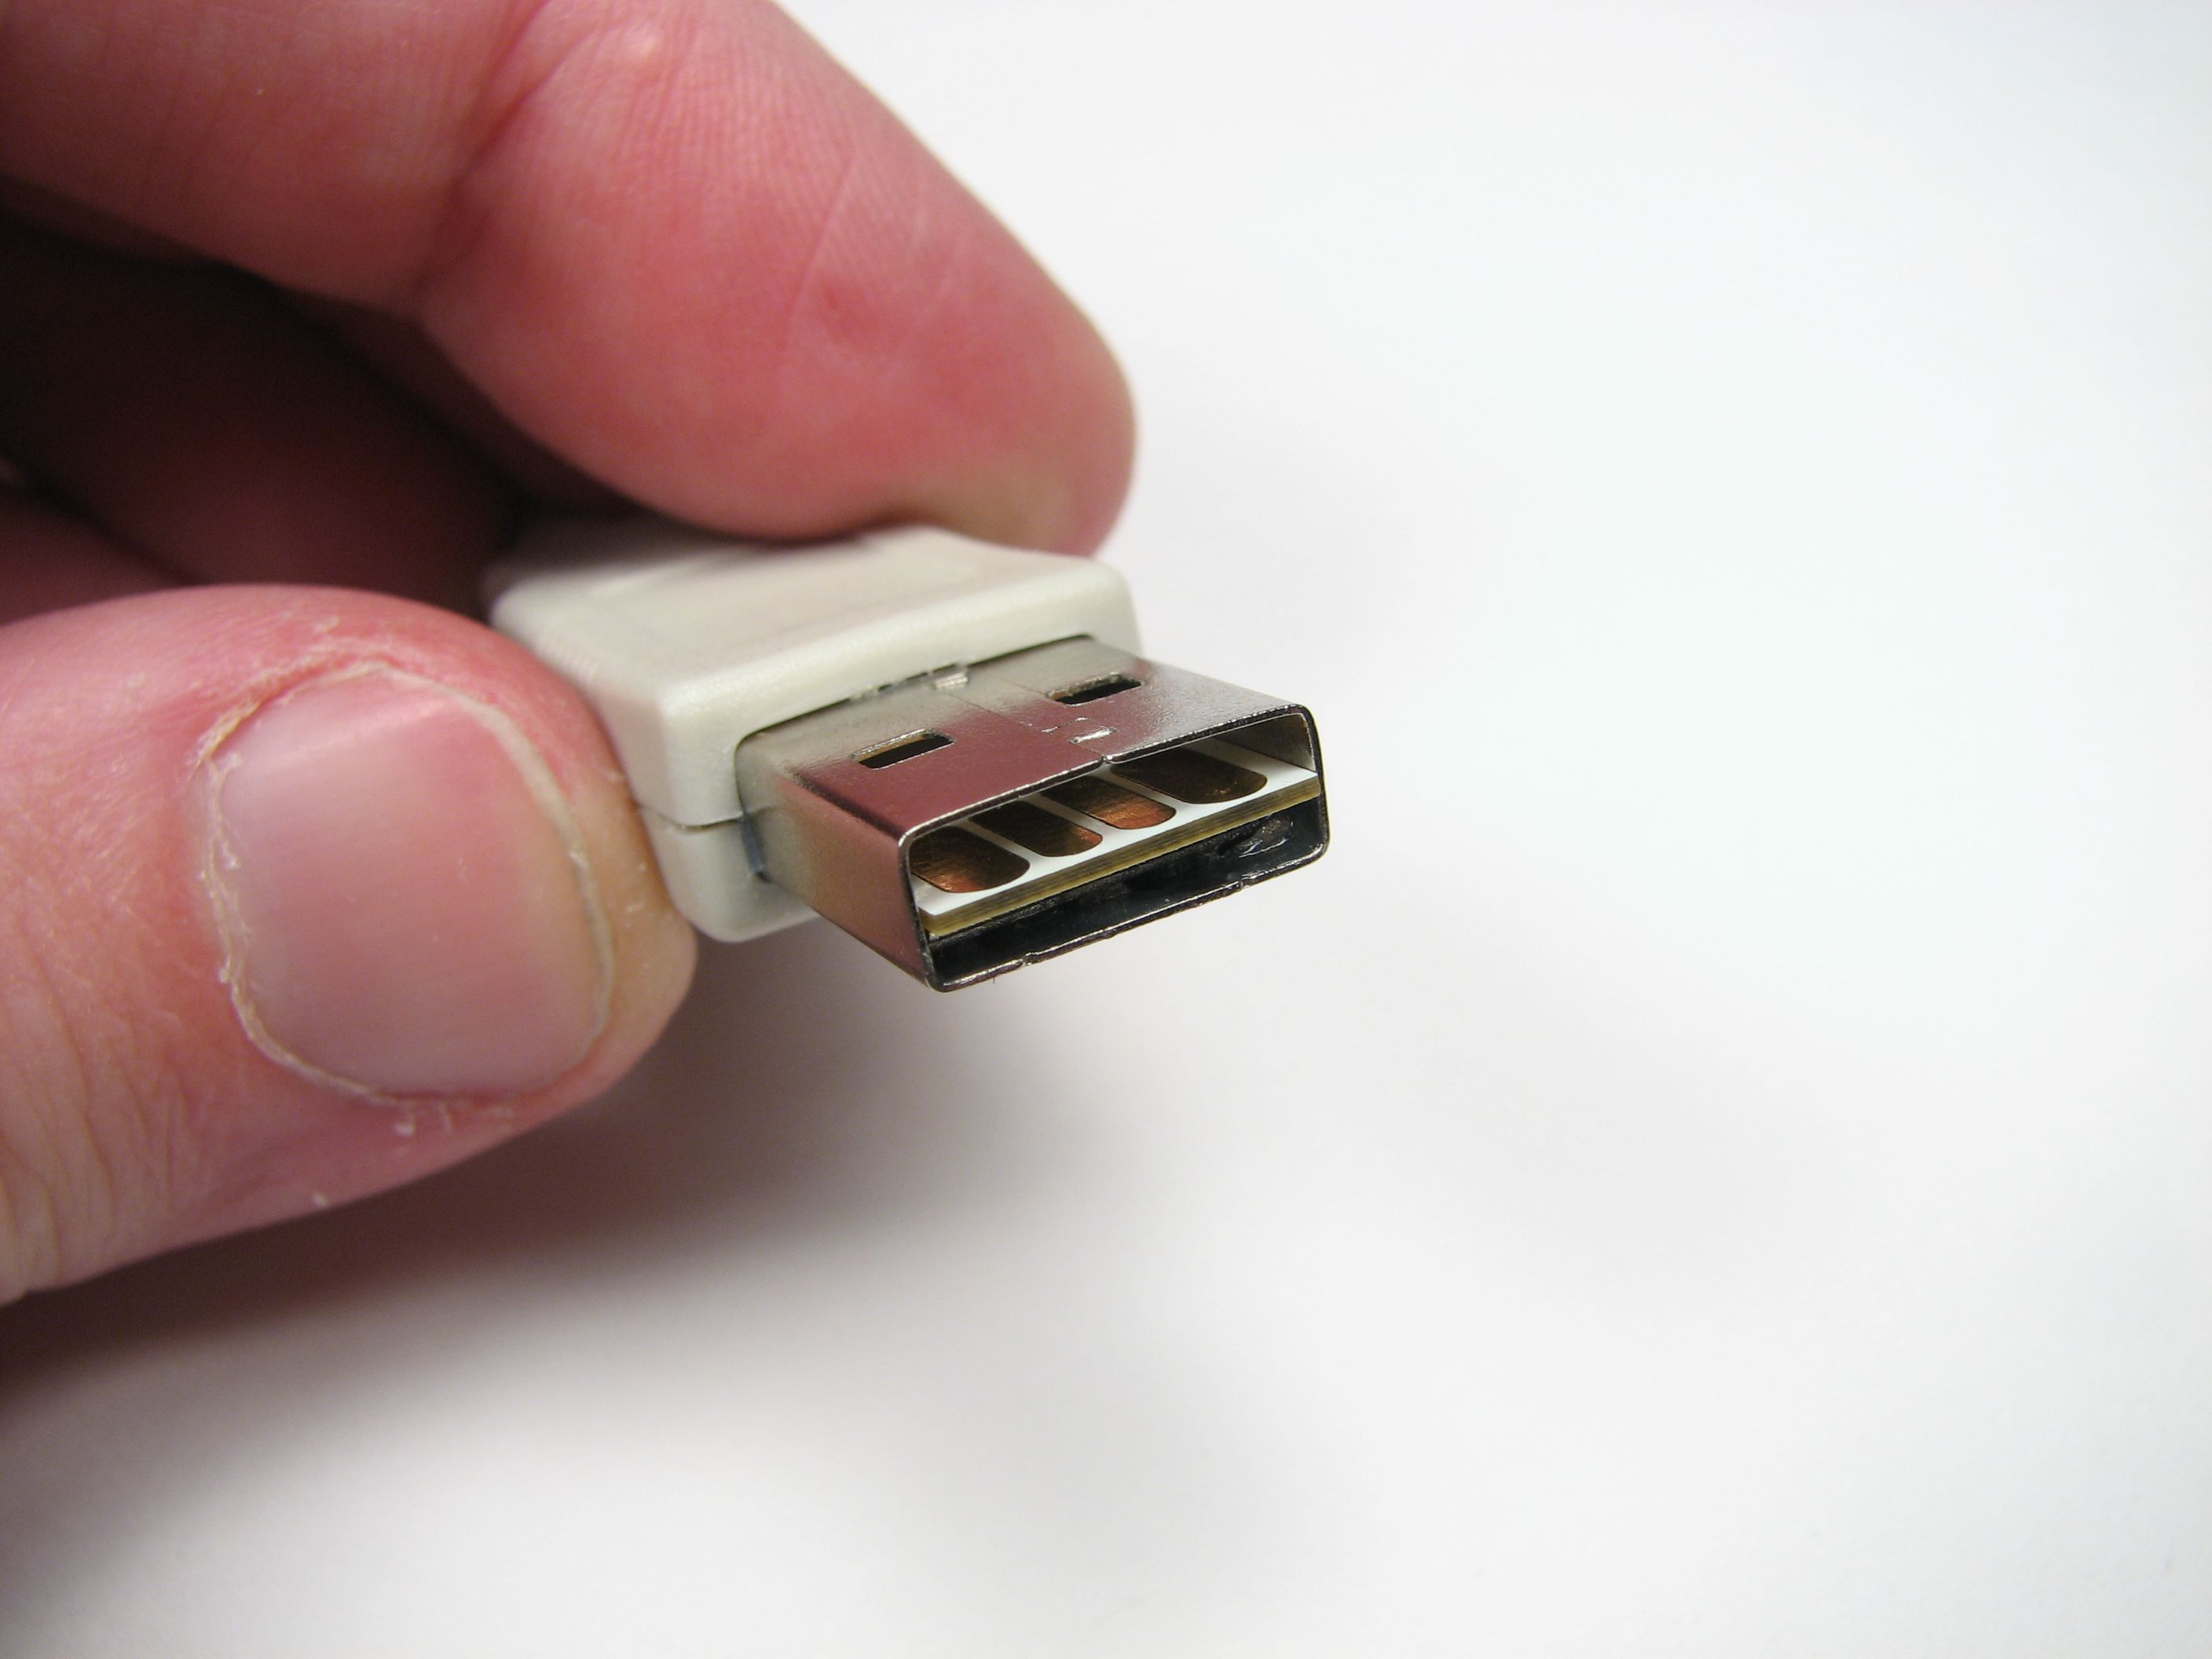
Despite all that, the picture above is a little surprising– because yes, it’s a working USB flash drive. Here, we give the step by step walk through of how to make your own.
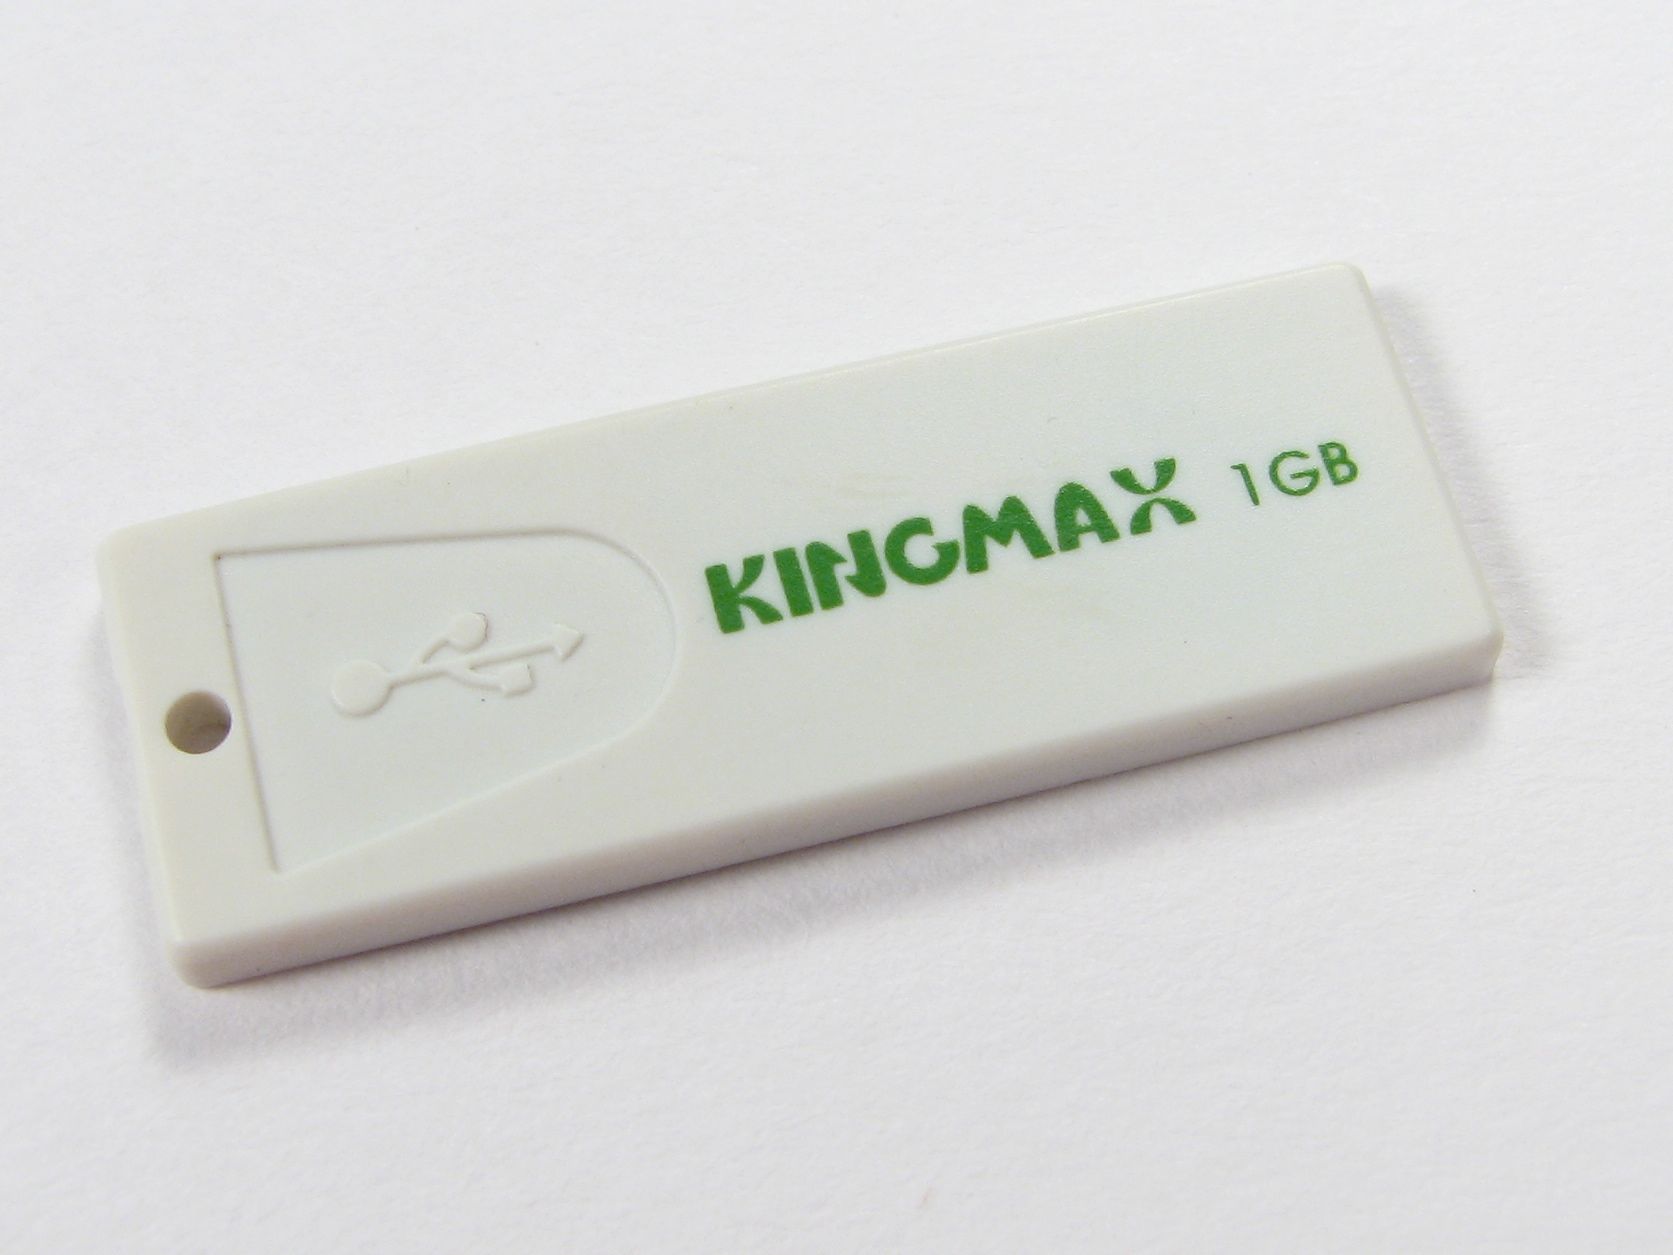
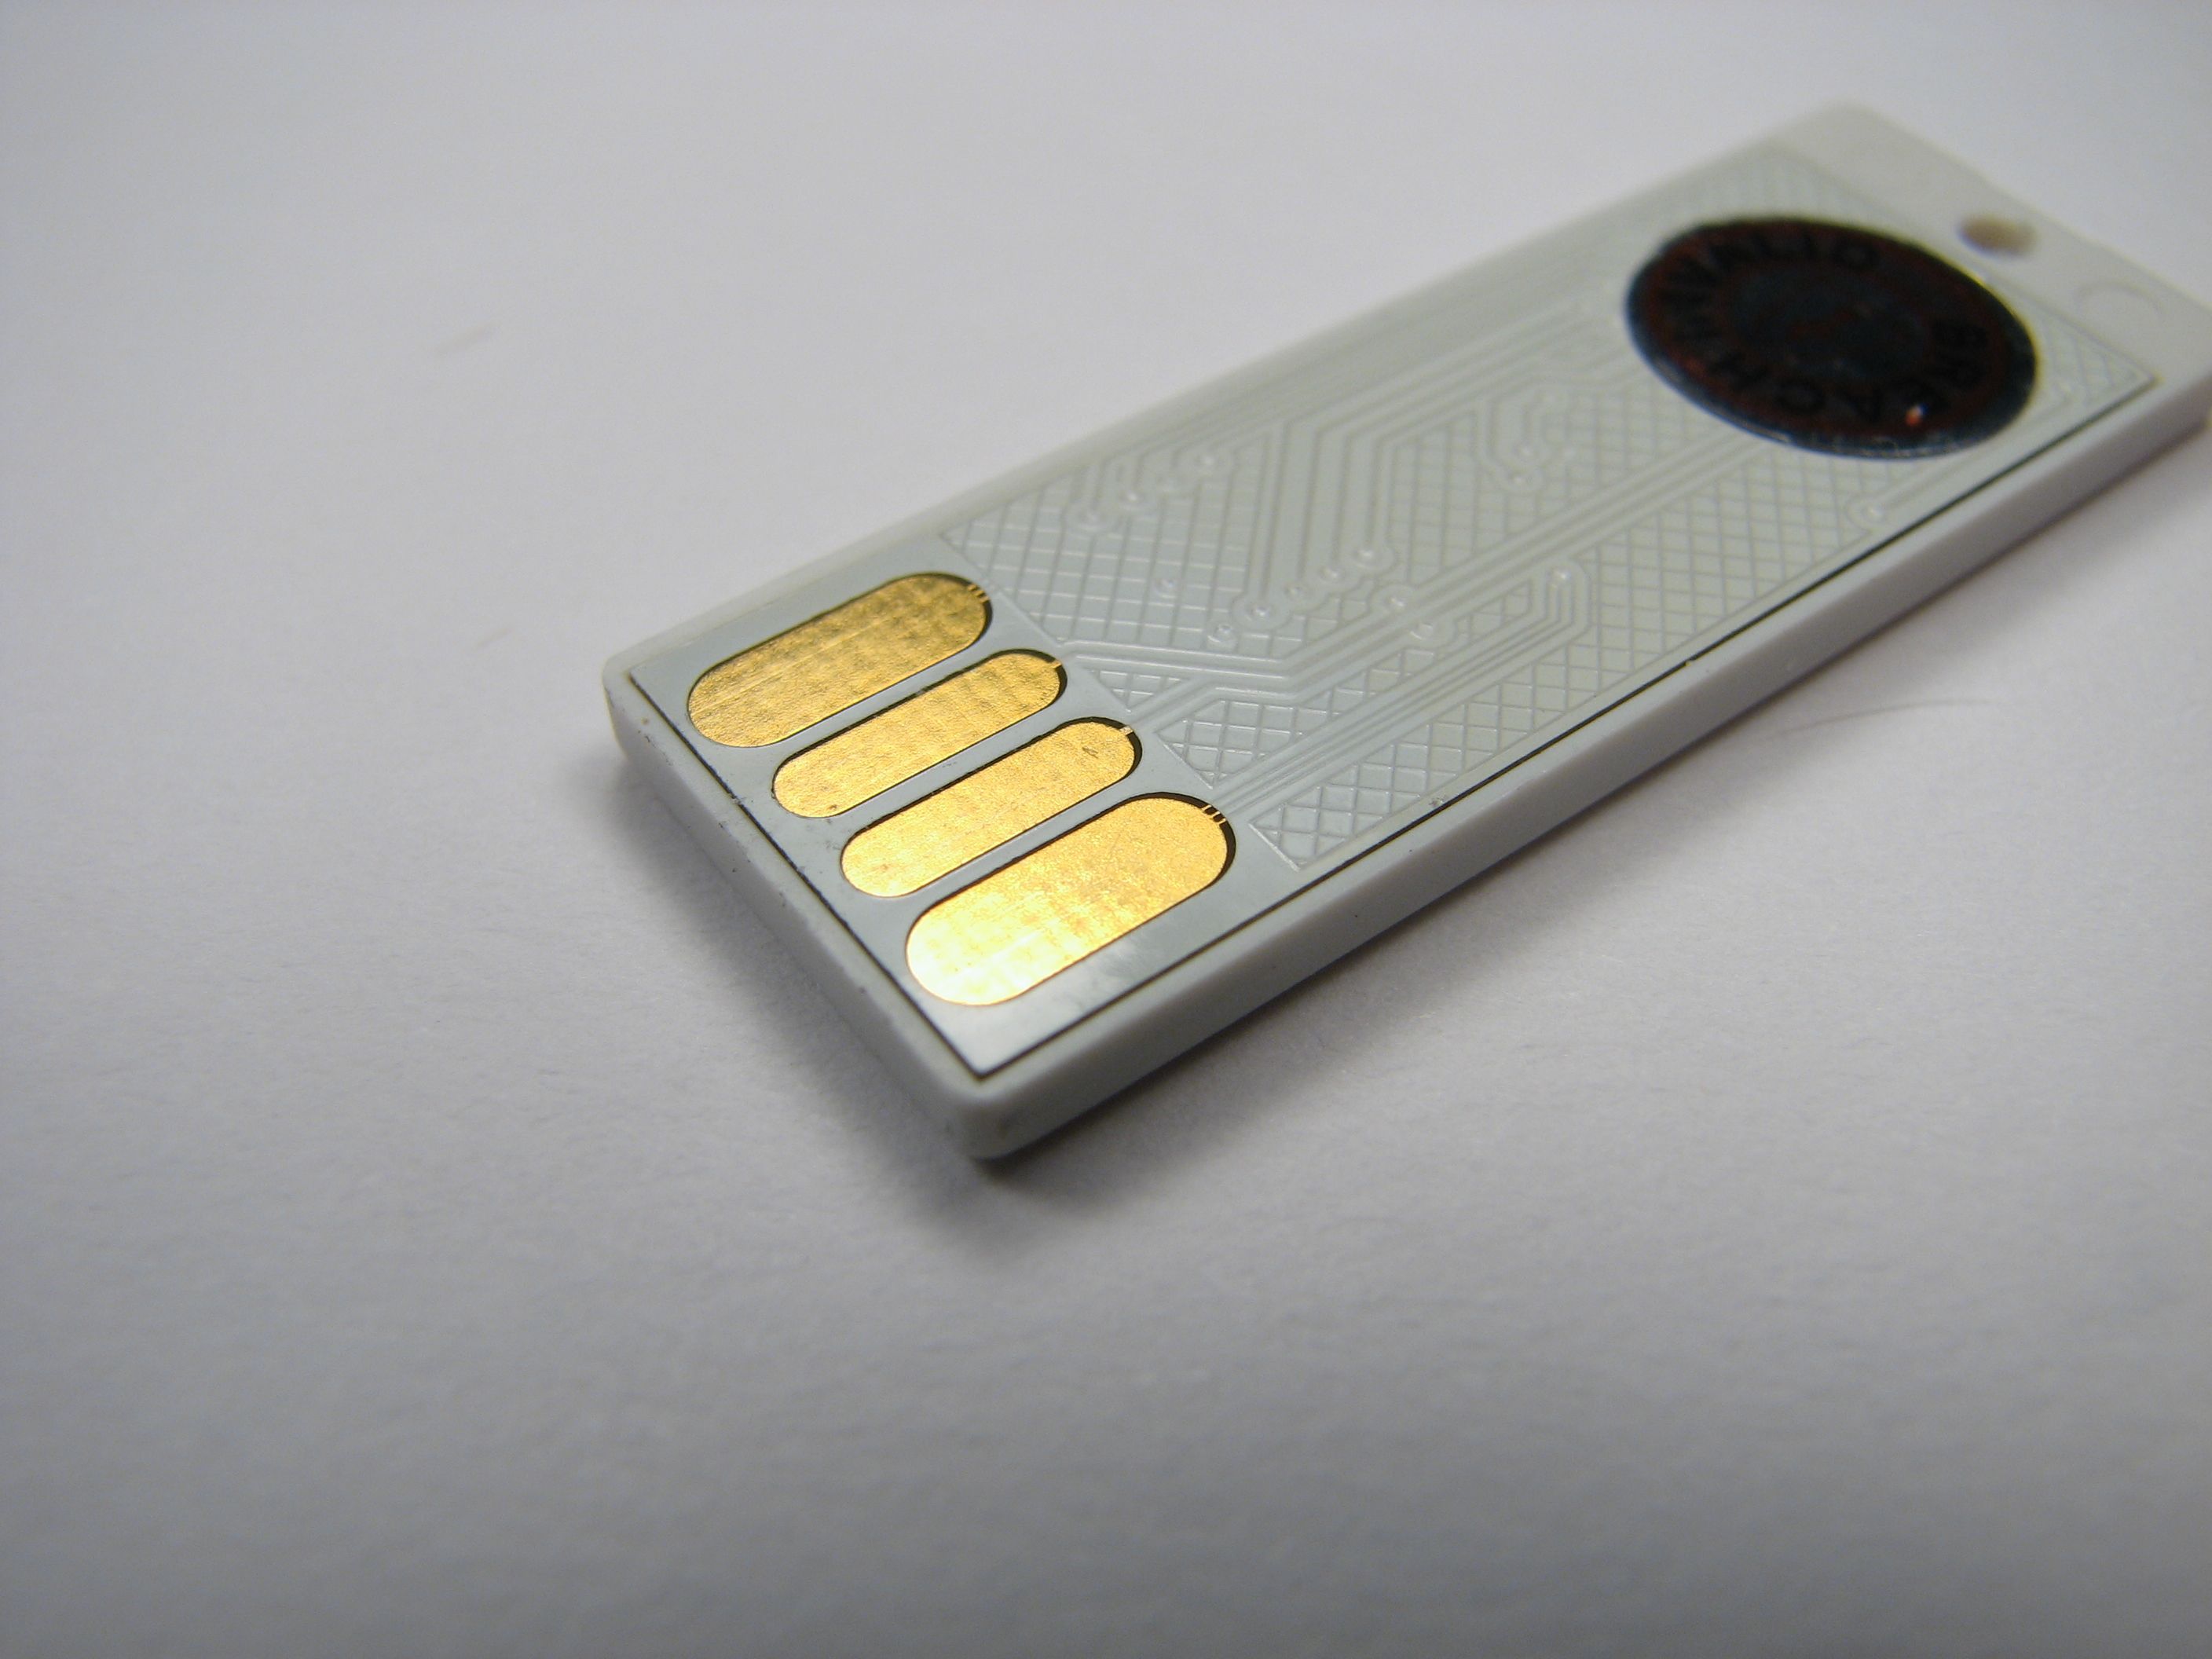
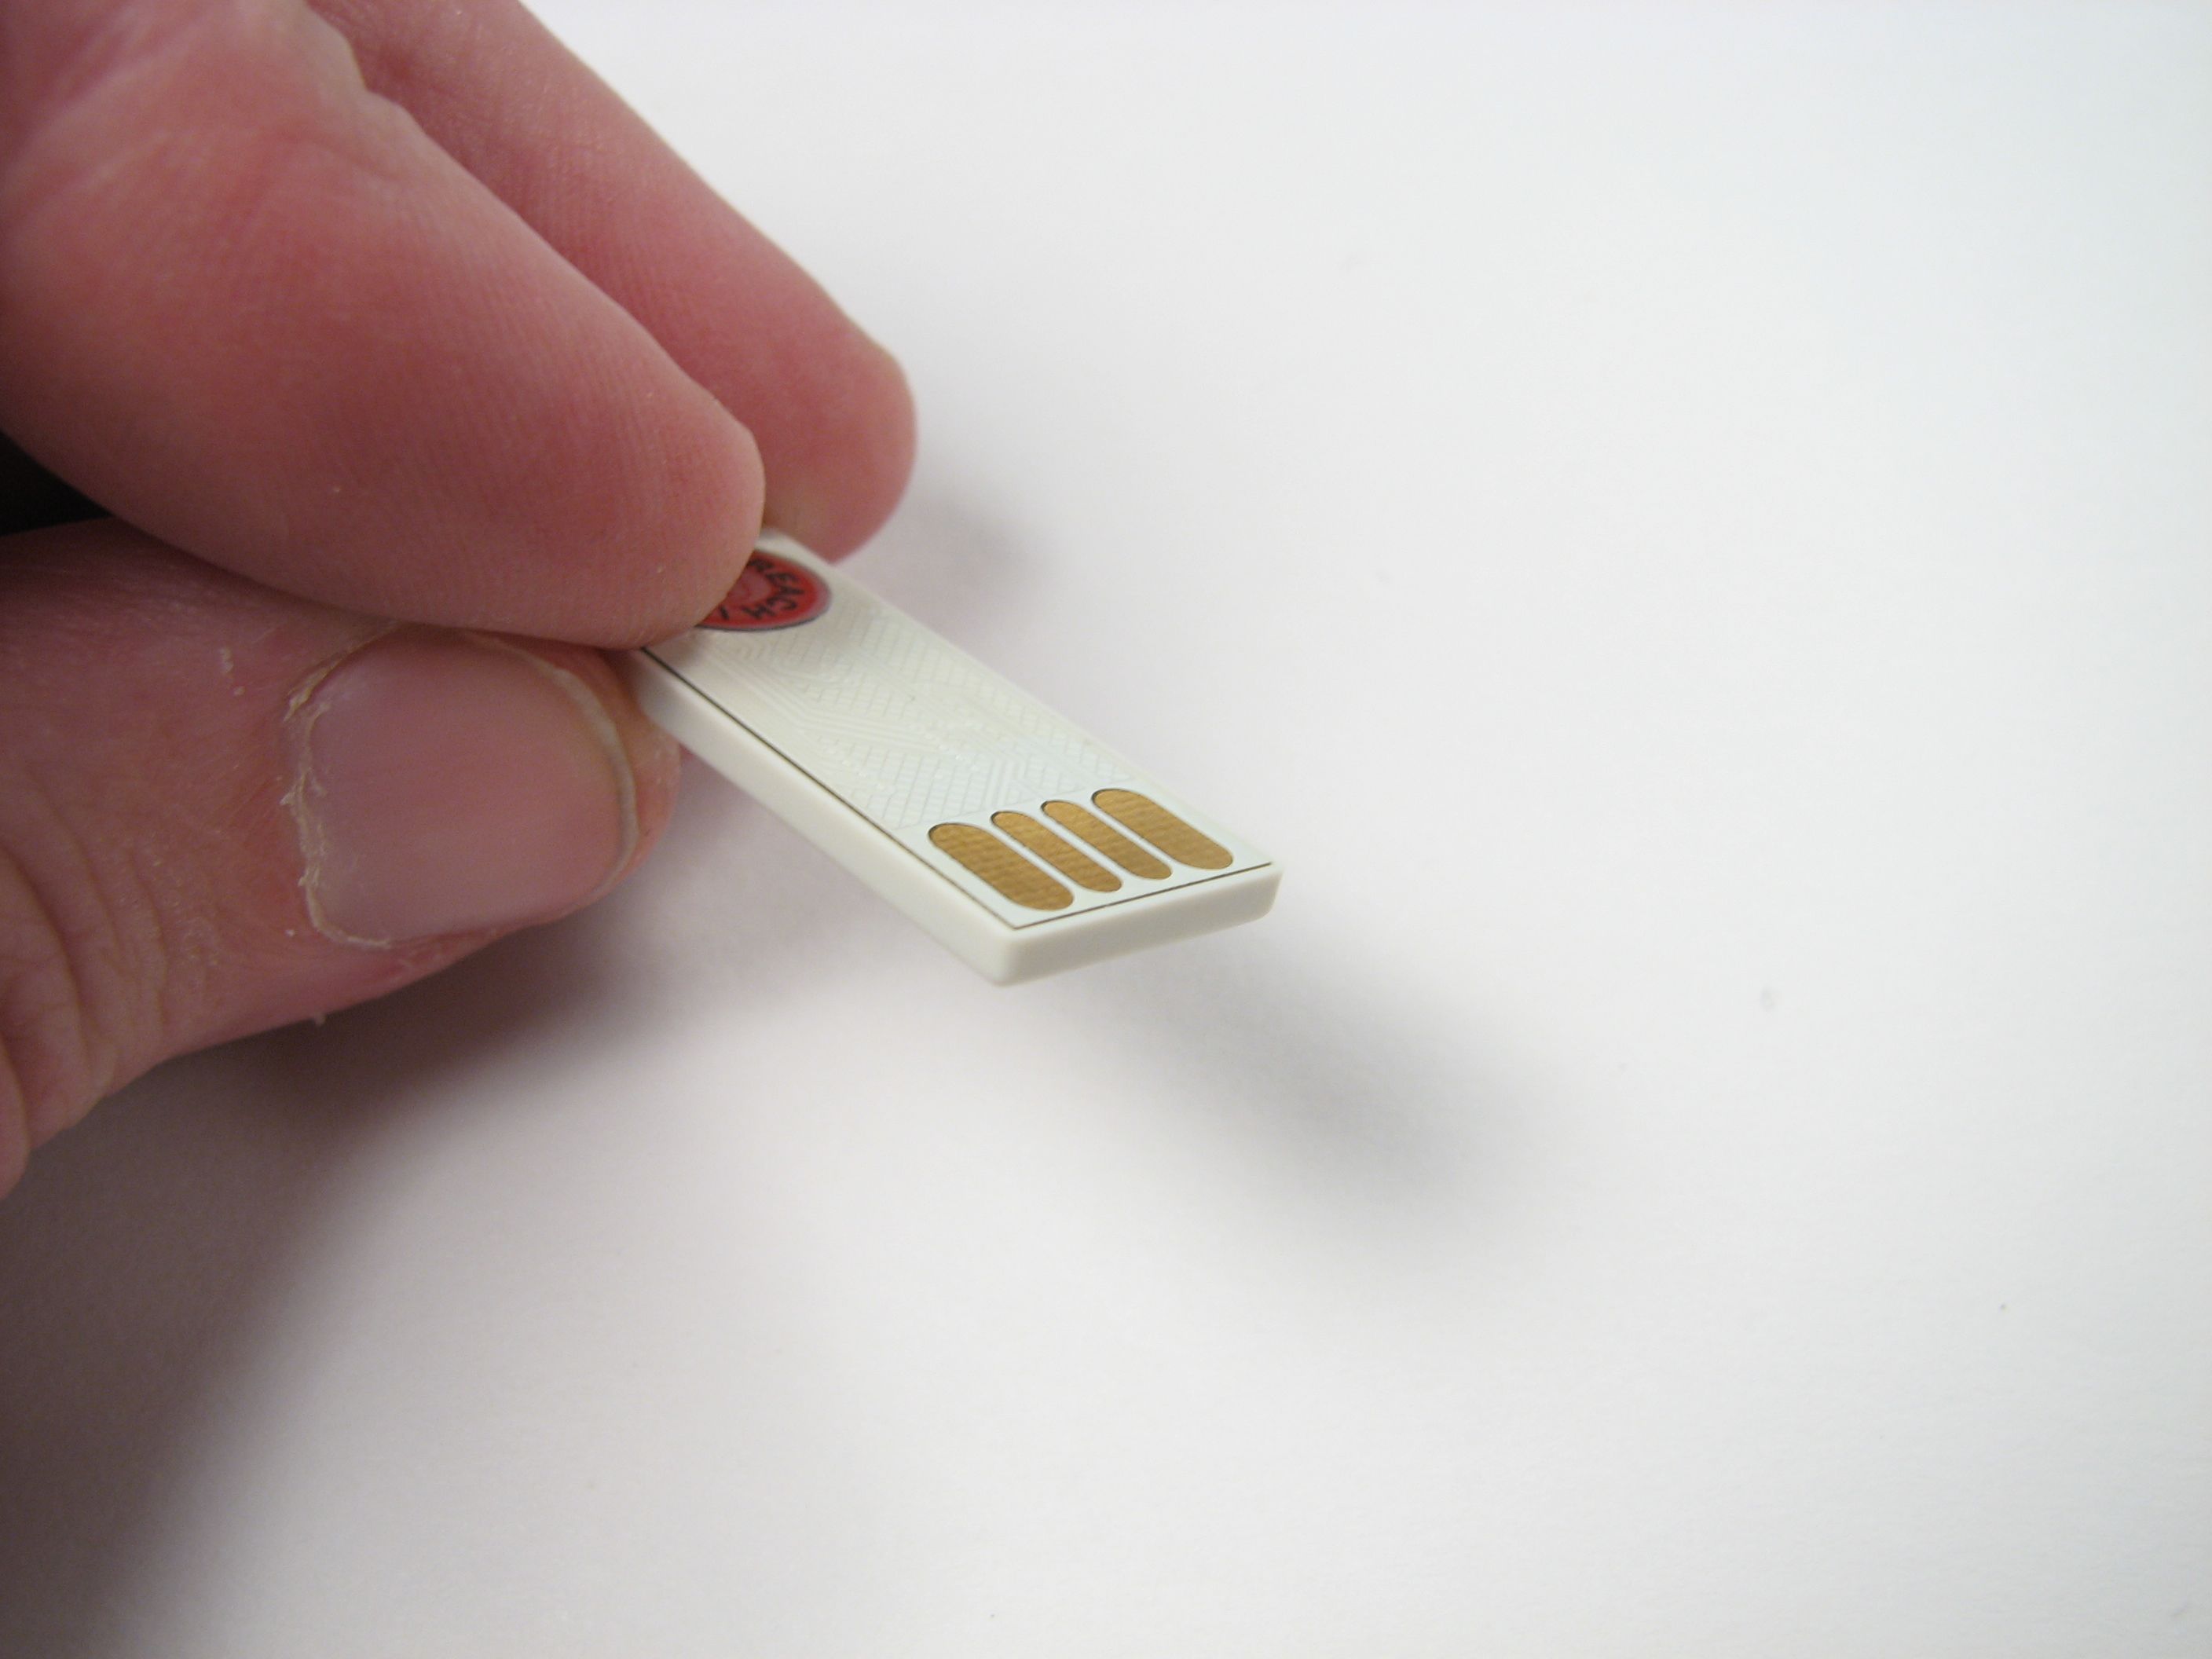
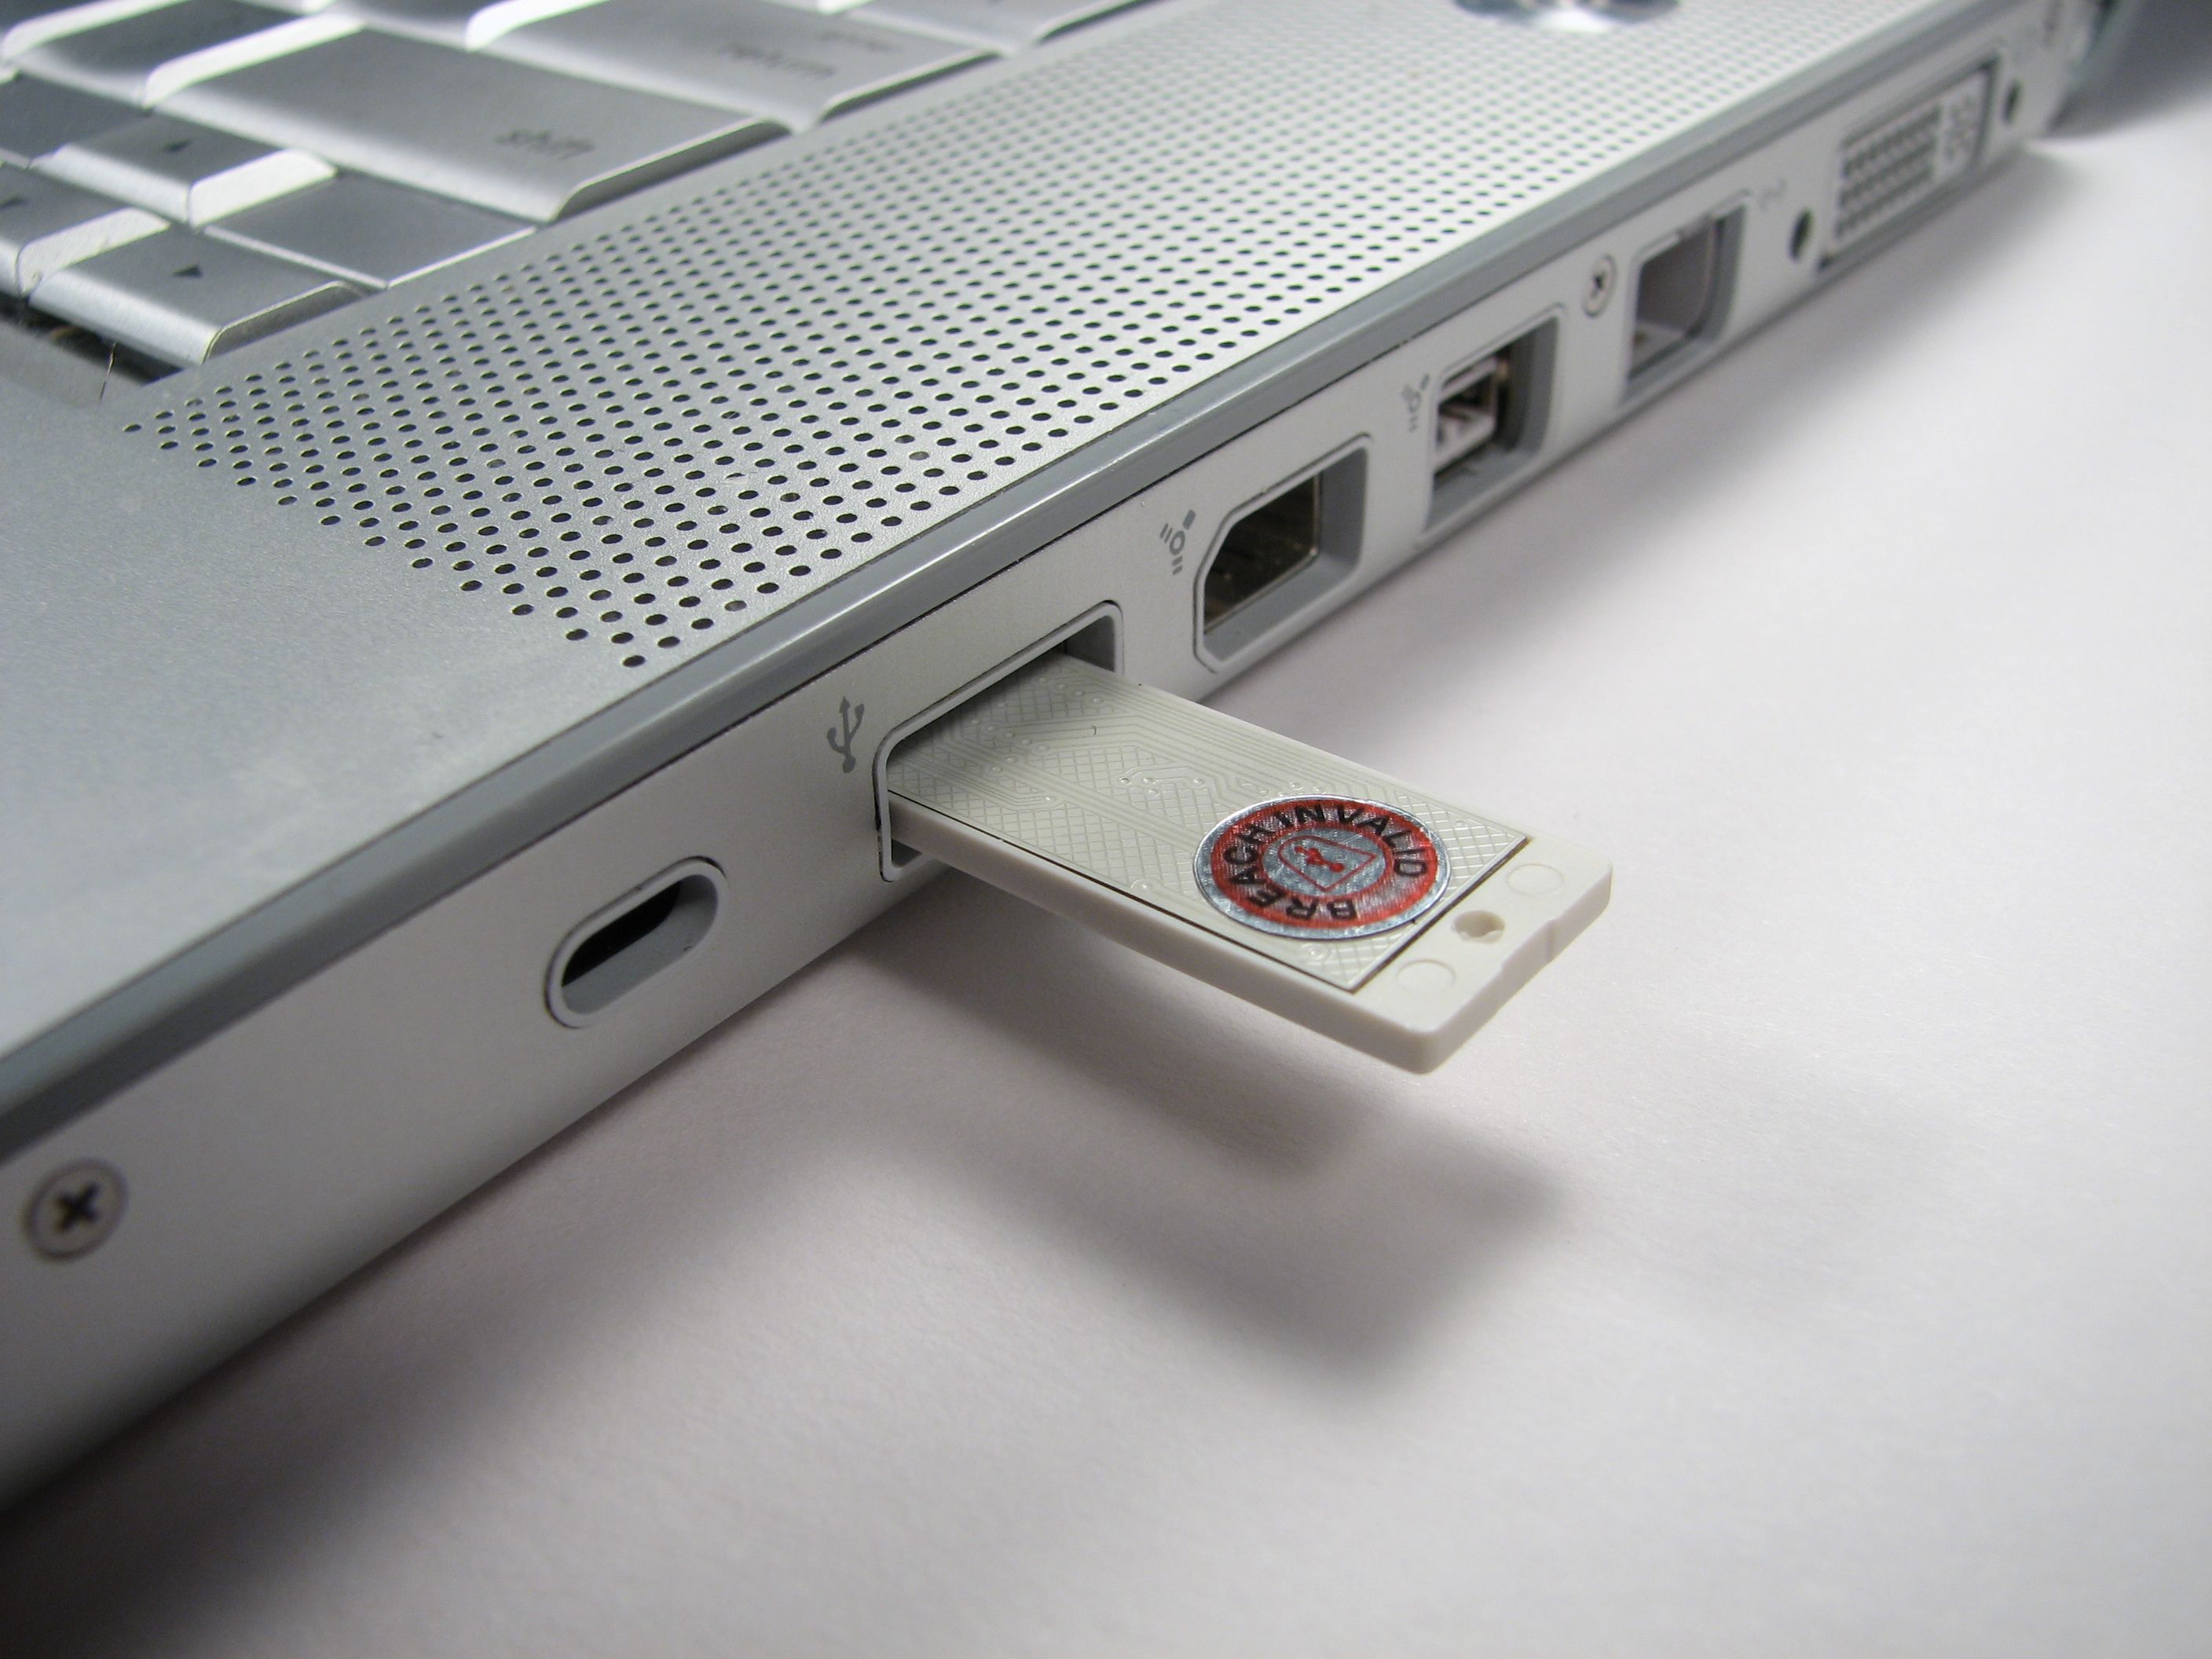
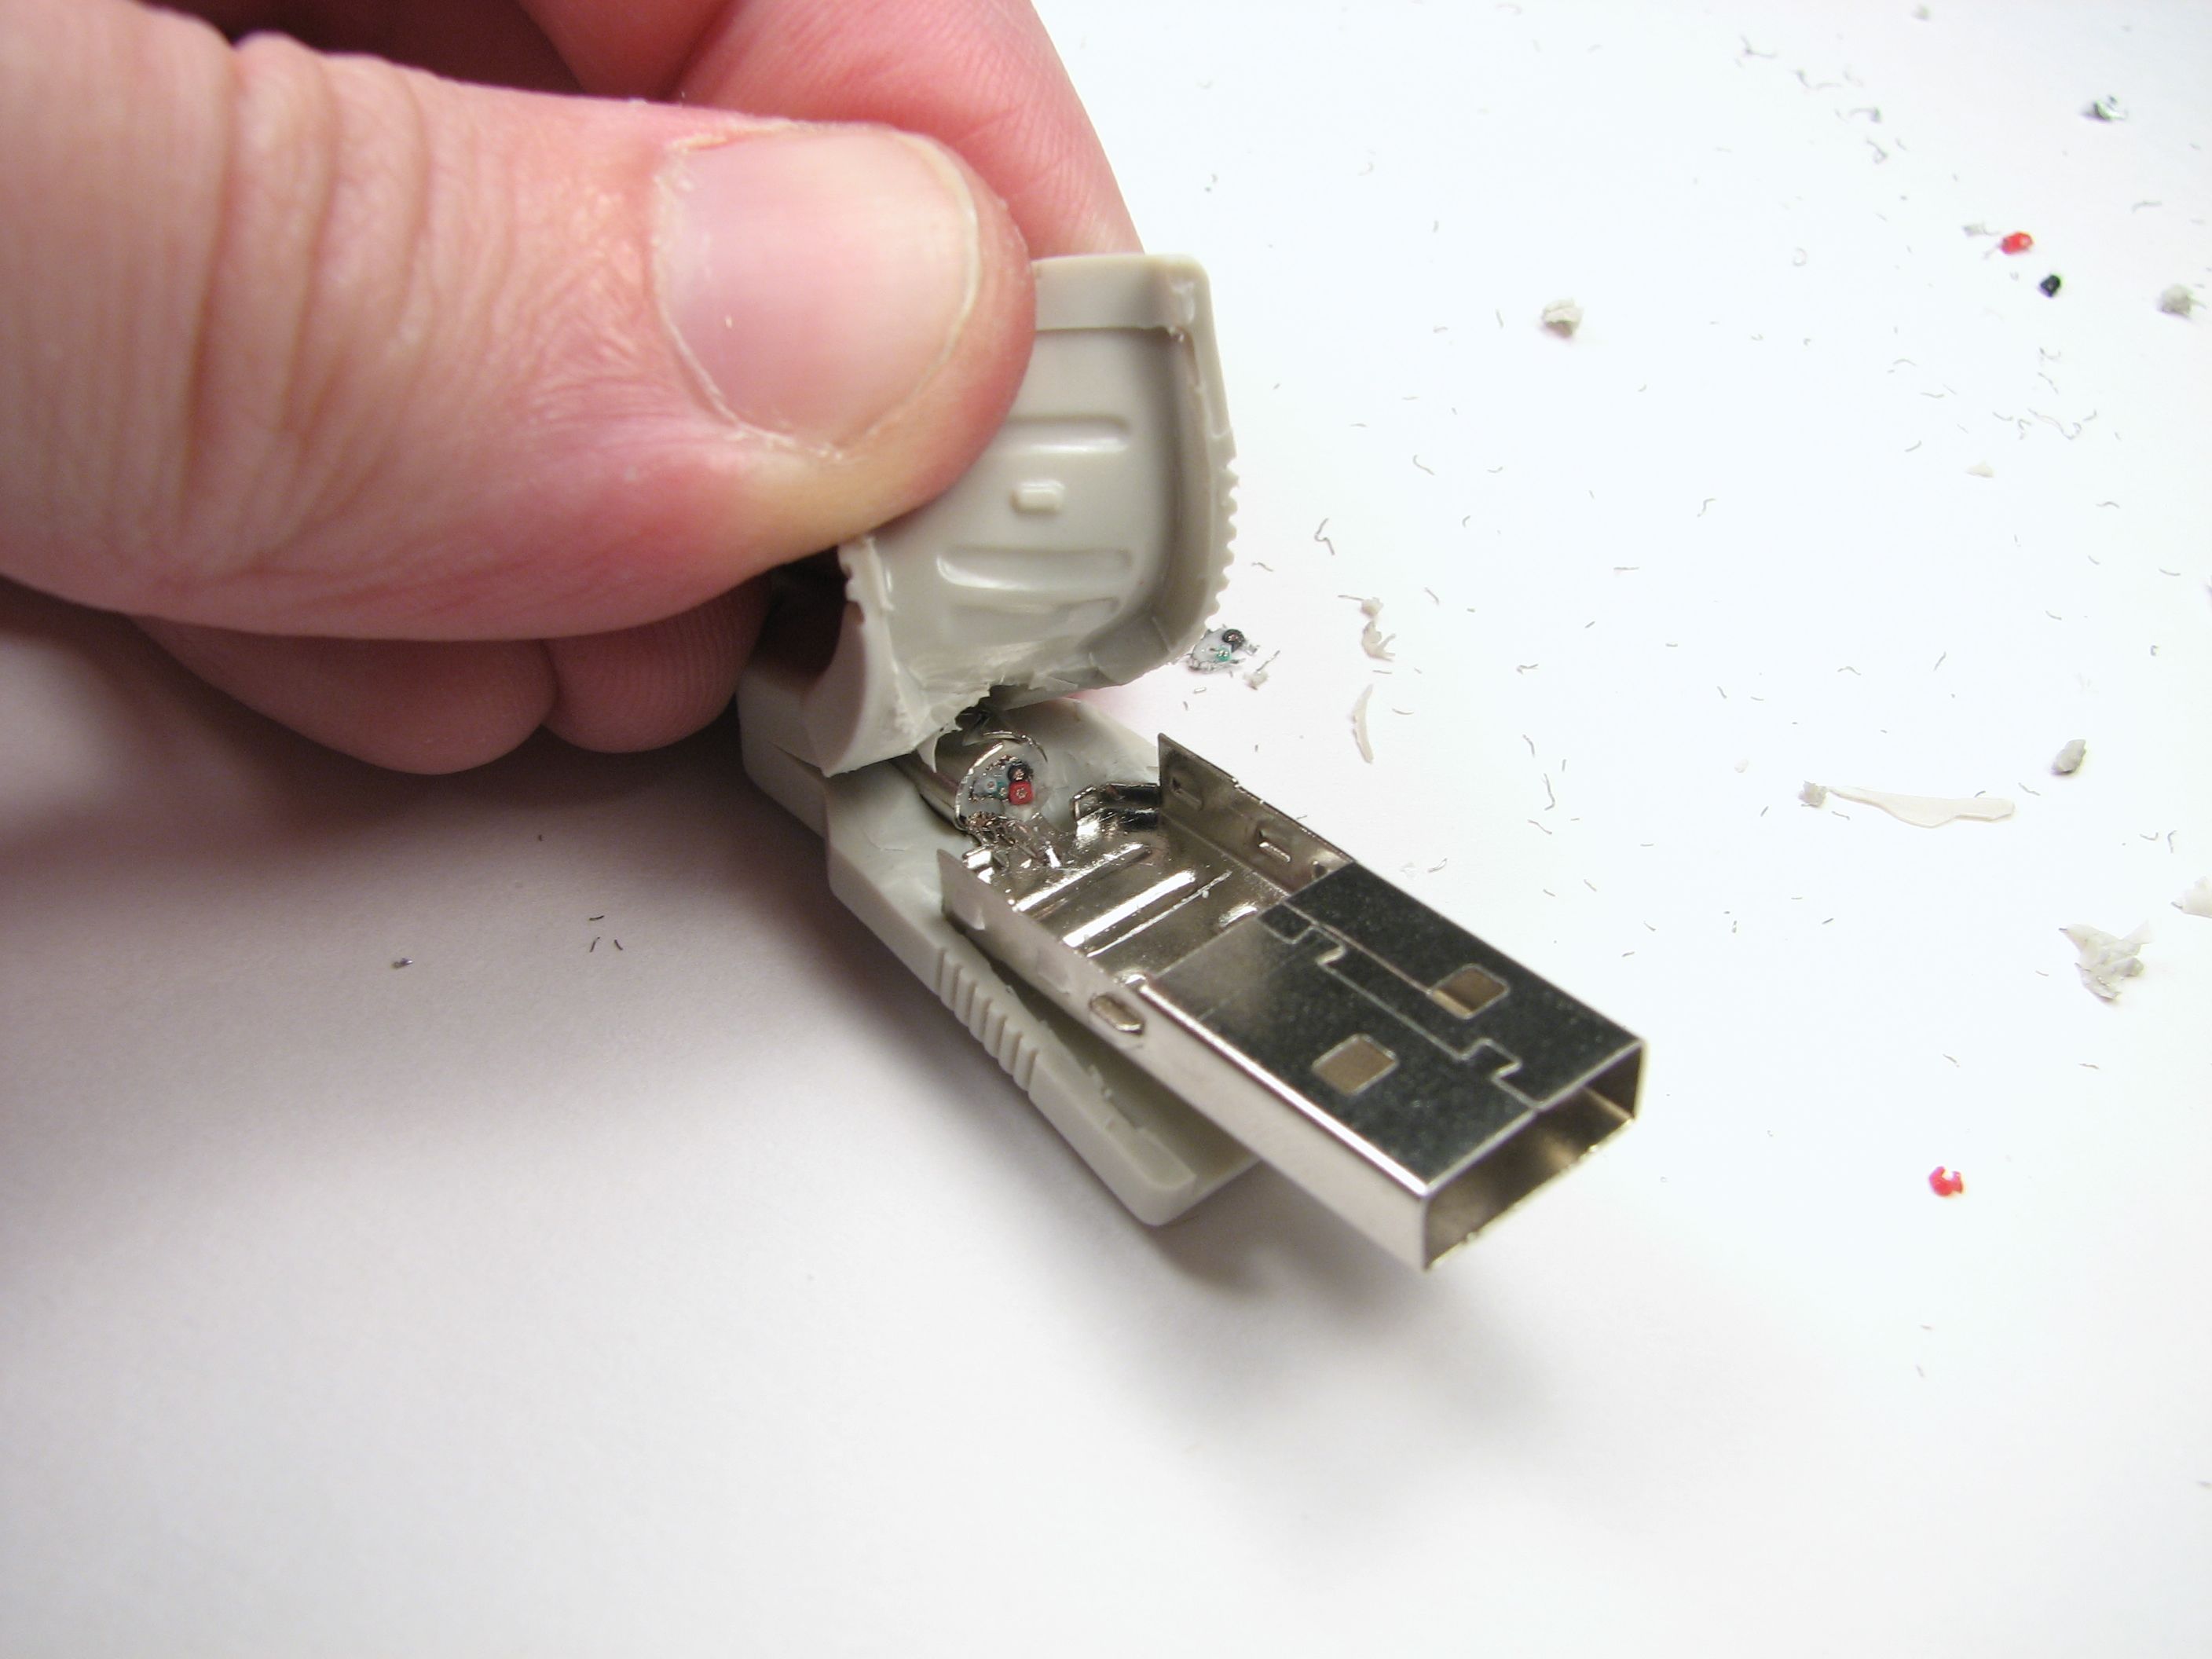
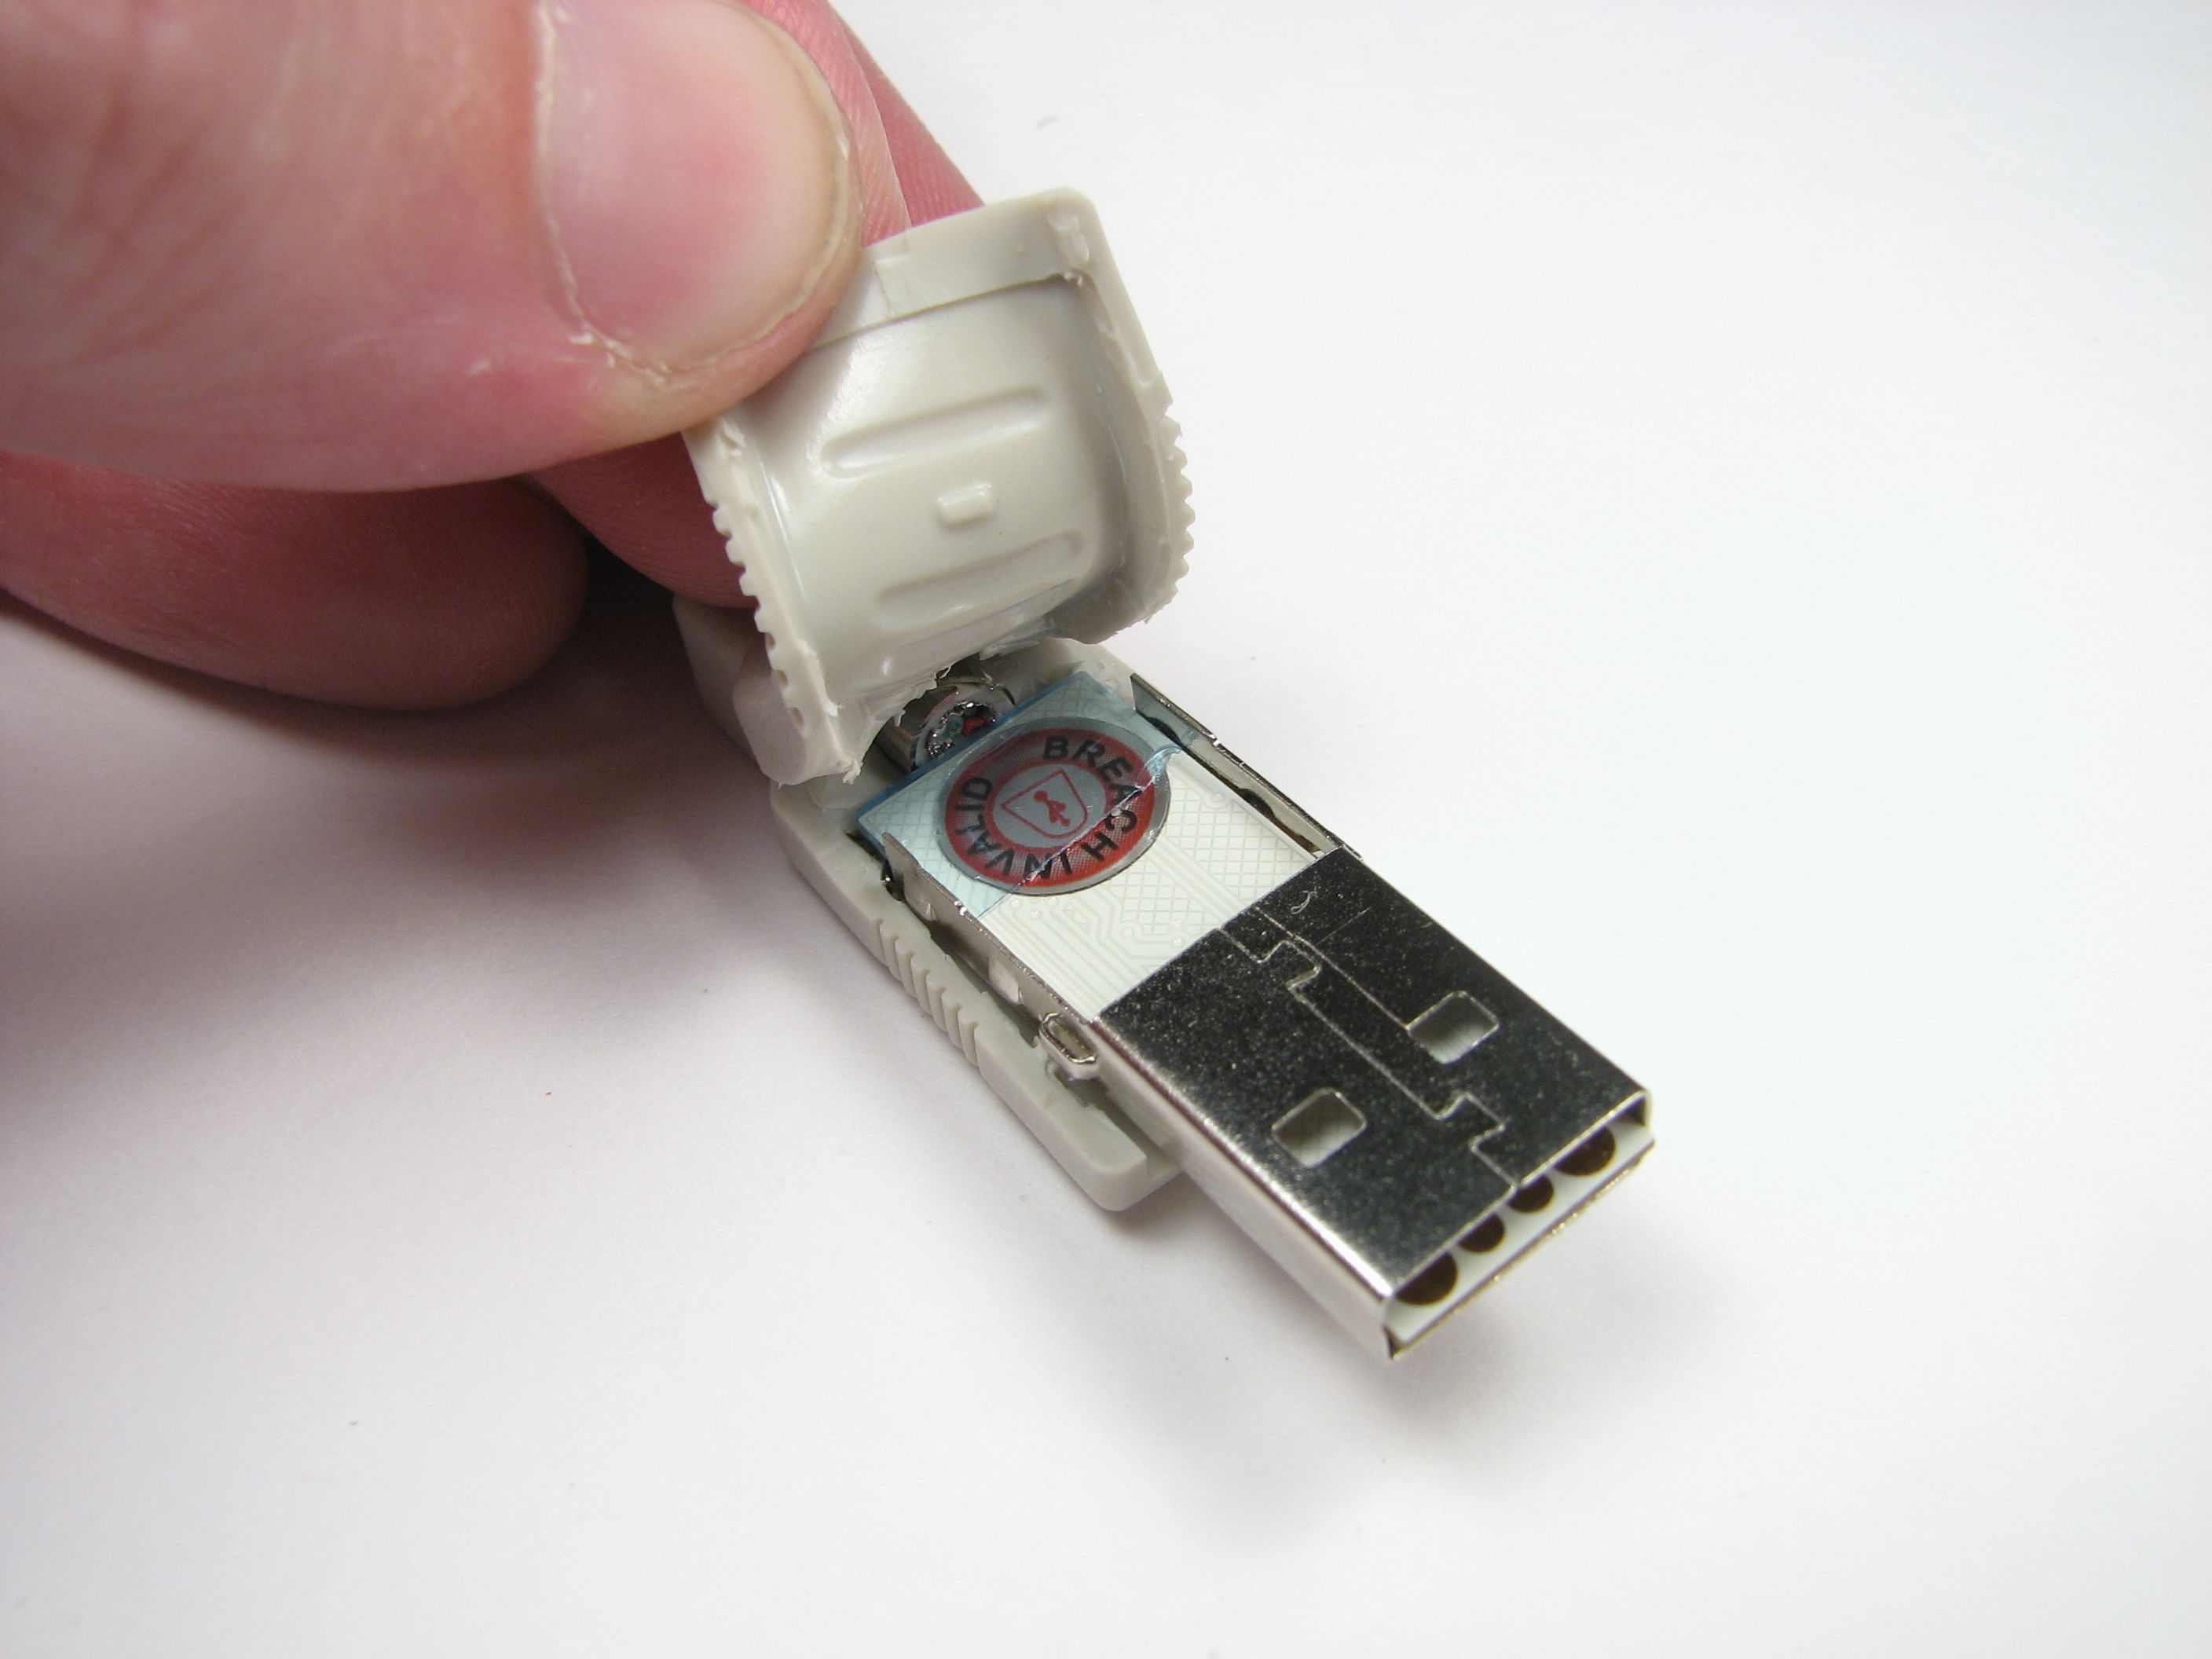
This is a KingMax 1 GB USB flash drive, one of the smaller varieties out there. I got it on eBay for about $10 and there seem to be plenty more available. Above, you can see it in between my fingers and in my computer for scale. The gold pads are just printed pads on a tiny circuit board.
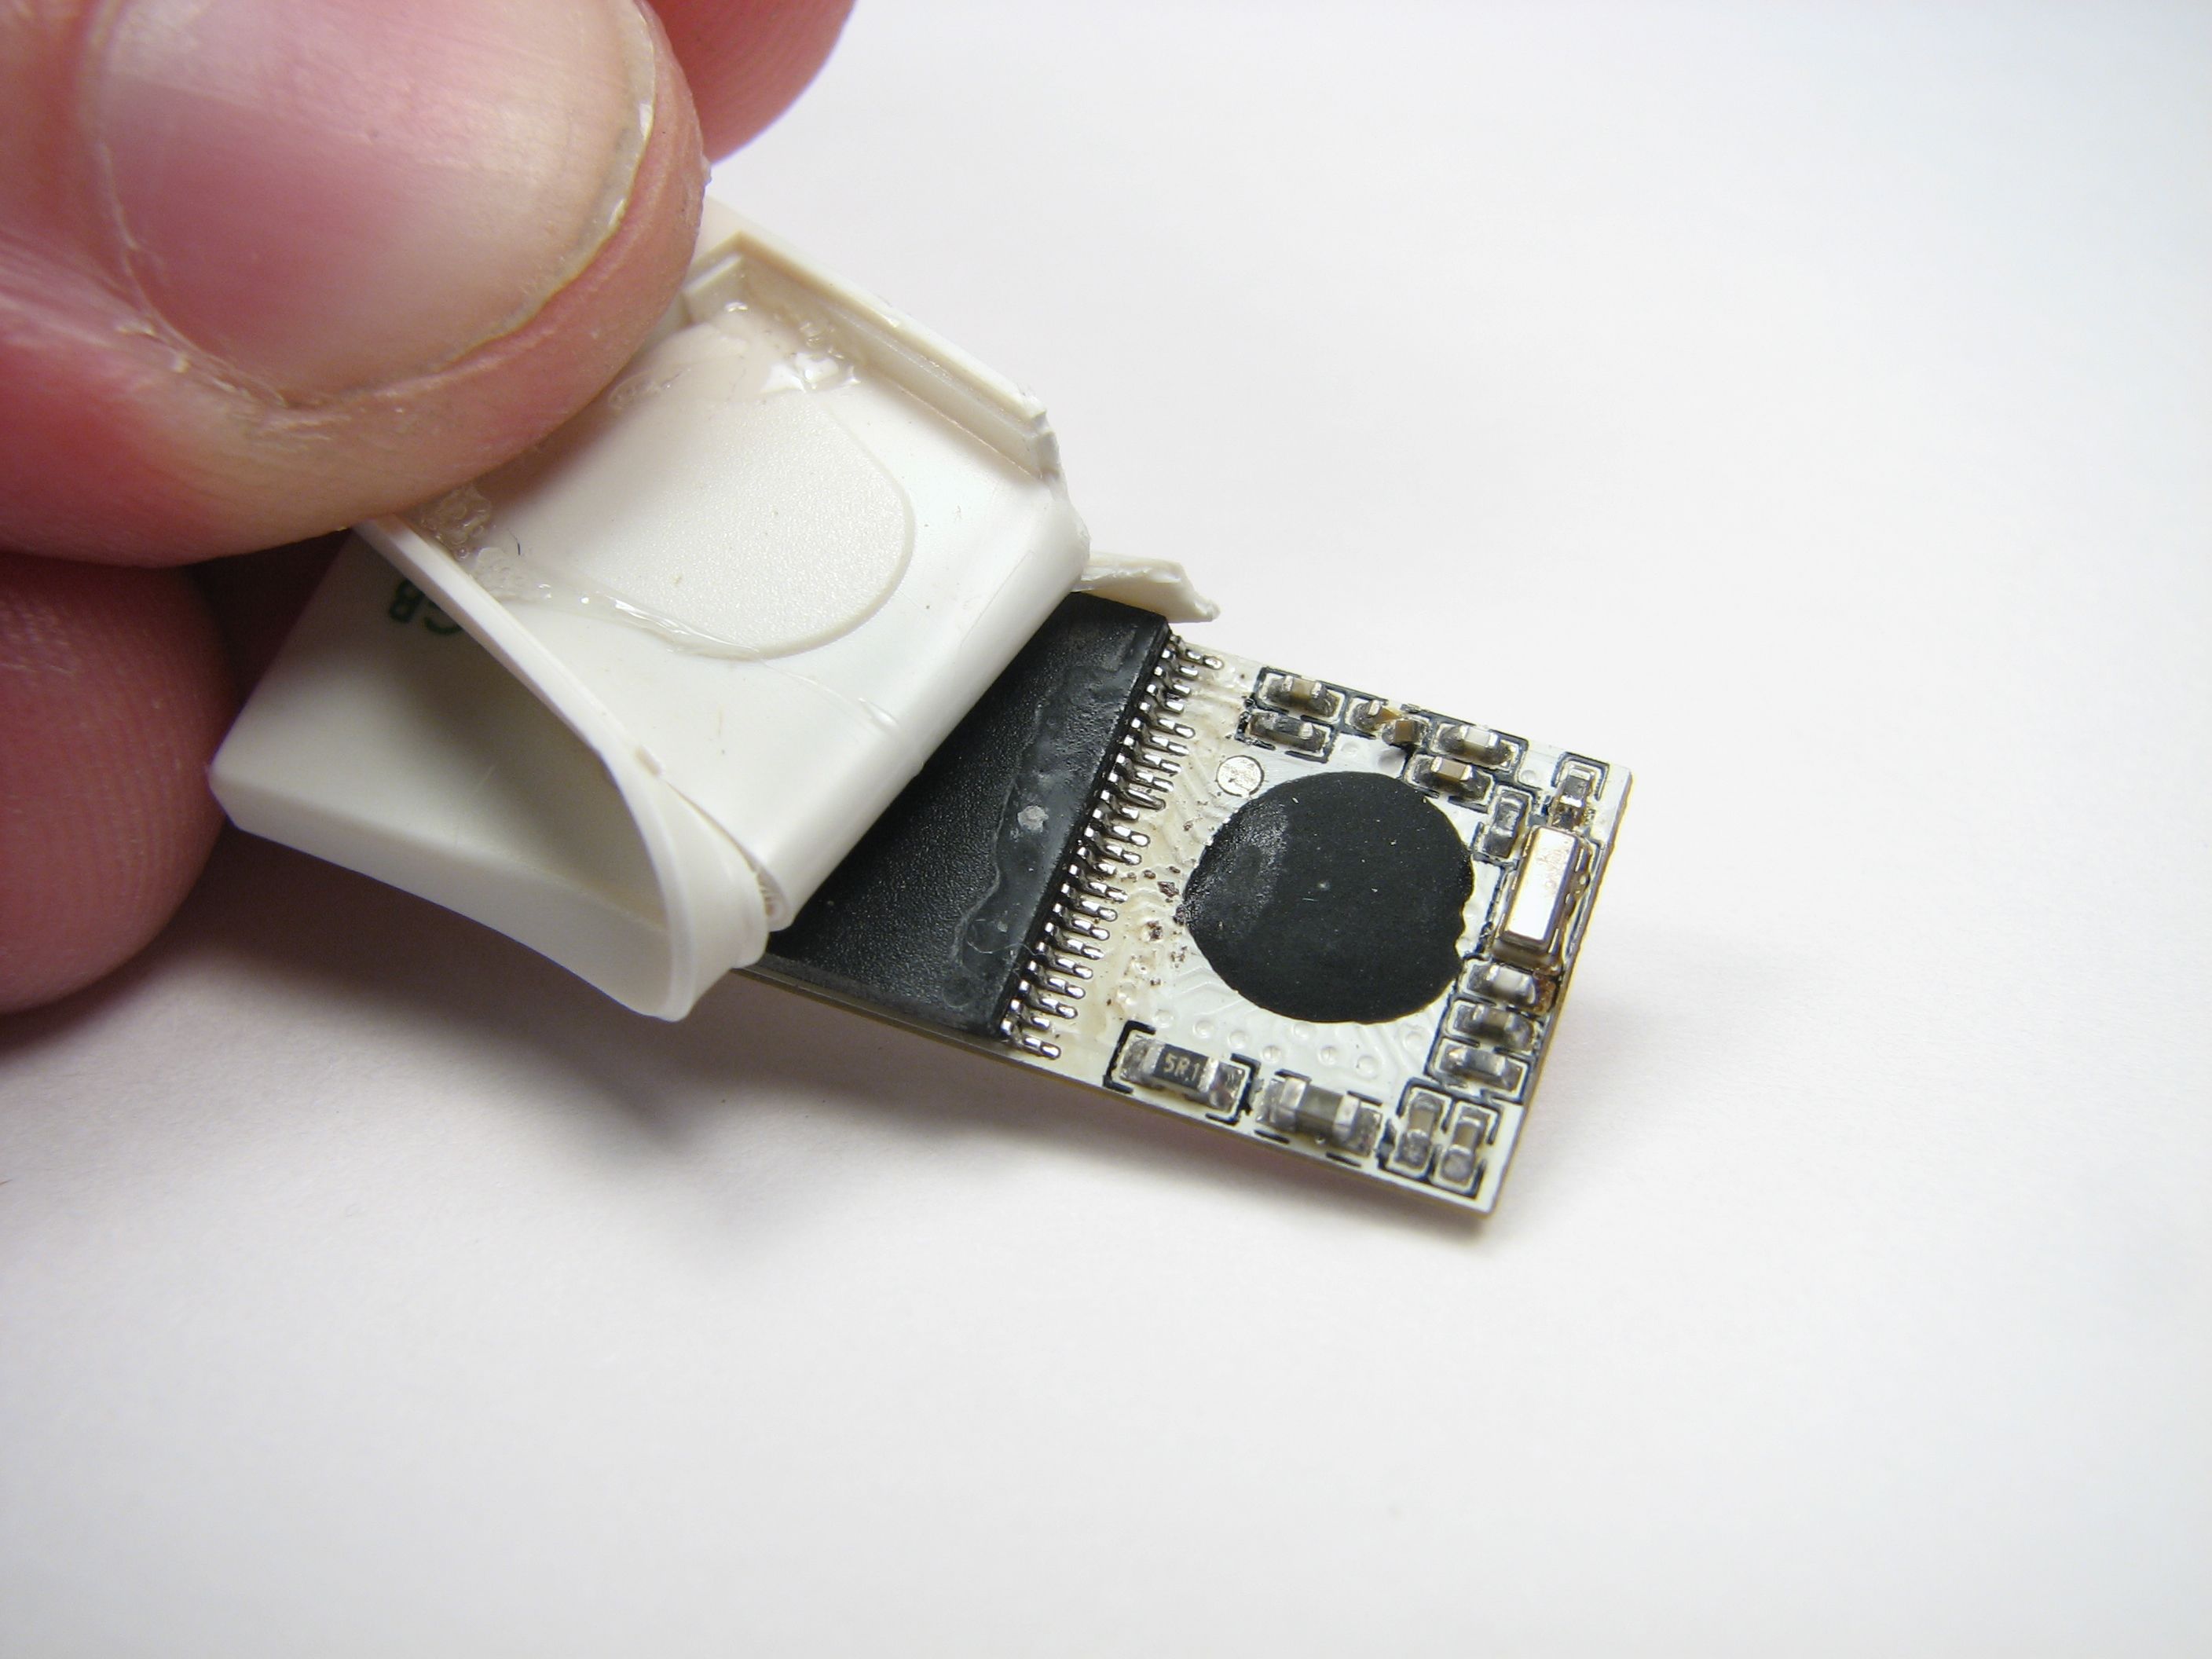
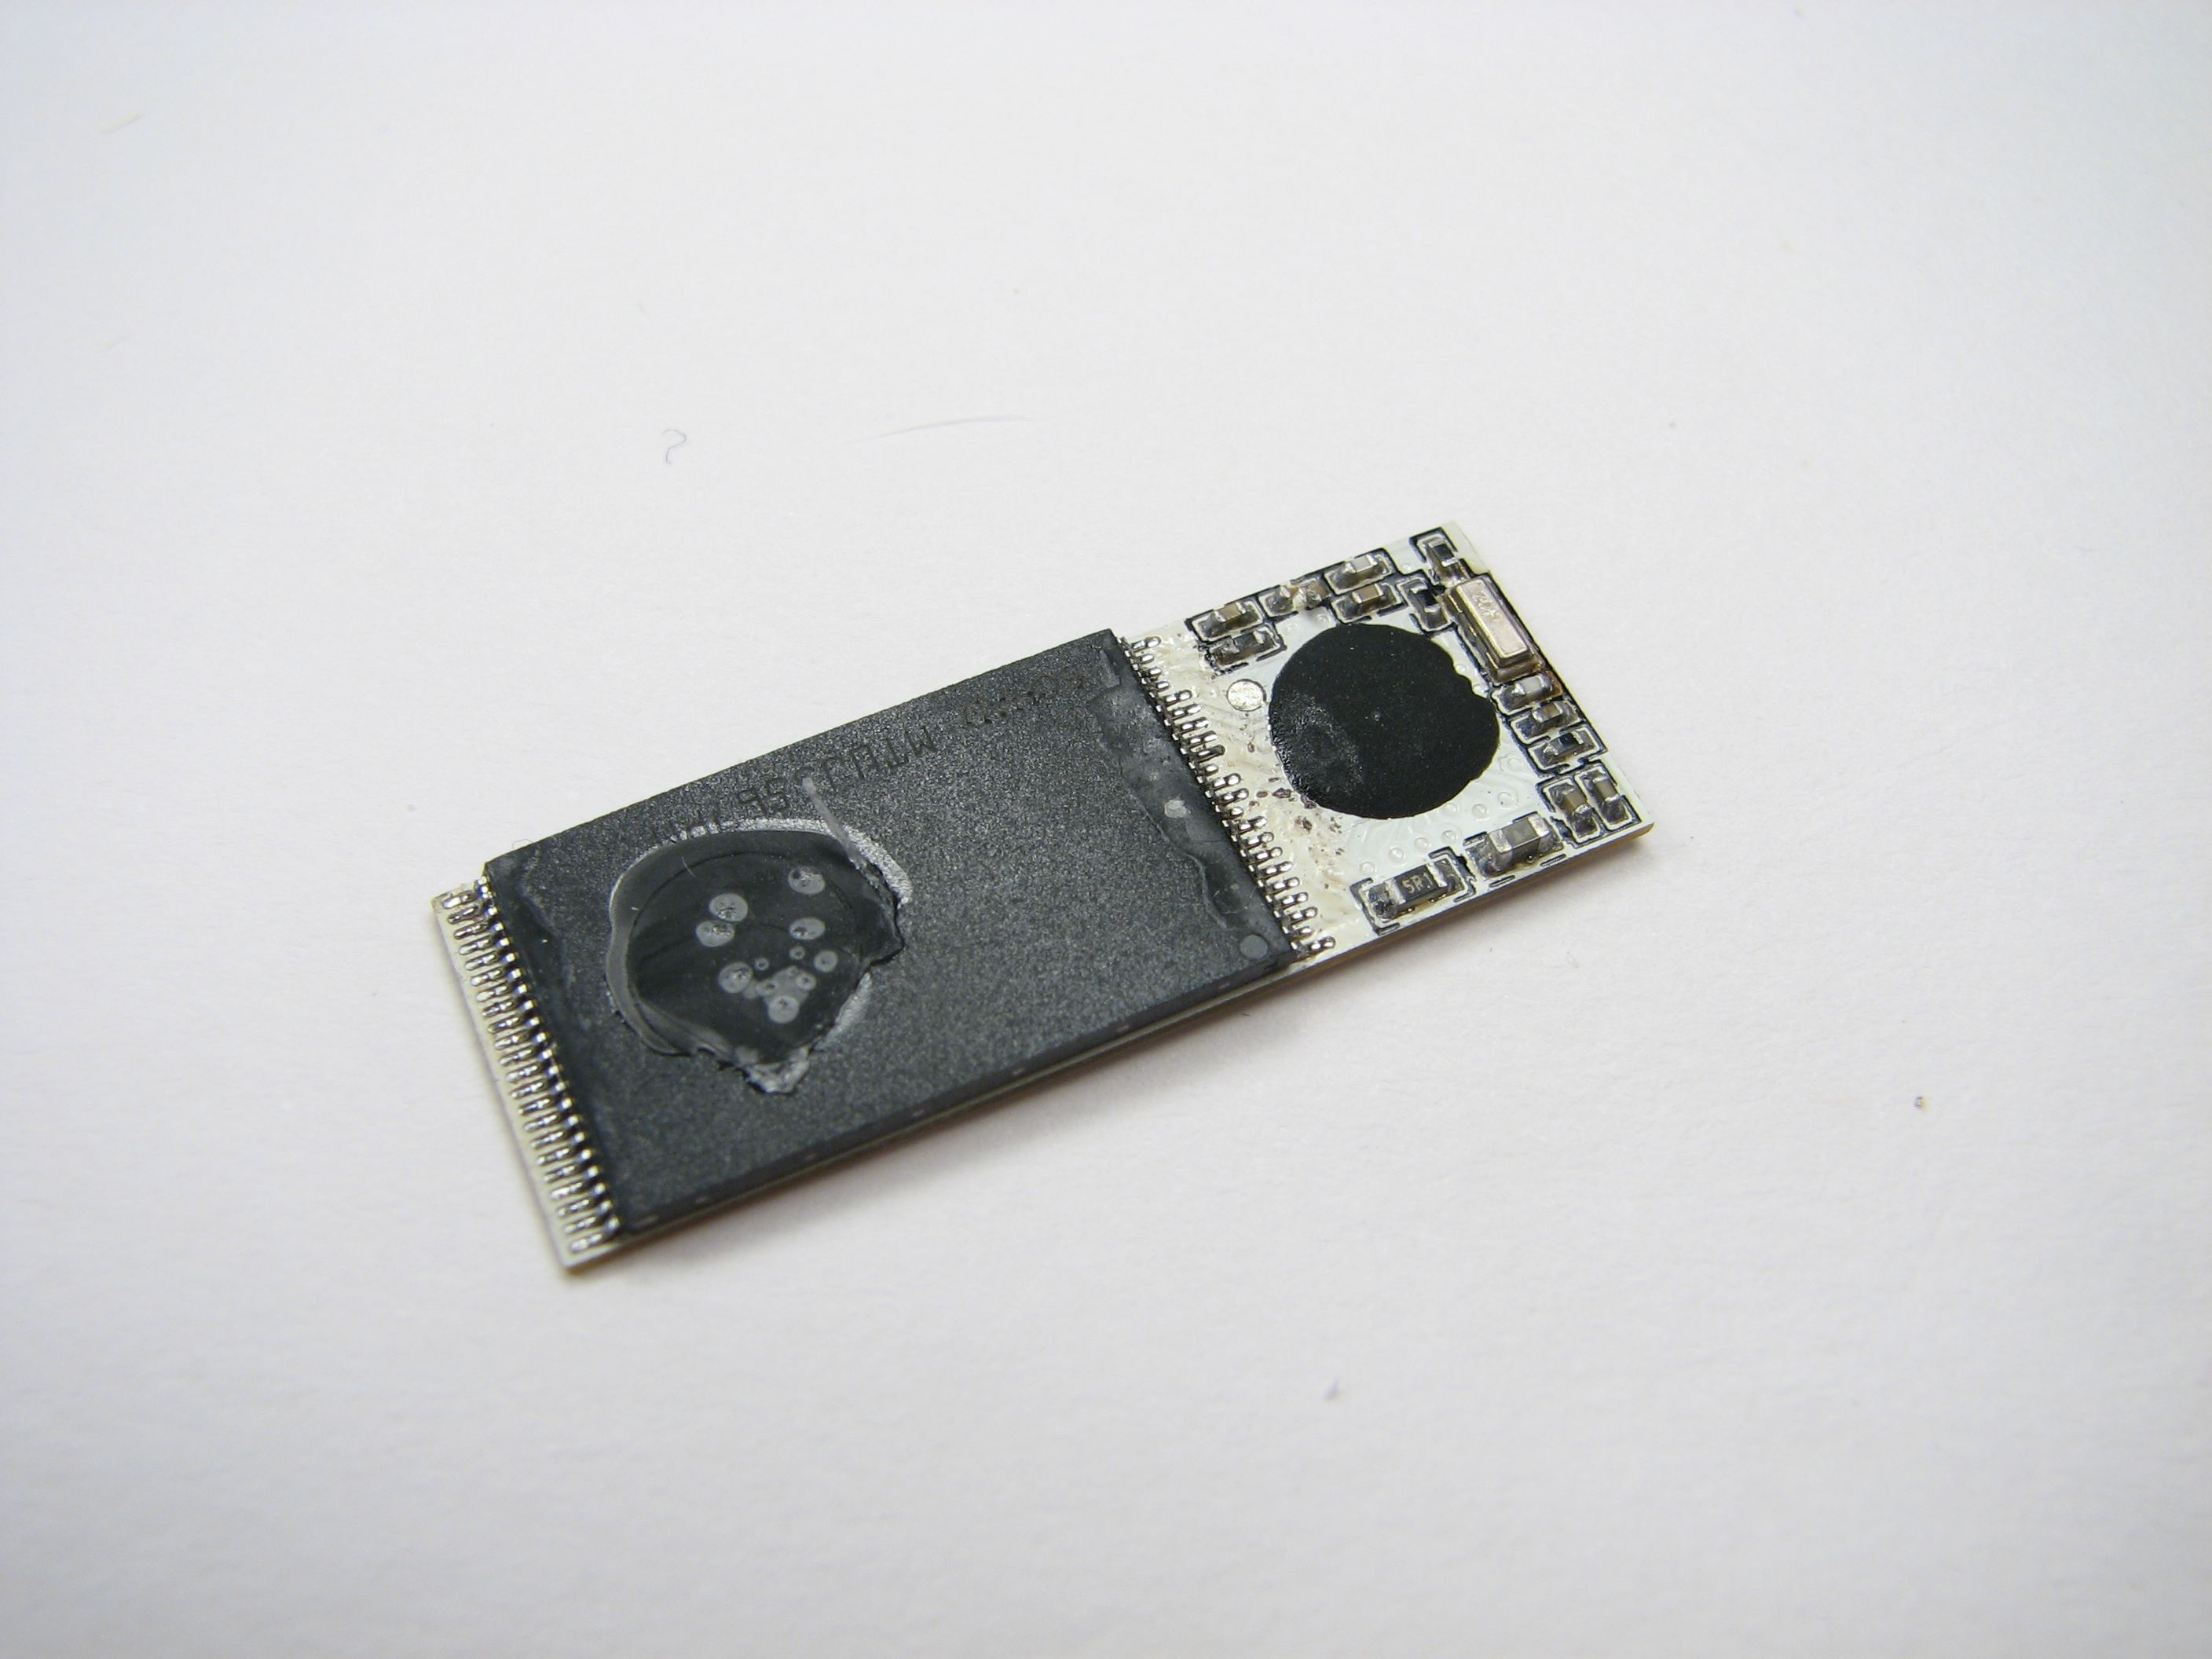
The plastic cover is attached only weakly, by a bit of silicone adhesive, and peels off fairly easily to expose the bare printed circuit board of the flash drive. Not too much to it, really.
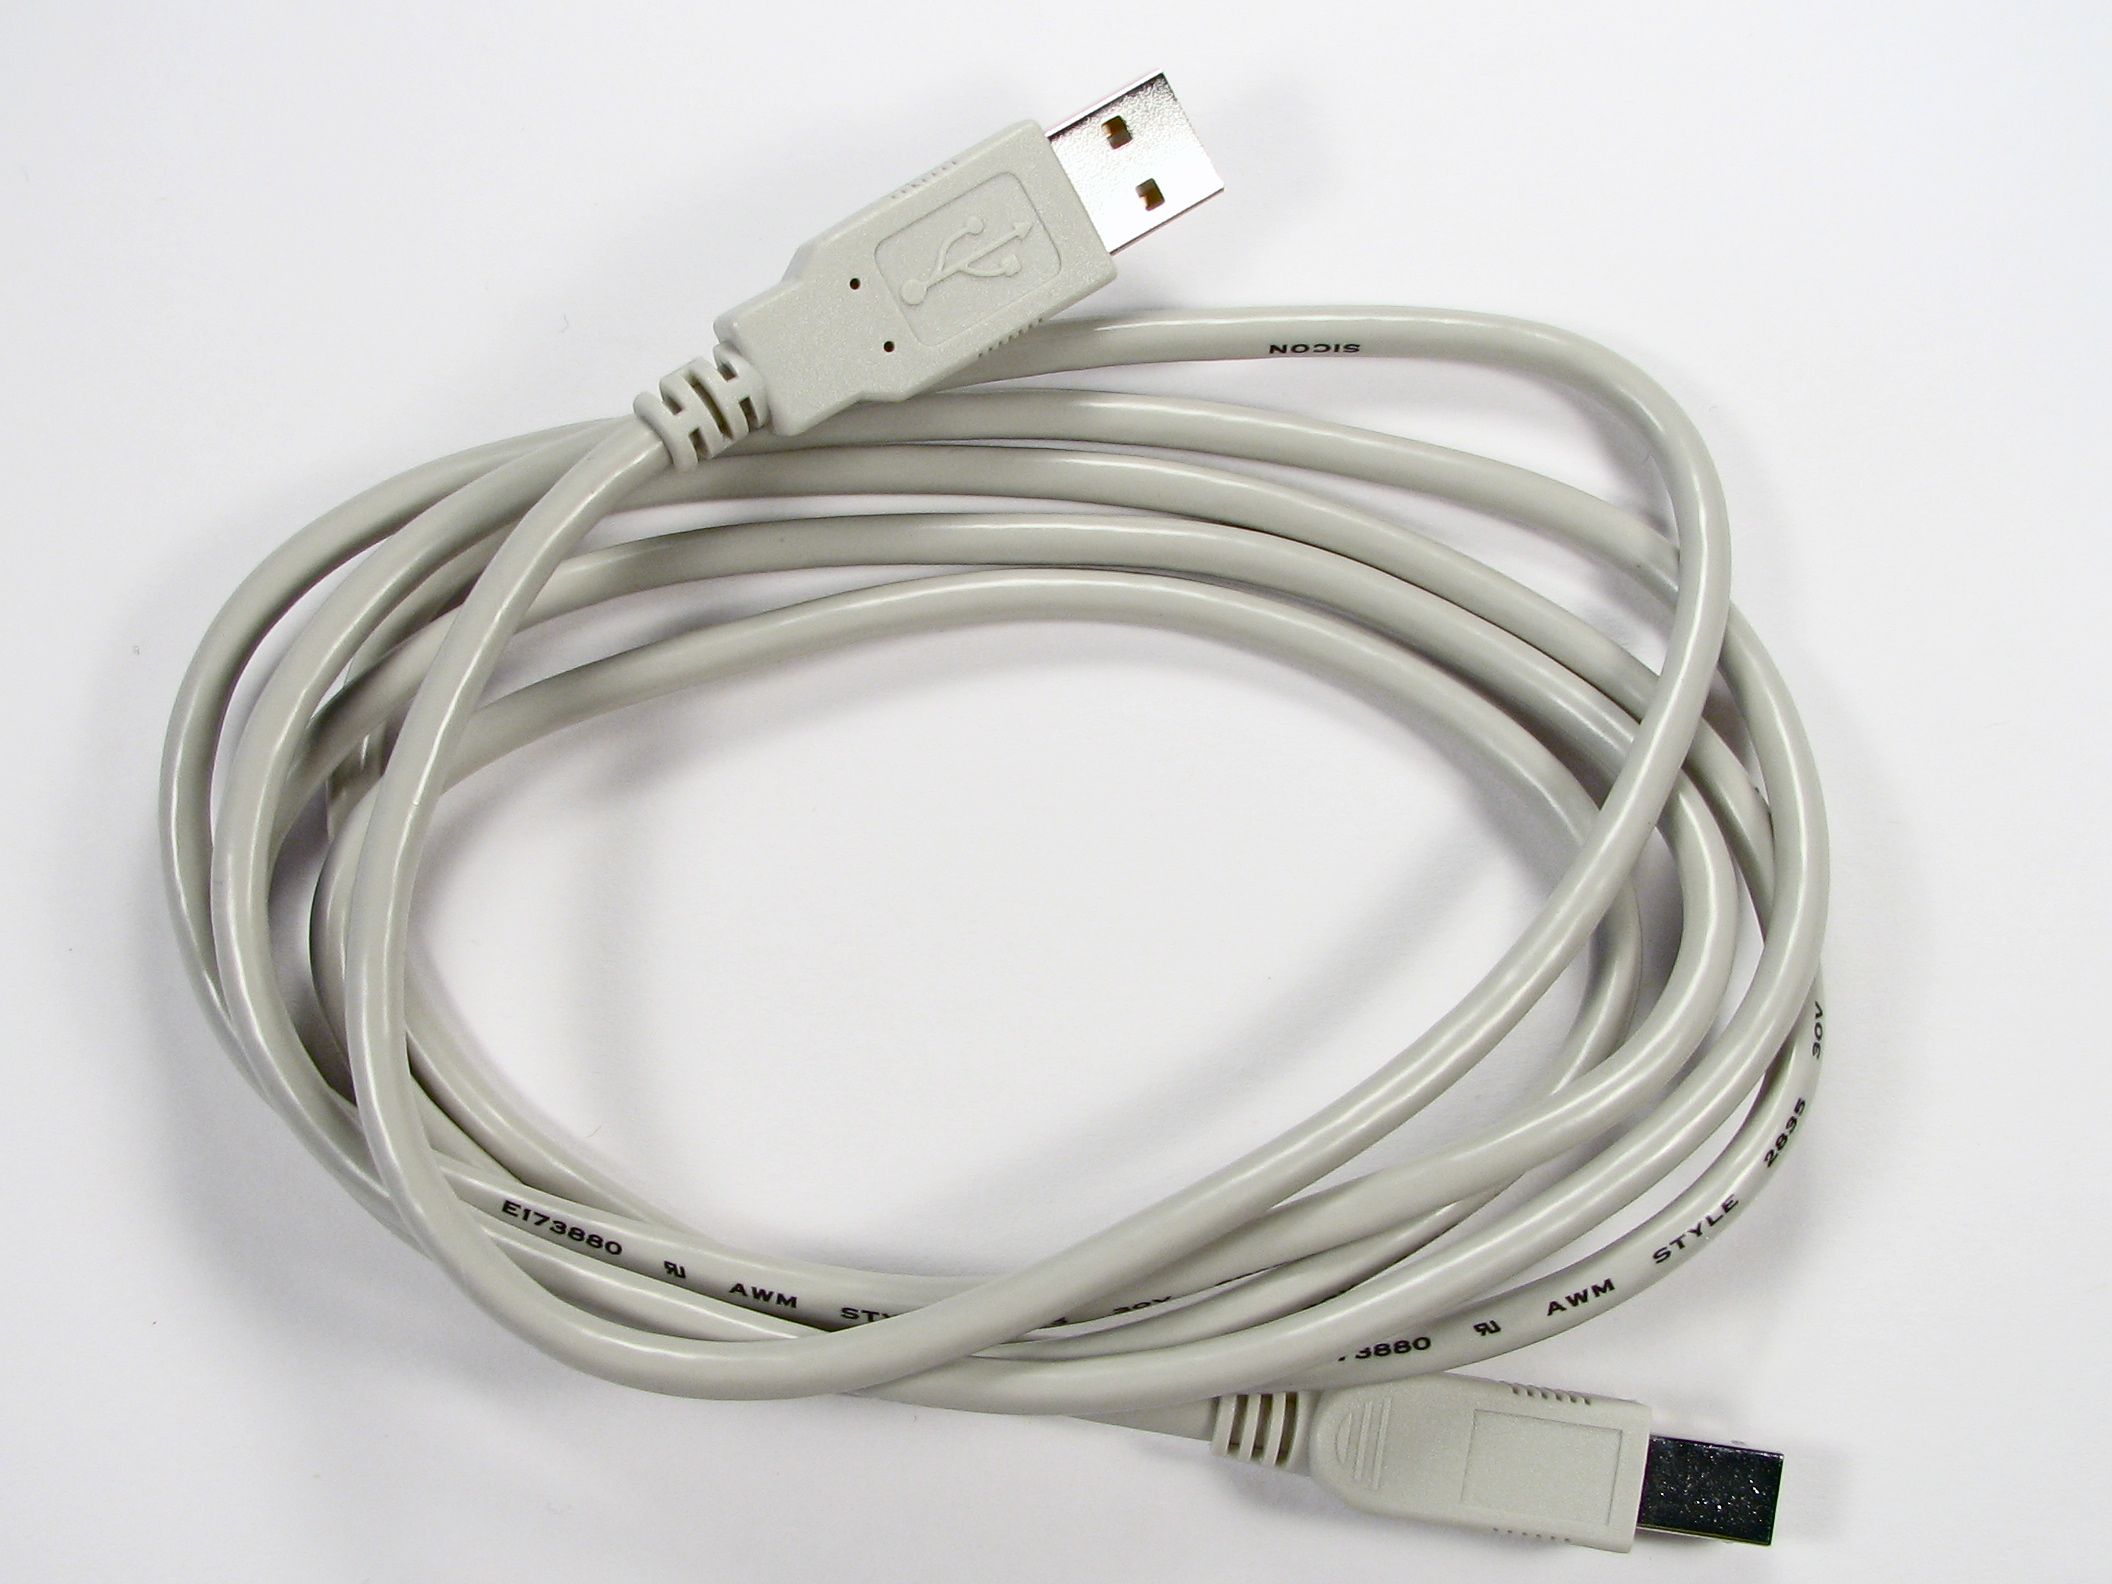
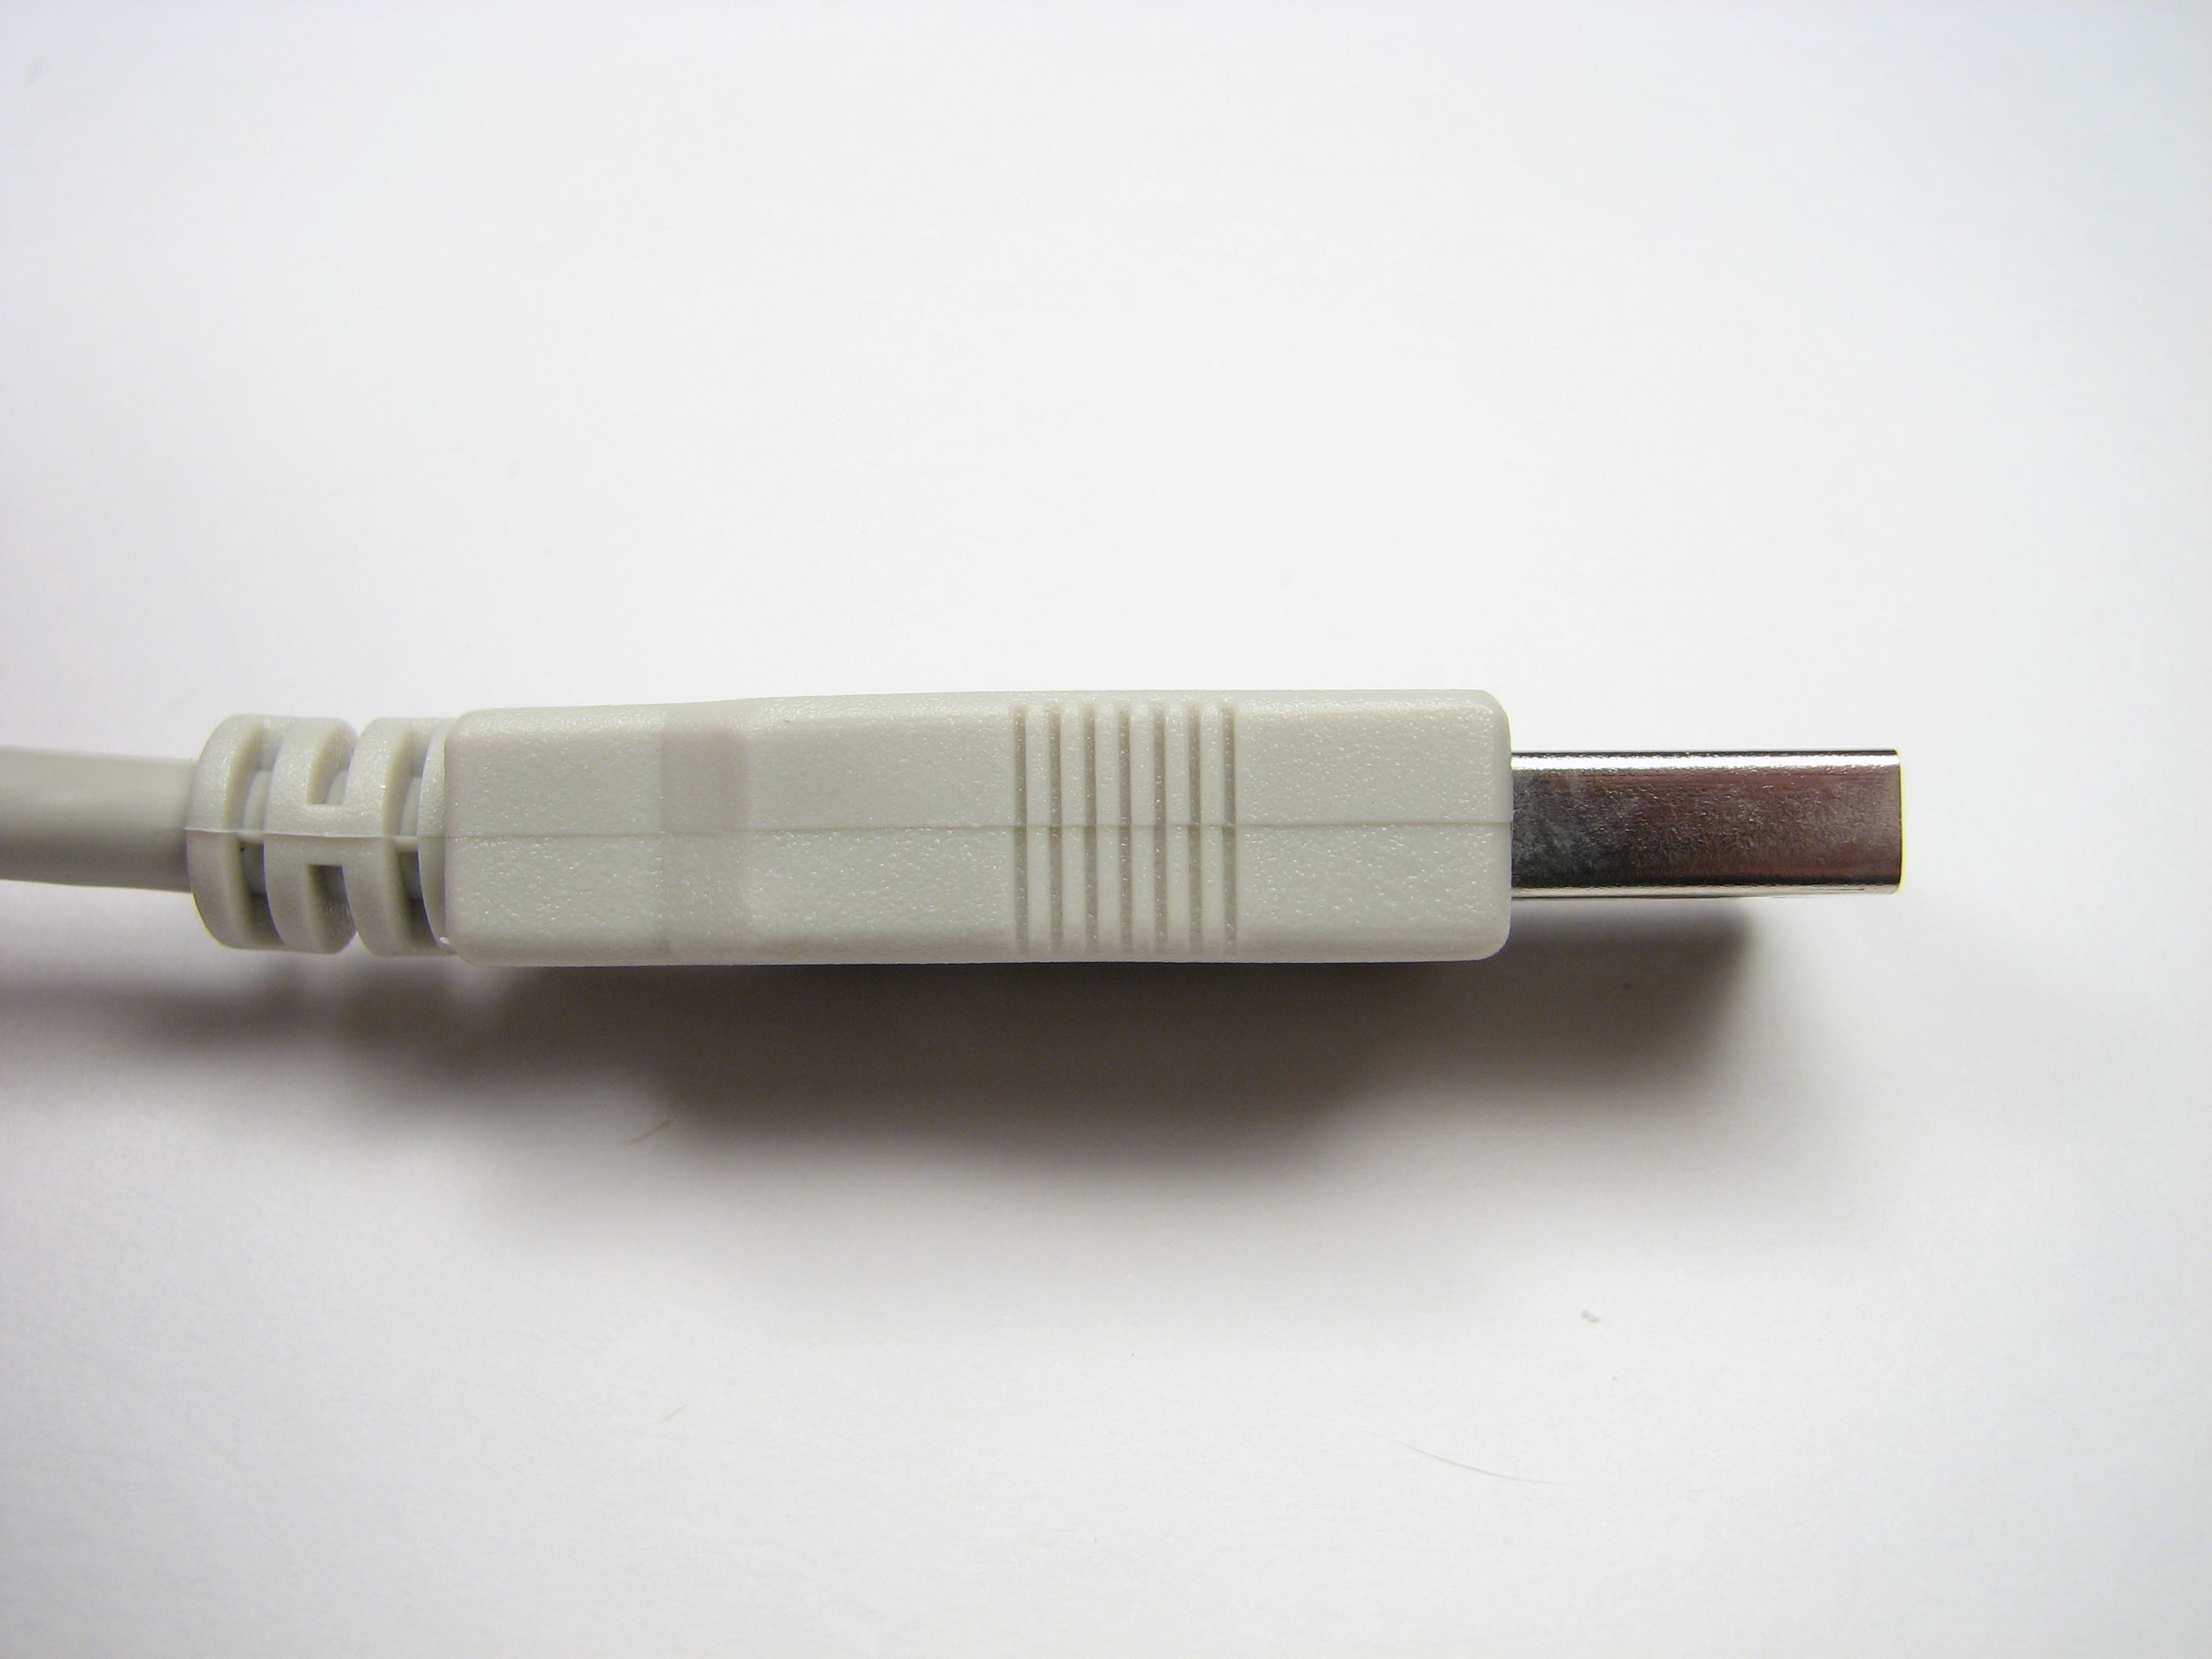
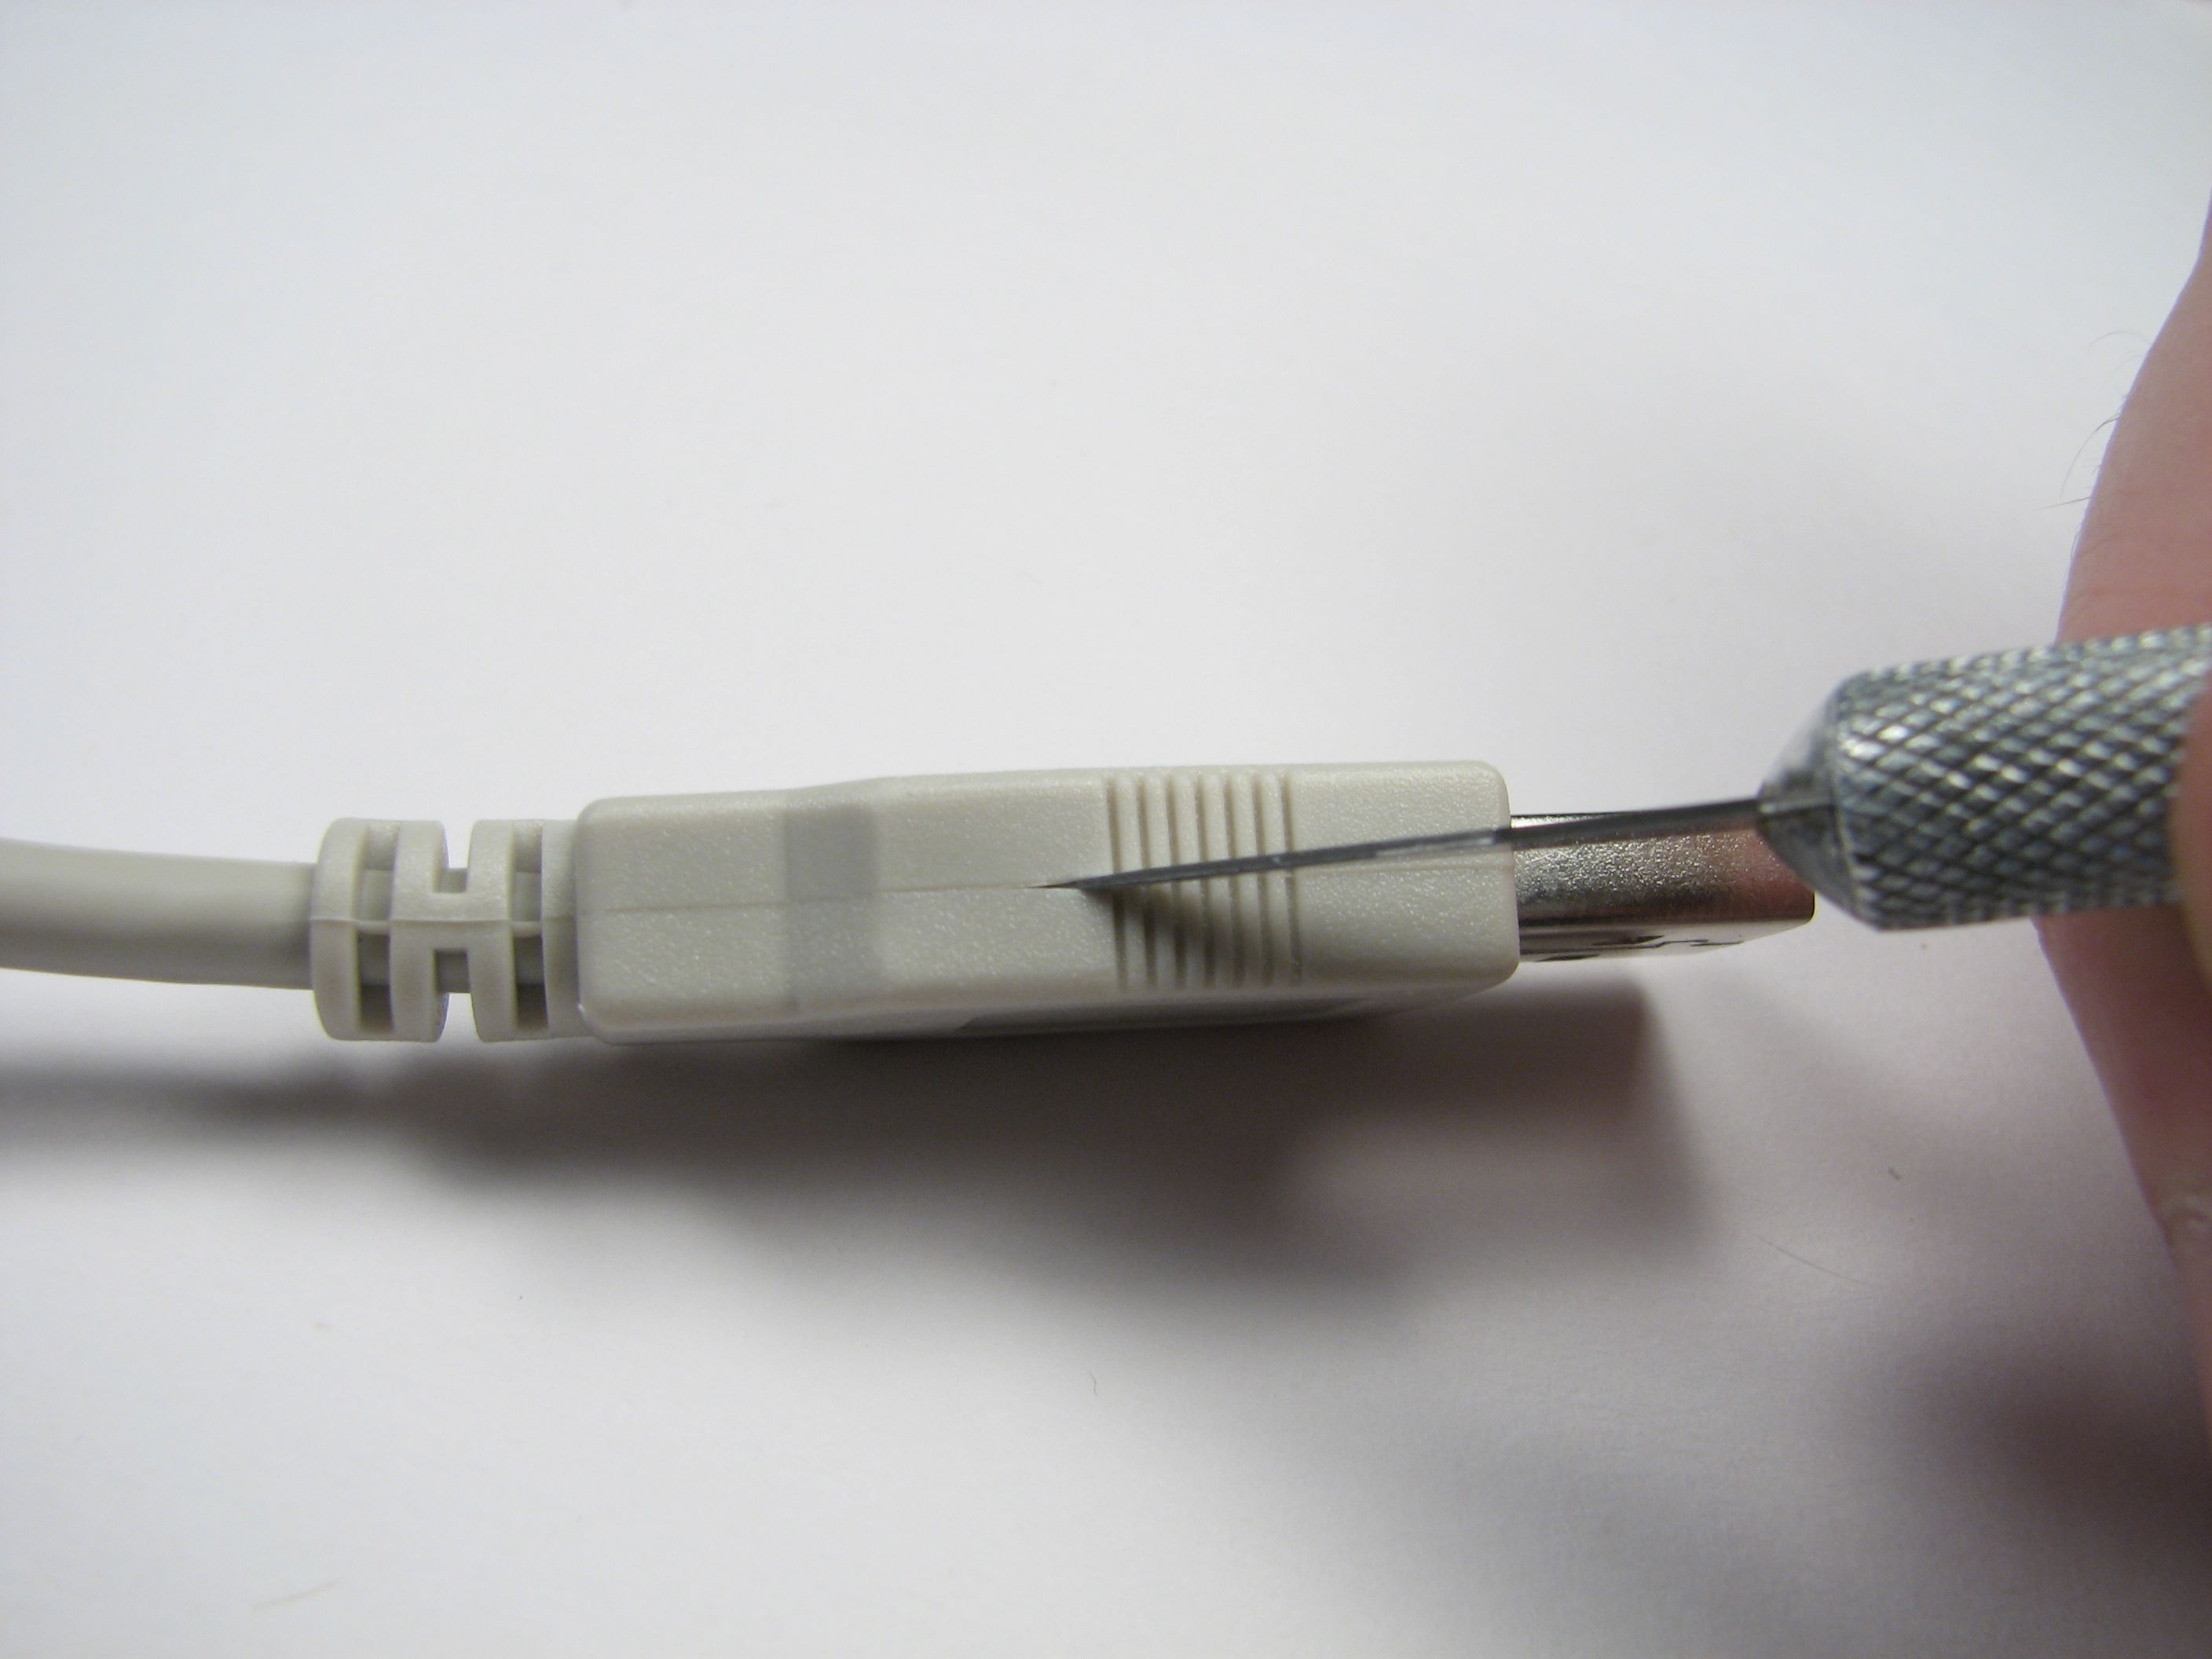
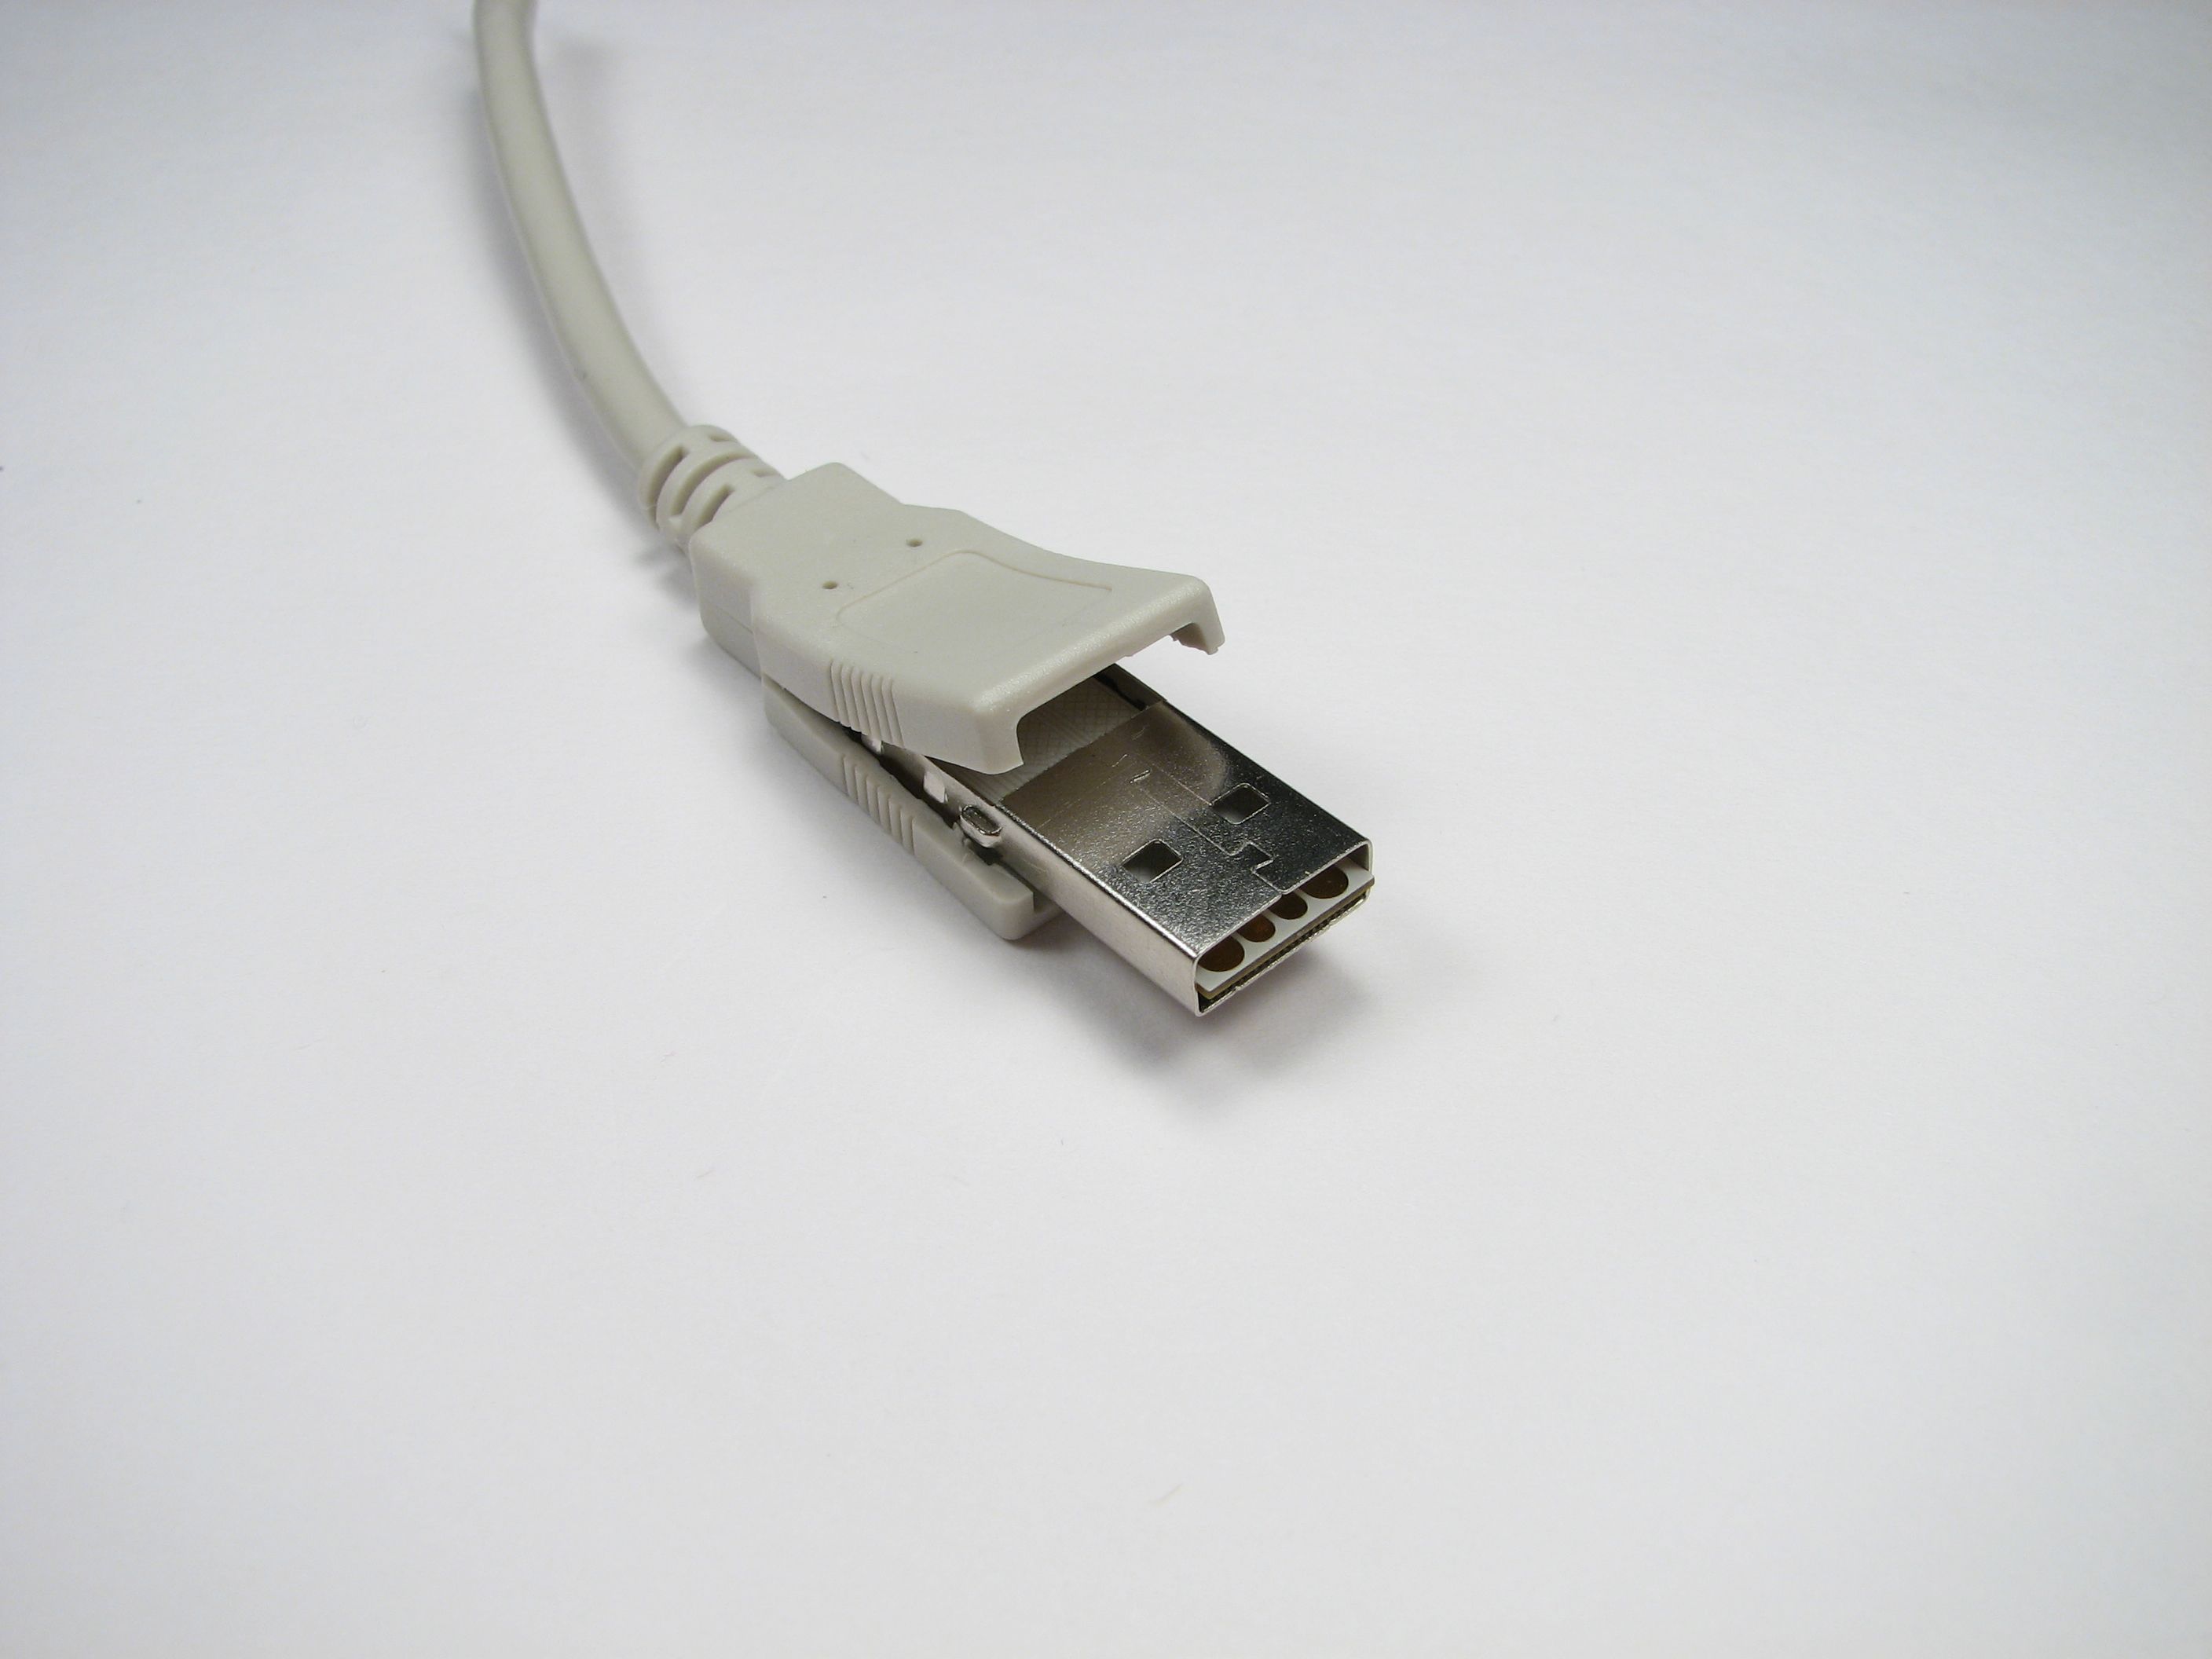
Next we need a victim USB cable. I started with this new $1.50 USB “A-B” cable. Looking at the end that we’ll be cutting up, you might notice a neat injection molding seam that runs around the edge. Using a sharp hobby knife, cut neatly along that seam. Cutting there actually provides some camouflage for you: Since we expect there to be a seam there, it’s very hard to notice an additional cut as well. If you really want your seams to be invisible, you might want to use a black USB cable.
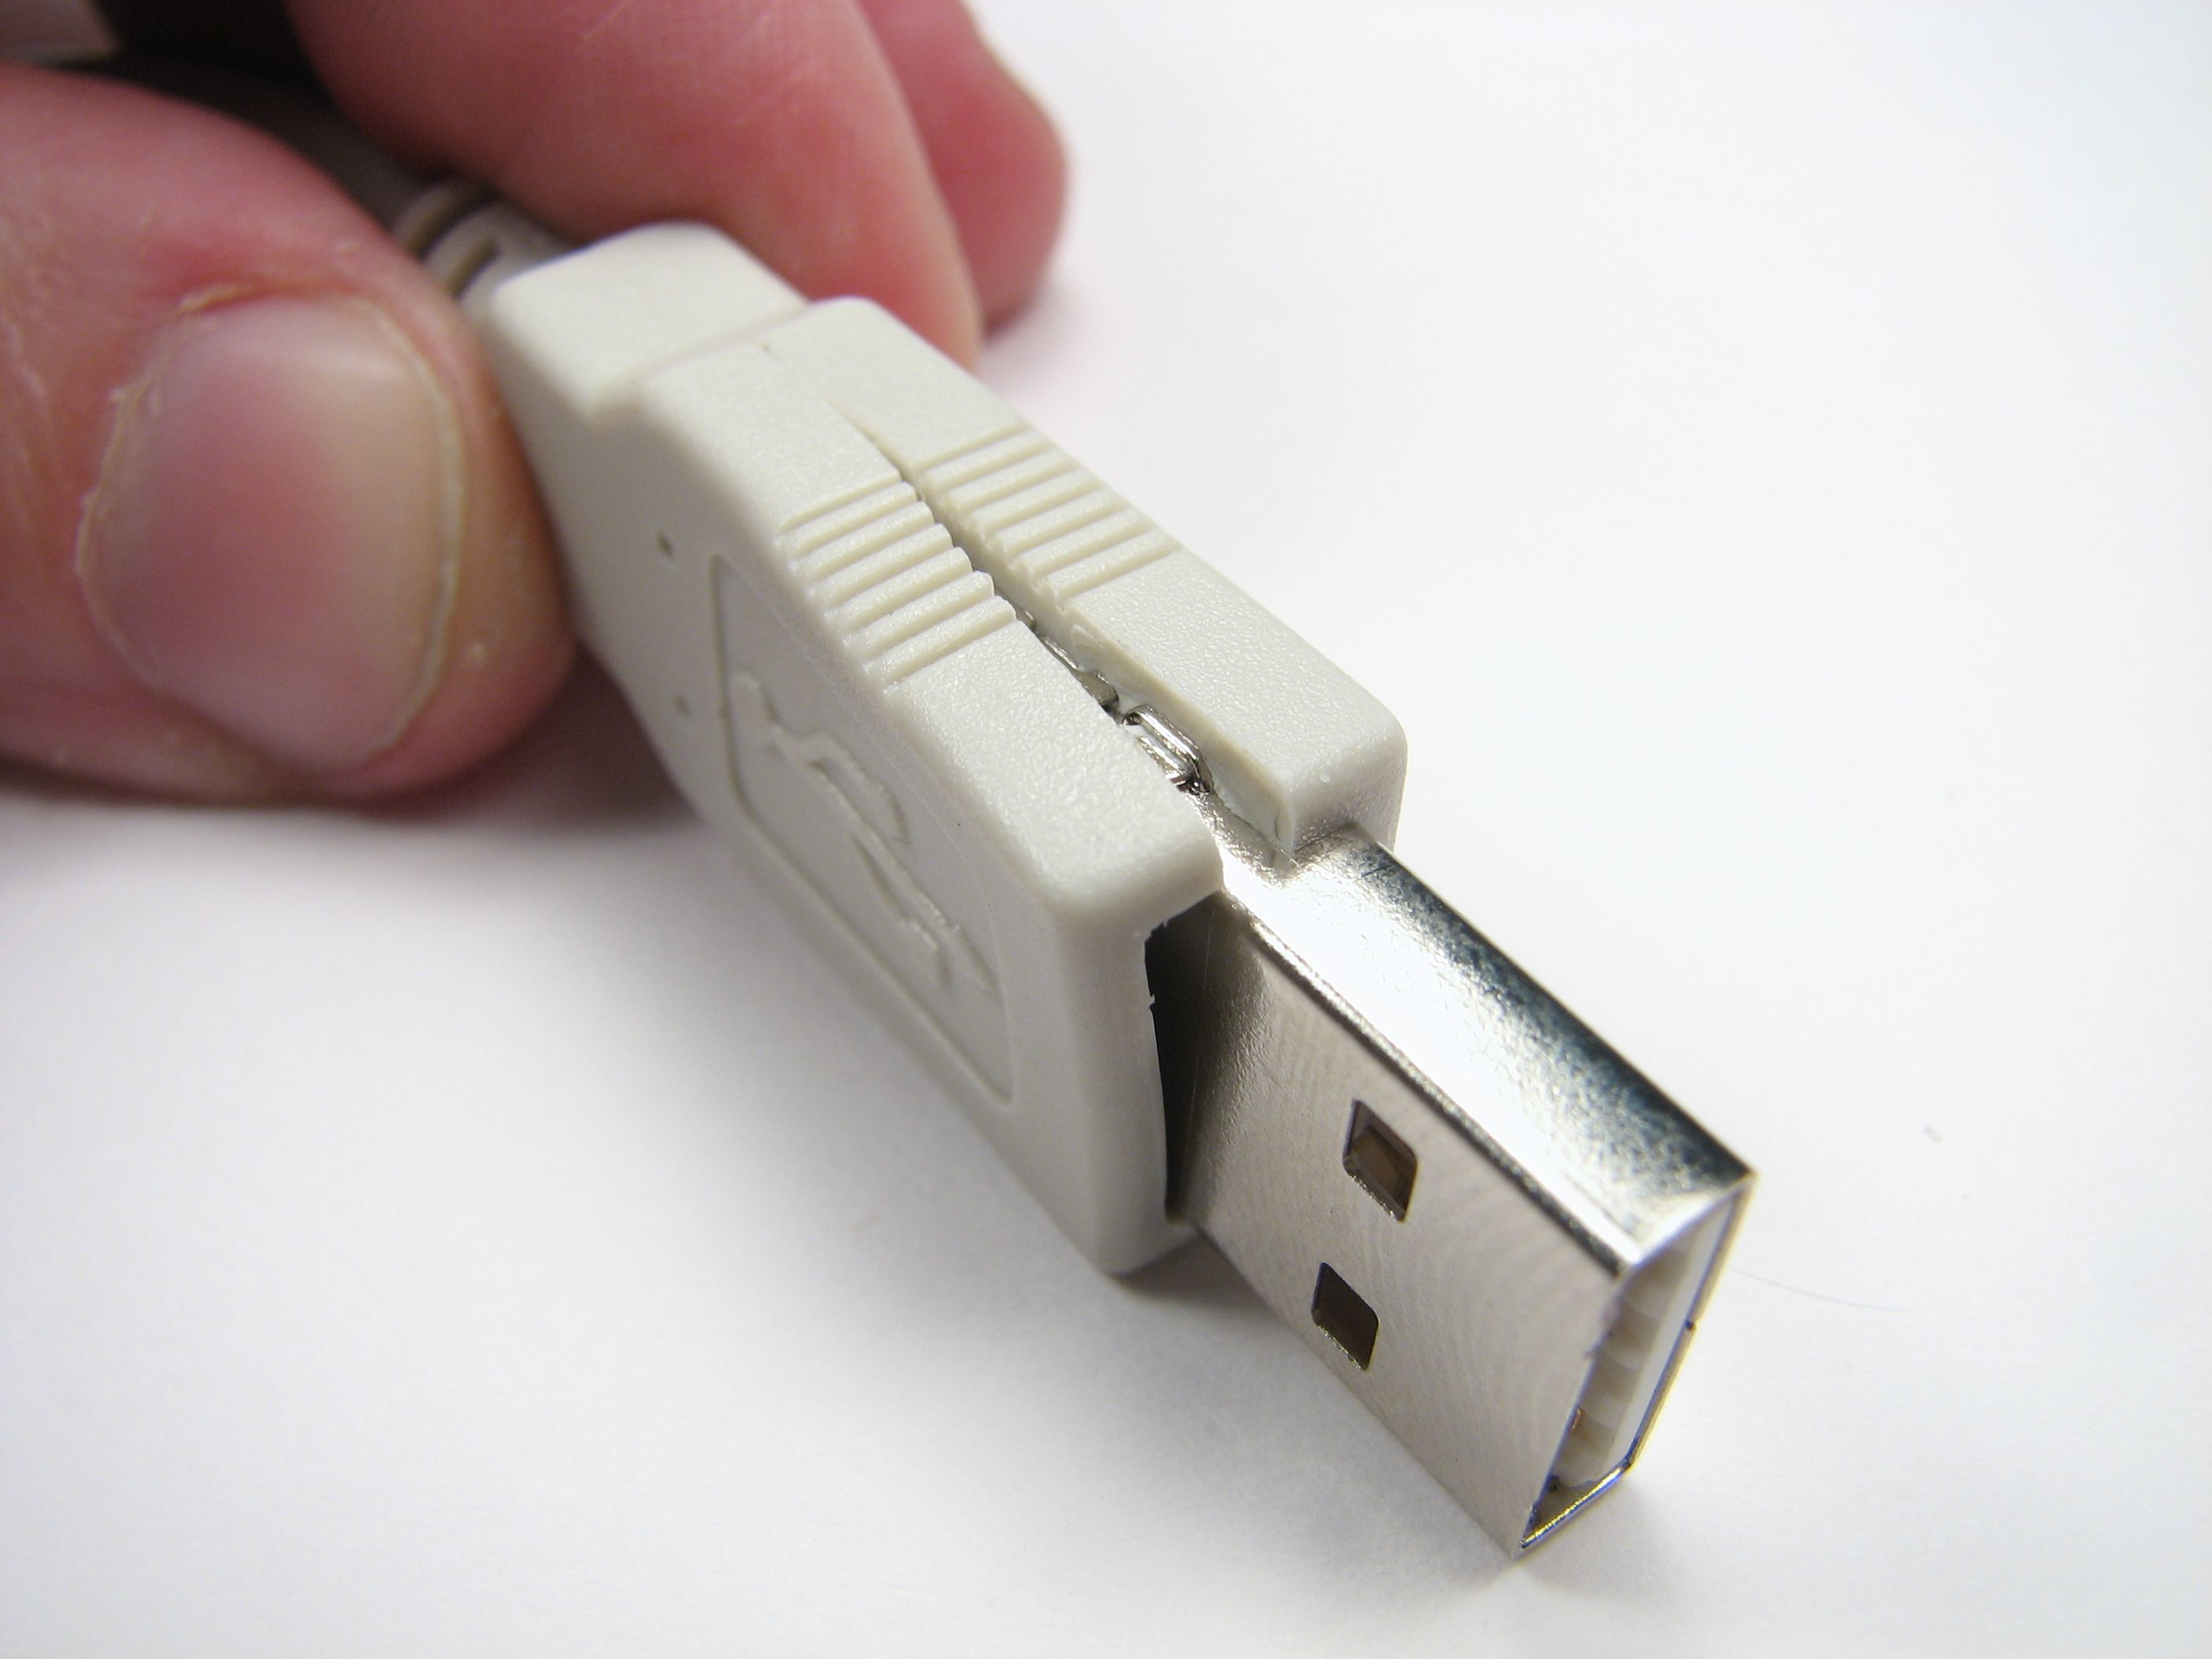
Cut deeply enough that you actually cut through to the metal shell underneath the rubber, at which point you can start to peel back the rubber parts.
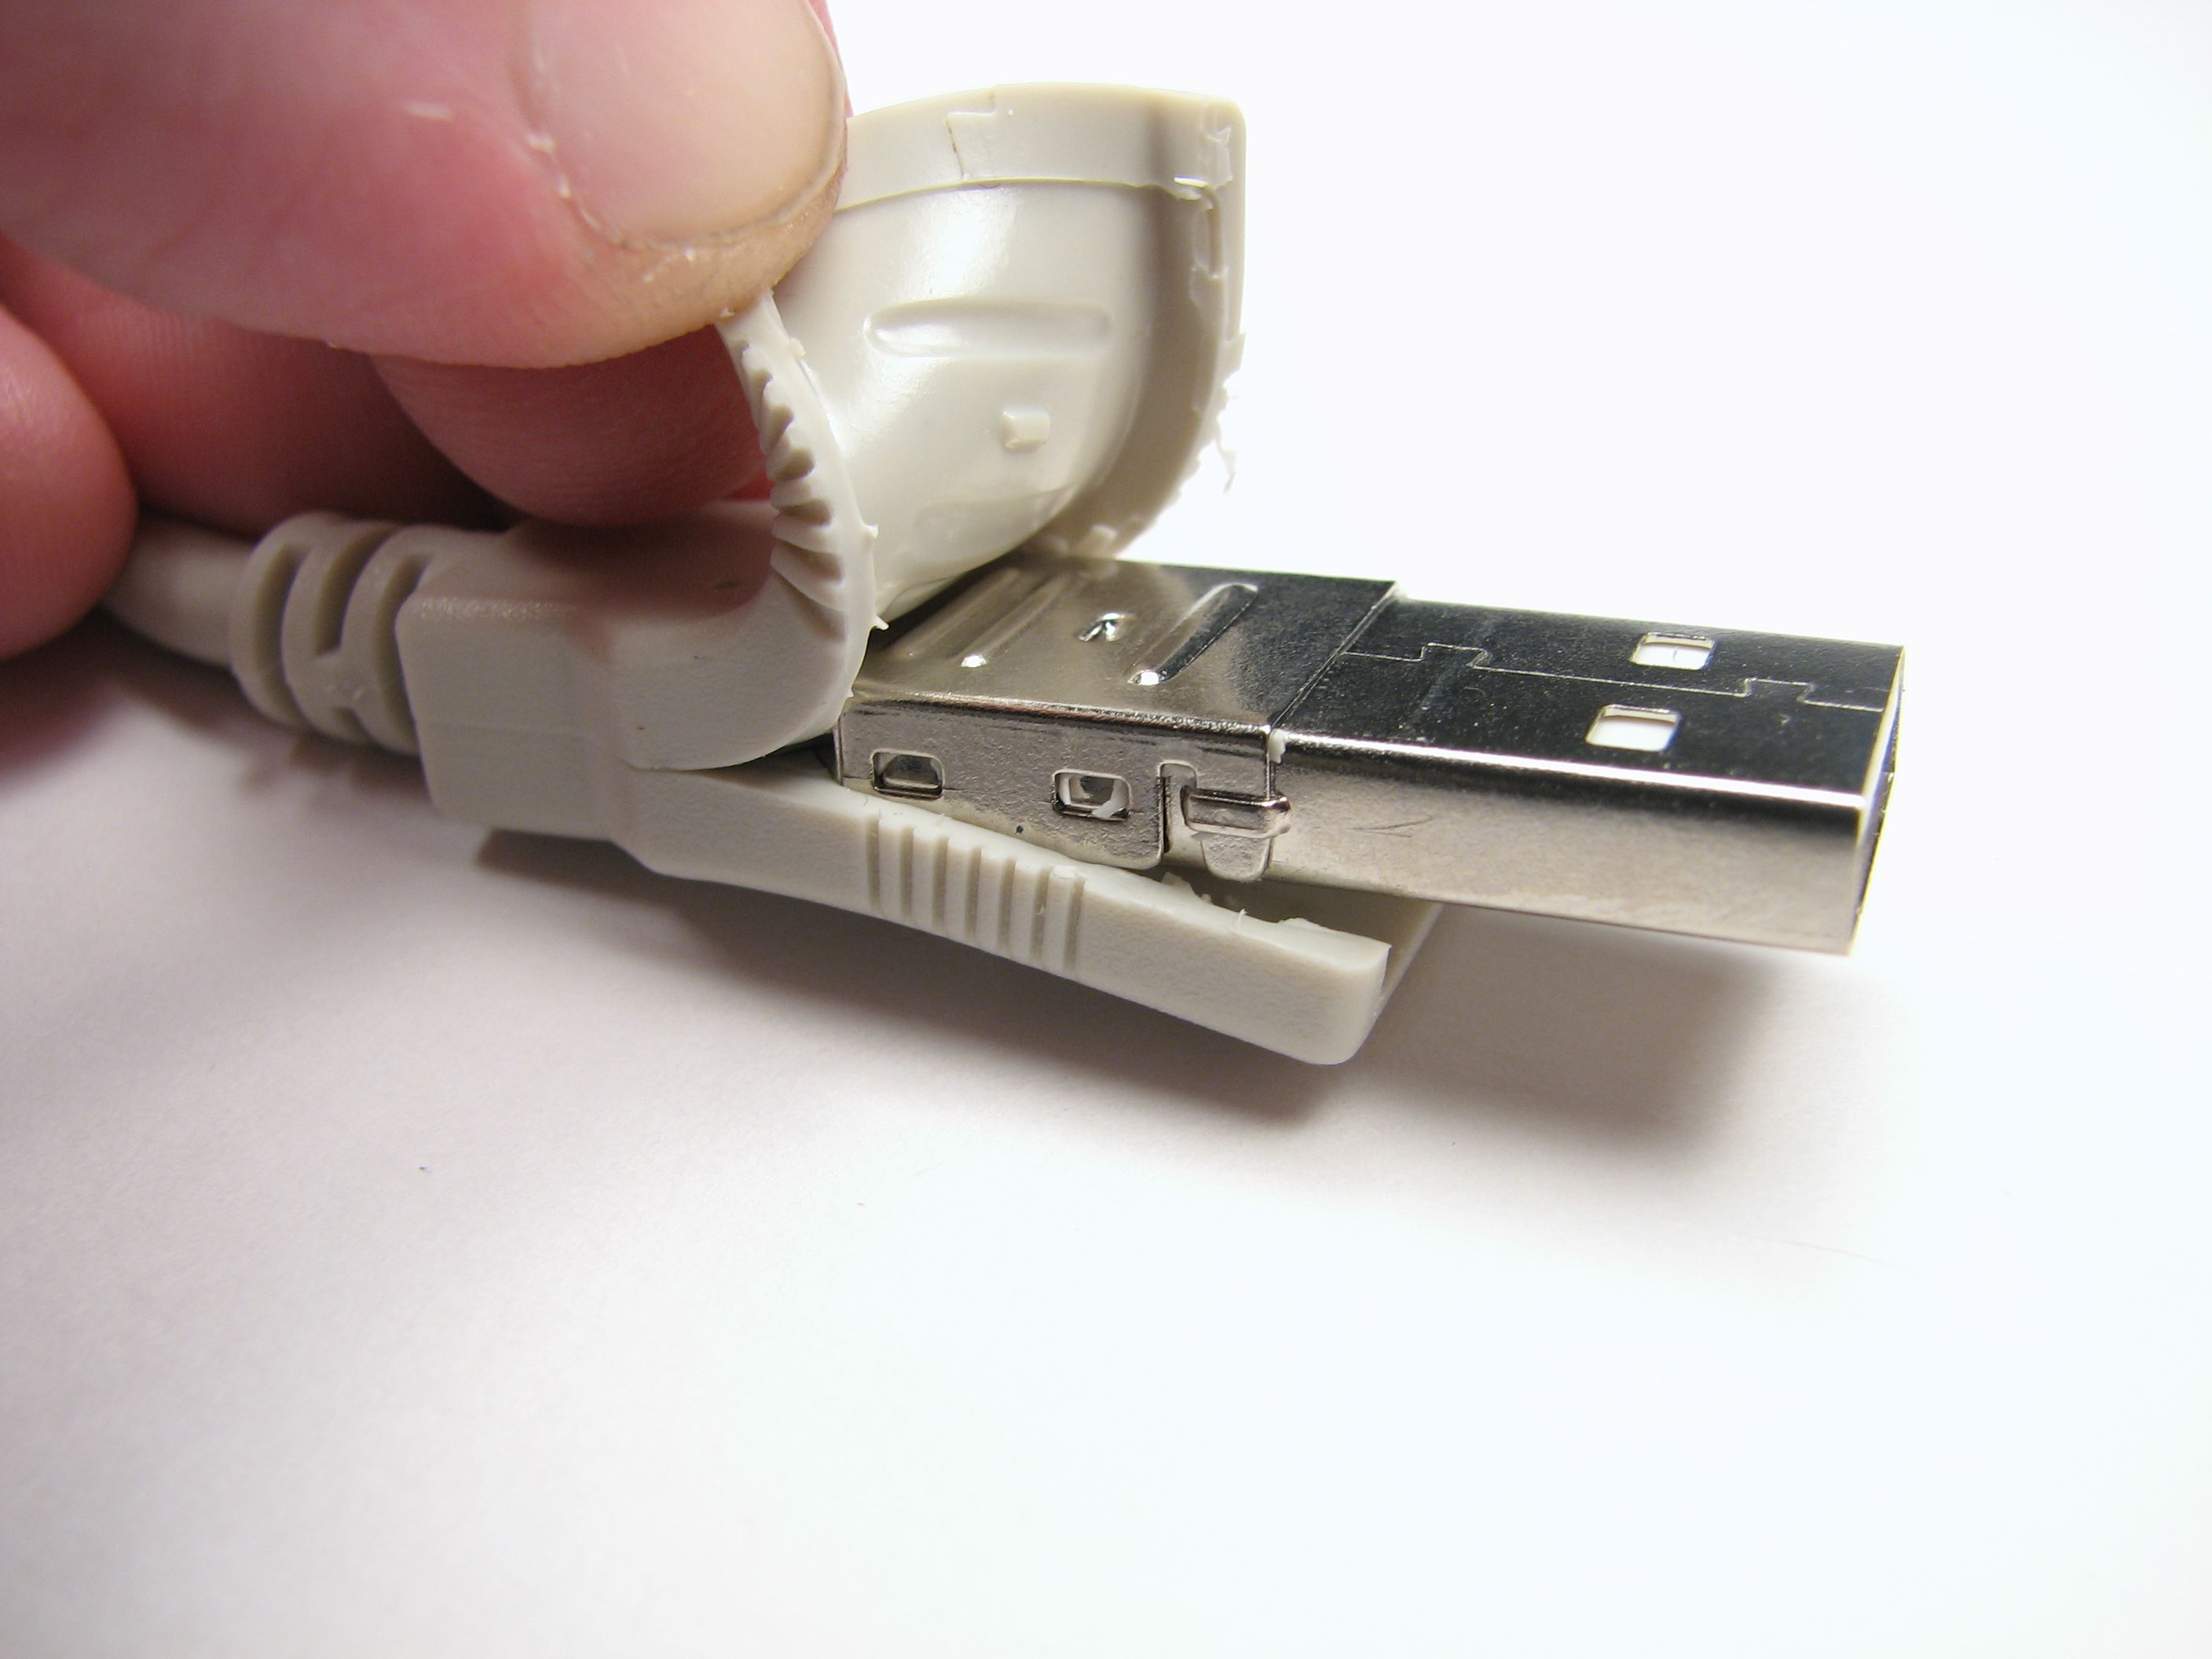
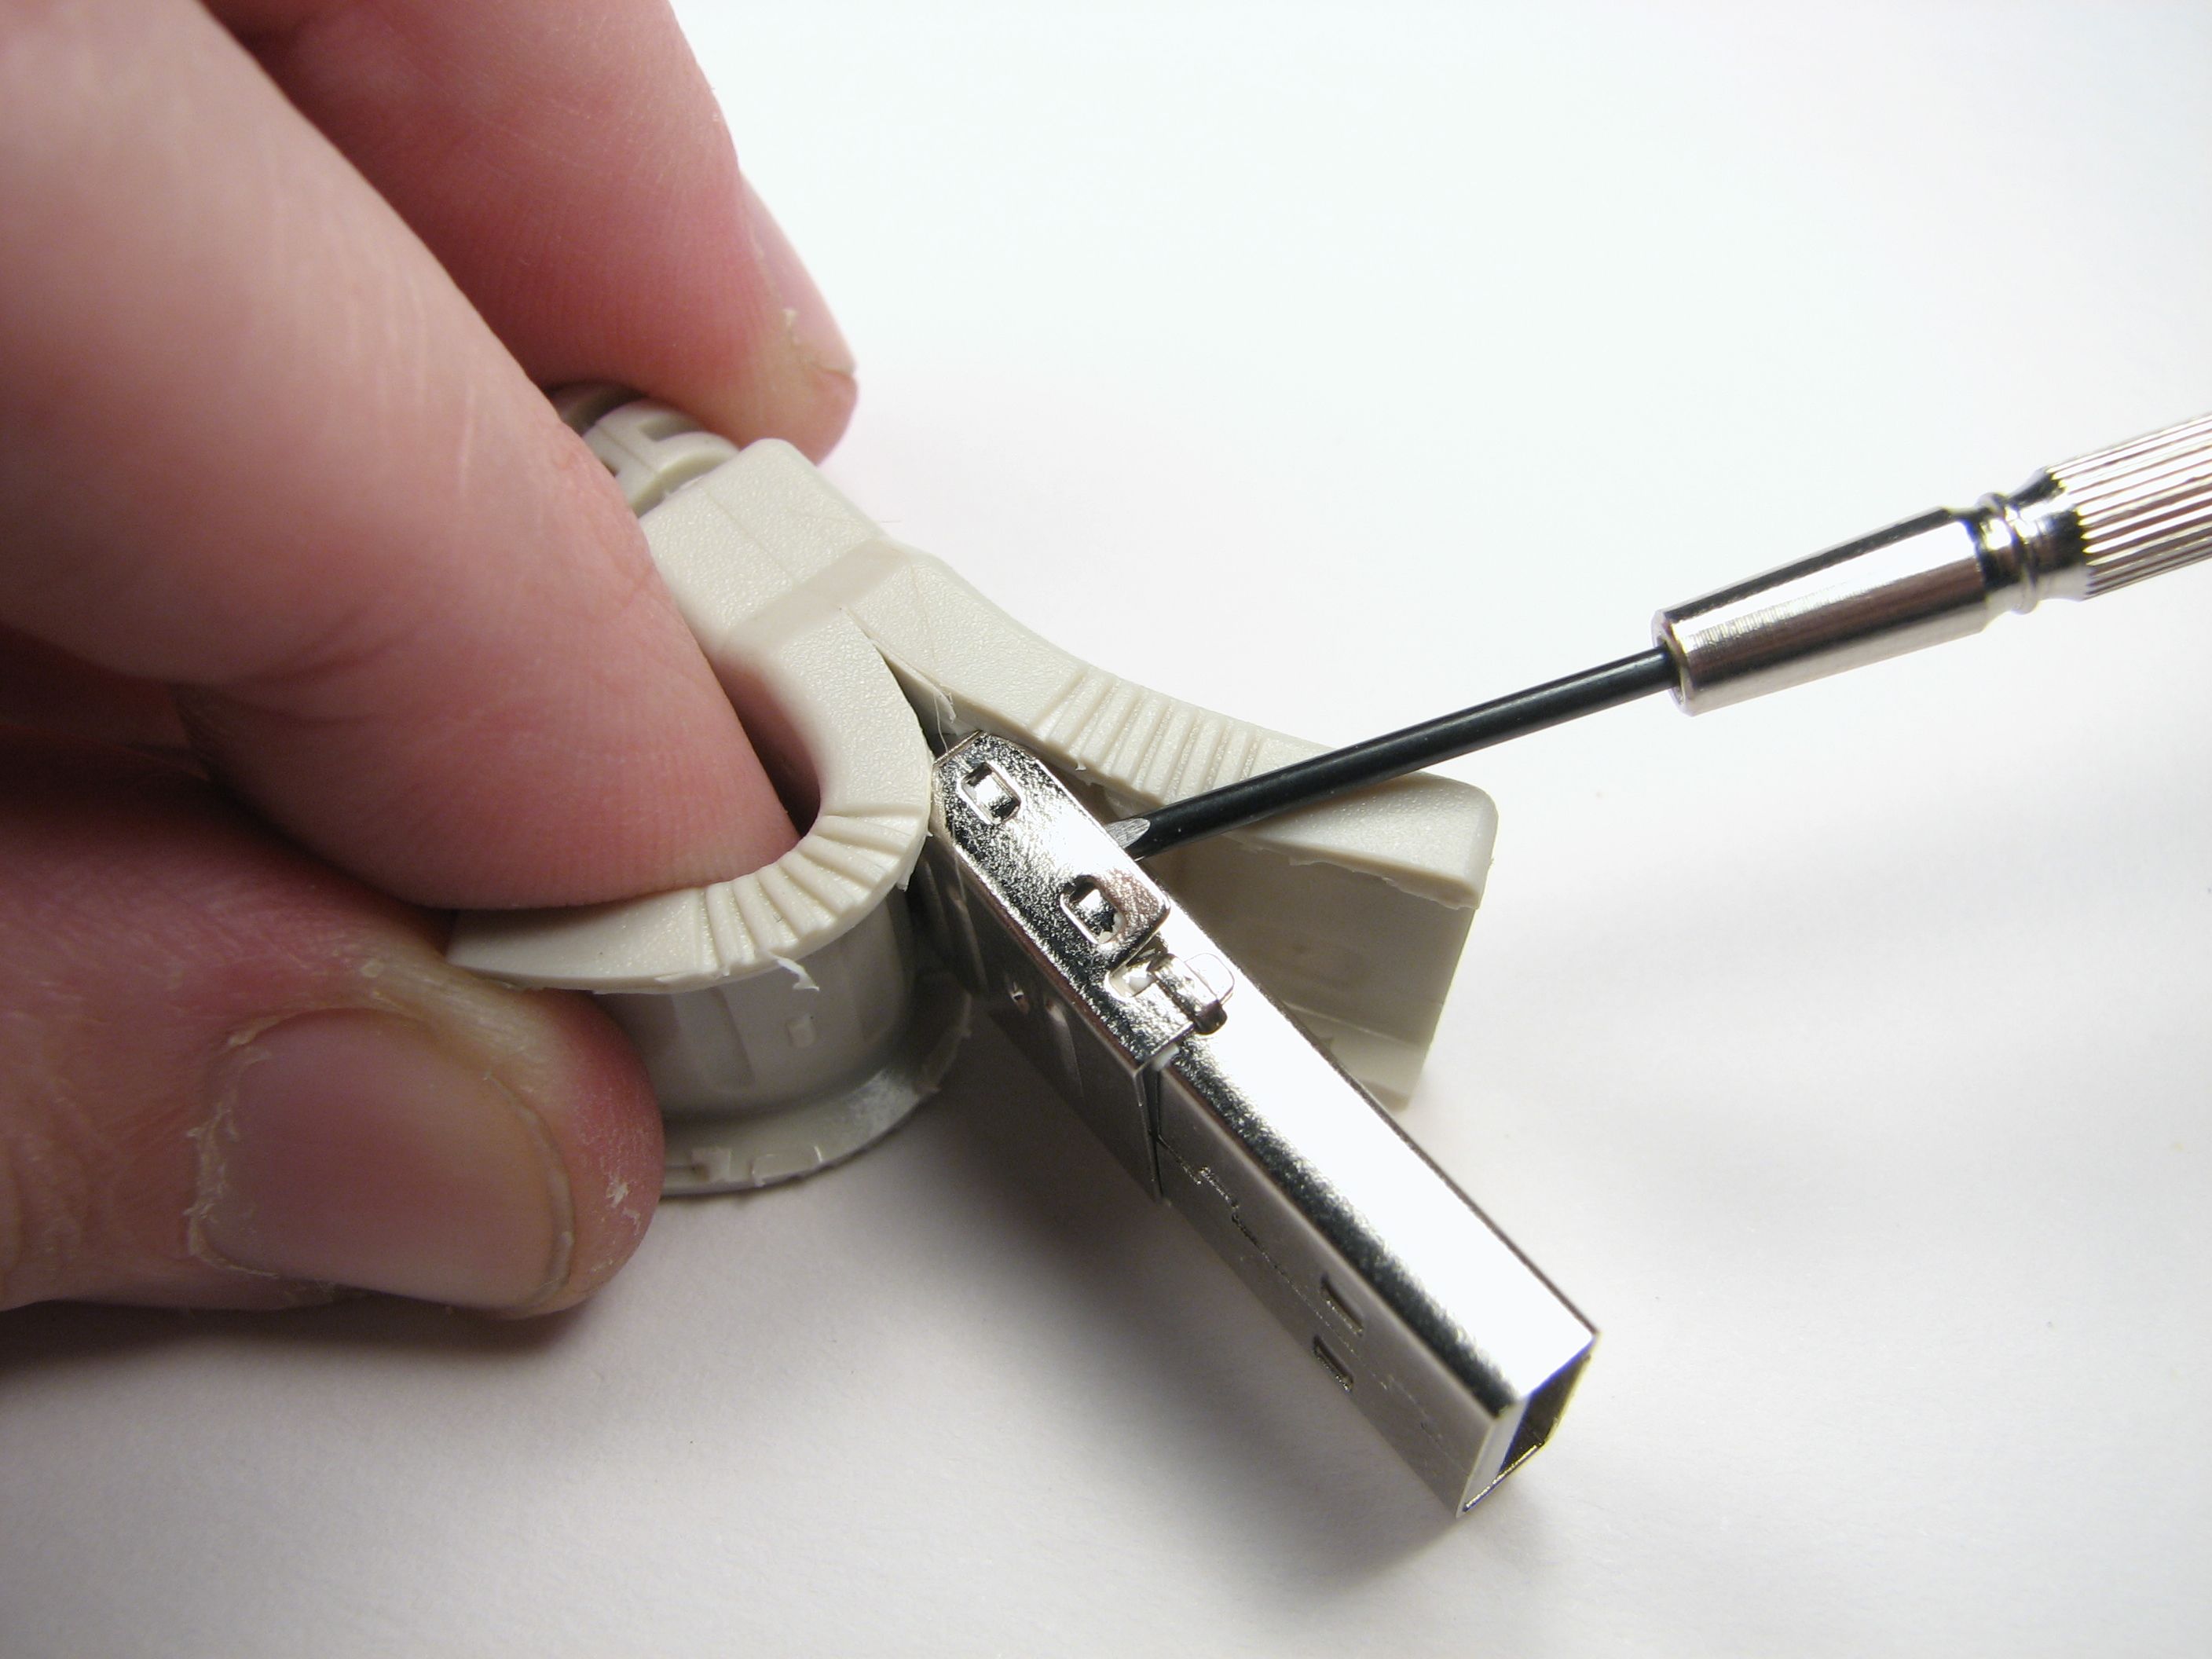
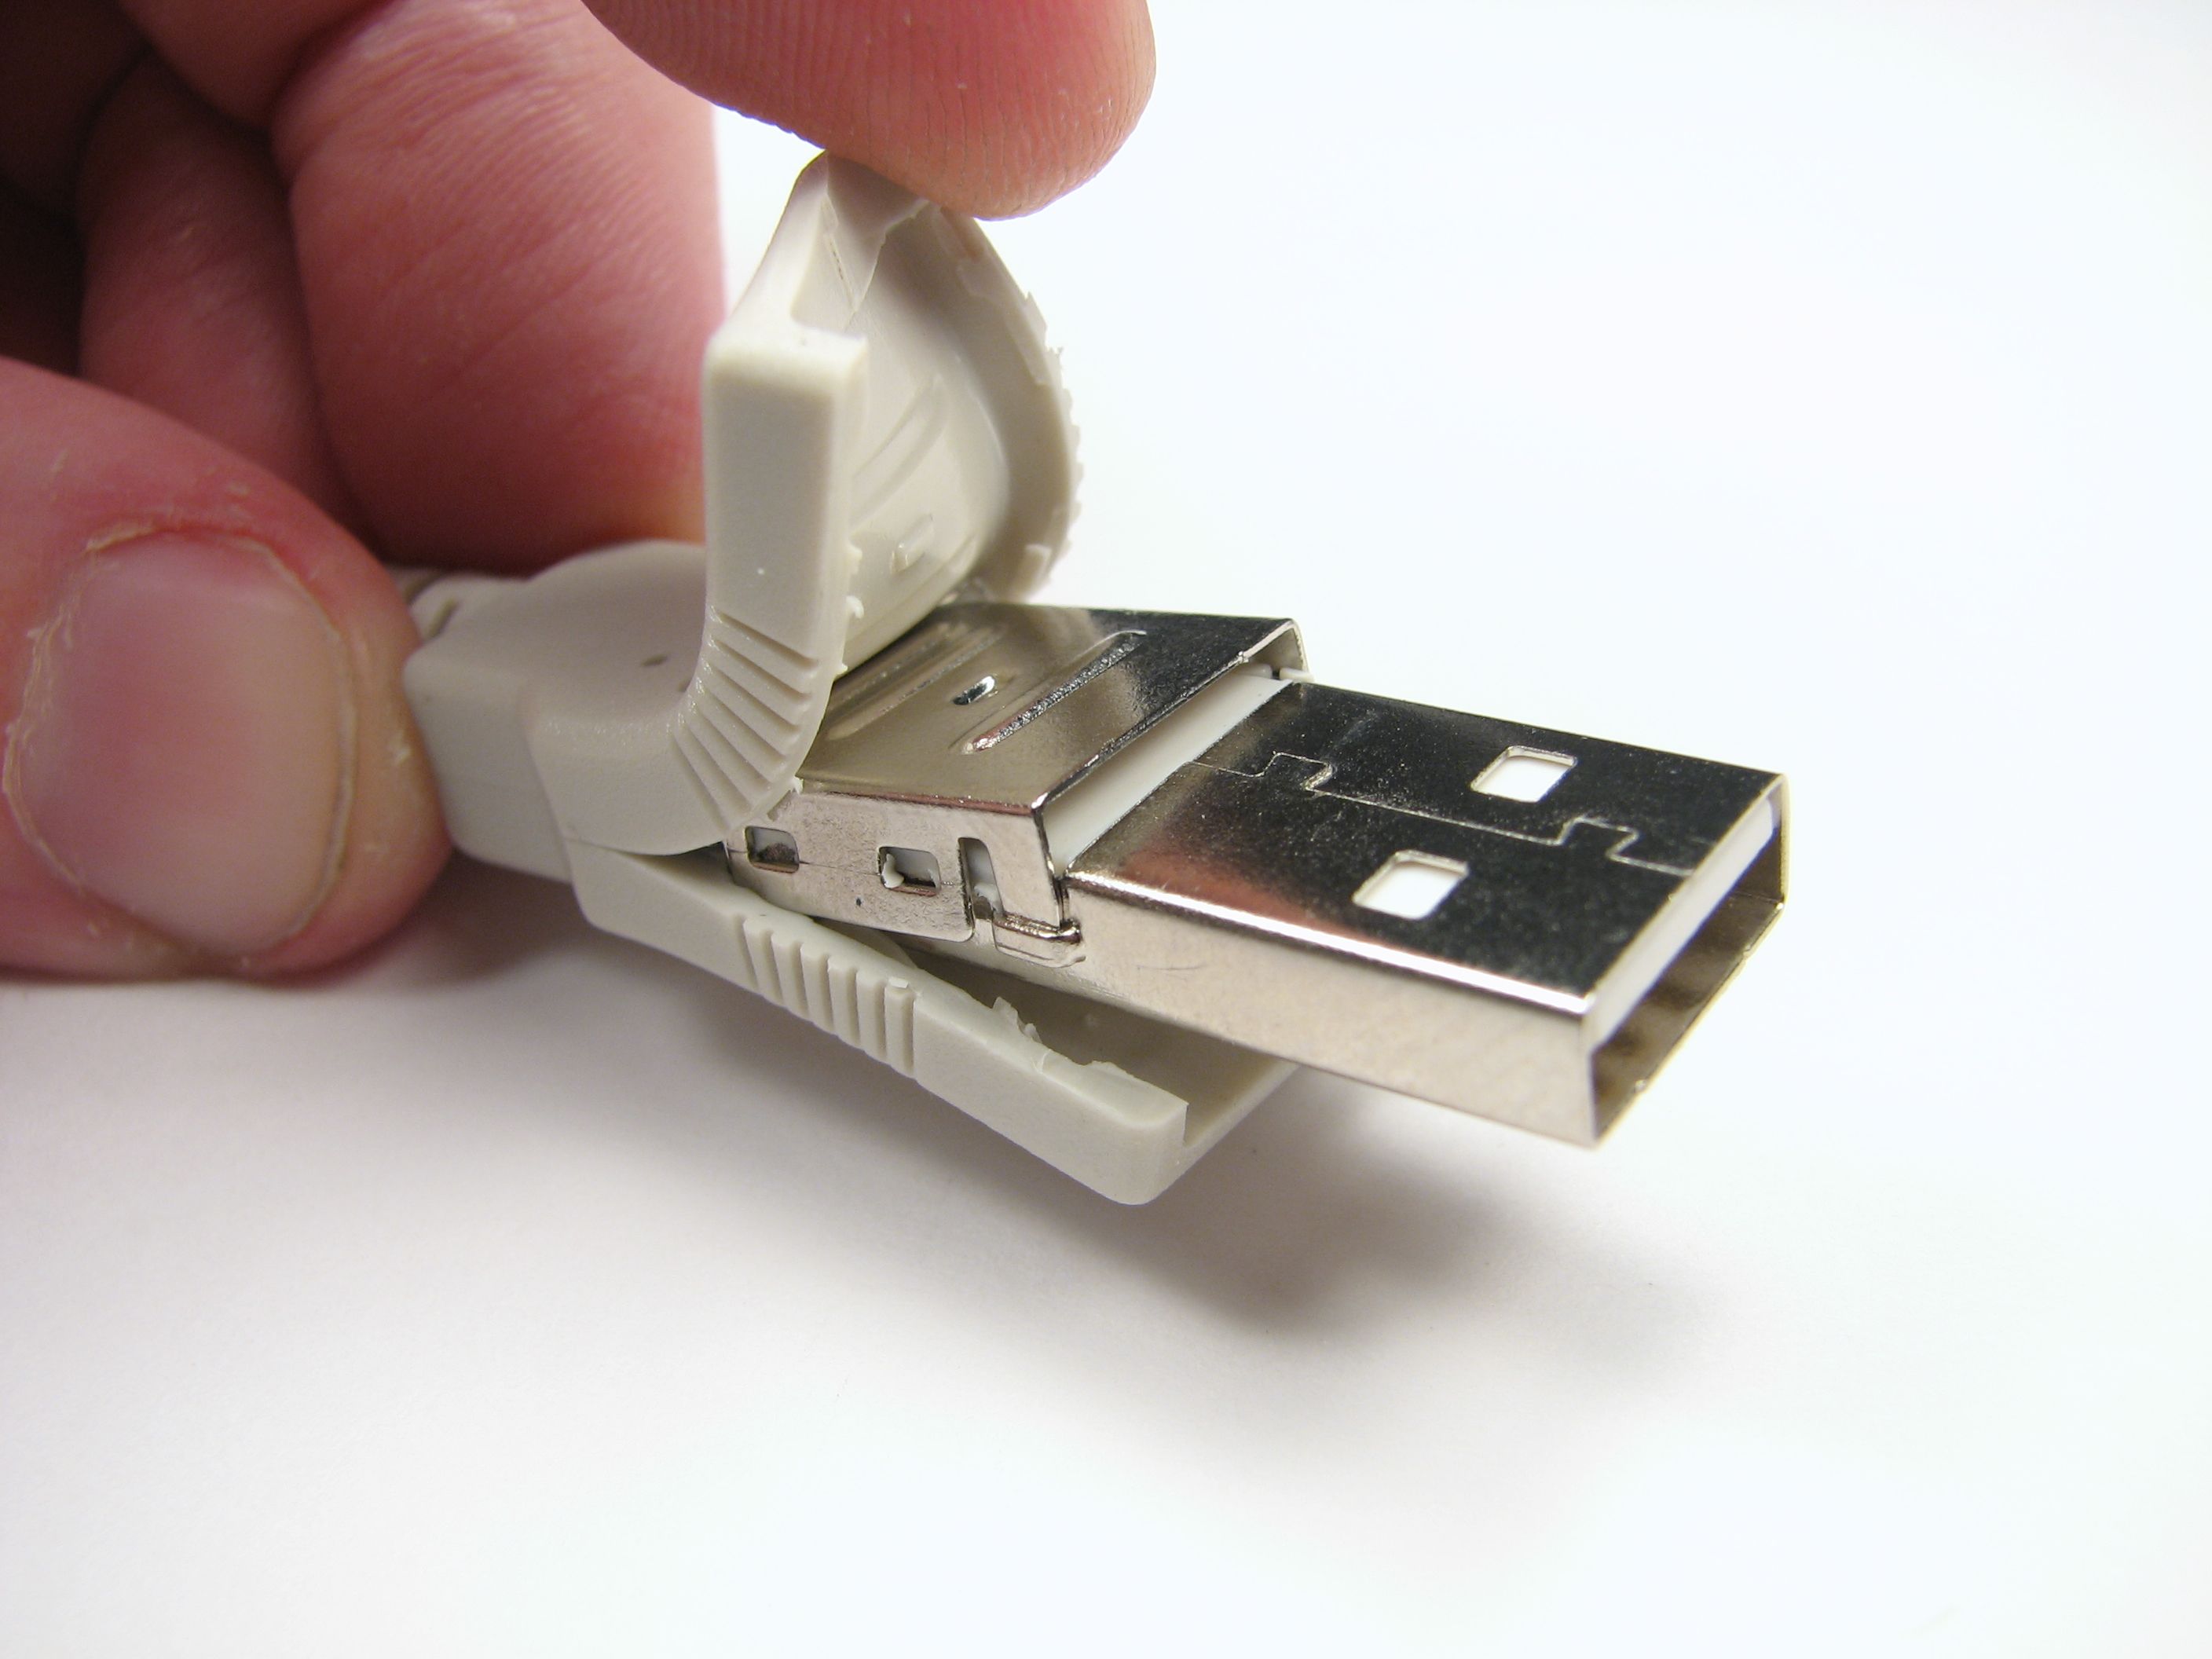
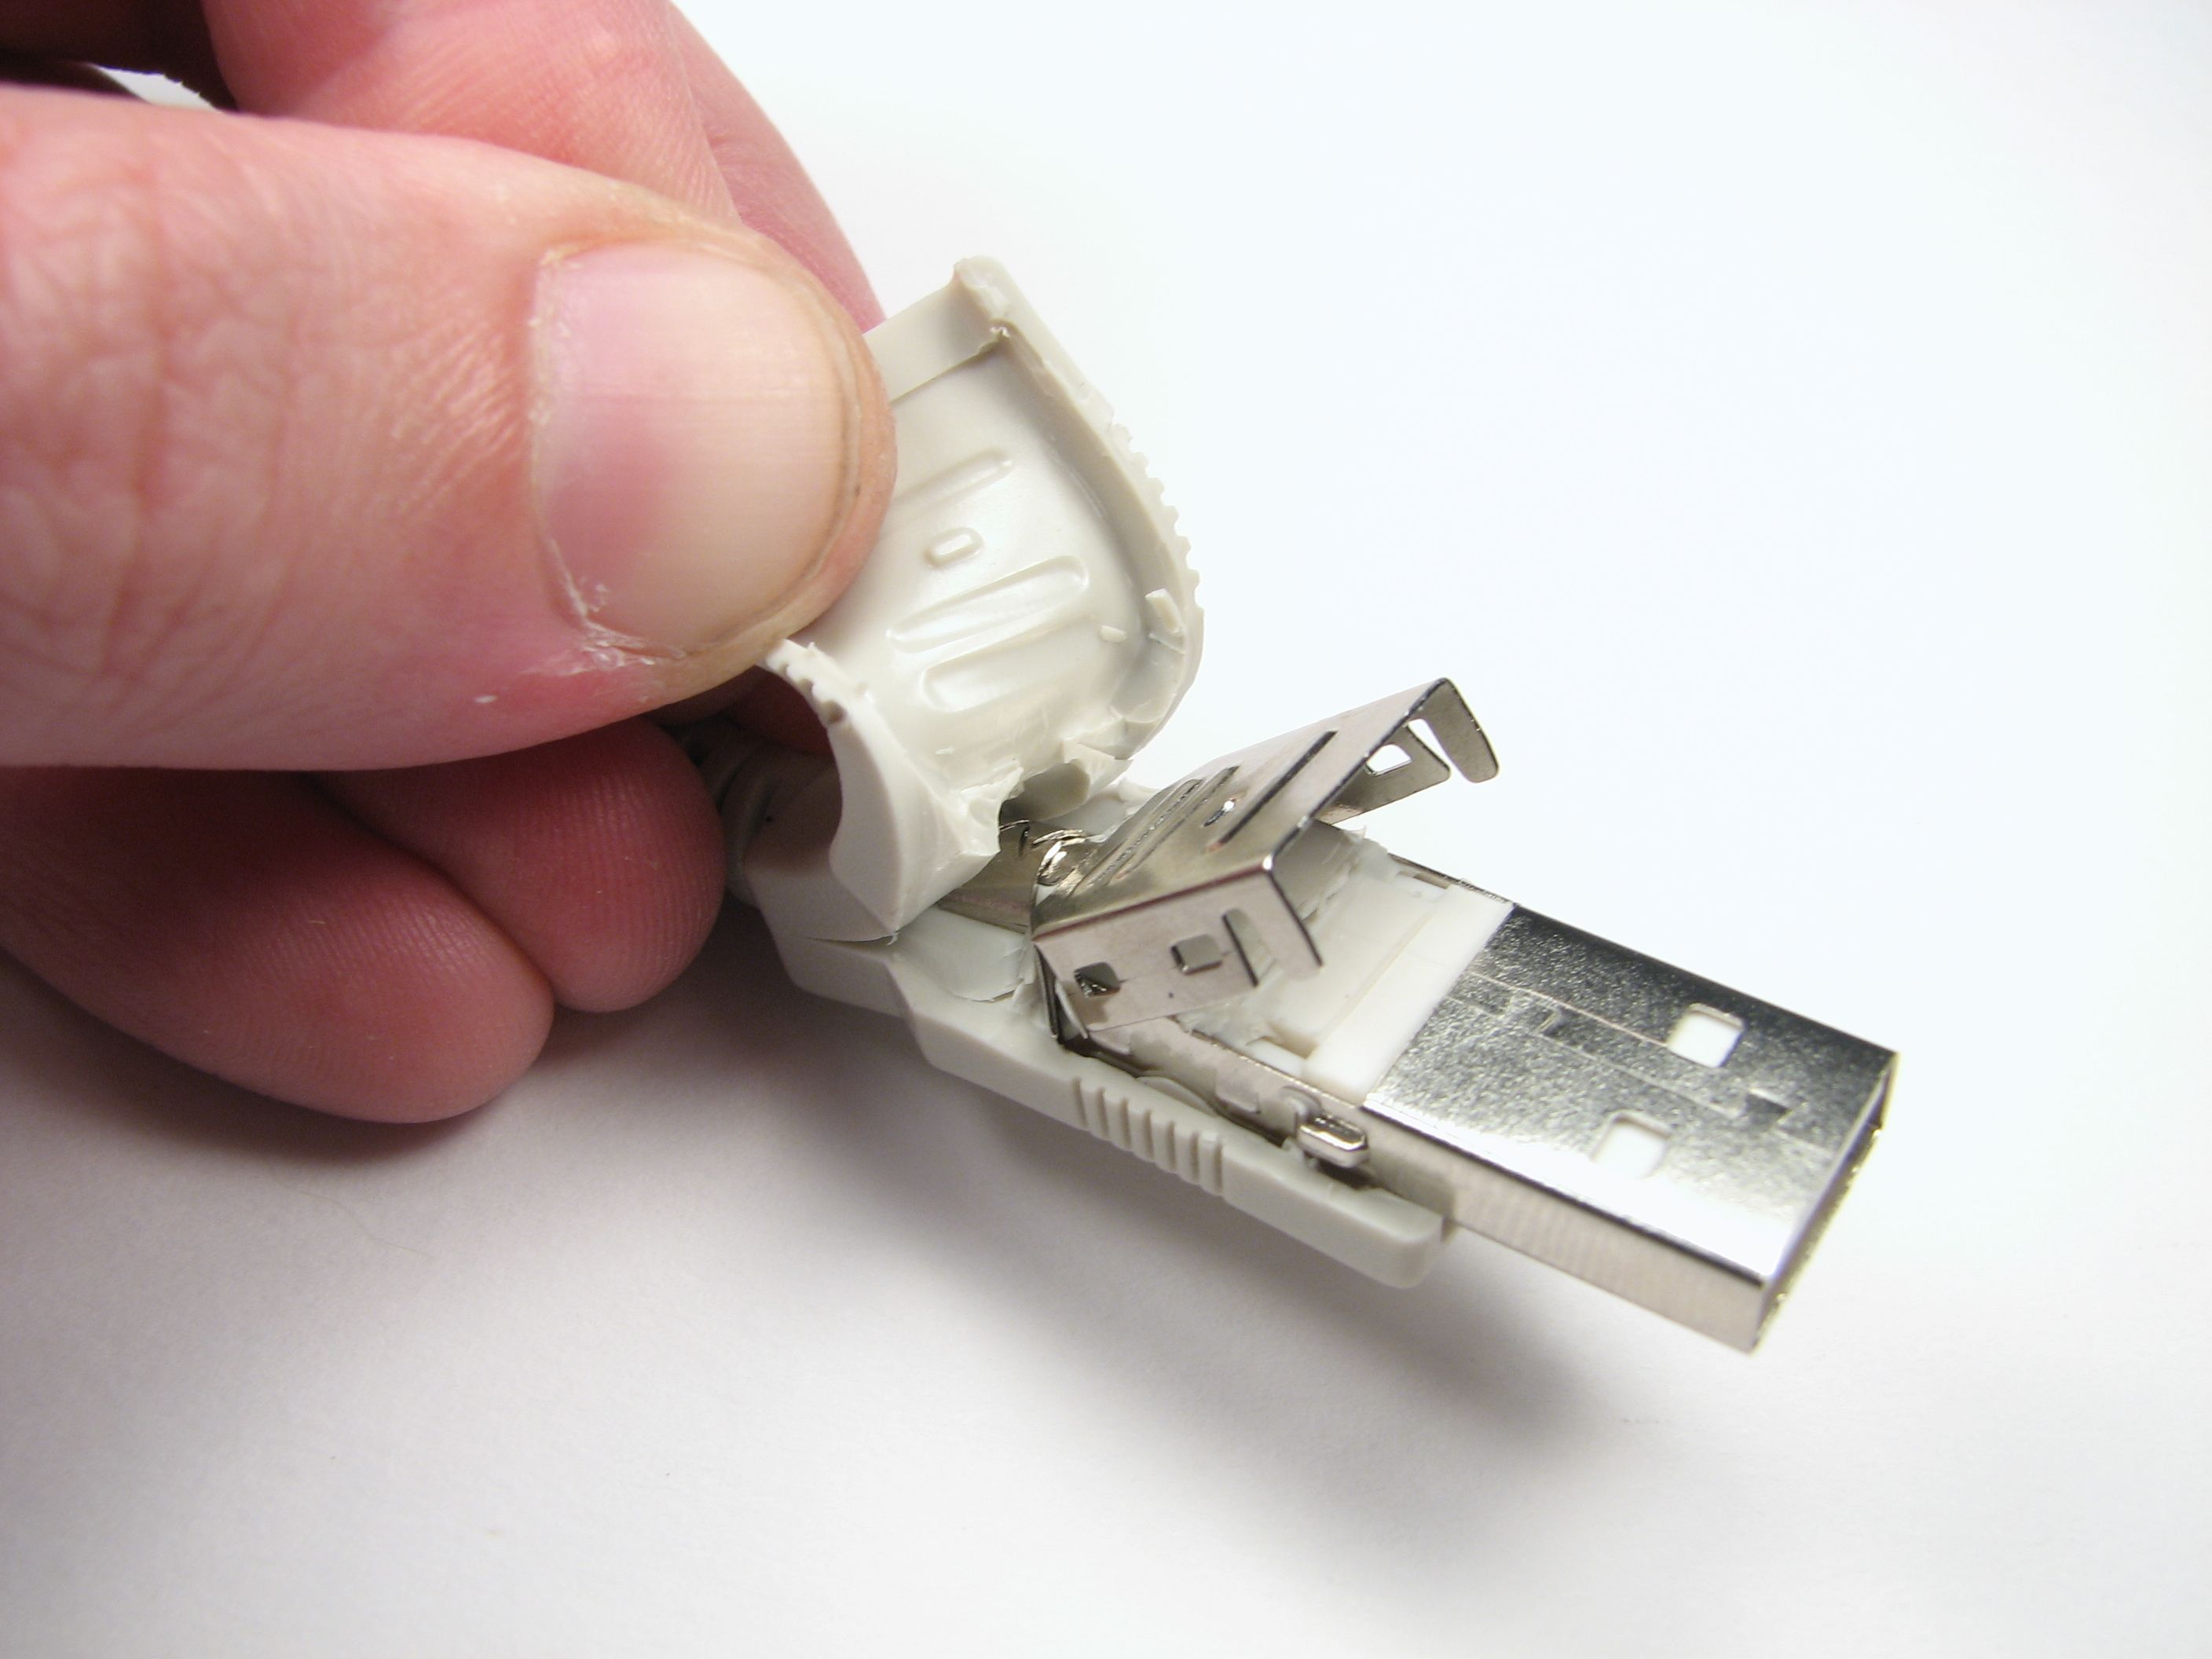
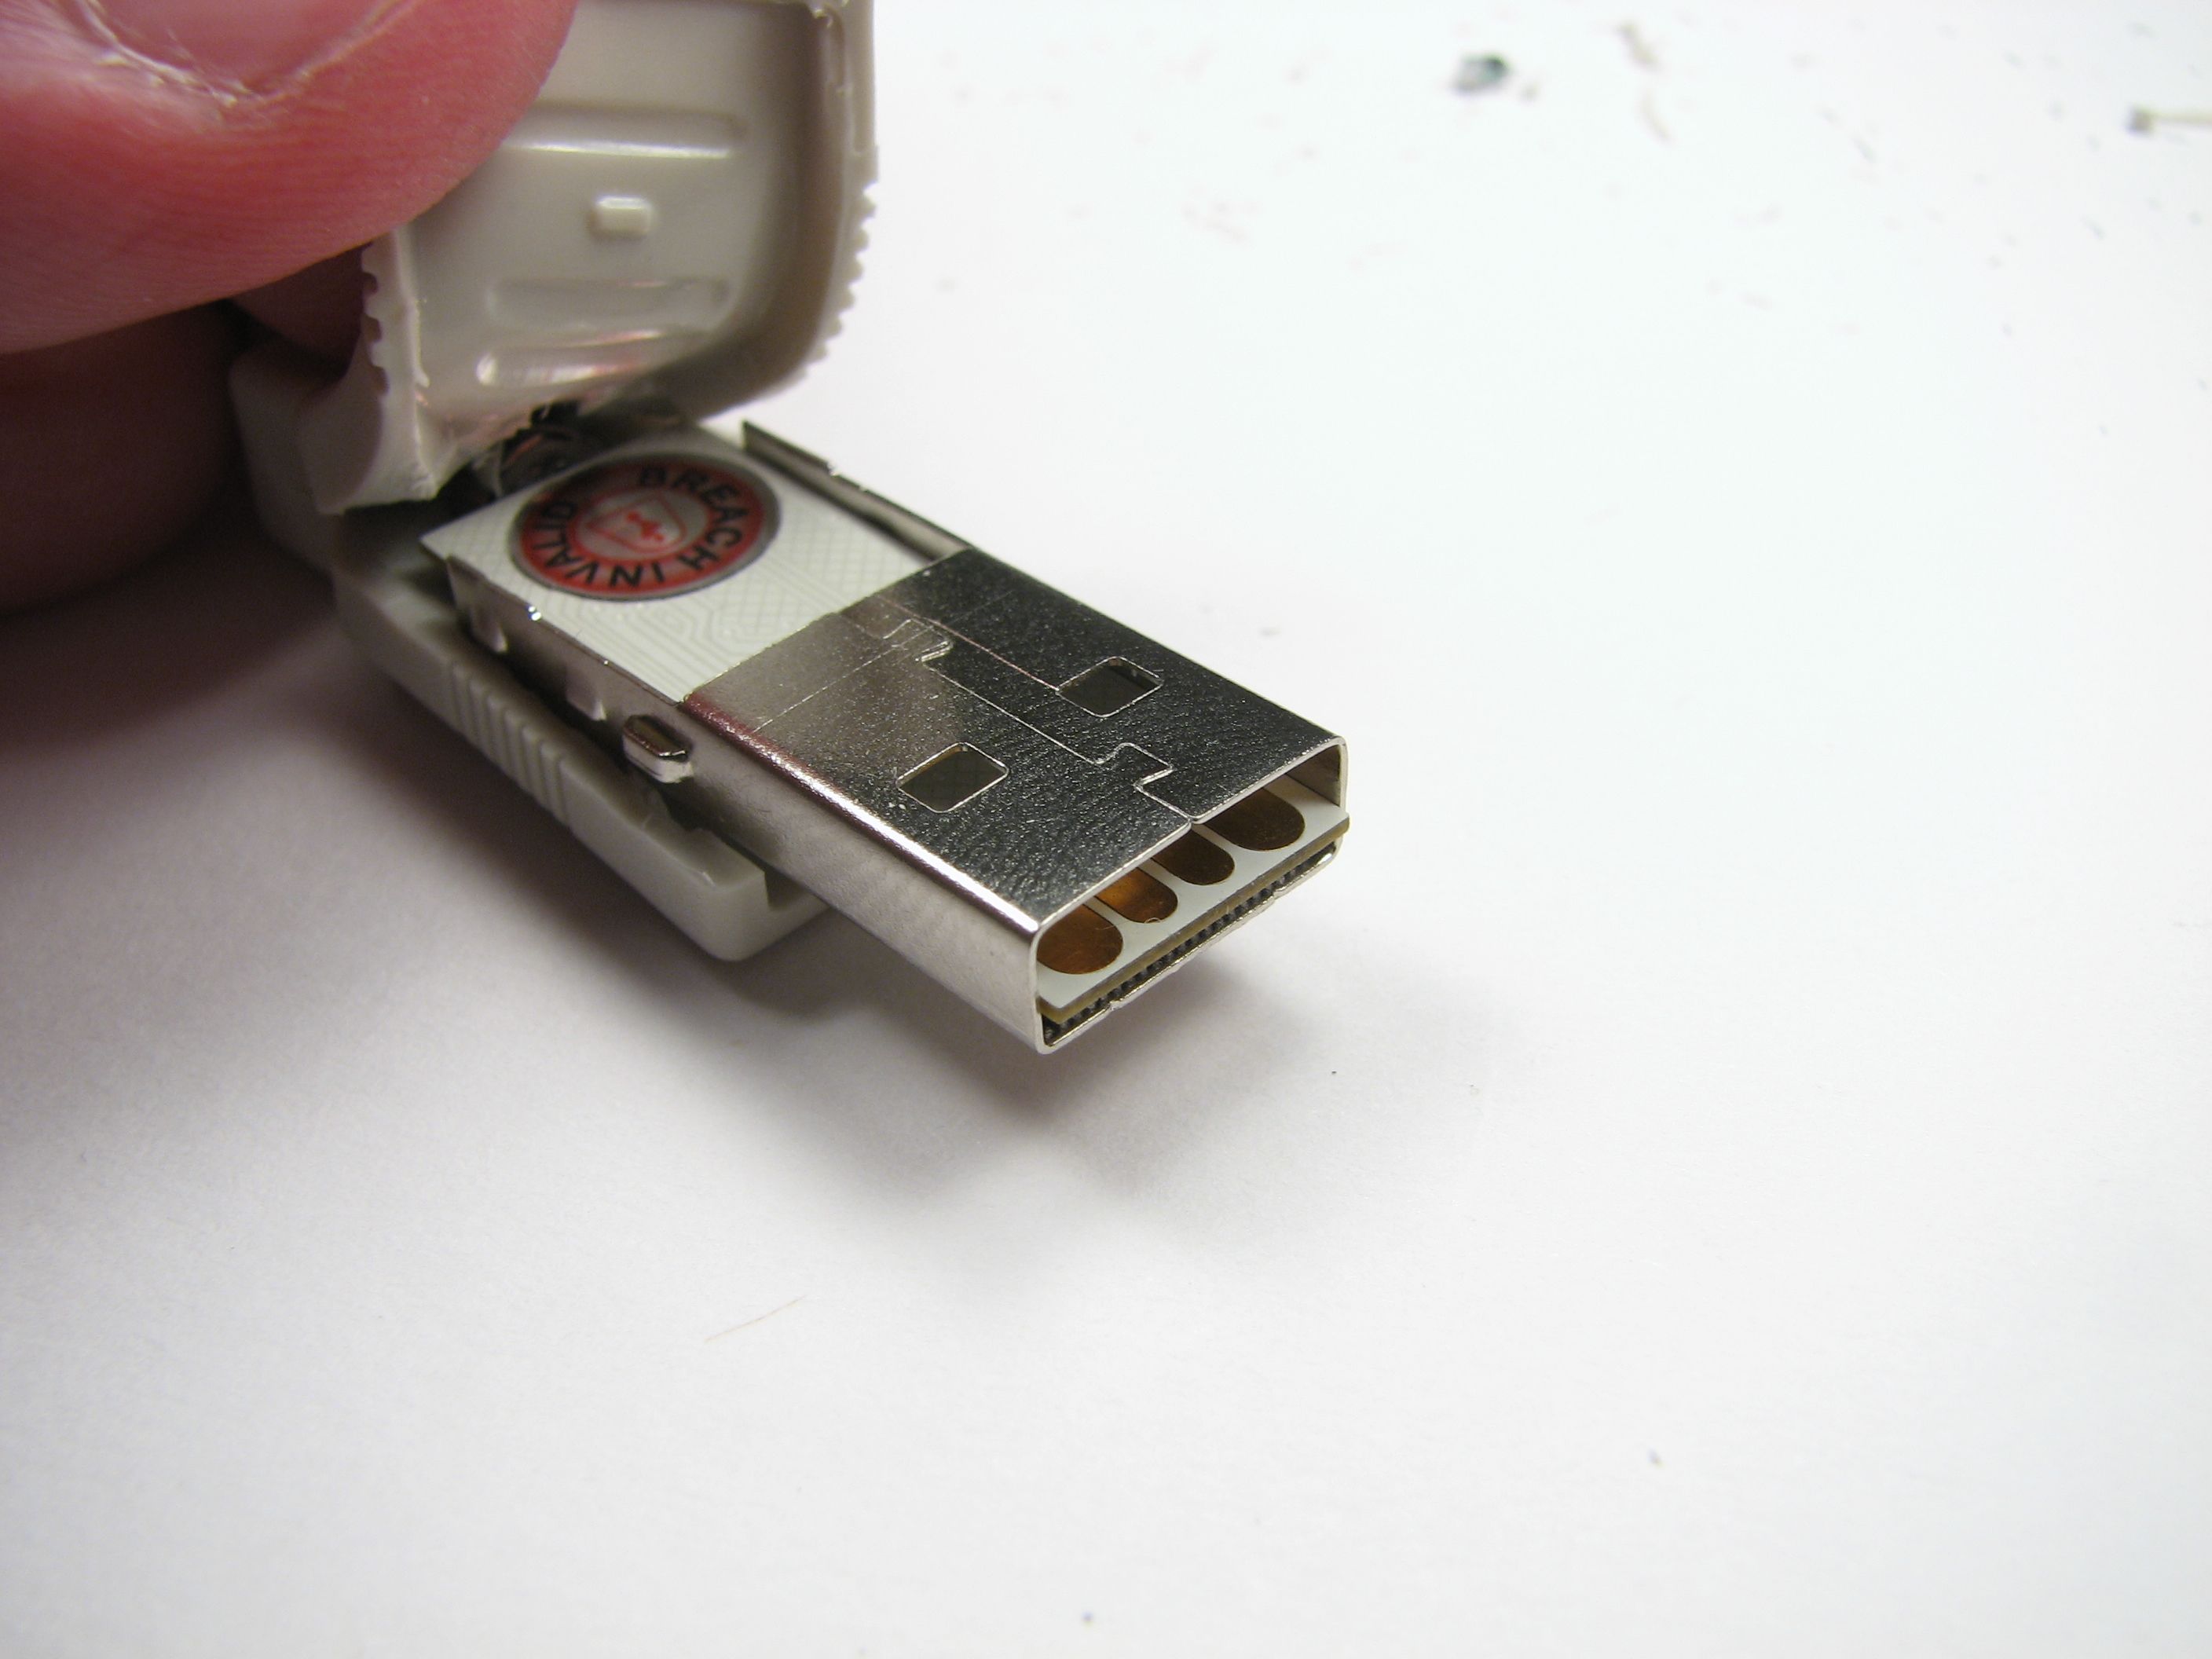
The metal shell underneath the rubber overmolding consists of two of pieces of thin steel that are stamped and folded into place. They are held together by some tabs and slots– use a small screwdriver to defeat the tabs and you can pull the flap the “lid” piece, so that you can now get at the inside of the metal shell.
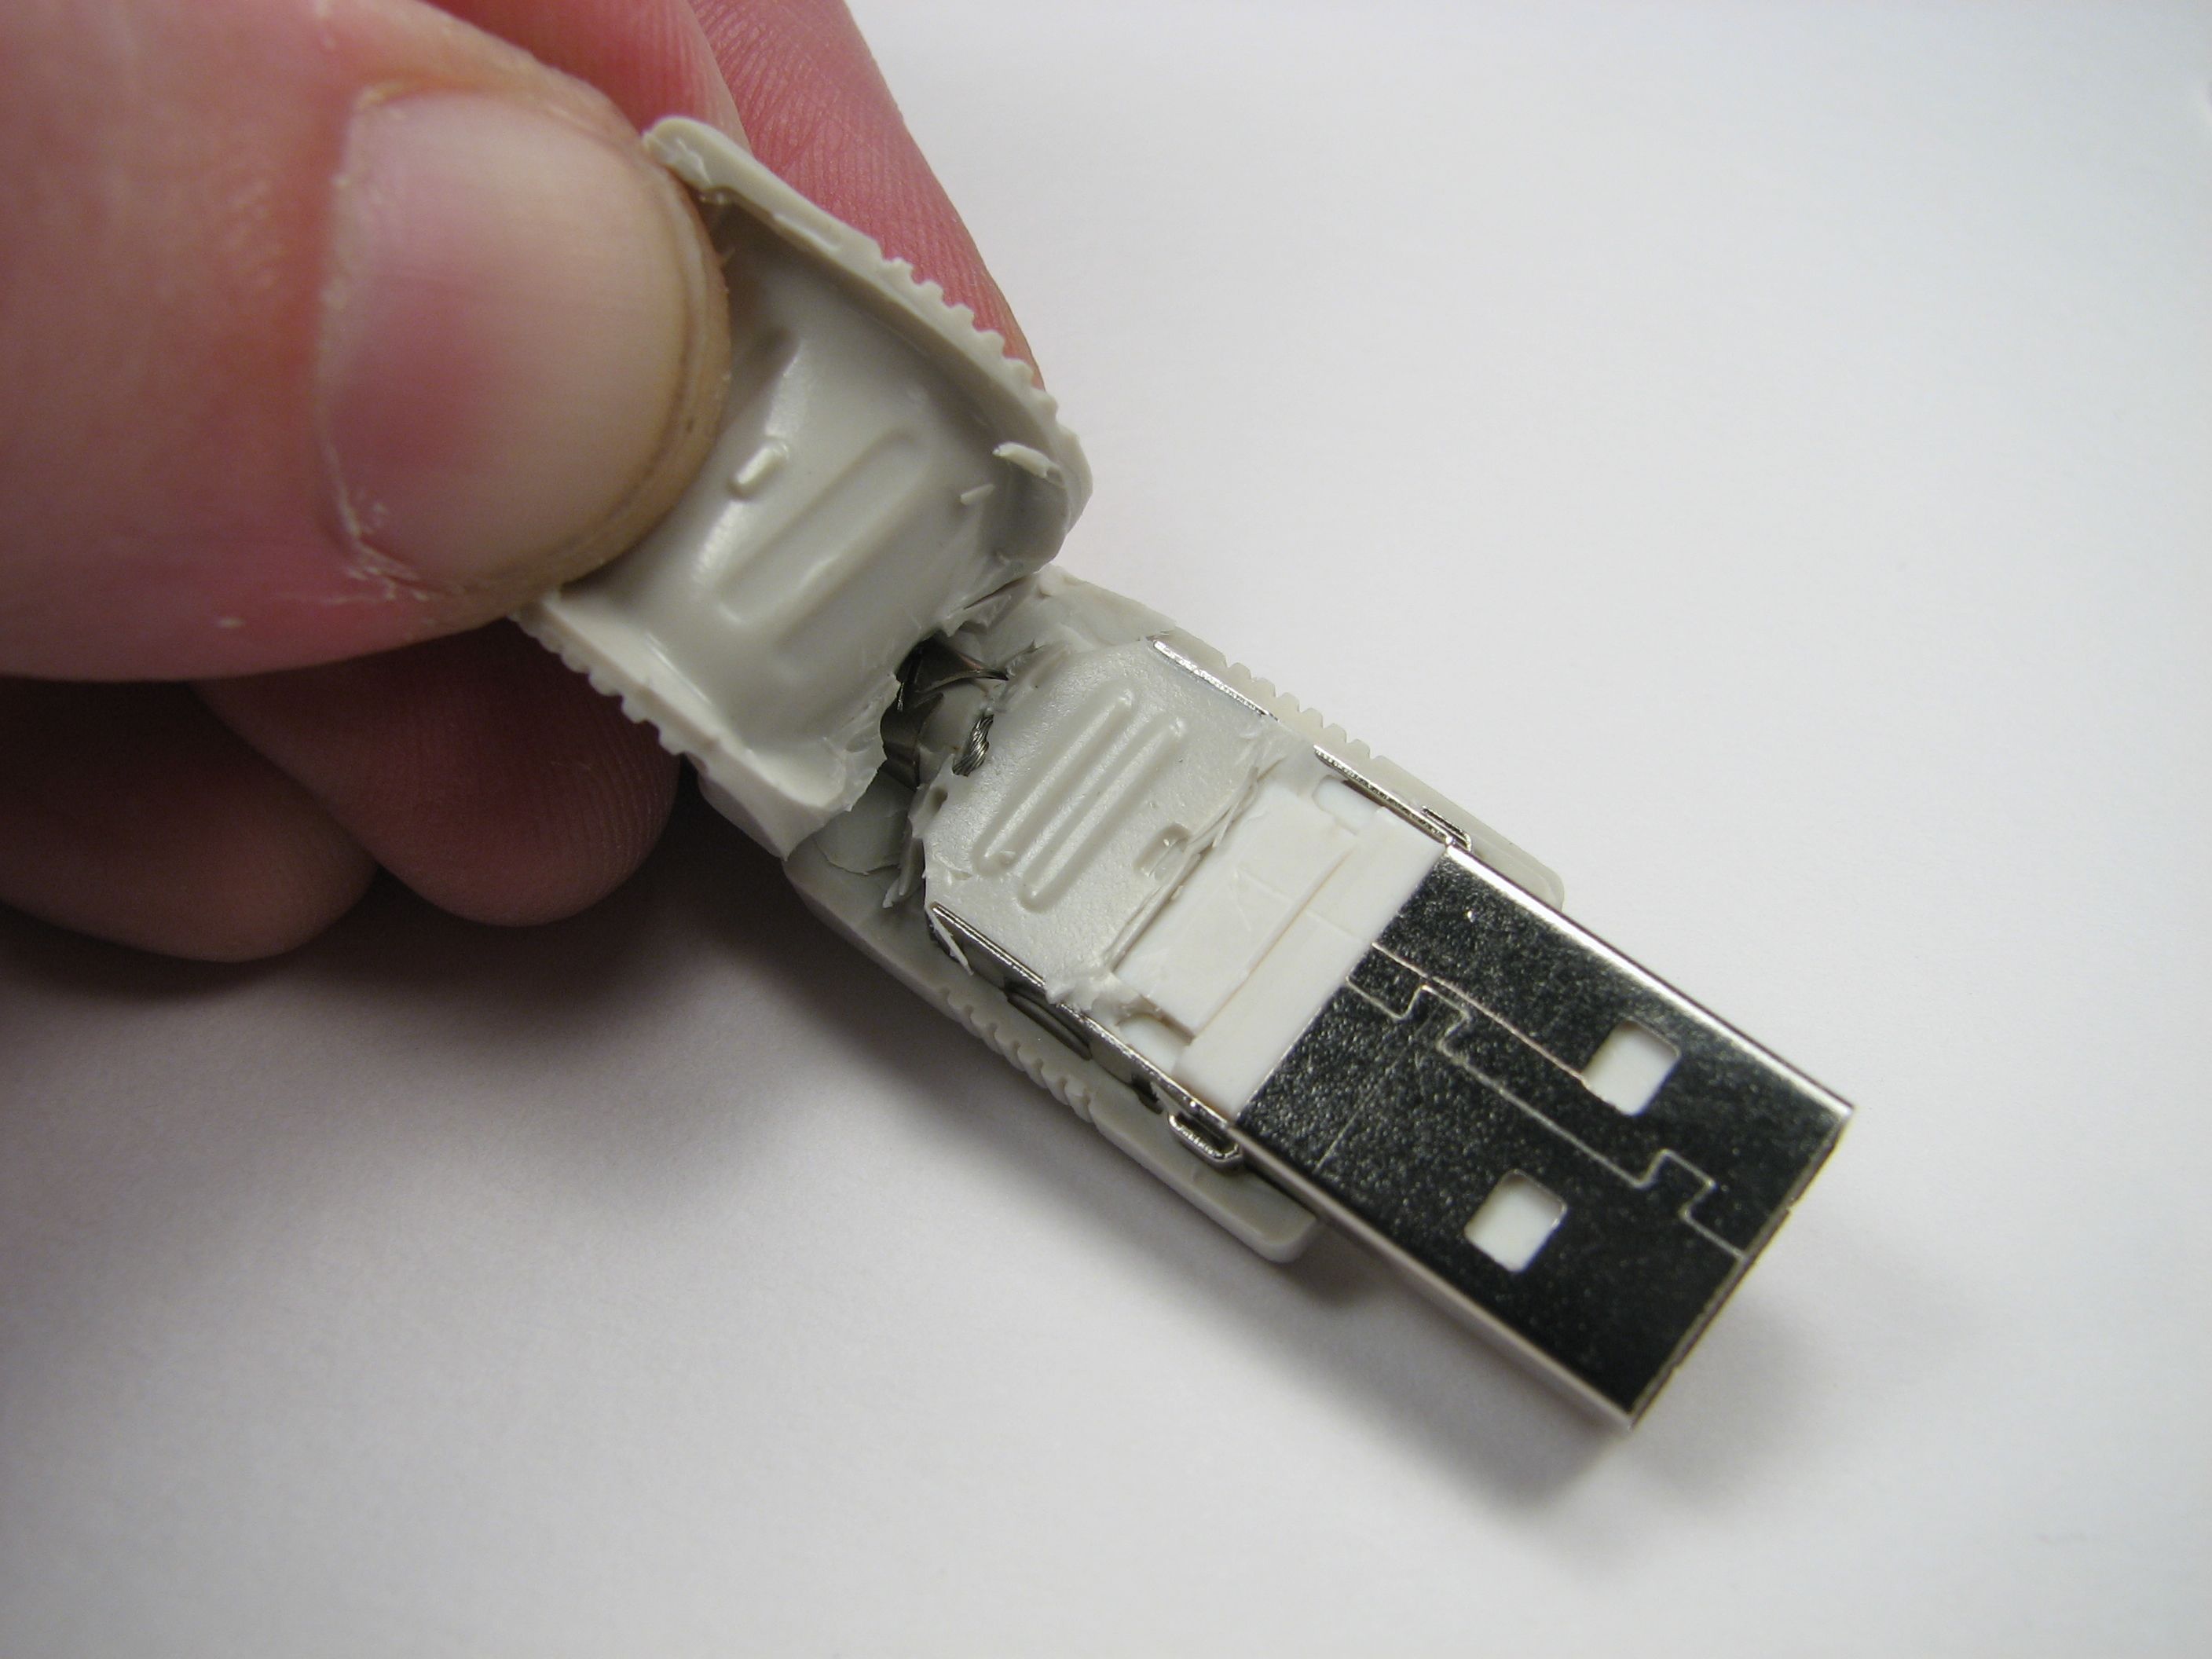
With the one piece of the metal shell removed, you have access to the middle parts of the shell where the original USB wires and plastic and metal connections are located. Cut them away with your choice of tools. I found that the hobby knife worked well enough to sever the wires, at which point the remaining plastic parts could be removed pretty easily. What’s left is just the metal shell– ready for us to put our own circuit board in.

Now we can start to test-fit the bare-board USB drive into the metal shell. Seems to fit okay. Still need to fix it in place, though.
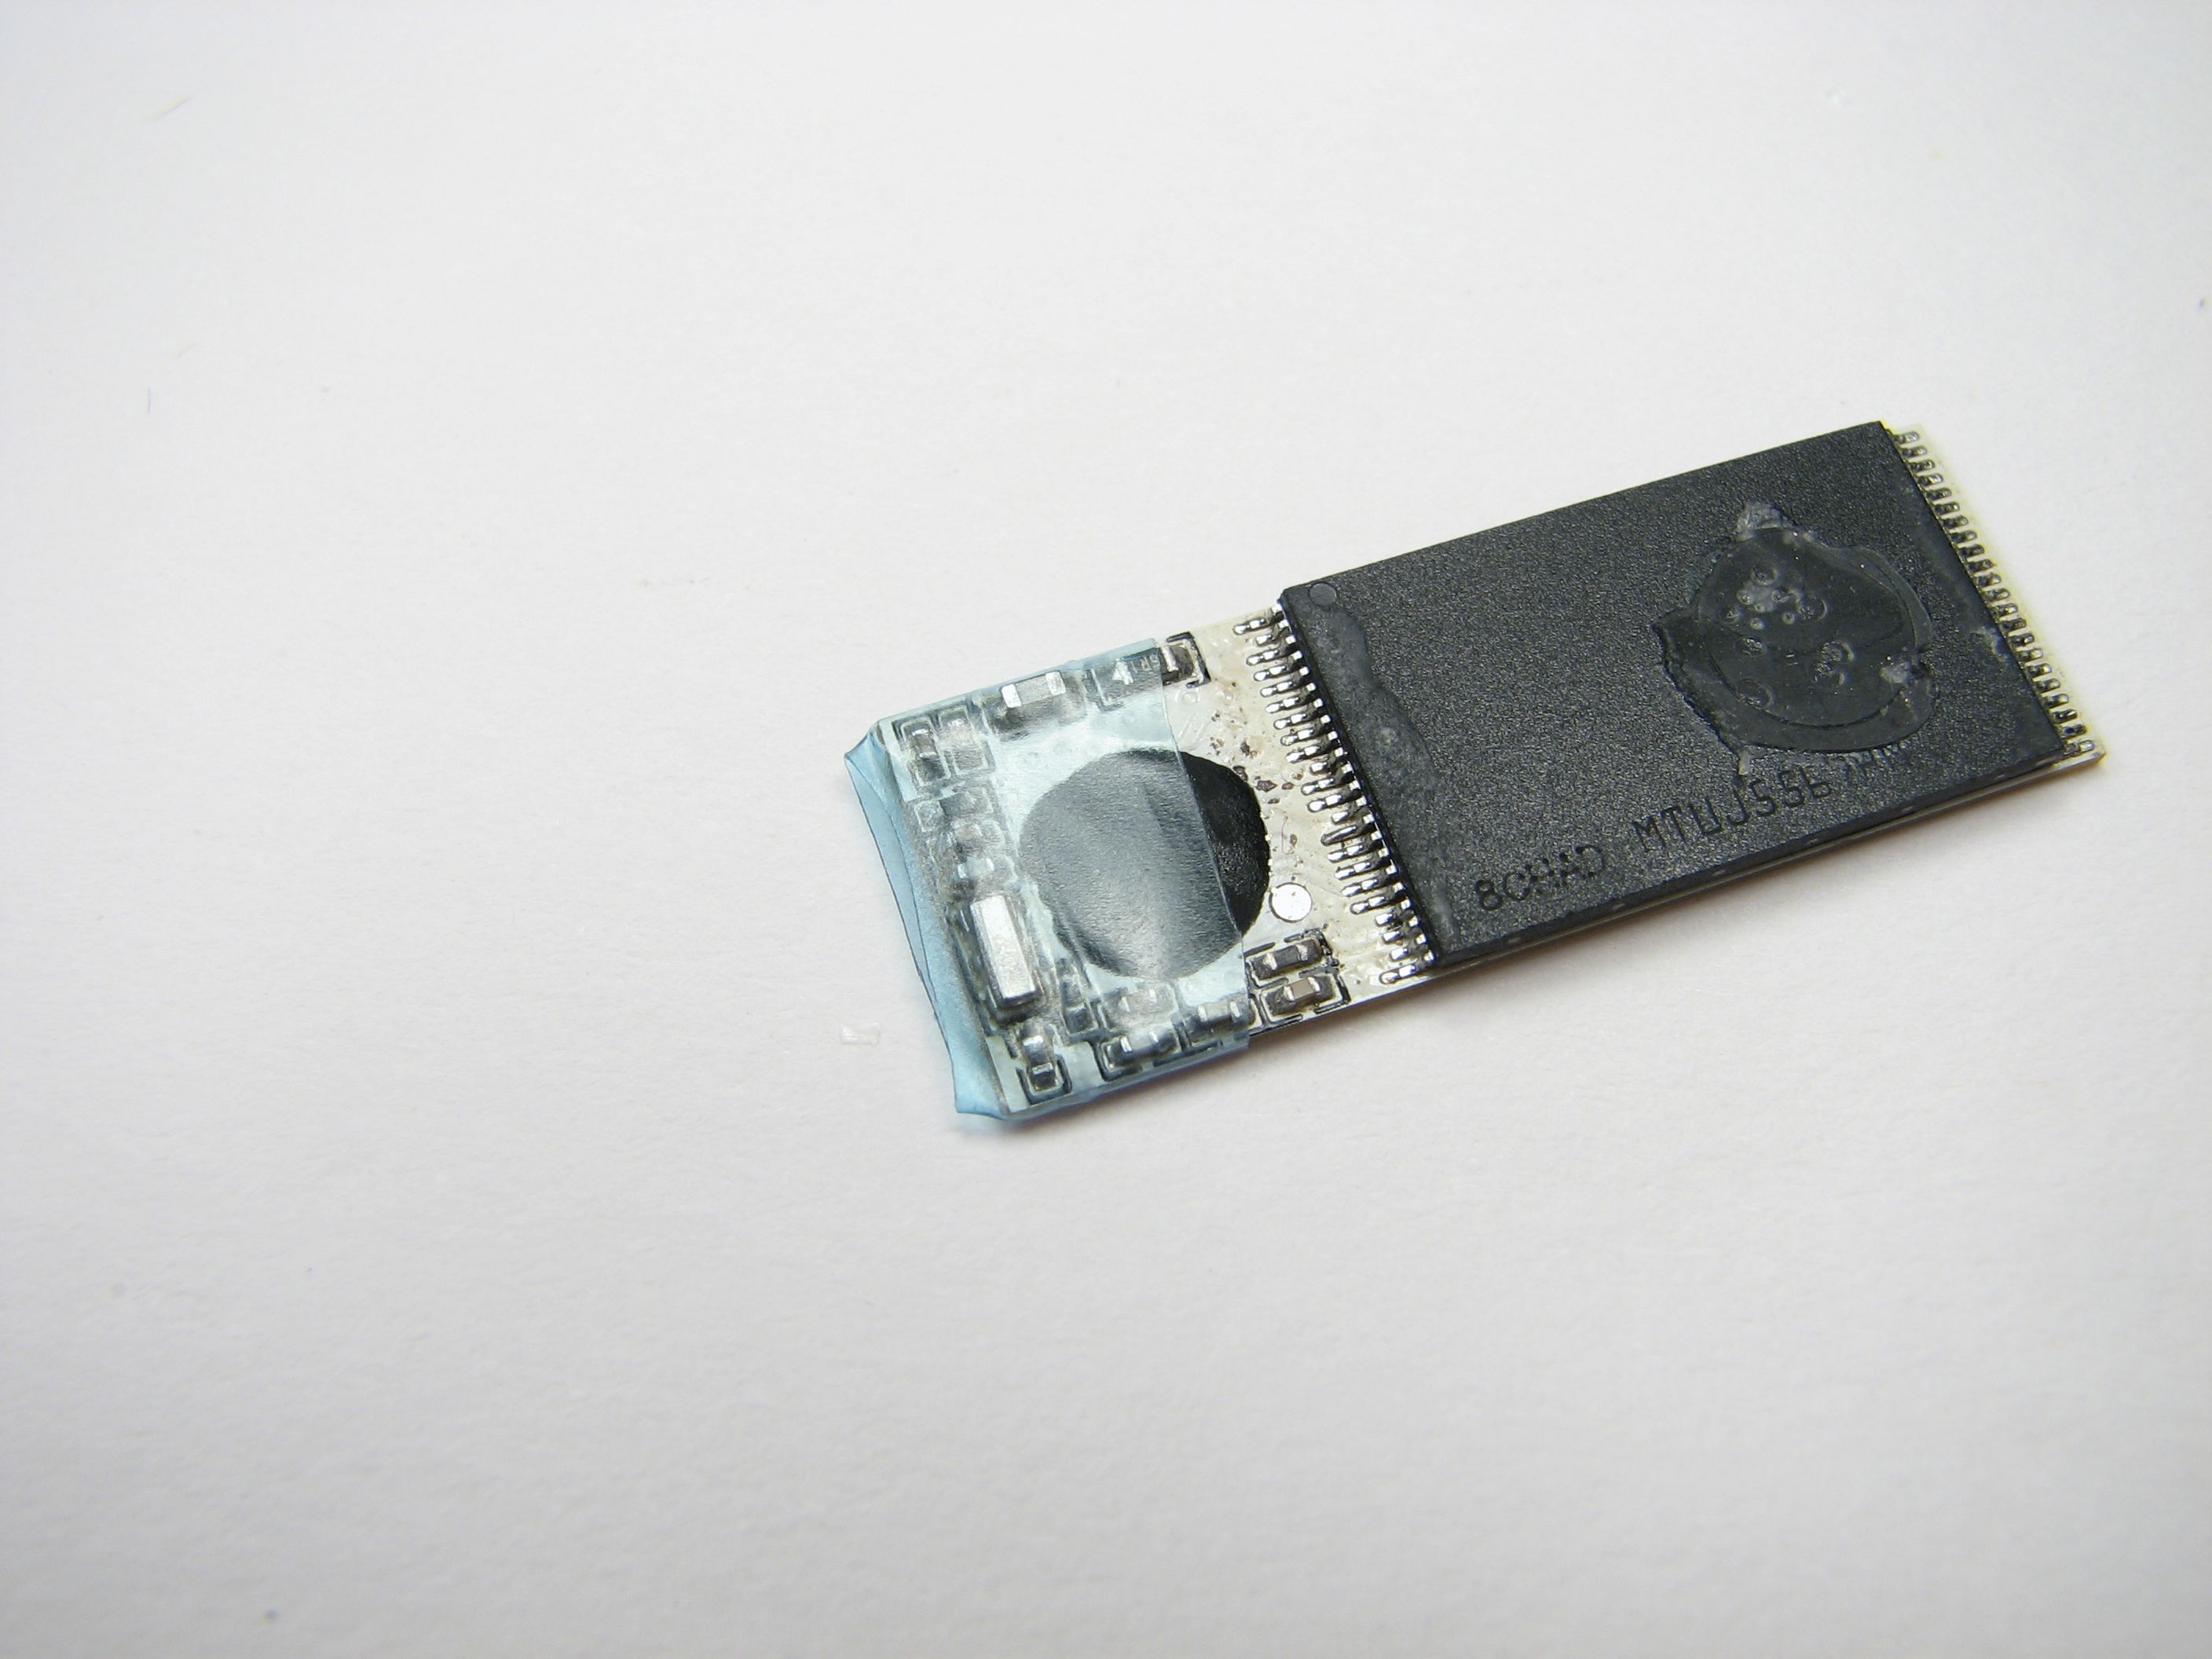
One other final detail to take care of: The back side, where the circuit board will be resting, has some metal parts that the back side of the circuit board will be touching– so we need an insulator there. I had an old piece of clear blue heat-shrink tubing that happened to fit well, but a piece of electrical tape would have done the job too. Once that was added, it all looked safe and still fit together.
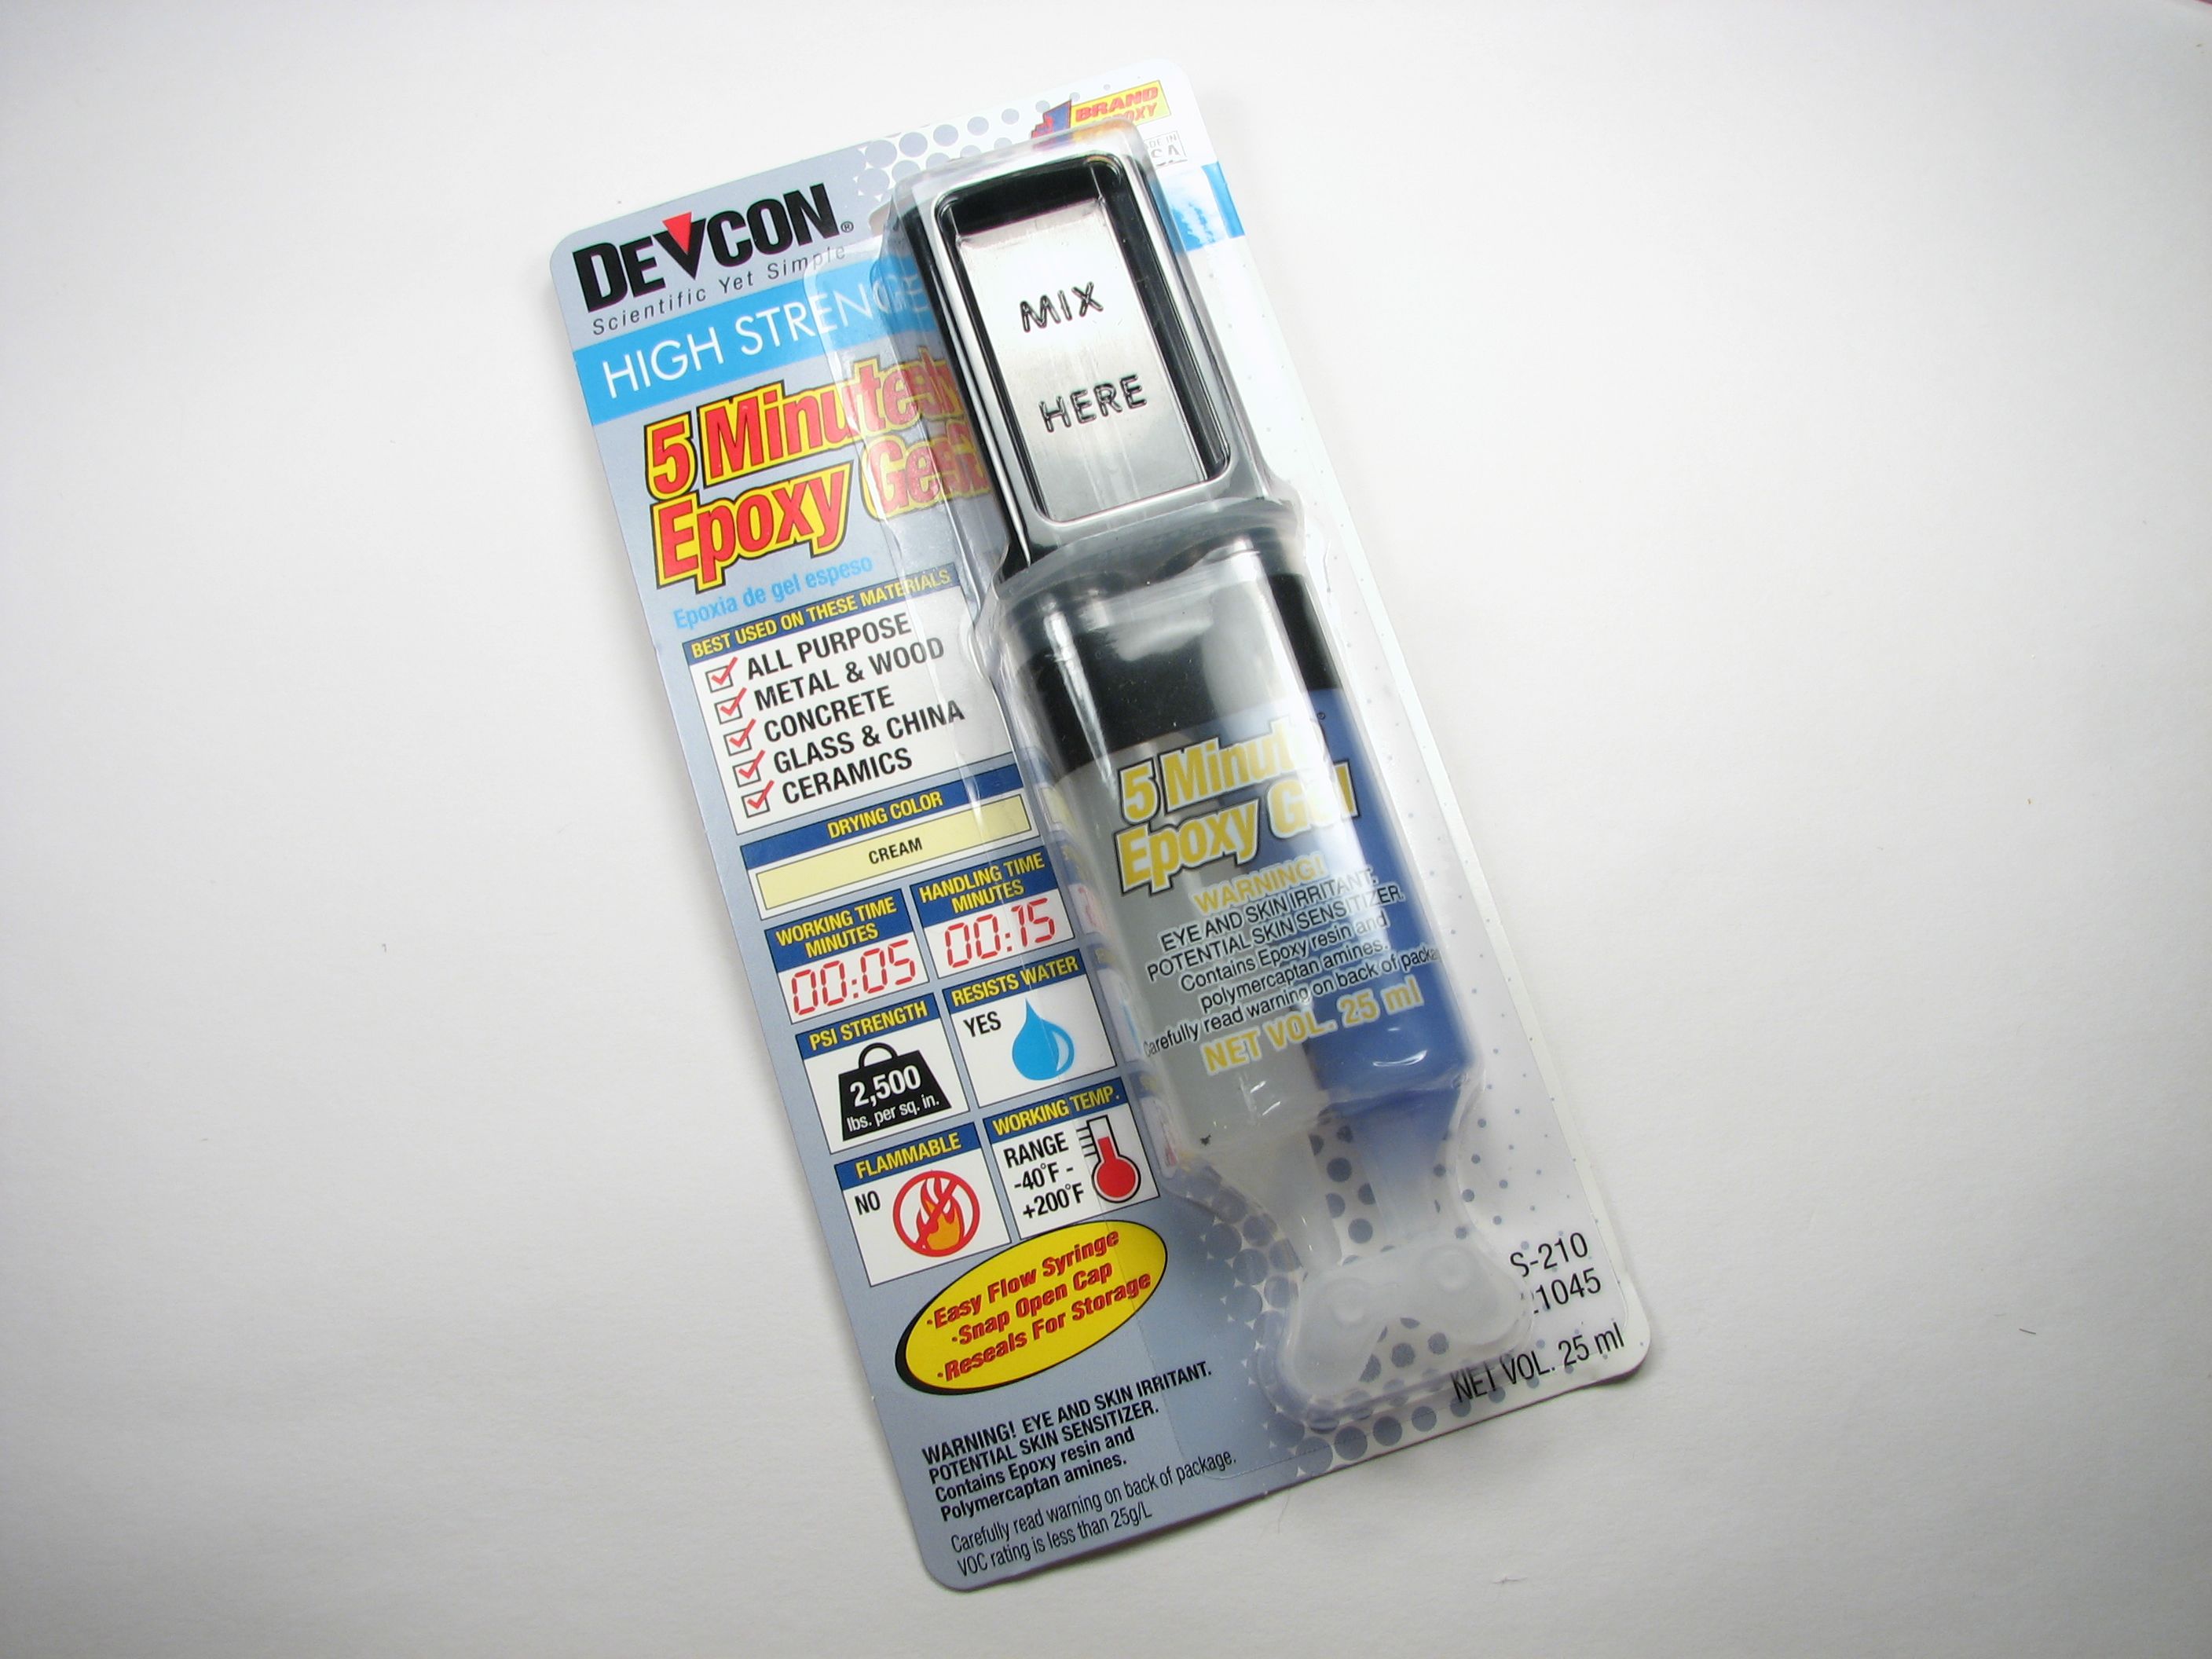
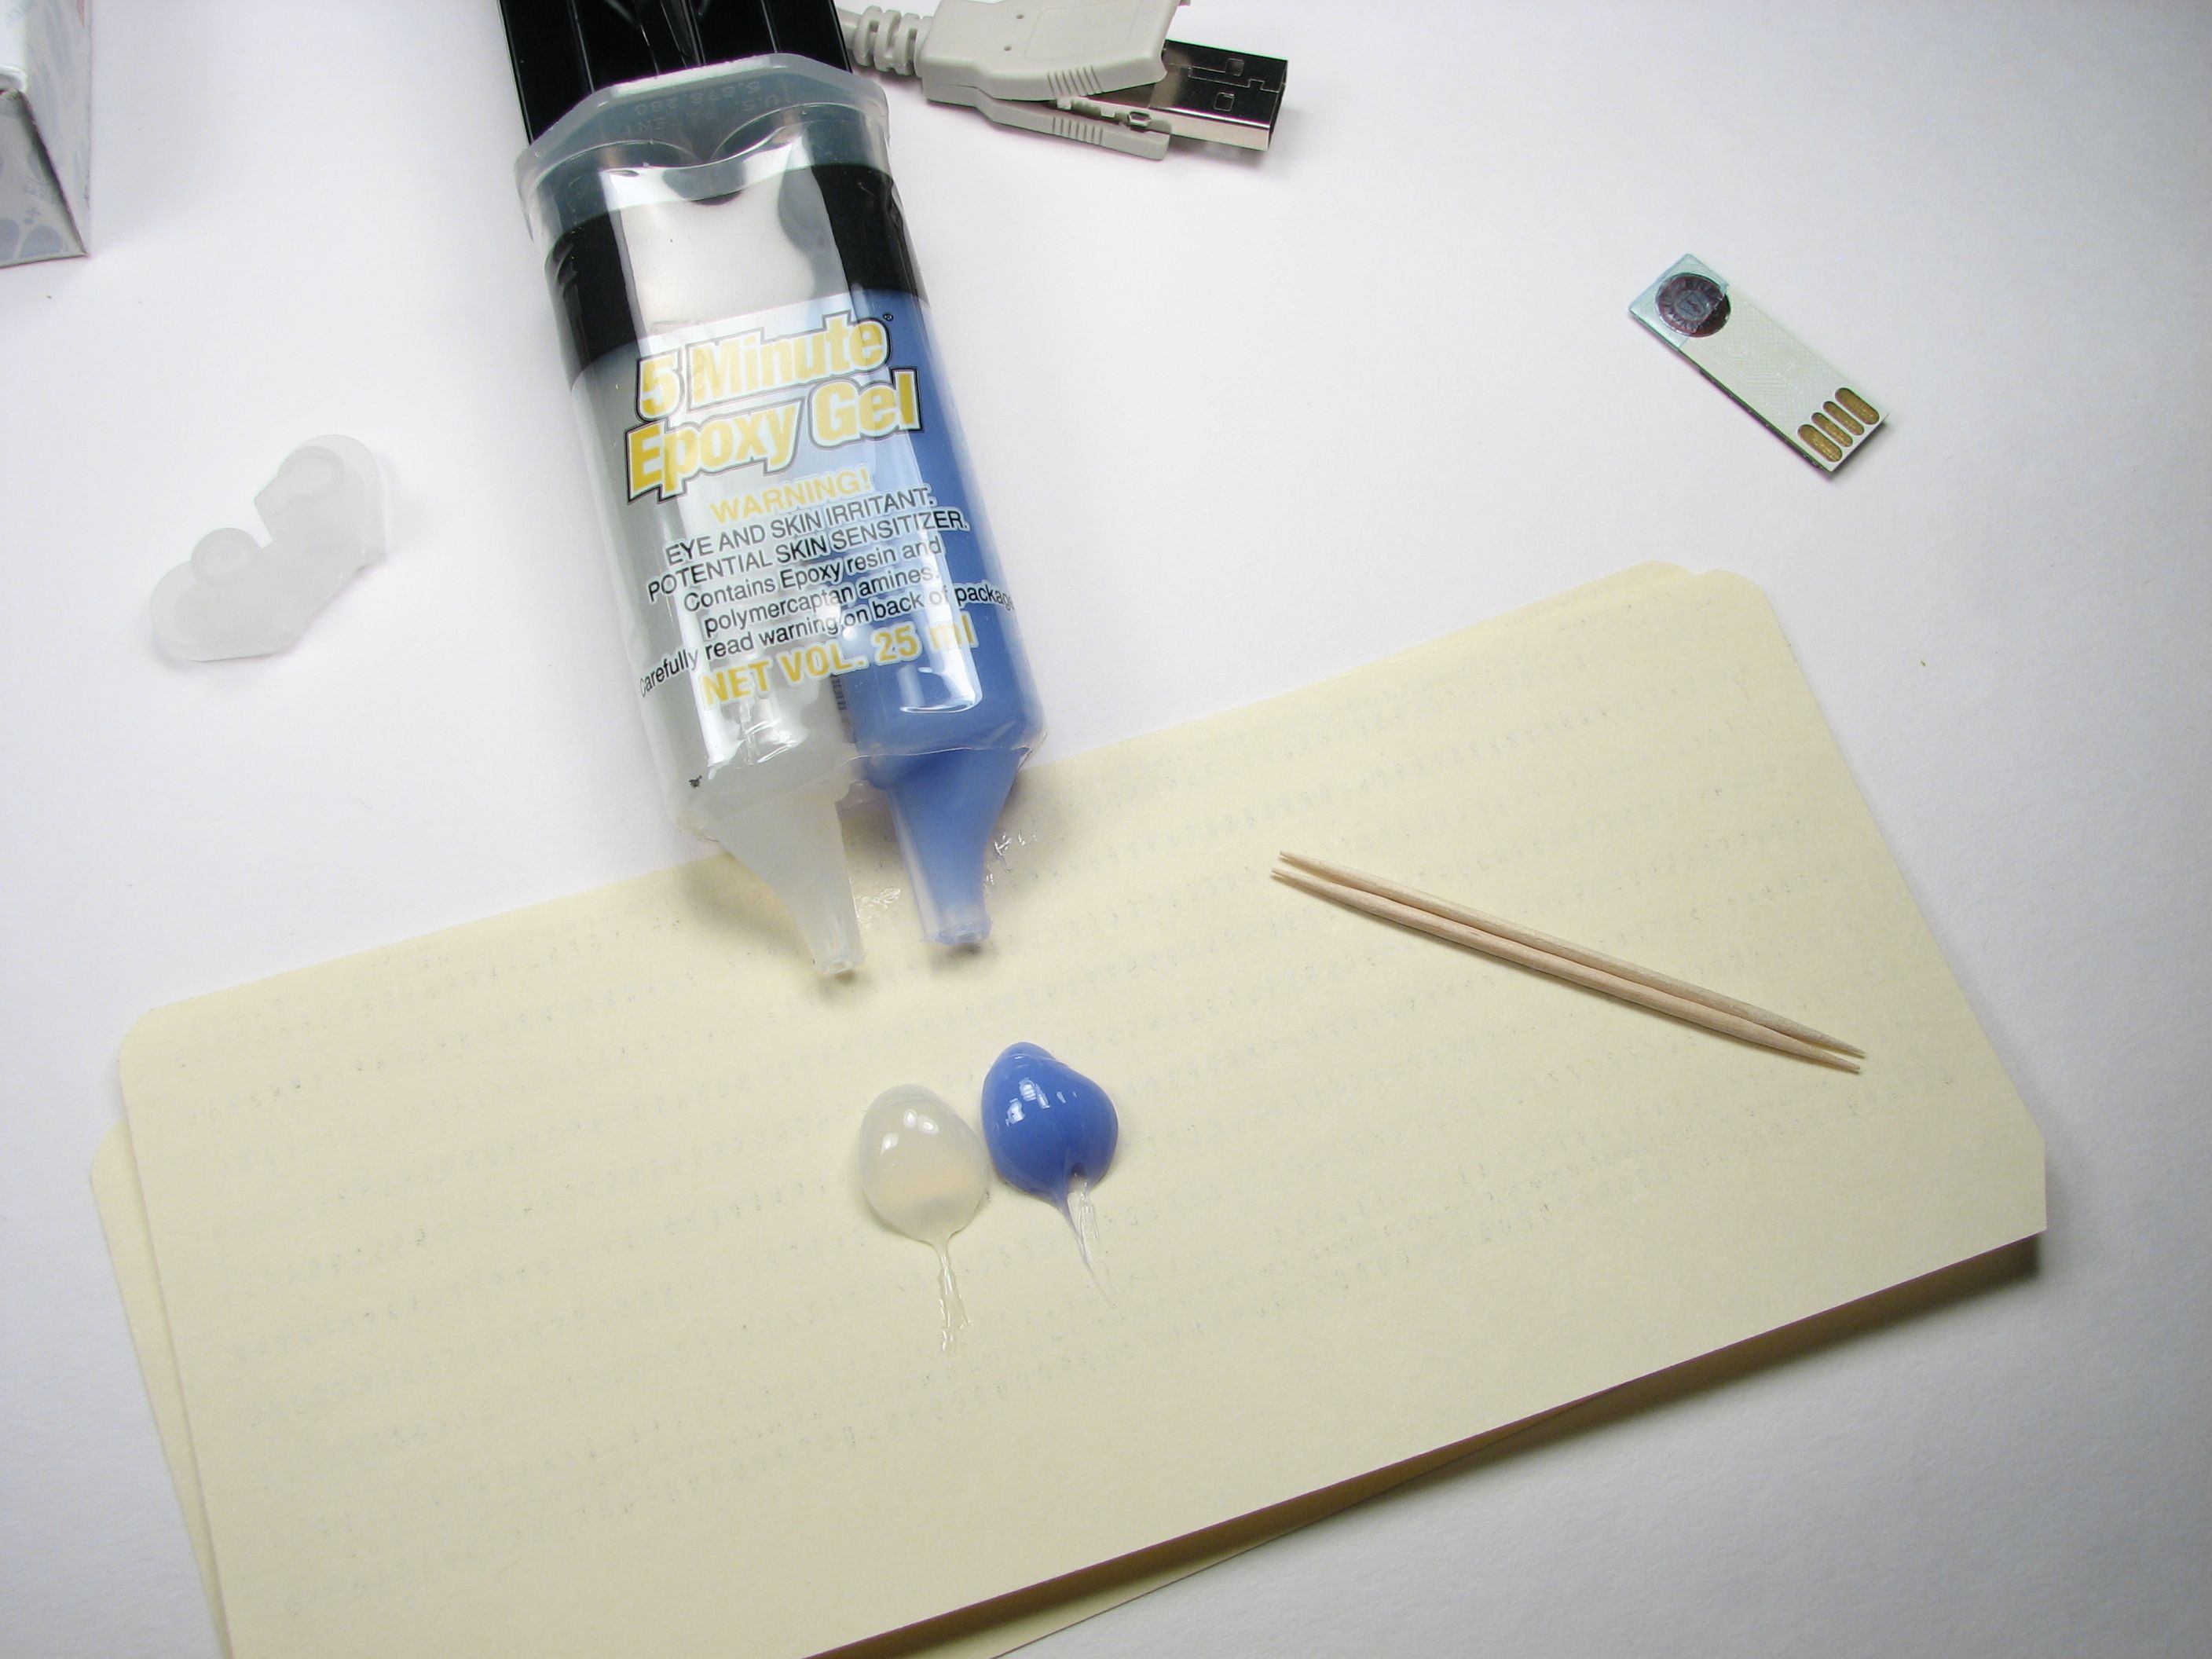
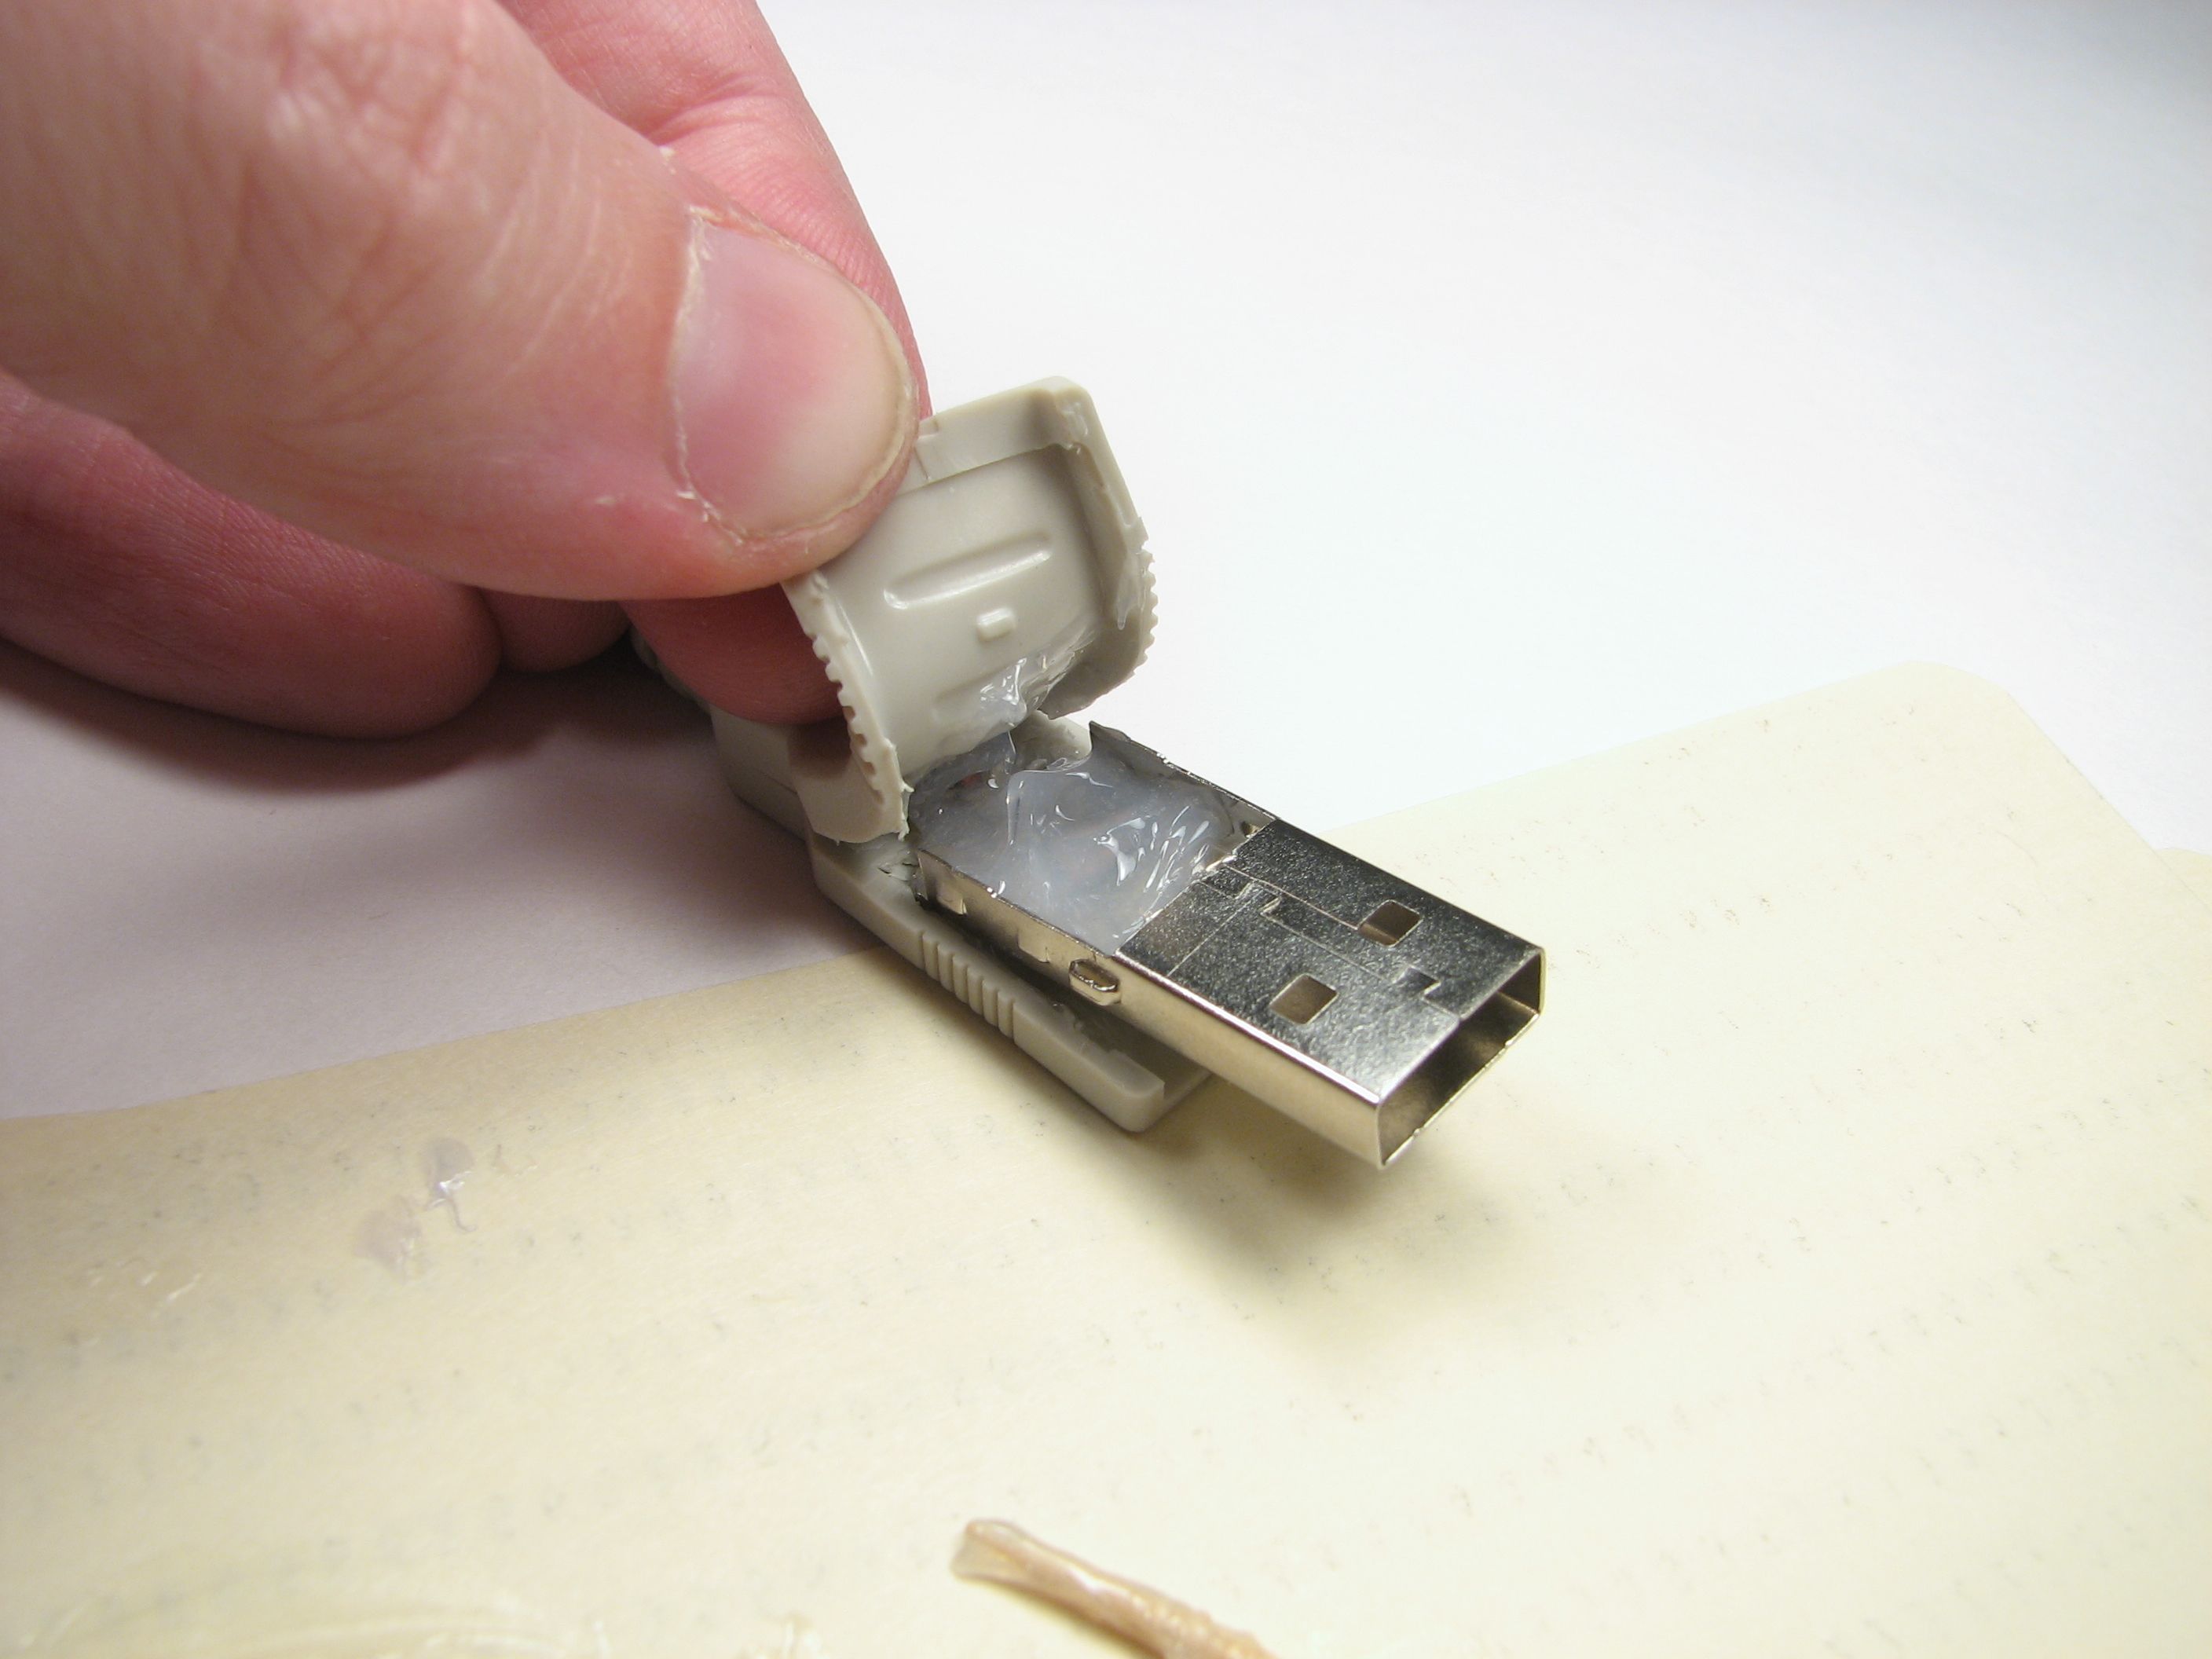
To bond everything together and fill all the extra space inside the USB cable end, I use gel-style 5 minute epoxy. Fortunately, five minutes gives you enough time to apply the glue, place the flash drive in place, and put the rubber molded housing back on. Hold the connector firmly– paying attention to the seams for alignment– until the epoxy cures, about five more minutes.

Last step: Cut the cable as desired. A jagged cut looks different than a clean cut– take your pick.
So that’s it– how to make your own cut-off usb cable flash drive. A few more pictures are available in this flickr photo set. As usual, if you have interesting pictures of our projects to show off, please post them in the Evil Mad Science Auxiliary,
http://www.flickr.com/groups/evilmadscience/pool/.
I’d worry about it accidentally getting tossed out as trash!
Oh, and for the love of dog, PLEASE DO NOT use the phrase, "after the jump"
I think that is the most annoying thing in all of blogdom.
What does it even mean? Am I supposed to walk away from the computer and
take a leap over something before finishing the article?
I wish that whoever invented that phrase would have taken a flying leap, instead.
Doesn’t bug me nearly as much as "E-mails."
—
Windell H. Oskay
drwho(at)evilmadscientist.com
http://www.evilmadscientist.com/
That’s a pretty idiotic thing to get miffed at.
I doubt anyone would walk away with it, and it looks pretty neat [more after the jump]
Yeah, makes no sense on a blog. If you look at a newspaper front-page story and you see print that states ‘STORY continues on Page 2’ that’s a jump, as in, it ‘jumps’ to page 2. The continuation on page 2 is also referred to as ‘a jump.’
Well you said "blogdom." What the hell is that?
good call
Oh for christ’s sake, it makes sense, just like the term "below the fold" still applies to a web page versus a printed page. Get the *[BLEEP!]* over yourself.
Did you stop to consider that "After the jump" is meant for people reading the main page, where only a small intro is published? They are simply letting those readers that there is more "After the jump" – if they click to "Read More" (or something similar). If you come directly to the site via some other link it doesn’t make as much sense.
The phrase "after the jump" comes from print, where the "jump" is the next part of a story on an inside page after the initial bit on the front (or whichever) page.
It’s not a perfect analogy to what happens in a blog, but it’s close enough.
More details at http://ask.metafilter.com/31756/After-the-jump
I made it too
the cool part is mine has bin in the washing machine twice and it still works great haha !!!
It’s normally used for when a blog entry is broken in two parts, the short version that normally would appear in a RSS reader, and the full version that would be on the site.
So if you are reading this entry in a RSS reader, and the story ends at "…after the jump" at which point you would click the link to go to the full story. However the RSS feed for this site is a full feed anyways *shrug*
There’s a nice discussion at Ask Metafilter covering the newspaper origins of the phrase. In our case, it is used because we only display the introduction to the story on the main page: to read the rest of the story you need to click through (analogous to having to turn to page A19 in the newspaper).
its actually an old old newspaper term, the jump being multi useful, as the page fold, moving to a new page, or an image in the middle of the column.
High up on nerd ratings and a waste of a good cable!
Maybe it was done to distinguish-it from other stuff when plugged in but using a shoddy cable makes more sense than destroying resources fit for use with something else.
Silly person. It’s funny. The person who made it had a sense of humour. Do you?
Are you really so stupid that you cannot see the beauty in this device???
Talk about a spoil sport…
Off-topic, irrelevant, and mean-spirited comments will be deleted.
STUMBLED!
Very cool
VOTED for you at:
News Dots
You wrote: "(And after the jump, how to make your own.)".
There is no jump. DEATH TO "AFTER THE JUMP"!!!!
can this also be done with a super talent pico c usb drive?
Not clear. If the case comes off easily, then yes. If it’s fully molded like I think it is, then it’s anybody’s guess whether you can cut down the sides without a problem resulting.
—
Windell H. Oskay
drwho(at)evilmadscientist.com
http://www.evilmadscientist.com/
Brilliant! Im gonna make business out of it.
lol and what happen’s if someone throw your cable (with usb drive) away… XD
My initial reaction was Krazy® Glue would be a lot faster, but you nailed it by pointing out epoxy gives you time to adjust and line things up.
If you really want to have fun with people, take a lighter or soldering iron and singe/blister the cable tail. Just the thought that their USB cable could overheat and catch fire ought to scare the hell out of some.
There is no jump. DEATH TO “AFTER THE JUMP”!!!!
My position is that a link entitled “more” is pretty cut and dried, and requires no commentary.
As for the drive: in utilitarian terms, that’s somwhere down there with wax fruit and fly-powered micro-gliders.
Ooooh! Wax-fruit-fly-powered micro-gliders!
Now, should that be “wax-fruit flies” (they eat* wax fruit) or “wax fruit-flies” (they’re made of wax) or “wax-fruit-flies” (both)?
more – after the jump – below the fold
* Or, perhaps, reproduce in
For the record, don’t try any of the Sony MicroVault Tiny range. Despite the name, they’re actually slightly too large to fit into the USB connector without some serious modification (ie fiddly cutting and filing of the metal connector). The plastic outer casing comes off easily enough, but it quickly turns into a nasty mess after that.
2 hours and counting, and the bloody thing STILL won’t quite fit right.
OK I did actually get it done, although the end result is a bit wonky. Still, it works, and I’ve already had one work colleague walk over and comment on it, having seen this walkthrough mentioned on The Register.
verry nice…
Oficina da Net
Nícolas
Awesome! Thanks!
BTW, the past-tense of ‘to saw’ is sawn, not sawed…
Both are accepted forms. (I just checked my dictionary.)
—
Windell H. Oskay
drwho(at)evilmadscientist.com
http://www.evilmadscientist.com/
Actually "sawn" is a past participle but not past tense. "Sawed" can be either the past tense or a past participle. In its use as an adjective as in "sawed-off USB key", the past participle form is correct. "Sawed-off" is more common – as in "sawed-off shotgun".
Is that you, Dan Quayle?
The problem with "after the jump" is that many of us imagine it being read out loud in
smarmy, tv-personality voice as in "we’ll be right back, after the break". And the problem
with that is that it is not a break per se, but is an opportunity to have all sorts of crap
advertised at you. So if you don’t mind the possibility of creating a subtle but perceptible
impression of smarminess and crap in some potentially large segment of your readership,
go right ahead. If you think it might be an issue, then maybe reconsider.
Since you’re neither smarmy nor crap, not even close, I’d vote for reconsideration.
Great idea. It can also be a great example of hiding things in plain sight. Nobody is ever
going to steal a usb cable, or even think to look there for your stash of whatever data you
may need to stash. So instead of cutting the cable, install usb drives on both ends and
leave the cable whole.
"So instead of cutting the cable, install usb drives on both ends and
leave the cable whole."
That would require type A plugs at both ends of the cable which would be non-standard (in appearance – ignoring the non-standard functionality <grin>).
Eh, I honestly think that no one would notice if it was bunched up in a drawer with a bunch of other cables, which is where I’d stash mine.
I actually have a couple male-male USB cables, and I think I’ll try it with one of those as soon as I go out and buy more cheap flash drives.
Is it ok that FRED is selling a version of this?
http://www.worldwidefred.com/hacked.htm
— Ghoast
Yup, we’ve been working with them. We’re even credited on the product page, if you’ll notice. I’ll be doing a post about it soon.
—
Windell H. Oskay
drwho(at)evilmadscientist.com
http://www.evilmadscientist.com/
It’s ok, on their blog, they claim to have licensed it from MAKE: Magazine
"We’re very proud of the work of Fred’s in-house design team, but we’re always on the lookout for new concepts from around the world that fit with our product sensibilities. This season, we licensed two great ideas from the pages of Make: Magazine, a print and web collection of new ideas from a number of do-it-yourself creatives."
They said it here:
http://fredandfriends.wordpress.com/
Think Geek has it. Thirty bucks.
Does it make a difference if the flash drive is larger than 1GB? I’ve never used a King Max drive before so I don’t know how big they are.
Should be fine– I imagine that they use the same size chip but with higher capacity.
—
Windell H. Oskay
drwho(at)evilmadscientist.com
http://www.evilmadscientist.com/
I did one using a clear usb cable so the activity light on the chip shows (used a firefly usb chip). I get a lot of weird looks from people until I tell them that it’s for my "wireless hard drive". Then they look confused. I plan on doing another one using some fibre optic strands down the cable and butted up against the LED on the chip. It should make a nice light show.
lol for the wireless HD :)
I was also thinking about the fiber optic for the wires. I just don’t know where to find them, other than in a 15$ DYI lamp kit or in 10ft-long cables :T
Awesome really.I will give it a try
18 oyunlar
Great idea ! This article inspires me to make of my own.
Thanks!
Programming The Life
i tried a KingMax 2 GB but it is too big for a the usb-plug. i tried to make it fit, but no chance.
do anybody have an exact specifaction of a stick that fits?
thanx in advance
FYI: HuffingtonPost is using your lead photo:
http://www.huffingtonpost.com/2008/12/21/internet-connection-cut-b_n_152669.html
Thanks for the tip– I’ve contacted them. (The photo is distributed under a CC license– they are free to use it so long as they attribute the photo, but they sure haven’t!)
—
Windell H. Oskay
drwho(at)evilmadscientist.com
http://www.evilmadscientist.com/
lol very nice i gonna try this
Can anyone tell me some good ones to use?
I wanna buy one but I want to know it’ll fit.
Check out what had happened to me… xD I was kind of negligent with whole procedure, so… Look for your self xD
I got pwned by myself haha
step #1: http://i42.tinypic.com/19lcsj.jpg
step #2: http://i39.tinypic.com/1zwgh9i.jpg
step #2: http://i37.tinypic.com/5x05xs.jpg
So, use recommended USB key :)
king regards!
Nix
I think you’ve been Klutzed again. I saw this at Thinkgeek.com the other day.
http://www.thinkgeek.com/computing/drives/ab63/
Actually this one is produced by Fred, with full credit to us for the design– nothing fishy going on here.
—
Windell H. Oskay
drwho(at)evilmadscientist.com
http://www.evilmadscientist.com/
I’ve made my own USB-key with this guide this weekend and for those who can’t find the usb-key from this article (I think they don’t make them anymore): I’ve used a 4GB Transcend Jetflash T3 (Only $9). It had two covers. One weakly attached plastic one and one molded. It had a perfect fit if you removed only the weak plastic one. So no need for insulators since it’s already protected by it’s own cover.
About your USB project:
pchands.blogspot.com/2009/05/blog-post_6907.html#comment-form
I never realized that you have affiliates in many countries.
Are there more like this one?
i did this but i used a corsair mini… it worked at first and all that fancy stuff… but then it renamed it self to a skymidi… that didn’t bother me… but then it stopped working all together… any help… or a way that i can get the stuff off of the drive?
Made one out of an abandoned 2gig high school musical usb flash drive bracelet. Think it probably fell off somebody’s wrist because all that was on it was high school musical desktops and sound clips. Well, I erased all that, reformated and put it into an old broken printer USB cable. Free project! But the wires from the electrical shielding poke through my pants pockets and poke my leg something fierce. :( Turns heads though!
can this be work for other USB? can this only works on kingmax?
The kingmax happened to work. Other small ones probably will as well.
—
Windell H. Oskay
drwho(at)evilmadscientist.com
http://www.evilmadscientist.com/
Thats pretty cool and impressive, although I don’t think I could trust myself to do such a thing.
-Jack @ Arc Fault Breaker
I thought the project was creative, entertaining, and useful (IMHO). It gave me all kinds of DIY ideas on how to make my own. One thing about this project is… unless someone knows exactly what it is no one is going to walk off with it. Which if you think about it is a real benefit if it needs to be out in the open and accessable.
Anyone know if a Kodak flashdrive would work with this? I don’t know how big the circuit board for the Kodak is, but the casing is smaller than the others.
Just made my second one today from an 8GB kingmax, after my wife borrowed my original 4GB one and left it in a school USB slot, and it was never seen again.
I don’t know if this is a difference between the 1GB and the larger ones, or if it’s just a new design, but both the drives I bought had a completely solid circuit board covered with the same thin plastic shell. Fit even better, and didn’t require any extra circuit protection.
Thanks EMSL!
Hi – Firslty thanks for such a great thread. I’d really like the whole idea of this project but I’m physically unable to carry out the work required. Would any of the good chaps / girls on here be able to help me out ??? mail wilson-craig@sky.com
It’s kinda like a DUH-dom!
I seen that!
I have a 4gb SanDisk Cruzer with a broken connector. This sounds like a possible fix to not only get my files off the broken one, but turn it into a new and much cooler drive. My concern is, though, that this flash drive is the kind where the connector slides in and out of the drive. Will this cause problems or make it more difficult? Is there any way to tell if the chip will small enough before taking it apart?
This mod really only applies to drives small enough to fit *into* the connector, and not others.
Windell H. Oskay
drwho(at)evilmadscientist.com
http://www.evilmadscientist.com/
Minor update: newer versions of the Kingmax SuperStick place the entire non-silicon-coating part of the stick in one black plastic block, so you don’t need the electrical tape.
I’ve been thinking of making this myself. I’ve looking at purchasing a new 4gig kingmax drive. Will this be able to fit into the connector?
Don’t know; haven’t tried it.
Windell H. Oskay
drwho(at)evilmadscientist.com
http://www.evilmadscientist.com/
I’ve heard that a lexar firefly drive might work as well. Just not sure of the specs.
Mine didn’t- it’s just slightly too wide (due to being one solid block of plastic inside of the silicone instead of a ragged collection of chips like the one used here).
I am thinking to do this with a bluetooth adapter. It’s small enough to fit, and I can say the 4 wires at the end are wireless antennas to a harddrive LOL a real external harddrive (my phone w/ bluetooth) LOL
+++++++
question: okay can you do this with an old non-working ipod charger by just hacking off the cord and making it a thumb drive -. -"
Correction, "blogdum" is the most annoying crap I have heard a twit utter.
I made one before I even saw this article…
I used the latest model PNY Mini Attache 4GB USB flash drive (p/n P-FD4GB/MINI-EF). This drive contains a relatively new type of flash storage module- an epoxy-encapsulated chip-on-board (COB) device made by Hynix.
(a similar device is pictured here: http://www.supertechina.com/cp/html/images/1256611549.jpg)
The whole unit sits inside of a metal sleeve contained inside of the drive case. I hollowed out the end of the cable to fit this and hot-glued the module with its metal sleeve inside.
and you think for the love of a dog is any better…