


I never really set out with the goal of roasting my own coffee beans, it just kind of happened.
It started a month ago when we got a coffee grinder. Naturally we started getting whole bean coffee, which we used at a rate of about one pound per week. While I’m not (by any standards) a coffee connoisseur, I found myself noticing that the first pot of coffee out of the new can really was just betterthan the last pot of coffee out of the old can– meaning that the coffee quality does actually decline noticeably after just a week.
Now, that’s a minor annoyance, and hardly cause for action. But, two weekends ago I happened to be browsing in a home brewing store (needed champagne yeast– that’s another story) where there were sealed bags of green coffee beans just sitting there on the shelf. Fair trade, organic, and in a number of varieites. Only 5 bucks a pound. So what the heck, right?
It turns out that there’s a common and cheap method of roasting coffee at home: using a regular air popcorn maker. You put the beans in the popper as though they were popcorn kernels, heat them for a few minutes until they’re properly roasted, and then cool them. (You can read the details of this process here, here, here, and here, amongst other places.) This is kind of neat because it doesn’t take much in the way of equipment and it roasts just enough for a big pot of coffee.
The weak point in the popper method is the cooling. The beans keep roasting as long as they are still hot, so many of the sites suggest pouring the beans back and forth between a couple of metal colanders until they cool down. We tried it, and while it did cool them faster than a cookie sheet, it was more tedious than fun. It also seemed a bit silly to use this nice semi-automatic roaster and then turn it over to a manual process for the next few minutes. So, here is our better (if somewhat obvious) solution: a dedicated coffee cooling tower, built from a second modified air popper.
For roasting coffee, it’s better to have a specific type of air popper, one that has the heater vents on the sides the roasting chamber, rather than one that has a mesh or bottom vent for the heat. You can read more about this in Sweet Maria’s guide, which lists several poppers of this variety.
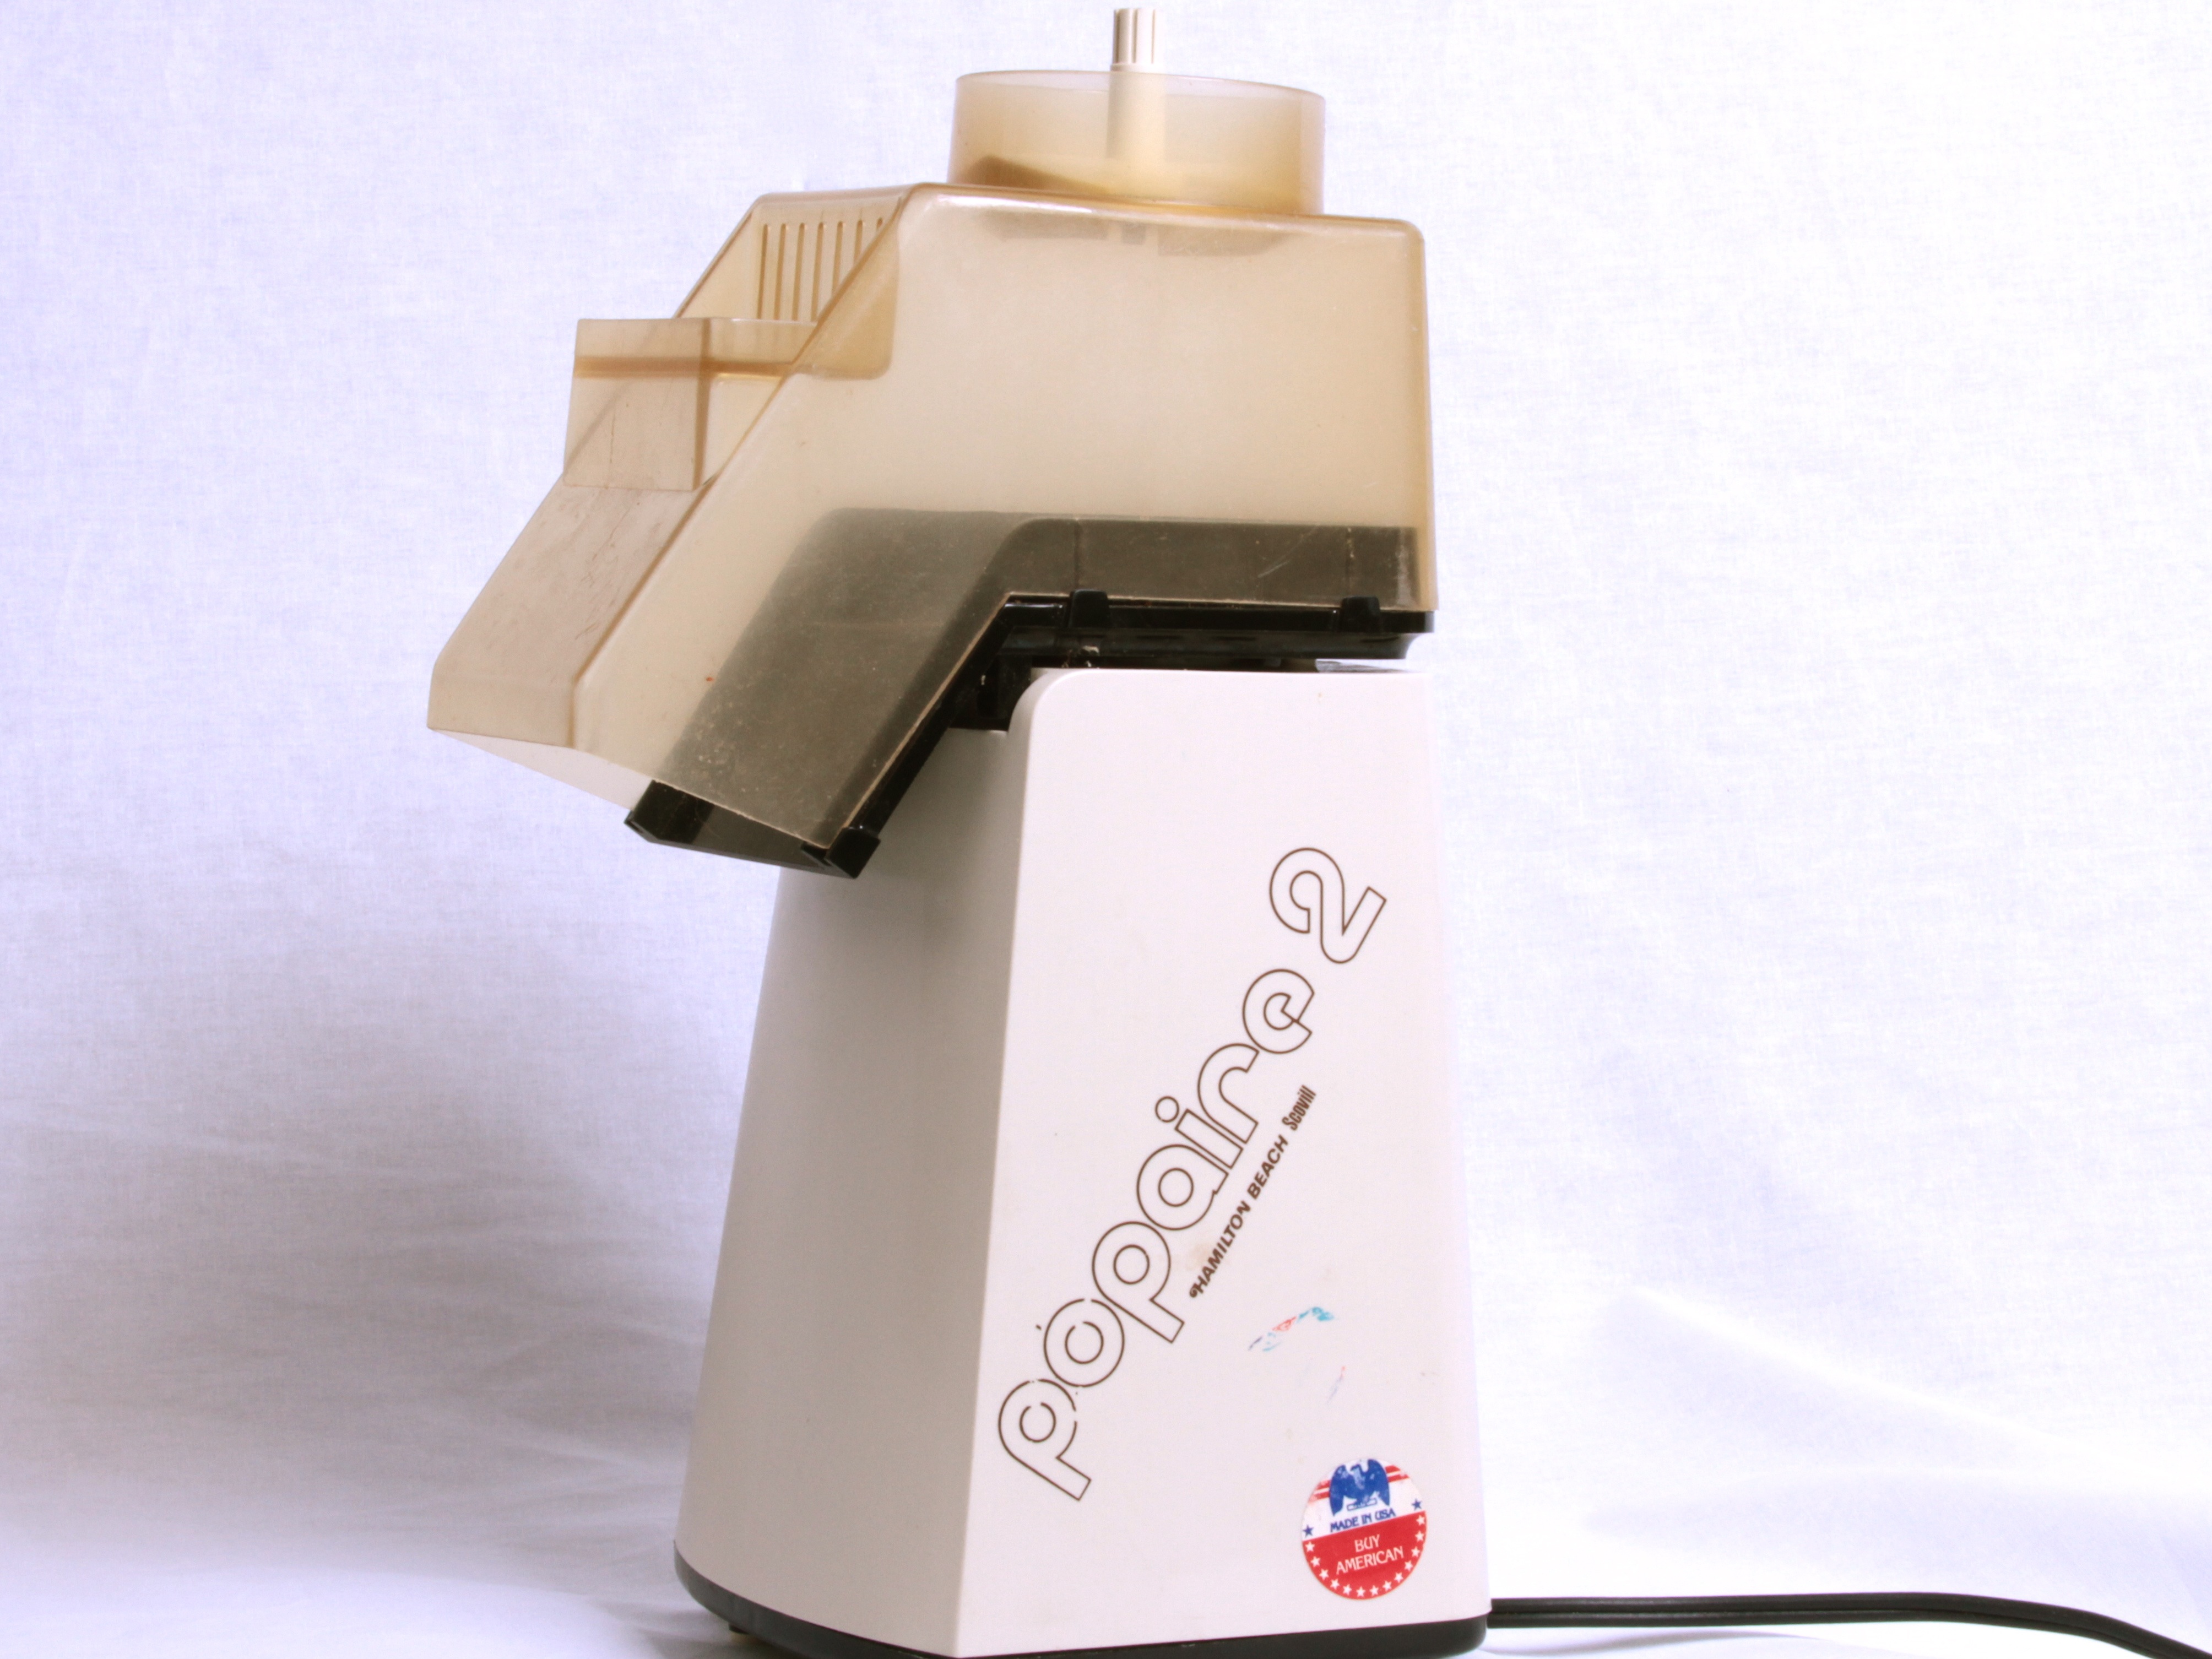
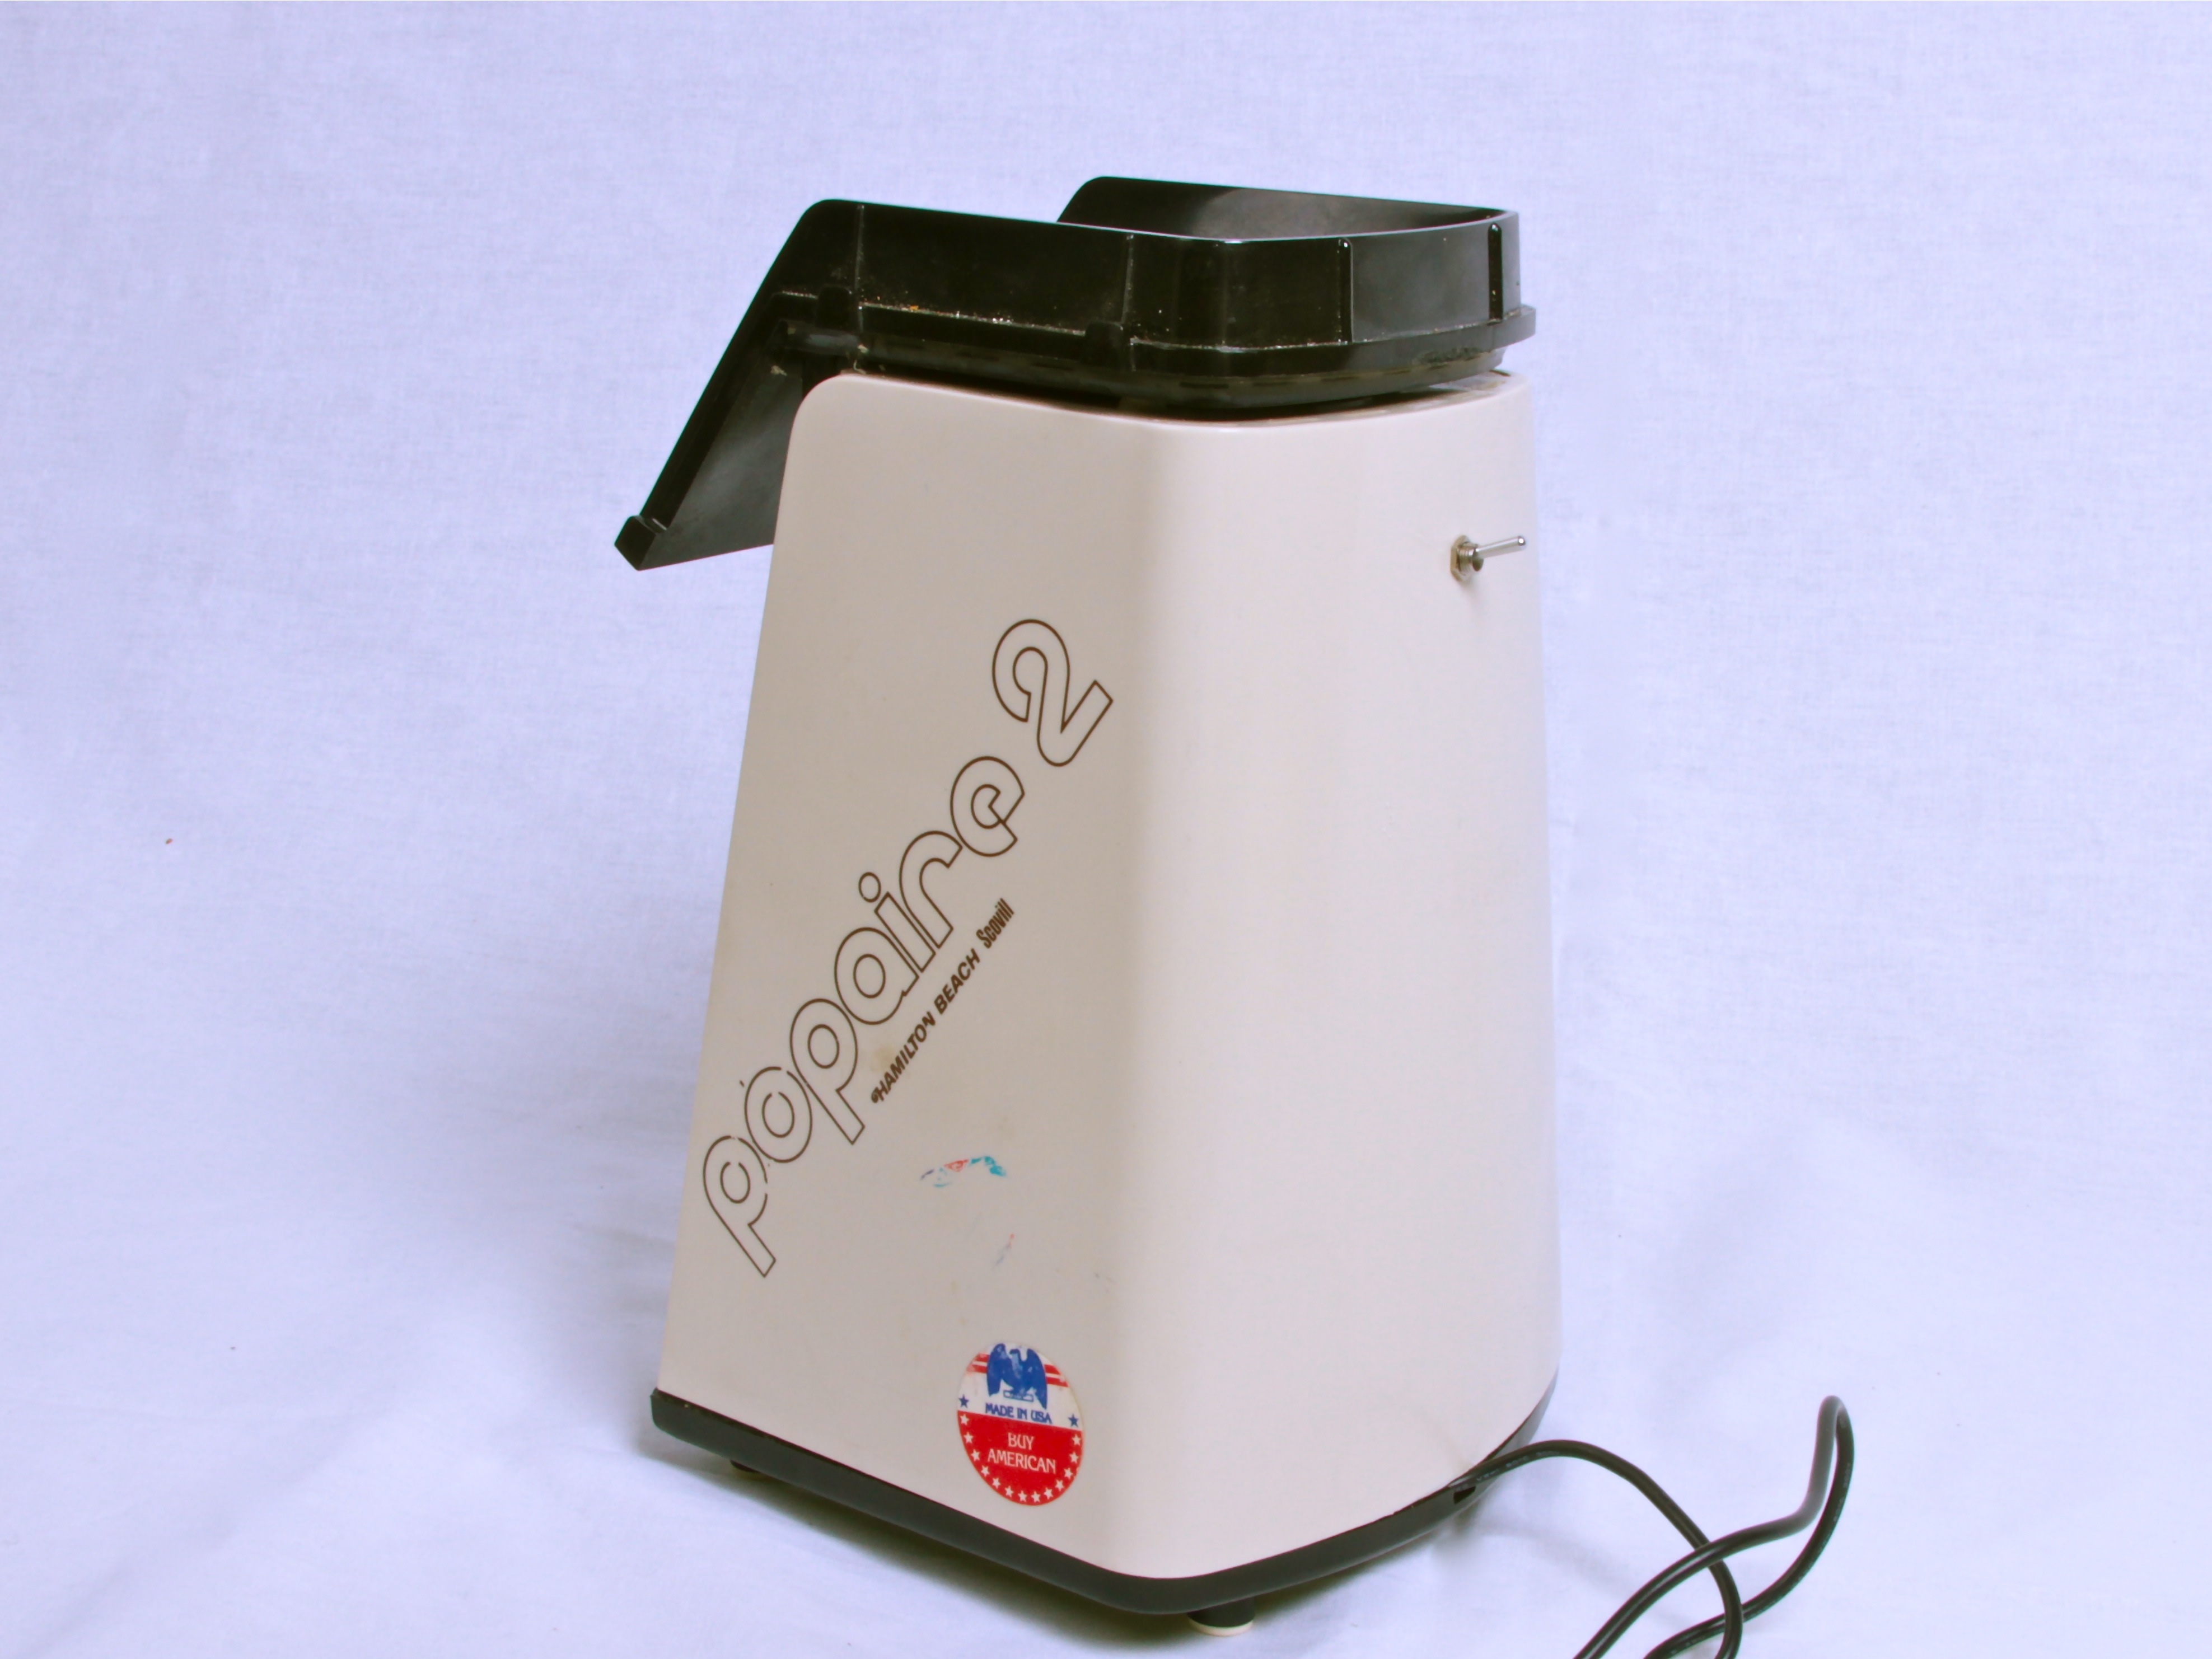
So, after we first picked up those green beans, we immediately went to eBay and bought an old Popaire 2, which is one of the models that Sweet Maria’s recommends.
And… then we got it. It turns out that it’s actually one of the “bad” mesh-bottom models. (Doh!)
We tried it, and indeed, it was pretty questionable. Also: it doesn’t have a power switch. (Doh, again.)

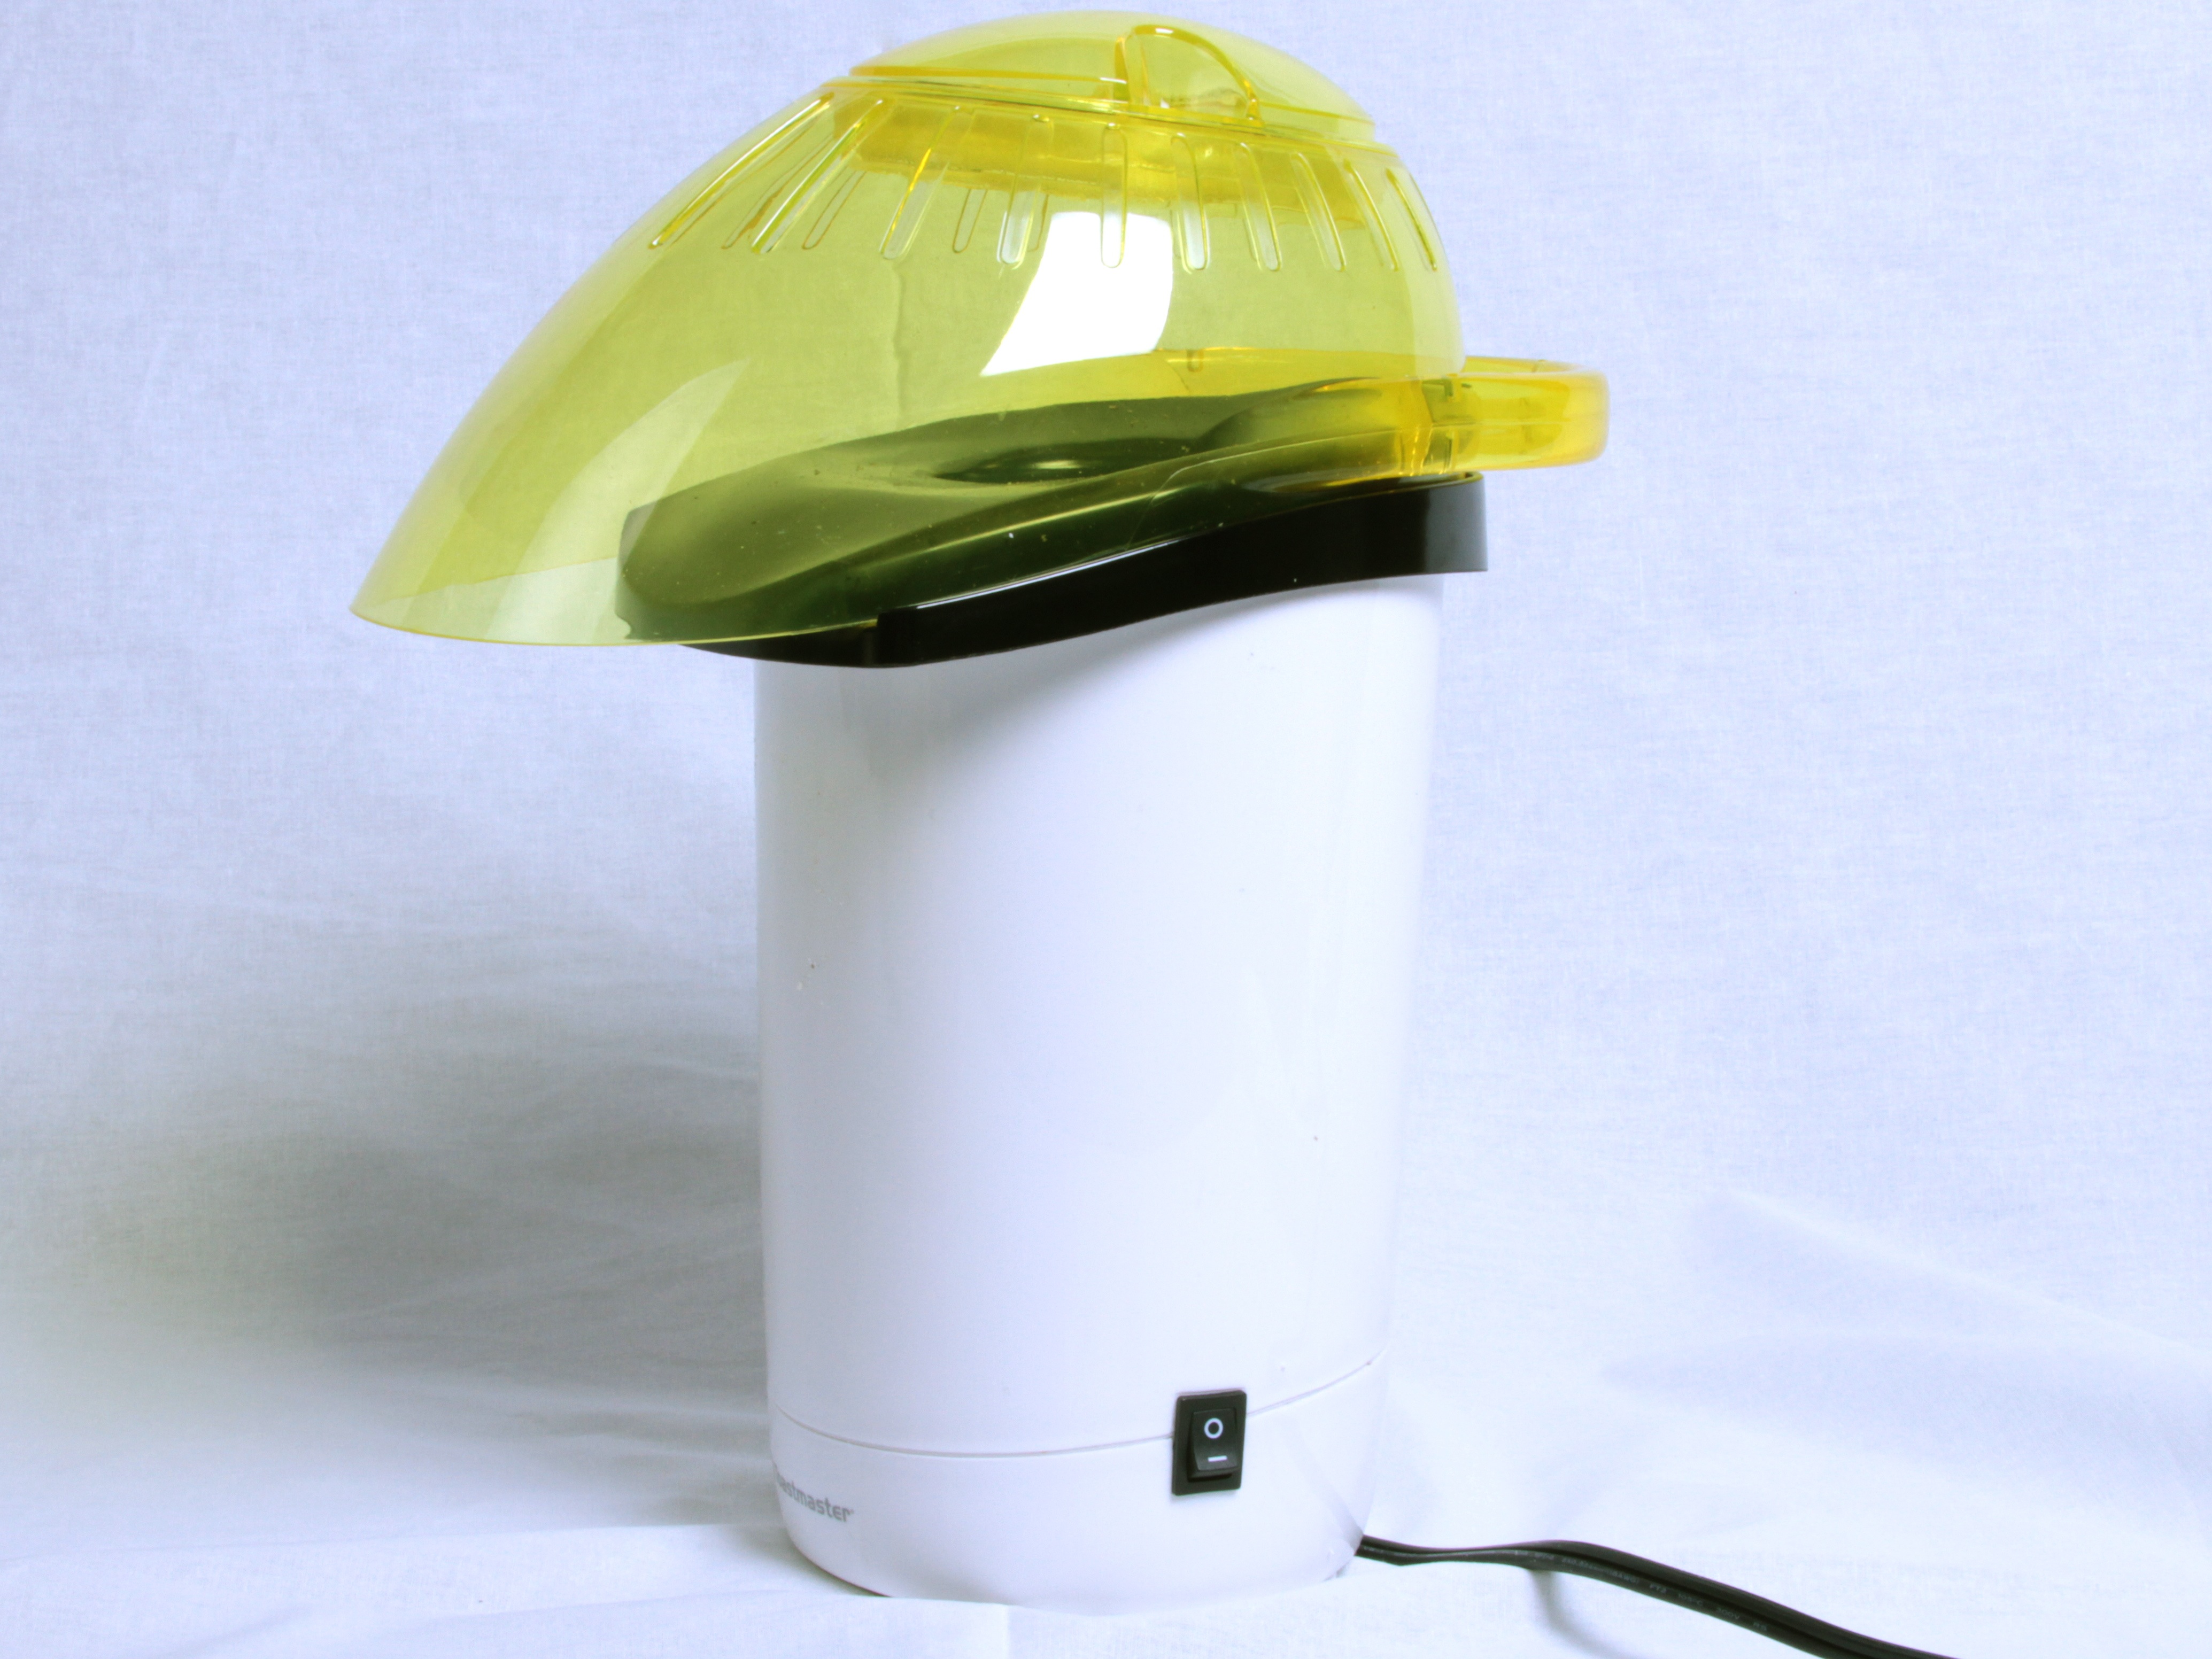
Since that was something of a bust, we did some more research and found that the Toastmaster 6203 Popcorn Popper is one of the correct variety and is actually available new from Amazon.com. After a couple of tries, this one works like a champfor roasting coffee. For a few reasons, we found that it works much better with the yellow lid removed. The disadvantage is that the chaff (papery coffee husk material) flies around a bit. But it’s easy to clean, there isn’t usually much of it, and it lands in an eight-inch circle around the machine.
(For proper irony: We had one of these exact poppers a few years ago, but got rid of it because it’s a *terrible* popcorn maker. I wish we had kept it– it’s a *great* coffee roaster.)
Of course, using the Toastmaster for roasting coffee left us with the extra mesh-bottom Popaire 2, ready to convert to a cooler.
So what’s in a popcorn maker? Obviously there’s a heater and a fan. Can we just disconnect the heater and hook up the fan alone? There’s one way to find out.
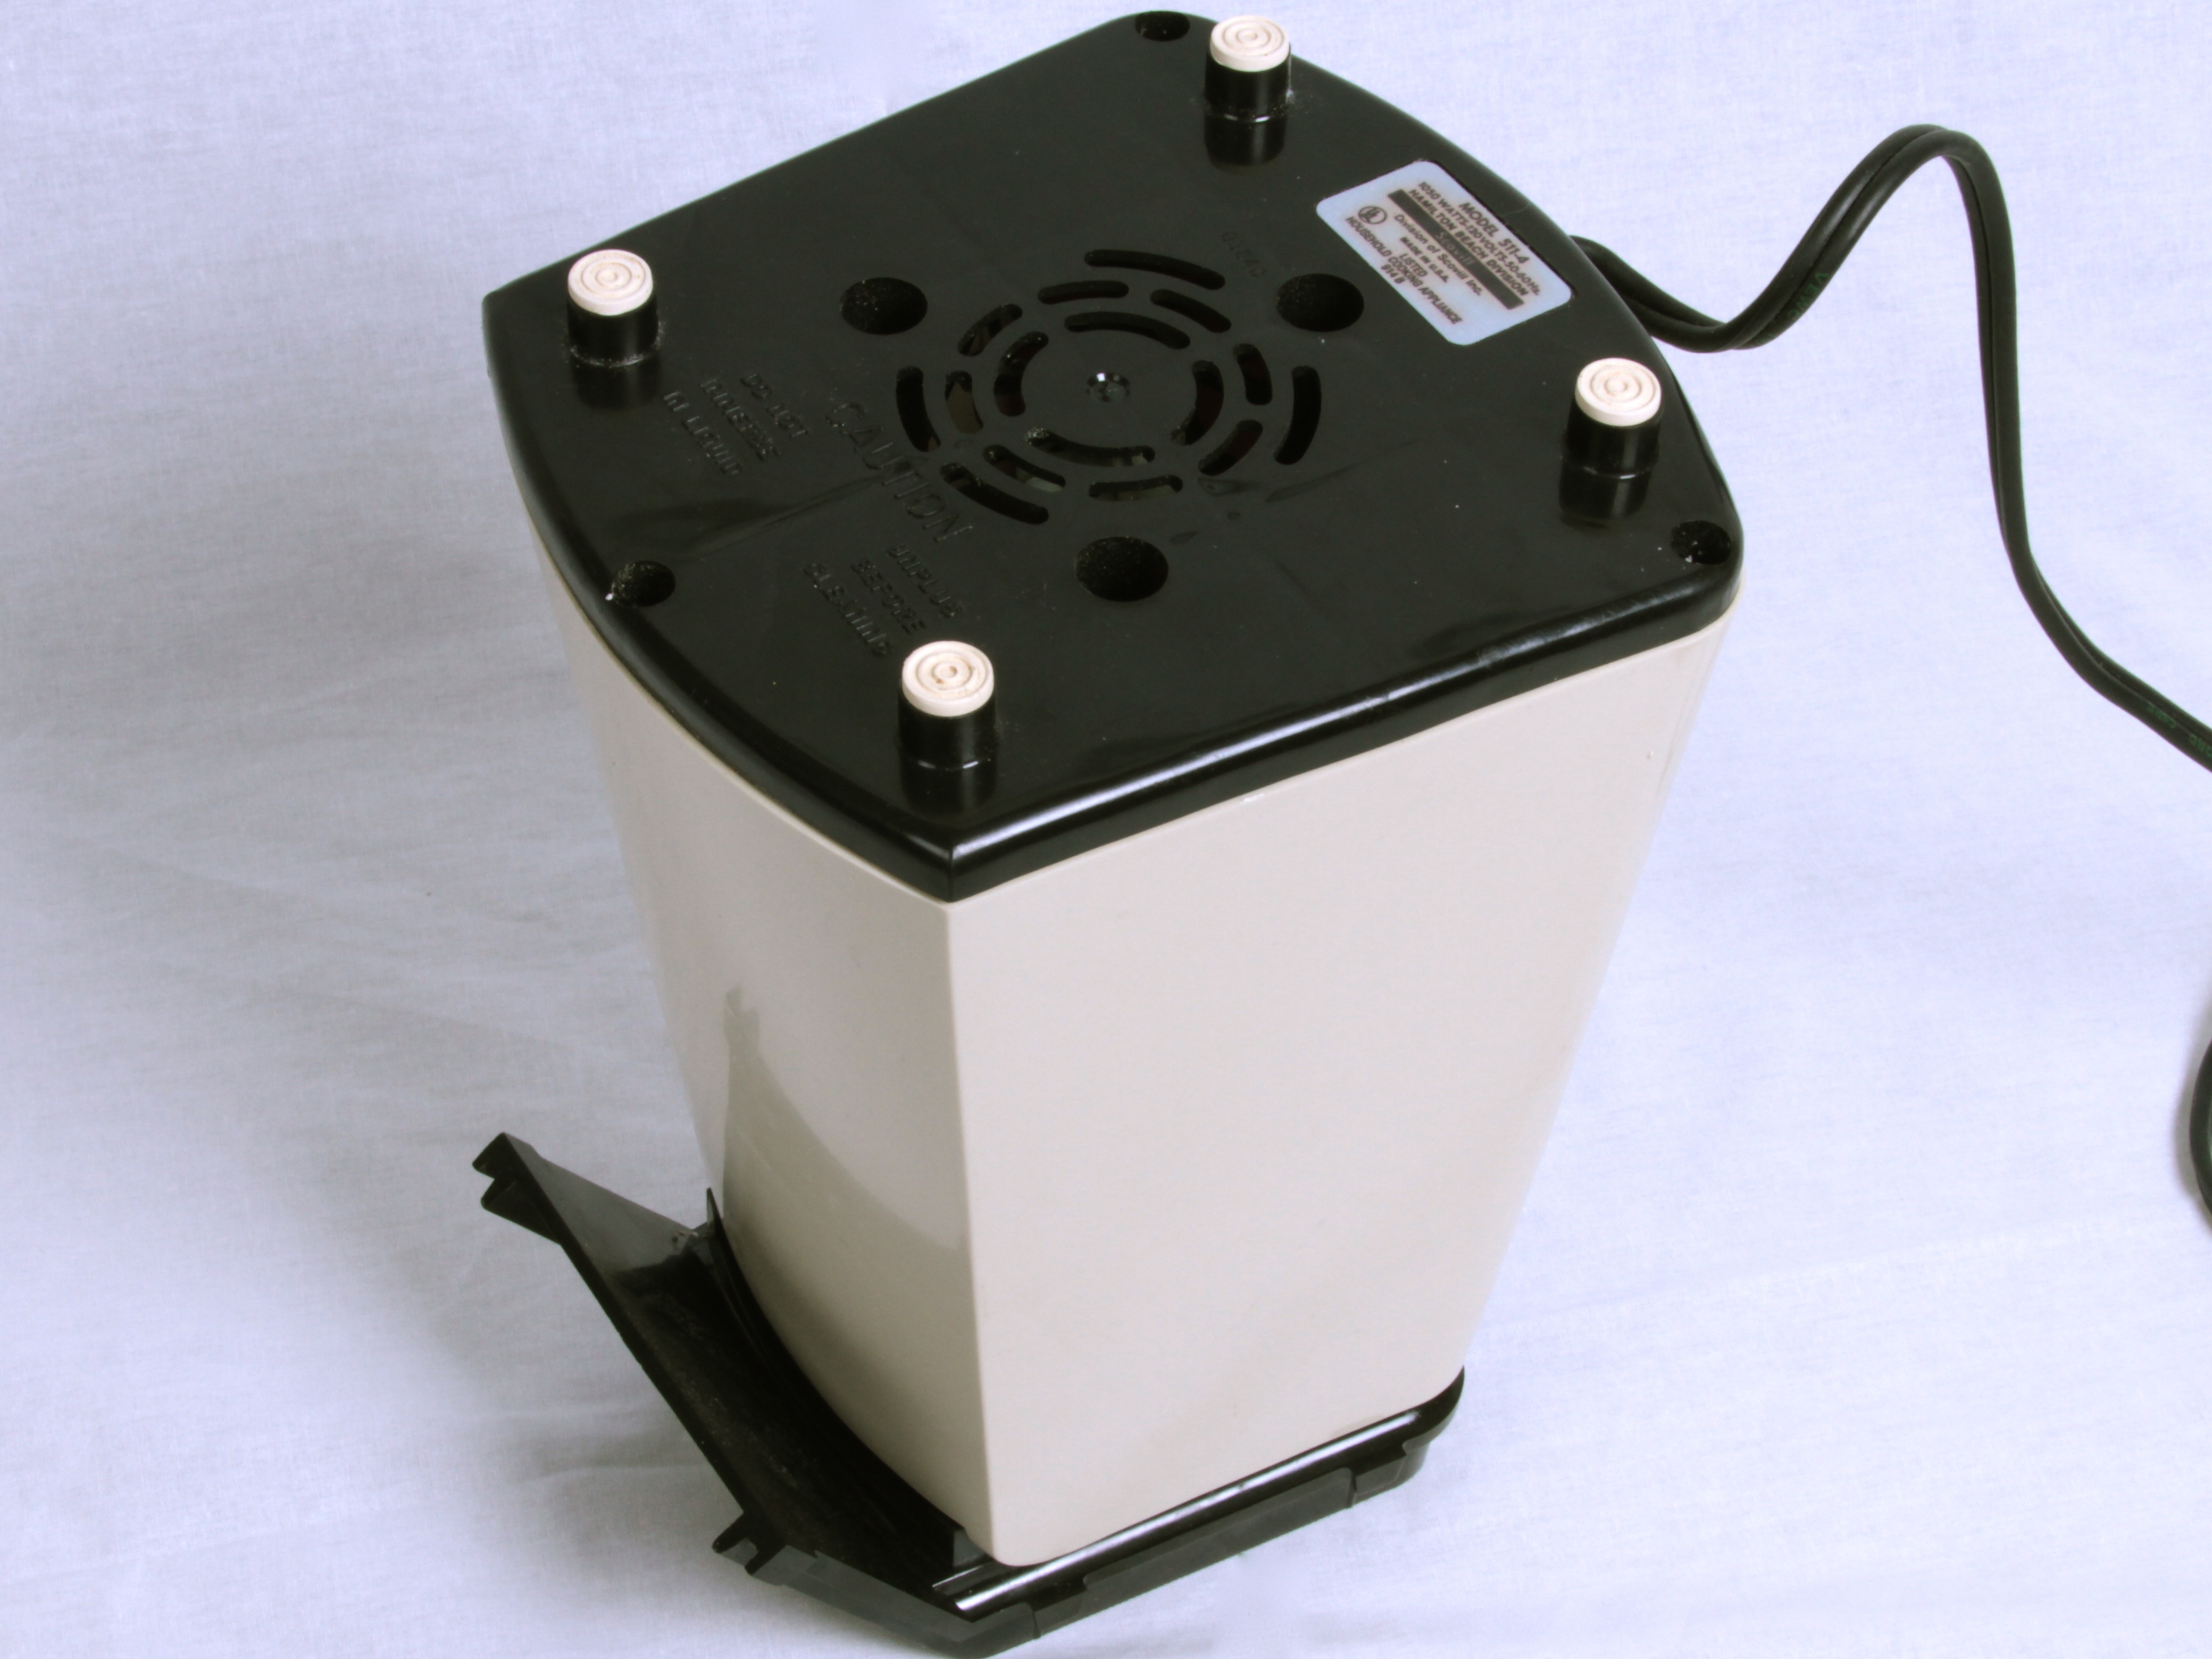
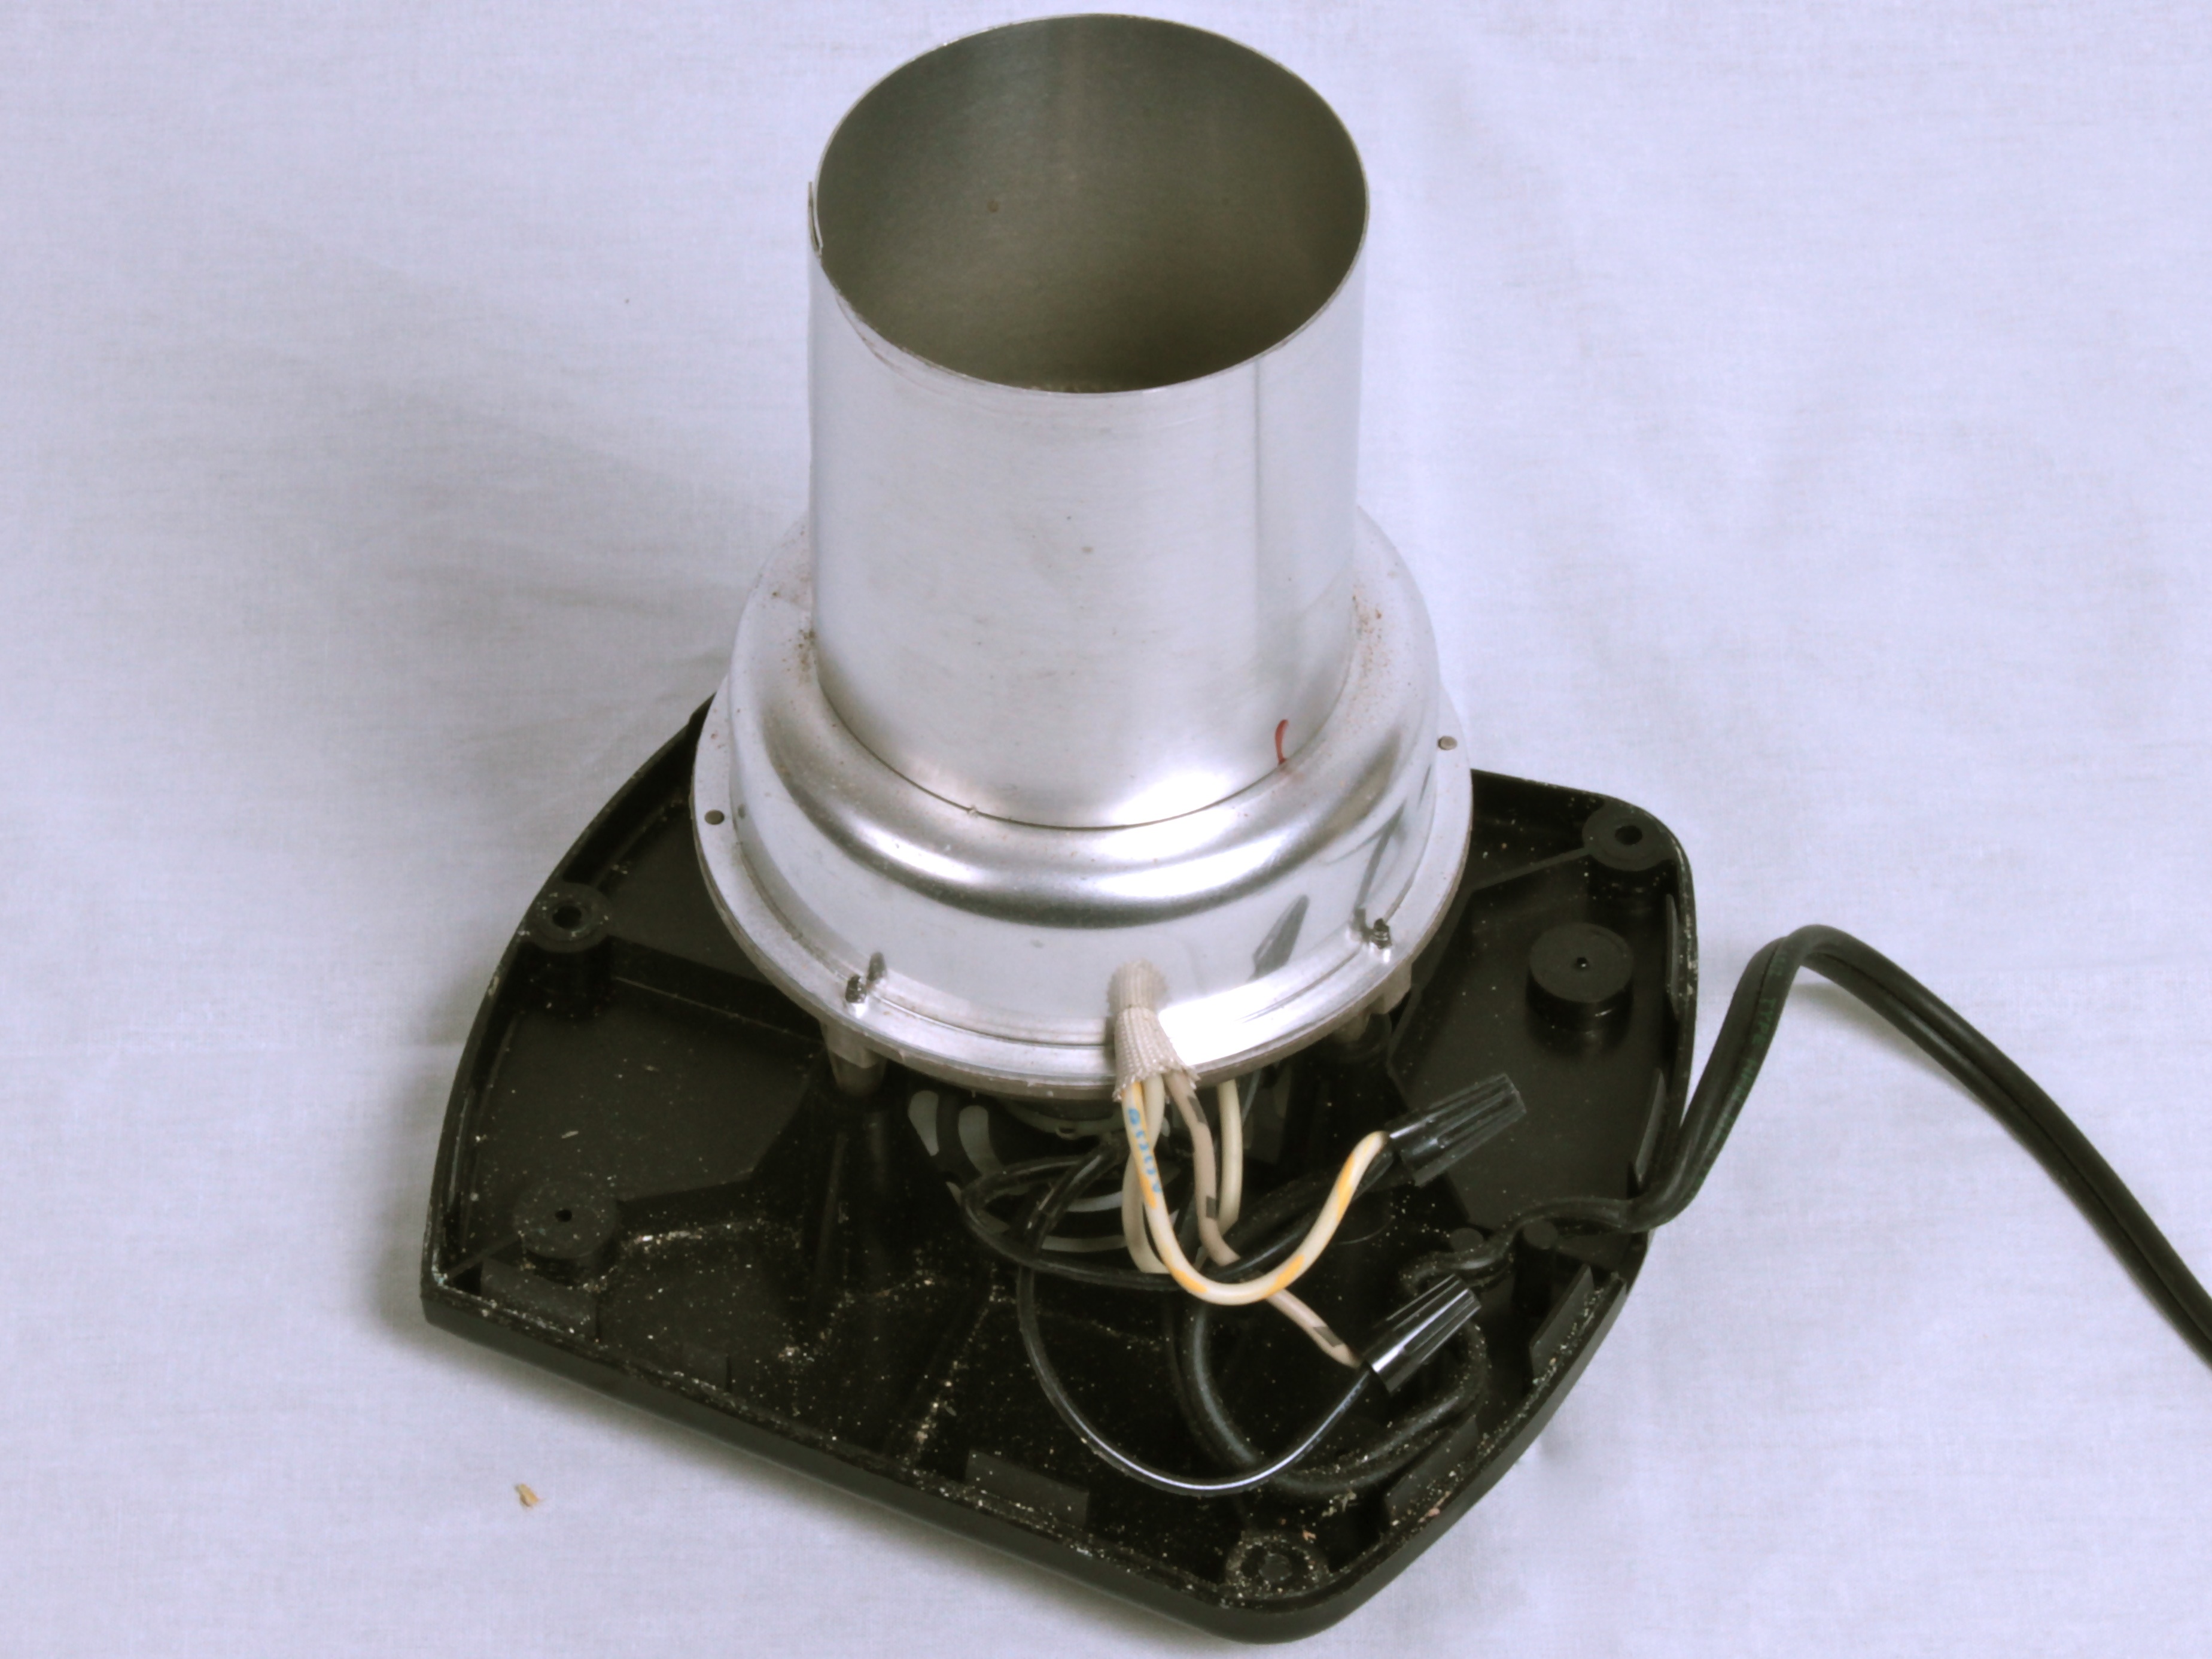
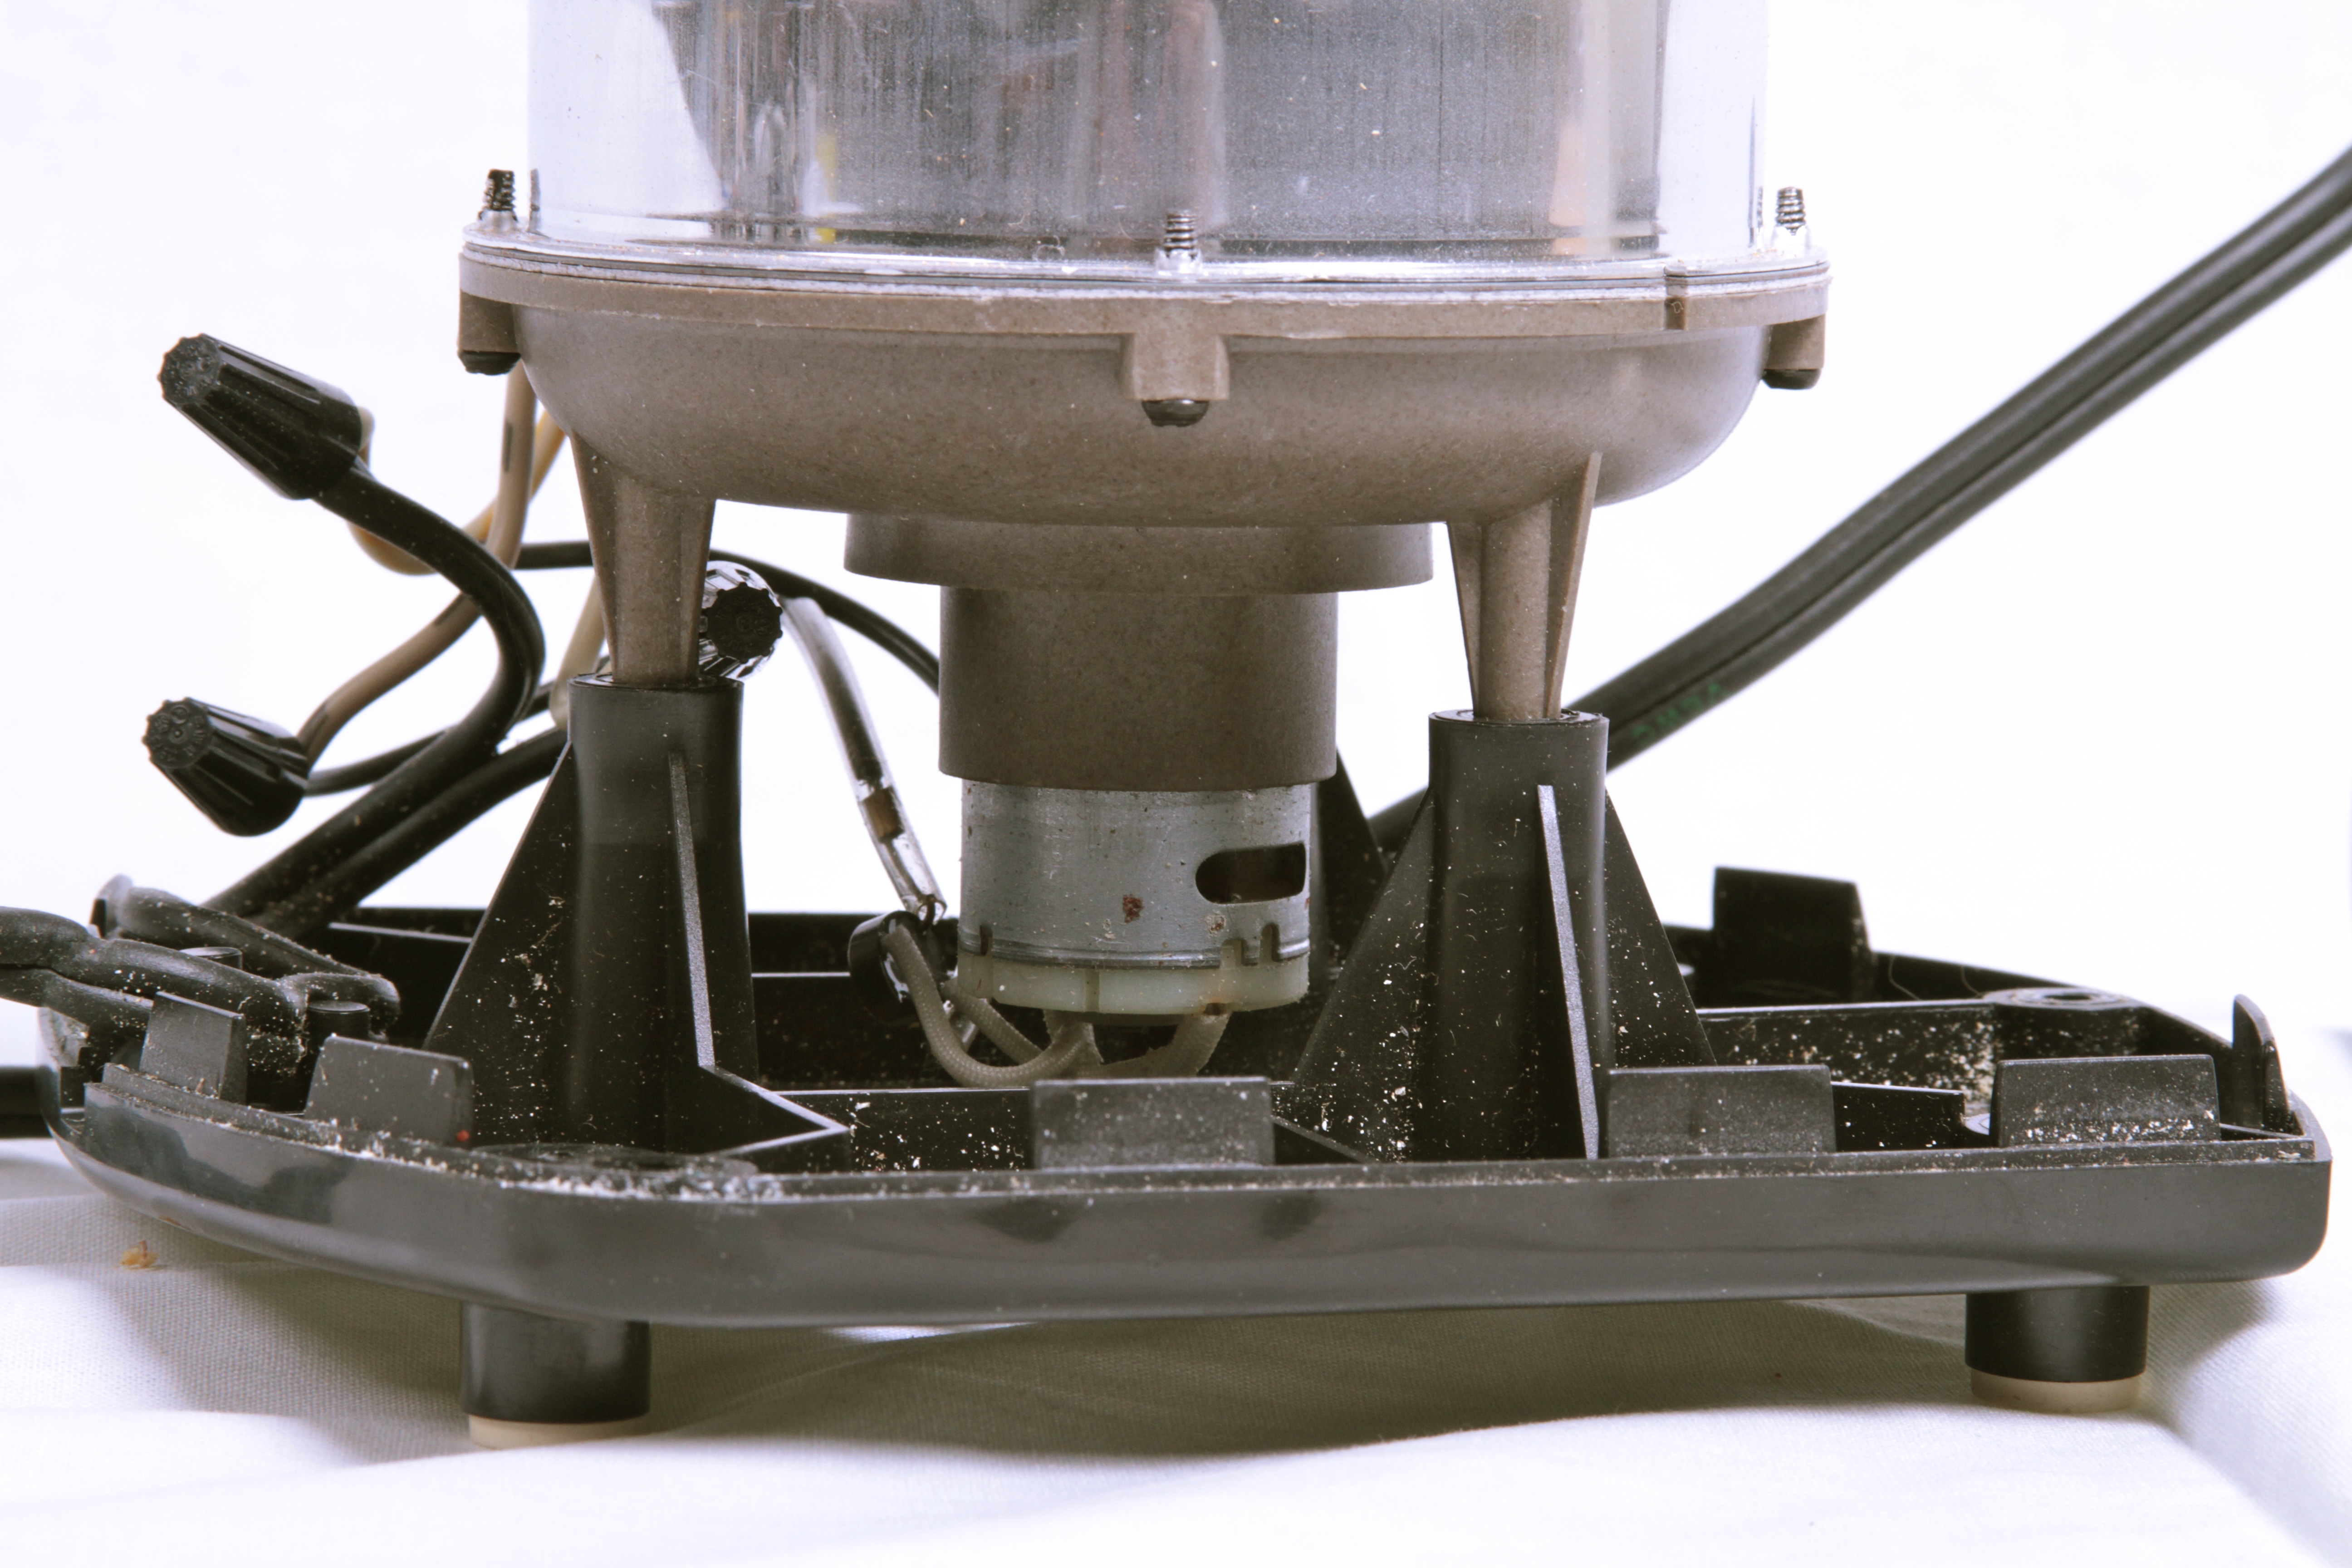
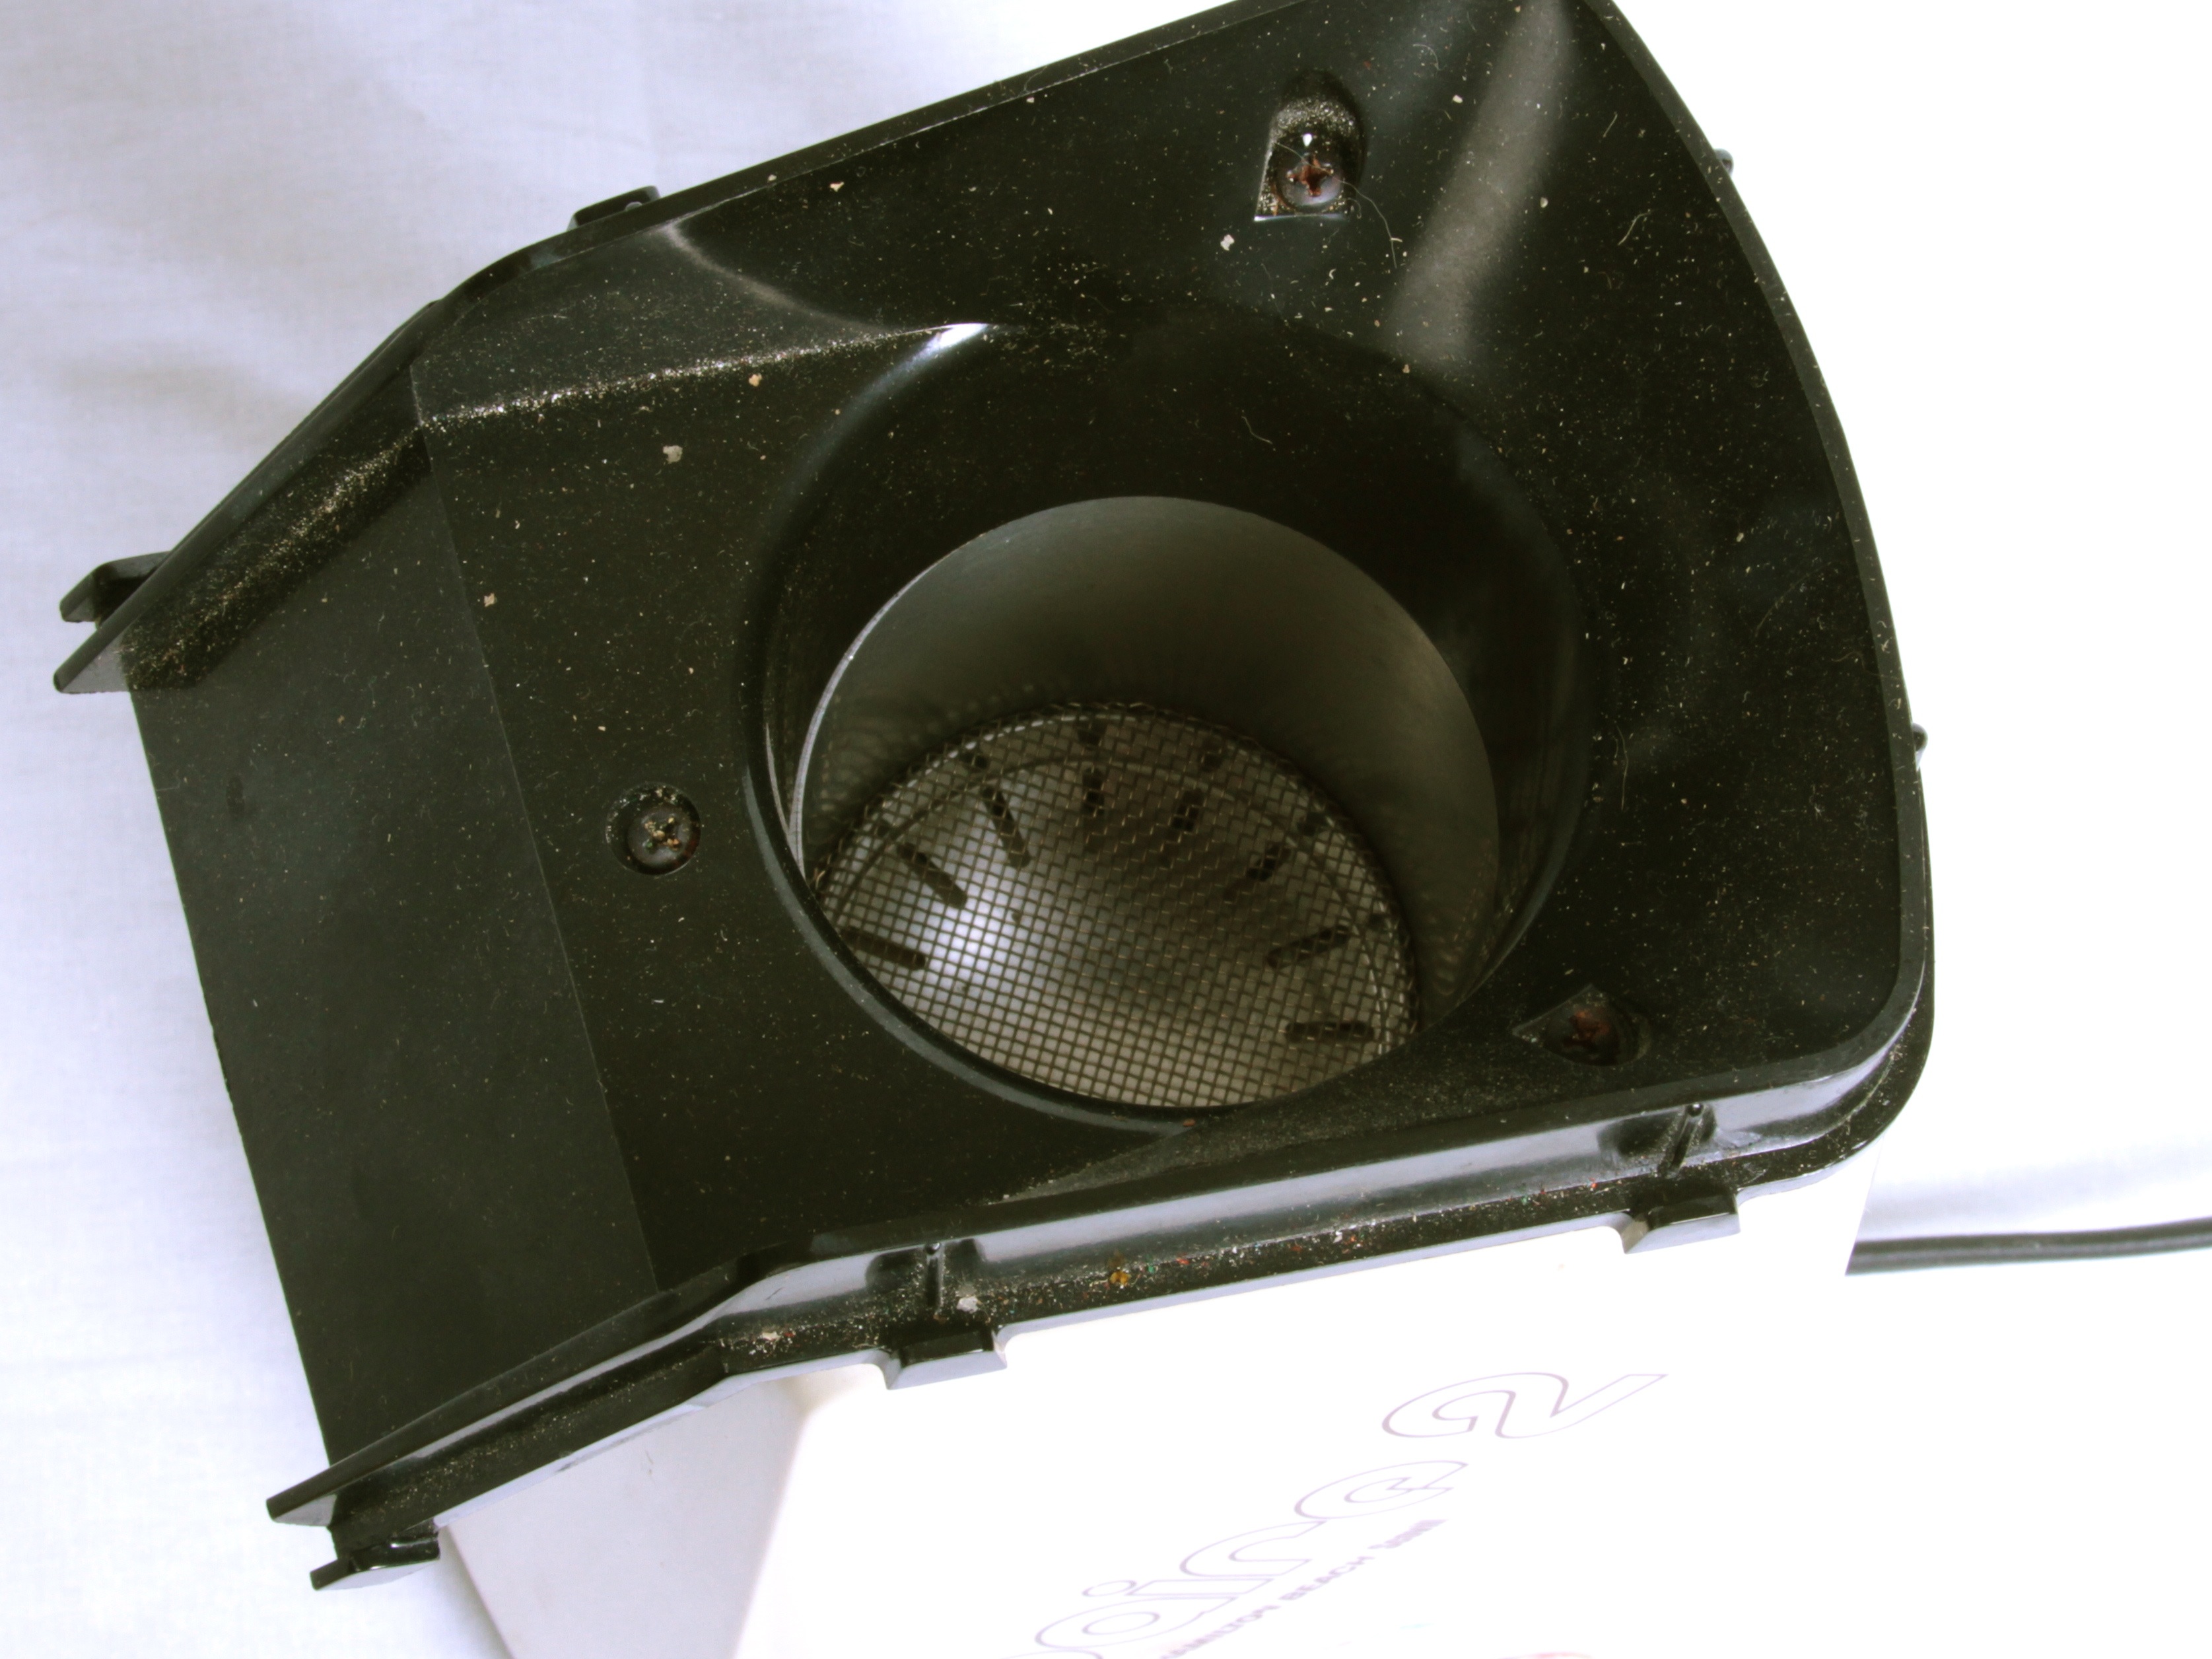
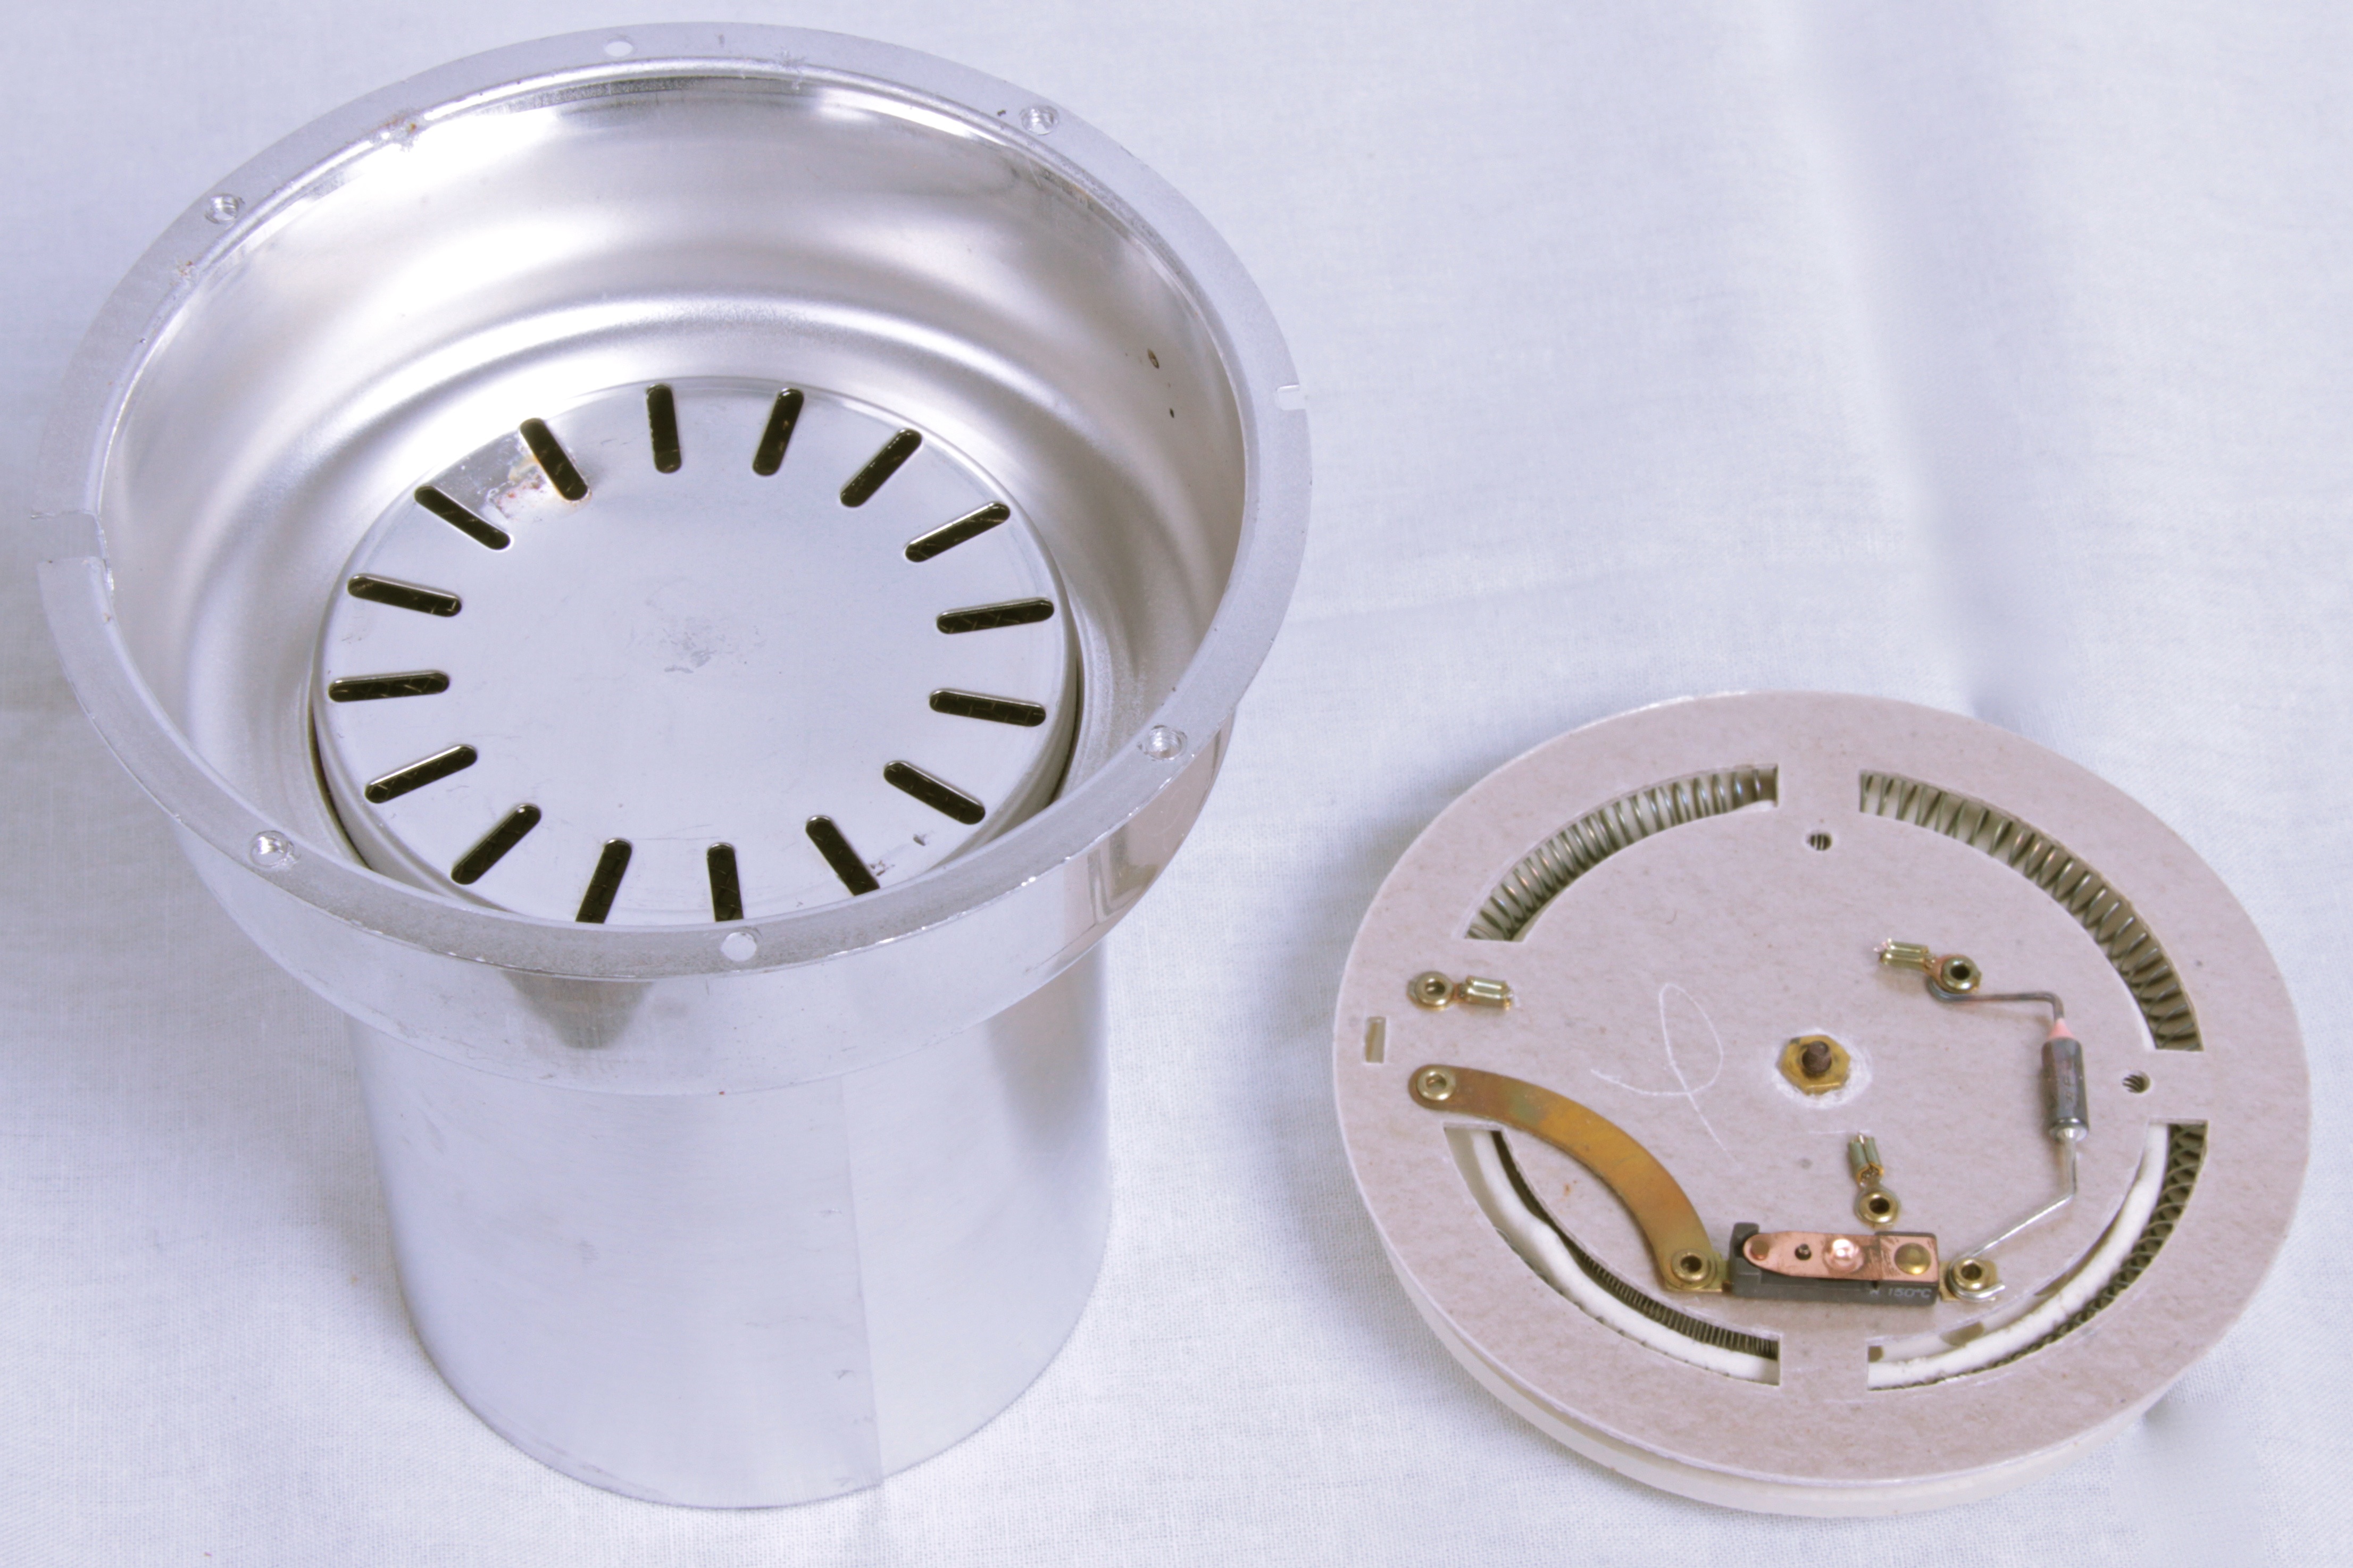
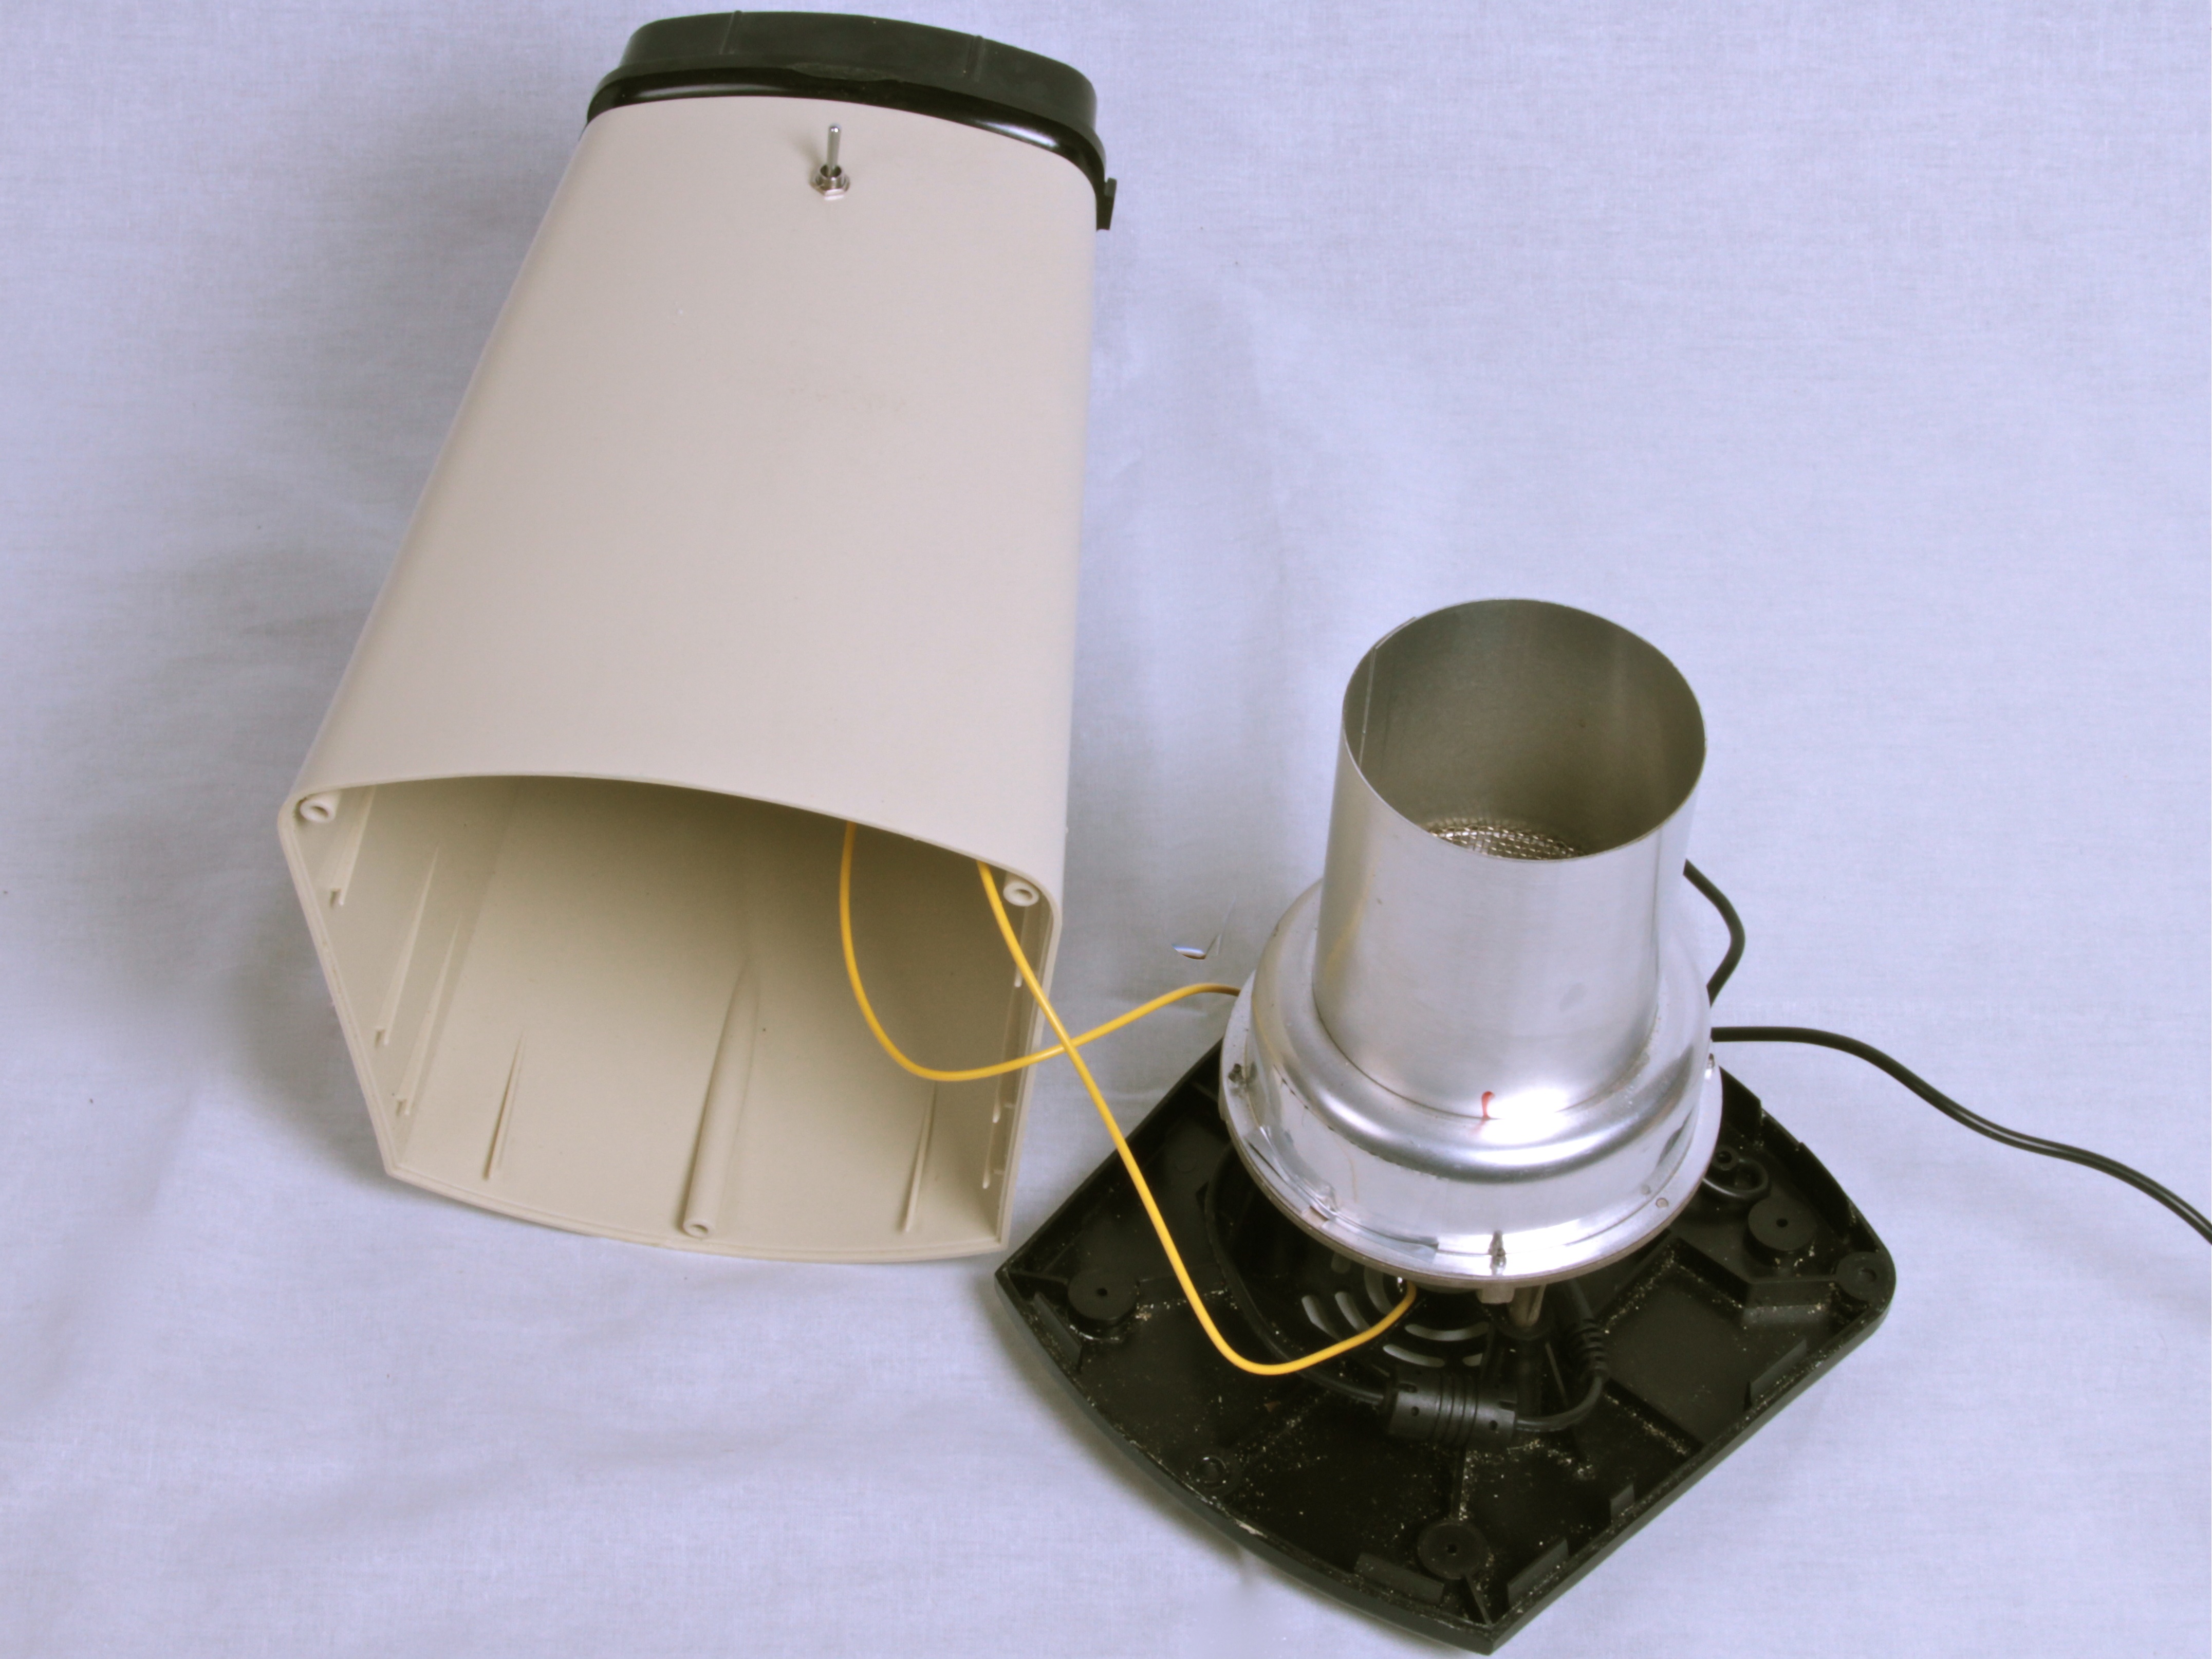
Fortunately, the whole machine is held together by a few sets of screws and comes apart easily. Once the outer case is off, you can see that the inside consists of an aluminum vessel– which normally holds the popcorn — with a high-temperature plastic base, a motor below that, and then the outer black base of the popcorn maker.
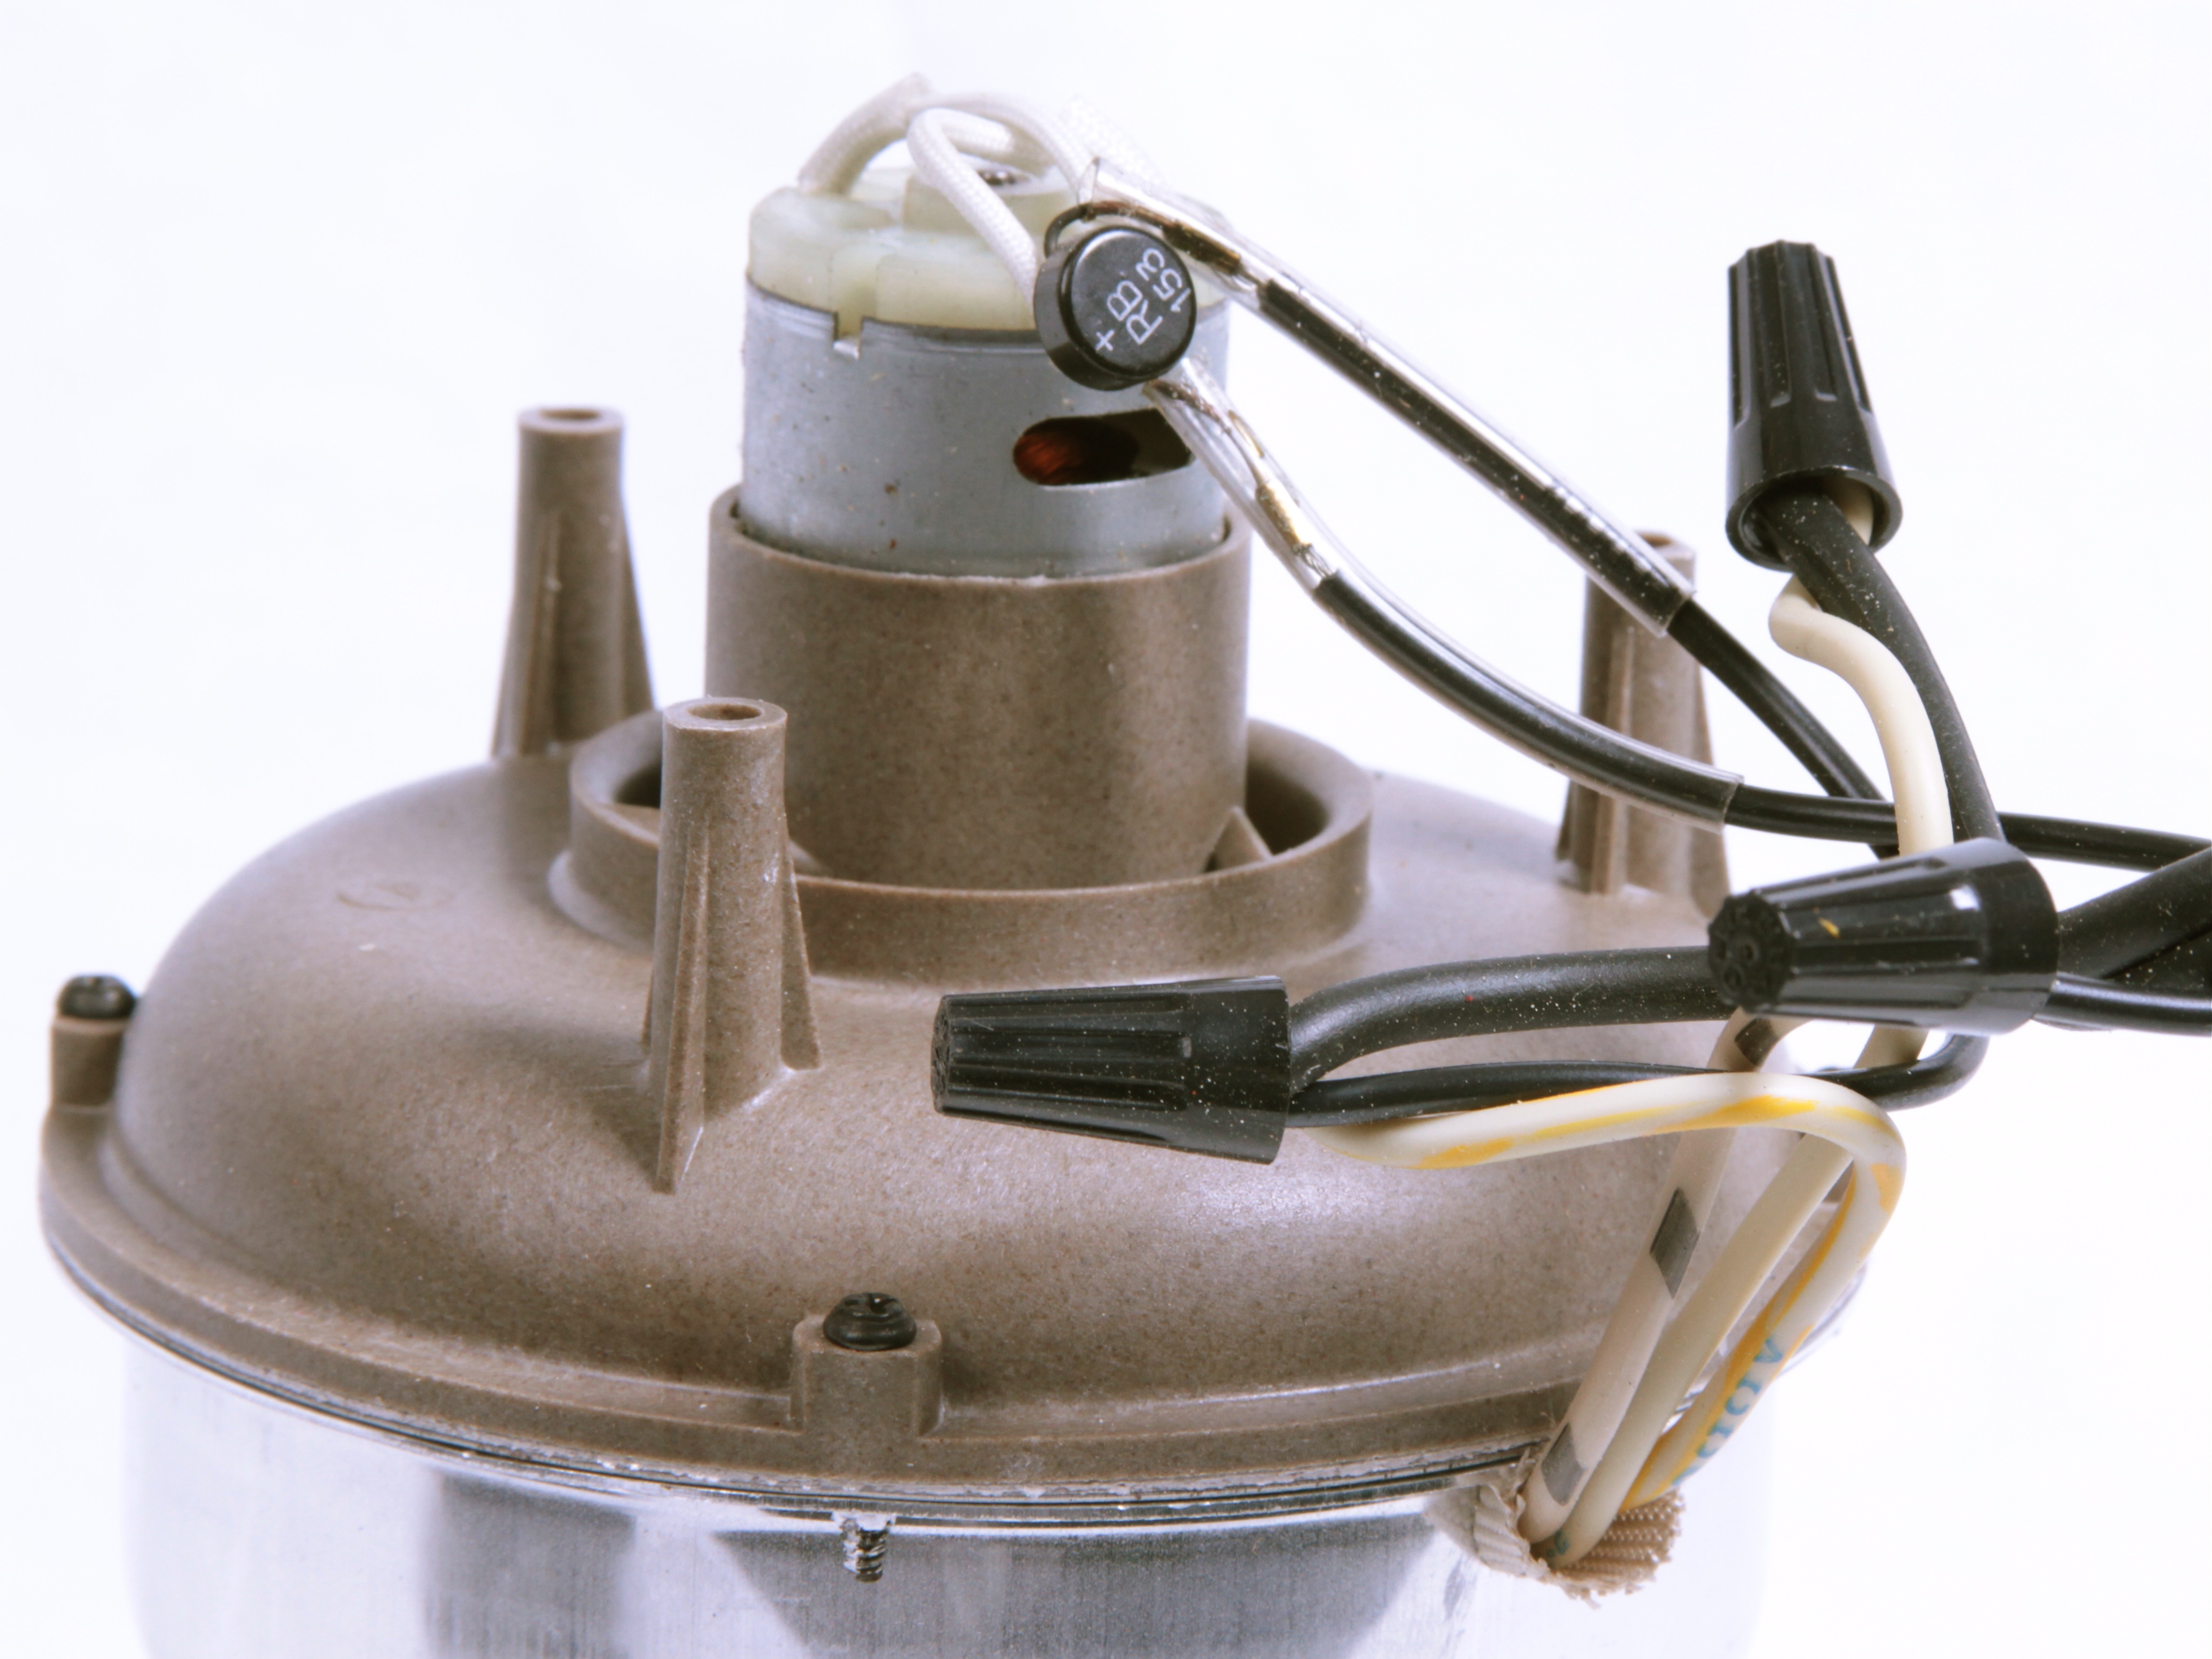
After removing the outer black base, you can see that the fan motor is driven through this part labeled RB153; which is a 1.5A 200V rectifier bridge. This type of motor is an inexpensive type that requires DC current to operate. A rectifier bridge like this converts AC to (poor) DC in a process called full-wave rectification, so that the motor can run.
There are other wires here too. Some are leading into the plastic base, so let’s look in there as well to see what’s going on.
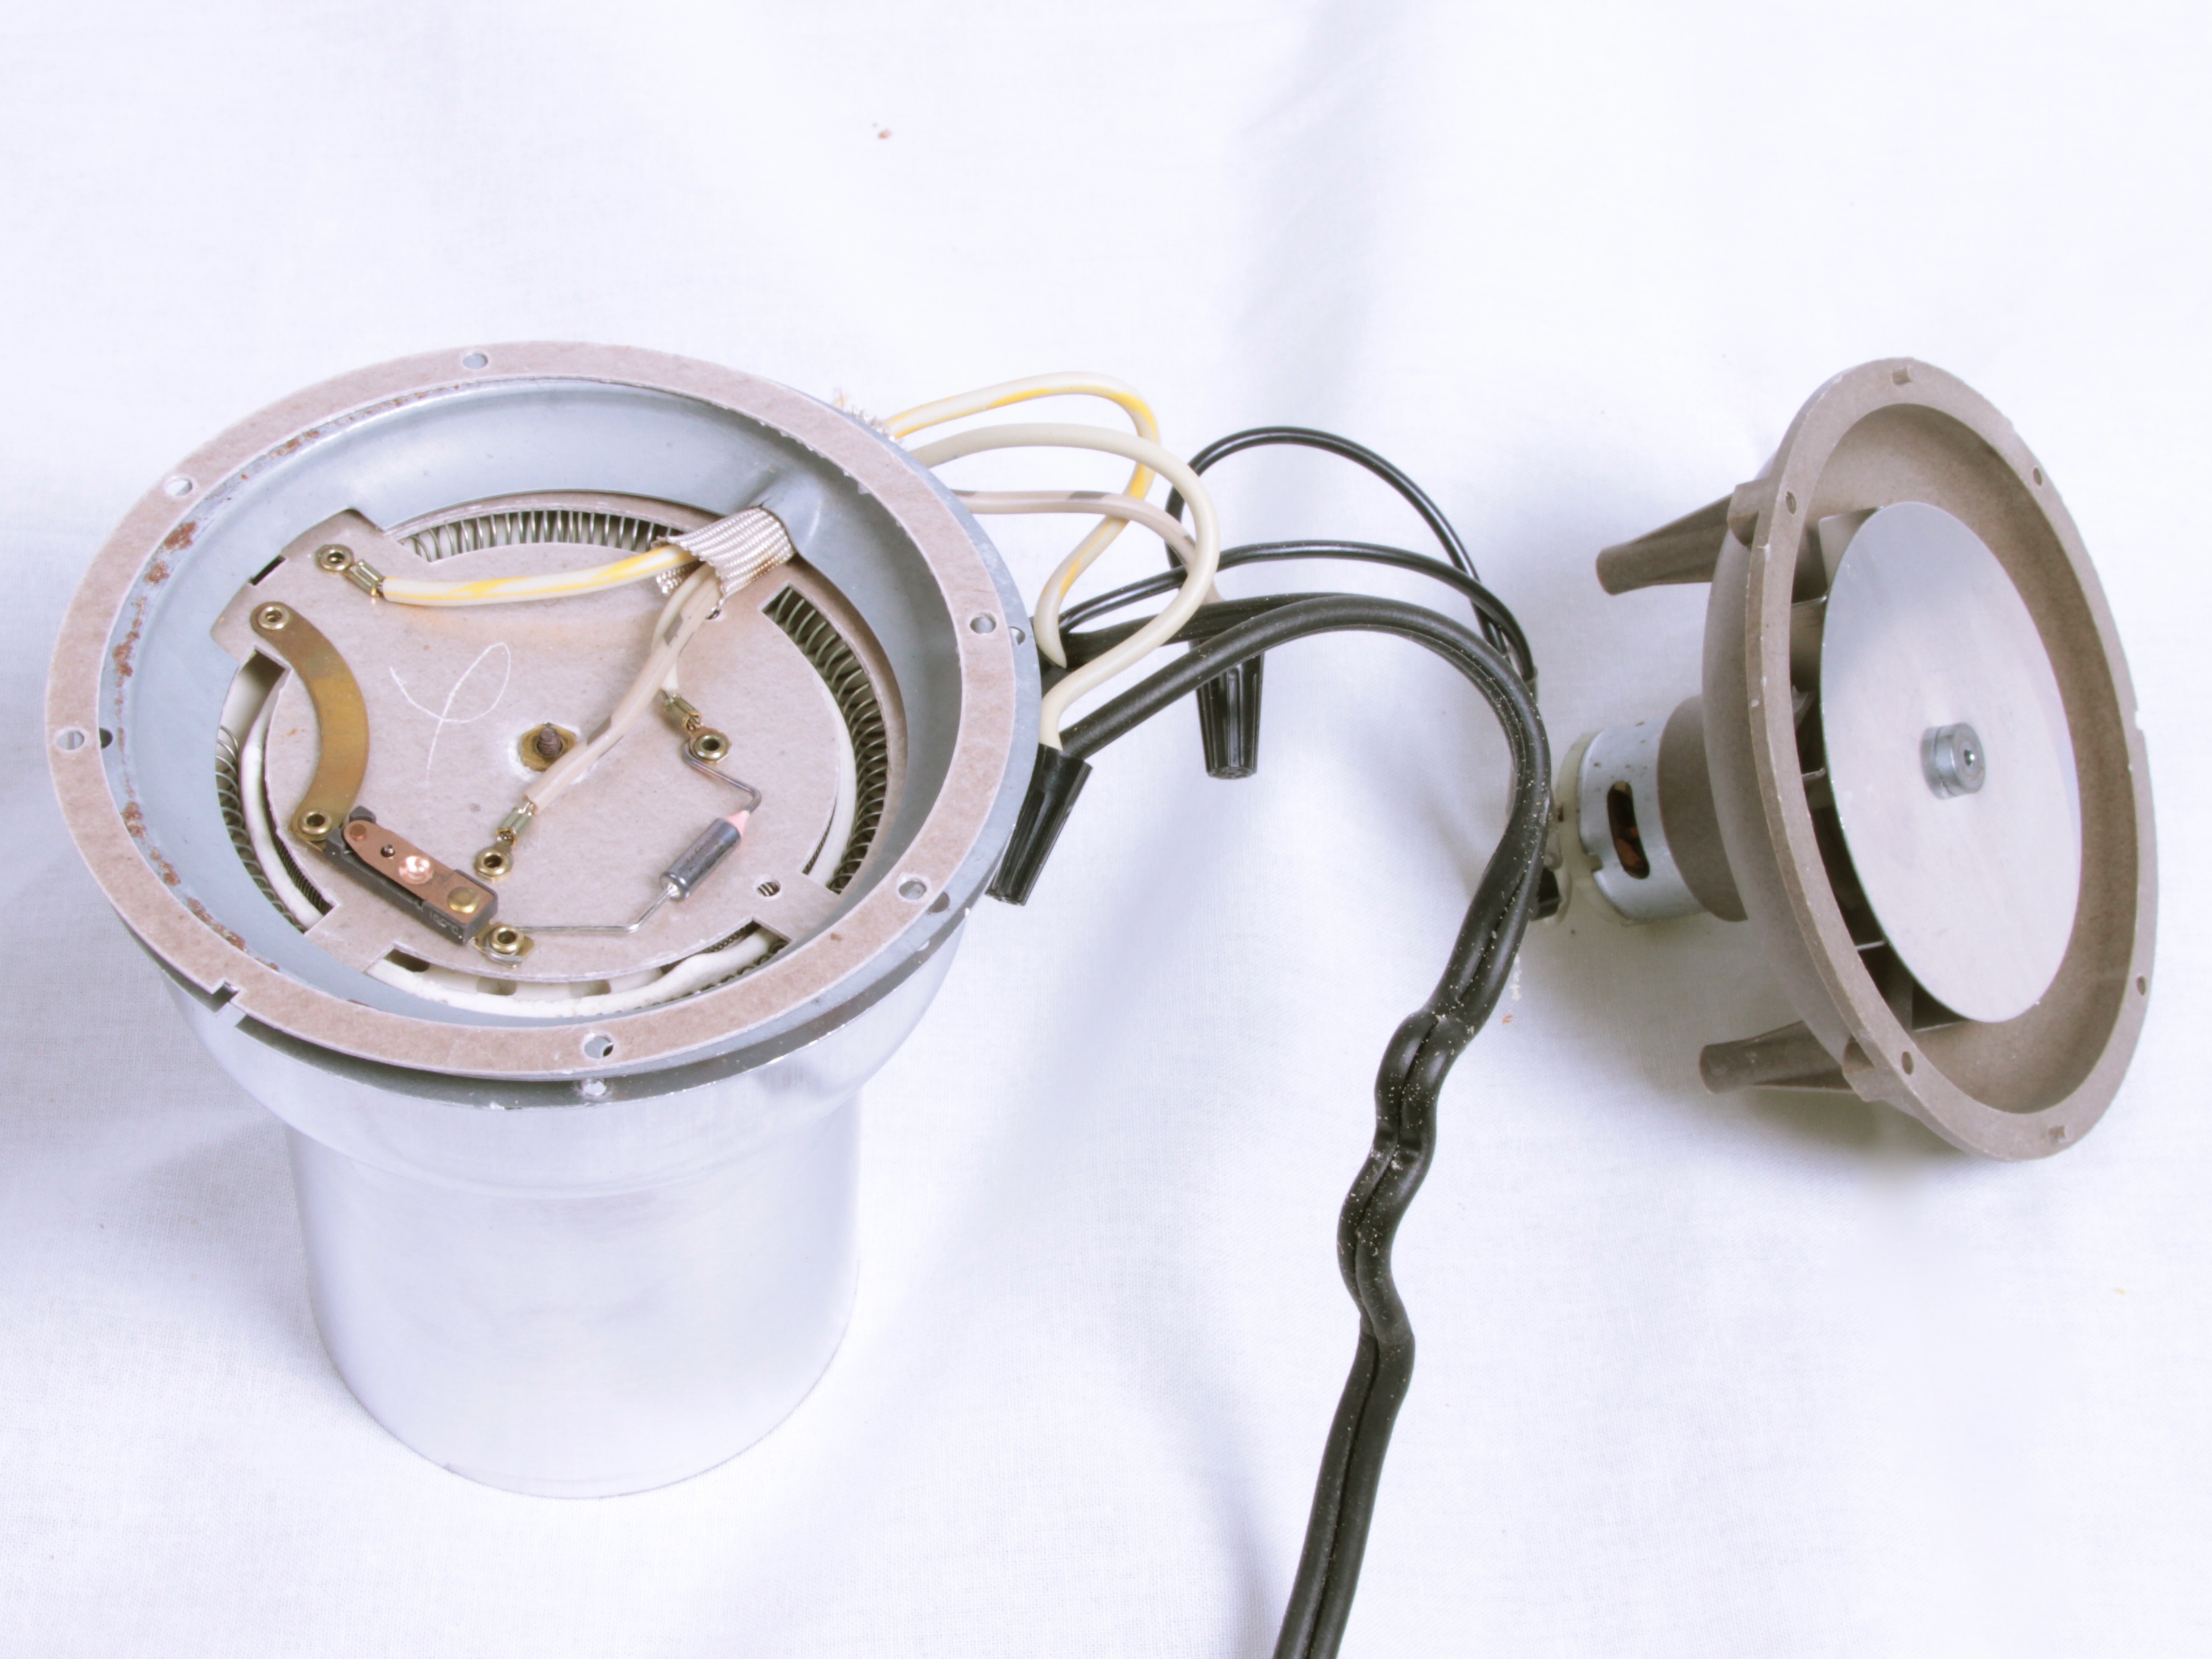
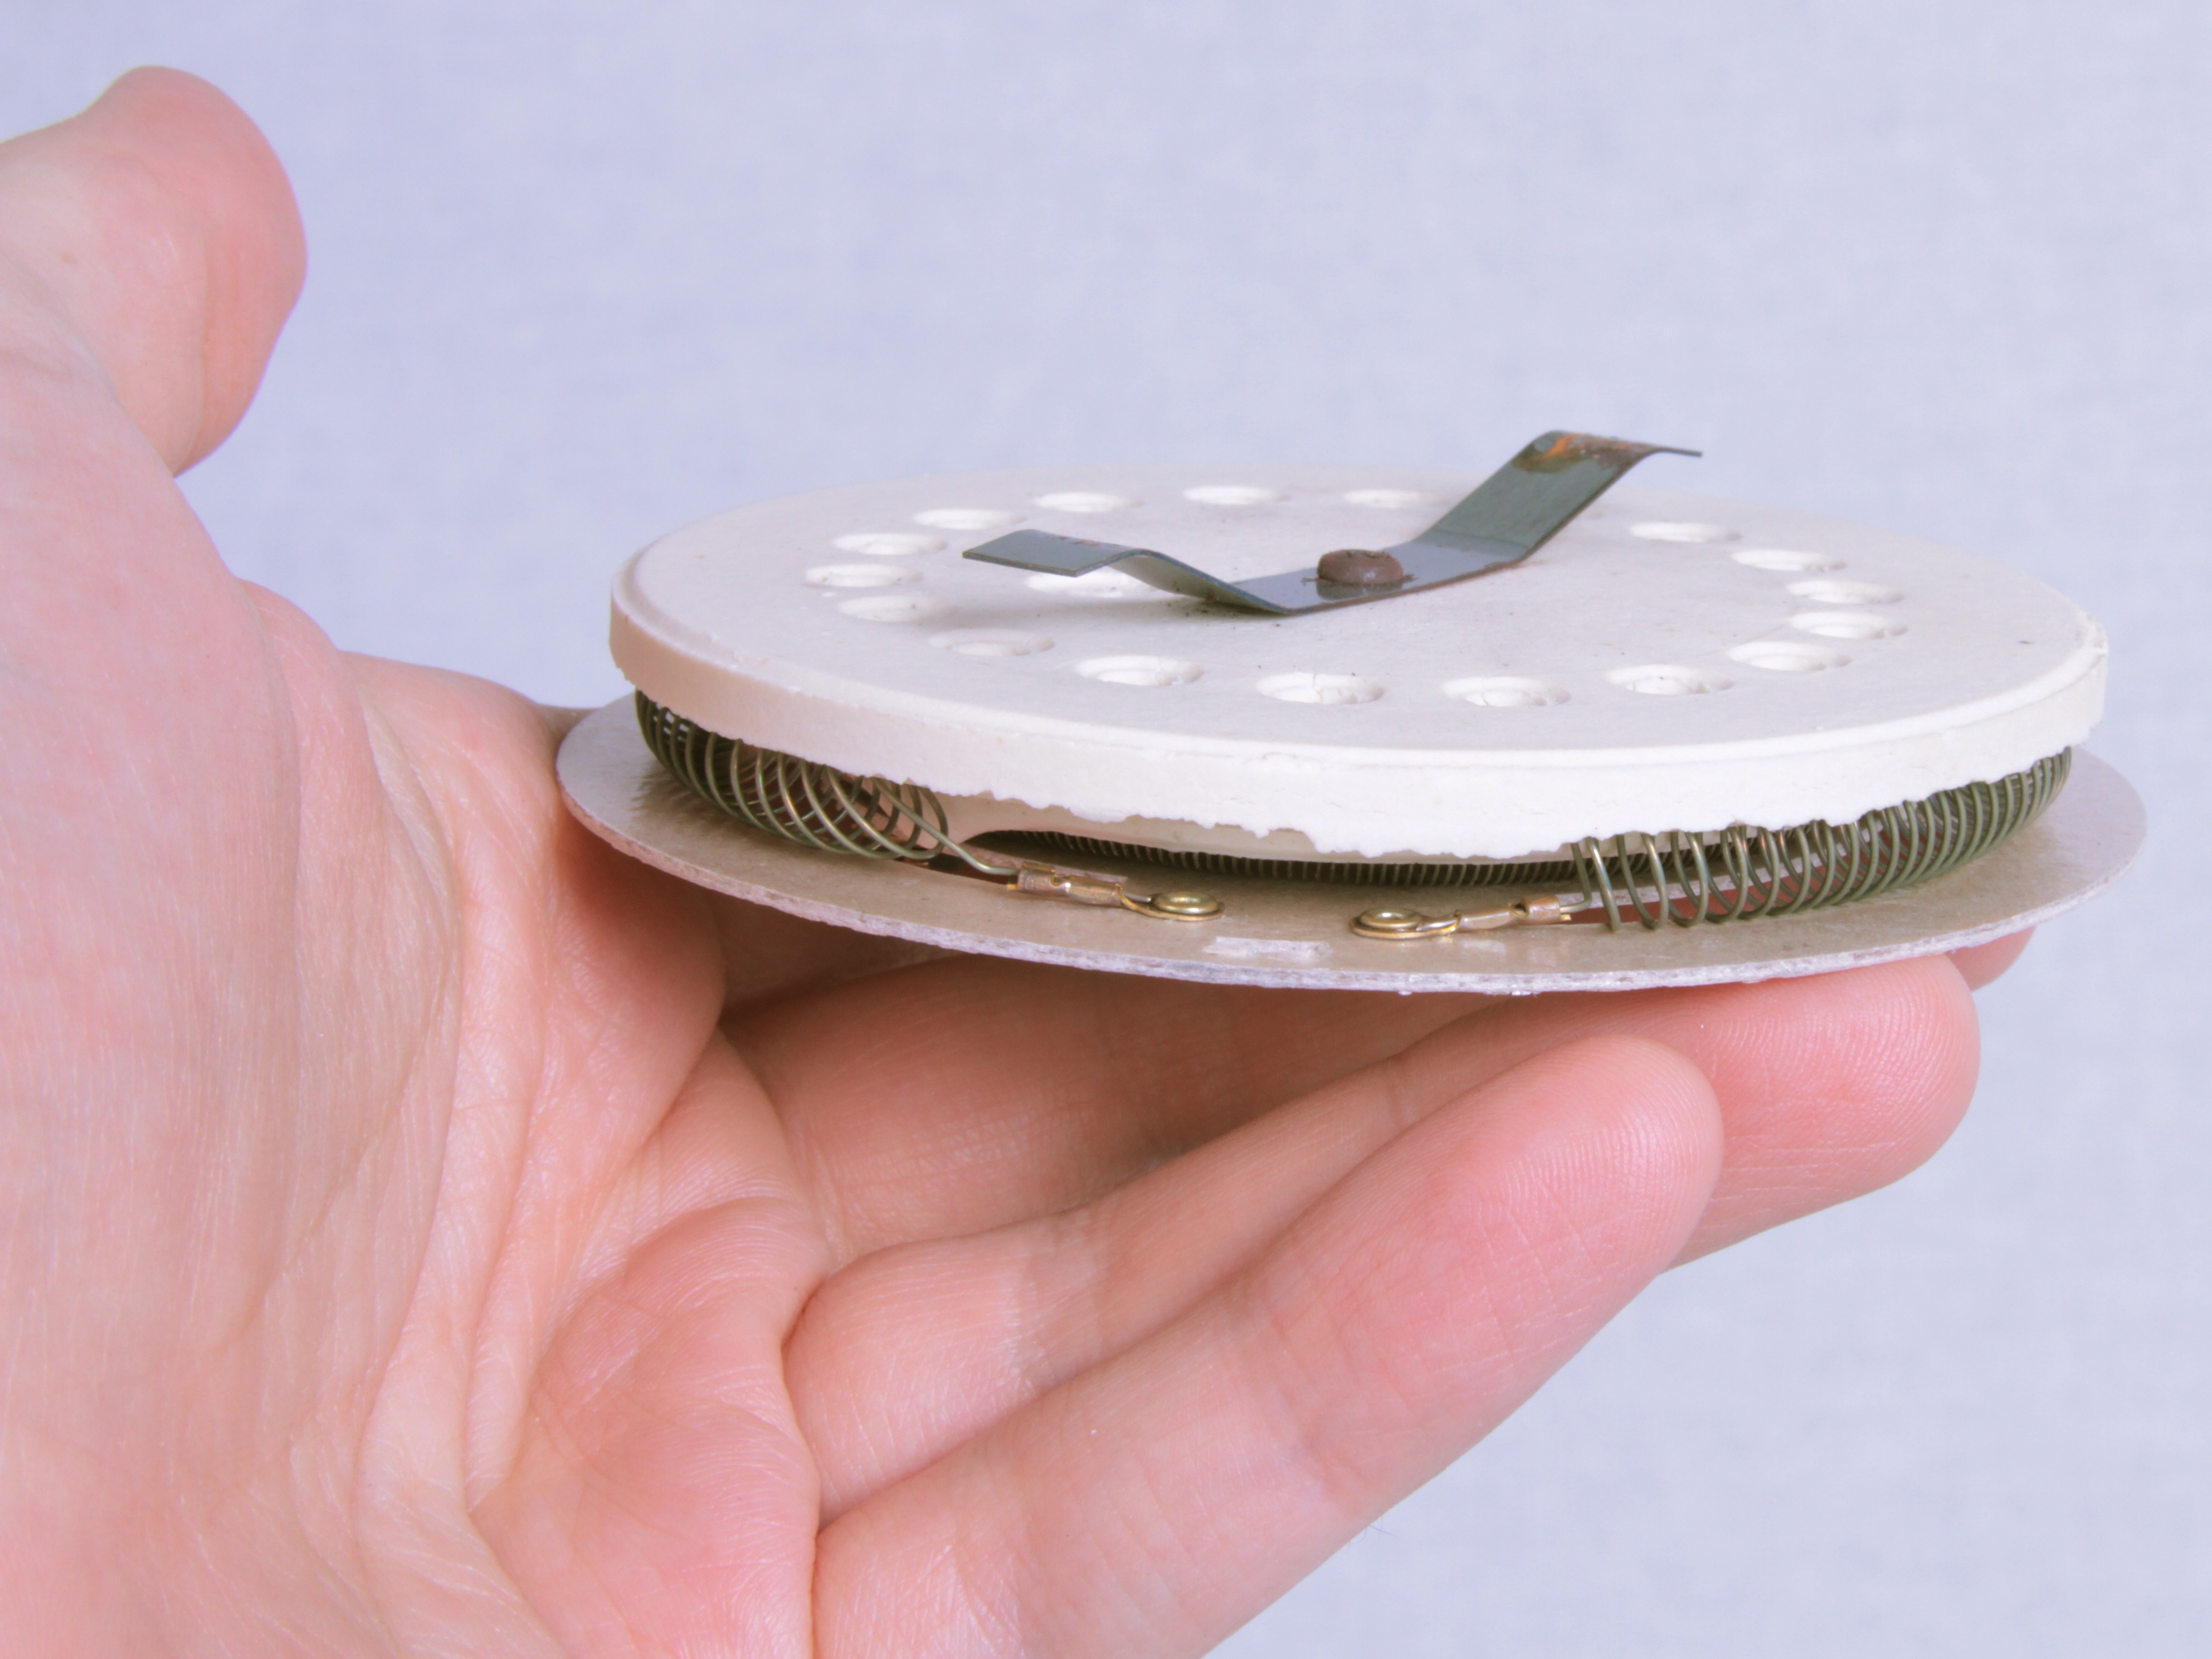
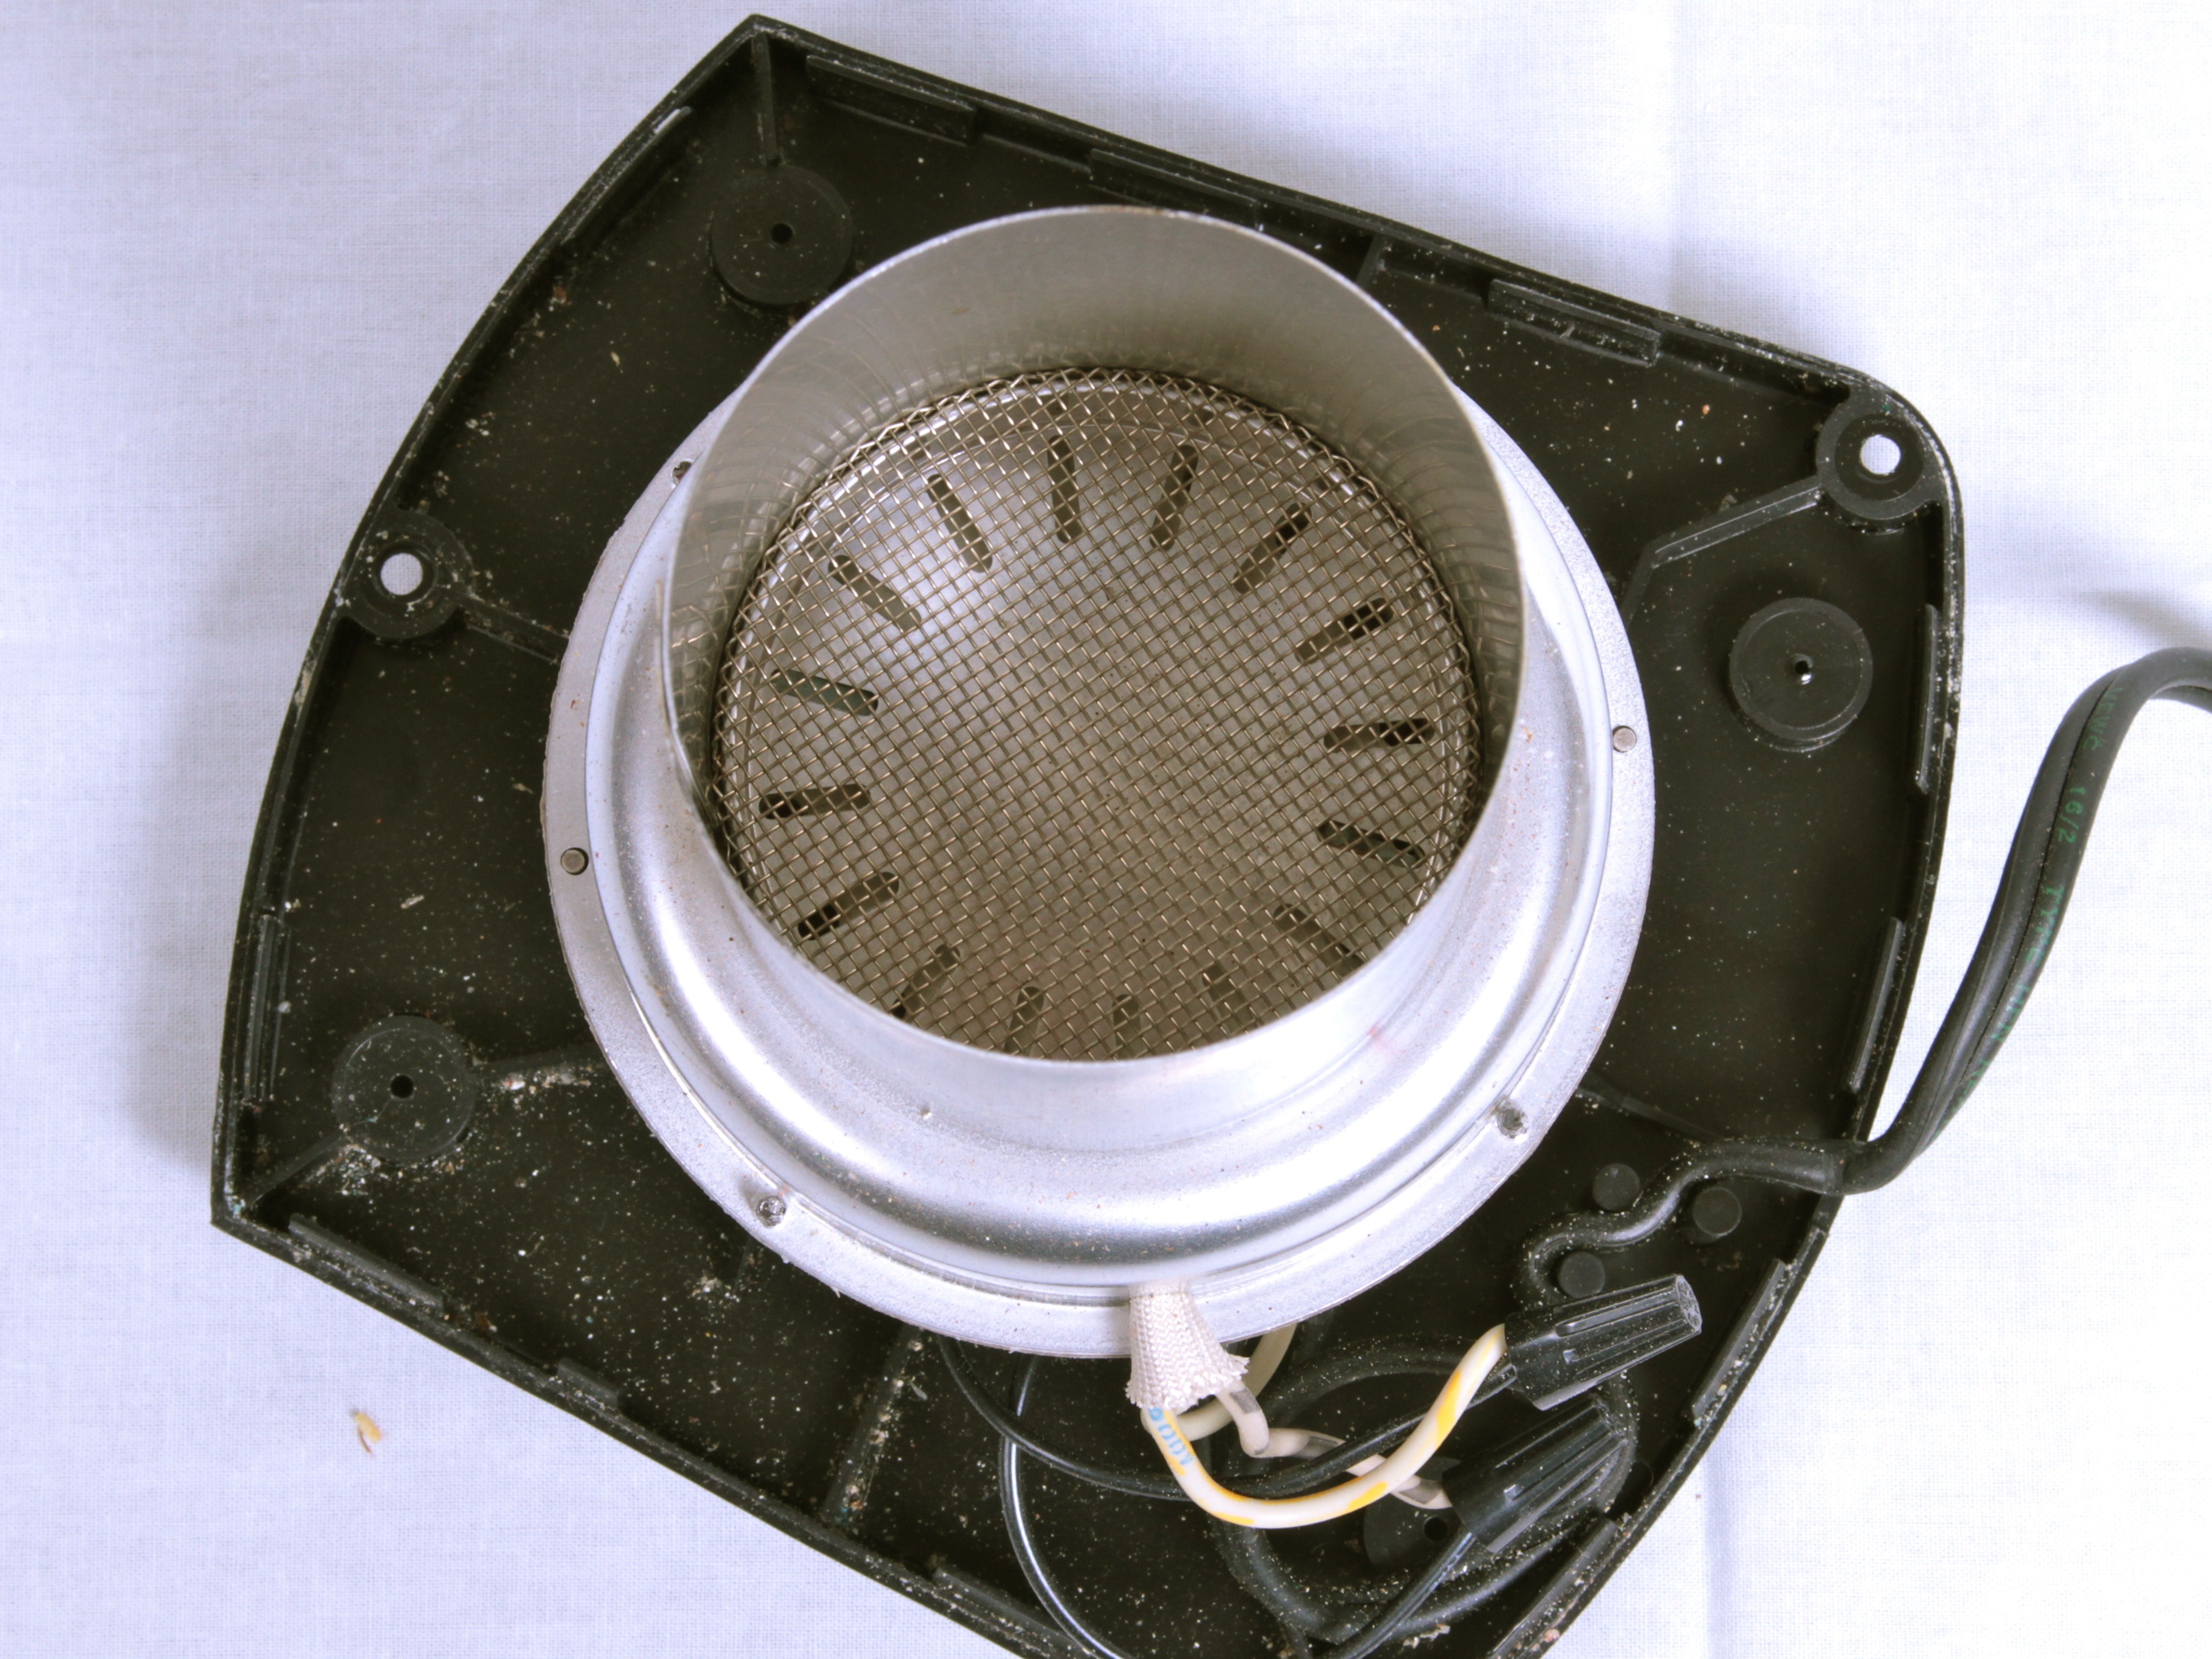
On the right you can see the aluminum “fan” (or impeller, actually) attached to the motor, and on the left you can see the main electronics of the popcorn maker. Next, we’ll get a closer look at the electronics.
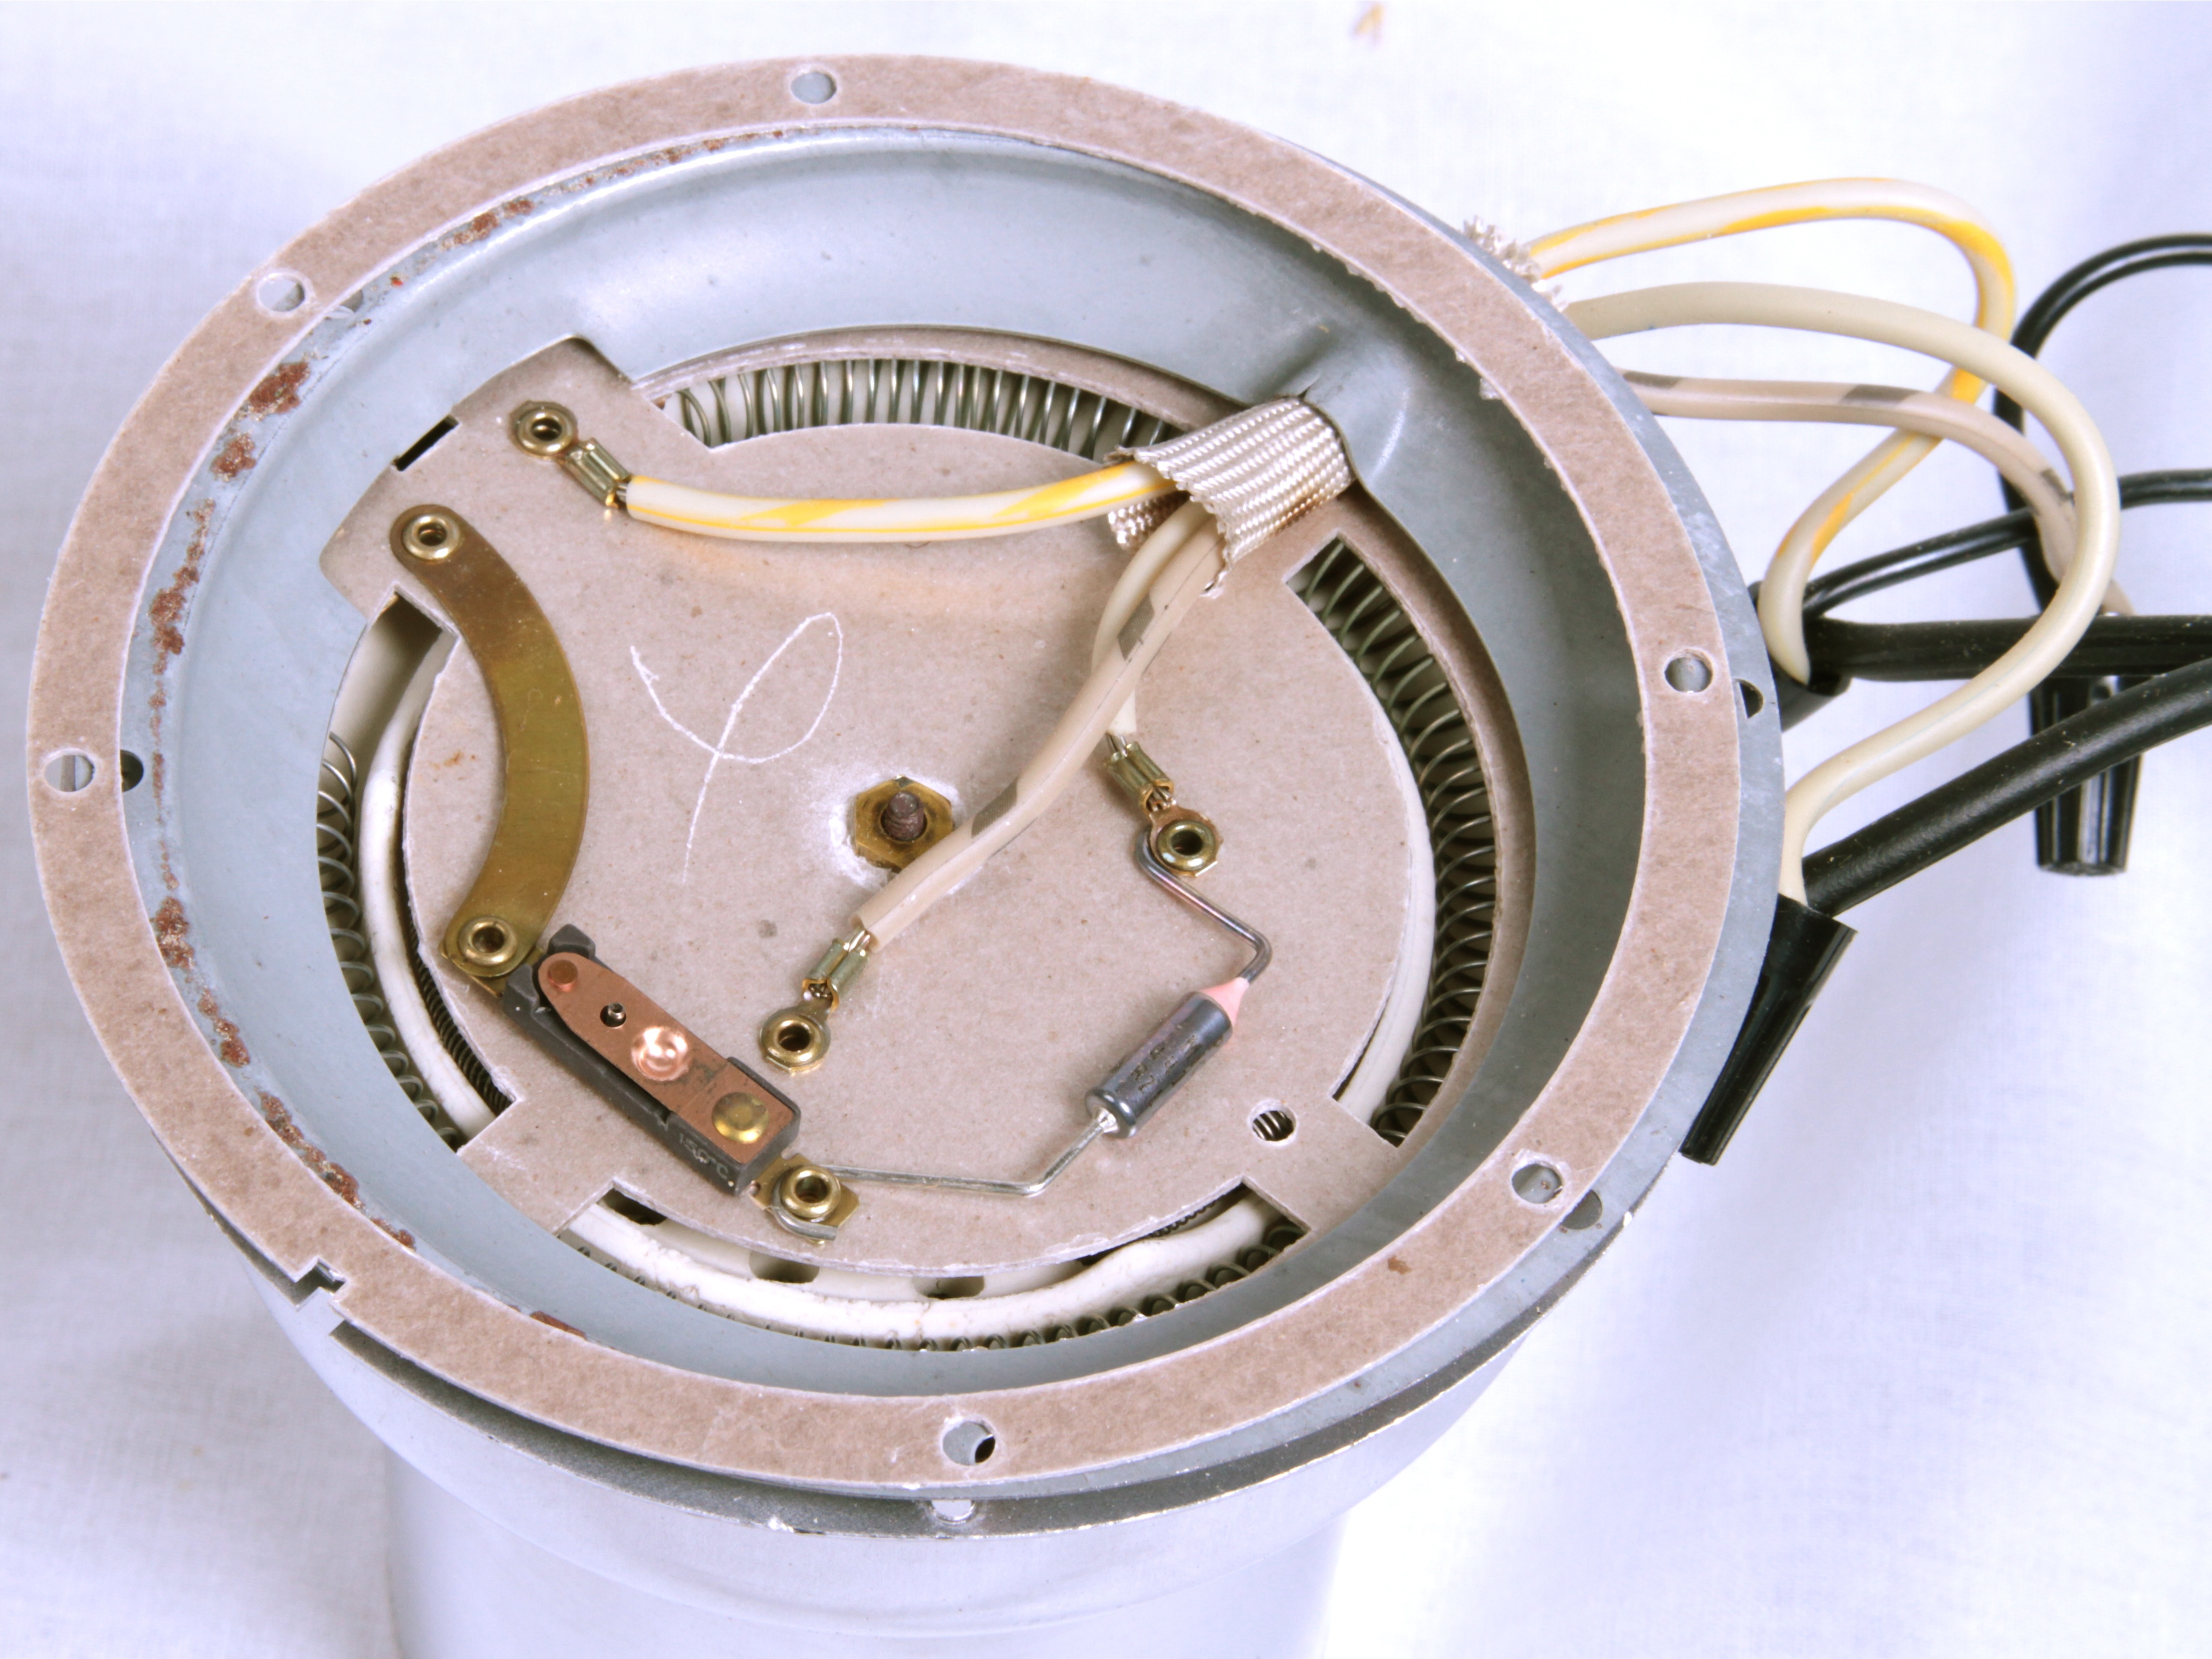
The bottom right component, with the silver cylinder and the pink cone, is a thermal cut-off (safety) fuse. To the left of that is the thermostat; it’s stamped “150 C” on the side.
There are also two coils of heater wire beneath the board. It’s relatively straightforward to map out the circuit and see what we find:
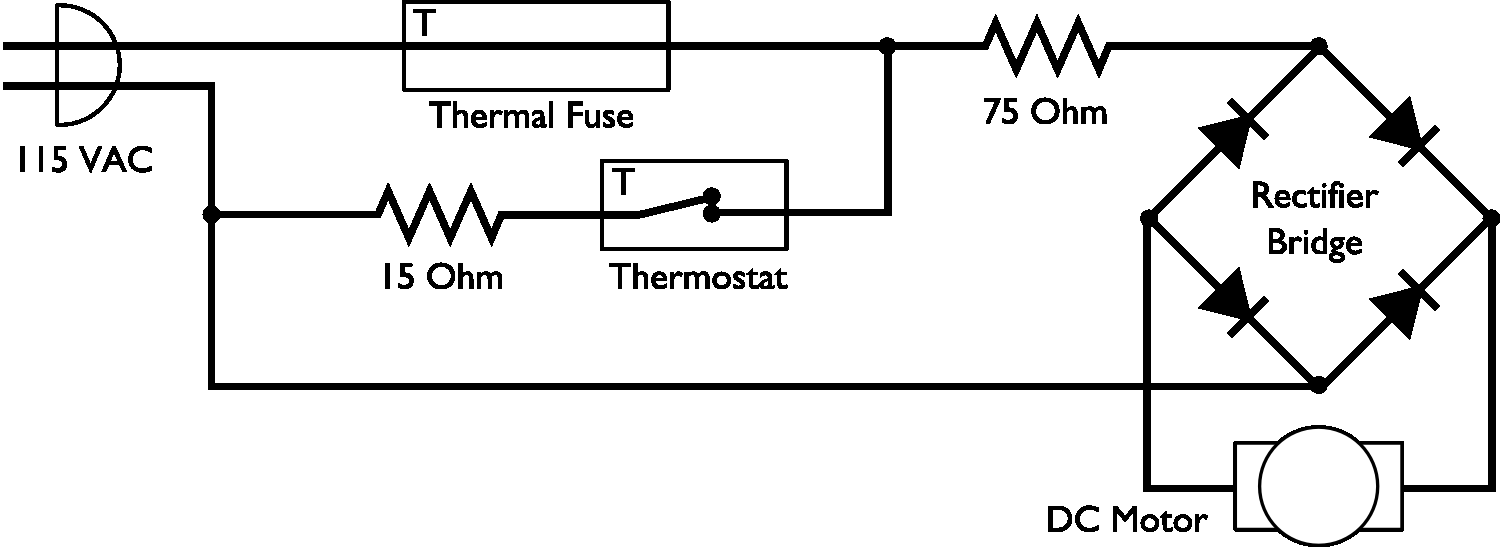
The thermal fuse protects the whole circuit from overheating– if it goes, the popcorn maker will be fully dead. Whether or not the thermostat is open, the 75 ohm heater coil will always be dissipating power.
The thermostat can be used to turn on or off the *big* 15 ohm coil, depending on the temperature inside. The rectifier bridge is used to drive the motor, but is in series with the 75 ohm resistor.
From the standpoint of our mod, this is a minor setback. If we snip out the thermostat and/or 15 ohm heater coil, the motor will still run, but there’s a 75 ohm coil used to (1) generate heat and (2) drop the voltage to a suitable level for the DC motor. It’s not as big as the other coil, but we probably don’t want to leave any heater coils at all running in our cooler.
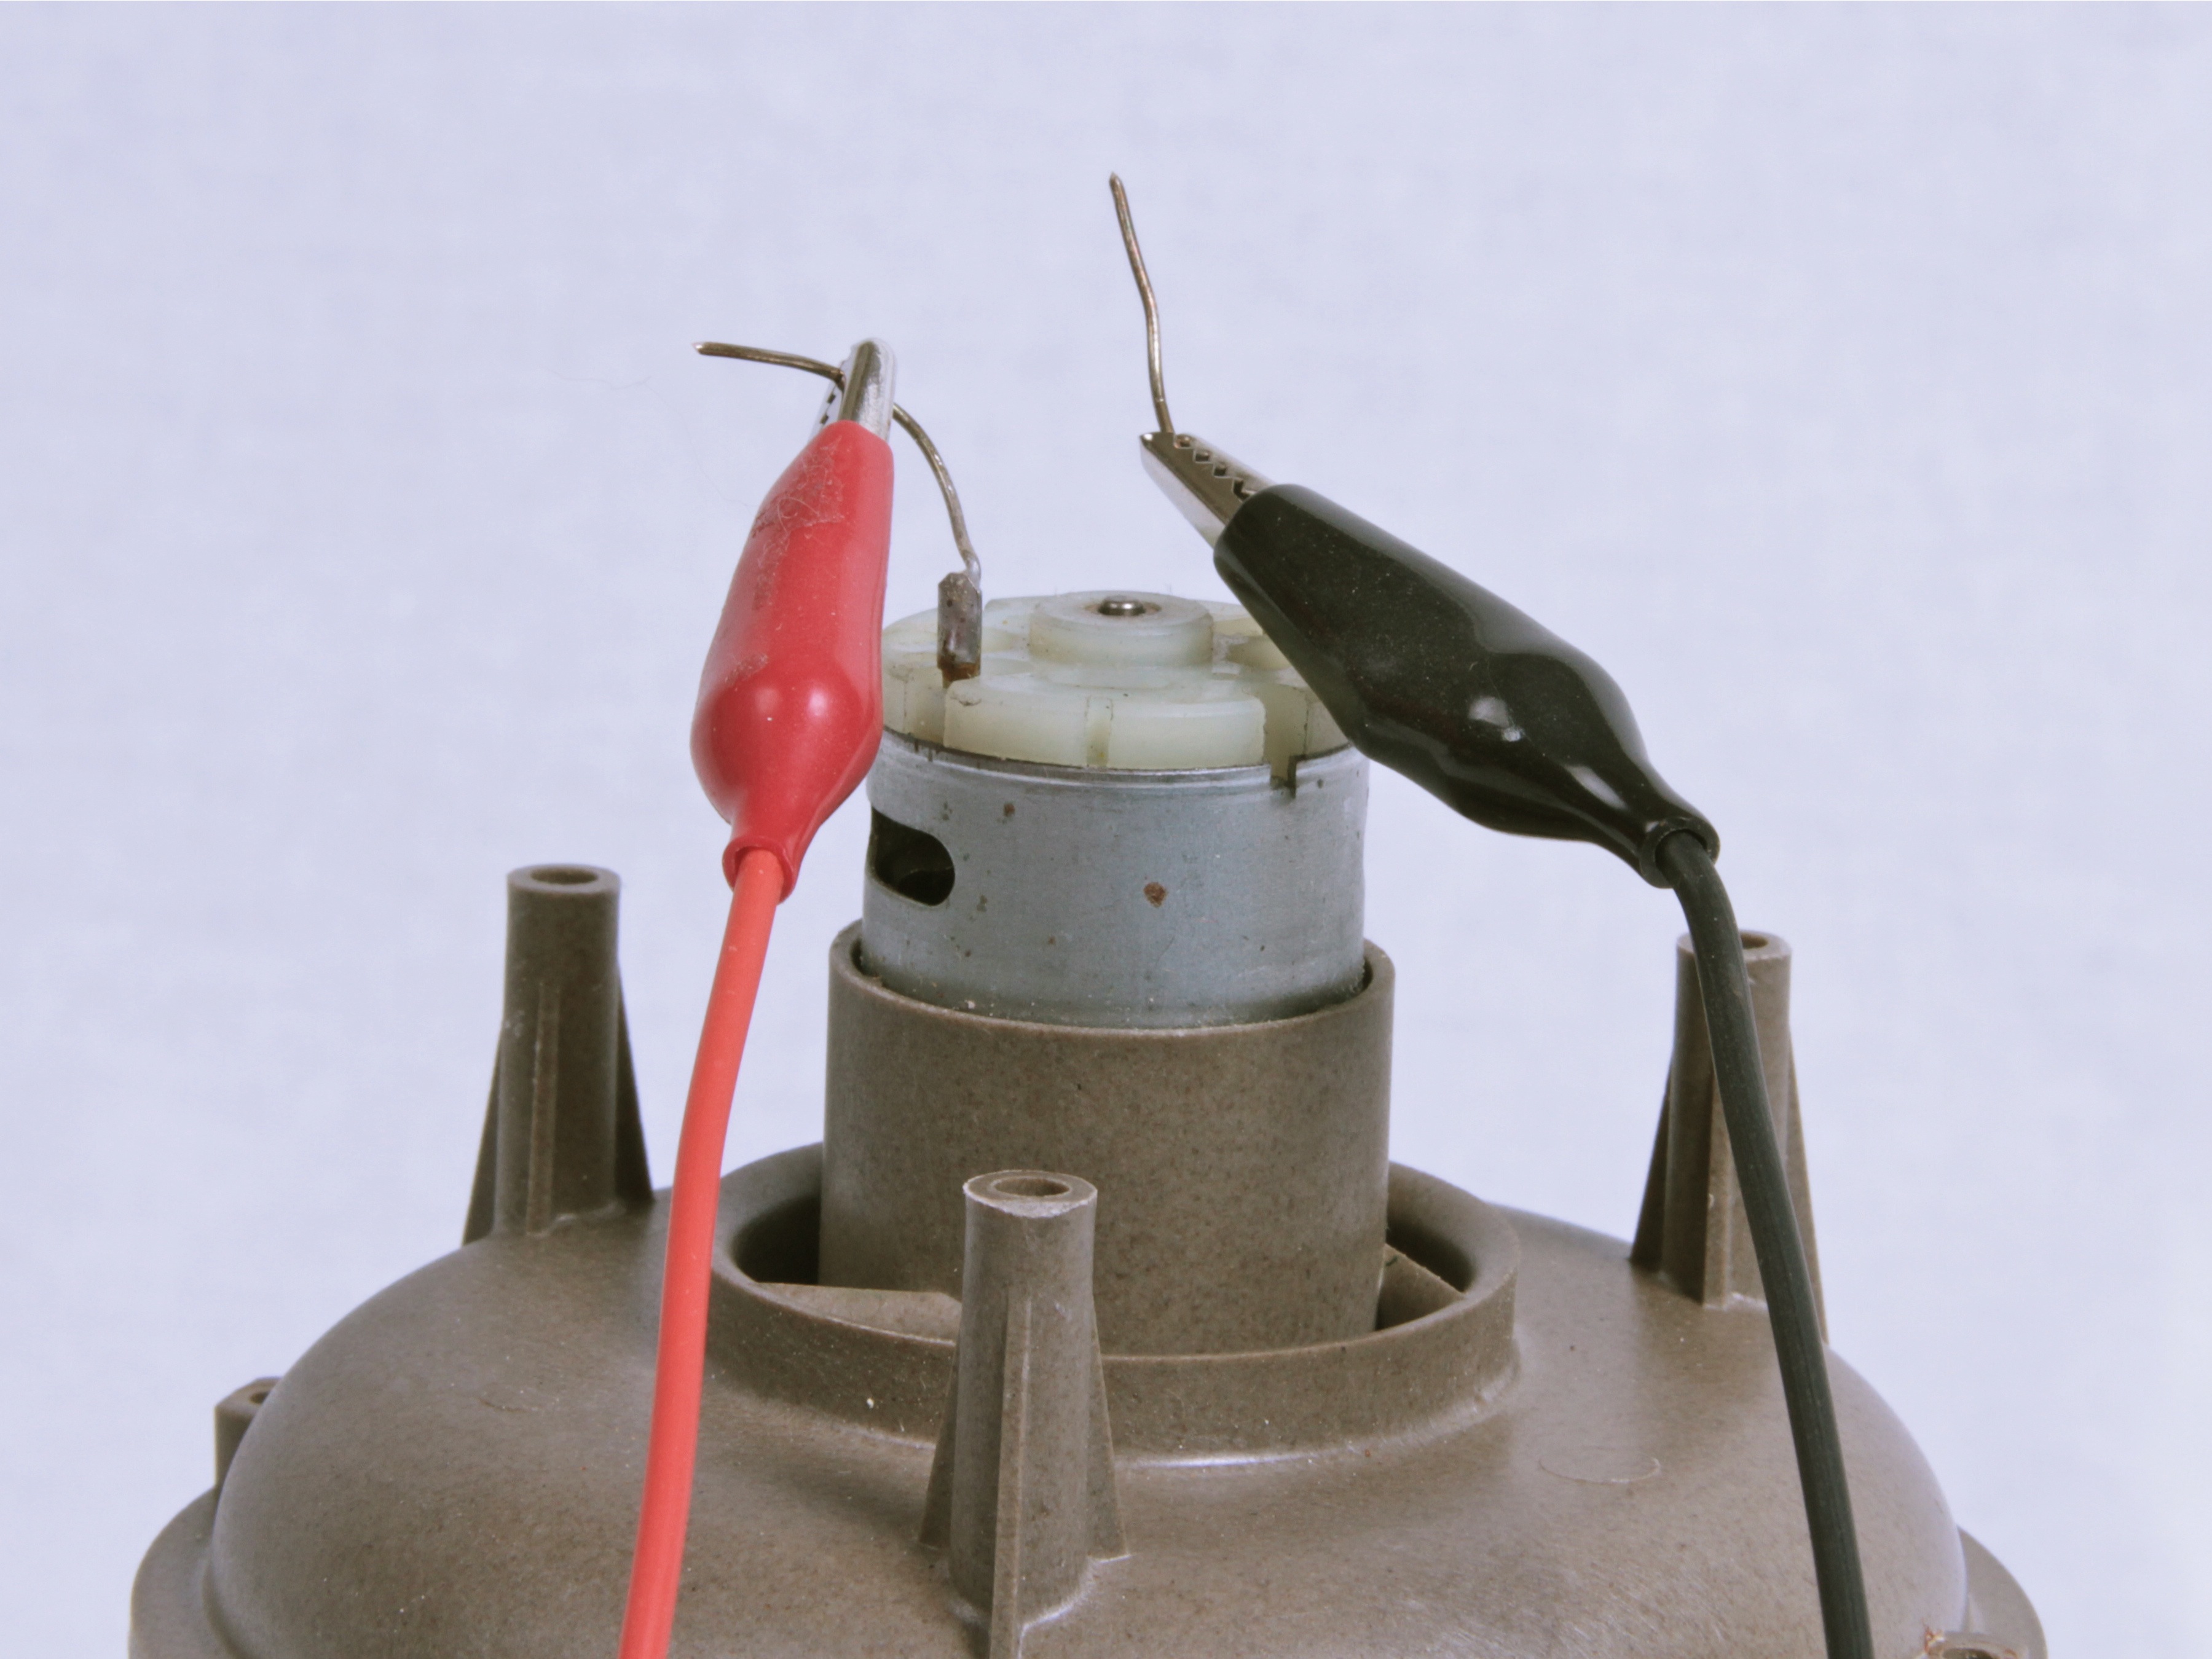
A solution is to drive the motor independently from DC, from our own power supply, and completely ignore the original circuitry. With a benchtop power supply, it looked clear that the motor can run well at 12 V, albeit slightly slower than when running off of AC.
Since we didn’t need it, we took out the assembly with the heater coils parts and set it aside. This has the added benefit of improving air flow from the fan to the coffee beans.
Next, we hook it all up and put it back together.
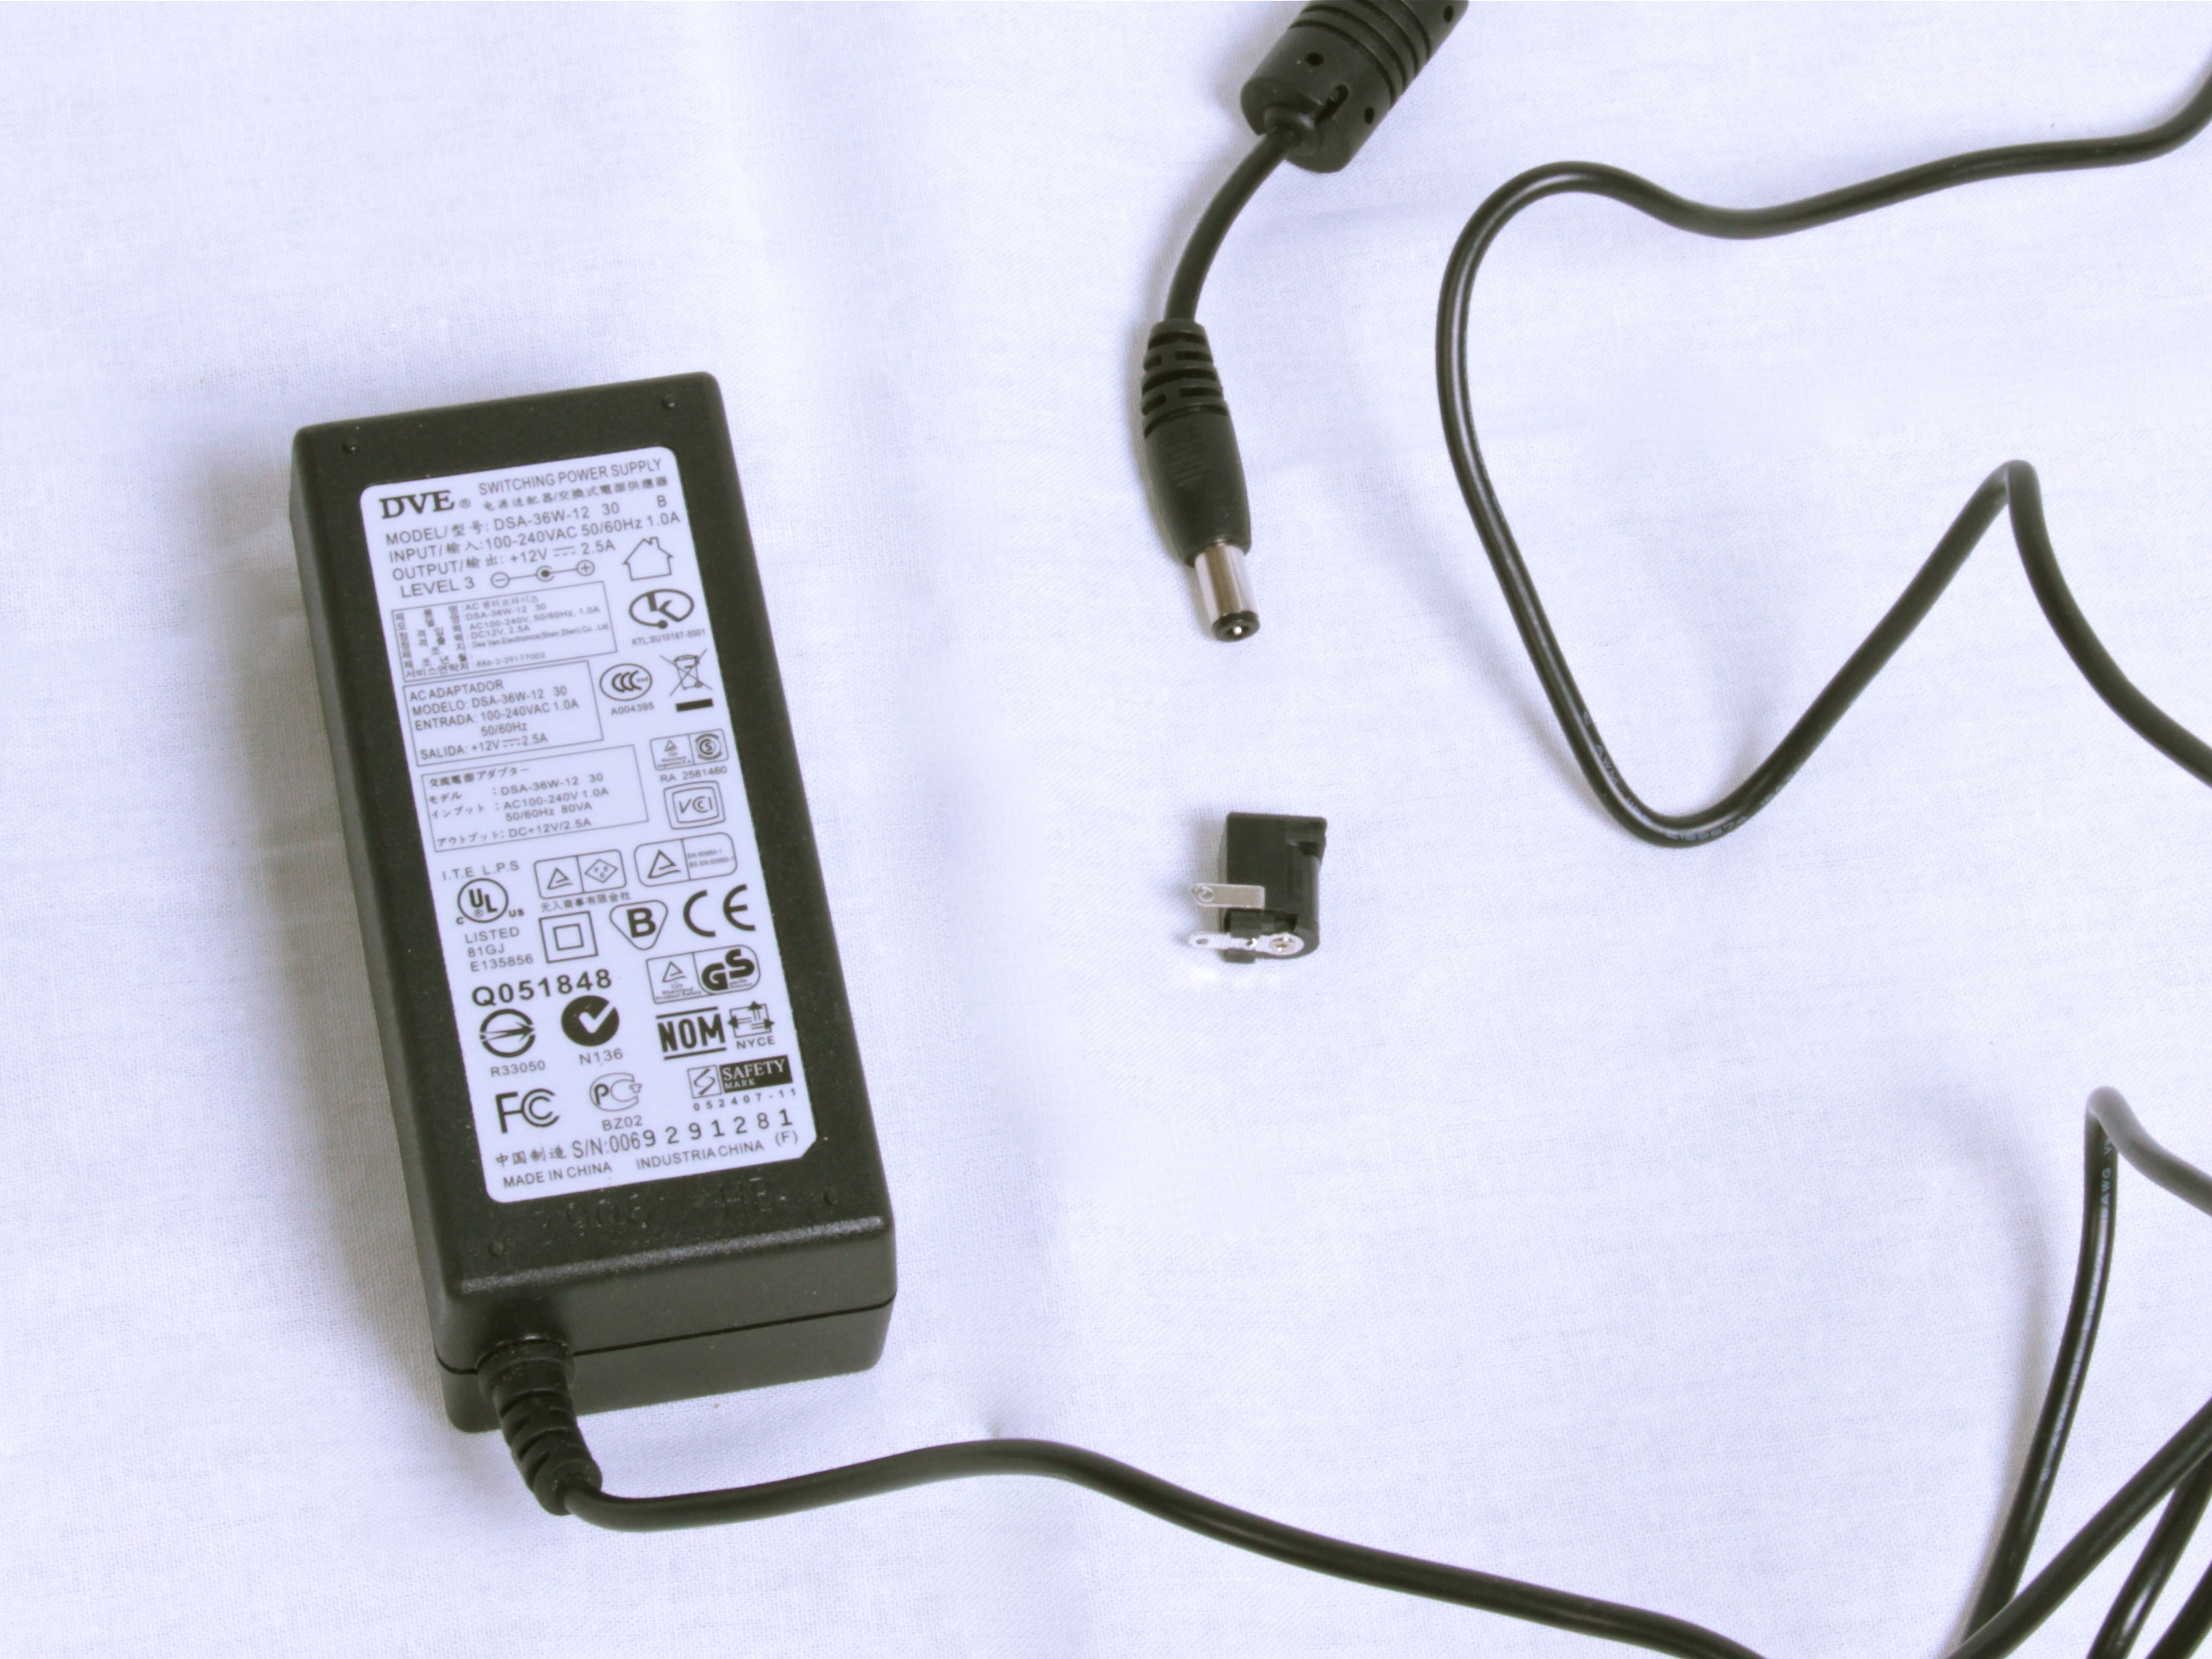

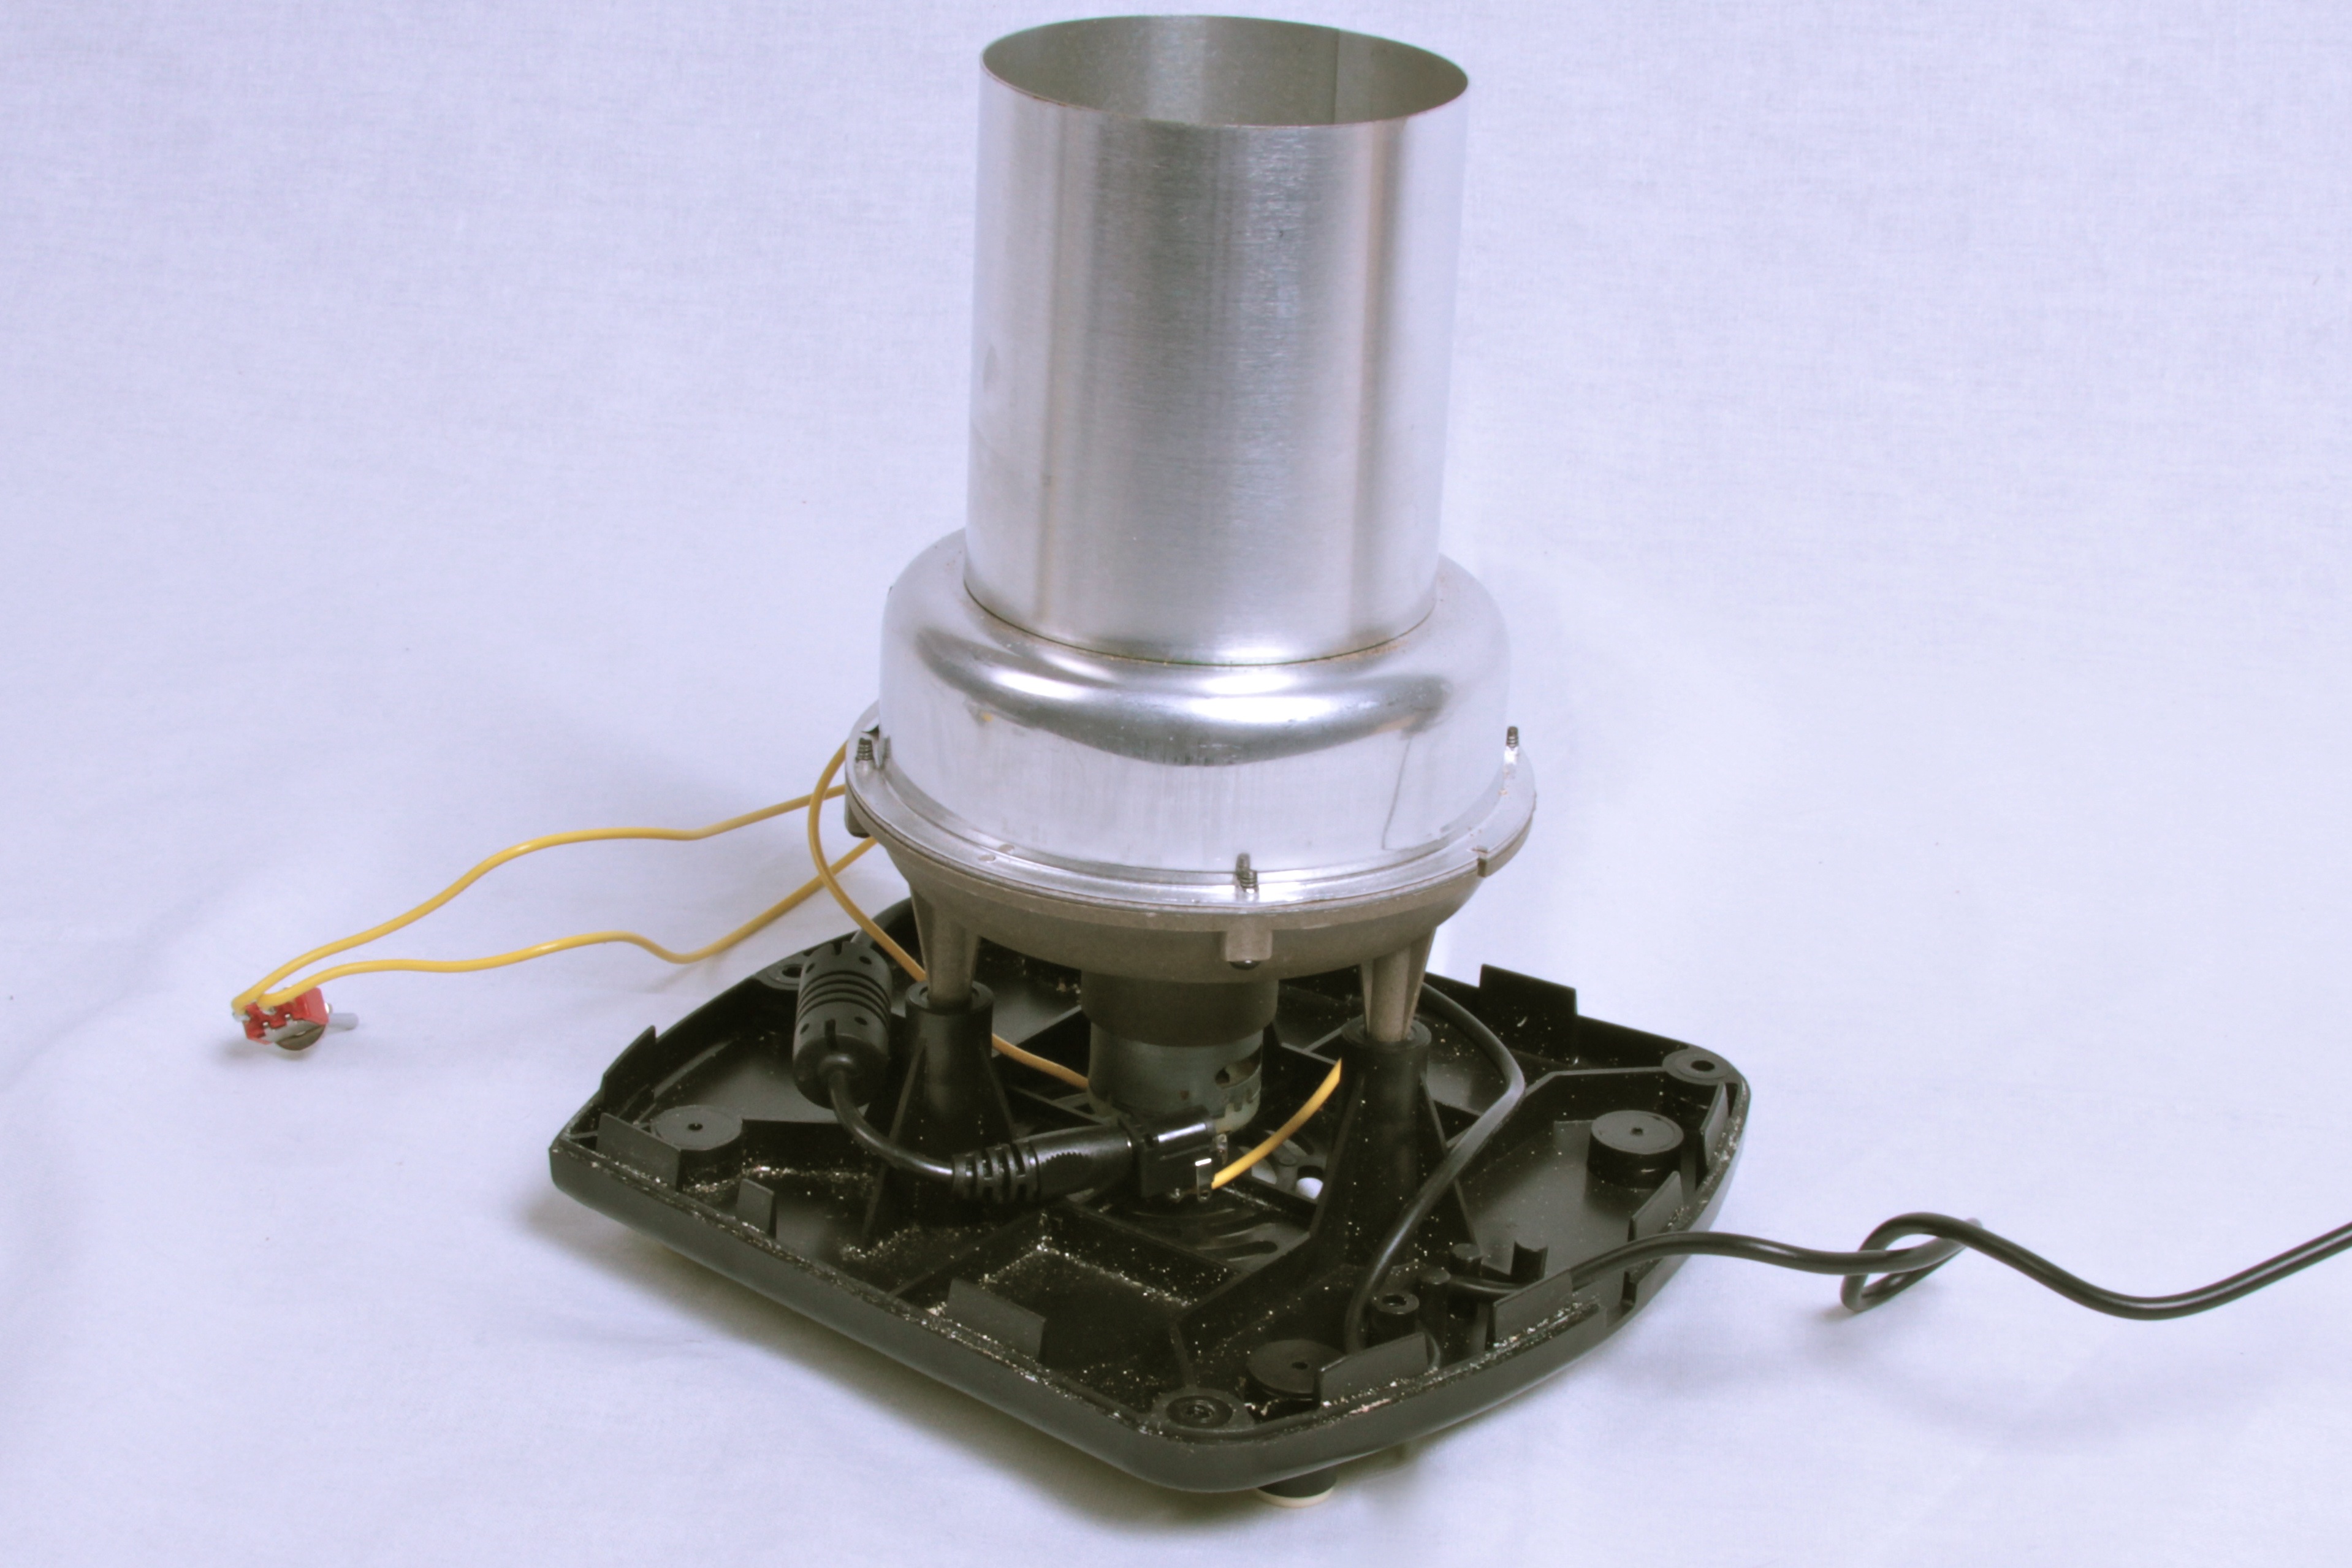
We took a 12 V DC power supply that we happened to have hanging around, and soldered up a matching jack across the motor, along with a power switch– for a real improvement over the original.
And there it is, all completed, with the 12 V power cord coming out of it now.
To use the cooler, roast beans normally, then pour them from the “roasting” popper to the “cooling” popper, with the fan on.
The heat transfer from the beans to the air coming out is surprisingly efficient– the air over the top when the beans are still hot is flaming hotso watch your hands above it. The beans come to room temperature in a minute or two, which is ultimately comparable to the two-colander method that we were using, but it’s slightly easier and more reliable.
And it makes pretty good coffee.

Why not use a three position switch?
Up = Heat and Fan
Center = off
Down = Fan only
Then there is no switching between poppers and you reclaim some counter space.
You could even use an arduino.
Push button, it roasts, then cools, then powers it’s self off.
You’d need a few more parts (optocouplers/relays and the uC) but it might be worth the convenience.
As you probably read in the article, the heater and fan circuitry parts are not independent, which is the reason that we went to a DC power supply. If we just turned off the main heater with a switch, we’d still have somewhere between 50 and 75 W of heat coming out of the secondary.
Yes, you can come up with a Rube Goldberg version with a DPDT switch that cuts off the AC entirely and turns on a separate external DC power supply for the fan, but then you lose the advantage of dumping the beans into a cooling container that’s already cold. You’ll spend the first few minutes of cooling just reducing the temperature of the heating elements and metal parts. Maybe we’ll do something like that someday, but there are certain advantages to what we’re doing right now, including simplicity.
—
Windell H. Oskay
drwho(at)evilmadscientist.com
http://www.evilmadscientist.com/
yeah but why not just wire one circuit with a 75ohm resistor (not expensive), the rectifier bridge and the fan, and a second circuit with the heating elements as they are in all other respects? a 3 position switch connects power to fan, power to heater or power off. or, actually, you could just have an on/off switch and a heater/fan switch . . . then you could even still use it as a popcorn maker.
Yes, there’s a reason not to do it that way.
That 75 ohm resistor is an independent *heater coil.* If the motor runs at ~1A average, it’s easy to see that the coil still puts out 75 W or so of heat. If you use a smaller 75 ohm resistor, it will still put out the same amount of heat. (Considering which, it might well explode or catch on fire.) No, it’s not as much heat as the main coil, but we’re trying to *cool* the beans, not just keep them warm.
Also, we lose some ability to rapidly cool the beans if we just turn the power off. The machine is *HOT* when its done, and starting with a cold machine might cut our cooling time in half. From what we’ve read, cooling the beans rapidly makes a big difference in the final flavor.
(Also: We have a separate popcorn roaster. These models both suck at making popcorn.)
—
Windell H. Oskay
drwho(at)evilmadscientist.com
http://www.evilmadscientist.com/
Why not replace the 75 Ohm heater with a capacitor with the same(ish) ESR, let’s see, X = 1 / 2 * PI * F * C so at 110V 60Hz you would need a 35nF capacitor (make it 33nF). Make sure to use a 200V or better part.
For 240V50Hz users it would have to be a 43nf (47nF will be fine), 400V part.
No heat is produced in the capacitor, and the voltage is dropped in the same way as if there had been a resistor there.
I think that you mean microfarad, not nanofarad.
It’s possible, but you need to be pretty darned careful about what type you pick– certain ceramics may be safe, polarized electrolytics are not. Moreover, it introduces a number of very real safety issues because it’s building a non-isolated non-protected line-level circuit. I’m not sure that I could recommend this as a better solution. :)
—
Windell H. Oskay
drwho(at)evilmadscientist.com
http://www.evilmadscientist.com/
It should be micro Farad indeed, which at 200v would make it quite a large part, reminiscent of the vacuum tube era. It is however not less safe then leaving the heating element in, line voltage exists in that spot in the original schematic.
I’m not an expert, and I agree the all-in-one method wouldn’t work, but here are two ideas to tos around:
1) How about using a water based cooler used in PCs between the fan and the faceplate to add more cooling power? Think very simple refrigerator.
2) If the all-in-one unit is a MUST, how about this: One larger unit with two chambers, one for heating with a shaft connecting it to the other chamber. A small "valve" would keep the beans in the first chamber until done, then just at the end , let the hot air blow them through the connecting shaft to the cooling chamber that will already have the cooling fan going. Overkill? Absolutely!
And for even more fun and go green, make it solar powered! :P
Front page I was totally thinking this was going toward adding a "no heat" switch to the roaster so it can be used to just blow air after roasting. Not sure why that wouldn’t be easier, but then I’ve never gone as far as roasting – half the time I don’t even use fresh ground (for shame) so perhaps there’s another reason then not messing up the good roaster. It’d be pretty cool to have something that could also grind (after blowing off the remains of roasting) but then you’re into pretty heavy builds and you’d be tempted to add "and brew".
>Front page I was totally thinking this was going toward adding a
>"no heat" switch to the roaster so it can be used to just blow air
>after roasting. Not sure why that wouldn’t be easier,
Again, there’s no straightforward way to do that. The design of the popper is that there are two heating coils, and one is in series with the fan– if the fan is on, that secondary coil is on.
Our original plan with this to make a separate cooler, that starts out at room temperature. A common criticism of roasters with built-in cooling is that they take a long time just to get back to room temperature. Ours solves this problem. :)
>you’re into pretty heavy builds and you’d be tempted to add "and brew".
Ha! Actually, it’s pretty nice. Pour beans into container A, roast for set period of time. Dump beans into container B, cool for set period of time. From there we can pour them right into the hopper of the grinder.
—
Windell H. Oskay
drwho(at)evilmadscientist.com
http://www.evilmadscientist.com/
Back when I was using a popper to roast coffee (I gave up and bought a roaster ‘cuz I kept killing poppers…) I just used a big aluminum pot to cool the beans – think giant heatsink. Given that I roasted outside (in the evening) because of the smoke and chaff, the pot tended to be pretty cool, so the beans stopped roasting pretty quickly.
Another thing – fresh roasted coffee continues to off-gas CO2 for a while after its roasted (one reason coffee bags have that little one-way valve is so the bags don’t burst…). You may find that you get a better cup of coffee if you wait 12 or even 24 hours after the roast. I use a mason jar with a disk, and ring not tightened to rest the beans – the CO2 can lift the disk to vent pressure, but gravity keeps it pretty airtight otherwise. Just tighten the ring after you use the coffee the first time.
Yes, we’re definitely roasting *the night before.* :)
—
Windell H. Oskay
drwho(at)evilmadscientist.com
http://www.evilmadscientist.com/
Letting the roasted beans degas for 12 hours is actually a common practice by professionals even though some people like to wait 24 hours. Packing in bags with one-way valves allows for CO2 release, but those who grind right after roasting will lack the good tastes and aromas since the flavors have not have enough time to develop yet. Speaking of packing the beans, some experts think that storing coffee beans after roasting, or coffee grounds, in vacuum packed bags is not good for the coffee.
http://www.engadget.com/2006/02/28/how-to-make-a-popcorn-popper-coffee-roaster/
This guy did almost the same thing, but in one device. The trick was:
– Bypass the thermal safety to get the temperature up – may not be an issue with your version
– Add a fan-speed controller (dimmer knob), which allows for temperature control
– Dedicated on/off for the heater
I’ve considered doing this for quite a while, but I’m not going to expend effort until I get a burr grinder. Anyone know of a DIY burr grinder?
If you read up above, you’ll see that we did link to that very article.
That version is a little bit funny because they didn’t seem to realize that there are two heater coils– looks as though they’re putting all of the heat into just one of the coils, which is a little more than it was designed for. Also, I’m not sure why they felt a need to do all of that– the roasting part works just fine as is; varying the fan speed and disabling the thermal fuse are (IMHO) unnecessary and slightly unsafe.
—
Windell H. Oskay
drwho(at)evilmadscientist.com
http://www.evilmadscientist.com/
I’m pretty sure your schematic is incorrect. The path of least resistance is through the 15 ohm resister, then the thermostat, and then out the thermal fuse. Something isn’t right there.
Current actually divides itself among all possible paths. More current flows through the paths that have lower resistance, and indeed more power is generated by the 15 ohm coil than by the 75 ohm coil.
The idea that electricity “follows the path of least resistance” is basically correct if one path has vastly lower less resistance than the others, because the resistance through the other paths can be so small as to be ignorable.
Circuits where current has more than one possible path to flow along are called parallel circuits; you can read more about them here.
—
Windell H. Oskay
drwho(at)evilmadscientist.com
http://www.evilmadscientist.com/
i bought 2 popcorn machines, just like yours. and, i prepared them exactly as you did. thanks, works great, terrific coffee.
Hey, i did the mod from the Engadget site, and it all seemed to be in great working order until i tried roasting, the control box began to get hot, and exhibit a slight white smoke (i obviously unplugged quickly). By the way, i have never done any wiring project before, this is my first go so my language may be a bit off in explaining my current setup.
from the main power wire i have (what i believe to be) the hot lead directly to the fan (dimmer switch) and the Heat (dimmer switch). From the fan i have the current flow directly to one of the two black wires on the transformer (current in). the second current in black wire on the transformer is connected to the "other" wire from the main power wire (not sure what to call that one). The three current out wires on the transformer: the yellow 2 go to the fan and the middle black on is taped off. This "other wire" from the main power cord also connects directly to the heater cool along with the (seemingly superfluous "middle wire"). Connecting to the (what i thought it to be) hot lead wire of the coil is the current out from the heat dimmer switch. the two green ground wires from each switch are grounded.
the main power cord going to the control box has an on off switch for additional safety.
Please help in layman terms as i am still learning this tech jargon slowly (very slowly).
Thanks in advance for any help you could be.
First off, nice work.
Second, I think that most of you are missing out on a couple of things when you talk of having a mode switch and doing it all in the same unit, the issue of Thermal mass. Remember that allot of the parts in contact with the beans are mad of aluminum, a great heat conductor and thermal sink. As the author has noted in a response, the additional cooling time required to bring both the beans and the roaster parts temp down will hurt the final products flavor.
I have just one improvement to add. Allot of the current cheap LCD display and laptop adapters are 19VDC output. I see them going for less than a couple of bucks. This would run the motor quite a bit faster and should cool the beans faster as well. I don’t know the actual voltage of the motor but a 10-20% over voltage of it for a couple of minutes shouldn’t do harm for short term runs in the service it will see.
Now, where can I get unroasted Kona beans?…….
I agree– the power supply that I used is not quite optimal; it’s just one that I had lying around. :)
—
Windell H. Oskay
drwho(at)evilmadscientist.com
http://www.evilmadscientist.com/
In the link below you find how I combined the heating and cooling in one popcorn machine, including an Arduino that controls the heat. Works quite nice and when connected to a laptop you can even monitor the heating profile
http://www.instructables.com/id/A-fully-automatic-coffee-bean-roaster-Arduino/
Windell- I ran the hack basically as they laid it out in the engadget article but with a the main heater coil going out to a second switch to kill the heat. I think you would be surprised how little the smaller coil contributes to the heat. I am able to hit the heat kill switch and put the fan on full blast to get the beans down from 450°F to 90°F in about two minutes.
Actually, it’s pretty clear from the circuit how much it contributes.
—
Windell H. Oskay
drwho(at)evilmadscientist.com
http://www.evilmadscientist.com/
Thank you for this one. I’ve been trying to figure out how to convert mine from running from a battery. I’ve actually gone through three of these machines so far. I tend to burn out the heating coils even with the safeties still in place and I thought I might have been able to create a cooling unit out of it. The first has been lying in pieces until I found what I was doing with the circuitry. The second is still in one piece, and not educated in electrical work, I was a bit loathe to make too many more attempts, lest I blow more fuses and wind up doing something permanent to something expensive to repair.
I don’t suppose you know the Airflow of the impeller itself? Trying to find a way to rebuild a similar item using larger pieces but I’m a little concerned about the fluid movement.
I’ve been using a few hvac pieces to create a chaff chimney and will likely see about building a cyclone collection system next. But first is to see if I can increase the heat and airflow to a cylindirical unit. If I really have to use two heatguns, then I may as well try using a propane heat unit.
I really hope I haven’t posted this three times.
good God! why not do as Windell did and stop messing around! By the time the heating element cools downs the beans have continued to cook during that period of time. I realize it’s fun to add as much crap as possible to any concept, but why?? By the way, don’t add too many beans in the hopper or the beans on the bottom will burn.
Interesting, but overcomplicated. If the motor needs a 75ohm resistance in series with it, why not simply rewire the unit with a switch that cuts the supply to the 15ohm element and also switched out the 75ohm element and switced in a 75ohm resistor that is not a heating element.
Now I’m not sure what the voltage drop across the motor would be, so I can’t be sure of the power disipated by the 75ohm resistor. However if the replacement resistor still got too hot it should be fairly easy to mount it externally, with a heat sink if necessary?
It seems wasteful to use two poppers where one could do the job. And with a kitchen the size of mine storage is at a premium.
>why not simply […] switched out the 75ohm element and switced in a 75ohm resistor that is not a heating element.
You seem to have a basic misunderstanding of electronics; any 75 ohm resistor will emit the same amount of thermal energy, whether or not it’s designed to withstand that much heat.
>It seems wasteful to use two poppers where one could do the job.
You seem to have misread the article; we had an extra popper that we wanted to convert to a cooler. And, we’re happy that our modifications lead to cooling coffee faster, and without having to control line voltage directly.
—
Windell H. Oskay
drwho(at)evilmadscientist.com
http://www.evilmadscientist.com/
Nice job. For another data point, I’ve got the Gene Cafe 1/2 pound roaster. It ramps to it’s maximum 482 degrees F in about 17 minutes in this cold Colorado air. Getting to "second crack" takes between 19-21 minutes total; after the timed heating process, the unit then switches up the fan speed and turns off the heater to cool the beans to 140 degrees F in about 7 minutes. Then, I dump the canister of beans onto a plate for more passive cooling. There’s a bit of "roast coast" in the unit… I’d say the long cooling period adds about 1-2 minutes worth of hot roasting, so I always start the cooling cycle well before there’s any sign of oilyness in the beans. Otherwise, it’s fresh-roasted charcoal. I’m generally very happy with the roaster though it could always be bigger… first project if I ever live near a TechShop. Chafe control is really excellent with the tall chimney option, cleaning is easy.
So, these days I’m keeping our breakroom supplied with fresh-roasted beans, and covertly, some of the division administrators as well.
You can make a DIY coffee bean cooler, which is pretty fun, but if you’d like to know the simplest way to roast coffe, try this out:
Open some windows, sliding doors to get some cross ventilation. The smoke isn’t dense enough to set off alarms. As a bonus it’ll leave your place with a really nice sweet coffee smell for days.
If you have an electric stovetop, preheat an element to just a little over half way. This means if the dials read 1 thru 10, set it at 5.5. Set a 2quart saucepan on the range and let it heat up for about 5 minutes. Take 10 ounces of green coffee beans, pour them in the saucepan and stir with a whisk(sp?).
Then begins the 1/2 hour boring part: Stir. Stir constantly, evenly clockwise or counterclockwise, it doesn’t matter. 10 to 12 minutes in, you’ll start noticing the beans changing from light green to tan. At 13 to 20 minutes the beans will go from tan to medium brown and you’ll notice some crackling noise along with white smoke. At 20 to 30 minutes, you’ll notice the crackling becoming lighter but quicker.
Once you start noticing a light oil coat on the beans – this is pretty much a ‘City’ or dark roast -remove the beans and pour them into a metal colander. Stir the beans in the colander and all the chaff (the dried skin from the beans) will fall through the colander. Transfer the beans to a wire strainer and stir a little more. At this point you can set the strainer down, wipe out any chaff from the inside of the colander and then transfer the beans back into the colander, continuing to stir a little more. While the beans may still be a little hot, you can still make a final transfer to either a dark glass or opaque container that has a clamp on the side..the ones that have a rubber seal around the lid and the lid locks down when the clamp is placed over it.
That’s it! Approximately 30 minutes of your time stirring and maybe 5 or so extra minutes of cooling time (boring..but turn on the tv or listen to the radio during that time – it’ll go by fast). I’ve found that I can roast up to a pound and it’ll generally take the same amount of time. The roasted beans will last well over a week if they’re stored in an air tight container (like the one that was mentioned above). Just be sure to fill the container up only half-way, otherwise it may explode, leaving you with not much of a hill of beans, but a whole bunch of glass shards.
Hate to dig up an old thread, but are you still roasting like this? If you are, you CAN use one roaster to roast and cool, but you need a separate control box.
Inside of the control box ( I used an old coffee can), you’ll need a 24V thermostat transformer from the HVAC section of your hardware store, a cheap rotary dimmer switch, and a toggle switch that will handle 12 Amps at 120V.
Rewire your popper by isolating the leads from the rectifier on the motor and hooking them up to the secondary of the transformer. The primary side goes to the dimmer. BAM! variable speed fan. The big heating element and thermostat circuit get wired to the bat switch. Eliminate the small heating element, you don’t need it.
Temperature is controlled by the fan speed, more air means cooler temps. When you want to cool, flip the switch for the elements off and crank up the fan. Add finishing touches by finding hurricane glass that just fits in the top of the roasting chamber. Add a chaff collecting sock made from window screen to the top of the glass.
Be sure to make your wiring from the control box to the popper safe by using two different colors of lamp extension cord. Have a brown one coming from the control box with the male end from the safe 24Volt output off the transformer, flip the white one around like a normal extension cord for the 120v elements. be sure to use strain relief and proper grounding for the power cord to the control box that plugs into the wall.
Add a hole in the chamber for a thermostat and you’re off and running.
Yes, we are still roasting coffee this way. You are not the first person to suggest this, and as we have stated before, we do think that there’s a genuine advantage to having a separate cooling machine.
As we said, with the integrated version "you lose the advantage of dumping the beans into a cooling container that’s already cold. You’ll spend the first few minutes of cooling just reducing the temperature of the heating elements and metal parts. "
Windell H. Oskay
drwho(at)evilmadscientist.com
http://www.evilmadscientist.com/
If I were to hack into my popcorn maker, it would be for a one-machine solution. As it is, I have cut a hole in a bucket that snugly fits my vacuum cleaner nozzle. I dump my roasted beans into a colander, that sits in the top of the bucket, and fire up the vacuum cleaner. Cold beans in about 45 seconds.