


We have been using POV-Ray to create 3D models and render bitmap slices that can be printed with the CandyFab 4000, our home-built 3D sugar fabricator. One thing that we could do to extend the usefulness of this procedure is to be able to take STL files as input, because STL is the de facto standard file format for 3D fab shops and the machines that do the fabrication. So, here’s how to do it: STL files can be converted to POV-Ray format, and from there we can use our usual bag of tricks to render the set of bitmap slices.
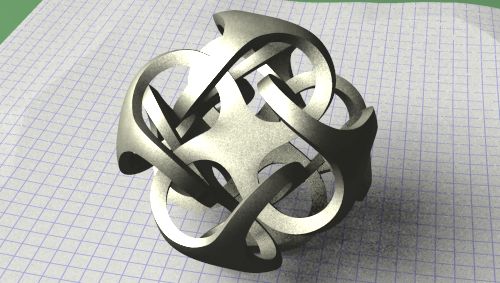
In this article, we explain that process in more detail: We’ll take an STL file, import it into POV-Ray using the stl2pov utility, and then set it up to render a series of slices. Our example file is the sculpture Metatron by Bathsheba Grossman, who has released the STL file for it into the public domain (with some interesting results). The picture above shows Metatron, as rendered in POV-Ray.
The first step is to get and install the stl2pov utility from the author’s page. It’s a cross-platform command line program. (Mac/Linux/Unix users, follow the instructions to compile the source. Windows users, go ahead and download the compiled binary.)
Next, we need an STL file to convert. If you have your own, you can certainly use that. To follow along using the Metatron STL file, go to http://www.bathsheba.com/downloads/ and download the file metatron.zip, a 3.1 MB .ZIP file. After decompressing, that yields metatron.stl, which weighs in at 6.6 MB.
Since we have the utility and the source STL file, we’re ready to perform the conversion. The output file after the conversion will be a large text file that can be awkward to work with. A solution that makes things easier is instead to make it into a POV-Ray .inc (include) file, so that we can simply edit a small POV-Ray wrapper that calls the included file that describes our complex object. To perform the conversion at the command line, execute the following code in the directory with metatron.stl:
stl2pov -s metatron.stl > metatron.inc
The “-s” option turns on smoothing, an option that I have found to increase reliability, and the command saves the converted output to a new file called “metatron.inc”. Unless your computer is really fast, go get some coffee and come back in ten minutes– the conversion can take a while. My file ended up at 28 MB — large enough that you may want to edit it in a dedicated text editor (emacs, vi, AlphaTK….), not the editor built into POV-Ray.
The contents of the new metatron.inc consist of a single definition of a POV-Ray mesh object made out of smooth triangles. It looks like this:
[Snip! Insert 28 MB of the same right here…]#declare m_Rhinoceros_Binary_STL___Jun_15_2005__ = mesh {
smooth_triangle { // #1
<-1.56964, 0.774161, -0.360695>, <-0.898199, 0.389497, -0.20379>,
<-1.59137, 0.732853, -0.338752>, <-0.910102, 0.368279, -0.189959>,
<-1.57298, 0.776465, -0.341074>, <-0.903134, 0.383962, -0.192153>
}
smooth_triangle { // #2
<-1.58513, 0.728167, -0.377533>, <-0.910933, 0.36028, -0.200995>,
<-1.56964, 0.774161, -0.360695>, <-0.898199, 0.389497, -0.20379>,
<-1.56618, 0.771805, -0.379959>, <-0.892874, 0.395758, -0.214829>
}
  smooth_triangle { // #138379

    <0.486637, 0.670353, 0.431943>, <0.678163, 0.482259, 0.554546>,

    <0.451365, 0.691581, 0.456294>, <0.669205, 0.482143, 0.565423>,

    <0.480983, 0.649411, 0.456491>, <0.678073, 0.468723, 0.56614>

  }

  smooth_triangle { // #138380

    <0.451365, 0.691581, 0.456294>, <0.669205, 0.482143, 0.565423>,

    <0.427022, 0.675693, 0.497914>, <0.659582, 0.482502, 0.576319>,

    <0.456994, 0.655713, 0.480073>, <0.669431, 0.473142, 0.572712>

  }

} // end of mesh m_Rhinoceros_Binary_STL___Jun_15_2005__
The #declare statement in the .inc file tells us that it defines a POV-Ray mesh object called “m_Rhinoceros_Binary_STL___Jun_15_2005__”, and it is up to us to use it. Minimally, we need to call #include “metatron.inc” to get the file, and then place the object somewhere. Here is a complete code example, for a POV-Ray file (let’s call it “metatronSimple.pov”) that can draw the Metatron, given that the metatron.inc file is present:
//metatronSimple.pov#include “metatron.inc”
background{color rgb 1 }
object{ m_Rhinoceros_Binary_STL___Jun_15_2005__
rotate 90*xtexture{ pigment{ color rgb <1,0.5,0> }
finish { ambient 0.15
diffuse 0.85
specular 0.3 } } }light_source { <-20,100,20> color rgb 2}
camera {
perspective
angle 35
right x*image_width/image_height
location <-3,7,15>
look_at y*0.25
}
Since we can now render the sculpture, are we done? Note quite. There’s one little detail to worry about which is that the mesh object does not really have a defined inside or outside, which becomes a problem when you want to start slicing it up with boolean operations. The solution to this is to define what’s called an “inside vector” that tells POV-Ray where the inside of the sculpture is.
The vector is added just before the closing bracket of the #declare statement, at the very end of metatron.inc, like so:
  inside_vector <-0.5, 0.68, 0.5>

  } // end of mesh m_Rhinoceros_Binary_STL___Jun_15_2005__
With that modification, you can now use full constructive solid geometry operations on the imported STL object, including slicing it. As we described in the article about the CandyFab 4000, it’s a matter of rendering an animation in POV-Ray to automatically generate the slices. For each frame of the animation, we take the intersection of the object of interest with a thin, flat rectangle, which is raised up a little bit higher with each successive frame:
  #if (overview)

    object {  m_Rhinoceros_Binary_STL___Jun_15_2005__   rotate 90*x }

  #else

    intersection {

        object {  m_Rhinoceros_Binary_STL___Jun_15_2005__   rotate 90*x }

        box { < -50, 0, -50>, < 50, .10833, 50>

	          translate y*frame_number*0.10833 }

        }

    #end // end if
As you can see, we’ve also added a code “switch” (“#if (overview)”) that determines whether we’re slicing the object or just displaying it. Also note that the slice thickness can be chosen however you like; our 3D slices are 0.10833″ thick right now, so that’s the value that’s displayed here.
Of course, if you’re just displaying the object (not slicing), you might want to make it look a bit nicer. The rendering at the top of this article was made by adding a background, some texture, lighting, moving the camera, and was otherwise gussied in ways that you don’t want if you’re slicing up the object. These are all controlled by the same software switch (overview) which is at the beginning of this POV-Ray file, which is called “metatron.pov”. You can download this code example (along with metatronSimple.pov) here (3 kB .ZIP file).
Setting overview = 0 instead, we can now render the slices. Turn on animation, i.e., the clock variable, in POV-Ray, and set it to render 58 frames. You can use the lowest quality setting (Quality 1) and antialiasing should be turned off. Running that produces 58 separate bitmap image files; here is what a selection of four of those slices looks like:


Just looking at a few slices doesn’t really give you a flavor of what the whole object looks like, however. One trick to visualize it is to scan rapidly through the image slice files like a flip book. You can watch this little quicktime movie (53 kB) of doing just that to get the idea. If you watch a few times, it can give you good intuition into how the structure actually fits together.
So are we planning to render Metatron in sugar? Yes, but not yet– it’s a detailed sculpture and we need to improve our effective resolution (or total build size) before going there. We have, however, previously used the technique we’ve described here to fabricate Soliton, which is another one of Bathsheba Grossman’s sculptures.

Next up: fabricating pre-Cambrian fossils like Namacalathus?
http://www.mit.edu/~watters/watters_etal_paleobio_2001.pdf
— Dave
That is an absolutely brilliant idea. I would love to model fossils– do you know where any 3D model files are available?
—
Windell H. Oskay
drwho(at)evilmadscientist.com
http://www.evilmadscientist.com/
I gave you the best link I could think of offhand, but there may be more available from the MS thesis it’s based off. To wit:
Watters, W. A. 2000. Digital reconstructions of fossil morphologies, Nama Group, Namibia.
M.S. thesis. Massachusetts Institute of Technology, Cambridge.
I mostly remember the video reconstructions presented at GSA meetings years ago, but Namacalathus is pretty darn simple (go figure, it’s one of the first skeletons in the record). You might have an easier time finding digitized skulls etc. out of the vert. paleo crowd, but it’d take some digging around (bad-dam-boom!).
But lets face it, candy skulls would be fantastic to hand out at Halloween.
— Dave
Have a look at freesteel slice
It’s a free command line tool to slice STL to a number of different formats, one being SVG. We can add an image format, like PNG if there is demand, leave a message on our blog at http://www.freesteel.co.uk. Here is a link to an XML visualisation using SVG of a sliced STL file, use firefox or other compatible browser to see:
XML visualizer of STL slices
Shouldn’t you be using an orthographic camera for this? You’ll get perspective stretching otherwise, surely? Not that I’m questioning the utter awesomeness of the whole project, you understand…
Indeed, an orthographic camera is required. The example file (linked in the article) changes the viewpoint and camera type (to orthographic) whenever slicing is turned on via the "#if (overview)" switch. That way you can turn it back to looking at the object from the side, in perspective, when you aren’t slicing.
Of course, now that you point it out, I see that I failed to mention the part about the camera type in the in the article! (Doh!) Thank you for catching it– I may make a correction to the article about that.
—
Windell H. Oskay
drwho(at)evilmadscientist.com
http://www.evilmadscientist.com/