


What is a good science project and turns really fast? An electric motor! I built an electric motor for my school science project in third grade. It was fun to build and got a lot of attention at the school’s science fair.
I was looking in a book for a science project idea when I saw instructions for building an electric motor. My parents approved the idea, so Windell and I went looking for parts.
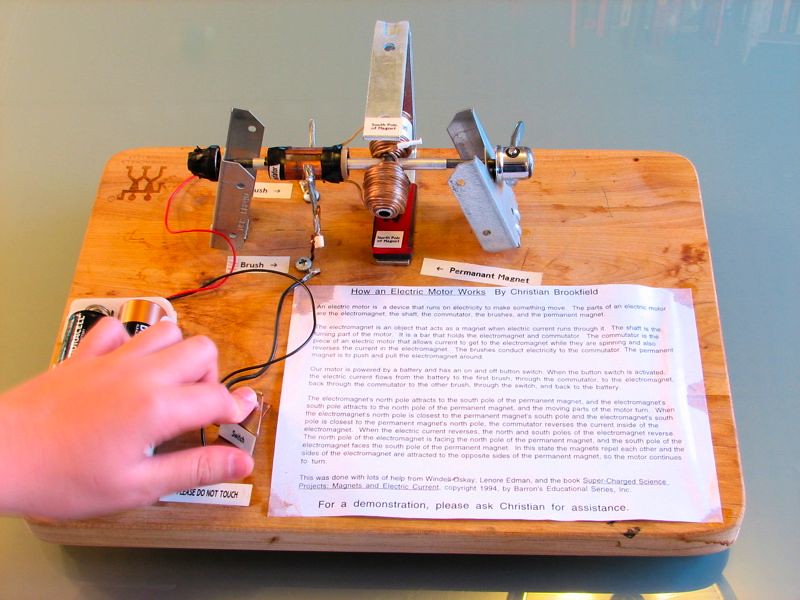
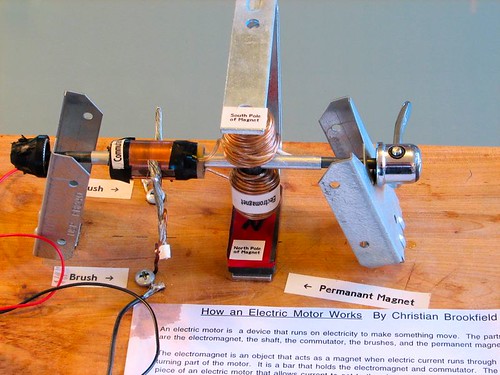
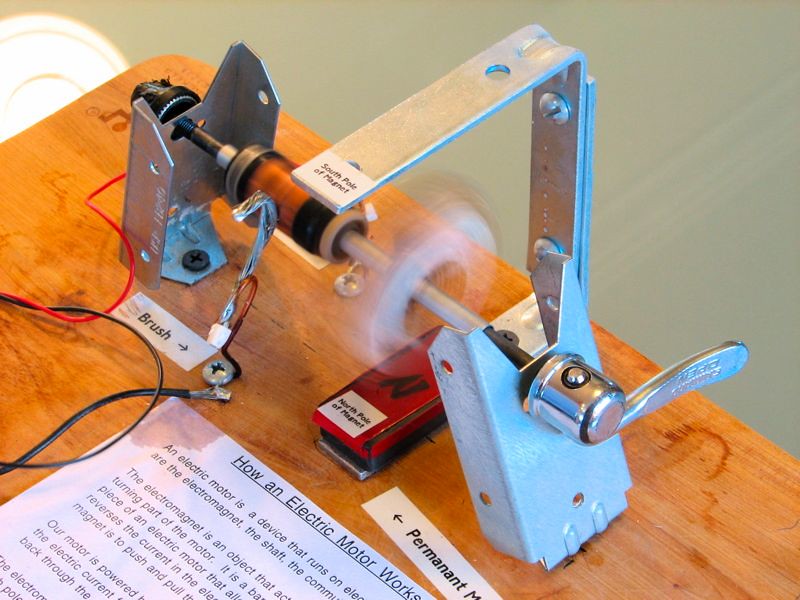
We used a quick release skewer from a bicycle and an aluminum pipe for the shaft. We used speaker wire for the coils in the electromagnet. We made the poles of the permanent magnet with two right angle brackets. We used a powerful fridge magnet as our permanent magnet. The commutator was made with a piece of rubber, a piece of cardboard, and a copper pipe cut in two. We used sheet copper and an adhesive rubber button to make the switch. Windell gave me a battery cage that holds four C cells. The shaft supports are made of steel. I don’t know their intended usage. The base is an old cutting board. The right angle brackets, magnet, copper pipe, and shaft supports came from a wonderful, independent hardware store in Boulder, Colorado called McGuckin Hardware. The other parts came from Windell’s workbench or the kitchen.
We built the electric motor by coiling the speaker wire around an iron rod approximately 500 turns for each coil with a power drill. We glued the commutator to the shaft with rubber and cardboard to fill the gap between the commutator and the shaft. We couldn’t use metal between the shaft and commutator because it would cause a short circuit. We then attached the the electromagnet to the shaft with super glue. The ends of the speaker wire are taped to the commutator with electric tape. Next, we bolted the shaft supports into place and stuck the skewer through one support, the aluminum shaft, and the other support. We then screwed the cap the skewer to keep it in place. After that, we bolted the right angle brackets together and screwed them in place. Then we made the brushes with thick wire by wrapping them around a screw and bending the ends so that they would just touch the commutator enough to transmit electricity but not enough to significantly slow the motor down. We also had to make sure the brushes wouldn’t cause a short circuit during the switching between commutator plates. We then installed the battery case and switch. The switch is just two pieces of bent sheet copper with an adhesive rubber button. Lastly, we placed the permanent magnet on the lower right angle bracket.
In Make Magazine Volume 1, there is a Howtoons comic about making an electric motor. We did not use this to help us in building ours; Make Magazine didn’t exist yet. The motor in Howtoons is somewhat simpler than mine, but it is not the simplest. The Howtoons motor has only one coil instead of two and its coil is not wrapped around an iron rod like mine. Mine, however, has a stronger electromagnet and runs longer than the Howtoons motor. My motor also has the advantage of two places where the permanent magnet repels/attracts the electromagnet instead of one.
Here is the text that is written on the electric motor base:
How an Electric Motor Works
An electric motor is a device that runs on electricity to make something move. The parts of an electric motor are the electromagnet, the shaft, the commutator, the brushes, and the permanent magnet.
The electromagnet is an object that acts as a magnet when electric current runs through it. The shaft is the turning part of the motor. It is a bar that holds the electromagnet and commutator. The commutator is the piece of an electric motor that allows current to get to the electromagnet while they are spinning and also reverses the current in the electromagnet. The brushes conduct electricity to the commutator. The permanent magnet is to push and pull the electromagnet around.
Our motor is powered by a battery and has an on and off button switch. When the button switch is activated, the electric current flows from the battery to the first brush, through the commutator, to the electromagnet, back through the commutator to the other brush, through the switch, and back to the battery.
The electromagnet’s north pole attracts to the south pole of the permanent magnet, and the electromagnet’s south pole attracts to the north pole of the permanent magnet, and the moving parts of the motor turn. When the electromagnet’s north pole is closest to the permanent magnet’s south pole and the electromagnet’s south pole is closest to the permanent magnet’s north pole, the commutator reverses the current inside of the electromagnet. When the electric current reverses, the north and south poles of the electromagnet reverse. The north pole of the electromagnet is facing the north pole of the permanent magnet, and the south pole of the electromagnet faces the south pole of the permanent magnet. In this state the magnets repel each other and the sides of the electromagnet are attracted to the opposite sides of the permanent magnet, so the motor continues to turn.

this is an interesting project I just need to find out how to get the supplies
i want to make this project on my own because it is good but please help me how it is build step by step?????and more specific for the materials needed??????
nice i like it
Hi, I’m looking for some kind of motor to make a merry go round!!! it needs to hold at least 10 lbs.
I need help!!! I’ve been looking all over and "no luck!"
you can e-mail be with any information at: alinachalco@gmail.com
Thanks!
omg this is the best electric motor i have seen so far im gonna make one for science fair
I KNOW THATS RITE I THOUGHT THE SAME THING
Can I get instructions on how to make the commutator.
Please, reply so we can get in contact…
how to make a generator using only those materials but your poles are not permanent magnets but electromagnet?
im doing a project and i need to make a cake mixer please help.
Thanks! :D