Category Archives: EMSL Projects

A Simple Relay Shield for Arduino

Relay Shield

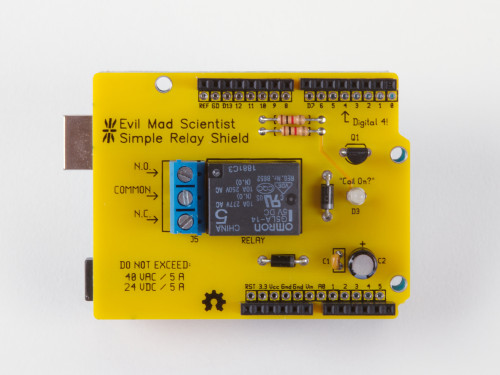
Introducing our newest kit: the Evil Mad Scientist Simple Relay Shield for Arduino.

It’s a dead-simple single-purpose low-cost mechanical relay board, with a single low-power SPDT relay that can switch moderate loads of up to 5 A, AC or DC.

Relay Shield

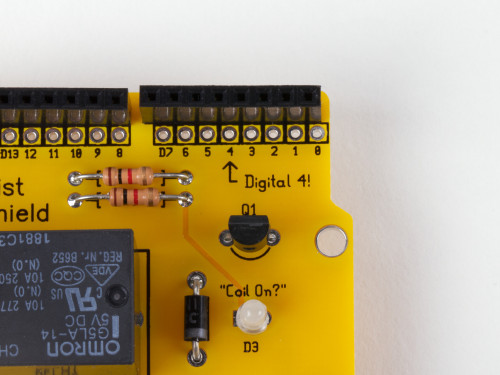
The relay is controlled by digital line 4— and that’s well labeled, too.

No library is needed. For a demo, just open the Arduino “Blink” example sketch and change the LED pin to 4.   When output Digital 4 on your Arduino is low, the relay is in the “normal” state: the “Common” pin of the screw terminal is connected to the N.C. (“Normally Closed”) pin of the screw terminal.

When output Digital 4 goes high, the “Coil On?” LED will light up and the relay enters (for lack of a better term— suggestions welcome!) the “abnormal” state, and the Common pin is instead connected to the N.O. (“Normally Open”) pin of the screw terminal.

Relay Shield

One of the main concerns about using higher voltages and/or currents on an Arduino shield is that you potentially have these things wired awfully close to things sticking up from your Arduino board, like the microcontroller itself or the USB connector.  If you sometimes would like a little more breathing room, a good solution is to add the insulator shield Googly Eye Shield between the two.

Relay Shield

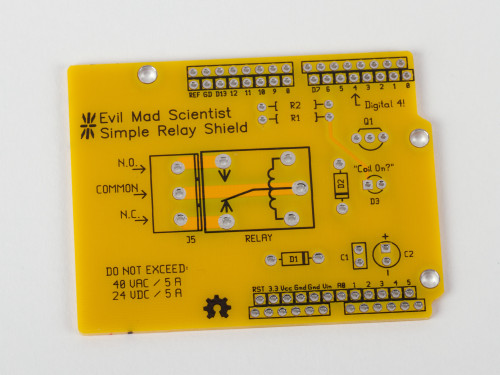
The Simple Relay Shield circuit board is a standard 2-layer, 1/16″ thick FR-4 PCB, but with highly-visible yellow soldermask.  While it is (yes) very simple, the Simple Relay Shield is an open source hardware project. The circuit board is designed in gEDA, and the design files are available for download at the Evil Mad Science Wiki.

The Simple Relay Shield is available now at Evil Mad Science.

Interesting Diodes from the Electronics Flea Market

Diodes from the eFlea

We have written before about the the Silicon Valley Electronics Flea Market, one of our favorite places to go treasure hunting. At this weekend’s flea, we came across a cache of beautiful old diodes, including some in rather unusual packages.

Continue reading Interesting Diodes from the Electronics Flea Market

Replacing the laser tube

Epilog Tube Swap 1

One of the most useful tools in our shop is our laser cutter— or more formally, our low power carbon dioxide laser cutting and engraving machine.   We use it for all kinds of mechanical prototyping, cutting parts out of wood and acrylic, and even some production parts, like the cases for our clock kits, the custom cloth numbers on our d12 and d20 bag kits, and the pen arm on the Eggbot kit.

Epilog Tube Swap 8

And while this has been a fantastic and reliable machine for the last several years, eventually the moment that we had dreaded arrived.  Our laser power began to droop, and it started getting harder and harder to cut through the materials that we regularly work with.  A visit from a technician confirmed that the power had fallen significantly, and that we needed a new tube.  The replacement process is actually managed as a swap: The factory sends us a new laser cartridge, and we send them back our old one.

But on the bright side, we get to take a close peek at the laser hardware. It is interesting to note that many commercial laser engravers have user serviceable parts inside. Even the laser cartridge itself can be replaced by relative novices. The smaller (closer, dirtier) of the two cartridges shown above is our old one, and the new (well, refurbished) cartridge came with installation instructions and mounting bracket adapter to compensate for the change in shape from the previous cartridge to the newer one.

Continue reading Replacing the laser tube

Make your own epic-scale water weenie!

Water Weenie 32

Summer is here, and with it, the advancing aqueous arms race!  Squirt cannons, water balloon launchers, and myriad other technologies for soaking your fellow citizens.

One of the classic squirt mechanisms is the “water weenie,” where the water is stored under pressure in a length of elastic tubing, and the force to eject the water is provided by the restoring force of that tubing. Often the elastic tubing is a simple length of latex “surgical” tubing, or in the case of the classic Wham-O Water Wiennie, a literal rubber balloon.   While people have almost certainly been squirting each other with these things since (we’re guessing about ten minutes after) the invention of the water balloon, the technology has more recently been reinvented as the “constant pressure system” used in modern high-end water guns.

Here is our take on the water weenie: How to make your own high-performance, arbitrary-capacity squirt machine, starting with basic hardware.    Our 10′ version shown above— which you can lift if you’re strong!  —throws water up to 25 feet and can empty over ten gallons of water onto your target in one continuous shot.  And of course, you can make it bigger if you want to.


Continue reading Make your own epic-scale water weenie!

Los Angeles Meetup! Saturday June 23

.35in

This weekend we will be visiting the Los Angeles area and we’re planning a meetup at Los Angeles Hackerspace Null Space Labs. This will be informal, but we’ll be bringing along a few of our little projects to show off.

The fine folks at Null Space Labs have generously offered to host the event, which is scheduled for Saturday evening, the 23rd of June, from 8-11 PM.

Null Space Labs is located at 1015 South Main Street, Los Angeles, CA (Google Map). Please see their about page for parking details.

In case of overflow, or other last-minute changes on Saturday, please check our twitter feed for updates. We’ll hope to see you there!

CNC Art from StippleGen 2

Lasercut cardboard

These two real-world examples of CNC Art made using StippleGen 2 come from Bruce Shapiro, who created them at The Mill. Above, a stippled portrait of Einstein is laser cut into cardboard, using light stipples on a dark background. Below, a paper mask was applied to a piece of wood, v-carved with a CNC router, spray painted, and then the mask was removed. This time, a light background with dark stipples was used.

Wood: masked and painted

The same source image was used for both, although the image is mirrored for the wooden portrait.

It’s great to see some examples of what StippleGen can do out there in the real world. If you have any examples of your own to share, we’d love to see them in the Evil Mad Science Auxiliary pool on flickr.

Photos by Bruce Shapiro used with permission.

StippleGen 2

StippleGen 5

Two months ago, we introduced StippleGen, a program that can generate stipple diagrams and “TSP path” art from images, using Adrian Secord’s algorithm of weighted Voronoi stippling.  It’s a great (and free) tool for turning a photo into CNC-ready artwork, for use on the Eggbot or in other contexts.

twain5kw-newframe

Today we’re announcing a new verison, StippleGen 2. As with the earlier version, StippleGen 2 is free and open source software, written in the Processing development environment. It comes ready to run on Mac, Windows, and Linux, and it is available for download now.

StippleGen 2 comes with three new features: A gently redesigned set of controls that makes life easier on tiny laptop screens, an inverse color scheme— as illustrated above —so that you can now calculate white stipples on a black background, and comprehensive documentation on our Wiki.

newgui

The controls in StippleGen 2 have been redesigned and streamlined. They are also overall a bit thinner so that the full screen (and all of the controls) can now be viewed on an 11″ MacBook Air, without reducing the size of the main display area.

rembrant2kw

In the first version of StippleGen, the image was always computed with black dots on a white background. For most images that have a light-colored background, this is a good choice.  However, if you have an image with a dark background, you may find that nearly all of your stipples are used to just darken the backdrop, leaving less detail available in the foreground of the image.

StippleGen 2 gives you the option to draw with black stipples on a white background or white stipples on a black background. By using a dark background here, you may be able to recognize Rembrandt in just 2000 white stipples.

rembrant10kwhite

It does, of course, look better with a larger number of points.

apollow10kblackapollow10kw-newframe3

For images with a lot of black and a lot of white, it can be hard to choose which is the better scheme.

However, as this is tool to generate applied artwork, the choice is often made for you in advance.  If you are drawing with a black pen on a white egg, you’ll want black stipples.  On the other hand, if you’re carving into a black panel, white stipples might be the better choice.


hopper7600w
starry10kw

And here are a couple of other “test images” that we’ve been running in the new color scheme.

plant10k_vor

And finally, we have written up comprehensive documentation for StippleGen 2, hosted on the Evil Mad Science Wiki.

StippleGen 2 is free and open source software, now available for download here.
Go try it out for yourself!

Viewing the Transit of Venus

Transit of Venus with binoculars

Venus is just now passing between the earth and the sun, and so we stepped outside to take a look. We brought out a pair of binoculars to use to project the image of the sun onto a piece of paper on the ground. We also took a solar viewing film, but it turns out that the binoculars were a great way to see it as a group. These pictures were taken just after Venus crossed over the edge, and the speck you can see at the edge is much clearer if you click through to the large size on flickr. Over there, you may also be able to make out a couple of sunspots that we were also able to see with the binoculars, but not with the viewing film. Remember, don’t look directly at the sun without proper safety equipment! (See our earlier post for more details on viewing techniques.) The transit is still underway, so you still have a chance to get outside and see it!

Transit of Venus Closeup


Update:  Part II, with a slightly different method.

Venus Transit 3

To get a slightly better view, we used a simple telescope mounted to a tripod.

Aside: This is the Galileoscope, a high-quality, very low cost telescope for $50 (or as little $25 in classroom packs).  It’s designed to let you discover everything that Galileo could see with his telescope, including craters on the moon and the moons of Jupiter, albeit with modern optics that dramatically improve image clarity.


Venus Transit 2

Now, the one thing that you really don’t want to do with a telescope is directly look at the sun through it. (It’s bad enough to stare into the sun; it’s much worse to concentrate the light into a tiny spot.  That’s a good way to start fires, not view the Transit!)

What you can do is to project the light from the telescope onto a piece of paper or matte-white plastic. Adjust the focus until the edges are sharp and— poof! —suddenly, you can see the sunspots.

Venus Transit 1

And the image quality isn’t half bad.  This picture was taken right at the “peak” of the Transit, when Venus was as far into the disk of the sun as it went.  Our image on the screen is about two inches (five cm) across, and it’s easy to make out the features.

Most stunning of all is the incredibly rare opportunity to see a planet in the sky not just as a “point of light” but to see it for what it is: another planet just like ours, slowly orbiting around the same sun.

A Spectacular Speck on the Sun

Today, Tuesday June 5, 2012, the planet Venus— the planet in our solar system that is closest to the shape and size of Earth —will leisurely pass squarely between the Earth and sun.

The Transit of Venus, as it is called, is a once (or maybe twice) in a lifetime event. If at all possible, make an effort to see it today, because you won’t have another chance… at least until the year 2117.

While it will not be visible everywhere in the world (see map), it will be visible for all of North America, Asia, Australia, and eastern Europe. (The latter, towards sunrise on June 6.)   The transit begins at 22:09 UTC, peaks at 01:29 UTC, and ends at 04:49 UTC.  Here in the PDT time zone, that’s 3 PM, peaking at 6:30 PM, and finishing below the horizon. (More at the LA Times.)

Now, how to actually view it?

If you were clever, you might have stashed away an eclipse-viewing filter from the recent solar eclipse.  If not, another option— one that is cheap and easy to find at hardware stores —is a set of welding glasses with a #14 filter. (That’s black glass. Sadly, those dark green goggles that you found in the shed are likely not safe for direct solar viewing.)

But, as the Ontario Science Center warns you,

Be careful: there are many materials that may seem to block out the Sun’s rays, but which are not safe to use for solar viewing. DO NOT LOOK AT THE SUN THROUGH sunglasses, photographic neutral density filters, polarizing filters, photographic film, dark plastic such as garbage bags, or smoked glass.


The other approach to consider is indirect viewing. You can build a pinhole projector, or a simpler yet version.  You can also use a telescope set of binoculars to focus sunlight onto a surface for indirect viewing. (Using binoculars or a telescope for direct viewing requires a carefully chosen solar filter, to be safe.)

If all else fails— maybe you’re in cloudy Portland —NASA has got you covered. Head right over here for a “live” feed of solar pictures from the SDO spacecraft in orbit around the Earth, and updating every 15 minutes.

Update: A nice summary of the historical background of viewing transits of Venus is here.

[Image source]