The “Three Fives” Discrete 555 Timer Kit

555 kit

We’re pleased to announce our newest kit, the “Three Fives” Kit, a kit to build your own 555 timer circuit out of discrete components. Here’s a way to re-create one of the most classic, popular, and all-around useful chips of all time.

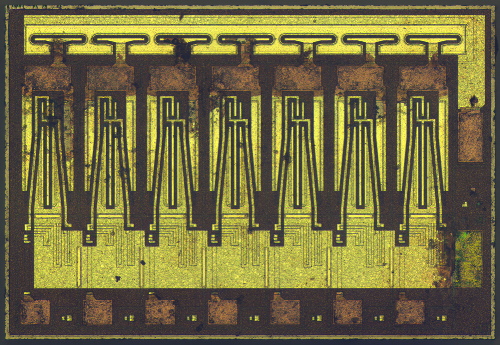
The kit is a faithful and functional transistor-scale replica of the classic NE555 timer integrated circuit, one of the most classic, popular, and all-around useful chips of all time. The kit was designed and developed as a collaboration with Eric Schlaepfer, based on a previous version (pictured here), and adapted from the equivalent schematic in the original datasheets for the device.  There have been a few other examples of circuits like these (such as the one that we featured in our article about the 555 contest), but we really like how this one has come together.

555 kit

The kit is designed to resemble an (overgrown) integrated circuit, based around an extra-thick matte-finish printed circuit board. The stand— which gives the circuit board eight legs in the shape of DIP-packaged integrated circuit pins —is made from machined and formed semi-rigid PVC foam.

555 kit

To actually hook up to the giant 555, there are the usual solder connection points, but there are also thumbscrew terminal posts that you can use with bare wires, solder lugs, or alligator clips.

555 kit

One of the really cool things about having a unintegrated disintegrated discrete circuit like this is that you can actually hook up probes and monitor what happens at different places inside the circuit.

555 kit

So that’s our new “Three Fives” Kit (shown above with an original NE555 for scale). It’s not quite as big as our 555 footstool, nor as tasty as our edible version, but it’s a great little circuit, and it’s got legs.

Roundup: Simple LED Projects

SimplePumpkins - 11

We’ve put together a roundup of our simplest LED projects; easy things to put together mostly with a bare LED and a coin cell.

Pictured above, Basics: Simple LED Pumpkins

Headless horseman LED Ghostie

How to hack LEDs into Lego minifigures for Halloween, and LED Ghosties for Halloween

urchin - 13 RoboGames Awards (on)

LED-lit sea urchin shells, RoboGames Awards

5 mm warm white diffused-lens LED Throwies - 03

Picking resistors for LEDs  and Some thoughts on throwies

lanterns - 11

Quick, easy, temporary, and beautiful LED garden lights

toner - 15 Soft Circuit Merit Badge14

Paper Circuitry at Home: Electric Origami, and the Soft circuitry merit badge

EdgeLitCard - 49 Edge Lit Cards

Edge-lit holiday cards and part II, Refining edge-it holiday cards

WaterColorBot at Kickstarter: One Day Left

WaterColorBot Drawing
The Kickstarter campaign for Super Awesome Sylvia’s WaterColorBot is almost at a close, with just 24 hours remaining; it winds up tomorrow (Thursday) morning, at 7 AM eastern time.

So, if you haven’t signed up yet— and you think you might like to —this would be a great time to do so. If you’d like to learn more about the WaterColorBot, we’ve written a number of articles here on our blog, and there is also a detailed introduction on the Kickstarter page itself.

And for those of you who have backed our project, we are thrilled to have your support, and to have you along with us as we unleash so many art robots upon the world this fall. We can’t wait to see what kinds of amazing things people will create with them.

WaterColorBot Drawing

Artwork painted on the WaterColorBot by Robert “RoboGenius” Sloan

Laser Marking with Moly

MolyMarking 9

A low power CO2 laser cutter (like the one that we use) is fantastic for cutting and engraving wood, fabric, paper, and plastics. It’s also great for engraving painted or otherwise surface coated metal, like anodized aluminum (for example, making the labels on a Maglite).

However, with only a few exceptions, a laser like this generally falls down flat if you want to cut or engrave a chunk of bare metal. One exception is that you can actually cut through metal if it’s thin enough. Another is that you can make dark marks on metal with the help of a ceramic coating compound like CerMark.  CerMark is sprayed on metal, then blasted with the laser so that it fuses to the surface, leaving a dark, permanent mark. Unfortunately, a spray can of CerMark costs $60, and as it is a specialty item, it may not be easily available when you happen to need it. So what do you do if you need something like this and you don’t have it?
Continue reading Laser Marking with Moly

Inside the ULN2003

Over at ZeptoBars, they have an incredibly detailed “take-apart” post on what’s inside the ULN2003 seven channel Darlington driver chip. The ULN2003 is commonly used for driving LED displays—you can find it, for example, in our Mignonette game.

We often receive comments that while out microchip photos are beautiful and interesting, it is completely unclear how integrated circuit implements basic elements and form larger circuit. Of course it is impossible to do a detailed review of an 1’000’000 transistor chip, so we’ve found simpler example: ULN2003 – array of Darlington transistors.

They’ve stripped off the outer housing and put it under the microscope. They then analyzed the photos to show you what parts make up the individual transistors, resistors and diodes inside the chip.