


Magnetic fields are everywhere– you just can’t see them*.
Here we introduce some basic and inexpensive visual tools, as varied as iron filings and Arduino, pre-school toys and OpenGL, for getting to know your local fields. It’s not exhaustive, but might provide you with some useful starting points for your own exploration.
(*Unless you count the magnetic field inside those photonsthat you use to see things.)
One of the simplest and oldest magnetic field sensors is the humble directional compass. A compass is simply a magnet with labeled north and south poles, held in a bearing such that it can align itself with the ambient magnetic field. Usually, that’s earth’s (relatively weak) magnetic field. But they also can be used to probe the field structure around stronger magnets, as they align to the sum total field at any given location.
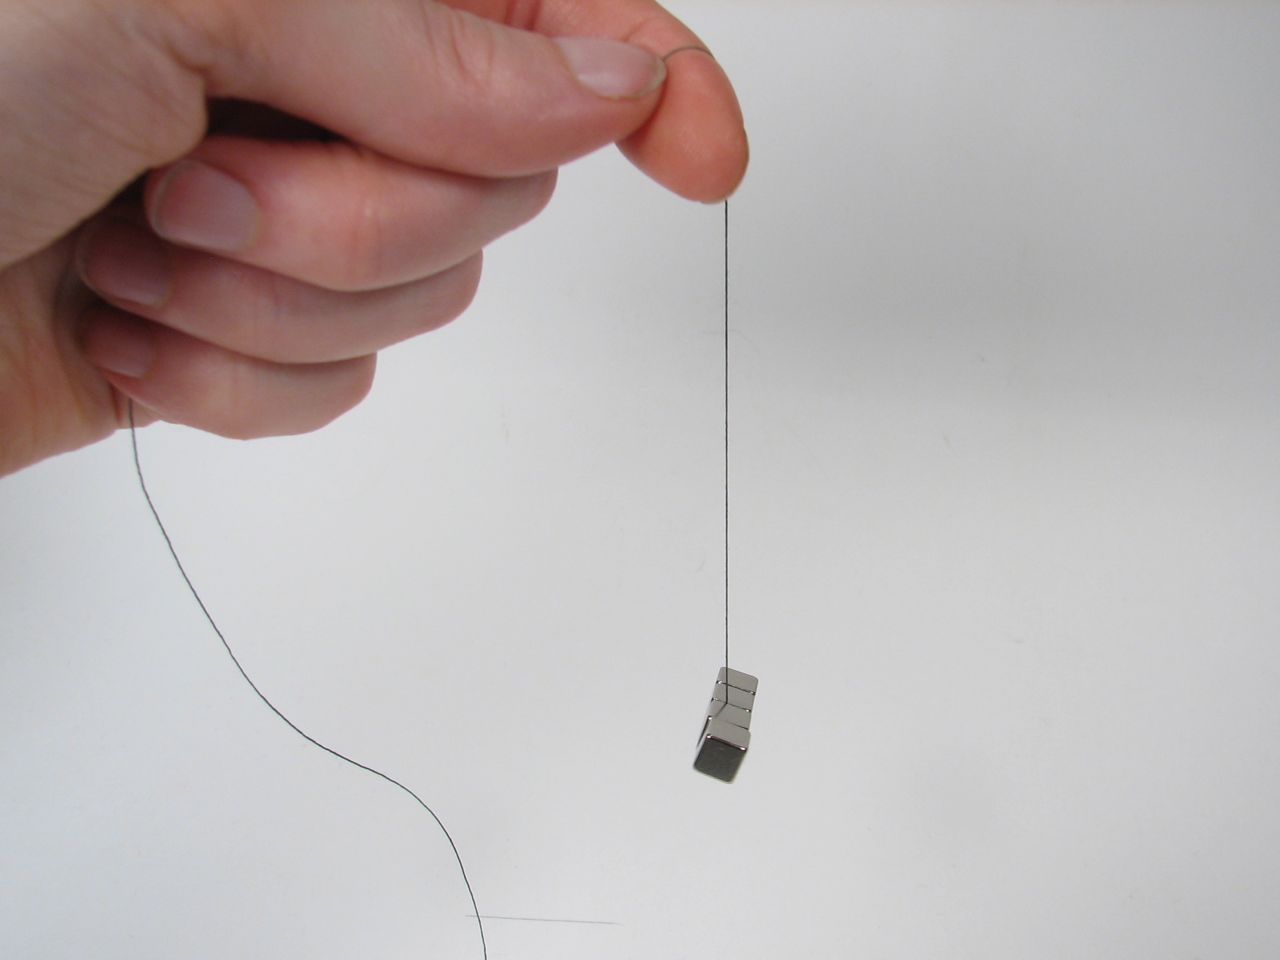
Compasses are easy to make. You can take a look here to learn how to make simple versions that float on water or spin on a smooth surface. However we’ve come to prefer the even simpler method shown here: sandwich a thin thread (or a long hair) between two very strong magnets and let it hang down.
If that’s too much trouble– or you need lots –you can pick one a bag full of simple compasses here.
One of the limitations of compasses is that the bearings usually rely on gravity, meaning that they only work in the horizontal plane. For our version with the string, you can get around this by putting the magnets near the middle of the thread, and holding the ends tight to get a compass that works in any plane that you like. You can also get a nifty 3D compass that has bearings to allow the magnet to point in any direction at all.
If you did go ahead and get that bag of simple compasses, you might imagine arranging them around a magnet to see how they all line up. Doing so, you’d find that all of the needles trace out a set of imaginary curves called magnetic field lines. The field lines are no more real than the lines on a topographic map, but provide a useful tool for visualizing the concentration and orientation of the magnetic field in a region.

Taking the natural limit of this situation, why not use zillions(technical term) of tiny compasses to look at the field?
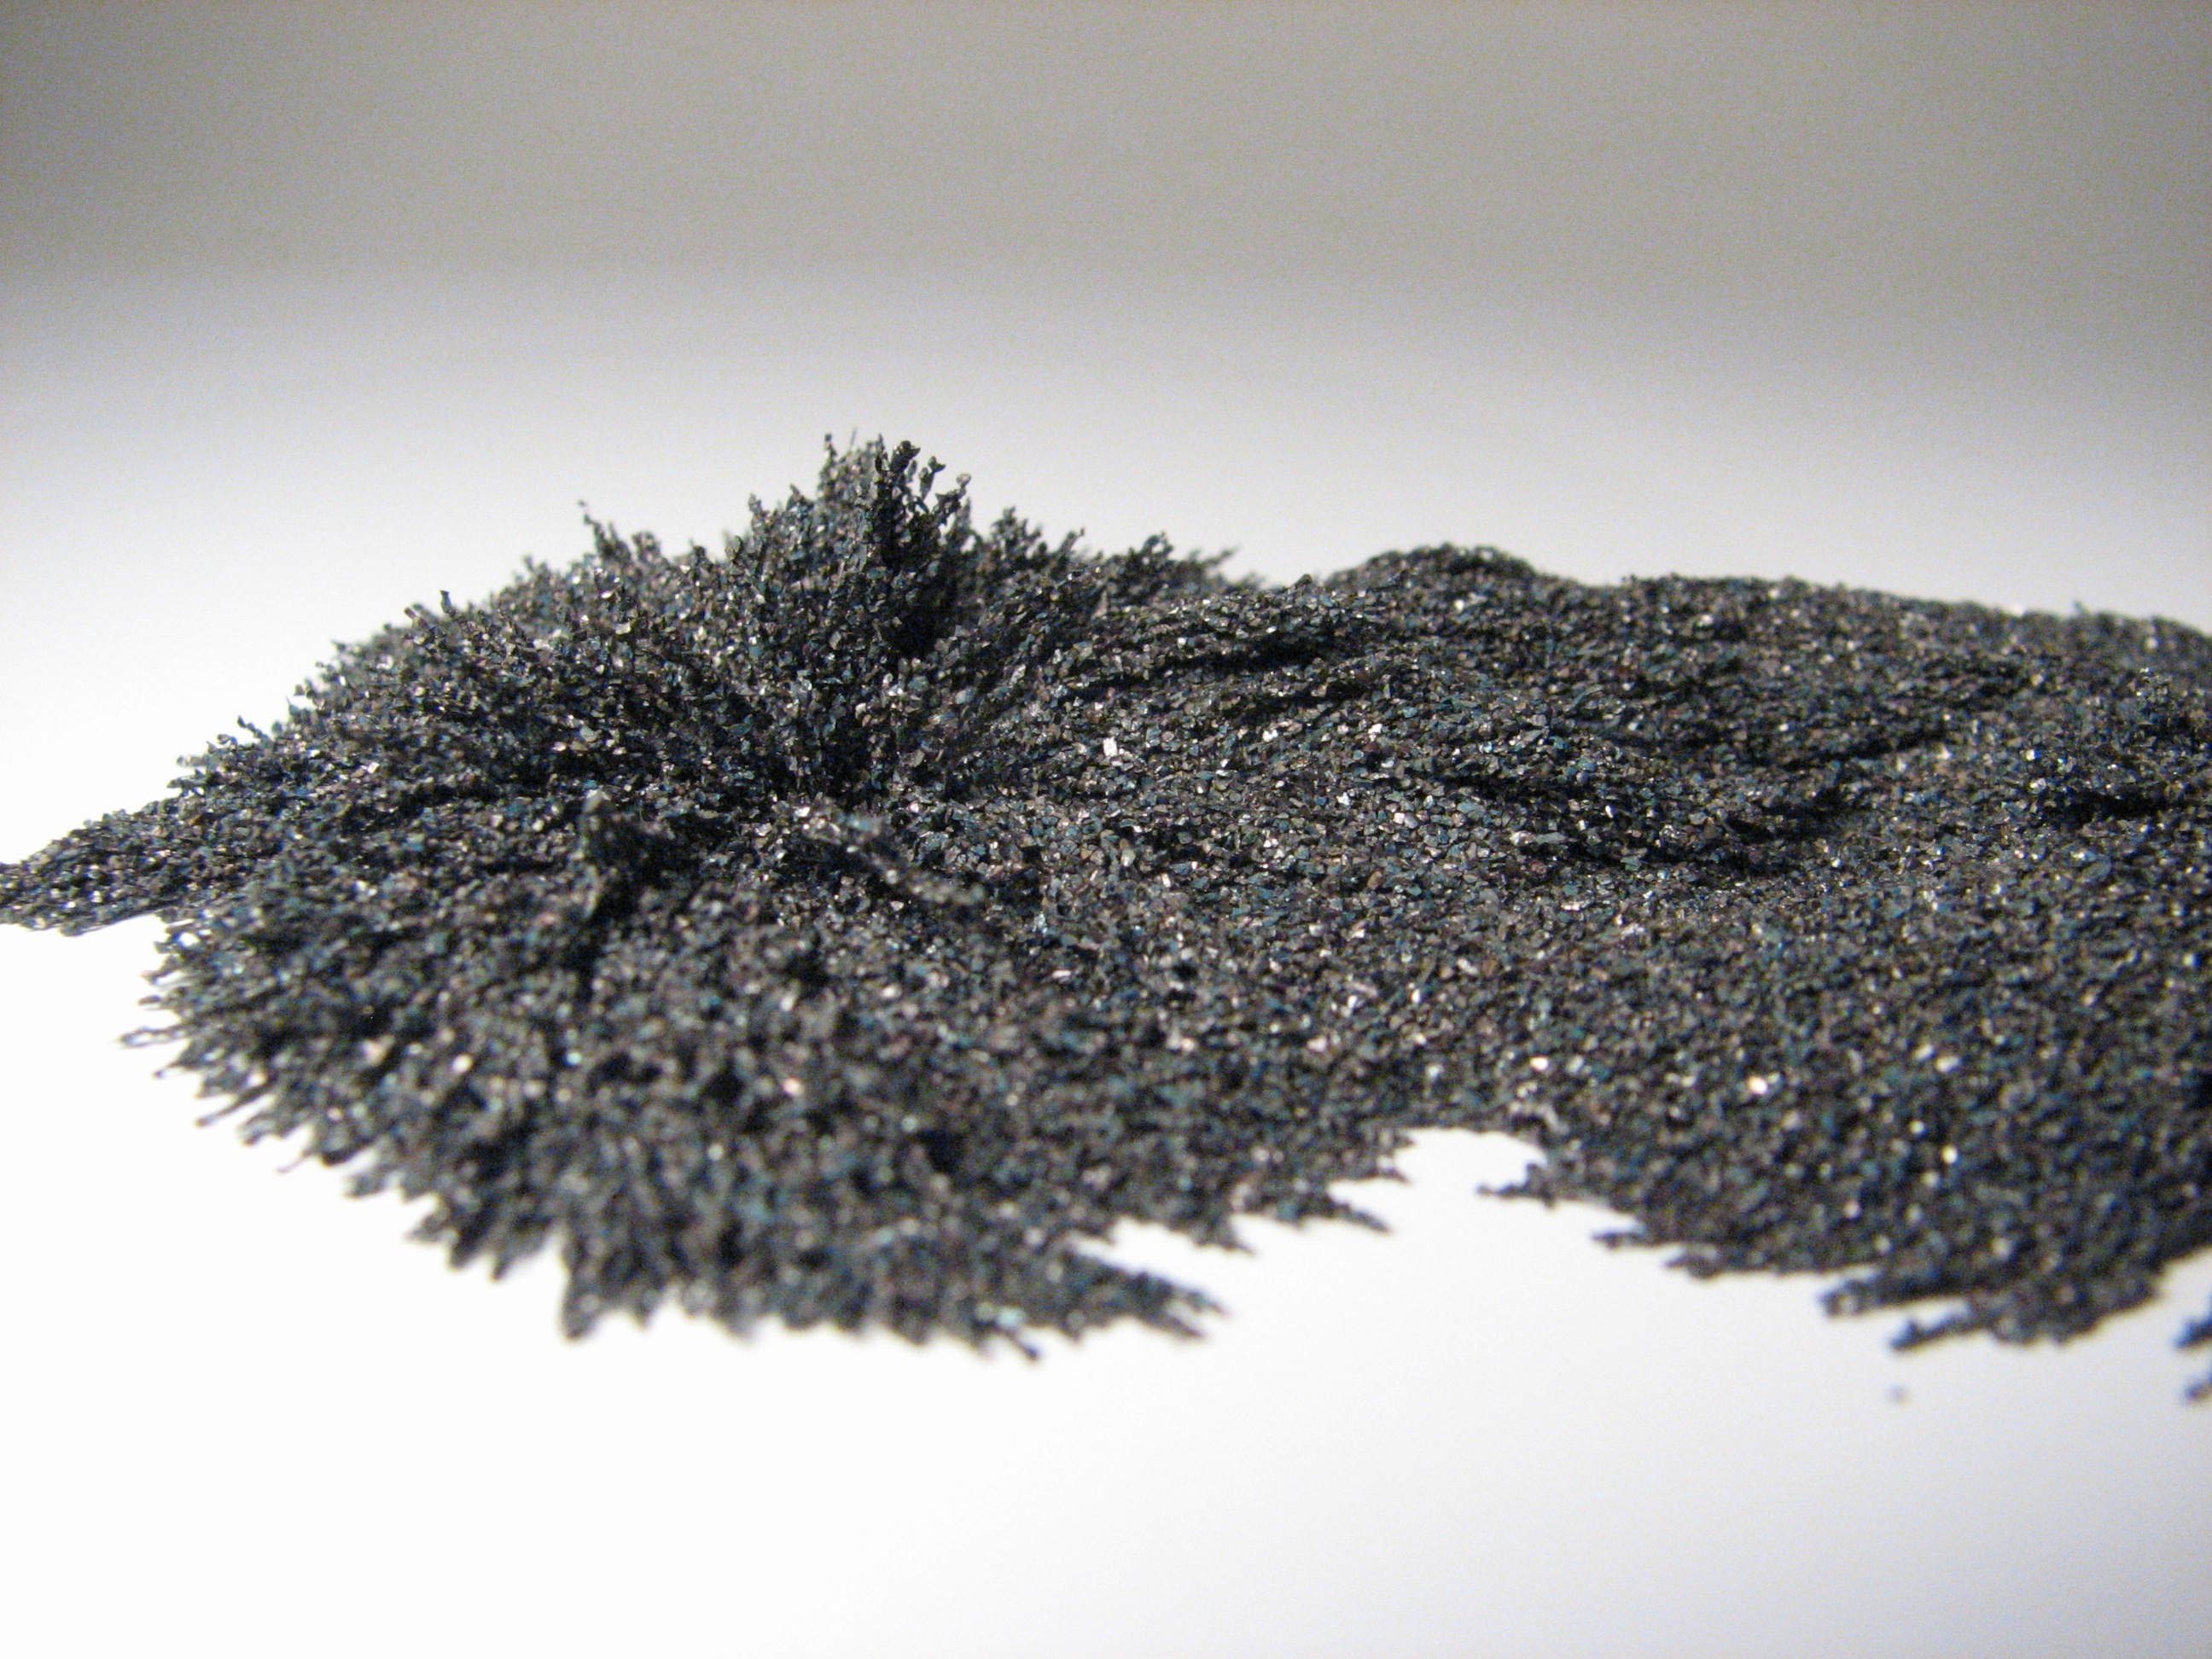
It turns out that you can get awfully close to that by using iron filings. Now, iron filings aren’t exactly a common household item, but you can make or buy some pretty easily. If you crush coarse steel wool (and be carefulif you choose to do so) you can make a pretty good approximation, or you can take actually spend a few minutes with a file and a chunk of soft iron to make authentic filings.
Toy stores sometimes carry tiny vials of iron filings in their science-y section, and so you that’s sometimes a good place to look, too. The “toy” filings that we’ve seen are often very dirty, and come across as uneven powders. By contrast, we’re really impressed with the quality of these iron filings from Arbor Scientific– shown above, and under six dollars per pound –which have larger and reasonably well matched grain size as well as low dust.
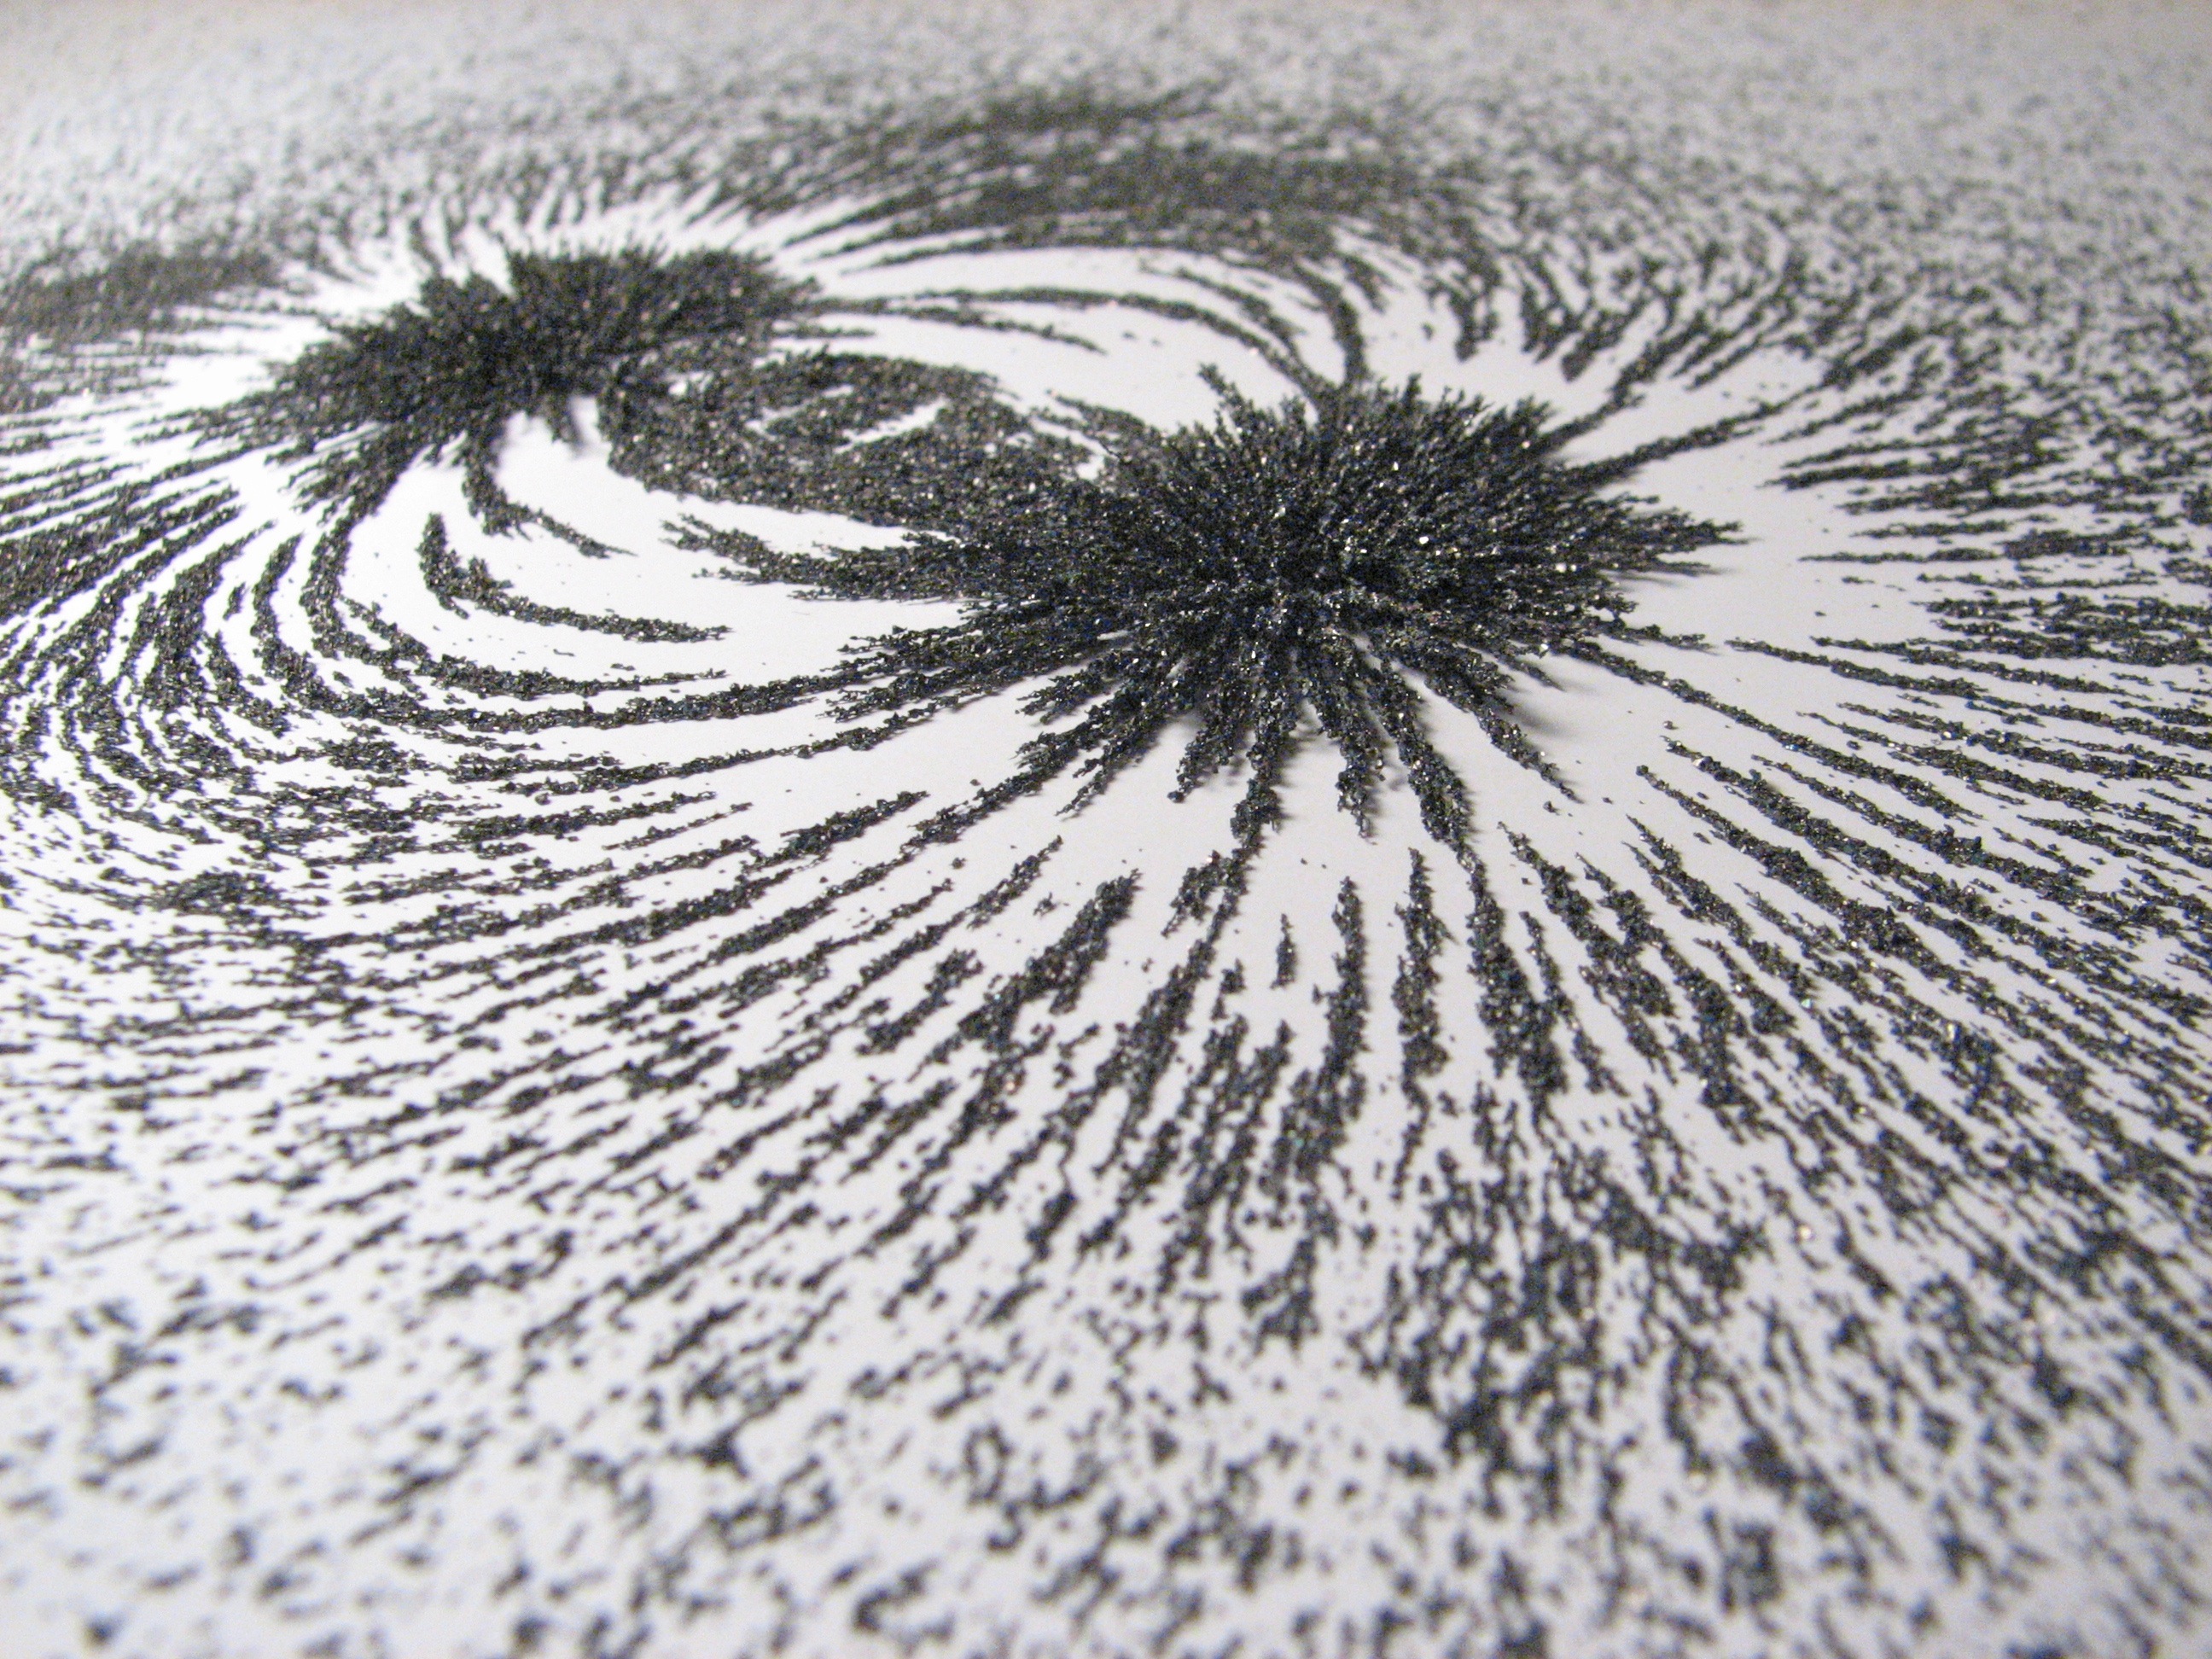
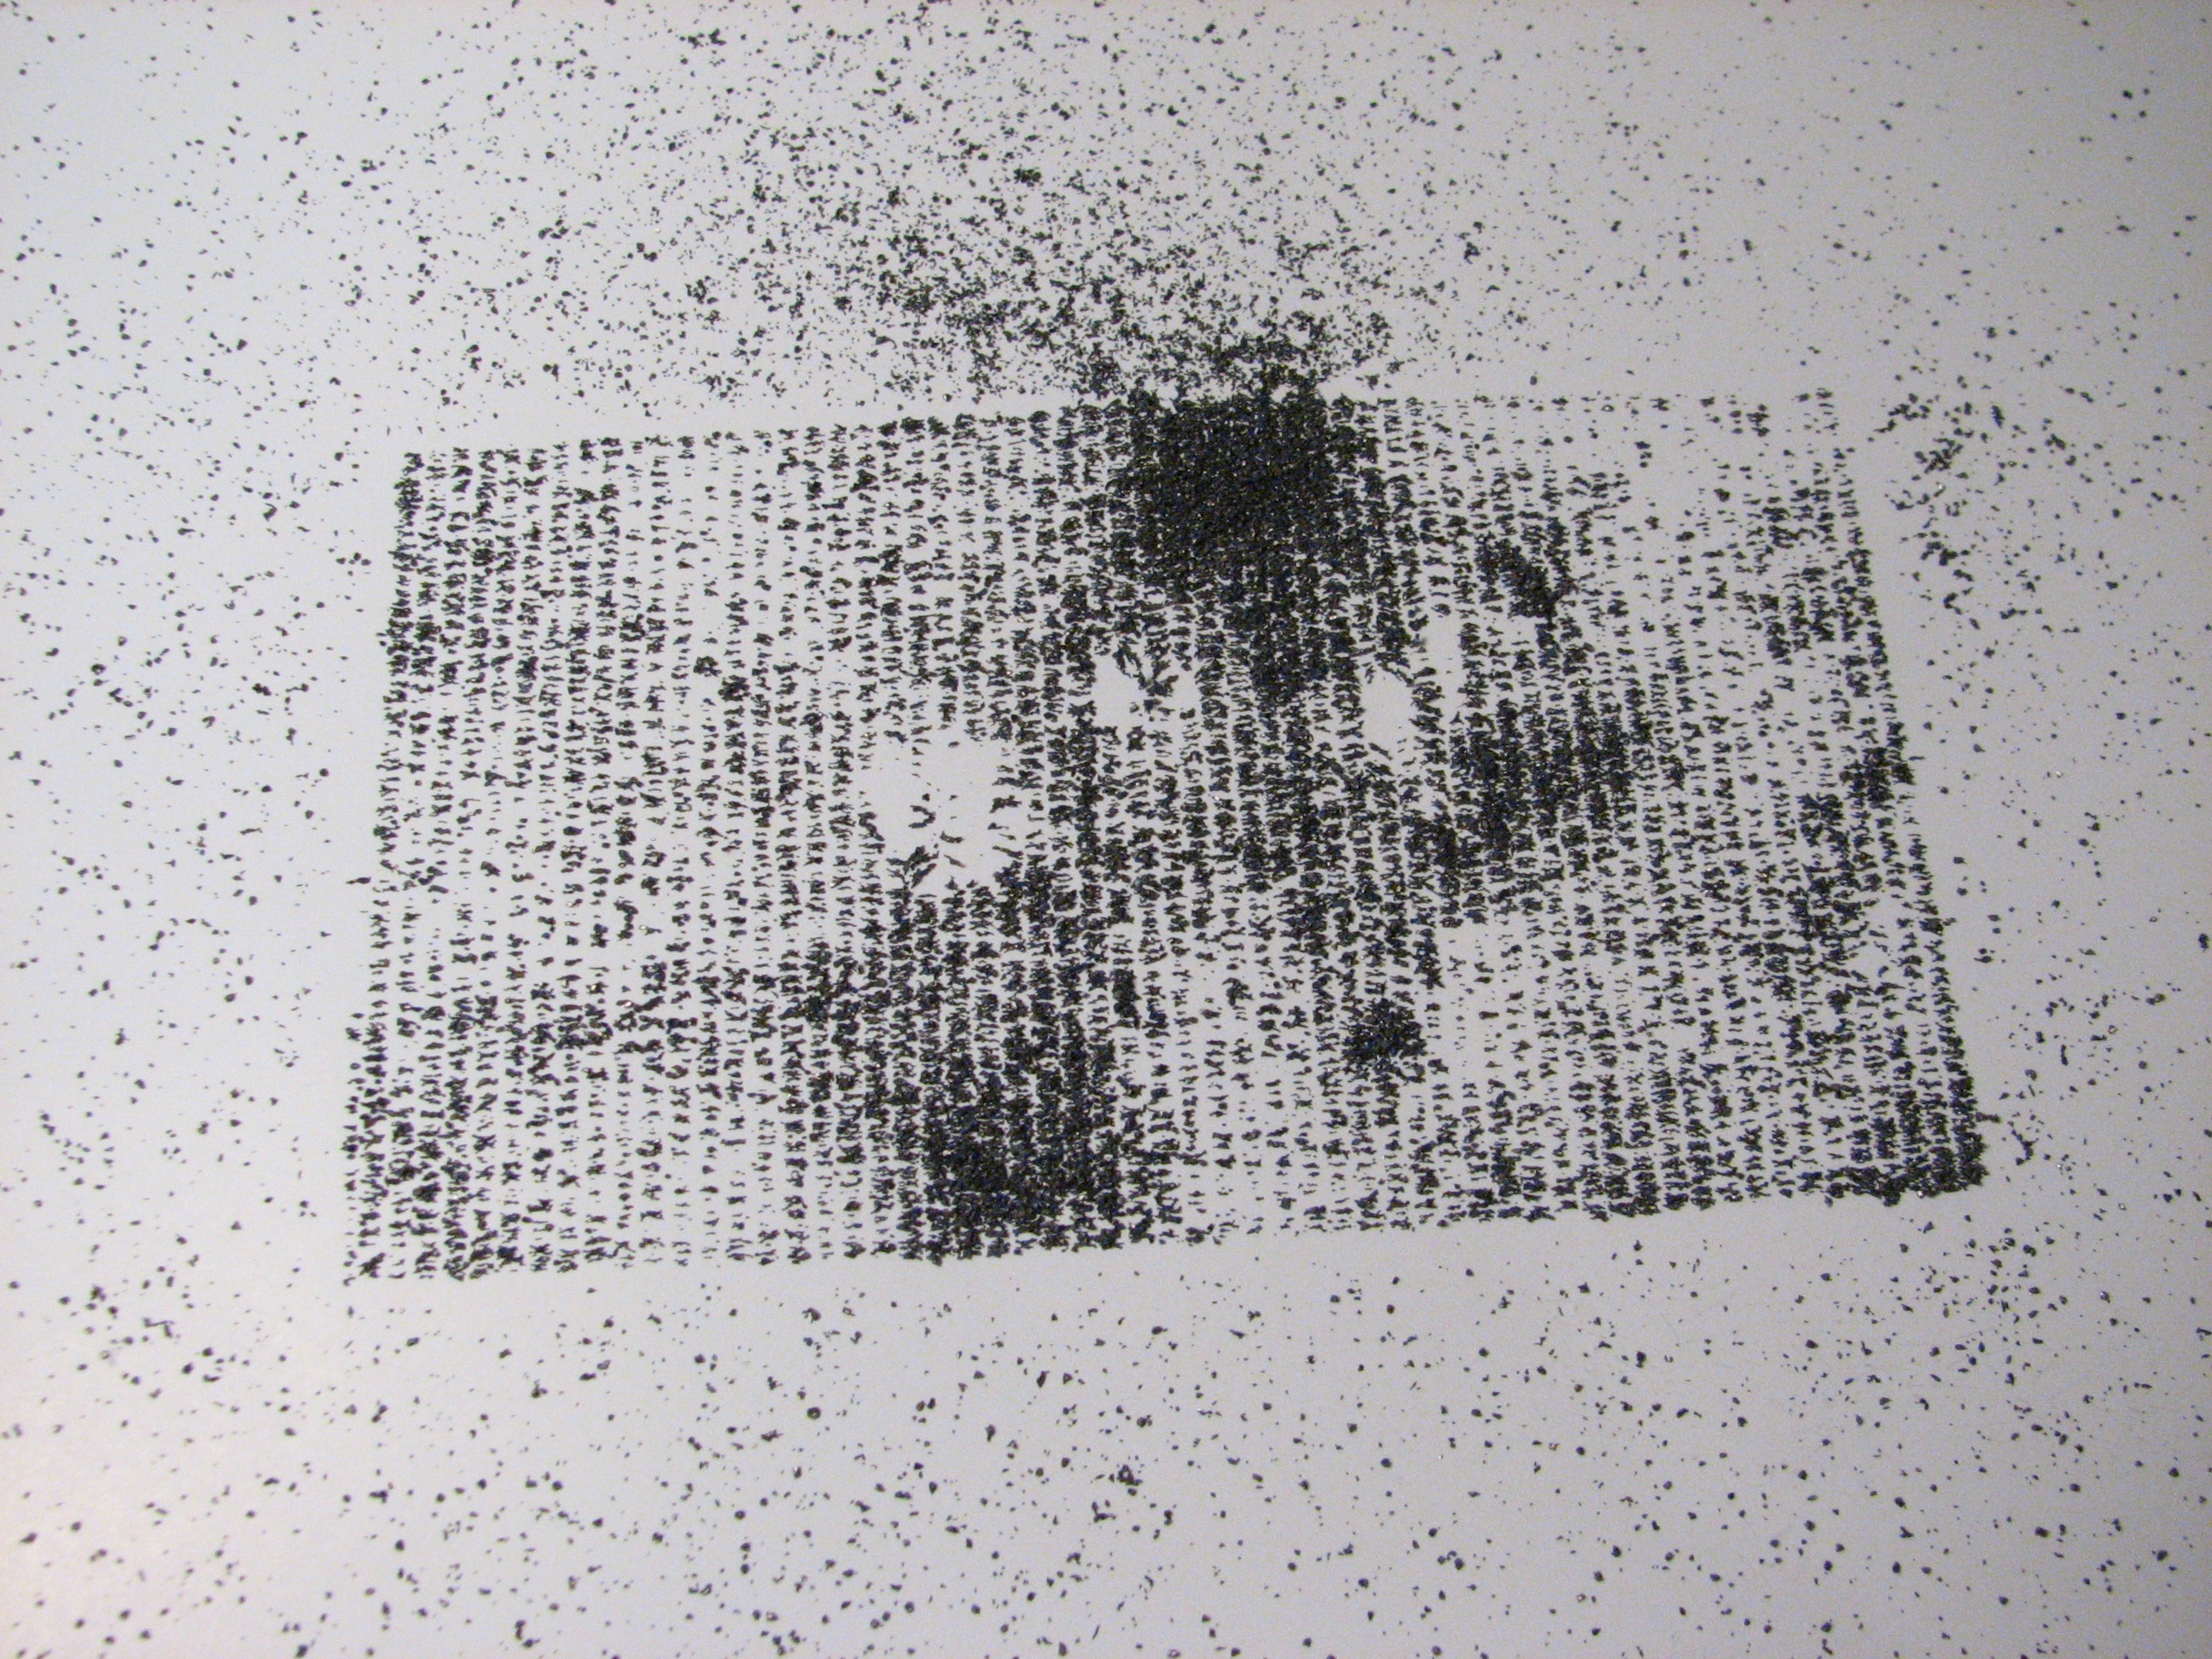
Here we’ve poured iron filings onto a piece of paper covering a stack of powerful NdFeB magnets. You can see some hints of field structure, but it’s hard to make anything out.
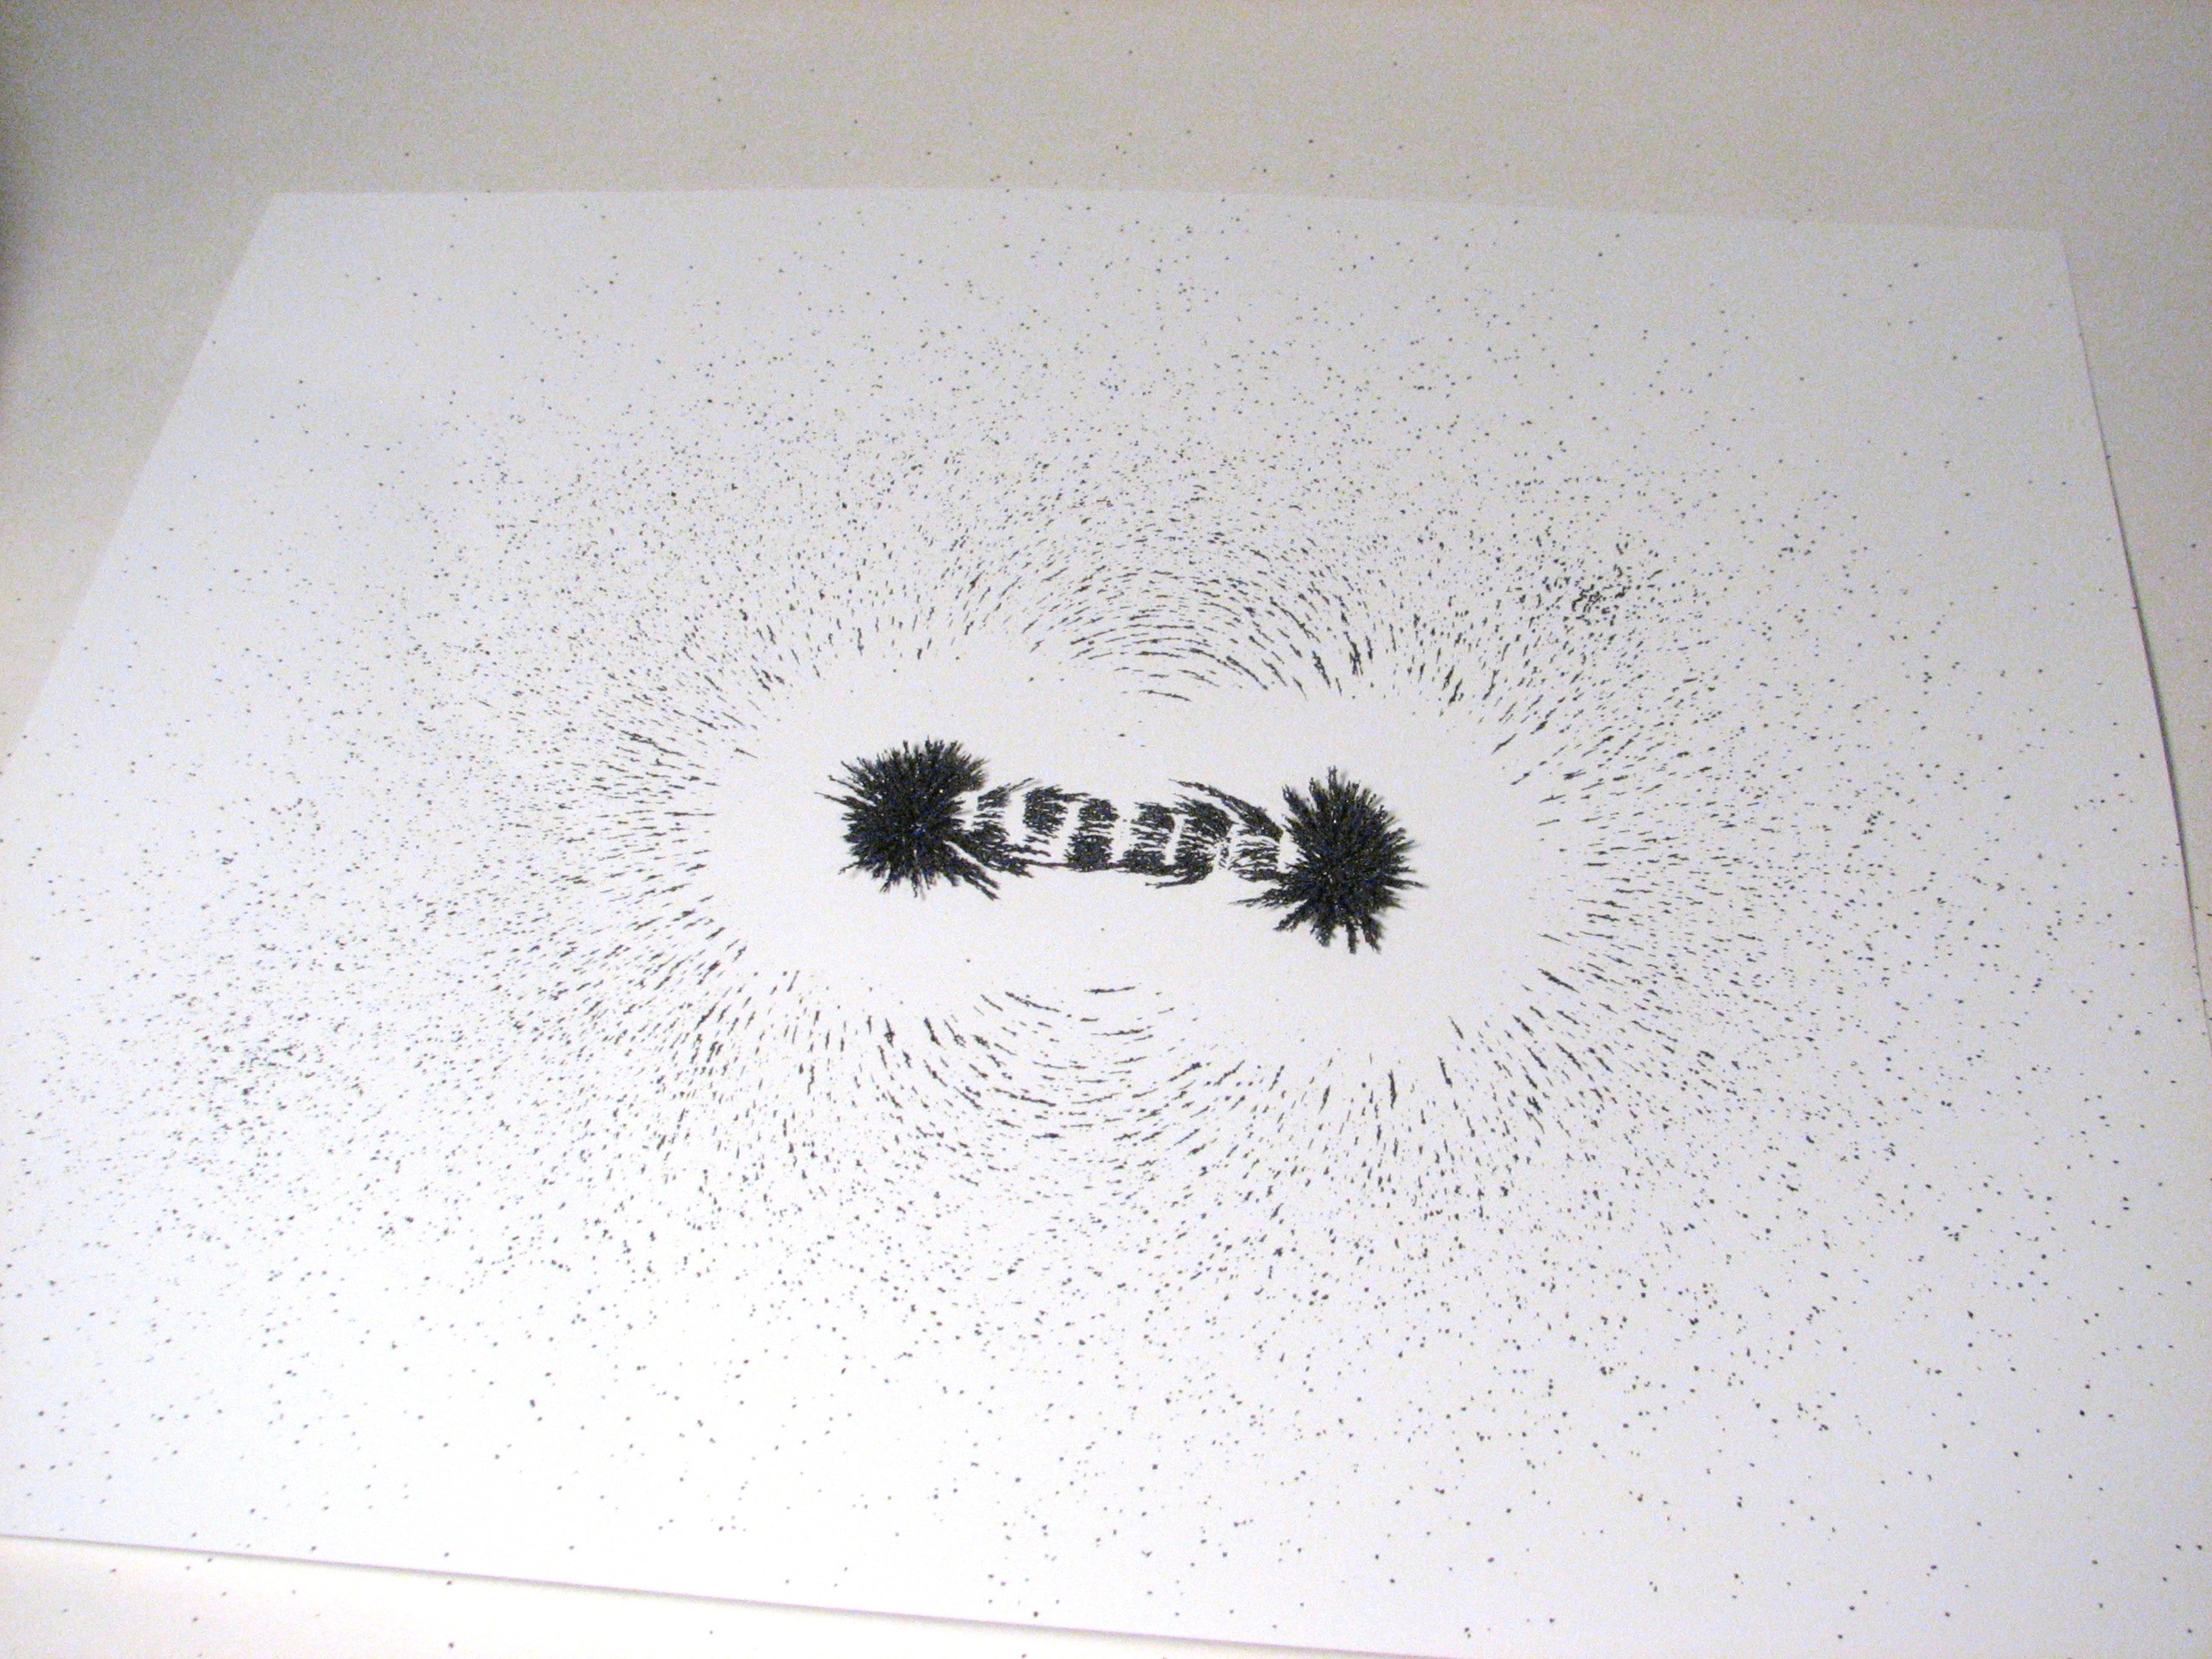
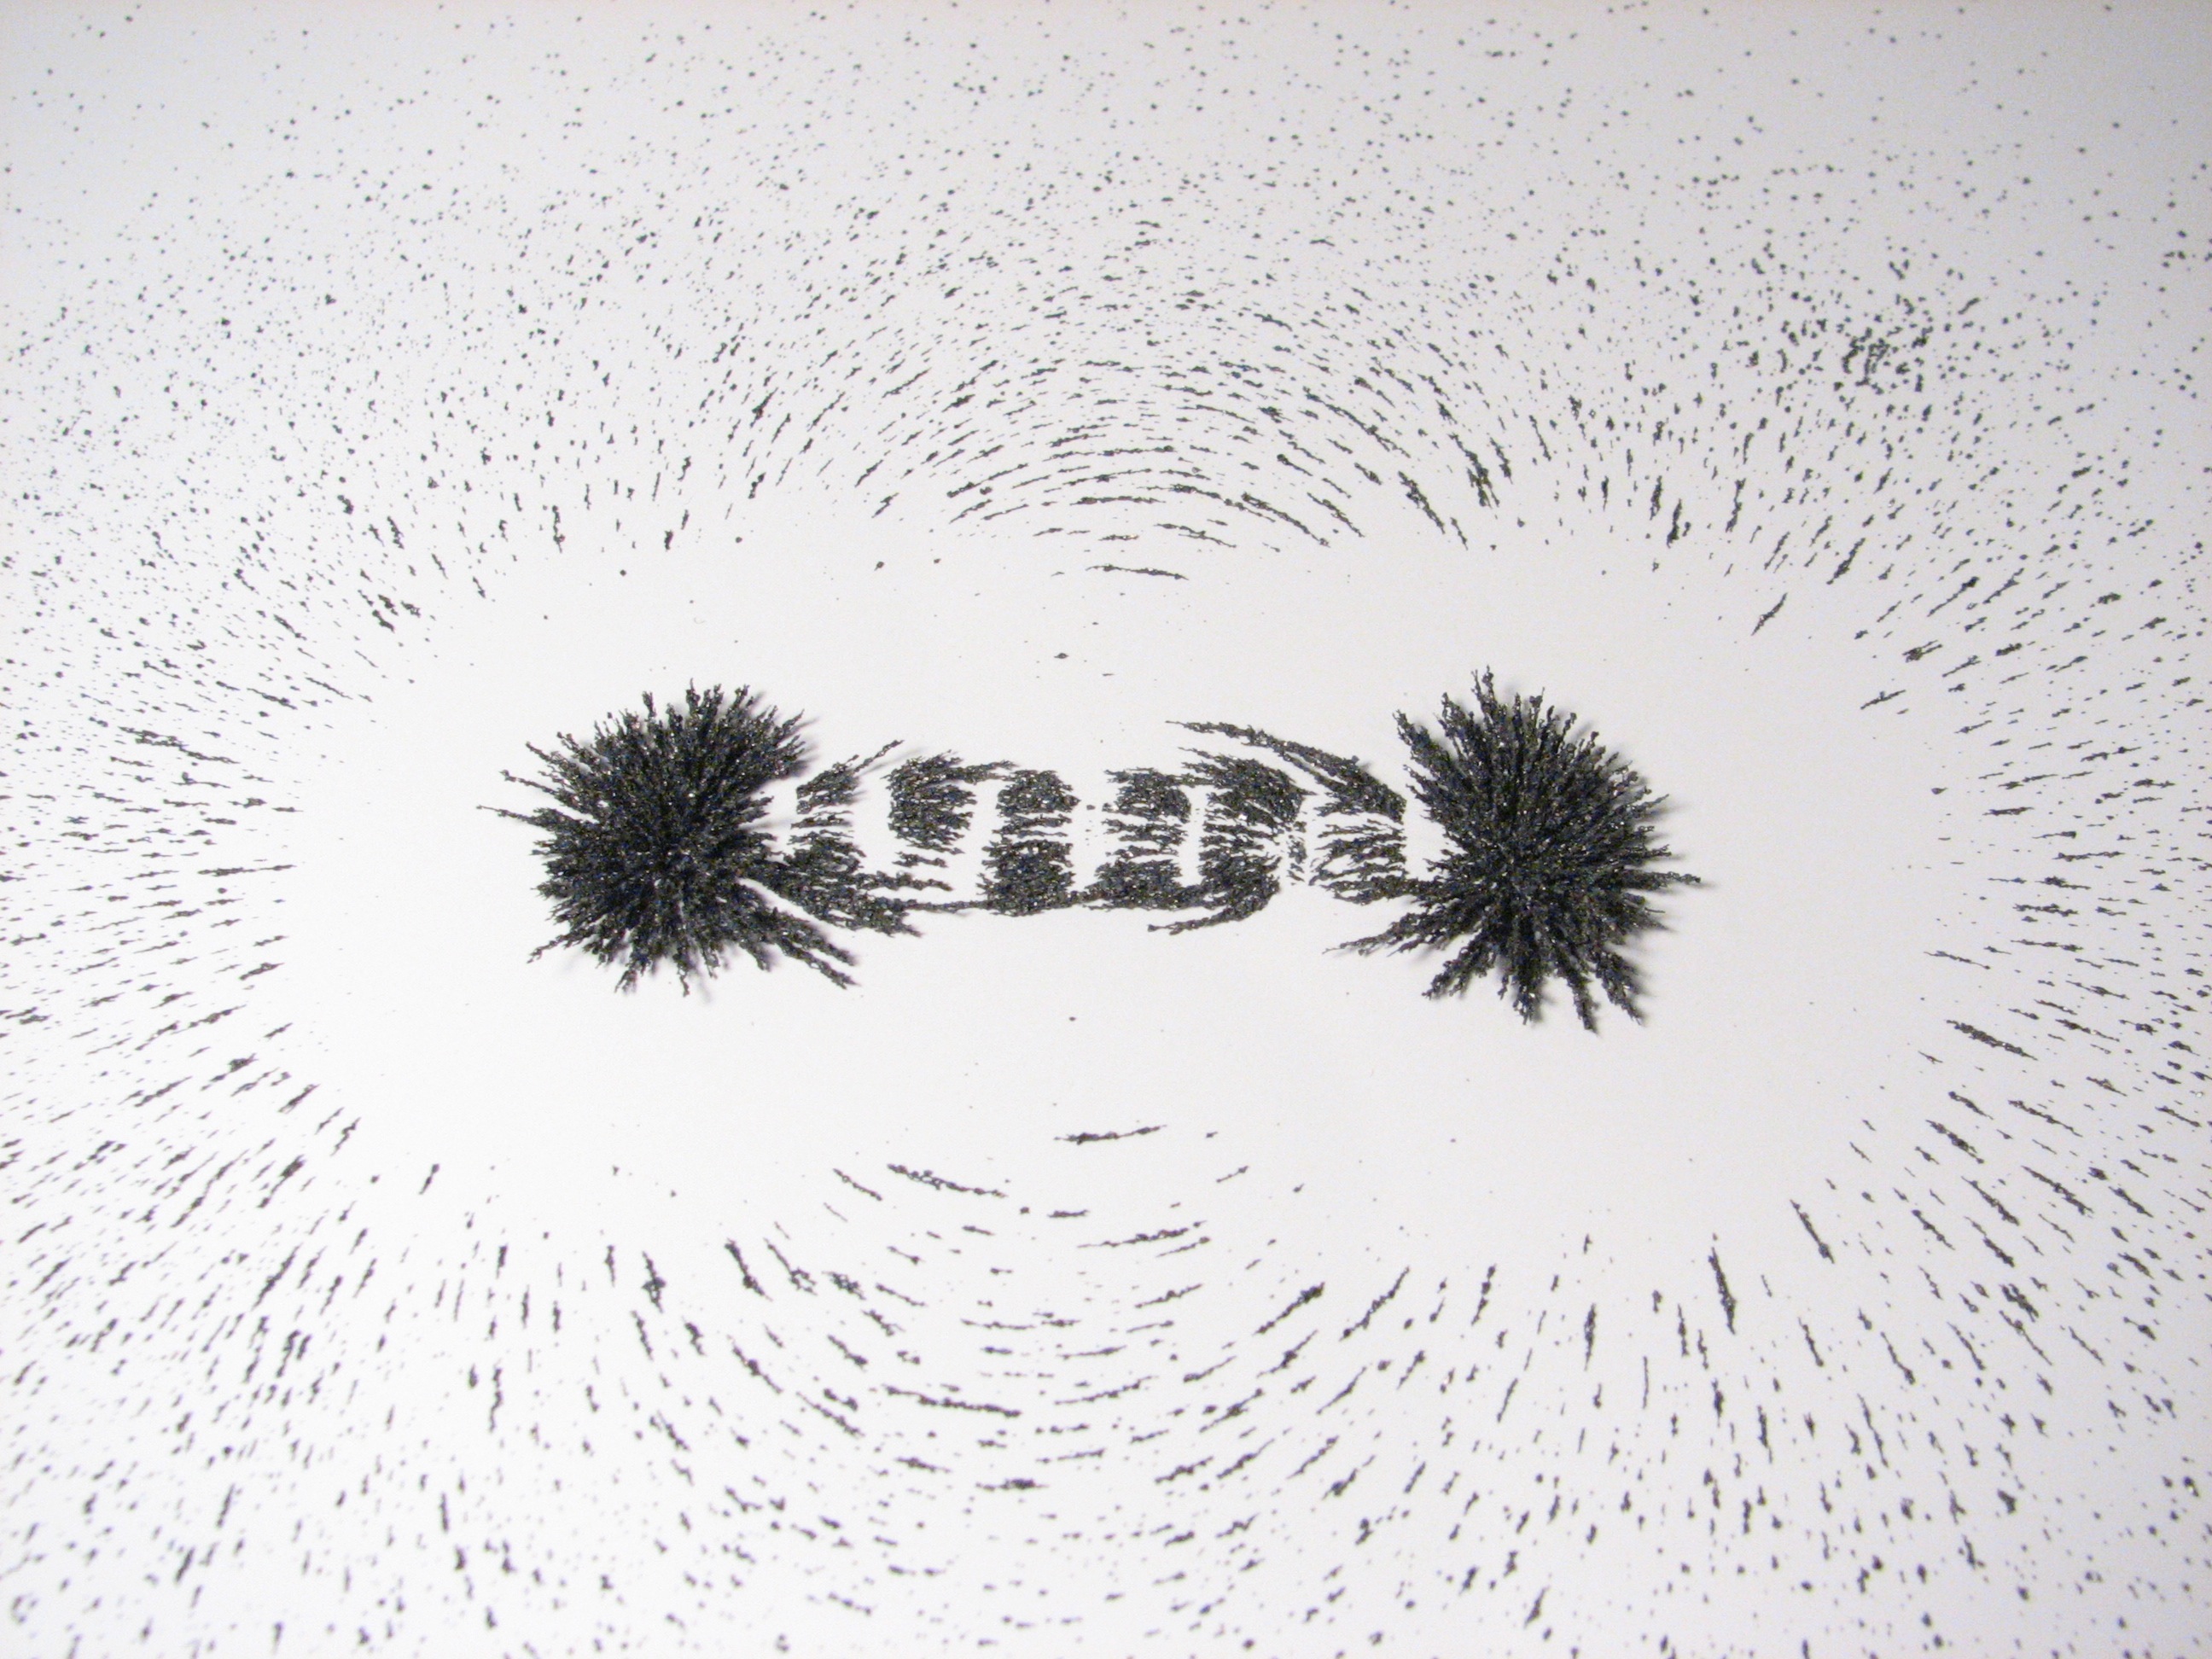
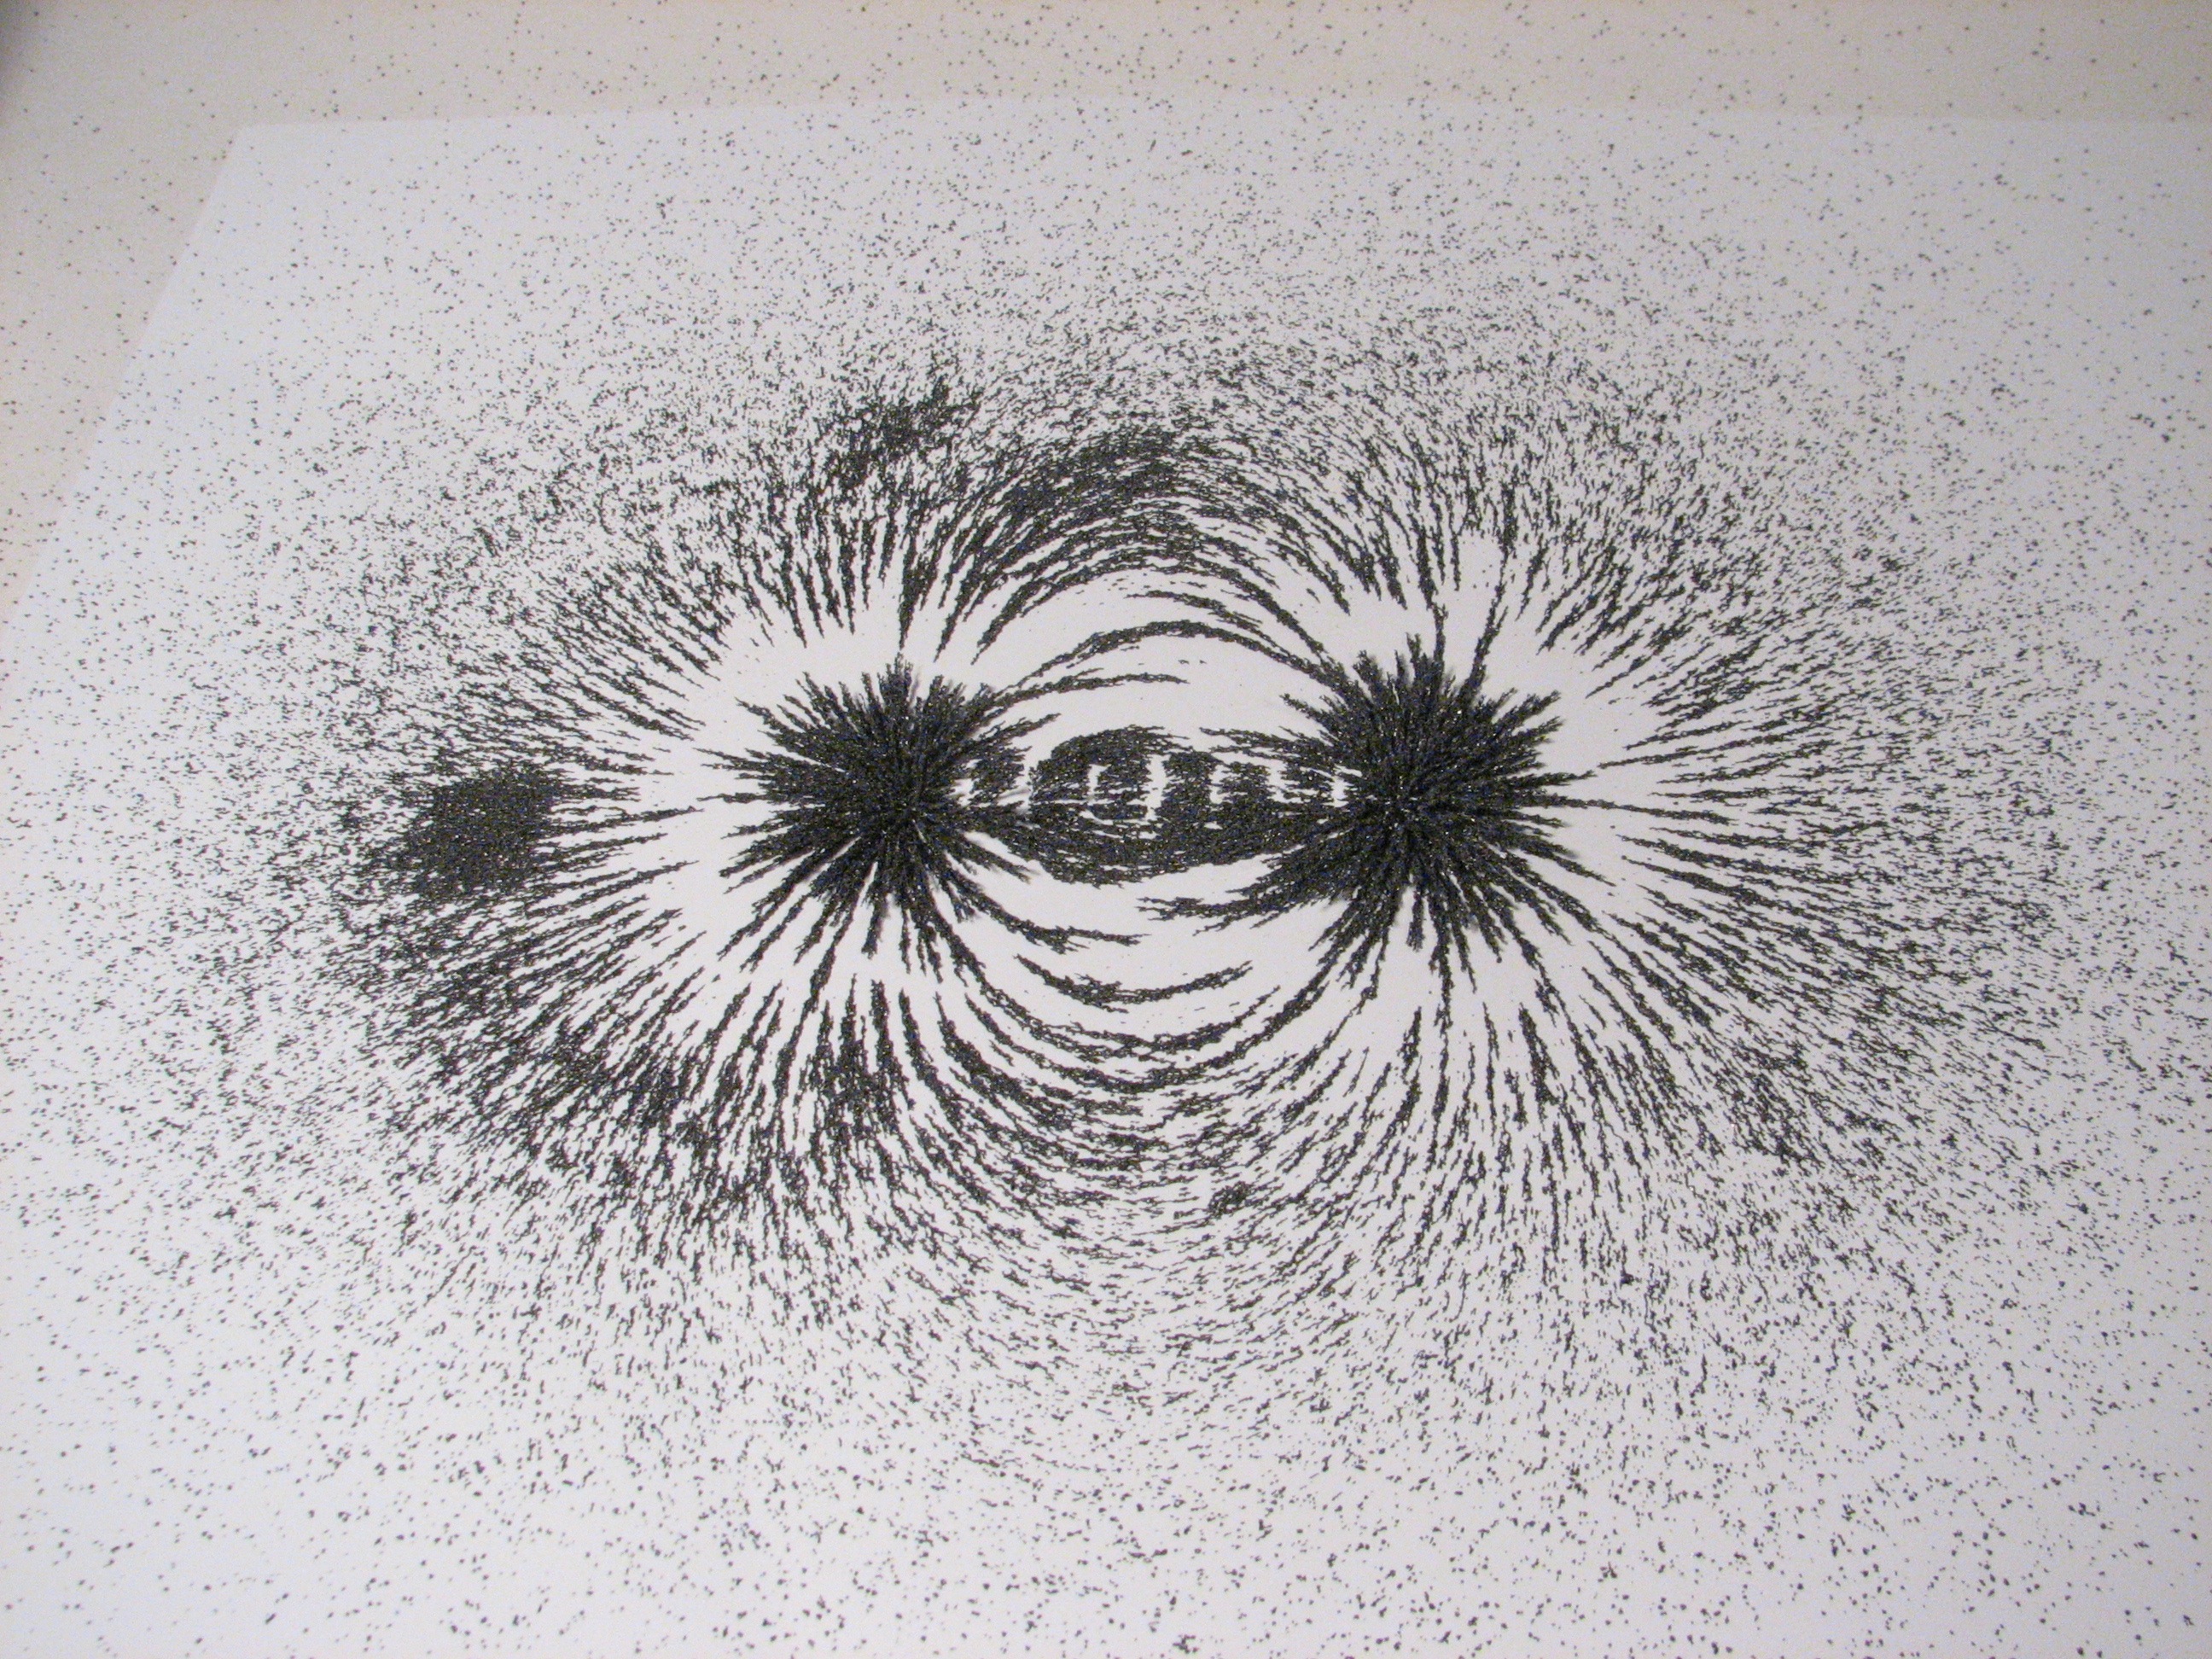
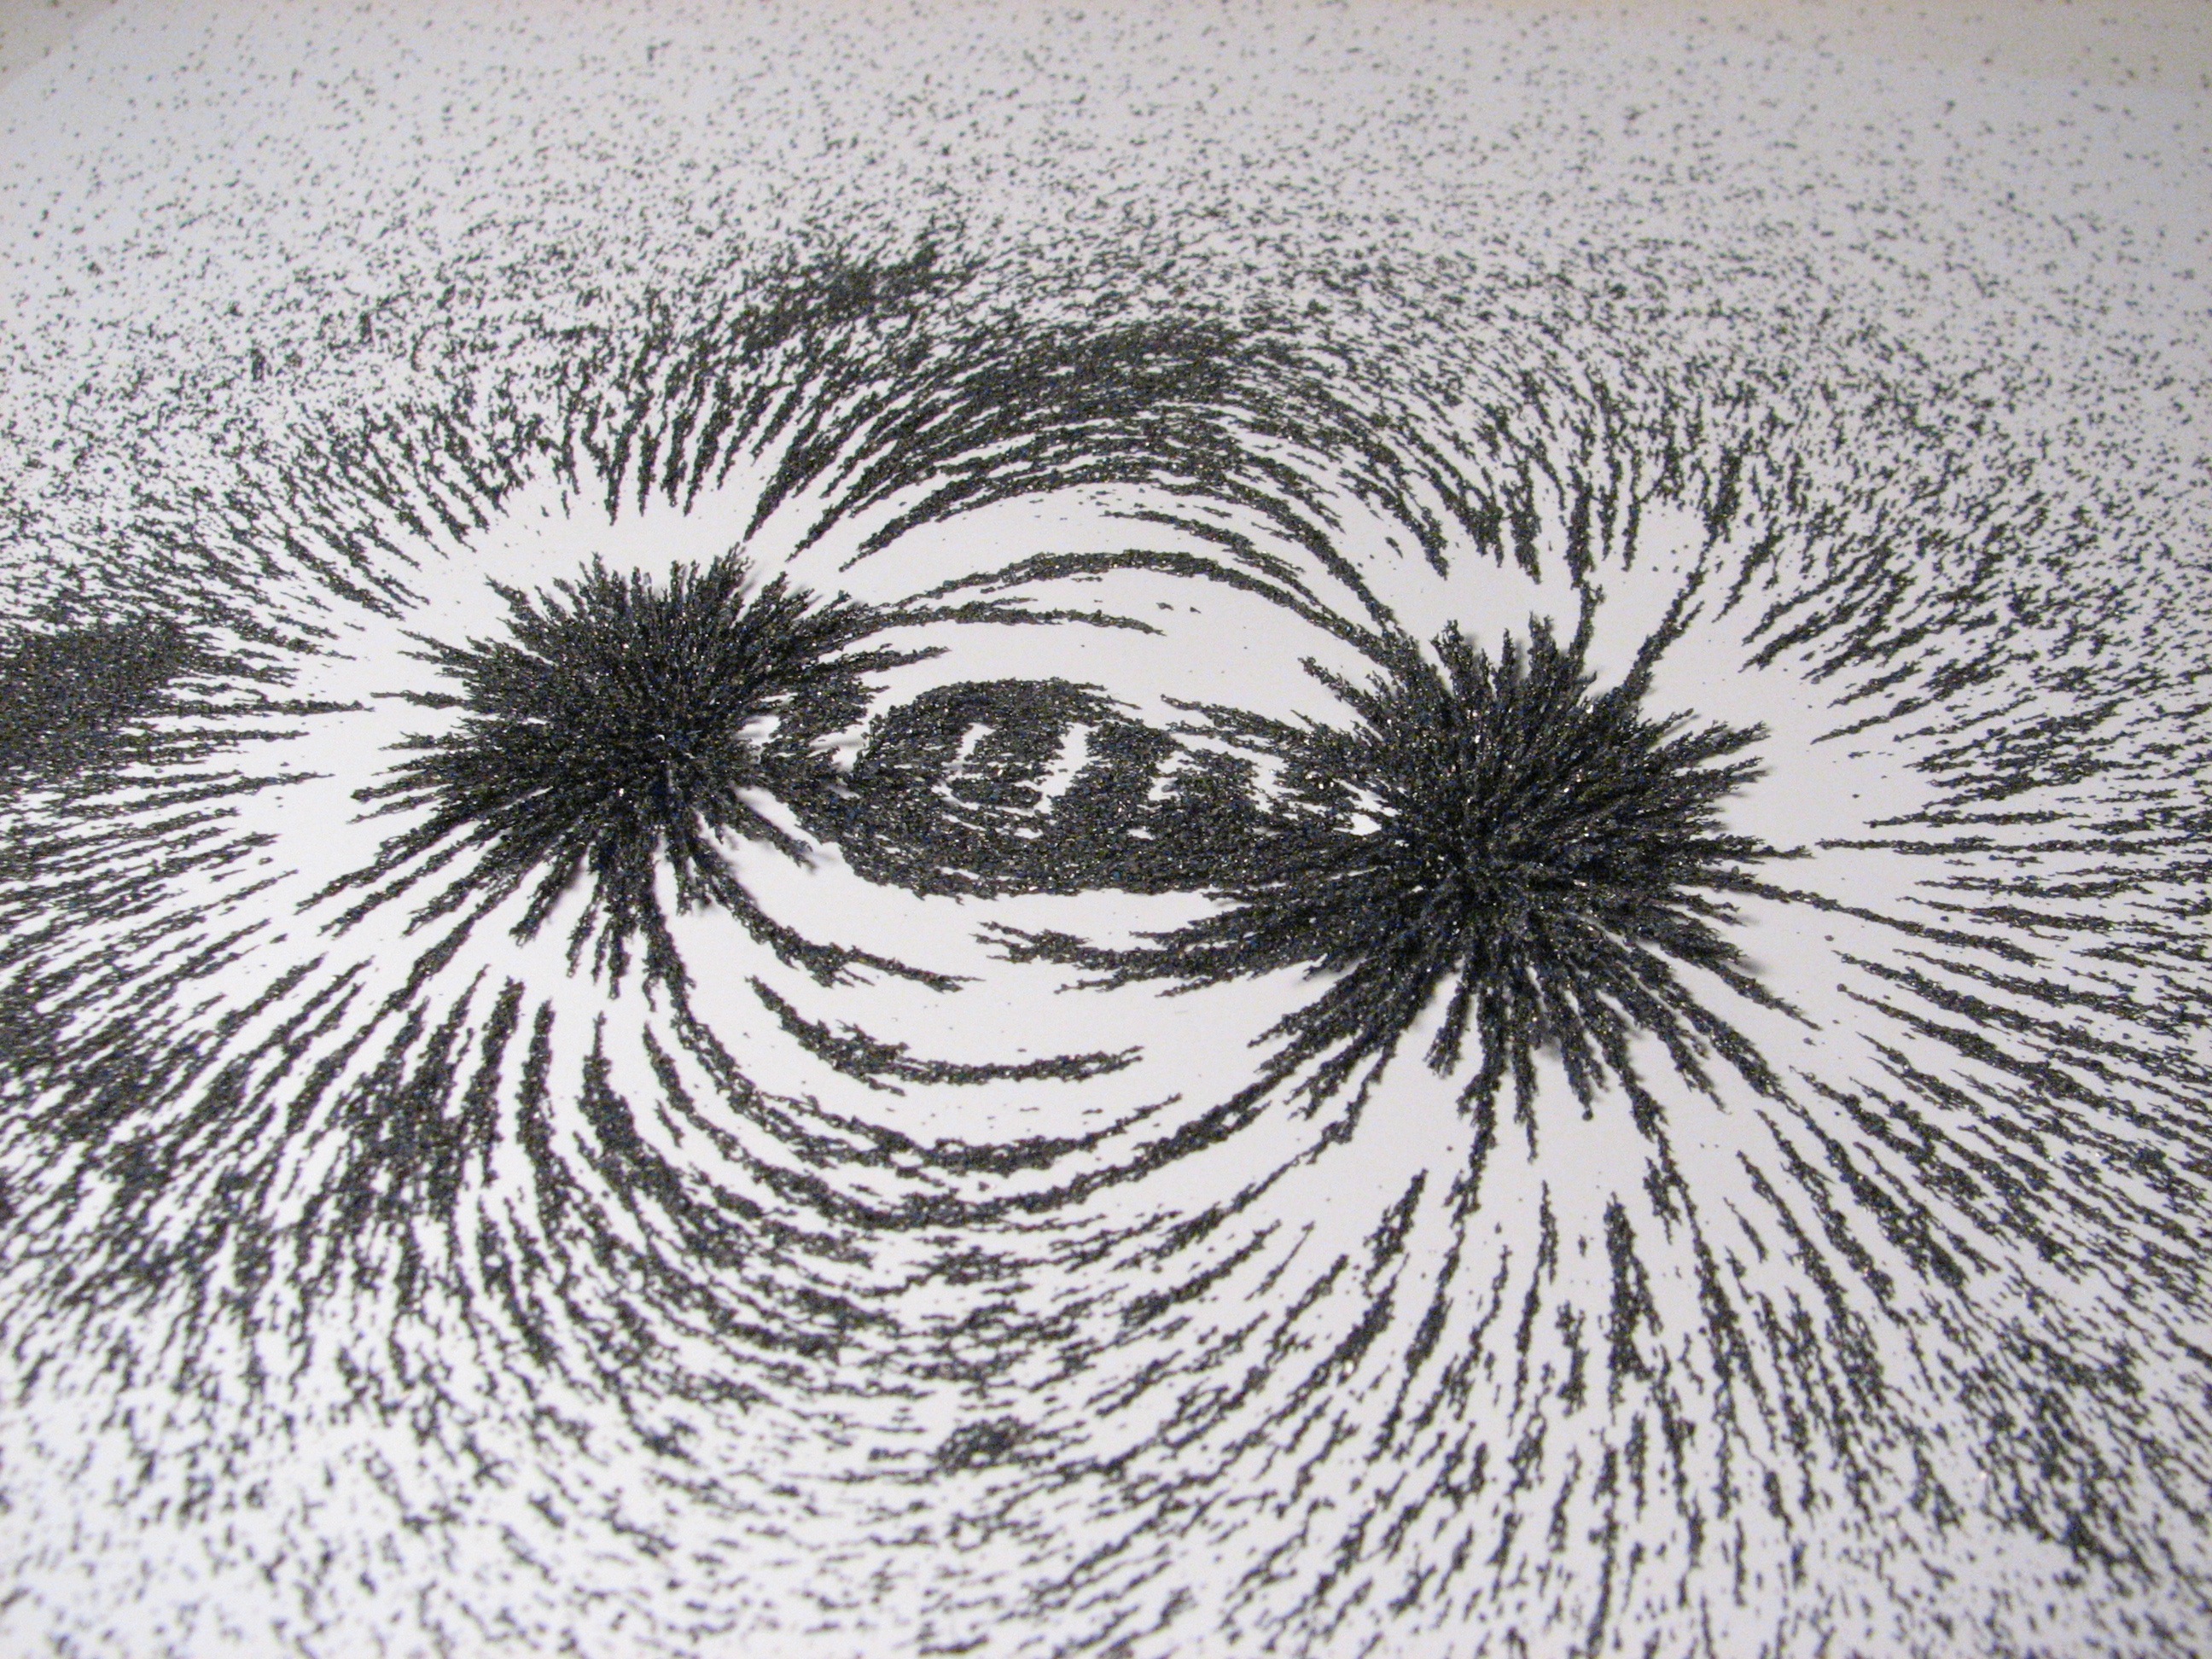
A much better approach is to slowly and uniformly sprinkle the filings onto the paper from a few inches above, giving them an opportunity to arrange themselves in the field. As you add more filings the filings illustrate the field lines more clearly, up until a certain point.
So what’s going on here, really? These aren’t compasses, free to rotate on a bearing. In fact, the iron particles are not all that magnetized initially. In the jar, the particles aren’t attracted to each other; they just feel like heavy sand.
Rather, the iron particles are just being good ferromagnets, which exhibit strong magnetization when placed in a strong external magnetic field.
(From a microscopic perspective, the magnetic domains inside the iron filings are randomly aligned to begin with. They align strongly when placed in the external field, and will retain some part of that
magnetization when the external field is removed.)
When the particles are dropped onto the paper, they suddenly become strong little bar magnets (thanks to the external field) and do their darned best to align to it– just like the little compasses. The particles that land close enough to the magnet itself are pulled right towards it. Those further away are magnetized by the big magnet, but don’t have enough attraction to move towards it. Instead, they attract towards one another, north to south, north to south, with the results that you see here.
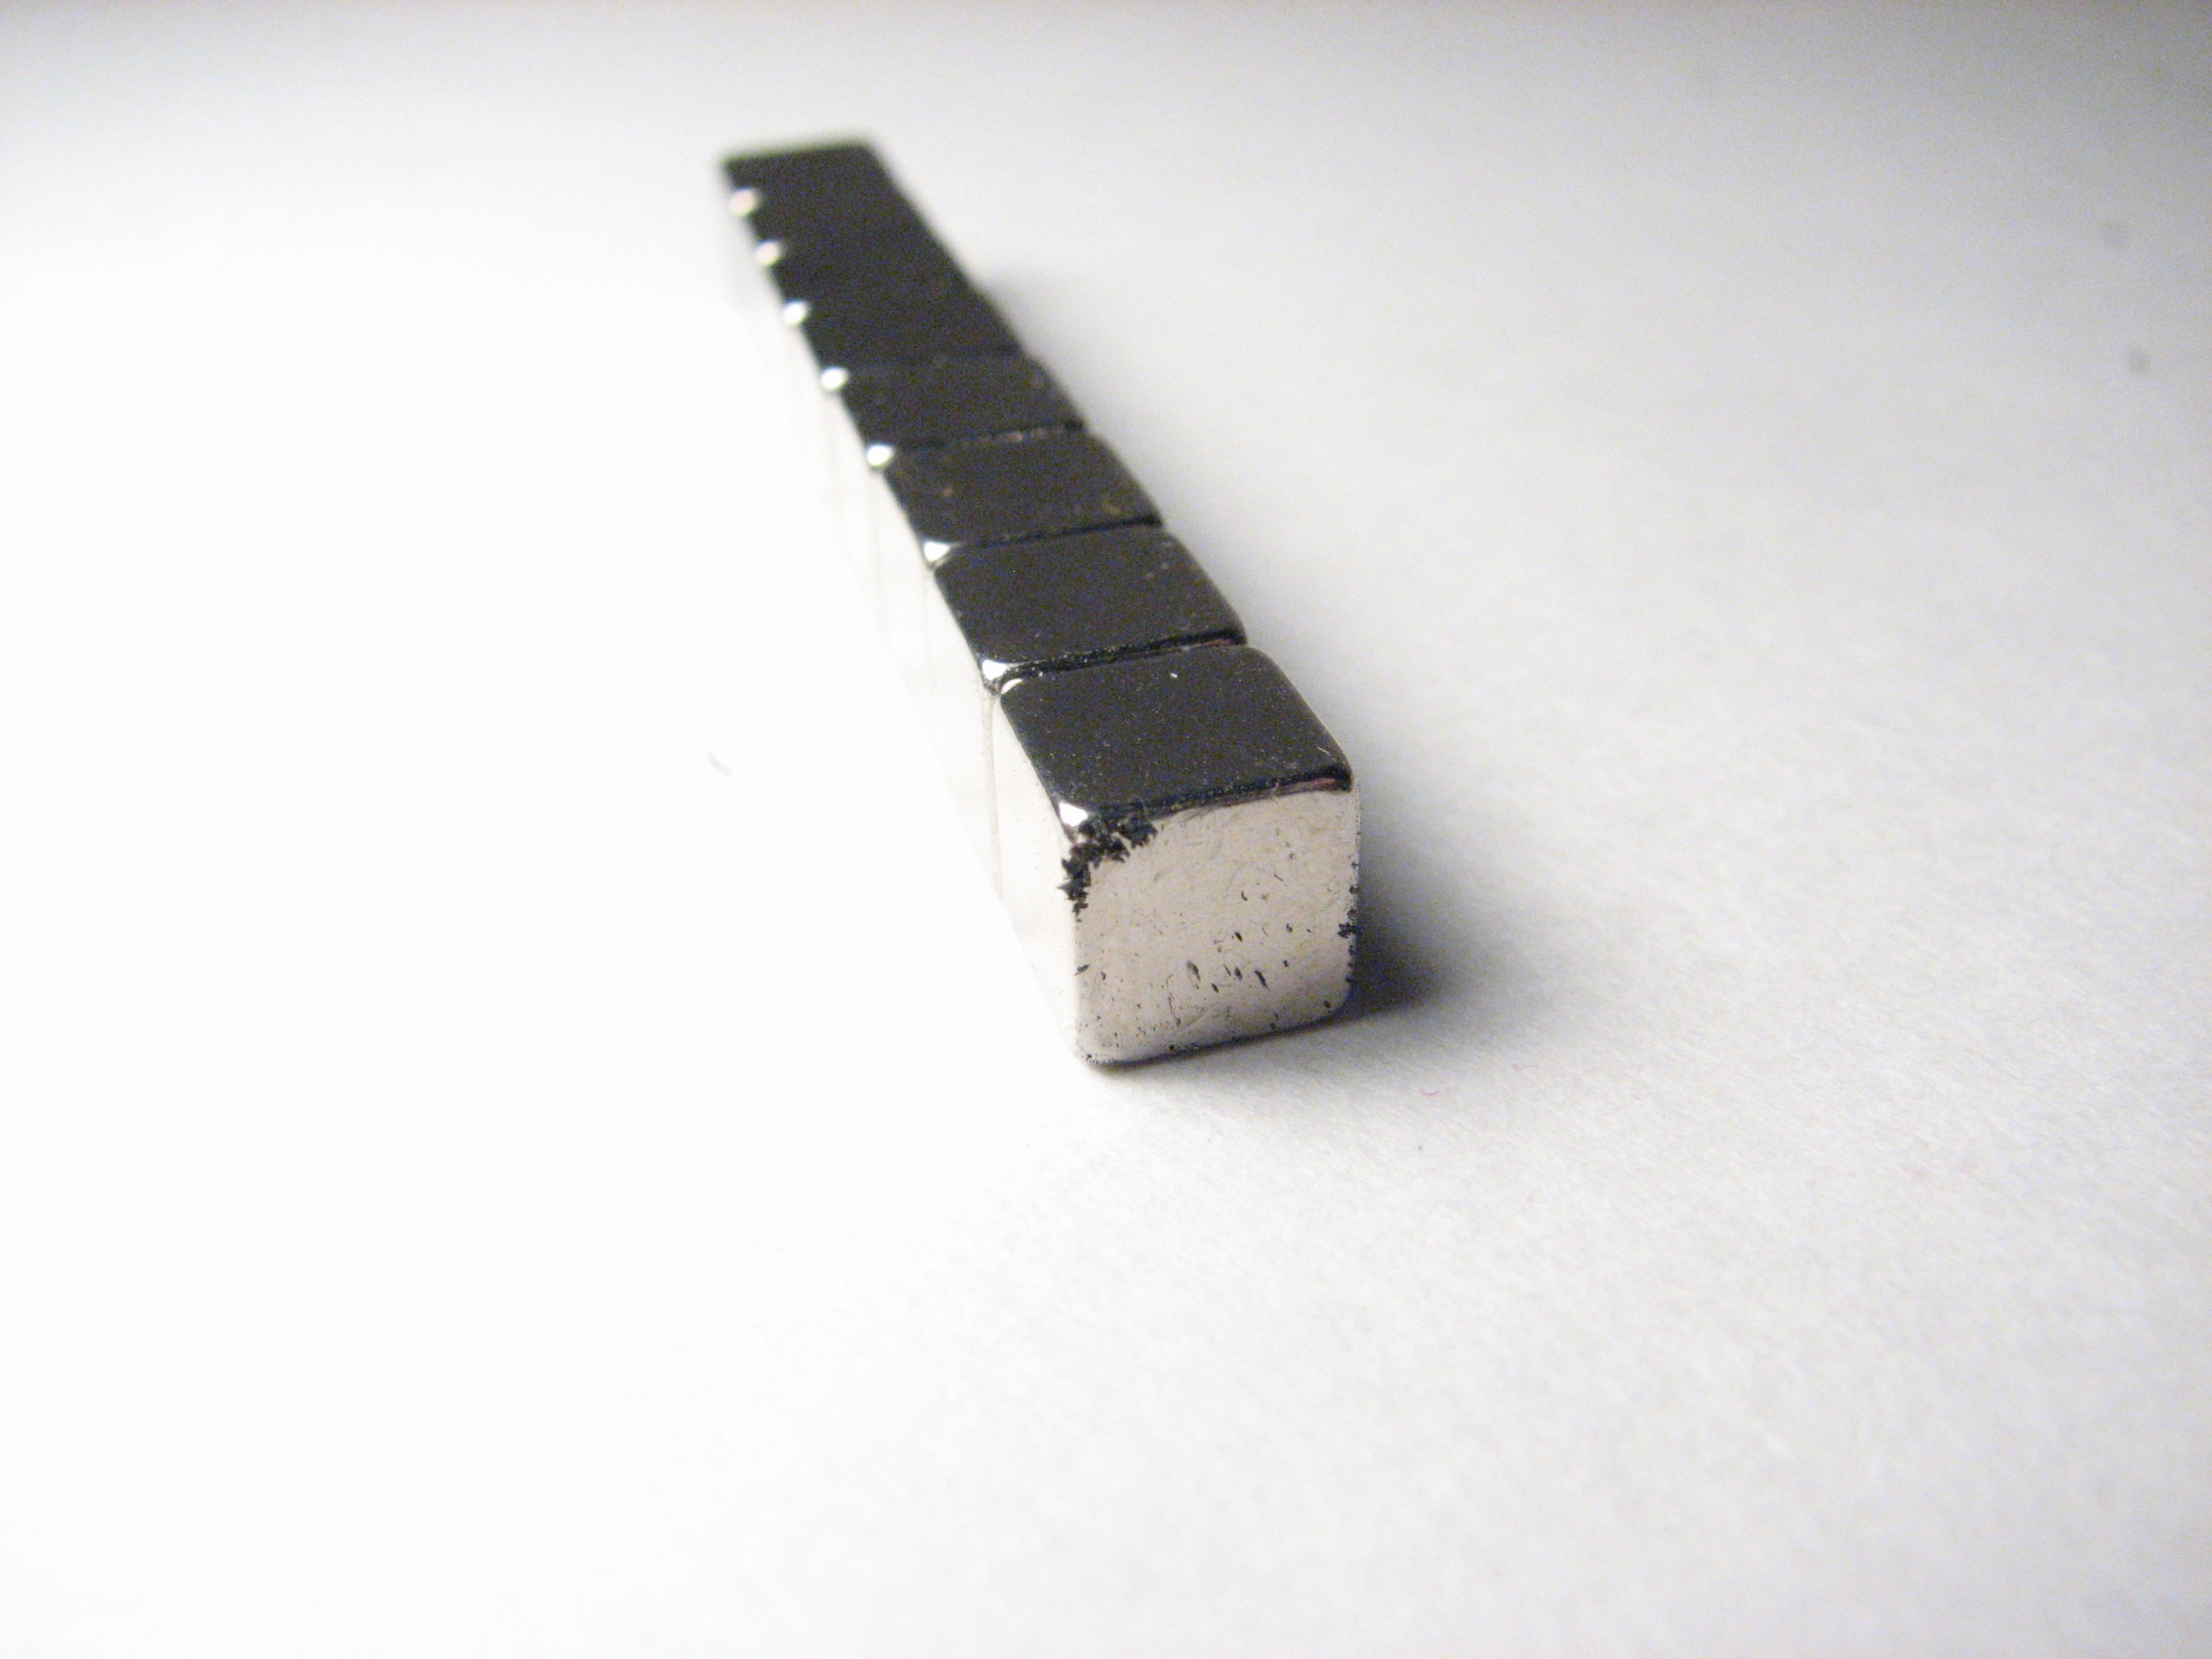
If you look closely, you’ll notice lateral stripes across the center of the magnet. That’s because we’re not using a single bar magnet under the paper, but instead the stack of strong magnet cubes shown in the next photo.
Pro tip for working with iron filings: do not let the filings touch the magnet directly. You’ll never get them off.

These pieces of zinc-plated iron wires are a fancy version of iron filings. They are dust free, won’t rust, and can be picked off of a magnet. You can get them here, but they cost about twenty times as much as the regular iron filings.
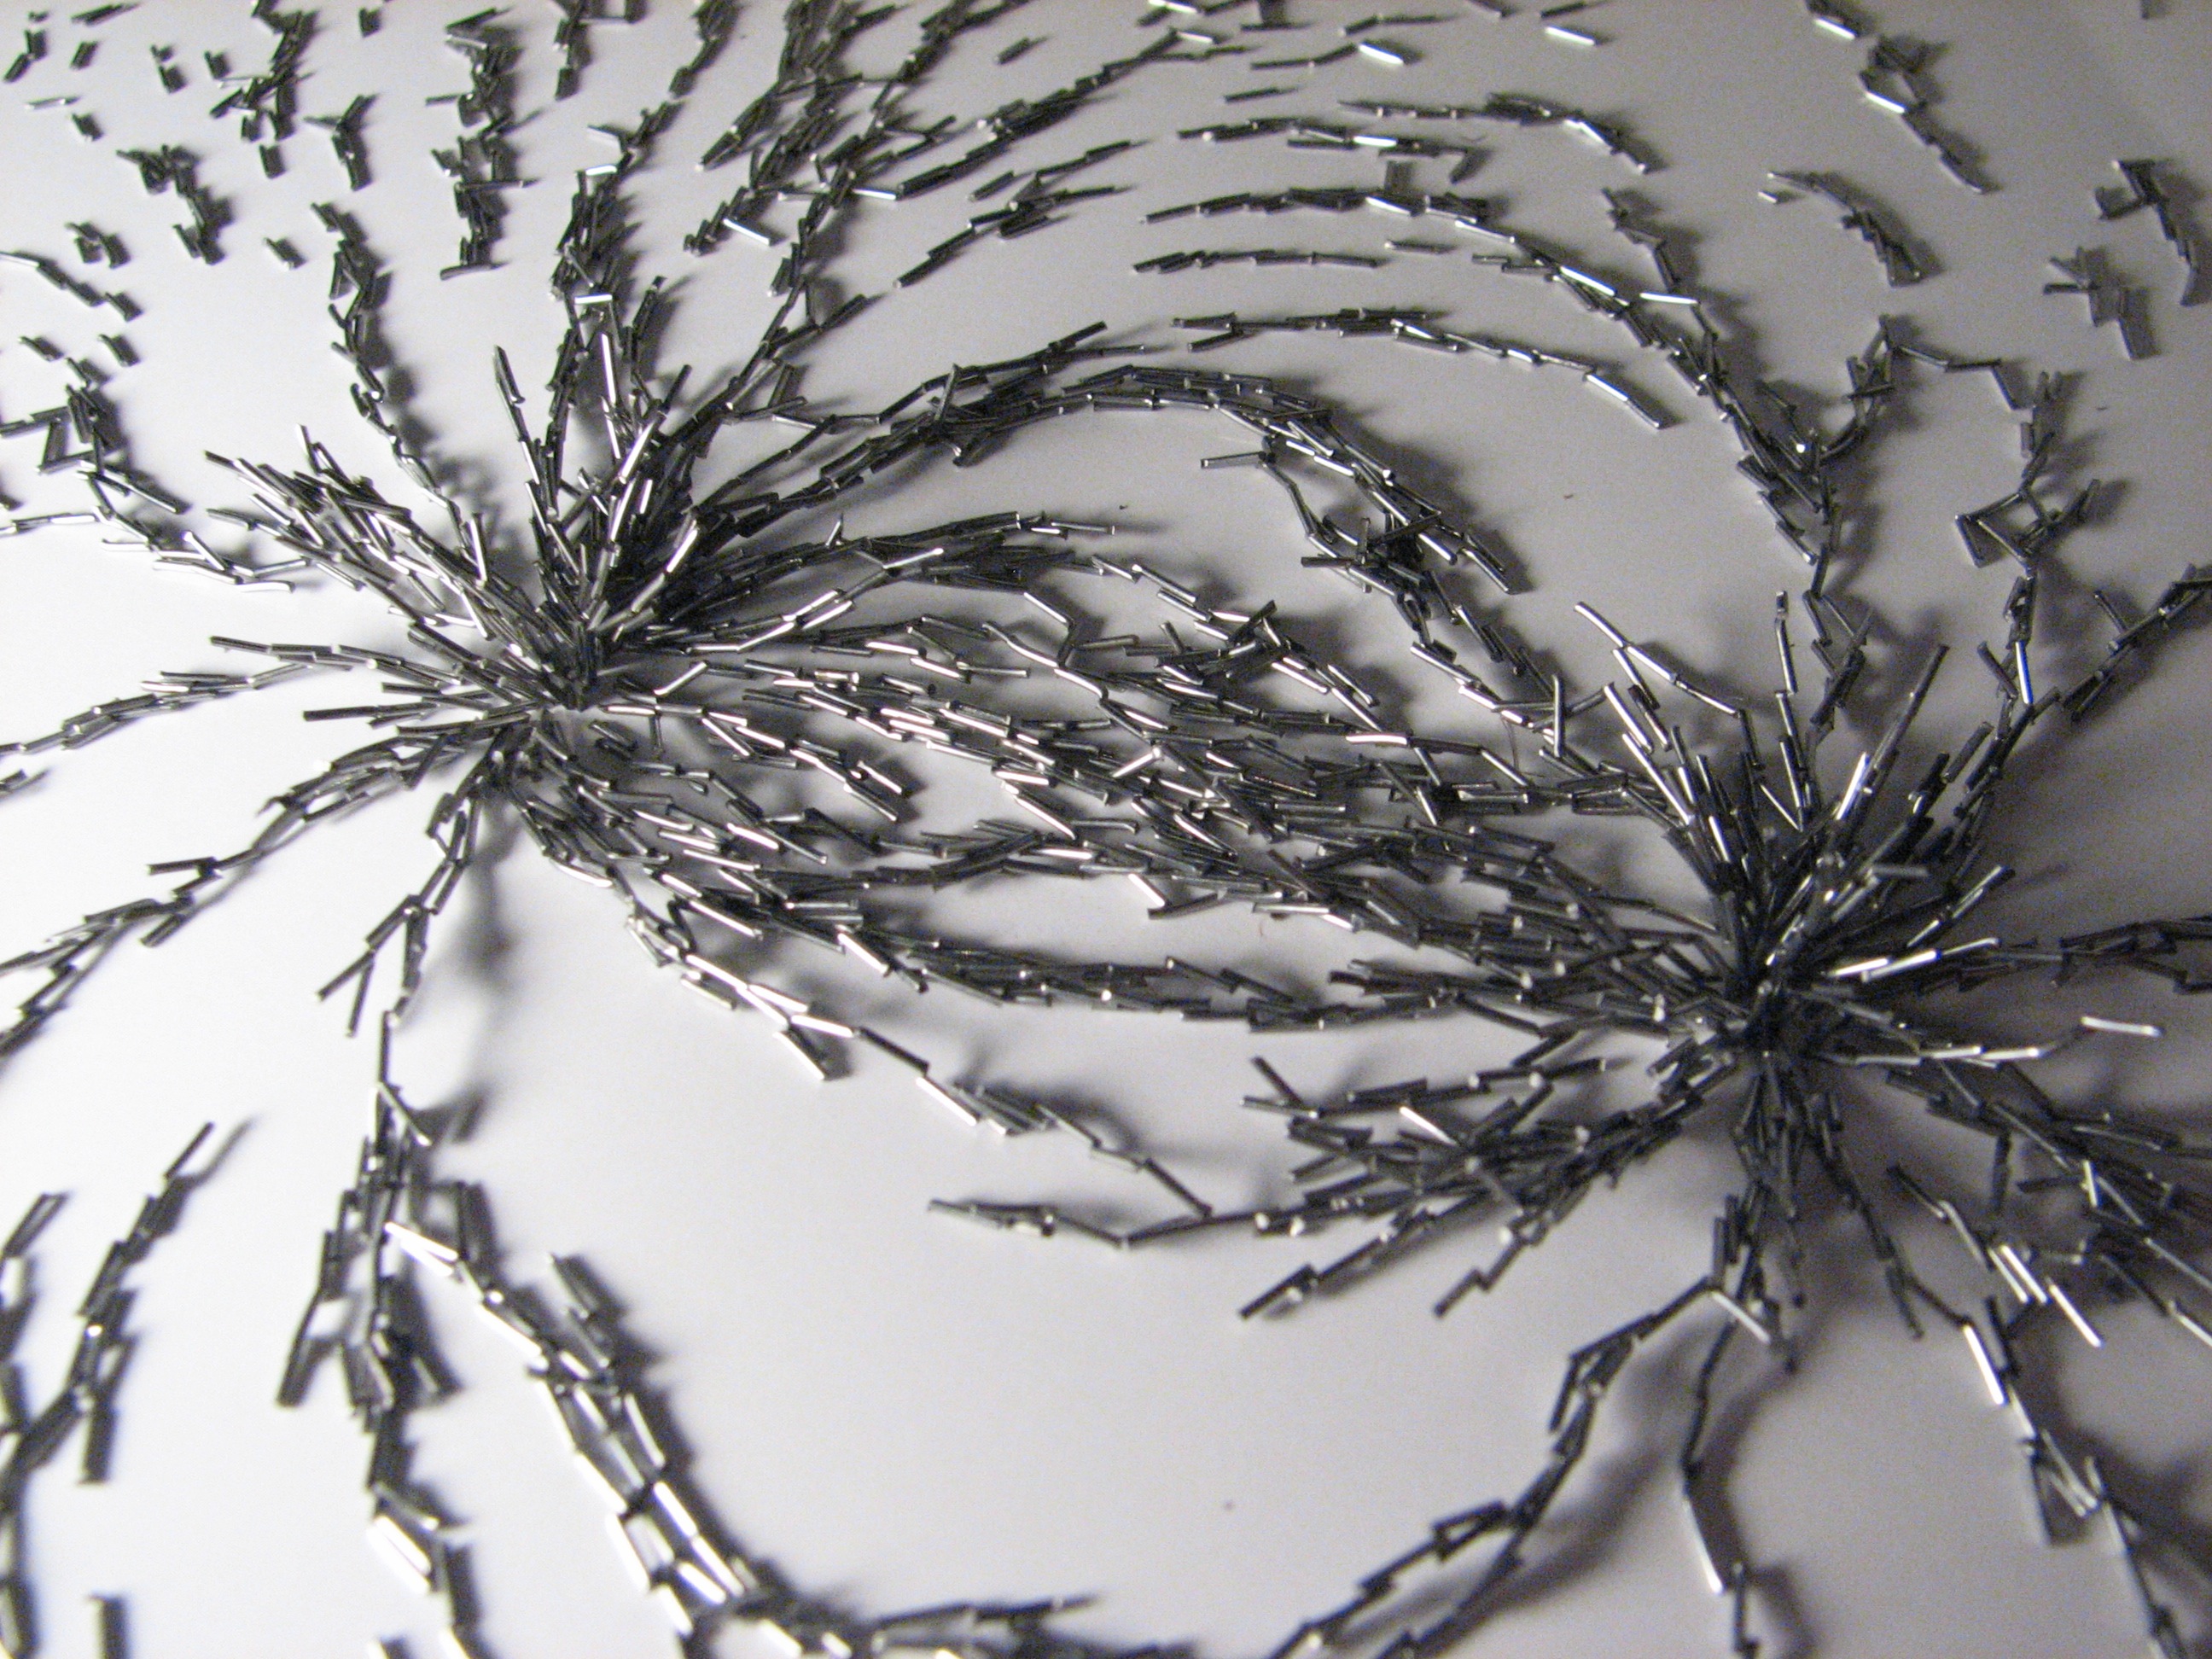
On the other hand, they make for a pretty good field display.
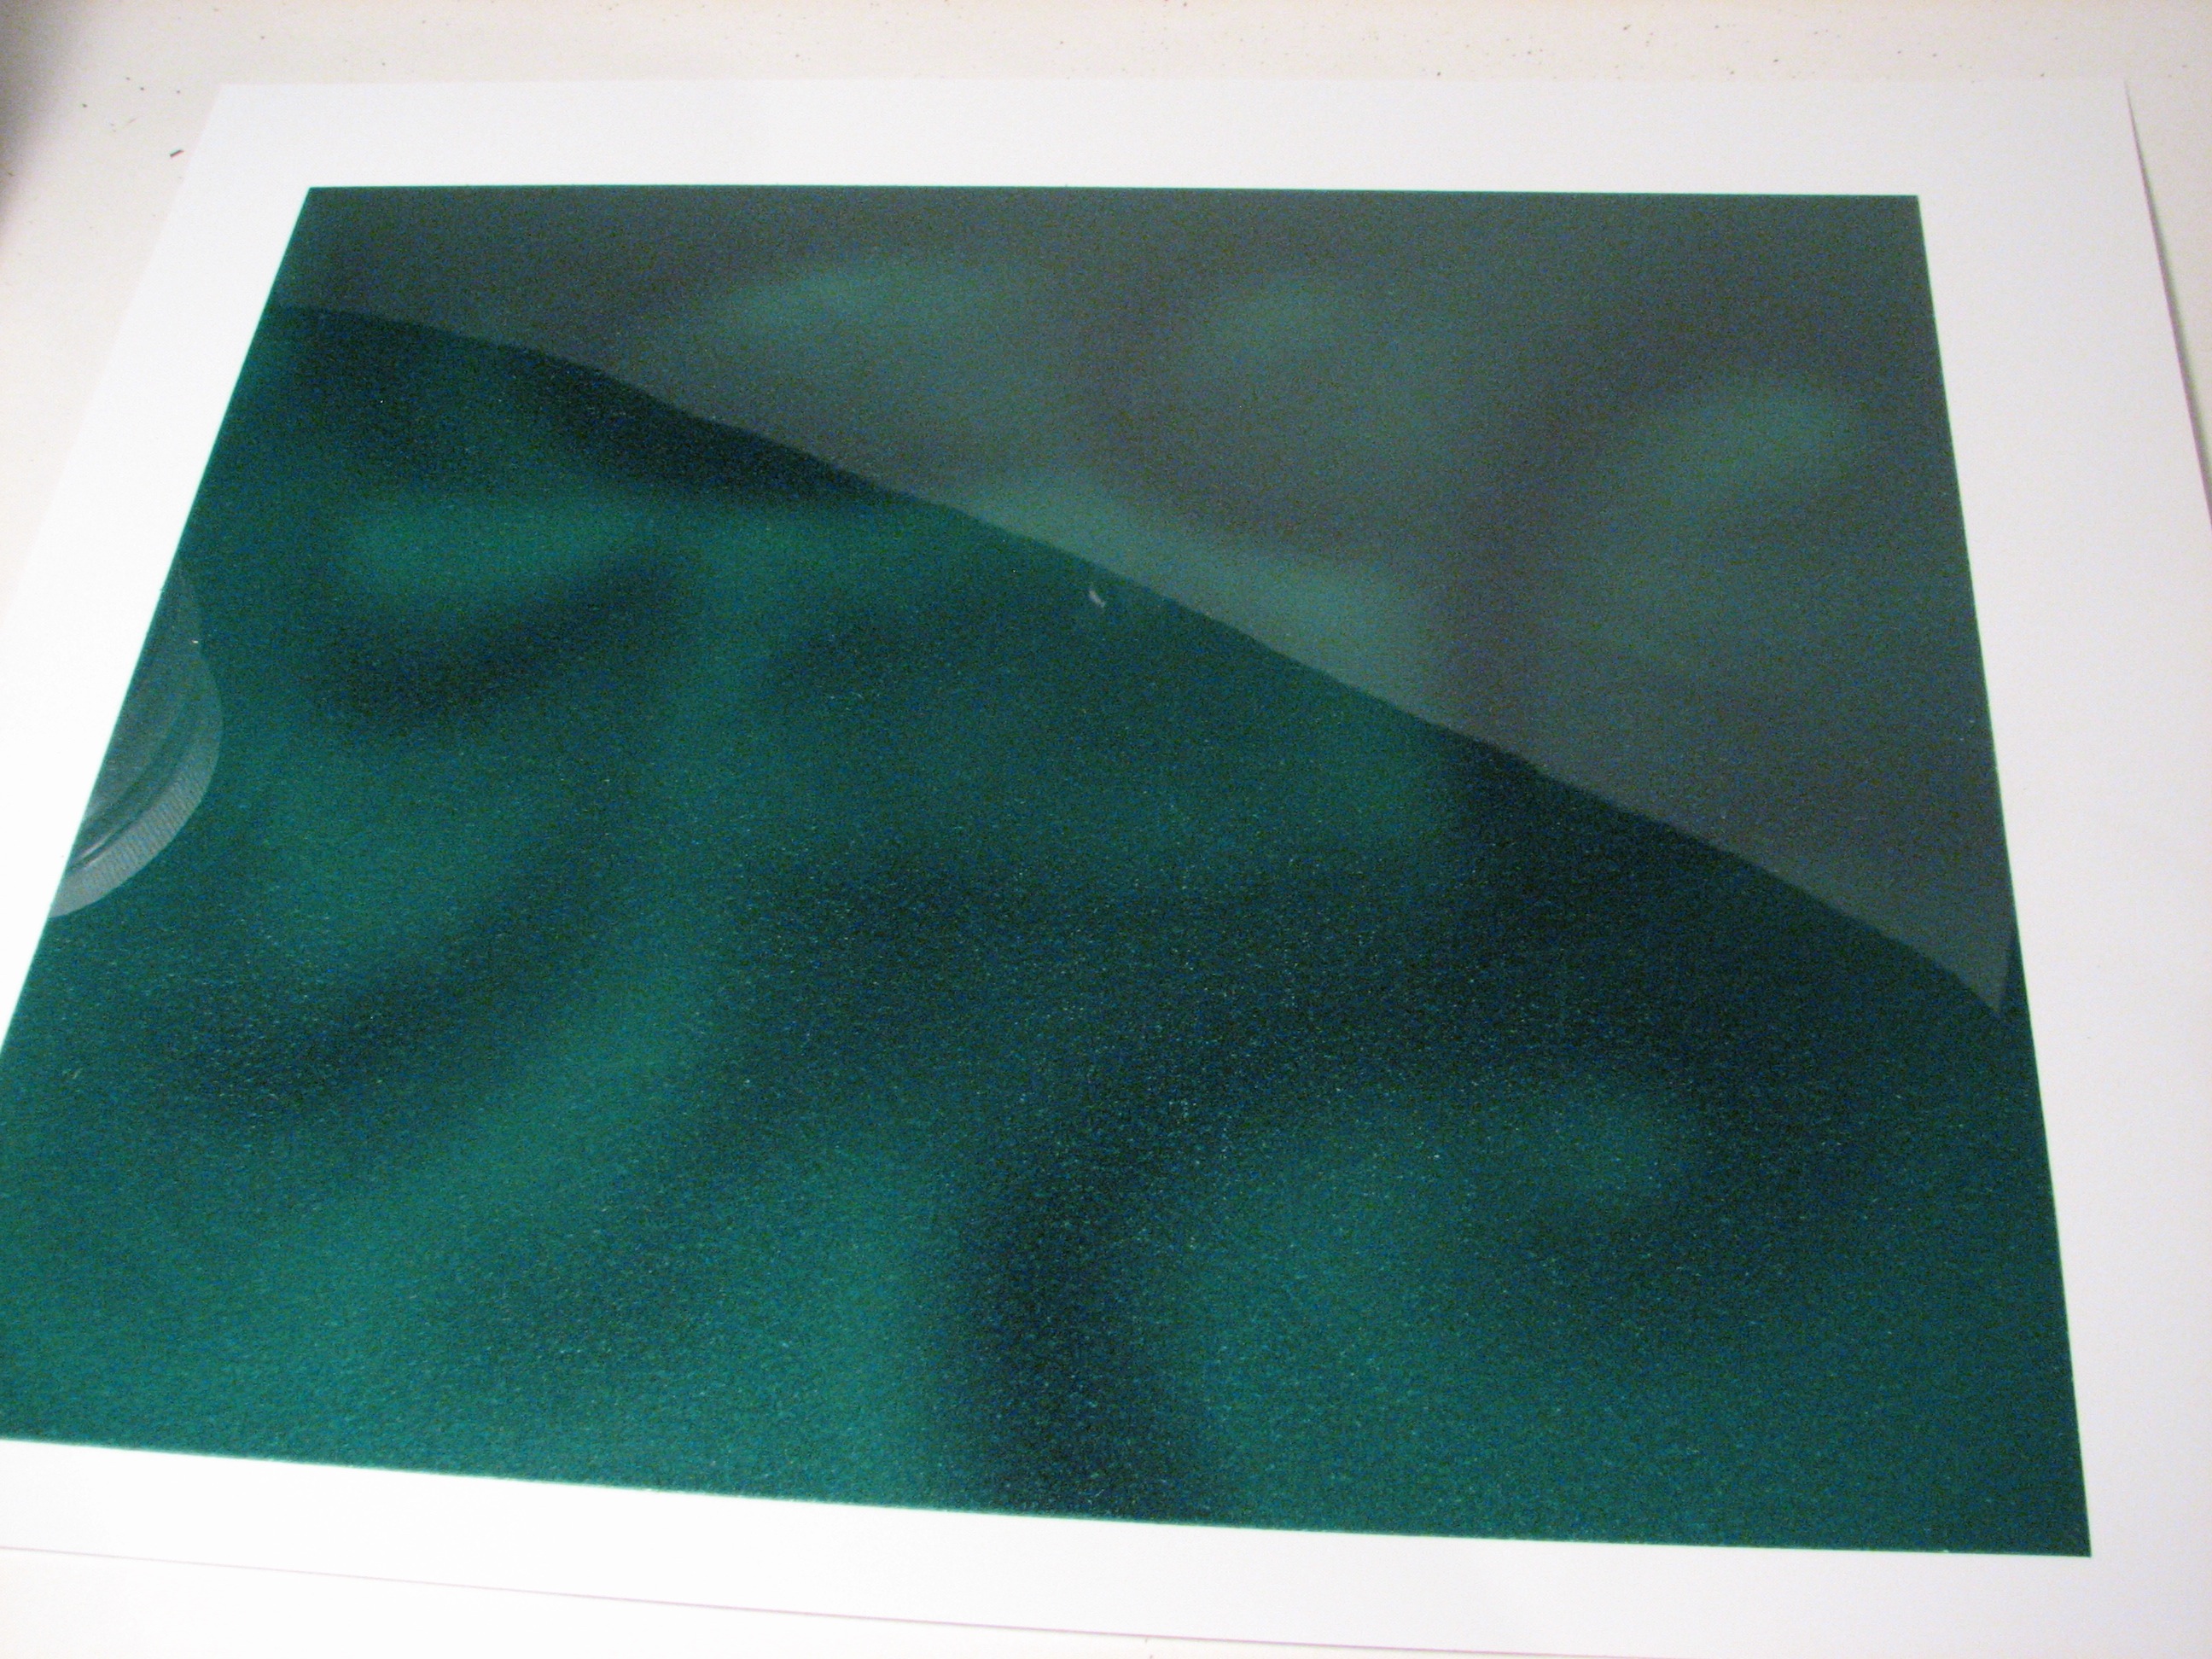
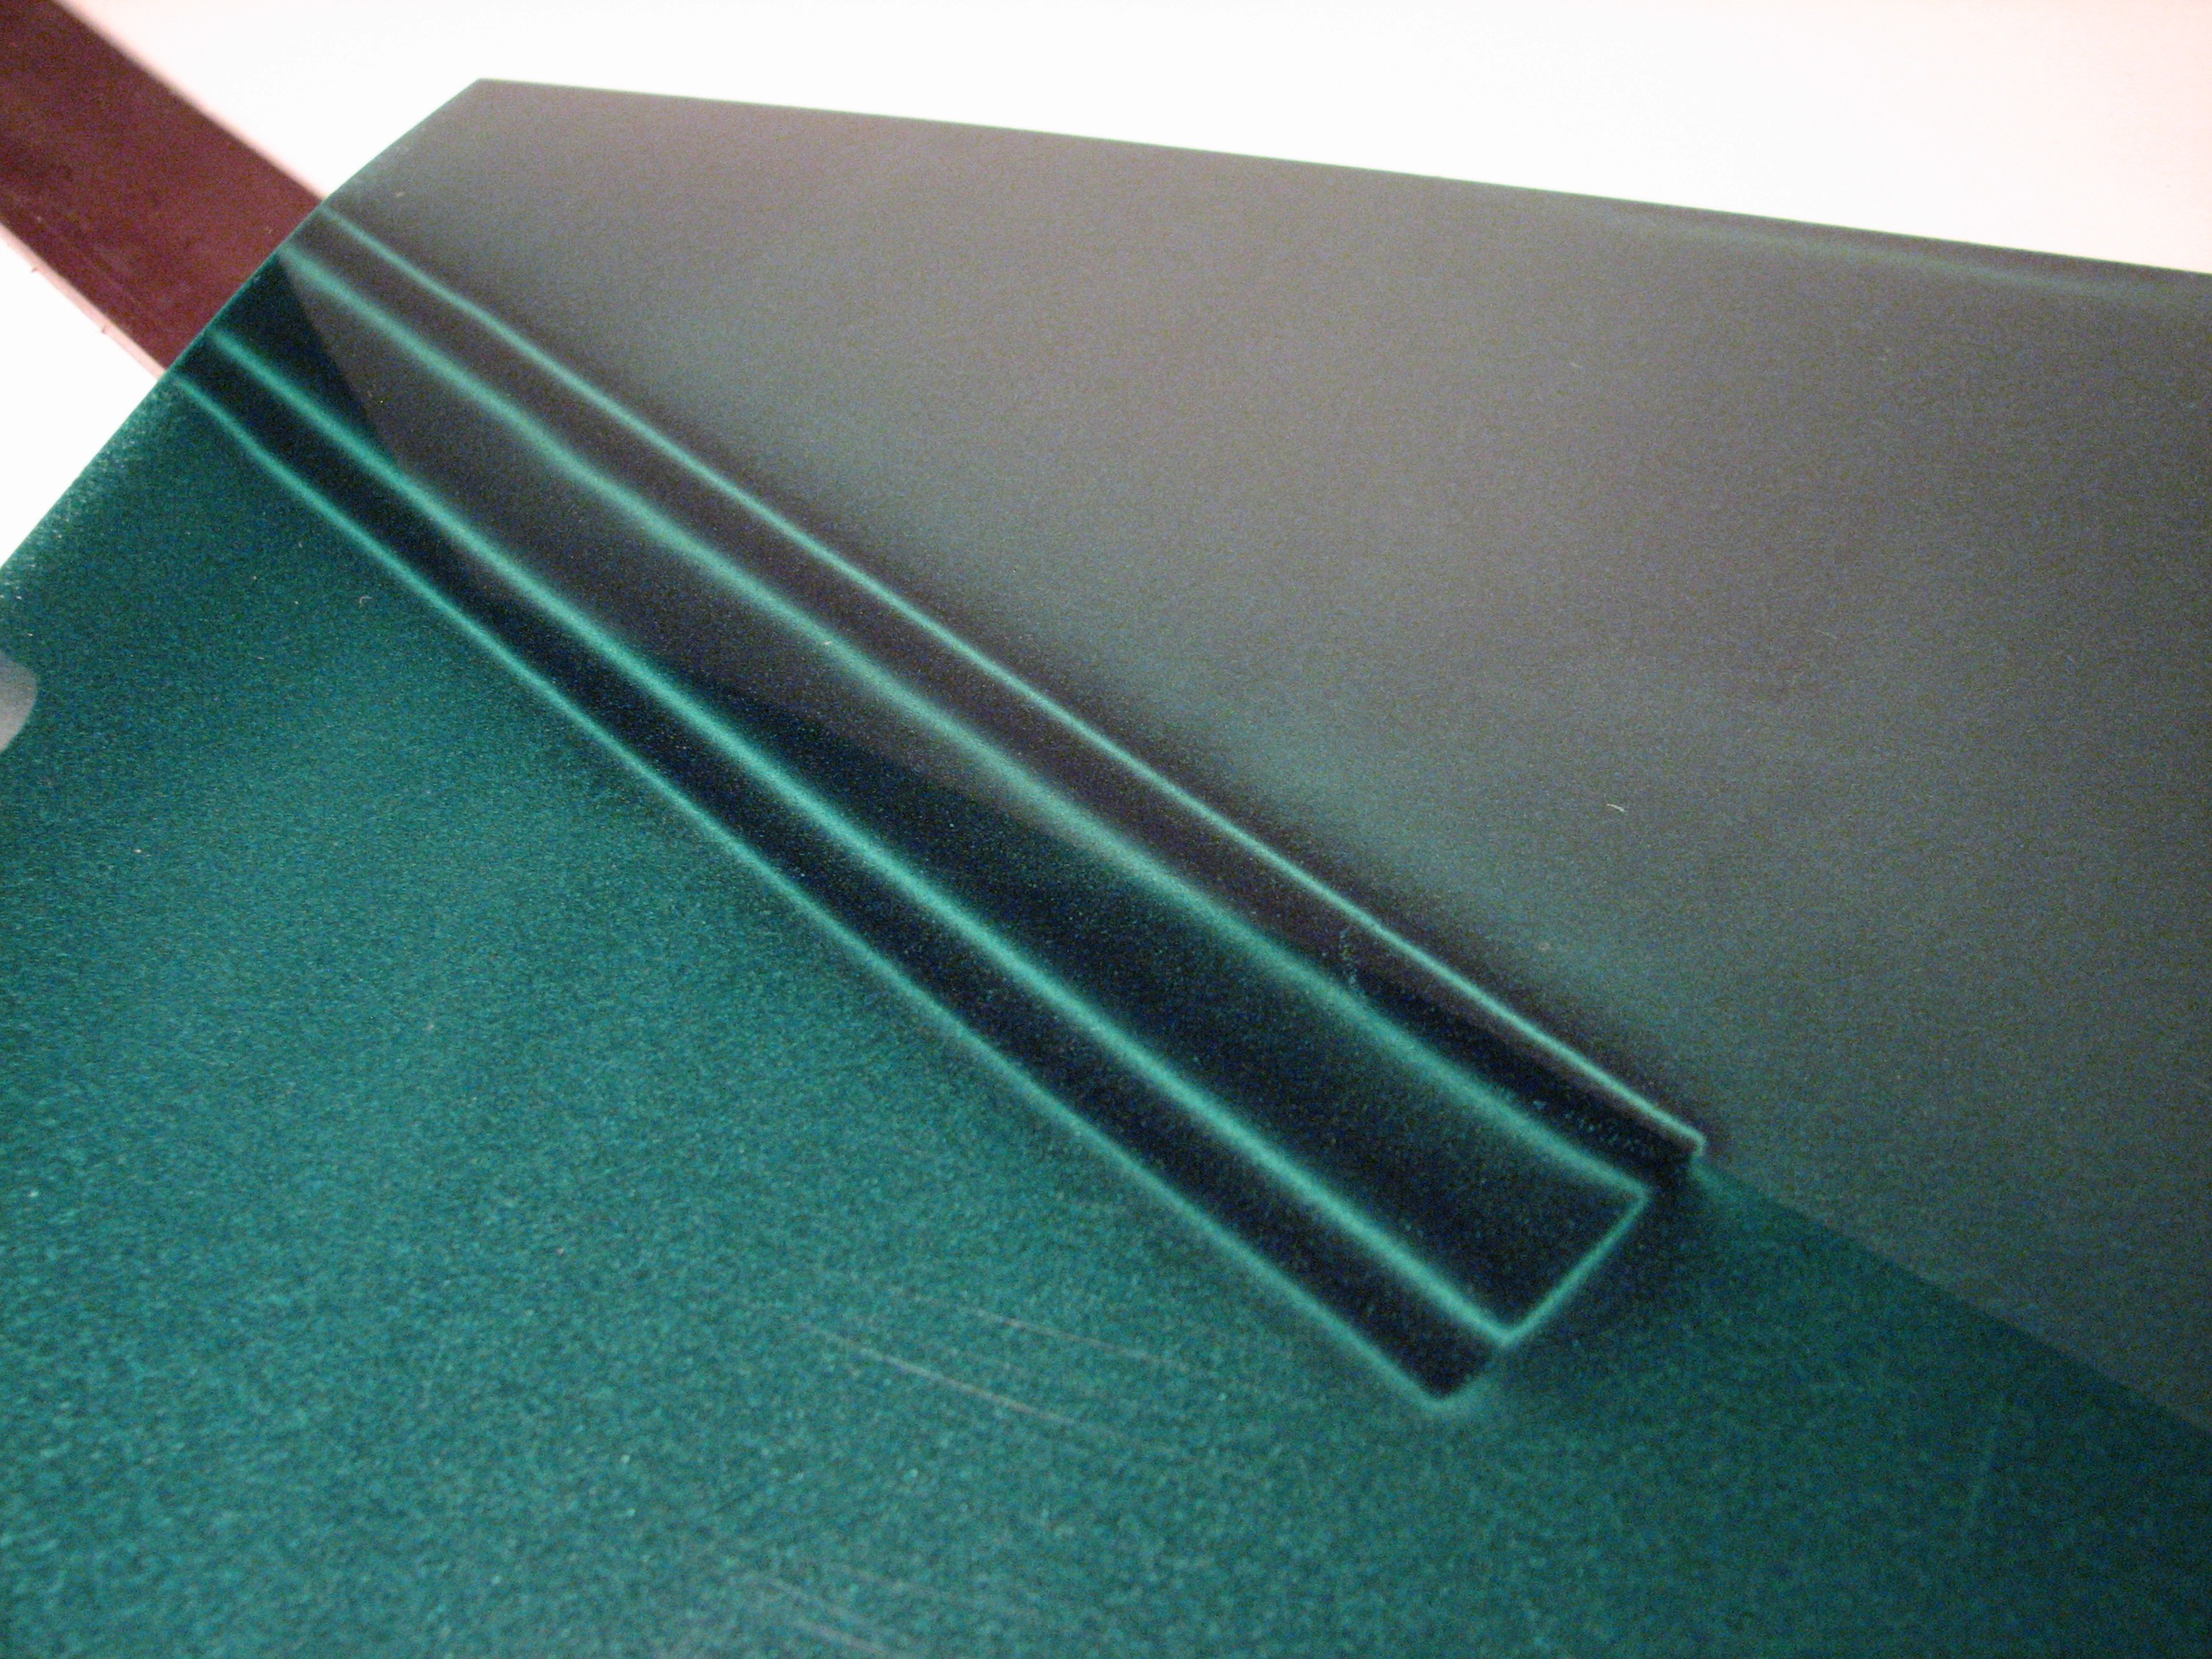
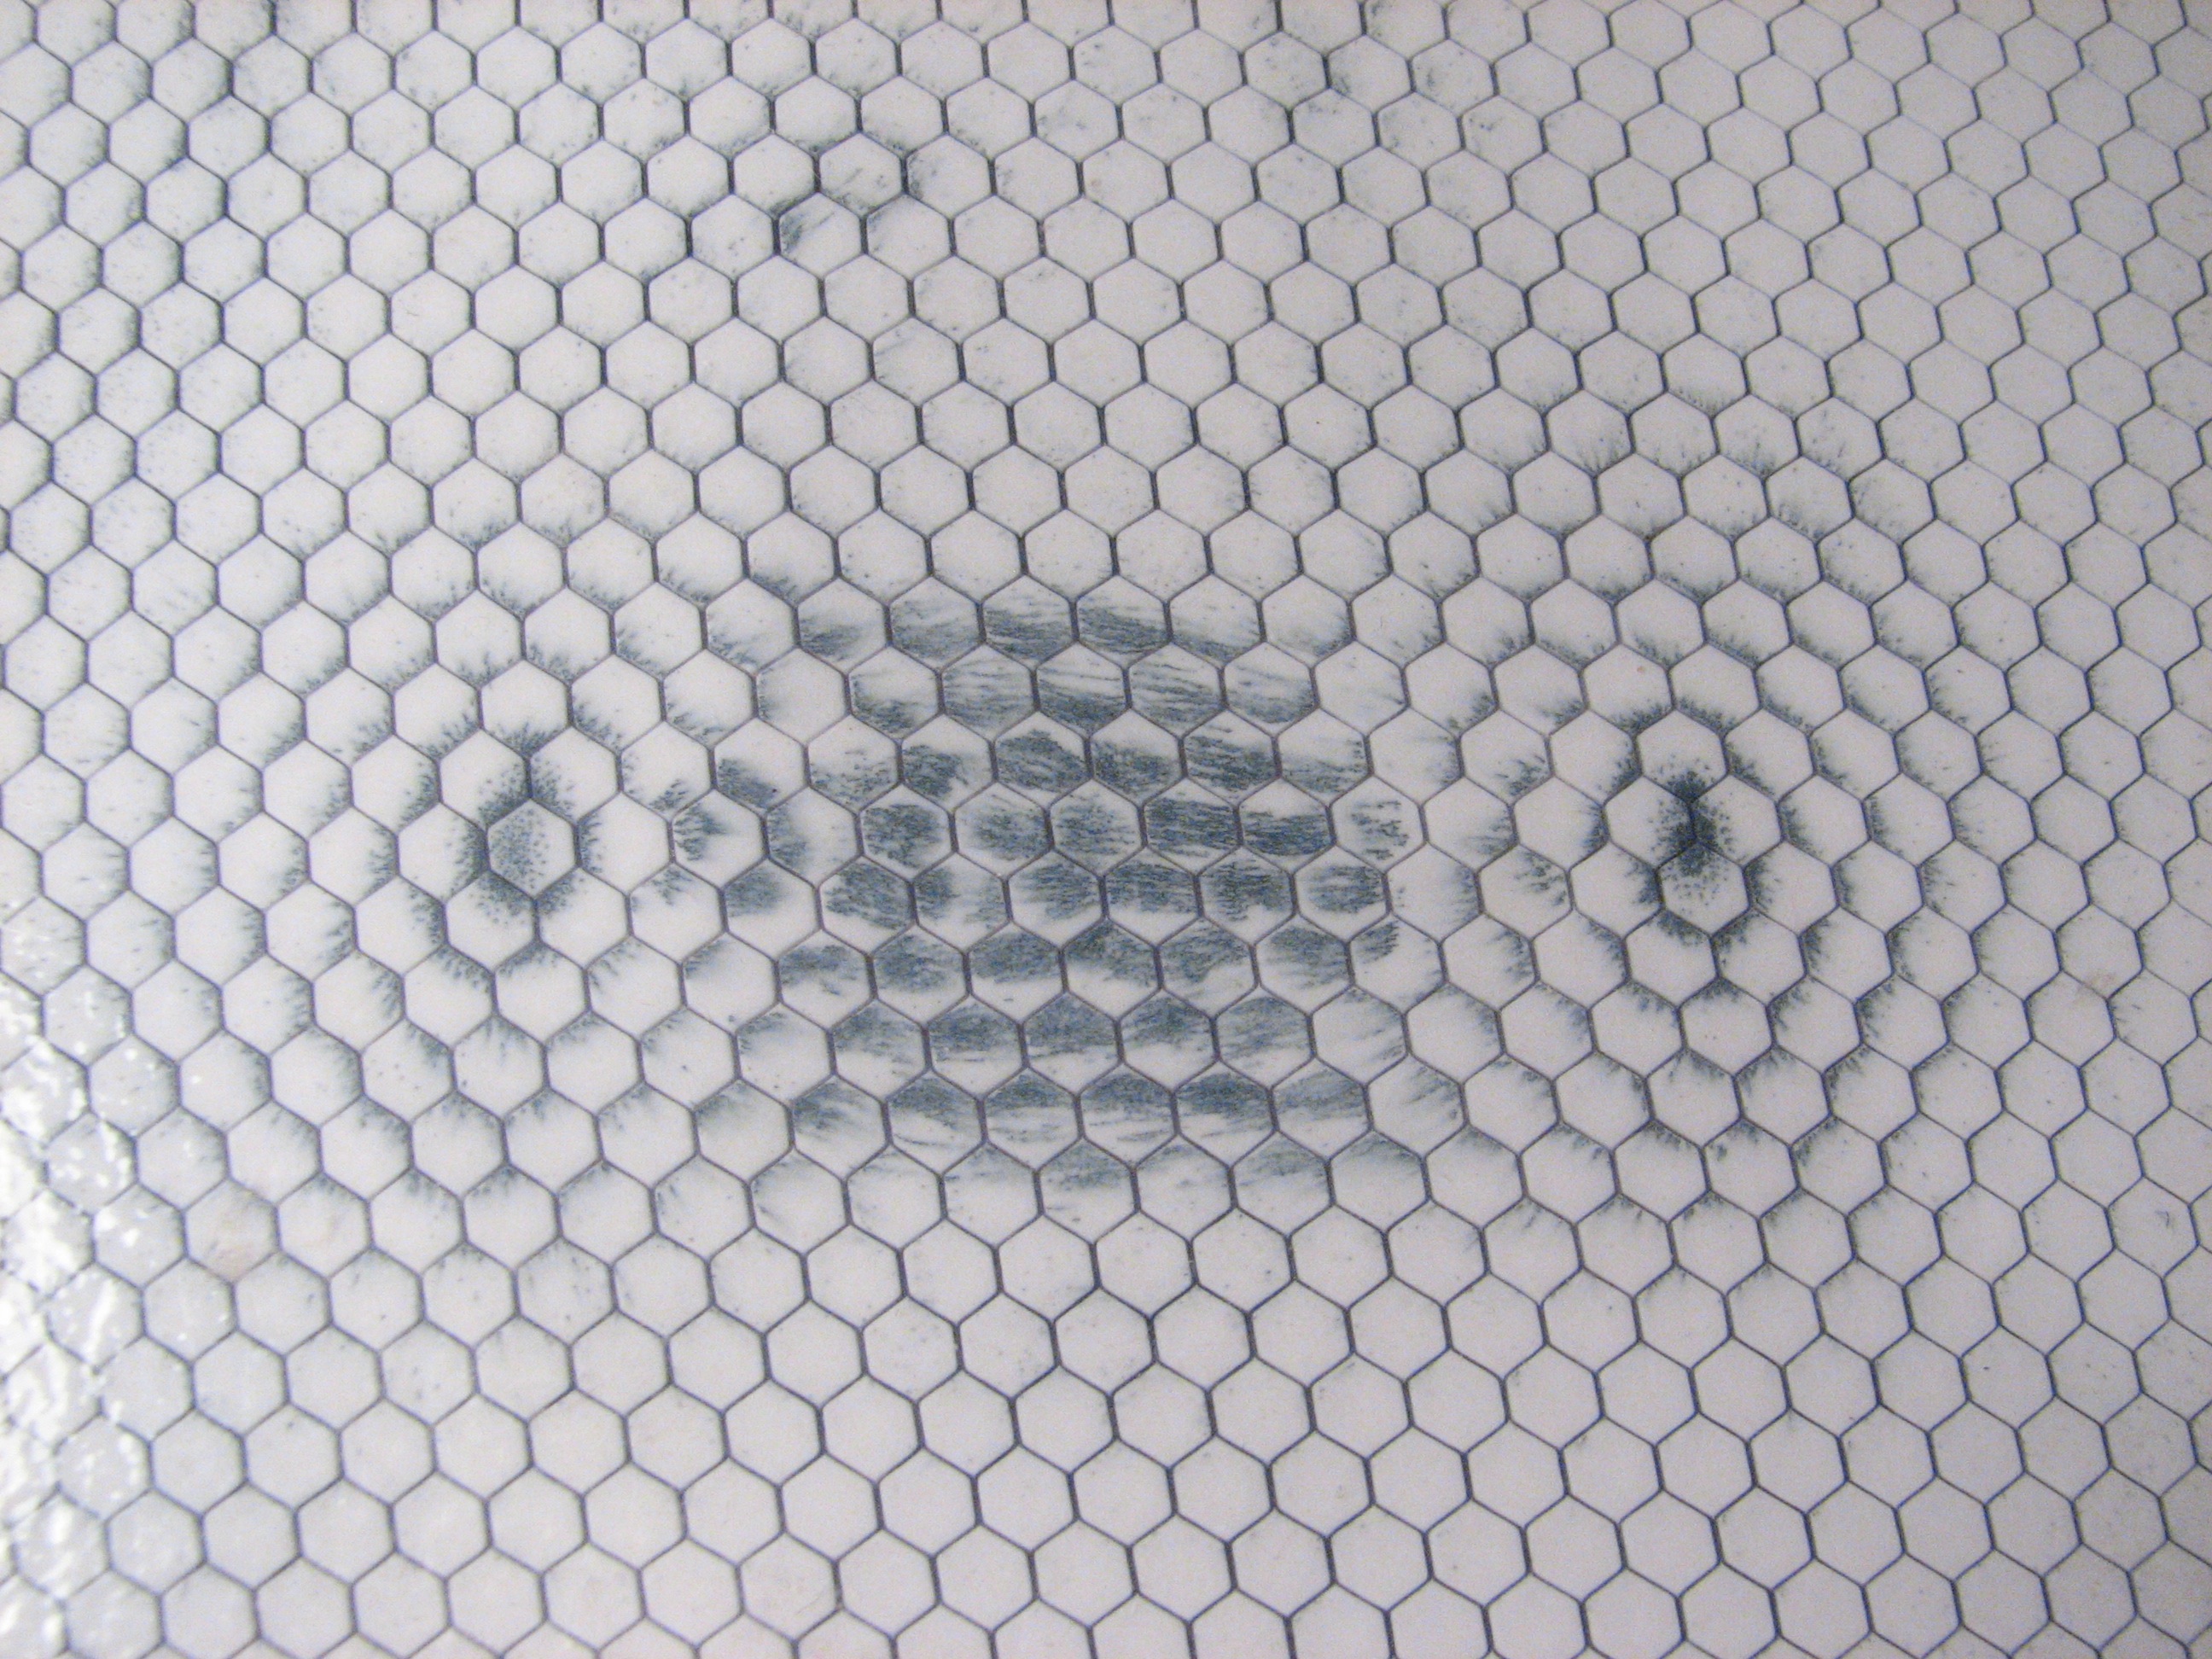
Another interesting way to look at magnetic fields is with magnetic field viewing film, ours is a piece 9 x 7 inches, from Arbor Scientific.
This material feels like a thin piece of semi-rigid plastic with paint on the back side. In practice it acts like a sheet of green bubble wrap that has ultra-fine bubbles filled with viscous fluid. Within the fluid,
there are shiny but microscopic magnetic rods. In the presence of a strong field the rods align to the field– much like our other examples. Near the poles of the magnet the film appears dark, as you view the rods end-on, and away from the poles, the film appears bright, as you view the shiny sides of the rods.
As the fluid is viscous, the particles do not align except to very strong magnetic fields, and tend to stay in place once the field is removed– the earth’s field (half a gauss or so) is nowhere near strong enough to affect it. You may be able to see whorls in the photo above, from when a magnet was waved over the surface to “erase” the image.
Pro-tip for using magnetic field viewing film: don’t scratch the back side or pinch it between two magnets– the “bubbles” will pop, and you’ll end up with dead spots on your film.
Here’s what the film looks like over the same magnet stack that we used for the iron filings. The contrast is remarkable. While it’s easy to see the lateral bars in the middle between the little cube magnets, it’s all but impossible to see the overall shape of the magnetic field that was revealed by the iron filings. The only hint of it is the dark region by each pole, corresponding to where the iron filings were also sticking up, out of the plane.
Again, this is because of the viscous nature of the material; it can only respond to very strong, local fields like those by the poles.
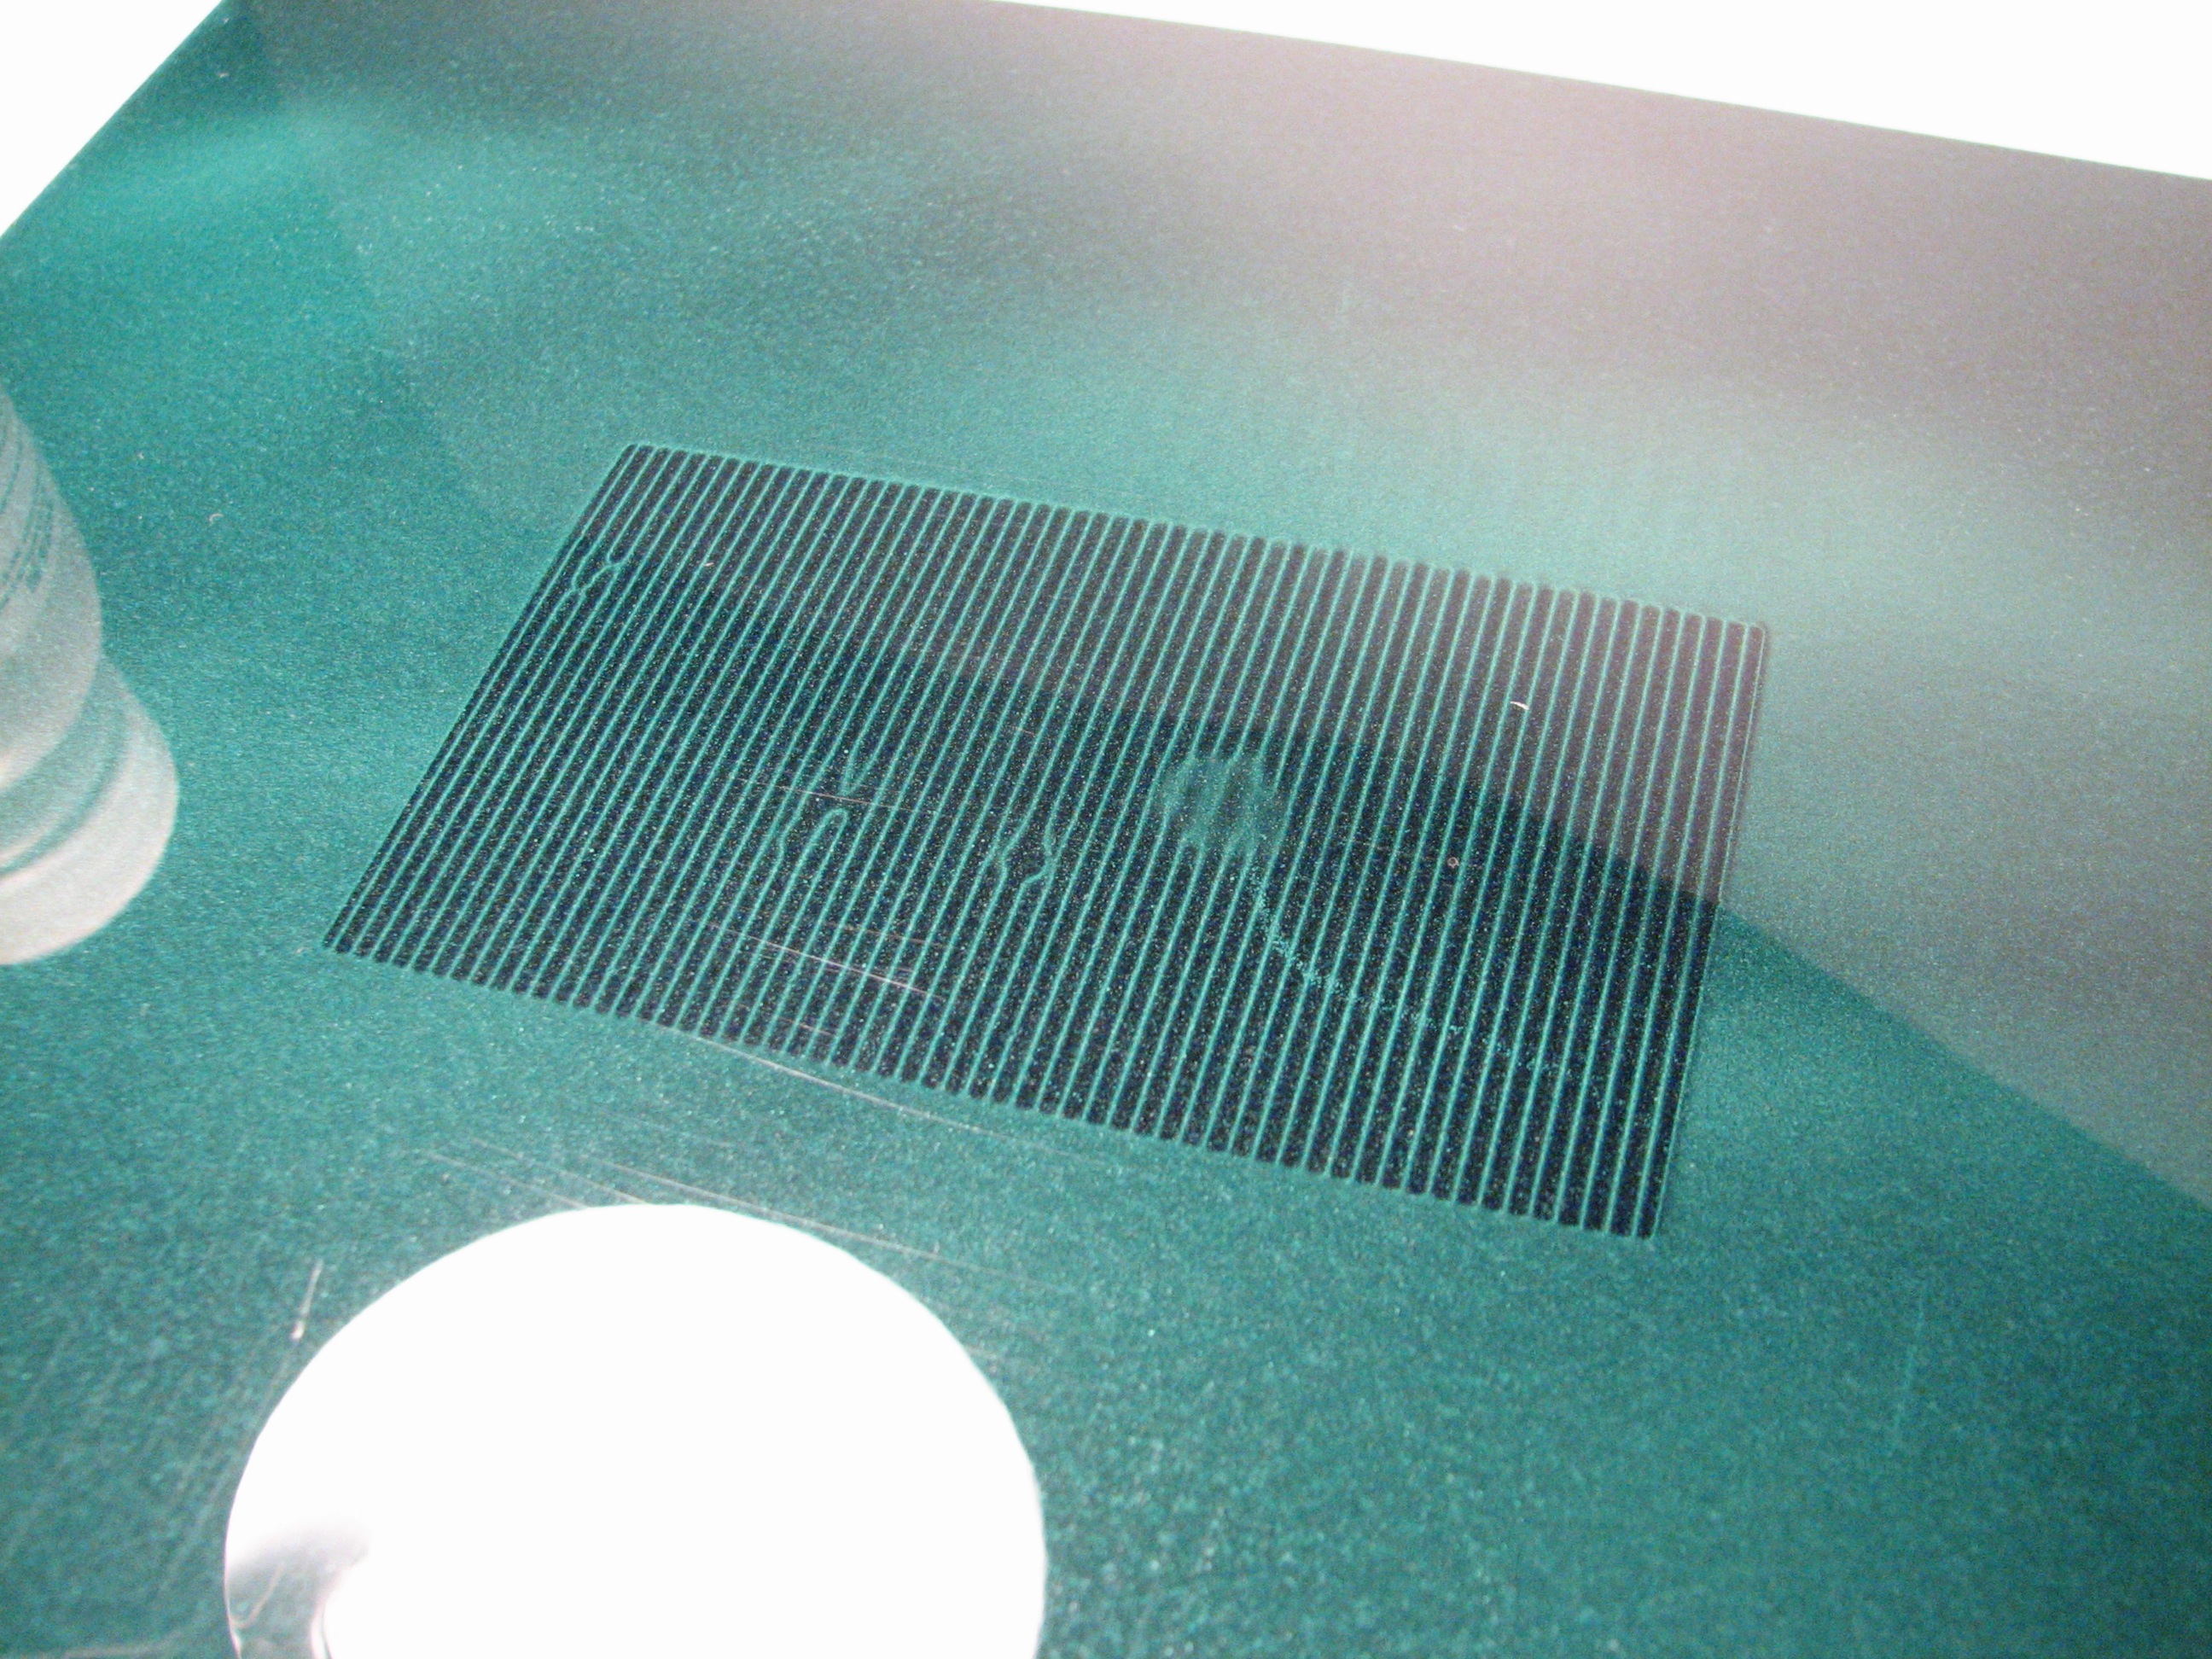
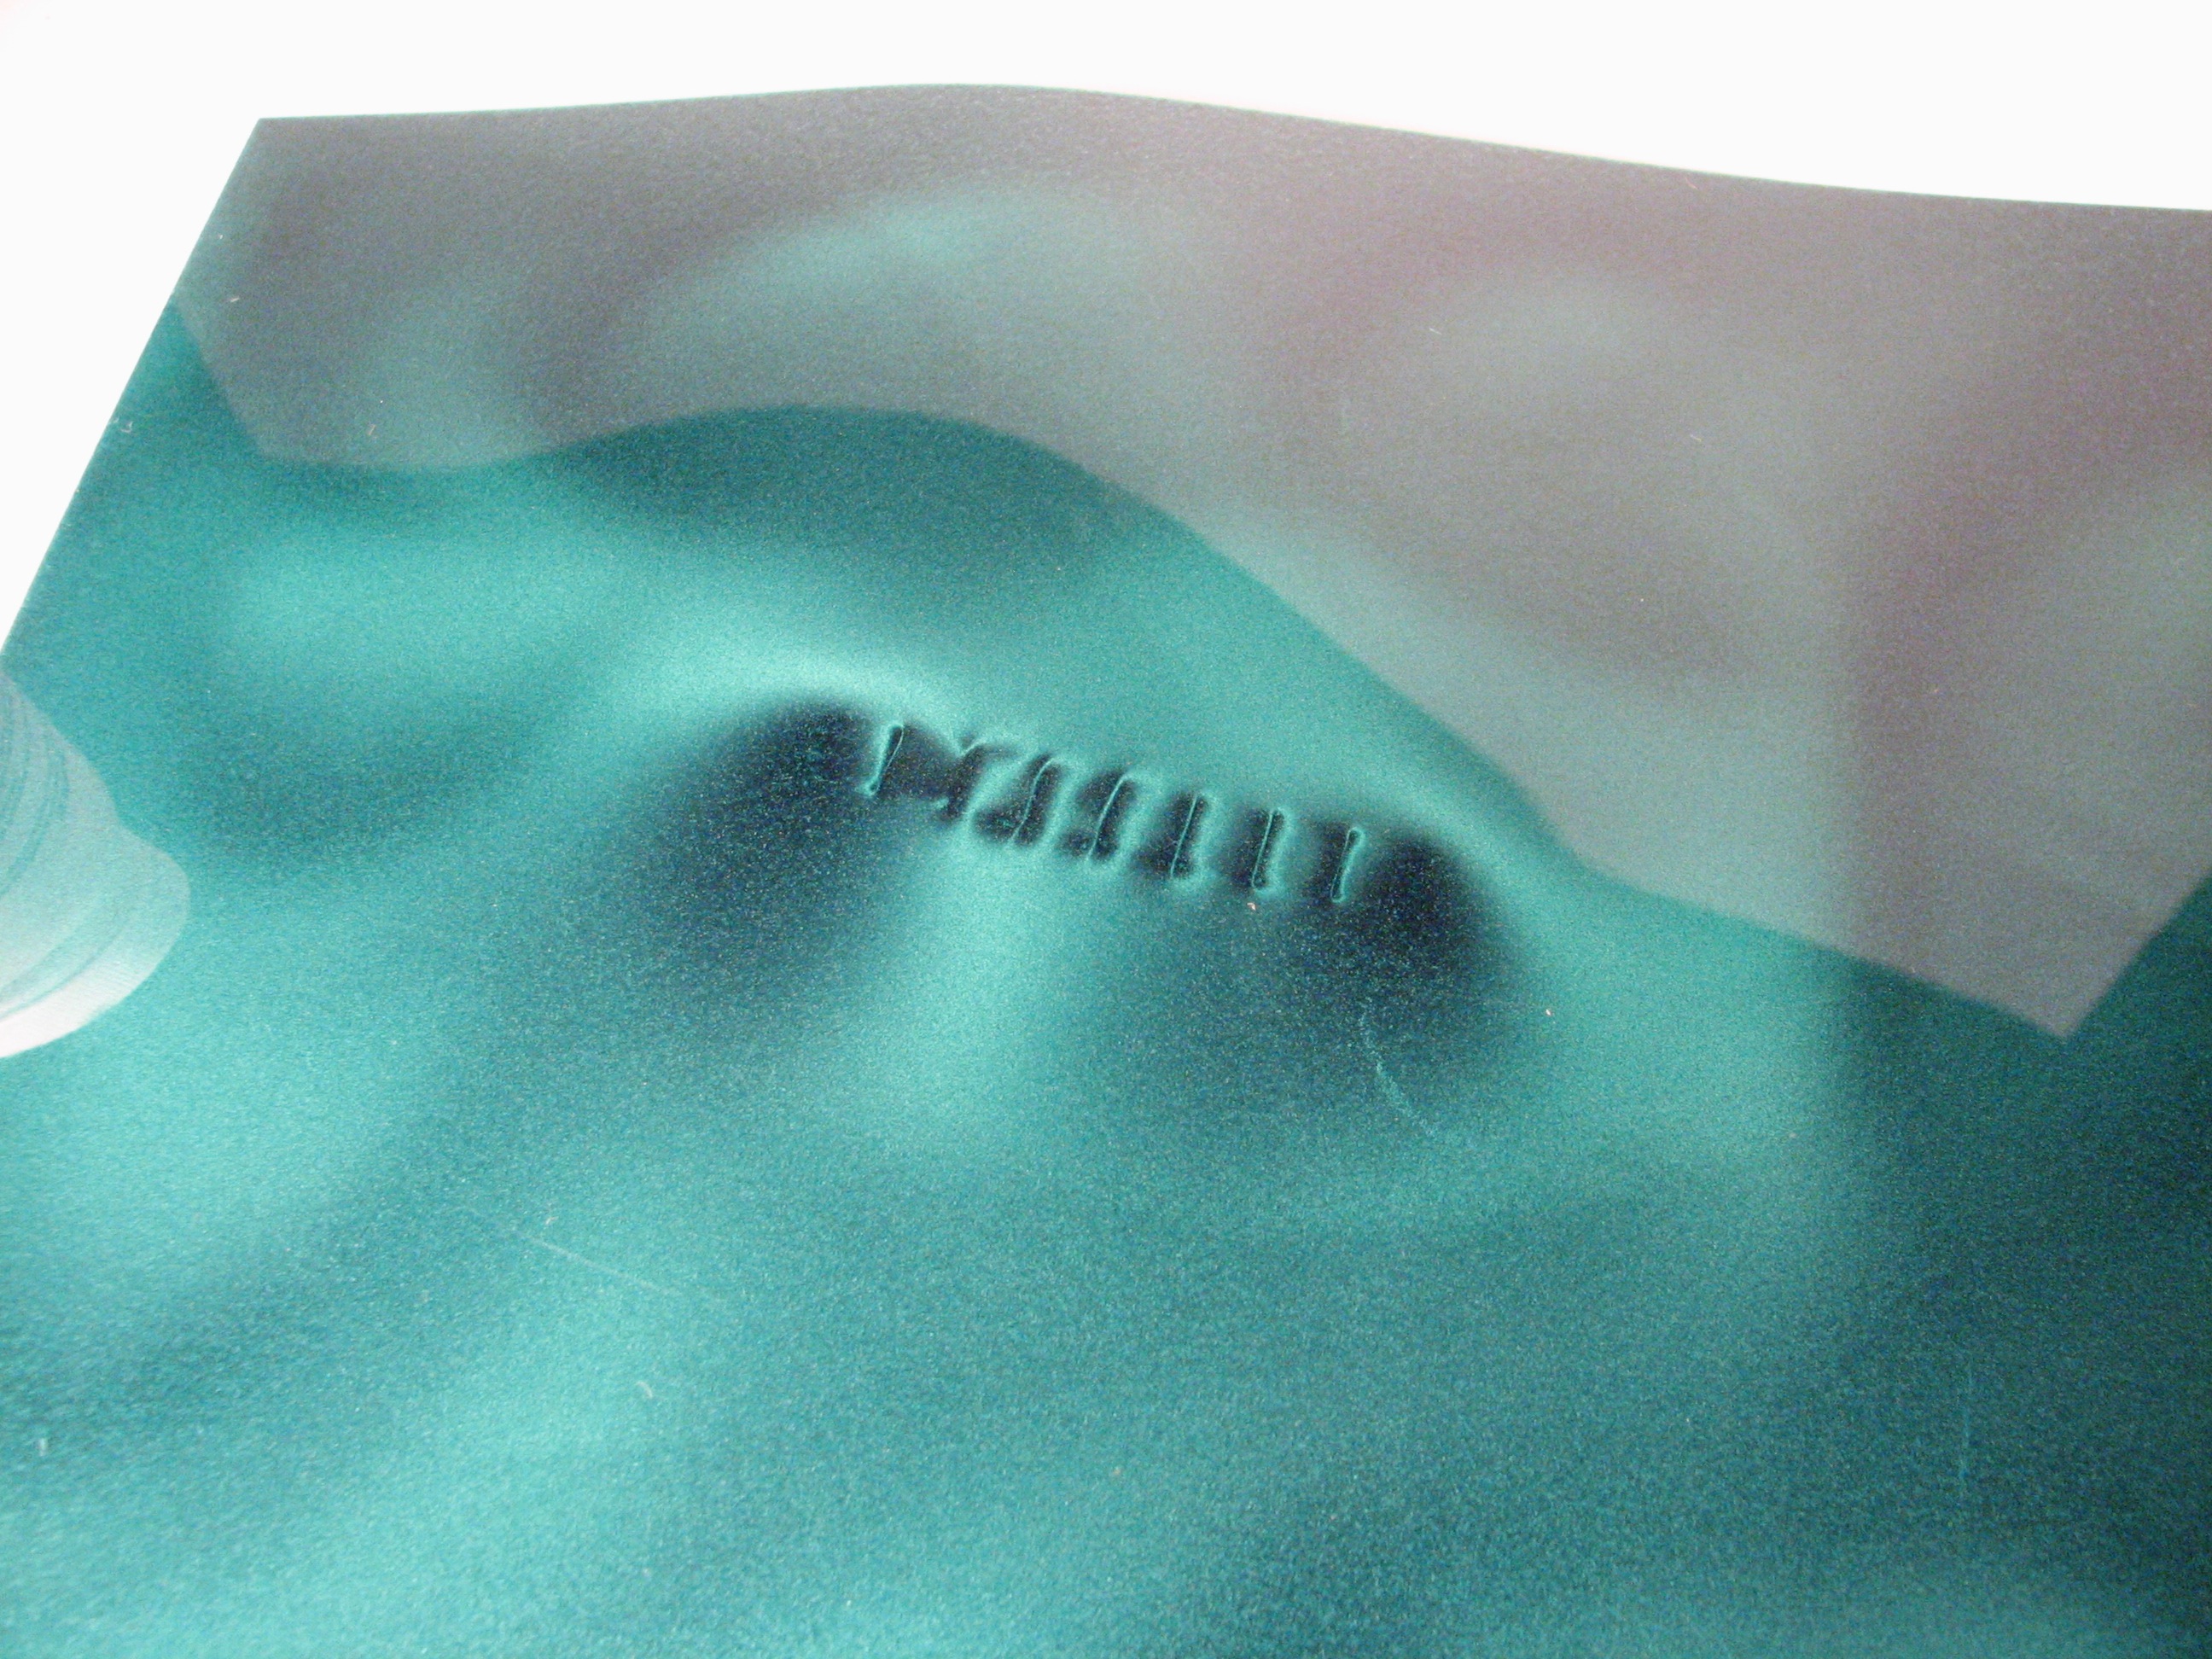
There are certain places where viewing film really does well– which are those with complex magnetic pole geometry. Consider a simple rubberized refrigerator magnet— the kind that appears as a business card that you stick on the fridge. Rather than using strong magnets to support the weight, they use a more complex field geometry, with lots of poles, to concentrate the field right by the magnet surface– as you can see above.
For reference, here’s how that same magnet looks under iron filings:

If magnetic viewing film seems obscure and technical, there’s an inexpensive alternative that’s surprisingly common: the Magna-Doodle, or Doodle Pro, as they seem to be labeled these days. You certainly won’t get the same level of performance out of it, but it’s an interesting toy once you approach it this way.
We first talked about the Magna Doodle several years ago in an article about using it as part of a pen plotter. It’s like the magnetic viewing film in the sense that it has chambers of viscous fluid and ferromagnetic particles. However, the particles and chambers in the Magna Doodle are macroscopic and you can see them. In that way, it’s much like a cross between the magnet viewing film and the iron filings.

Placing our magnet stack on the Magna Doodle screen and removing it, you can see the field lines show up, and even tell which set is “edge on” by the arrangement of the iron particles. (You may want to view that last picture extra large to see that in detail.)
(If you have access to the back side of the Magna Doodle screen, you might also see some interesting stuff there.)

We now head in a radically different direction: using an electronic compass to visualize magnetic fields with the help of a computer. The tiny circuit board shown here is a breakout board for the Honeywell HMC5843 3-Axis magnetoresistive sensor, from
from SparkFun Electronics. (If you need a scale reference, here it is.)
(The HMC5843 is a sensitive device, capable of reading fields up to six Gauss– about ten times Earth’s magnetic field, but isn’t suitable for making measurements near the poles of magnets. It’s more like a compass than an iron filing.)
There are only four connections to and from this board: 3.3 V input power, ground, and two I2C wires. To talk to it, we use an Arduino board (Duemilanove), which provides the 3.3 V (stepped down from the 5 V USB power), the I2C interface, and a USB interface so that we can get the data back to the computer. On the computer side, we use a Processing sketch to read out the data and plot it to our screen.
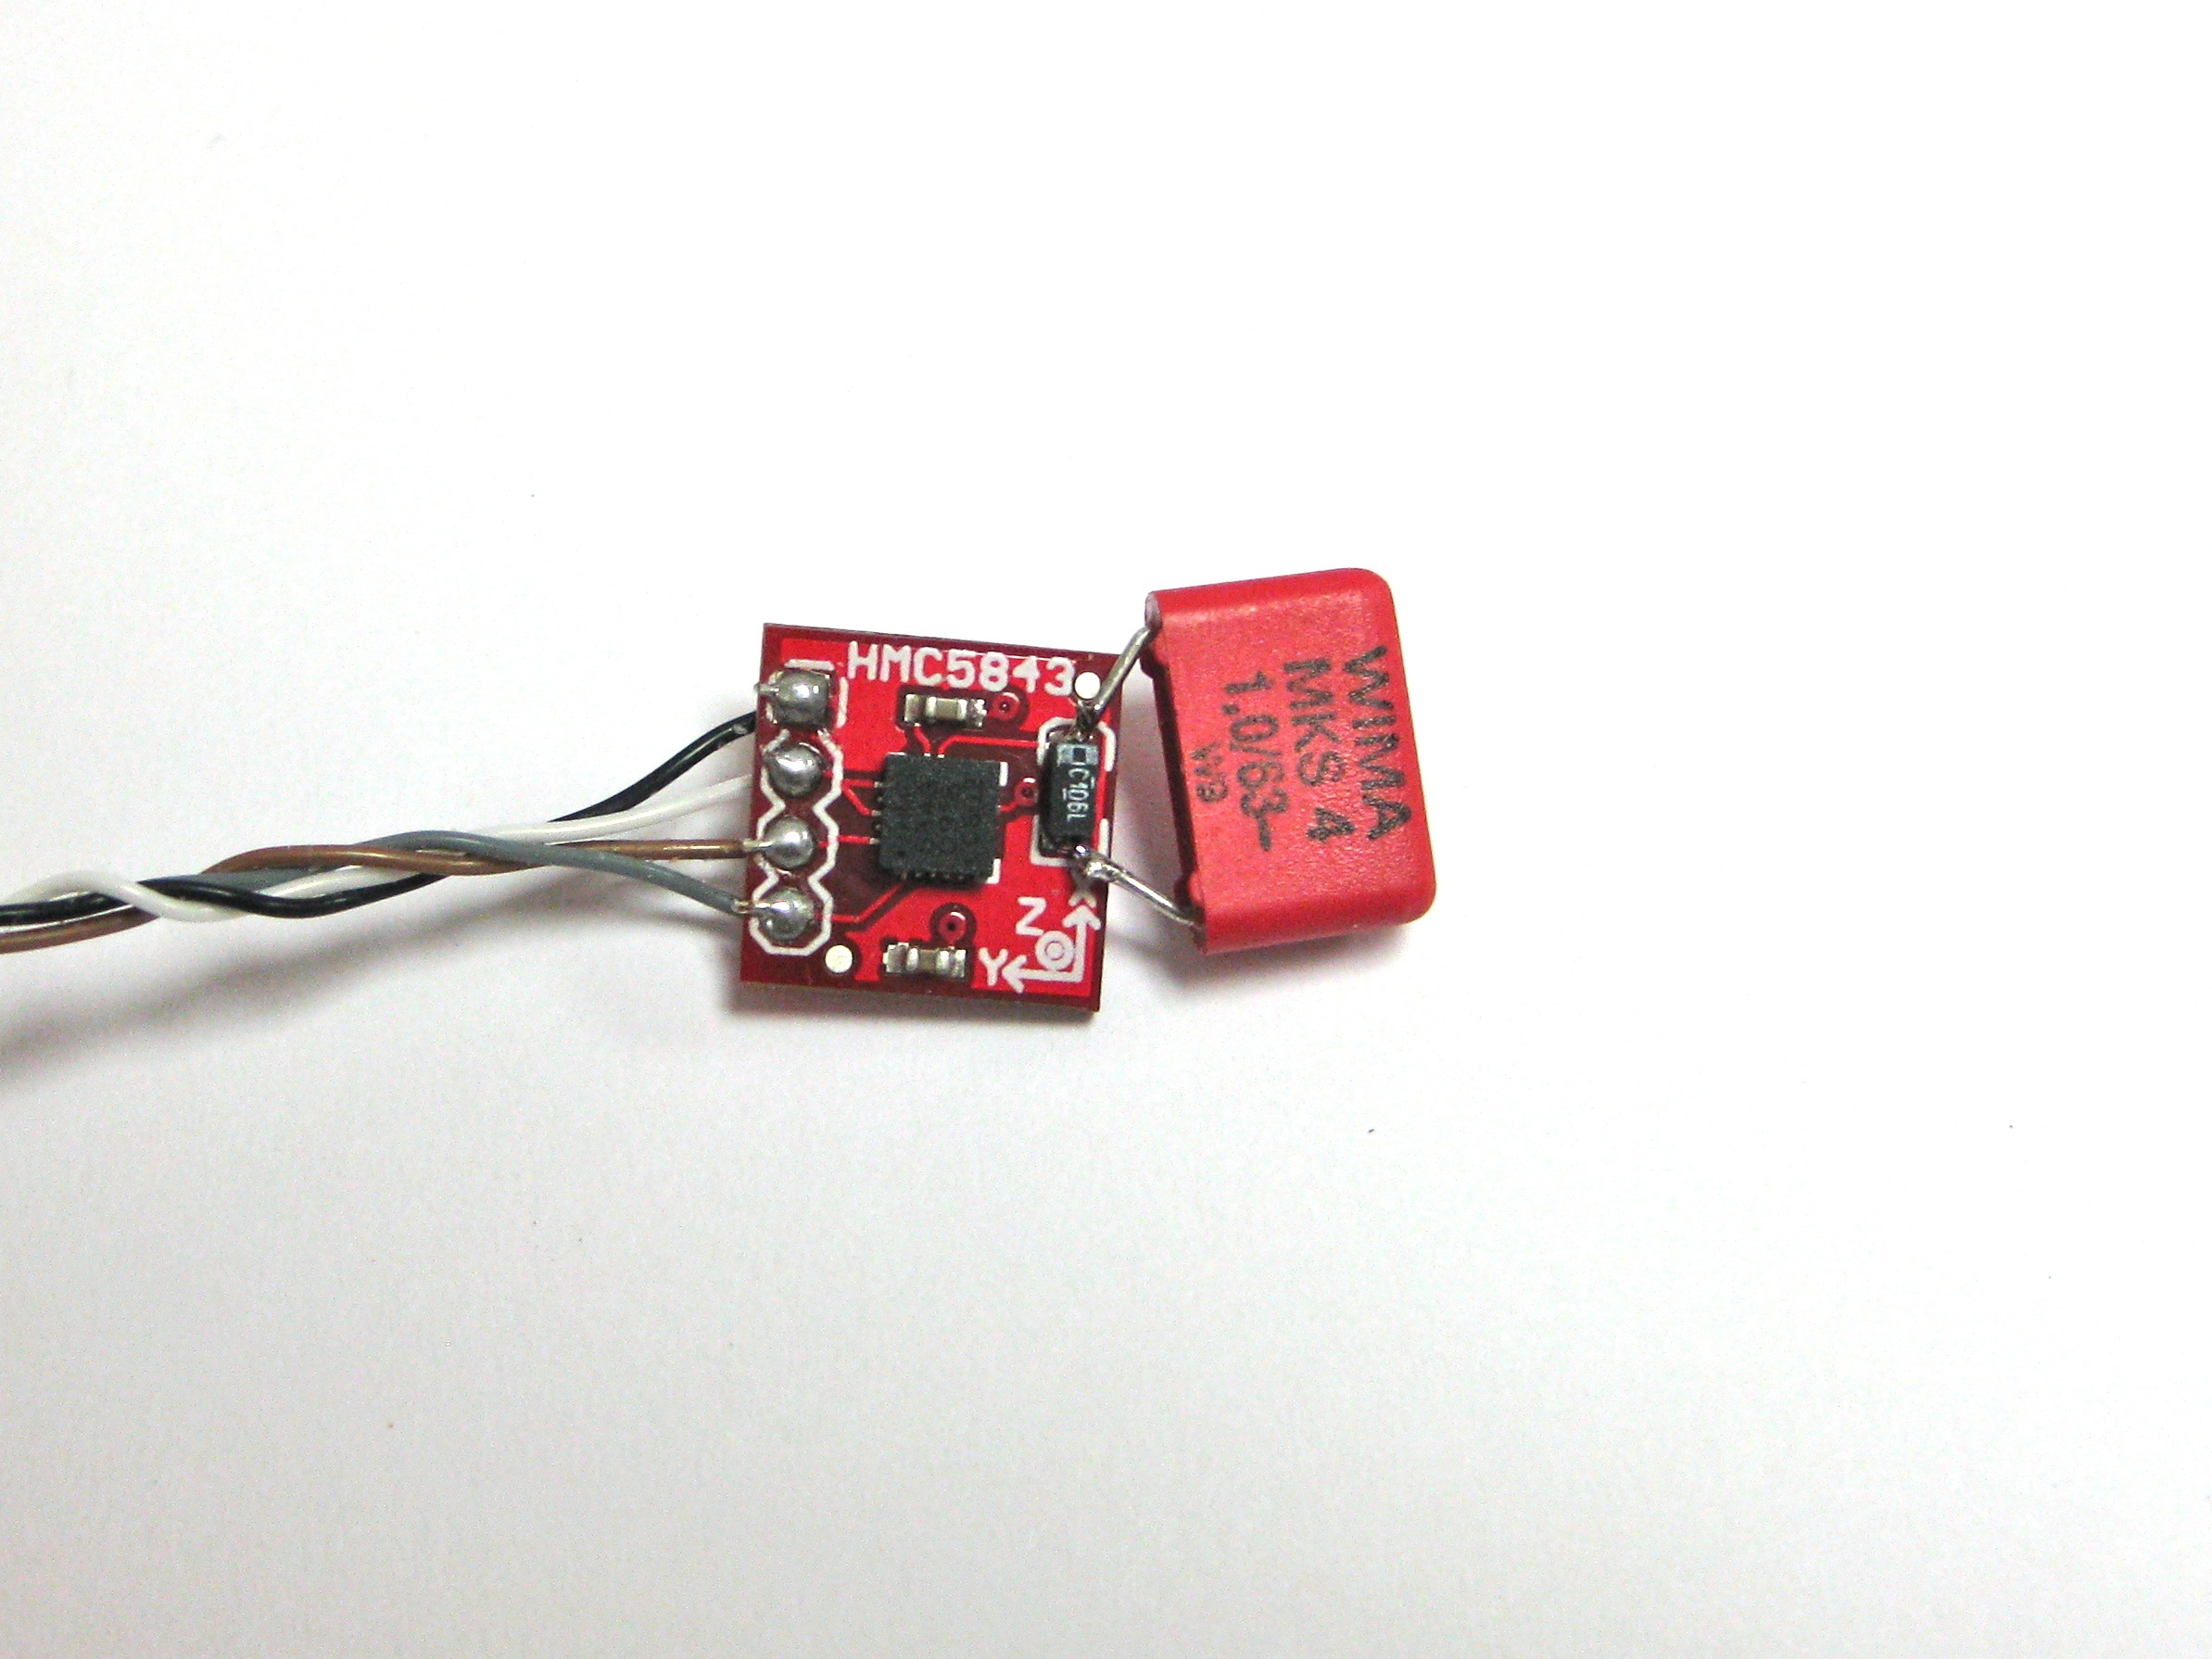
Here’s the breakout board with the four wires attached.
Aside: Why the giant capacitor? There’s actually a known bug on this version of the breakout board– not sure if it’s been fixed yet or not –which is that it did not read out sensible numbers with the default capacitor there. I added a *ahem* slightly larger 1 microfarad capacitor in parallel which seemed to fix it just fine. You can add a smaller one but (a) this one is nonmagnetic (b) it gives a place to actually hold the tiny circuit board and (c) it’s red, therefore SparkFun should approve. Matches the board and all.
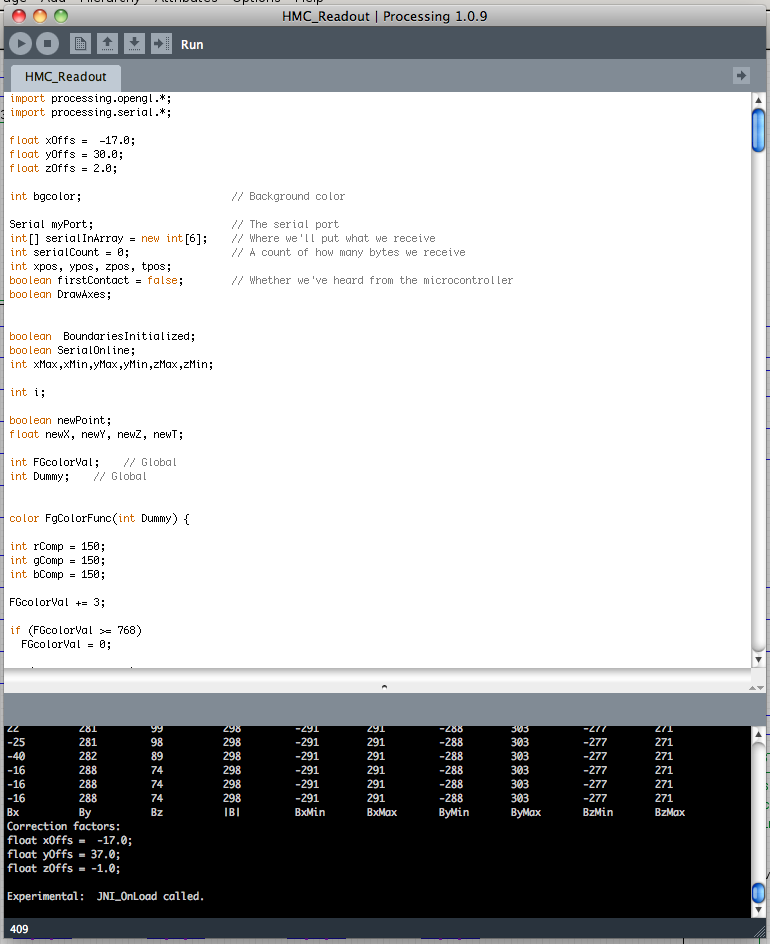
After soldering the sensor to the Arduino board by the four wires, we loaded this Arduino sketch onto the board. It’s based on this hmc5843 library that you’ll need for the sketch to compile. On the computer side, we wrote this Processing sketch to read out and graph the data.
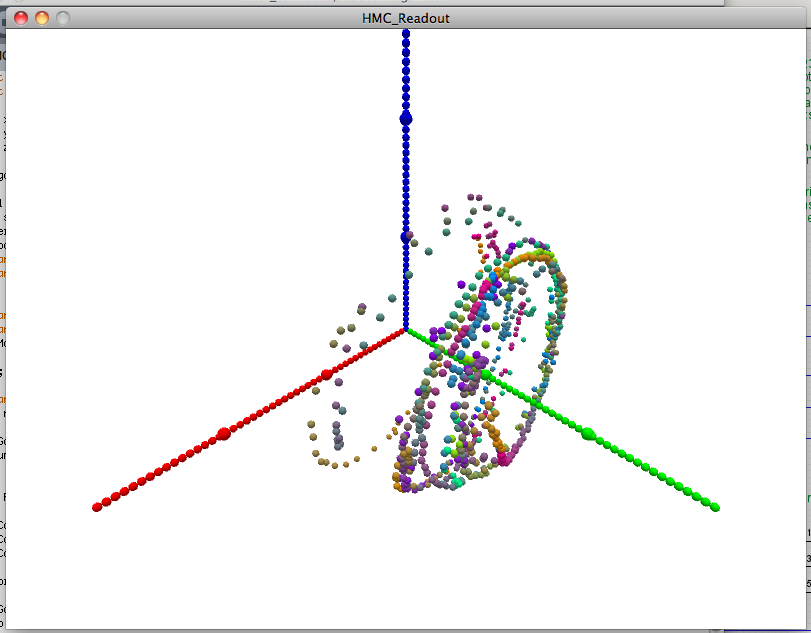
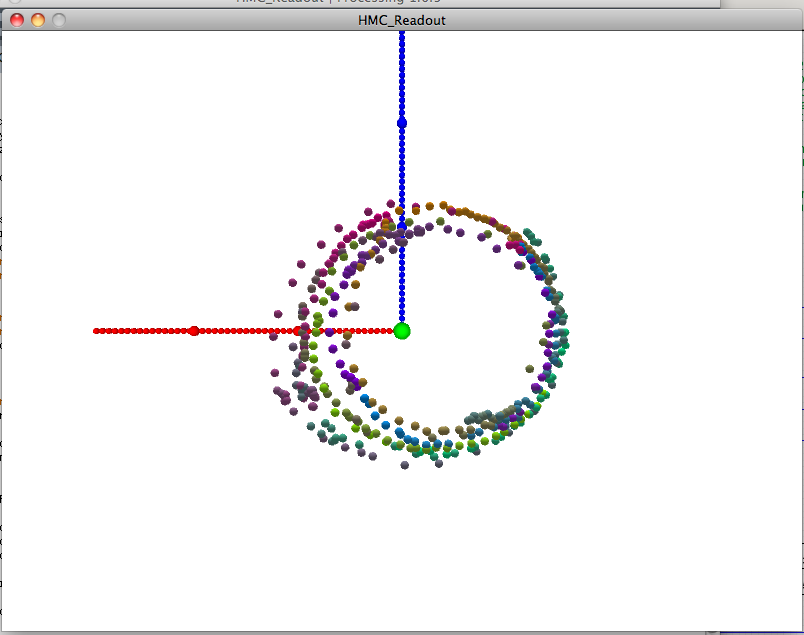
The Processing sketch uses its OpenGL routines to plot the magnetic field read out by the sensor. At the time of each reading– several times per second –a dot is plotted in 3D space, representing the field strength measured in the X, Y, and Z directions, shown as the red, green, and blue axes.
In this plot, the sensor is turned around a few times about its Y axis (where the cords come out) without moving around much. In the reference frame of the sensor, the Earth’s field keeps a constant magnitude, i.e., distance from the origin, but wanders in orientation.
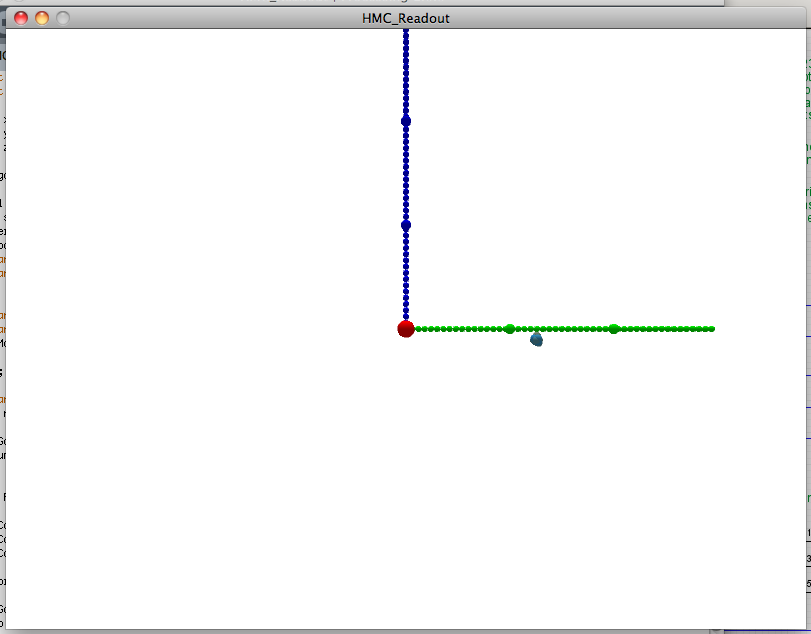
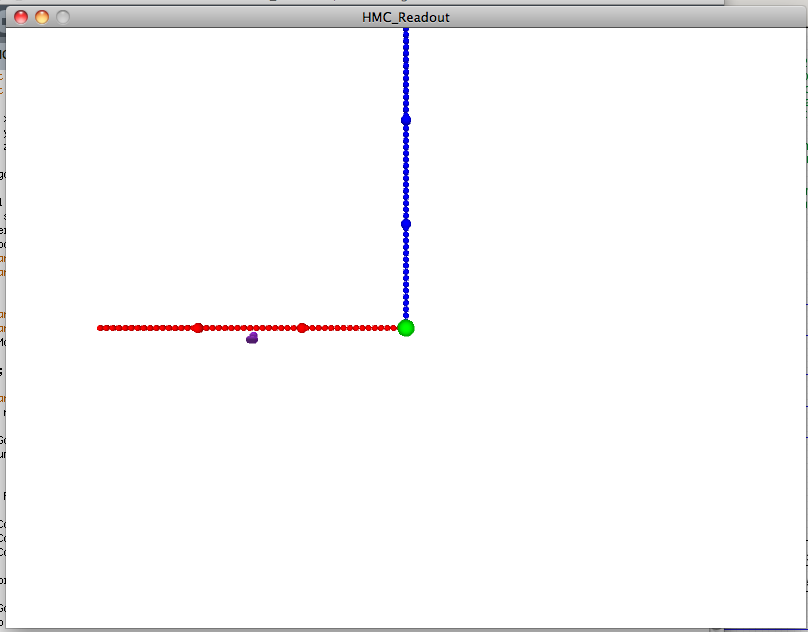
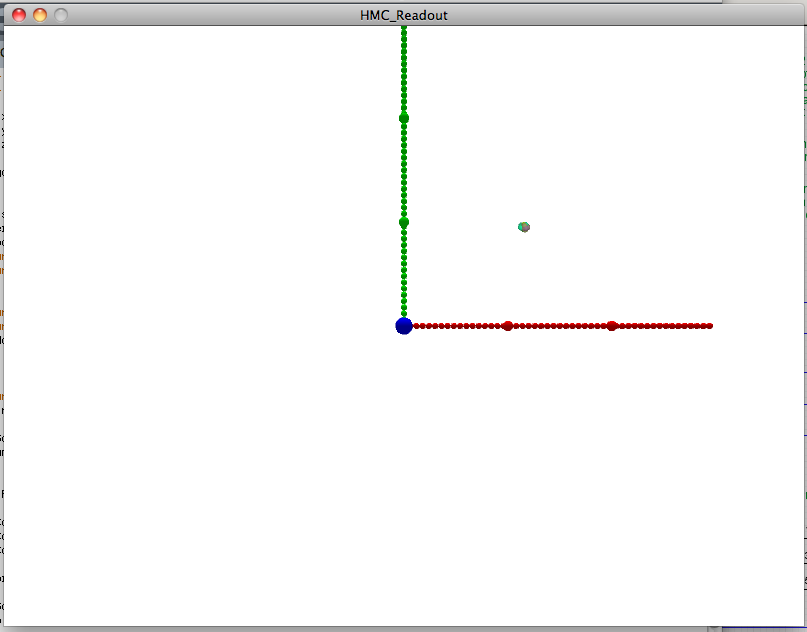
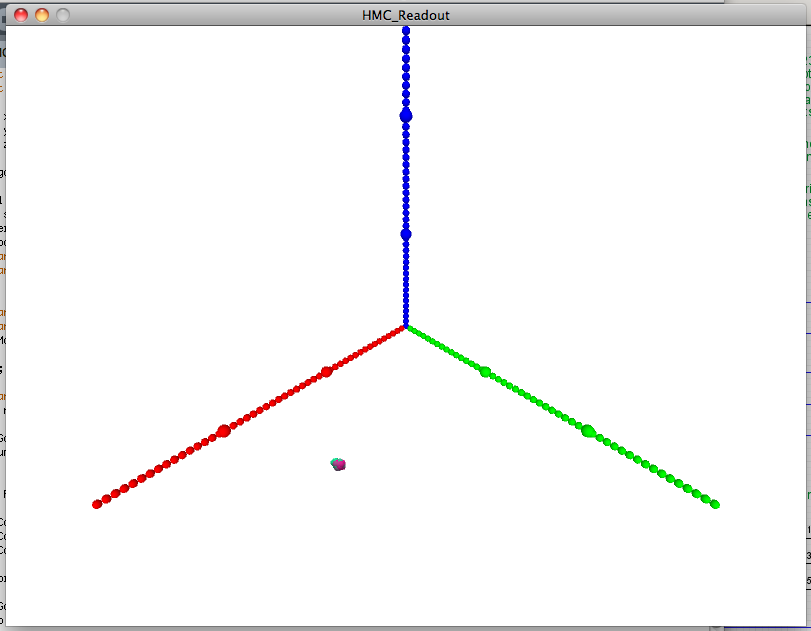
Holding the sensor still, you just get a single dot in space plotted. The color cycles slowly in time to help indicate the history. To reset the plot or look along the different axes, you can type ‘0’, ‘1’, ‘2’, or ‘3’ on your keyboard to reset the view to xyz, along x, along y, or along z respectively.
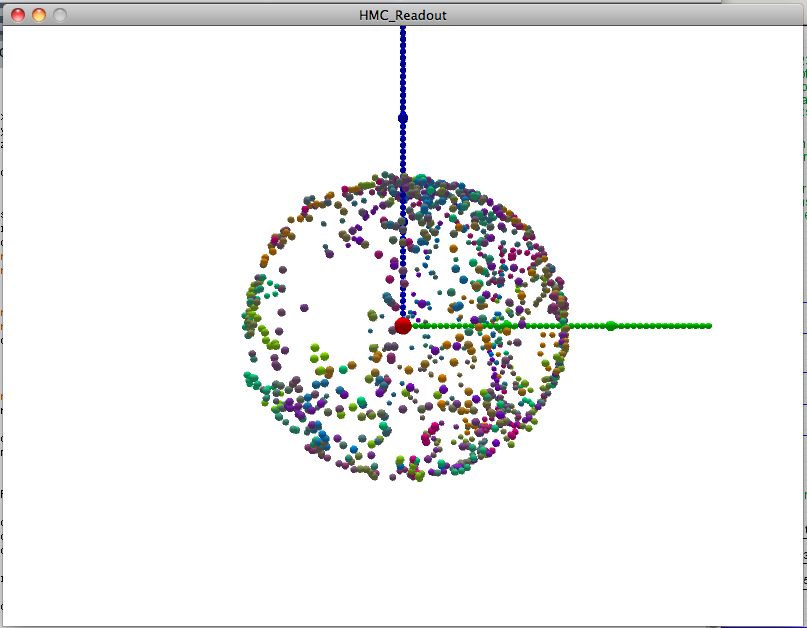
Ideally, as you rotate the sensor around in all possible directions, it will trace out a sphere, centered at the origin, where the radius is given by the ambient magnetic field. Something like you see above.
In practice there are usually magnetic offsets on the sensor chip itself or on the breakout board– those multilayer ceramic capacitors are almost always magnetic, for example. So, as you trace out the sphere, you’ll find the center to be displaced from the origin. For this reason, the Processing sketch includes x, y, and z correction factors (offsets) that you can use to center the sphere back on the origin.
You can use the sketch to calculate the proper offsets. If you rotate the sensor through all possible positions, spanning the maximum orientation along +x, -x, +y, -y, +z, and -z,
then when you end the program by clicking in the window, the data printed will include new offset values that you can paste back into the sketch– ensuring that the data will be reasonably accurate next time that you run the program.
So, it’s a starting place for exploring magnetic fields on the computer, and works pretty well as a 3D compass that you can plot in real time.
A natural next step would be to plot the magnitude of the field at different positions in space. That’s straightforward once you add in data for where the device is located– but tracking is another topic for another time.
We hope that this article provides a few points for starting to play with and see magnetic fields. Again, it isn’t meant to be comprehensive, but merely to provide a few starting points for easy exploration. There are many other methods of looking at and measuring magnetic fields as well– for example ferrofluids come to mind, but may provide less intuition about field geometry than simple iron filings.
If you liked this article, you might want to check out these others as well:
- 17 cool magnet tricks
- How to make the simplest electric motor
- Making Crafty Fridge Magnets
- How to extract magnets from plastic toys
- Demonstrate Magnetohydrodynamic Propulsion in a Minute
- Iron filing nail polish
- An AVR-based Analog Plotbot with an E-Paper Display
- Building an Electric Motor
- Homopolar motor exhibit at the Exploratorium
- Super-Easy Supermagnet Compass
mixing Iron Filings and mineral oil in a clear container makes a great 3D magnetic field viewer. (Here’s the first link I found with photos: http://www.darylscience.com/Demos/3DMag.html)
I tried to avoid the messy ones. :)
There’s also a really classy version of that, also available from Arbor Scientific (among other places):
http://www.arborsci.com/prod-Magnetic_Field_Observation_Box-662.aspx
Windell H. Oskay
drwho(at)evilmadscientist.com
http://www.evilmadscientist.com/
Here’s my old article on 3D baby oil:
"3D field viewing bottle"
[link:]http://amasci.com/electrom/statbotl.html
Note that these also work for visualizing high voltage. Try exploring the e-fields surrounding a charged spot on a balloon. The forces are weaker, so it takes longer for the fibers to rotate and the field to become visible.
Also on youtube:
http://www.youtube.com/watch?v=wuA-dkKvrd0
Someone made an instructable: [link:]http://www.instructables.com/id/3D-Magnetic-Field-Viewer/
Here’s another possibility: build a high speed rotating drum w/slip rings, many analog Hall sensors, red and green LEDs, and LED driver. As a science museum exhibit I made a quickie prototype using a motor-spun cylindrical black wastebasket with only one sensor. The idea appeared to work fine, but I never built a big professional version. Hint: if each row on the drum has several LED/sensors rather than just one, it lets you spin the drum much more slowly while still creating a glowing field of light.
[link:]http://amasci.com/exhibits/statdrum.html
Another way to "see" a magnetic field is using a hall effect sensor, LED and long exposure photograph.
Here’s the results of a prototype I built – http://blog.hodgepig.org/articles/000032-magnet/index.html
Not perfect results, but I think that there’s potential in the idea.
Hello – lots of your references are to Arbor Scientific, and on first glance it looks great. Then – if you’re in Europe – you check the postage. For example, for the light piece of magnetic viewing film, they want more than 30$ for the BASIC postage, let alone any quicker options! For something that could slip into a padded envelope and cost, what, less than 4$ to post?
Now wait for it – for the credit-card sized viewer, costing 2.95$, they want…… 59.66$ as the CHEAPEST shipping option to Germany.
Are they mad? Is it something in the magnetic fields?
Oops, no, sorry, that was UPS. Ordinary post for that tiny thing is "only" 30.80$
For UK readers there is MUTR http://www.mutr.co.uk/ I haven’t checked that they have the specific stuff but they are a great resource for science education stuff – also I haven’t checked their shipping rates to Germany.
But there is in all likelihood something similar in Germany…
I’m sorry to hear that, and I’m sure that it’s nothing personal about Germany. Arbor had a lot of the interesting supplies at one shop– and is a good resource in general –but we haven’t priced their shipping worldwide.
In their defense, let me say that shipping costs to Europe are *very* high for any businesses that do not get special volume discounts. I’d wager that Arbor is just as unhappy with the situation as you are.
BTW– Some of the best physics teaching supplies in the world come from Germany; you just need to find them. I wouldn’t be surprised if a lot of the same supplies were available from PHYWE, for example.
Windell H. Oskay
drwho(at)evilmadscientist.com
http://www.evilmadscientist.com/
Thanks to both of you for useful hints :-)
You can remove iron filings from a magnet with silly putty. I use it to clean the small rare earth magnets in my glasses that hold my clip on sun glasses in place.
Also, if you load up a ball of silly putty with iron fillings it will do some very strange things in proximity to a strong magnet.
What a great tip. I’ll have to pick some up. Thanks!
I’ve had good luck with two methods. One is by using tape of just about any kind. Stick the tape to the magnet, remove, and the filings come along with the tape. Anoter method that works quite well is by using a stiff brush, even a wire brush. Moving the brush in a quick, striking motion tangential to the edge of the magnet flings the particles away at a speed too fast for them to re-attach.
Hey, couldn’t you use your CandyFab to move the sensor on the x/y? Or, does it put out too much magnetic interference?
Adding a CandyFab to the bill of materials does make a more complex project….
Windell H. Oskay
drwho(at)evilmadscientist.com
http://www.evilmadscientist.com/
We were doing this over 40 years ago with Video Tape to facilitate editing. Ampex made a product called “Edivue” which was (I think) Iron dust suspended in Freon. One needed to be able to see the individual tracks on the tape in order to know where to apply the razor blade.
Like this one here
Staples are a quick, inexpensive visualization tool. Pound the stapler a bunch of times to get a bunch of closed staples. They are reusable, and not as hard to remove from magnets as filings. I’ve found that tape (duct tape, or scotch tape in a pinch) can be used to remove most of the filings from a magnet. I really like the Silly Putty tip, and will try it soon.
Instead of iron filings, try to get your hands on some unused developer (NOT TONER) from a photocopier. This stuff appears to be made of extremely small ferrous spheres that roll around easily, creating a very fluid medium to readily show magnetic fields. What fun!
I usually removed Iron filings from magnets by holding a sharp pin next to it, which will then attract the filings as the pin becomes magnetised. I can’t quite remember the exact explanation for it, but apparently doing this results in there being a stronger field near the tip of the pin.