Category Archives: EMSL Projects

Build Your Own CNC Workstation Cart

CNC Workstation 1

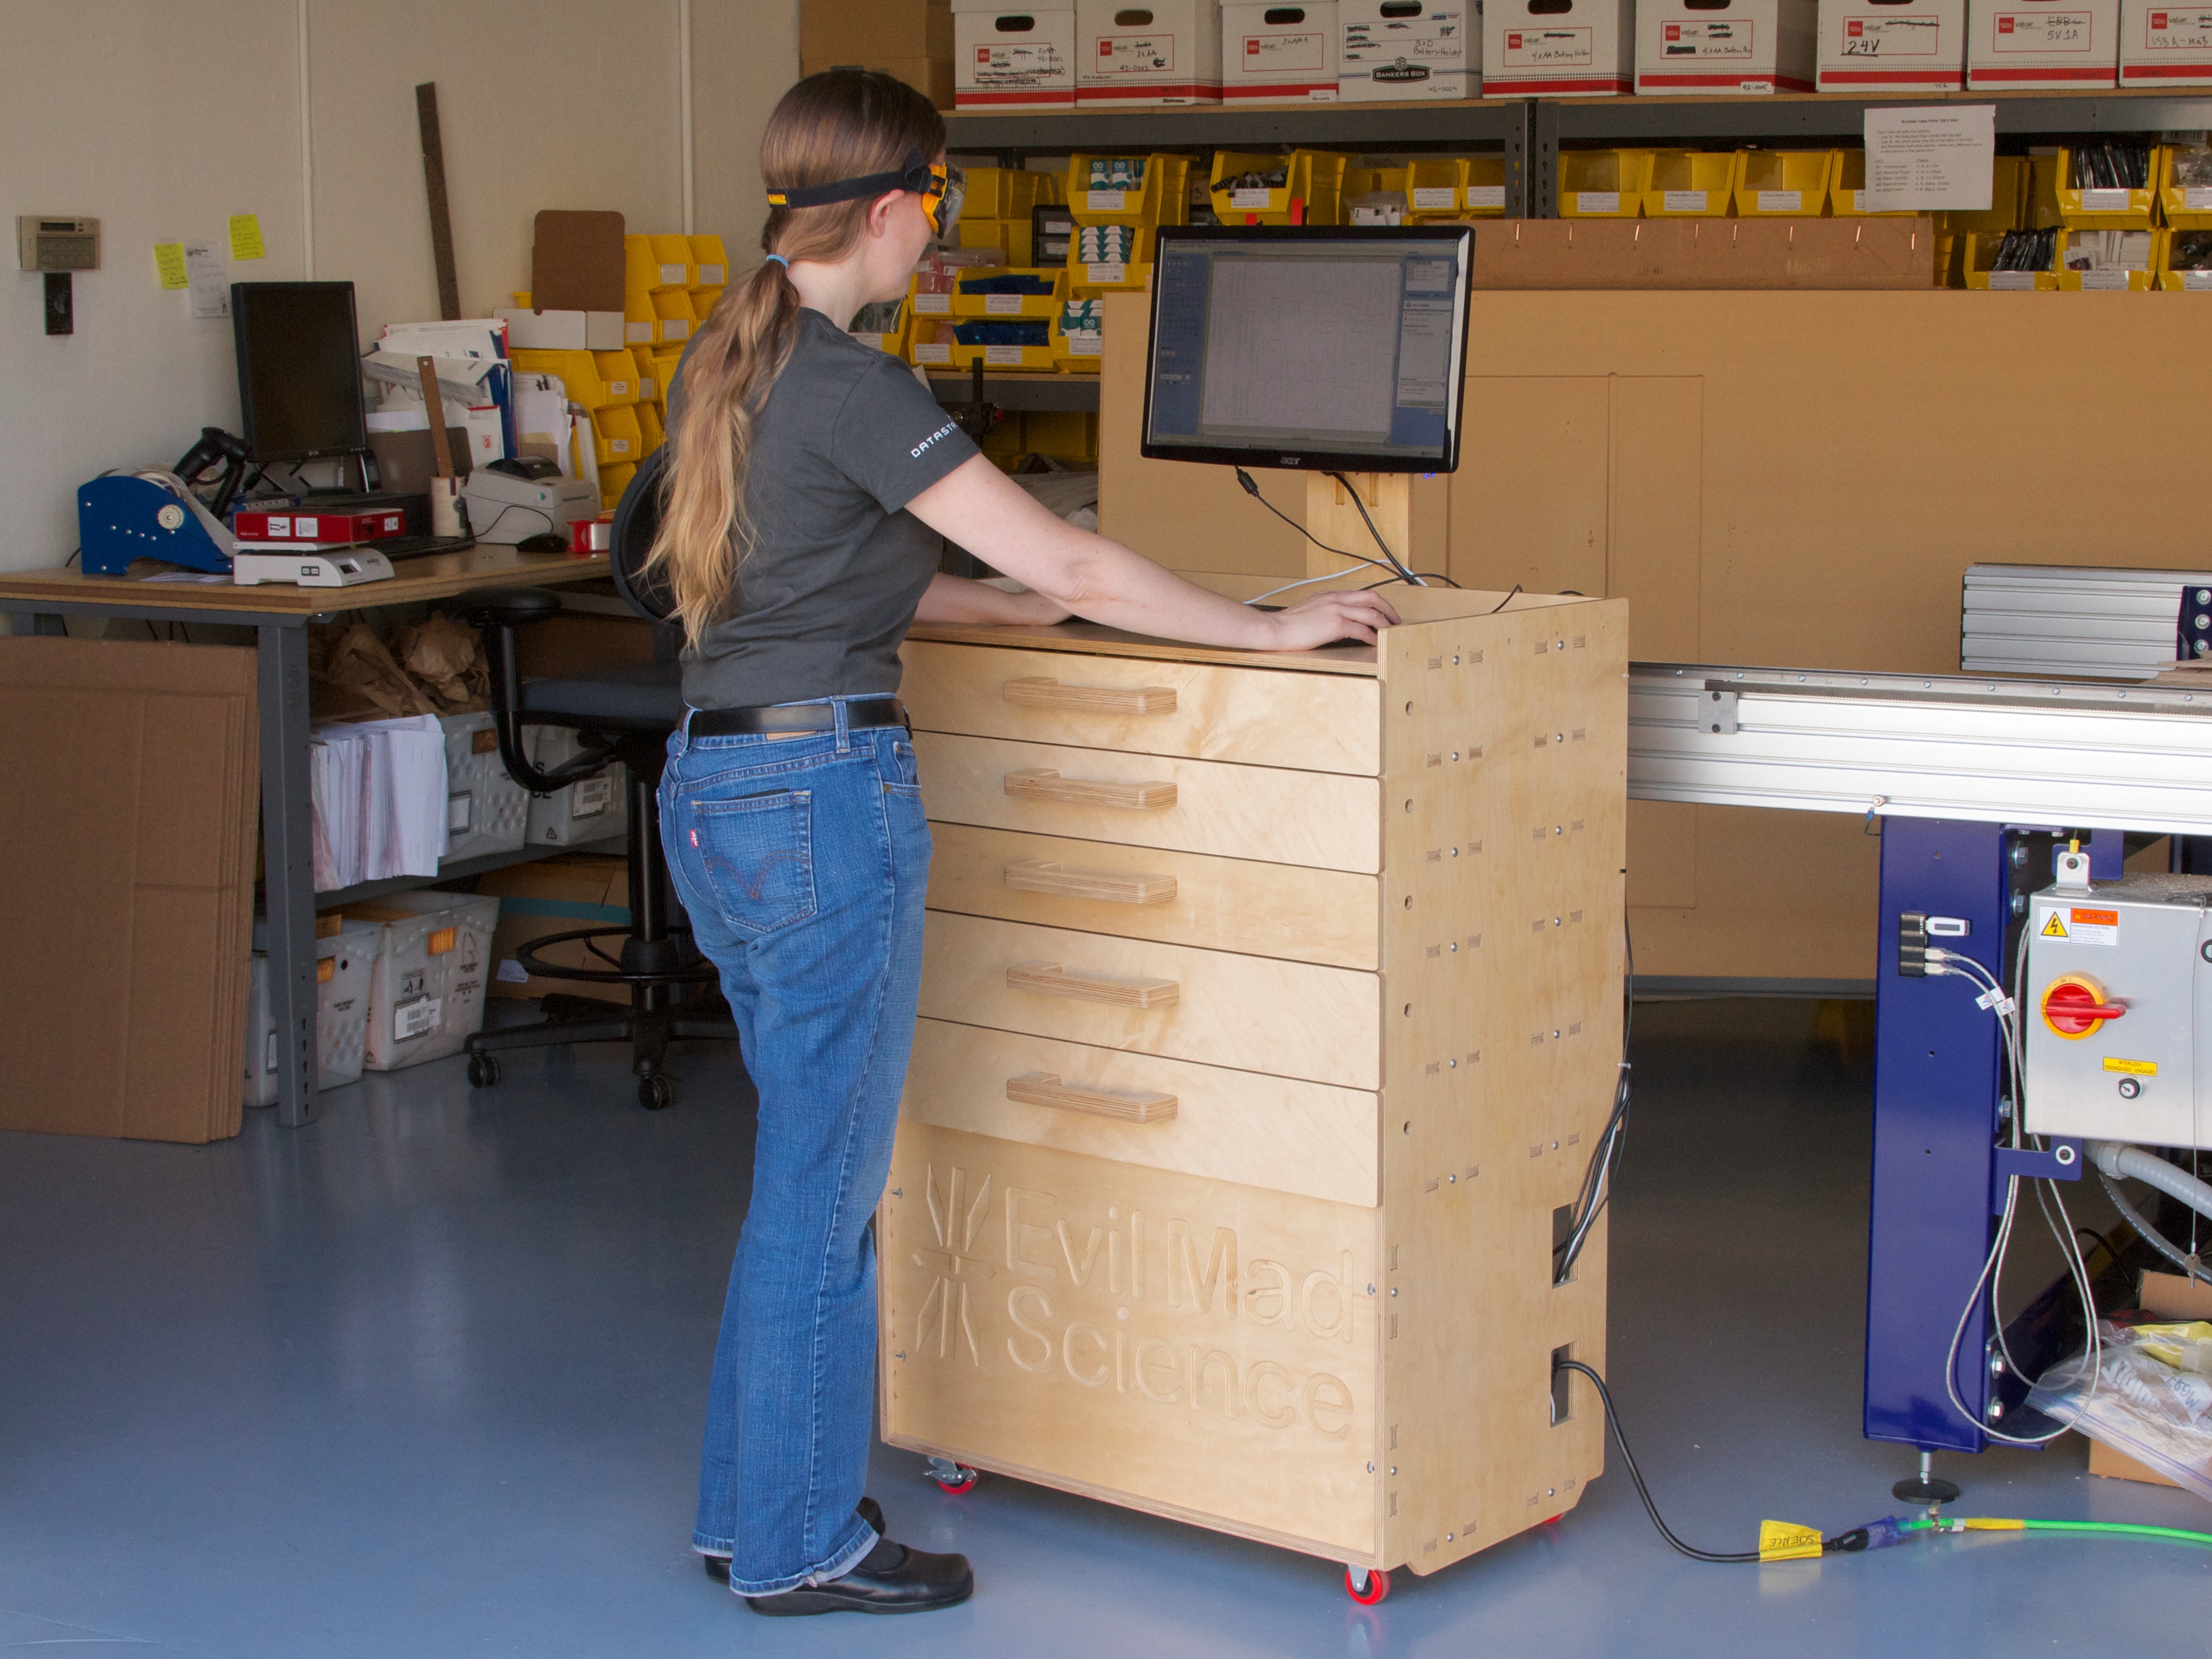
Recently we needed a sturdy, standing-height computer workstation for our workshop. So, we designed and built one. It has turned out to be one of the most useful things that we’ve ever made. And now, we’re releasing our design, so you can build one too!

A little background: This computer station is the one that we use to operate our CNC router.  Previously, we had been operating that machine from a laptop on a rolling tool chest.  While having a tool chest handy was great, the laptop wasn’t, and the height was backache-inducingly awkward.  Once we swapped the laptop out for a desktop computer that didn’t fit on the tool chest, we needed a new solution.  We needed a new computer workstation that would actually fit the computer, be comfortable for working at standing height, be sturdy enough for use in the workshop, roll where we needed it to, and offer a decent amount of storage space for tooling and supplies.

Our workstation is CNC-cut from half-inch plywood. It is rock-solid sturdy, yet comes apart easily for transport or modifications. It features a main computer bay with an optional door, five spacious drawers that can’t fall out, enough room on top to comfortably fit a laptop (in addition to the main computer), stainless hardware, polyurethane casters, and a stiff vertical “neck” that supports a swing-arm VESA monitor mount for the main computer.

Continue reading Build Your Own CNC Workstation Cart

A Liquid Power Fuse

Liquid Power Fuse 9

Liquid Power Fuse 5

Here’s an interesting find: This rather large mad-sciencey-looking component is a Bussmann type 23L1F15E, liquid-filled power fuse. What is all that stuff in there, and what’s it doing? It turns out to be a clever old solution to a tough problem, involving springs, wires, and solder, not to mention the mystery fluid!

Continue reading A Liquid Power Fuse

Curiosity on Mars!

NASA Ames

Congratulations to Curiosity! As the New York Times says this morning,

In a flawless, triumphant technological tour de force, a plutonium-powered rover the size of a small car was lowered at the end of 25-foot-long cables from a hovering rocket stage onto Mars early on Monday morning.

A crowd of some 5000 people gathered on the plaza at NASA Ames Research Center late last night (it was only Monday Morning on the east coast) to watch presentations by mission scientists and finally the live broadcast, on the big screen.

This was a thrill.  Not only was the landing process itself incredible— watch this video, “Seven minutes of terror” if you haven’t —but it was amazing to be in a crowd of so many people excited to watch the landing as well.  Many of the people in the audience screaming and cheering had worked on various parts of the mission, including the ground-breaking (pun intended) scientific instruments aboard the rover and the new lifting-body heat shield to get it there.

Curiosity closes in on Mars

On Sunday night, the Mars Science Laboratory rover Curiosity (the one on the right; the biggest, baddest, most awesomest Mars rover ever) will attempt to land on Mars. Curiosity is a nuclear powered Mini Cooper sized robotic geologist, much bigger and more capable than previous rovers. It’s going to be a moment of great excitement when Curiosity touches down, and there are a number of ways that you can watch.

If you have the opportunity (Mars rover pun intended) check with your local science museum, planetarium or hackerspace to find out if they’re hosting a viewing party.

Curiosity model at Exploratorium

Here in California, the Exploratorium currently hasa special exhibition up, including the simplified full-scale model of the rover in the picture above. They will be airing a live webcast of the landing on Sunday night.  And, NASA Ames Exploration Center in Mountain View, is hosting a live broadcast on-site with over 5000 people. The free tickets for the event went very quickly.

And, if you can only watch on the internet, NASA TV is NASA’s official video channel.  Star Talk Radio has a list of places to watch online. Space Industry News has a similar lineup, which includes a link to a google map of events.

Prefabricated Octolively Modules

Octolively Modules

Last year we released Octolively, an open source interactive LED kit, designed to respond in gentle and complex ways to stimulus provided by human interaction.

While Octolively has been a success (and a lot of fun), thus far it has only been available as a soldering kit. Today, we’re pleased to supplement those with a new version: prefabricated Octolively modules, all built-up and ready-to-use, so you can jump right in and start playing with the LEDs.


Octolively Modules

Like the soldering kit version, each “prefab” Octolively module is 4 × 8 inches (10.16 × 20.32 cm) in size, and features eight huge (10 mm) ultrabright LEDs, spaced along a two-inch grid.  And, for every LED, there is an independent infrared proximity sensor pair, configured to act as a reflective motion sensor.
Octolively Modules

The most obvious change from the soldering kit version of Octolively is that the topside components take up a lot less space. All of the resistors, capacitors, and the microcontroller have been replaced by their surface mount equivalents.


Octolively Modules

However, this not really a “surface mount” circuit board, it’s more accurately a “mixed technology” board.   Some of the components— in particular many “optoelectronic” components, like our visible and infrared LEDs —just don’t have great surface mount versions.  For example, when we’ve tried building motion sensors circuits with SMT infrared LEDs (even the pricier types that have itty-bitty lenses) we found that they just didn’t project enough IR light to be effective. Similarly, we’ve found that visible surface mount LEDs tend to be perceived as dim, even when a huge amount of light is being emitted, because the light usually goes into a very wide angle.


Octolively Modules

The microcontroller is an Atmel ATmega164A, in the 44-pin TQFP package.  (And in case you’re wondering, yes that’s exactly as redundant as “ATM machine.” )

Those white gumdrop-looking things are (as before) the big 10 mm LEDs, but they certainly seem even bigger sitting next to that chip.


Octolively Modules

Ready-to-use Octolively modules are available now at Evil Mad Science.

Additional details— including the datasheet and documentation links —are available on the product page.

Mystery components!

MysteryComponent1
While picking out interesting vintage diodes at the electronics flea market, we came across a couple of components— possibly also diodes because of where we found them —of types that we have never seen before.  And we can’t resist a good mystery.


MysteryComponent4

First, there’s this little two legged can, marked with 650, a black dot, and CO on one side. The other side (as you can see in the photo above this one), is marked T 1 and has black and red dots.


Secondly, a couple of things that look kind of like resistors:
MysteryComponent6

They are very small, only about the size of 1/4 W resistors.  They are marked with a red capitol letter “P” and a set of four colored stripes. The “P” marking interrupts the three narrower bands in both cases.

MysteryComponent8
Here’s a good look at the color bands: brown, violet, green, and then a broad yellow.  (We could be reading this wrong; is the broad stripe supposed to be read first?)

MysteryComponent7
This one has brown, violet, green, and then broad violet.

So, what are they?  We don’t actually know, but if you do, or if you have a good guess, we’d love to hear it!

Evil Mad Scientist at Maker Camp

Maker Camp Banner

Maker Camp is a virtual DIY camp for teens created by the folks at Make Magazine and Google. It’s free and open to all on Google+. I am excited to be participating in Maker Camp this week as the guest camp counselor on Thursday, July 26.

Electric Origami

The activity I’ll be leading will be Electric Origami. Schedule, materials lists and how to join the camp are all on the Maker Camp site and Make’s Google+ page.

Maker Camp Banner

I’m looking forward to hanging out with the campers! I’ll be posting the direct link to the broadcast and hangout as soon as it is posted on Thursday.

Update: Introductory information has now been posted for the Make G+ hangout, which begins at 12 noon, PST.

Update 2: The stream is up, link is here!  And, there’s a youtube stream, too!

The 2012 Open Source Awards

open source awards

Congratulations to the recipients of the Open Source Awards announced today at OSCON: Bradley Kuhn, Elizabeth Krumbach, Massimo Banzi, Christie Koehler, and Jim Jagielski!

lightbulb in eggbot

We were honored to participate in the creation of the awards which were given out this year. Using an Eggbot, we plotted the Open Source Award design onto lightbulbs which were integrated into the awards which were given out on stage. Additionally, the award recipients are each receiving an Eggbot. It is exciting and fitting that this year’s award is itself open source hardware which works on open source software and was created using open source tools.

lightbulbs and eggbot

Top photo by Sarah Novotny.

Creating optical rotary encoders with Inkscape

screenshot of optical encoder extension

Kalle Hyvönen of DGK Electronics has created a new Inkscape extension that might be handy for all of us robot builders:

I developed an extension for Inkscape which can create optical rotary encoder discs in any size/number of segments. It currently supports single and two-track (quadrature) encoders but I’m going to add support for gray encoded discs as well.


Link: Inkscape extension for creating optical rotary encoder discs
(via Inkscape on G+)