Yearly Archives: 2013

Father’s Day Gift Guide

In anticipation of the upcoming father’s day holiday, we’ve put together a little gift guide with selections from our store. We’re also putting all of these items on sale now through June 12: just enter coupon code “VADER” in the shopping cart to receive 10% off.

dcii_2

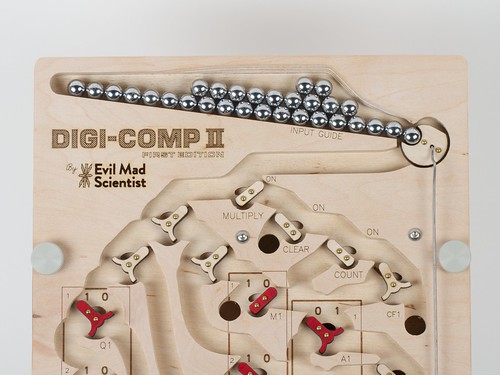
First up is the Digi-Comp II, First Edition. It’s perfect for teaching the basics of binary math to kids and parents alike.

A5White

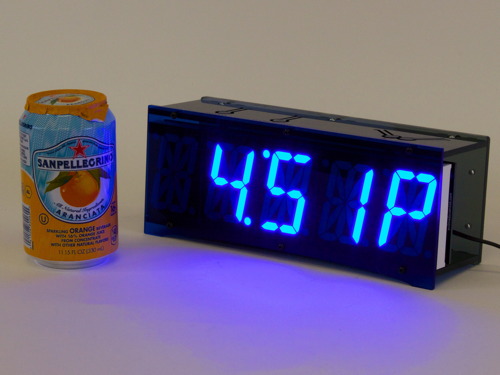
The Alpha Clock Five kit, in original Red Edition, the gleaming White Edition, or the brand-new Blue Edition, is the perfect clock for the discerning hobbyist. It’s eminently hackable and full-featured, with digits big enough to see across even the largest of garages or just next to the bed before you put your glasses on.

Diavolino-angle2

For someone expanding their electronic horizons, or working a ton of projects at once, our Diavolino Starter Packs, and AVR Starter Packs will keep them happily busy.

Our Octolively Modules would make an excellent addition to a furniture or remodeling project.

The Art Controller is a modern take on an old classic, perfect for someone with plenty of project ideas who just needs an occasional trigger.

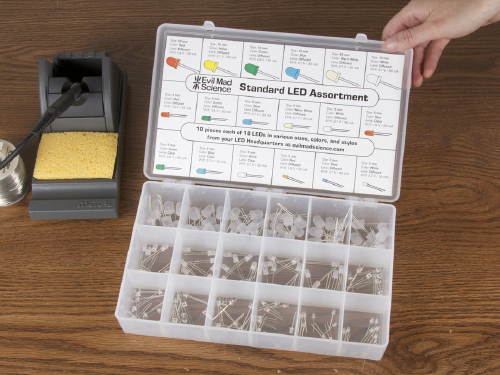
Tools are always a great gift choice, and anyone would be proud to own our ESD-Safe Screwdriver Sets. Another great workbench addition would be our Standard LED Assortment.

Original Egg-Bot with Ostrich Egg-Bot

The Egg-Bot started out as a way for one father used to show his family how cool it could be to play with stepper motors. Both The Original Egg-Bot Kit and the Ostrich Egg-bot are on sale.

The father’s day sale runs through June 12: enter coupon code “VADER” in the shopping cart to receive 10% off these items.

Happy Father’s Day!

Quick project: 24-hour Cosplay Sword

Cosplay Sword 1

Junior Evil Mad Scientist Chris came to us for help with what turned out to be a funny little (well, huge) cosplay prop project. The kind of project that starts off with a conversation that goes like this:

“You want to build what?”
“A giant sword for my costume for FanimeCon!”
“And when do you need it by?”
“Uh… tomorrow?”

So, we got to help make a 64″ long replica sword, one of several from the flash game Epic Battle Fantasy 3 (which we had admittedly never heard of before), in what turned out to be kind of an interesting (if quick) project.

Chris drew up the outline for the sword in Inkscape, by tracing the outline of a bitmap drawing of the sword in a larger collection (where you can find this one in the top row, one third of the way from the left).   We cut the outline on our CNC router from lightweight 3/4″ hardwood plywood— strong enough to not be floppy, yet light enough to be carried — and sanded the sides until it could be handled without creating splinters. We also sanded a slight bevel around the edges of the blade, so as to create the illusion of a sharpened edge without actually thinning it much around the edges.

Next, we needed to paint the sword silver.  We had some silver spray paint on hand (left over from our 555 Footstool project!), but if you directly spray paint lightweight plywood, it tends to soak into the wood unevenly, dry slowly, and leave a finish that awkwardly highlights the grain of the underlying wood.  Instead, we coated the sword with a fast-drying sanding sealer and allowed it to dry for two hours before getting out the spray paint.


Cosplay Sword 3

In the mean time, we made the hilt details— what might count as greebles —by laser cutting two sheets of thin 1/8″ thick plywood on each side, in a shape slightly inset from the outline of the thicker plywood.  There are two of these, one to go on each side of the hilt.

Cosplay Sword 2

Once the sanding sealer had dried enough to gently sand, we test-fit the parts together. The photo above shows how the parts look after laser cutting and with the slick, yellowish finish that the sanding sealer gives to the plywood.

Next, we spray painted the body of the sword. Primer gray for the hilt section and metallic silver for the blade section, and allowed it to dry overnight.

Separately, we painted the laser-cut overlays black with black one-part polyurethane finish (the same type that we used for our ASCII art Tie Fighter project), and allowed them to dry separately.

Cosplay Sword 4

In the morning, a little superglue attaches the newly-black hilt details, an old leather belt becomes some lashing details, with the help of a staple gun, and… it’s off to the show.

In case you’re interested, you can download a copy of Chris’s sword design here, as an Inkscape SVG file.


You can find more costume projects in our Halloween Project Archive.

Kitty’s Morning Tea

Kitty’s Morning Tea: Kinetic Theory of Matter for Kids, by Christine Liu, is a remarkably charming book and physics lesson for young children.  It’s a short twelve-pages about tea, molecules, and kinetic energy that you can read (in its entirety) above, in a digital edition released by the author.   We love seeing science-themed educational materials for youngsters— and this is no exception.

Christine and friends are running an (already funded) campaign on Kickstarter to print the book and get it into the hands of children, and you can get your own printed copy as one of the rewards.  It’s also available in a Kindle edition, free for the short remaining duration of their campaign.

Winner, Name that Ware May 2013

Mystery Ware May 2013 9

Congratulations to reader VAX-Dude for winning the Name that Ware contest for May 2013, by correctly identifying our mystery ware as a VAX 9000 series High Density Signal Carrier (HDSC).

Which might lead you to ask another perfectly reasonable question: What the heck is a High Density Signal Carrier? Continue reading Winner, Name that Ware May 2013

3D printing use case: Custom parts for vintage cars

We always hear about how someday people will just print out rather than order spare parts for their cars. Here’s someone who actually does it.

When instructables user madmorrie had new door trims (interior panels) made for his 1962 Valiant, he neglected to allow for clearance for the door lock levers on the back door, so the original levers would no longer work. In the photo above you can see the end of the mounting post for the levers is flush with surface of the new panel, leaving no way to attach them.

Rather than have expensive new door trims made, he decided to make new levers. He designed the new levers with an extended splined section that could be recessed into the door trim and wrote up his experience in his instructable, Custom 3D Printed Car Parts.

It’s likely that no other 1962 Valiant owner will ever have the same problem, and that’s exactly why 3D printing is a good choice in this scenario. While 3D printing can get expensive for larger parts, when building tiny parts like these, you can save a lot of money by not paying for tooling costs.

And it turns out that 3D printing is good enough, even in low-cost materials (about $15 for the pair through Shapeways), for a usable part. Madmorrie says,

Initially I was intending to order them in stainless steel, however the plastic ones seem to be perfectly strong enough, so unless they break I will stick with them.

And, they look great!

All photos by madmorrie.

DIY Deck Ambiance with Flickering LEDs

Jack Olsen (of the awesome 12-Gauge Garage) wrote in about using our flickering LEDs to line the deck and pergola he had just built.

He says, “The LED candle effect is great, and really gives the place a relaxed feel at night.” You can read more about the deck project over at the Garage Journal forums, where he describes the build in more detail:

It has 28 real candles on it that I’ve hollowed out to accommodate flickering LED lights. It’s pretty convincing.

I have a pair of 3 v power supplies — each feeds half the light set. They’re plugged into a switched outlet with wire running down along the edge/underside of the deck and up through one of the pillars, then sneaking around the back of the wooden frieze thing and into holes drilled in the backside of the frame.

He even sent us a before shot, so you can see just how from-the-ground-up building the deck was. Thanks for sharing your project with us!

All photos by Jack Olsen.

The 2013 Open Hardware Summit: Call for Papers

OHS 2012

As the review chair for this year’s Open Hardware Summit, I’m very pleased to announce that the call for papers is now open:

The Open Source Hardware Association invites submissions for the fourth annual Open Hardware Summit, to be held September 6, 2013 at the Massachusetts Institute of Technology.

The Open Hardware Summit is the world’s first comprehensive conference on open hardware; a venue to discuss and draw attention to the rapidly growing Open Source Hardware movement. The Open Hardware Summit is a venue to present, discuss, and learn about open hardware of all kinds. The summit examines open hardware and its relation to other issues, such as software, design, business, law, and education.

We are seeking proposals for talks, posters, and demos from individuals and groups working with open hardware and related areas.

Submissions are due by JUNE 21, 2013.  Please see the complete call for papers for additional details.

The 2013 Open Hardware Summit has also opened its call for sponsors; please click here if you are interested in helping to sponsor the summit.

Photo credit: Open Hardware Summit on Flickr.

Name that Ware May 2013

Mystery Ware May 2013 7Mystery Ware May 2013 8

In cooperation with Bunnie Studios, the blog of renowned hardware hacker Bunnie Huang (of Hacking the xbox and Chumby fame), we’re pleased to present an unusual “ware” that we acquired from one of our local Silicon Valley electronics surplus dealers.

(If you’re unfamiliar with the game, “Name that Ware” is a regular contest on Bunnie’s blog, where the goal is to learn about reverse engineering by analyzing unusual— or common but seldom-seen —hardware.  You can read about the contest rules here, and you can see many pictures of past entries with this google image search, or even get a calendar featuring Name that Ware entries from prior years.)

In the detail photos that follow, we’ll show some close-up photos, and provide a little more physical description (without speculating too much as to the purpose of the different features).   Can you identify this piece of hardware?

Continue reading Name that Ware May 2013

Alpha Clock Five: Introducing the Blue Edition!

Introducing our newest open source hardware kit: The Blue Edition of Alpha Clock Five.

Alpha Clock Five Red  Alpha Clock Five White

Alpha Clock Five is our flagship clock kit, which thus far has been available only in a Red Edition and in a White Edition. Whichever color you happen to like, it is a full-featured, beautiful, and extraordinarily easy-to-read desk clock based around oversized 2.3″ alphanumeric LED displays. It’s designed to work equally well as a bedside alarm clock and as a computer-controlled alphanumeric data display device.

We’ve already written extensively about the core design of Alpha Clock Five. We’ve also written about the modes and features added in version 2.0 of our Arduino-compatible firmware (such as date display and daisy chained scrolling text), and about the hardware changes necessary to support the White Edition of the kit. Fortunately, the changes that we made in order to support the White Edition also allow us to support the use of blue LEDs, just as easily. And so— by popular request —we now present the Blue Edition.


Here, the Blue Edition is shown with a soda can for scale. These LEDs are big and bright, and cast a heavy glow on the soda can and tabletop. (The usual caveats about the difficulty of photographing LEDs apply: A camera cannot capture the apparent intensity of pure blue LEDs in the same way that your eyes can.)


As with the other Alpha Clock Five kits, the control buttons are cut as flexures into the top of the laser-cut acrylic case, that can bend down to contact right-angle tactile button switches at the top edge of the circuit board. The top and bottom sides of the case are made of black acrylic, and the rear panel is made from smoke-gray acrylic.

For the Blue Edition, the front face of the case is made of deep blue transparent acrylic, which helps to increase display contrast, especially in brightly lit office environments.

Without the top and back panels, you can see the electronics within: the AVR microcontroller, LED driver chips, transistors, Chronodot RTC module and the other parts that make it all work.


The Blue Edition of Alpha Clock Five is available now at the Evil Mad Scientist shop.

Designs for Eggbot by RoboGenius

We’ve been watching the work of RoboGenius for quite some time. He has created some of the neatest non-geometric work anybody has done on the Egg-Bot. Recently, he uploaded a number of his designs to thingiverse, which means you can try them out, too. He has also been posting great pictures of them to flickr. When asked in the Egg-Bot user list how he created them, he posted:

The short answer is that it’s all done line by line in Inkscape.

The slightly more tedious answer is that it starts with an image (generally something off the web, or that has some significance to me), then I import that image onto my 3200px X 850px template in Inkscape and position it where I want it on the egg/ball. I then take a look at the image and decide how many color layers I’ll be needing for the plot and add those to the project, naming them sequentially followed by the color I use for the layer (for example: 1 – Yellow, or 5 – Black). I always begin with the lightest colors first, and generally end in black. Then it’s simply a matter of tracing over the picture on the correct layer using the bezier line tool (Shift + F6), and bending those lines with the path editing tool (F2). Once I get the basic lines created, I’ll create and fill any solid shapes using the EggBot Contributed Hatch fill extension (spacing should be set to 6 for eggs). To add shading, you simply go over the same places a couple of times with the same color, which can be achieved with Copy and Paste, and occasionally the shading can be enhanced by altering the angle of the line to match the angle of the shape or intended shadow (the Master Chief design is a good example of this technique).

That’s pretty much it. To finish off the project, I like to color all of the lines in a layer to match the marker used in that layer, then delete the layer with the picture in it.

Thank you for generously sharing both your designs and your techniques, RoboGenius!