Category Archives: Mathematics

The Evil Mad Scientist STEAM T-shirt

Evil Mad Scientist STEAM T-shirtEvil Mad Scientist STEAM T-shirt

Introducing the Evil Mad Scientist Laboratories STEAM T-shirt. Featuring high quality screen printing on 100% cotton tees from American Apparel.

Front side: Science & Technology & Engineering & Art & Mathematics. (Black ink)
Back side: The Evil Mad Scientist logo. (Red, brown, and black inks)
Shirt color: “New Silver,” a uniform light gray.

Evil Mad Scientist STEAM T-shirtEvil Mad Scientist STEAM T-shirt

These are Great Shirts

Beautiful quality screen printing by Social Imprints of San Francisco (“Printing with Purpose”).

The shirts themselves are comfortable 100% cotton tees, made in the USA by American Apparel. (Mens Fine Jersey Short Sleeve T-Shirt and Womens Fine Jersey Short Sleeve Women’s T.)


Inspiration

The design of the front is an homage (like so many others) to the John Paul Ringo George shirt by Experimental Jetset.

Why Science & Technology & Engineering & Art & Mathematics?
It’s who we are, and it’s what we stand for.

Why not just STEM?
We, like many, many others believe that art is a critical component of good design, of good engineering, and of beneficial technology.


Get yours

The Evil Mad Scientist STEAM T-shirt is in stock and shipping now!

Pi Blanket

PiQuilt

Happy Pi Day, everyone!

To celebrate, our friend Samantha brought in her knitted Pi blanket to share. After the first hexagon with the letter ? embroidered on it, the first 127 digits of Pi are shown using the resistor color code to represent the value of the digit. Samantha is donating this quilt to the Project Linus, an organization that gives blankets to children who are seriously ill, traumatized, or otherwise in need.

For those in the San Francisco area, the Exploratorium is celebrating the 25th Anniversary of Pi Day from 1 pm to 3 pm in front of their soon-to-open new location at Pier 15.

Download and Print: Evil Mad Scientist Valentines

EMS Valentines 1

If you’re anything like us, you’ve at some point come across supposedly-nerdy valentines and thought to yourself, “A real geek would have used an equation to express that sentiment.”  And if so, have we have got just the thing for you!

EMS Valentines 3

Here’s our collection of six little valentine cards, each of which adds a little authenticity and class to the not entirely uncommon “geek” valentine genre.

Suppose that you want to communicate to your valentine just how hot you think they are. Sure, you could go with a picture of a thermometer— or a Sriracha bottle —but isn’t the thermodynamic definition of temperature itself in a whole category of its own?

EMS Valentines 5

And what better way to say “I love you,” than with the gift of trigonometric identities?


Lo Res Valentines

You can download the original file here (260 kB .PDF document).

Print it out on (or otherwise affix to) card stock, and [some steps omitted] enjoy the resulting lifelong romance.


Update: New cards have been released! Please check out the 2019 set, which contains all 42 cards from 2013 through 2019.

Digi-Comp II: First Edition

dcii_9

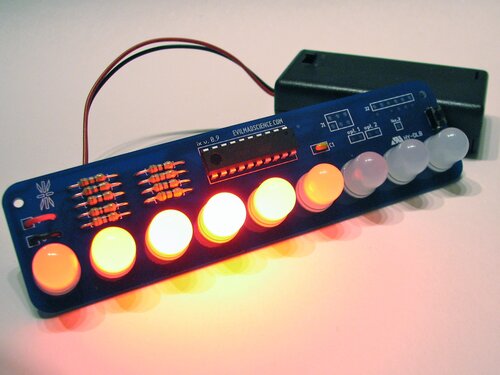
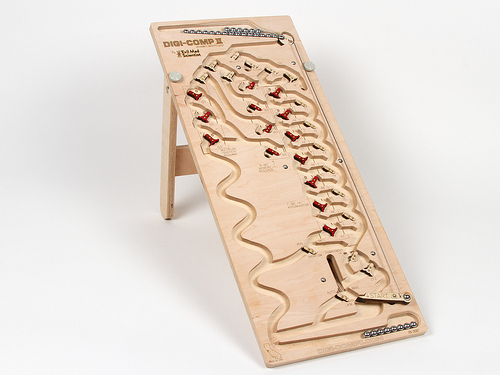
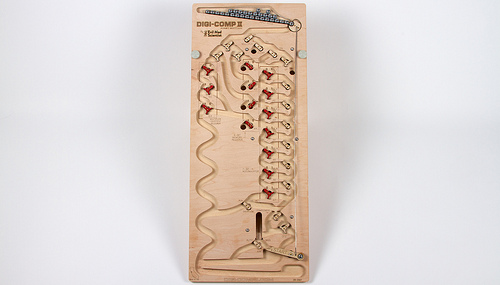
We’re pleased to finally announce availability of our brand new, long-awaited kit, the Digi-Comp II: First Edition. It’s a modern, fully-operational recreation of the original Digi-Comp II— the classic 1960?s educational computer kit —CNC routed from hardwood plywood.

The Digi-Comp II is a binary digital mechanical computer, capable of conducting basic operations like adding, multiplying, subtracting, dividing, counting, and so forth.  These operations are all conducted by the action of balls rolling down a slope, directed by mechanical switches and flip flops, and all powered by gravity.

We’ve been working on project for over two years now, and so we’ve written before, in some detail, about how the Digi-Comp II works, and what kinds of things you can do with it. We’ve written about our larger than life version of the Digi-Comp II, which uses 8 Balls.  We showed off that version at the 2011 and 2012 Bay Area Maker Faires and made a demonstration video to show how it works.   We have also written about our smaller wooden prototypes that we displayed at the 2011 Maker Faire New York.


dcii_2

Our new version, the “First Edition,” is a descendent of the latter.  As compared to the “2011” model, it has a huge number of refinements— including an improved ball feeder that both fits 30 balls at a time (so you don’t need to refill during most calculations) and is jam resistant, a more compact and reliable start lever, better labeling, better flip-flop design, and internal baffles that slow the balls down, to prevent them from flying out of the machine.


dcii_10

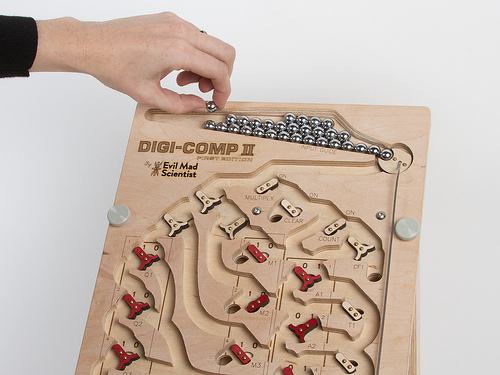
Many of these improvements were made possible by slightly reducing the size of the balls that we use.  Whereas the “2011” model used ½” ball bearings, the First Edition uses standard 11 mm pachinko balls, which are easily available, shiny, and rust resistant.  The fact that they are slightly smaller has allowed us to shrink some of the main circuitry, to allow for that larger ball feeder, to use thinner flip flops, and to fit the full machine into the same 10×24″ envelope that we had aimed for, which is considerably more compact than the 14×28.5″ size of the original.


dcii_3

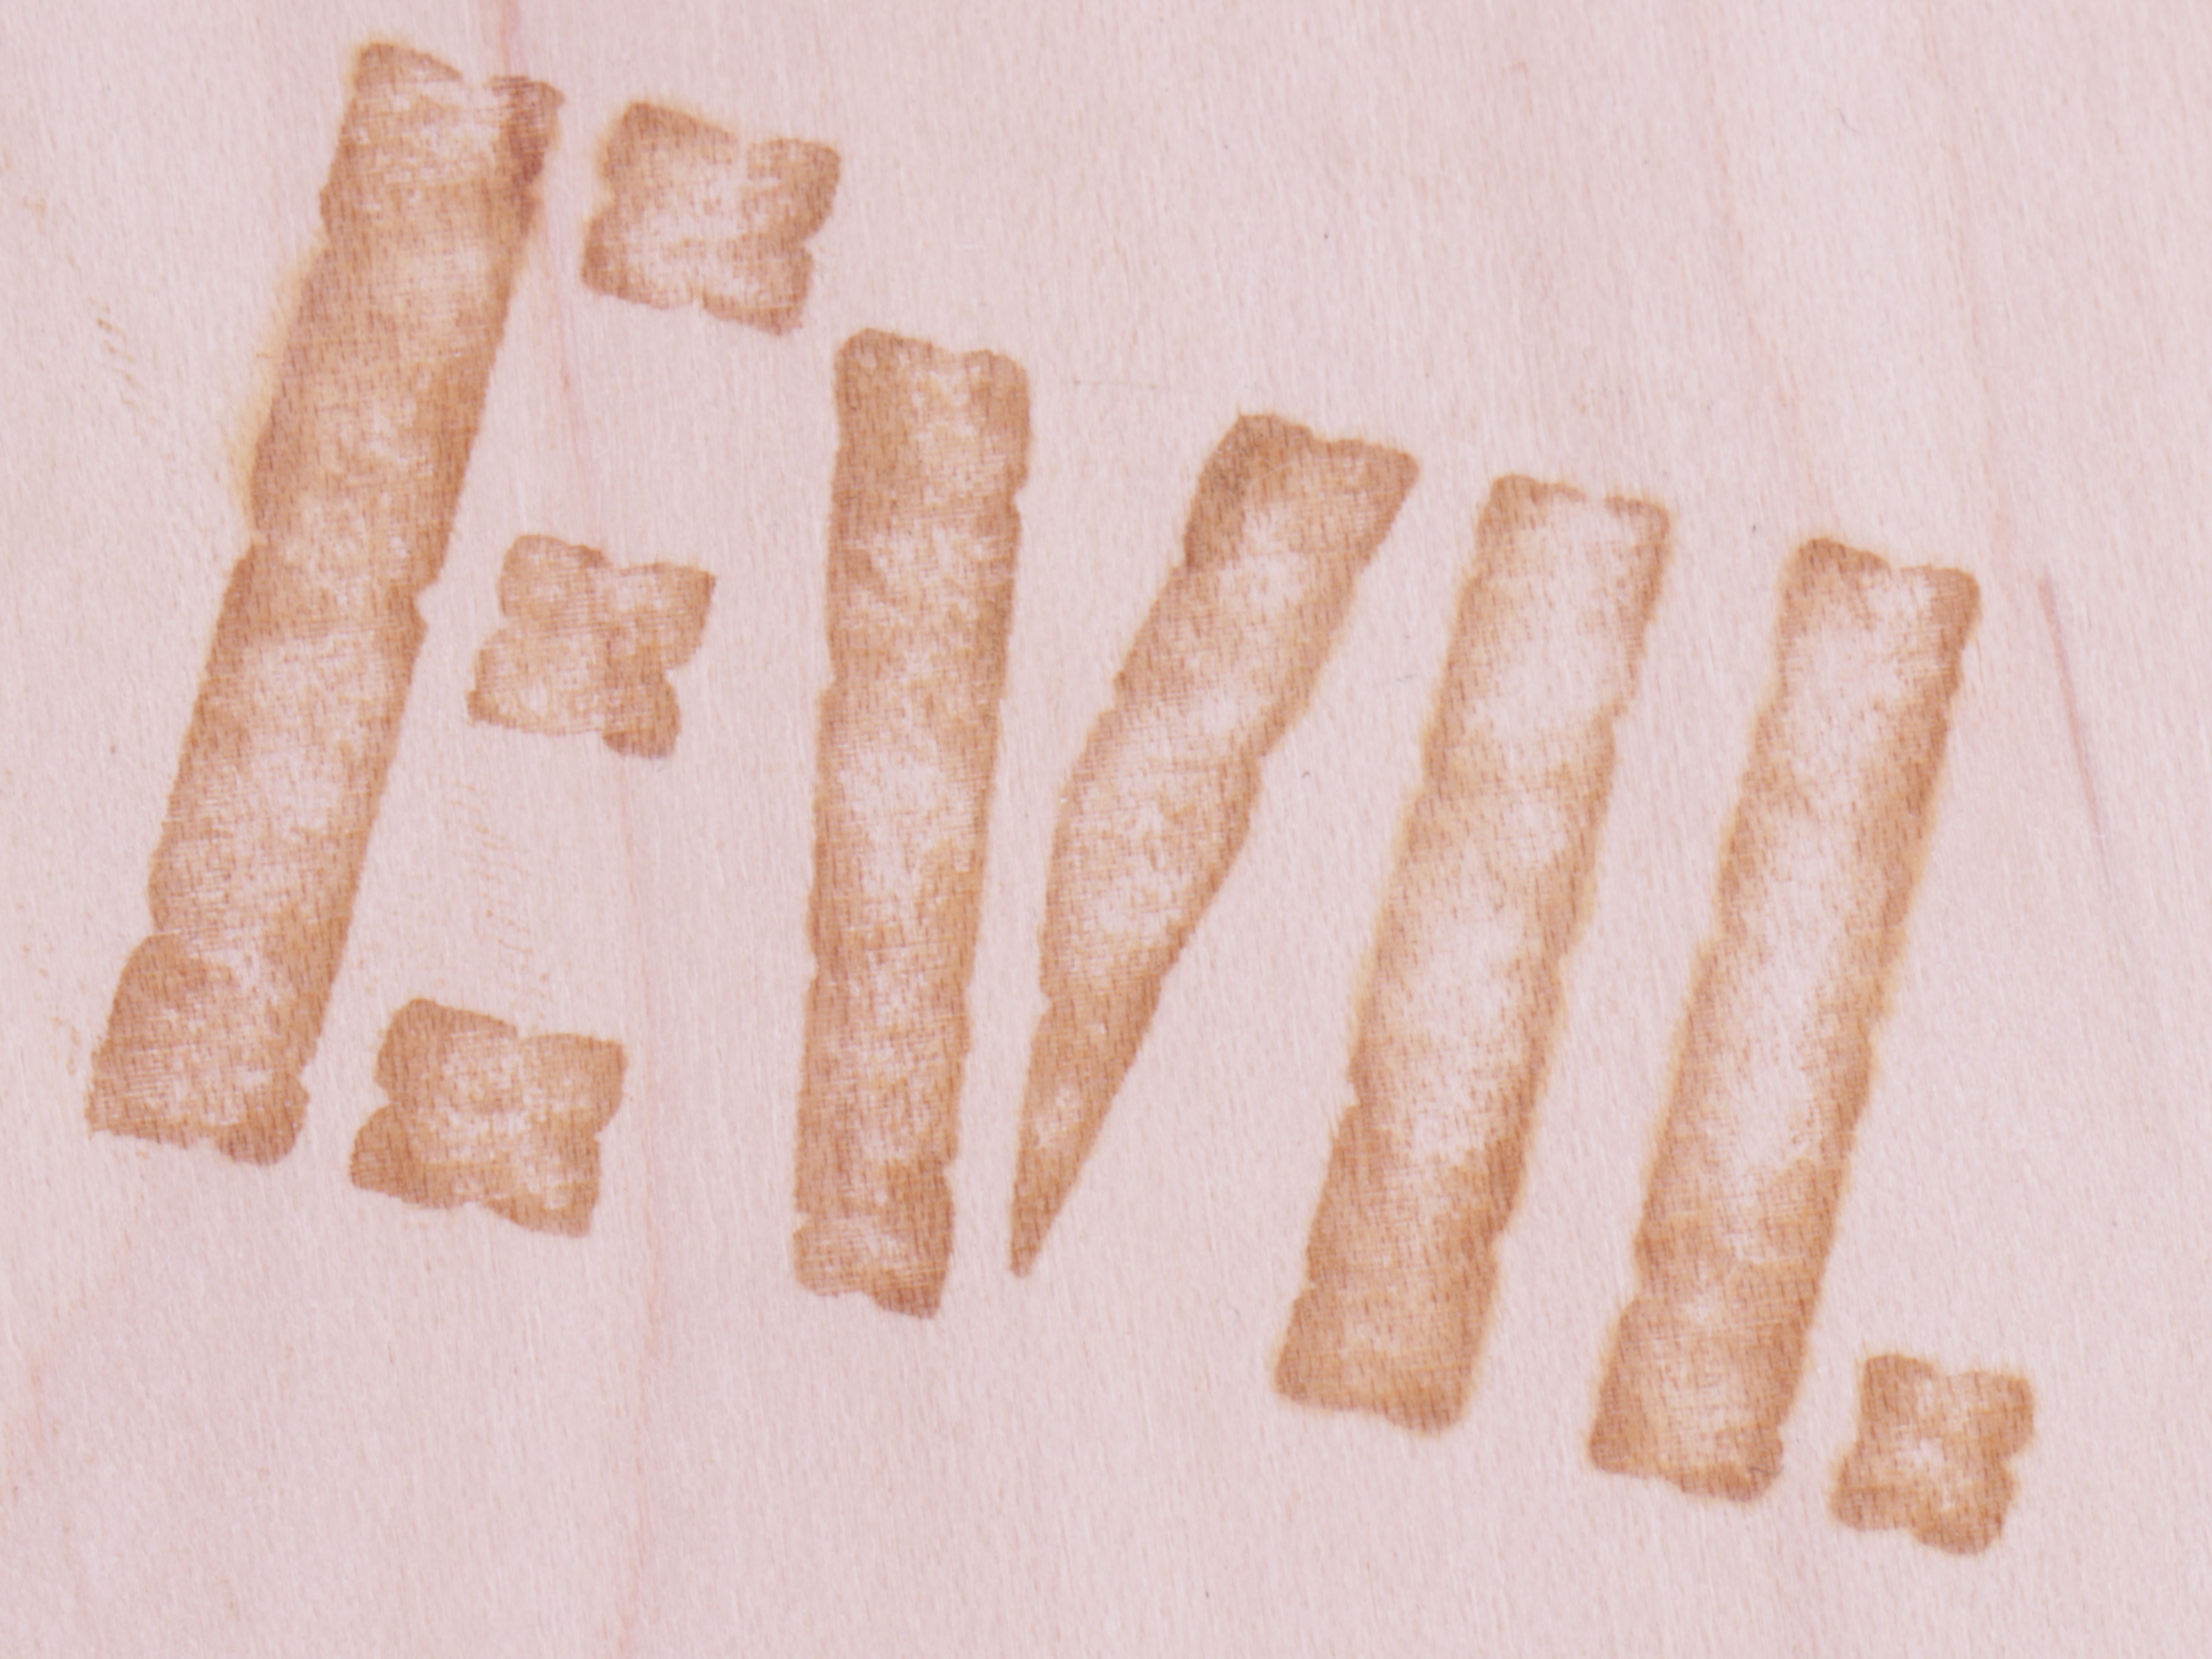
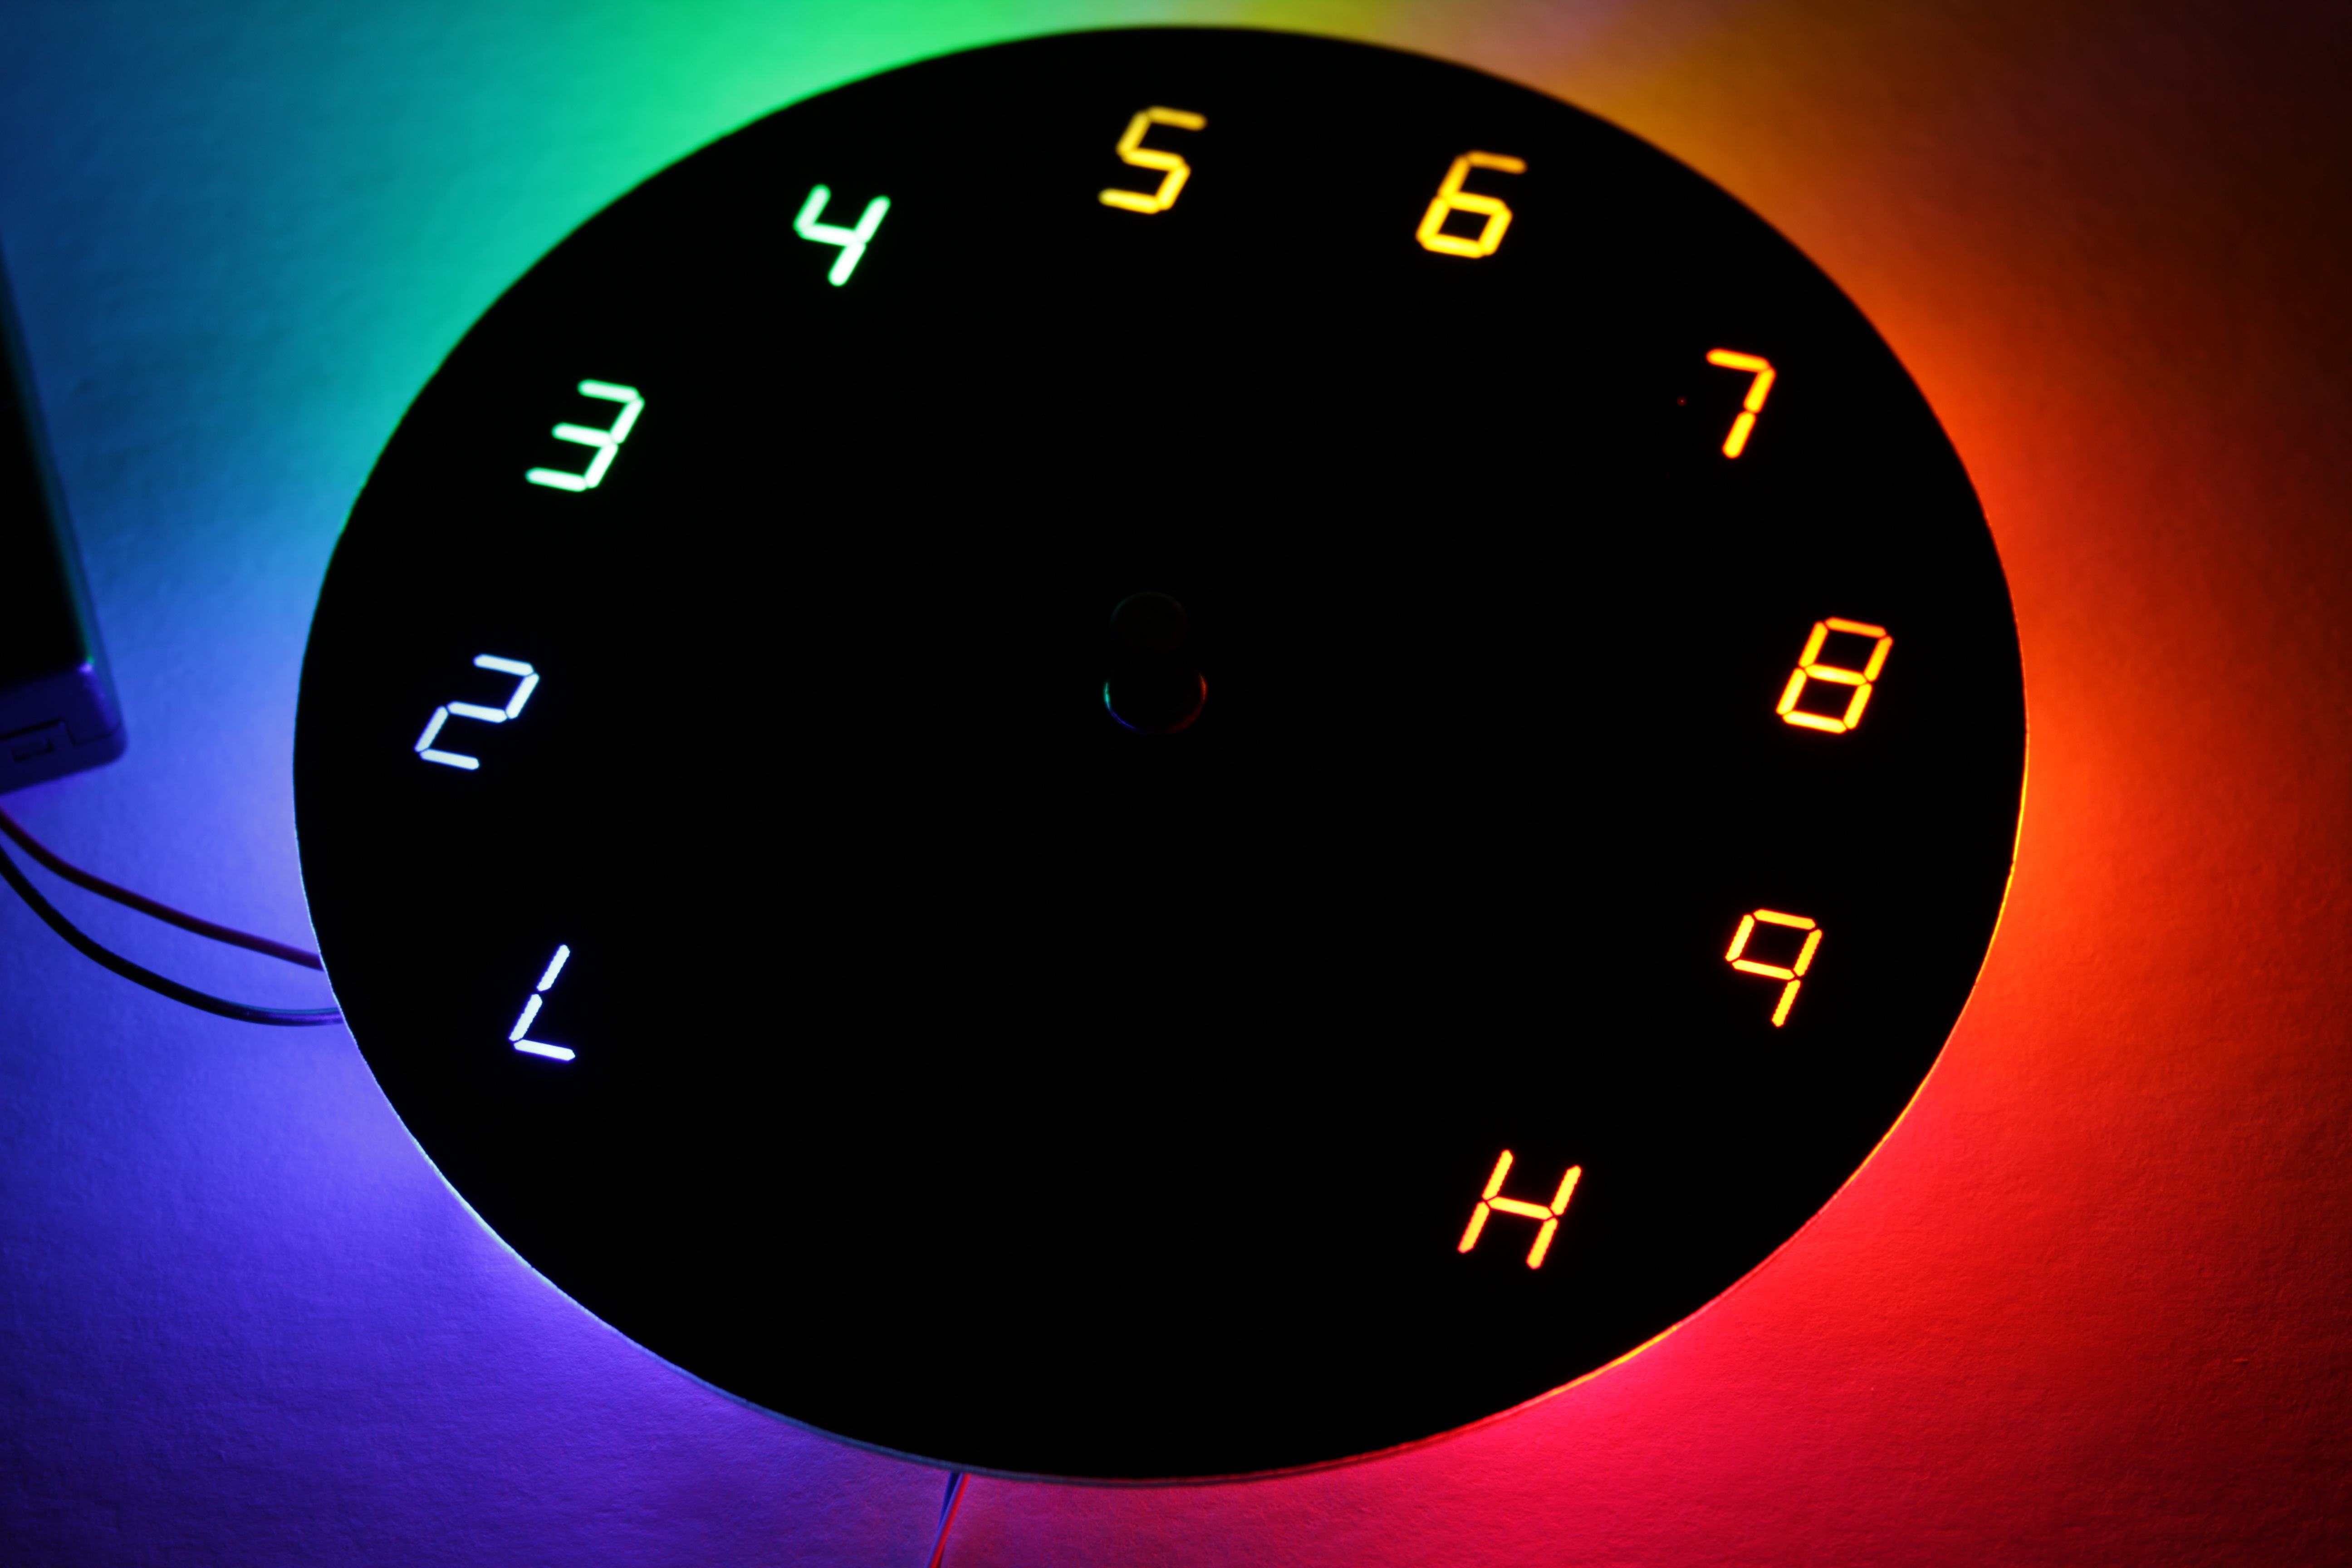
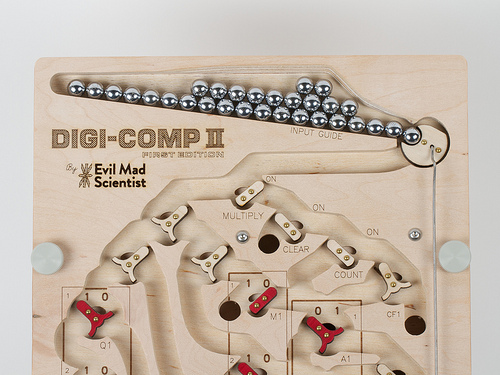
One of the nice things about keeping the size under 24 inches long is that we can fit the entire top deck of the Digi-Comp II into our 12×24″ laser engraver— so that we can directly laser engrave markings onto the playfield.  And while it’s nice to be able to write out DIGI-COMP II in huge letters, the more important application is actually adding the individual markings by the flip-flops and registers:

dcii_6

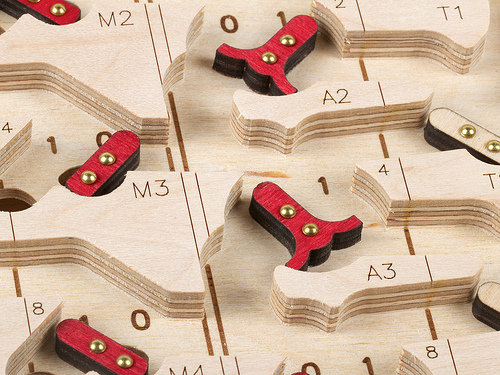
You may notice that the laser marks are very sharp on the “mesas” of the playfield, and less sharp but more bold down below.   This is an intentional effect, created by laser engraving the playfield in a single pass, with the laser focussed just below the level of the “mesas.”  On previous versions, we’ve either lasered the two parts independently, fully in focus at each depth, or focussed the laser halfway between the top and bottom— which leaves the engraving to look uniform, but less sharp, at each depth.   But this method seems to create exactly what we want:  sharp up top where it’s easier to read, and bold down below where it’s harder to see.


dcii_5

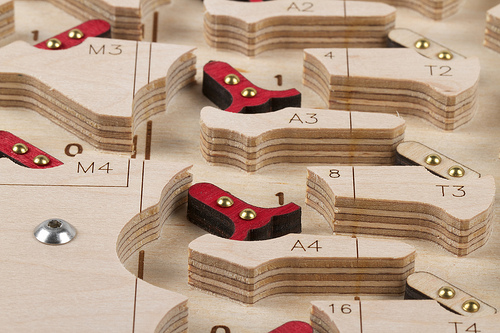
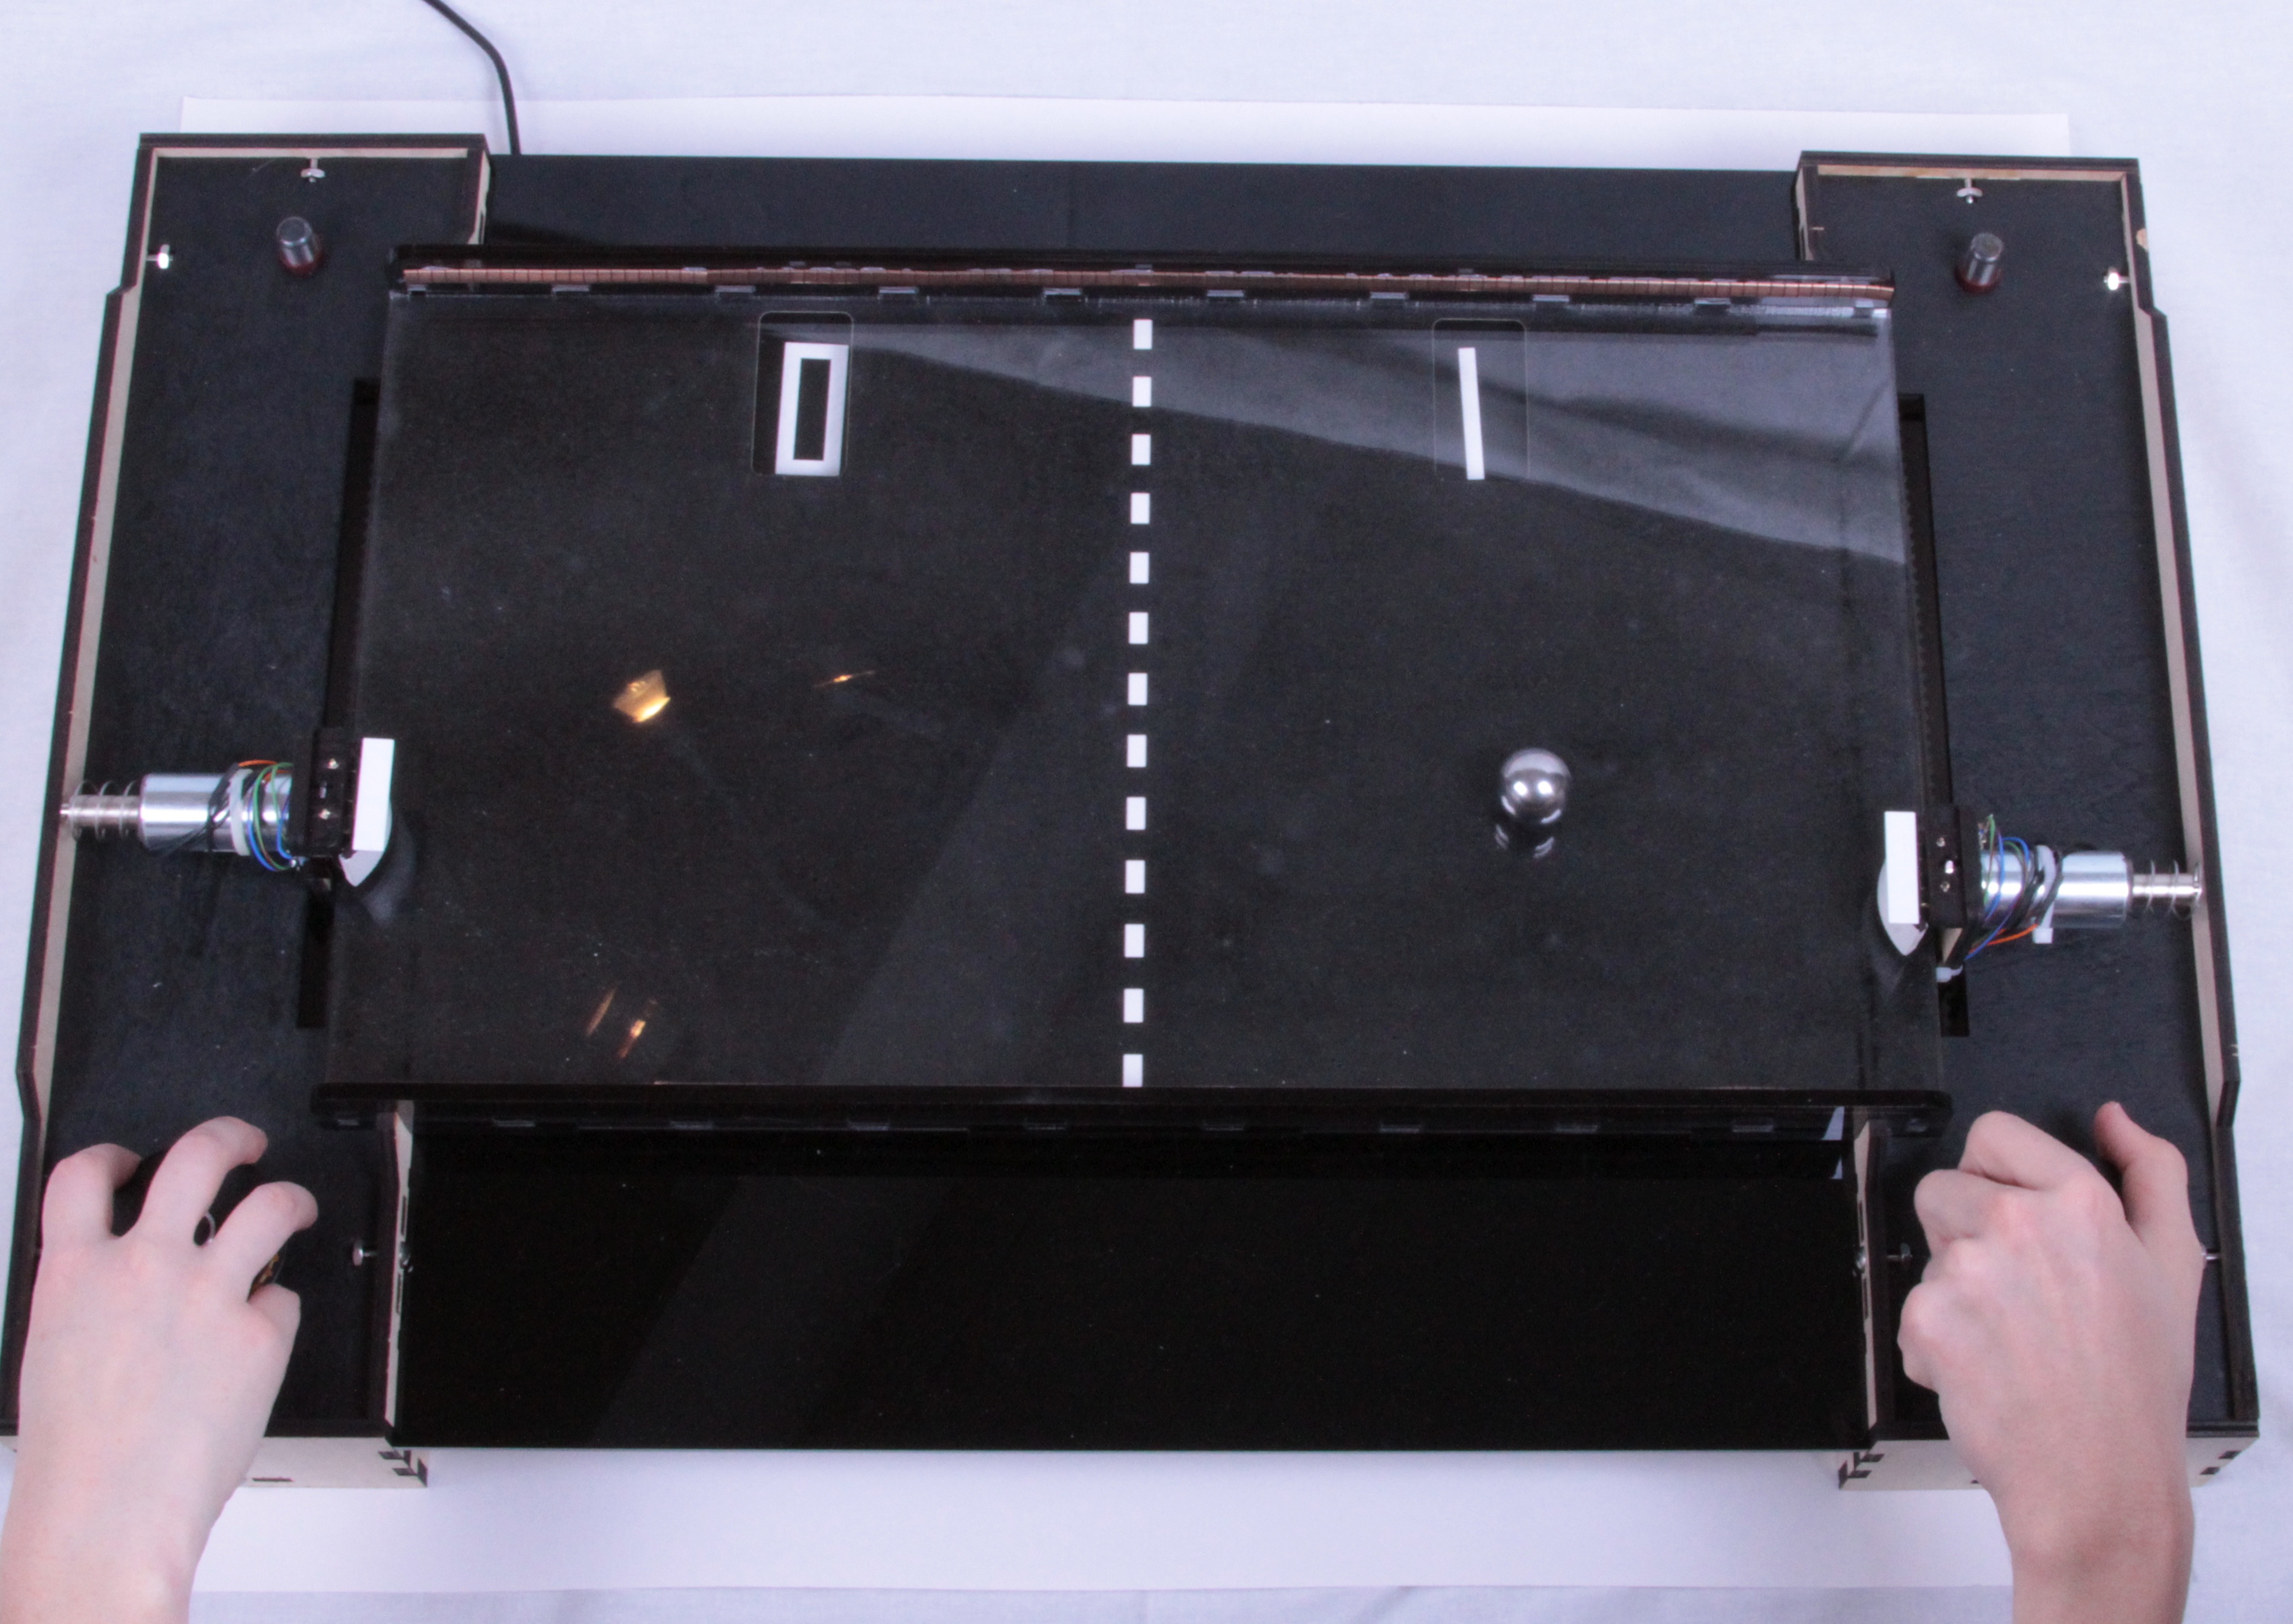
The playfield itself is made of 1/2″ thick maple-faced veneer-core all-hardwood plywood.  This is a rock-solid material that is about as far from “hardware store” plywood as you can imagine.  We use a CNC router to cut the pivot and limit holes for the flip flops and to carve the channels— roughly 3/8″ deep —where the balls can roll.  The CNC router is precise enough that when we cut the channels for the balls, we evenly split one of the veneer layers, ending up with a clean inner surface.  The Digi-Comp II also has a lower deck, below the playfield, that supports the clear-register and complement functions.  The lower deck is carved in the same way, but does not have any laser engraving.


dcii_12

The lower deck is attached below the upper deck by six screws that come down from the top to meet six wing nuts below.  Between the two layers are 3/16″ spacers that keep the decks uniformly separated.  It turns out that it’s actually important to use six screws; our earlier prototypes tended to jam up when the spacing between the two layers wasn’t controlled well enough.

One of the other improvements is that the “First Edition” kit has a very sturdy stand, as shown above.  The laser-cut stand on the “2011” model was flimsy, and the simple dowels on the original 1960’s kit were not much better.   The new stand is a glued assembly made of two rigid legs and a crossbeam, made of the same remarkably-hard plywood as the rest of the machine.  It can be attached to or detached from the playfield with the two fat thumbscrews.  It holds the playfield at an even 30° from horizontal, such that the top sits about 12 ½ inches above your desk top— a particularly good angle for viewing the playfield.  The stand is actually reversible, so that you turn it the other way and raise the playfield only about 20° from horizontal, giving the option of a slower speed of operation.  If you want to go faster instead, you can overclock the Digi-Comp II by putting a book below the stand to increase the angle.

 
dcii_1

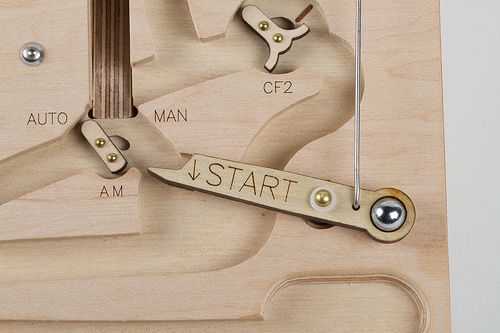
The new ball release mechanism has been fine-tuned and greatly simplified.  We recently showed off a little video demonstrating how this part of the machine works.  The start lever— now nicely labeled —is made of laser-cut poplar, has a brass rivet as its bearing and a glued-in pachinko ball as a counterweight.  When pulled down by a human or a rolling ball, it pushes a stainless steel rod that moves the ball release at the top of the machine to release the next ball.


dcii_11

Finally, it’s worth noting that this is called the “Digi-Comp II: First Edition” for a reason: We are planning others.

The original 1960’s Digi-Comp II kit was made of thin vacuum-formed plastic (what we more often refer to as “coffee drink lid material”), supported by a sheet of masonite and fitted with injection-molded flip-flops and switches.  Our CNC-cut wooden versions are much more substantial, but also cost a lot more to make, both in terms of raw materials and fabrication time.  We’ve been slowly working towards what we hope will be a happy medium: a Digi-Comp II made of (more substantial) vacuum-formed plastic, reasonably sturdy, and at a more modest cost.  We still plan to release a version like that, hopefully within the next year.  This has been a long journey for us— making wonderful machines mostly because they are wonderful machines —and we’re very happy to release our first one into the world.


The Digi-Comp II: First Edition is now available to order at the Evil Mad Scientist Shop.

Evil Mad Scientist Laboratories: Year 4

Evil

Happy birthday to us! Evil Mad Scientist Laboratories has now been around for four years. We’ve collected some interesting projects from this past year to celebrate.

Microcontroller and Electronics Projects:

Tabletop Pong
Tabletop Pong

Breadboard
Moving from breadboard to protoboard

Revenge!
Revenge of the Cherry Tomatoes

drink making unit
Drink making unit

pin 1
Finding pin 1

xmega - 2
Say hello to xmega

Peggydot
Adding a Chronodot to Peggy 2

Meggy Twitter Reader
Meggy Jr RGB Twitter Reader

twisted wire bundle
Twisted Wire Bundles

LED graph
Some thoughts on throwies

rovin pumpkin
Rovin’ pumpkin

ADXL335 - 10
Accelerometer with an AVR (updated)

LEDcalc - 20
Wallet-size LED Resistance Calculator

Science:

seeing magnetic fields
Seeing Magnetic Fields

Ice Spikes
Ice Spikes

opposition effect in clover
Opposition effect

Kitchen Science 18
Litmus Candy

Beans day five
Gibberellic Acid and Giantism in Sprouts

Simple LED Projects:

fake seven segment display
Fake seven segment display

LED-lit sea urchin
LED-lit sea urchins

Edge Lit Cards
Refining edge-lit cards

Food Hacking:

Ice Cream Gyoza -13
Ice Cream Gyoza

Lemon Pickle
Lemon Pickle

The array
Spices

coffee bean cooler
DIY coffee bean cooler

Marmalade 30
Marmalade: easier than it looks

AtomicCookies 7
Atomic Cookies

asteroids cookies
Asteroids (the edible kind)

Crunchy Frogs01
Crunchy Frog

Kit Projects:

tortiseshell
Bulbdial Clock Kit

Peggy2le-end
Peggy 2LE

Scale
LED Hanukkah Menorah Kit

Larson Scanner
Larson Scanner

D12 bag8
Handbag of Holding Kits

Crafty Projects:

arecibo 2
SETI Scarf

scrap acrylic
Scrap acrylic shelf

Tombstone
24 hour tombstones

ipad 3
iPad lap stand

Custom iron ons 10
Custom iron-on techniques

Geek Design:

symmetrisketch
SymmetriSketch

Typographic Coasters
Typgraphical Character Coasters

Ornamental Components 08
Ornamental Components

Cat String 6
Radio controlled string

Bookend - 9
Bookends for physics geeks

Lego business cards-2
Lego Business Cards

Tie Stools2
Portable Stools

And, don’t forget, you can win a Peggy 2 or one of 13 other prizes in our clock
concept contest
, going on this week.

Related:

Pi Pie Trivet

Pi (squared) trivet - 9


Happy Pi Day! Pi day was just made official. In honor of National Pi Day, we present a pi trivet, perfect for cooling your Apple pie (or pi pie) on.


Pi (squared) trivet - 6


Besides just the letter pi, The number pi up to the first thousand digits after the decimal are laser engraved into half-inch thick cork. The overall size of the trivet is about seven inches, square.


Pi (squared) trivet - 2


This cork is actually gasket material from McMaster-Carr, which has a wonderfully smooth and even surface. Compared to many of the other cork materials that we have seen– like that used for many cheap trivets– this has very little pitting and the surface shows fine detail very well.

Fabric Klein Bottle

fabric klein bottle
Klein bottles are an entertaining mathematical idea–a shape with no volume. A Klein bottle is basically a tube where the inside is connected to the outside. Making a Klein bottle in our 3D world requires a bit of cheating to work, by adding a hole in one of the walls of the tube to provide a place for an intersection.

The most common physical realization is a glass Klein bottle, which you can ogle and buy at Acme Klein Bottles. They also sell wonderful knit Klein bottle hats which can be bought with a matching mobius strip scarf. I was lucky enough to be given a set as a gift, and it is cozy and bright and wonderful. My only complaint is that the narrow neck of the Klein bottle makes it hard to pull it inside out (or right side out, since it is the same thing) to play with it.

I have found that the concept of a mobius strip is more understandable when you can hold it in your hands and turn it around and around, and I thought the same would be true with a Klein bottle, if only it were a little more flexible than my hat. With that in mind, here’s how to make a simple fabric Klein bottle you can play with from two sleeves of a worn out shirt. Continue reading Fabric Klein Bottle

A single sided circuit board

Mobius Circuit - 21

In electronics, it is common to talk about single sided circuit boards. The most common type is a circuit board that only has printed wiring on one side, and components on the other side. There are also surface-mount boards, where all the wiring and components sit on one side. But aren’t all of those reallyjust two-sided circuit boards where you only put components on one of the sides?

Here we present a method of making your own authentic single-sided circuit board.
Continue reading A single sided circuit board